Ination
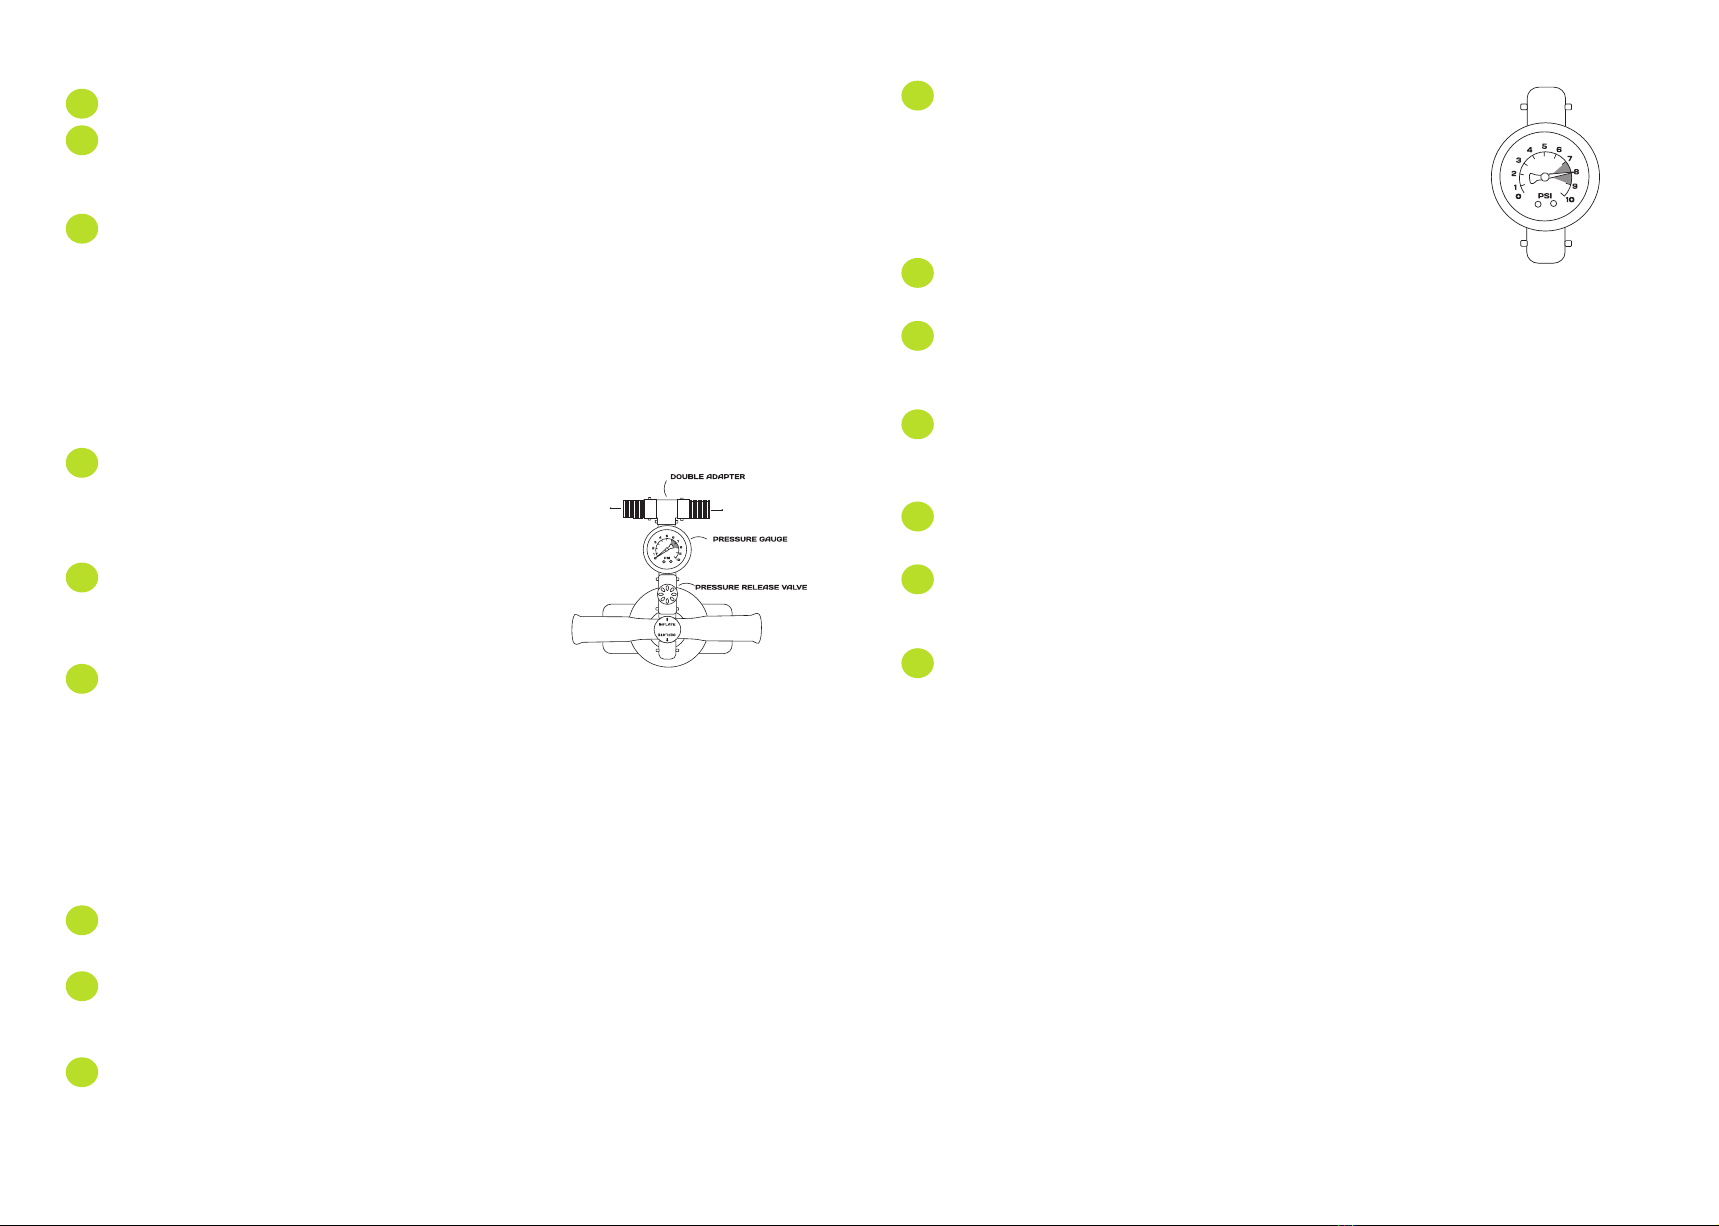
Working from the front of the tent to the rear, inate each tube to between 7 and 9
PSI. The pressure release valve will “honk” when 9 PSI is reached. It is important not
to over inate the tubes. It is recommended that during very hot weather 7 PSI is
used to provide room for expansion during the day. In cooler or windier conditions 9
PSI is recommended.
As each pole inates it may be necessary to support the centre of the pole until they
assume their correct shape. It is also a good time to ensure that the base of each
pole is sitting correctly on the Velcro patches. Poles can sometimes move o the
Velcro during the pitching process.
Siting
When nding a site for your Roadie, try to nd an area that is sheltered, at, and free from sharp objects. If
possible position your tent with the front door facing away from the prevailing wind. Also try not to pitch your
tent under trees as falling branches can damage the tent and falling sap can damage the fabric.
1Test run
Practice pitching your Roadie at home to ensure you understand the process
Unpacking
When you take your Roadie out for the rst time take a moment to see how it is packed or take a photo on
your phone. This will help you when it comes to packing your tent away. Separate and identify the dierent
parts in your tent. The package should include the following
- Tent Fly
- Guy Ropes (Pre Attached)
- Additional guy ropes
- Pegs
- Pump
- Pressure release valve
- Pressure gauge
Pump Setup
Your Zempire ® double action pump includes a pressure gauge
and pressure release valve to ensure that the poles are inated
to the correct level. A double adapter is also included that allows
two poles to be inated simultaneously. The pump accessories
should be assembled in the following conguration:
Layout
Unroll the Roadie y with the oor facing down. The large door
with logo to the side should be located furtherest away from the
vehicle. You will need to allow 4.5m beside your vehicle to allow
sucient space to pitch your Roadie.
Airow
To enable signicant air to enter tent during the pitching process, all door and window covers should be
opened. It is important that the mesh doors themselves remain closed during the pitching process to ensure
the tent holds its correct shape during ination and is not over tightened causing damage.
Valve attachment
The external ination valves are located under the rain sock on one side of each pole length. Before inating,
the valves will need to be attached the pole opening. Remove the valve cap and screw in the remaining section
into the pole opening. It is important that the valve is not cross threaded and is screwed rmly.
Setting the oor
It may be necessary to align the base of each pole so that the oor sits at and taught. You may also need to
re align the corner pegging points so the oor sits at.
Pegging
Peg the remaining peg loops around the tent. Durable steel pegs are included with your tent which will be
suitable for the majority of conditions. However, If you are camped at a rocky or loose sandy location it may
pay to purchase more specialized pegs. A range of specialized Zempire® pegs are available from your local
dealer.
Anchor Fins
Anchor ns are located at each end of your tent. These webbing straps are essential for the stability of your
tent. They should be rmly pegged out at a 45º angle. In windy conditions or when camping soggy ground it
may pay to double peg the Steel “O” rings at the base of each webbing. Anchor webbings should be used at all
times.
Guy Lines
Guy lines are pre attached on all Zempire® tents. It is recommended that guy lines are used at all times. It is
important not to over tighten guy lines. They should sit taught but should not distort the shape of the tent.
Inner Pods
Optional inner pods are available to purchase from your local Zempire®Dealer. The attachments for the
innerpods are colour coded for easy attachment. Right hand side or left hand side options are available.
UV Degradation
Tent fabrics can be weakened from prolonged exposure to sunlight. Under normal holiday use your Zempire
® tent will give you many years of camping enjoyment, but use for extended periods of strong sunlight will
cause degradation. It is recommended that during periods of strong sunlight a Zempire ® roof cover is used
to help protect from UV damage. UV Degradation is not covered under warranty. The warranty does not cover
permanent sites, displays or for commercial purposes.
Deation
- Close all the mesh doors leaving the covers open to allow air to escape the tent
- Loosen o the inner pod webbing straps
- Detach the Roadie from your vehicle
- Unpeg all guy ropes and roll up to ensure they do not get tangled during packing
- Unpeg the anchor n webbing straps
- Unpeg the peg points excluding the 4 corners. Clean and dry pegs before storing in the bag
- Open the valves on each pole. Wait for all the air to be expelled
- Unpeg the 4 corners of the tent, clean and pack the pegs
- Lay the carry bag at one end of the tent. Fold the tent to 2/3s of the length of the bag. The tent
should be folded from the “non-valve” side to the “valve-side” to help expel the nal amount of
air from the tubes.
- Place the Pole, Pump, and Peg bags on top of the folded tent at the bedroom end. Roll towards
the door end of the tent. It may take more than one roll to expel all the air out of the tent.
- Using the webbing straps tension the tent and stand on its end.
- Pull the Carrybag over the tent, tipping the tent over and tensioning the draw cord.
- The Carrybag is over sized to ensure easy packing.
2
3
4
5
6
7
8
9
10
11
12
13
14
15
16
Pegging
Peg out the 4 corners of the sewn in ground sheet ensuring there is signicant tension between and the oor
sits as at as possible. For best results pegs should be angled away from your tent at 45º
Kador Strips
Your Roadie has a number of options to attach to your vehicle. Your roadie has 2 thickness of Kador strip
attach. Depending on your location and vehicle you should use either the 6.5mm or the 8.5mm strip to
attach to your rail. Unzip the Kador strips from your roadie and thread through the rail on your vehicle.
Velcro® Strips
Using the pre attached Velcro® tab connect to the roof bars on your vehicle
Pole & Clamp
Slide the pole into the sleeve at the top of the rear section of your Roadie. Place the pole and fabric into
the gutter on the vehicle and use the clamps to secure at both ends and in the centre
Attachment Options:


