Snap Fresh BBT-KP526 User manual

Before reading, unfold the page containing the illustrations and familiarize yourself with
all functions of the device.
MADE IN CHINA
Ningbo Babytec Technology Co.,Ltd
Rm. 2802, Block A, Hebang Bldg., No.933 N.
Tiantong Rd. , Ningbo, China
www.snapfreshtools.com
User Manual
Read all safety rules and instructi ons carefully before operating this tool.
info@ s napfr es htools .com
+1(737) 471- 0443
CORDLESS ROTARY TOOL
BBT-KP526
8
910
13 14
15 16 17 18 19 20
22 23 25 26 2721
11
12
54
3
67
12
24

1 ■
Contents
Introduction ...................................................... ... . . ... ...
...................................................... ... ... ... . ... ....
...................................................... ... ... . . ... .
. . . . . . . . . . . . . . . . . . . . . . . . . . . . . . . . . . . . . . . . . . . . . . . . . . . . . . ... . . . . .....
........................ ... ..
. . . . . . . . . . . . . . . . . . . . . . . . . . . . . . . . . . . . . . . . . . . . . . . . . . . .
...................................................... ... . ... ...
. . . . . . . . . . . . . . . . . . . . . . . . . . . . . . . . . . . . . . . . . . . . . . . . . . . ... ... ... . . . . .
............................................................
.............................................................
. . . . . . . . . . . . . . . . . . . . . . . . . . . . . . . . . . . . . . . . . . . . . . . . . . . . . . . . . . .
......................................................... .
............................................................
..................................................................
. . . . . . . . . . . . . . . . . . . . . . . . . . . . . . . . . . . . . . . . . . . . .......
. . . . . . . . . . . . . . . . . . . . . . . . . . . . . . . . . . . . . . . . ..
..................................
. . . . . . . . . . . . . . . . . . . . . . . . . . . . . . . . . . . . ... . .
. . . . . . . . . . . . . . . . . . . . . . . . . . . . . . . . . . . . . . . . . . . . . . . . ..
..............................................
. . . . . . . . . . . . . . . . . . . . . . . . . . . . . . . . . . ... . . ..
........................................
. . . . . . . . . . . . . . . . . . . . . . . . . . . . .
. . . . . . . . . . . . . . . . . . .
. . . . . . . . . . . . .... . . ....
2
Intended use 2
Features 2-3
Package contents 3
Technical details 3
General Power Tool Safety Warnings 3
1. Work area safety 3
2. Electrical safety 3-4
3. Personal safety 4
4. Power tool use and care 4-5
5. Use and handling of the cordless electrical power tool 5
6. Service 5
Safety instructions for all applications 5-7
Additional safety instructions for all applications 7-8
Supplementary safety instructions for grinding and abrasive cutting 8
Supplementary safety instructions for working with wire brushes 9
Safety guidelines for battery chargers 9-10
Use 10
Charging the battery pack 10-11
Checking the battery charge level 11
Changing/inserting the tool/collet chuck 11
Switching on and off/setting speed range 11
Notes on working with materials/tools/speed range 11-14
Additional description for accessories/attachments 14-16
Maintenance and Cleaning 19
Disposal 19
Warranty 20
. . . . . . . . . . . . . . . . . . . . . . . . . . . . . . . . . . . . ... . . . . .
. . . . . . . . . . . . . . . . . . . . . . . . . . . .
. . . . . . . . . . . . .... . . ... . . .... . . ........... . . . . .... . . . ..
Additional safety warnings 9
. . . . . . . . . . . . . . . . . . . . . . . . . . . . . . . . . . . . . . . . . . . . . . . . ... . .
Operating Instructions 17-18
■ 2
Introduction
CORDLESS PRECISION
ROTARY TOOL BBT-KP526
Terminology
Intended use
Warnings used
As used in this instruction manual in general
and with regard to safety information, safety
information and safety messages and warn-
ings in particular, the following words have
the following means:
NOTICE indicates information considered
important, but not hazard related (e. g.
messages related to property damage).
A “Tip” identifies additional information that
will assist you in using the device.
This cordless rotary tool is intended for drill-
ing, milling, engraving, polishing, cleaning,
grinding, cutting of materials such as wood,
metal, plastics, ceramics and stone in dry
rooms using the corresponding attachments
(as supplied). Any other usage of or modific-
ation to the appliance is deemed to be impro-
per and carries a significant risk of accidents.
The manufacturer accepts no responsibility
for damage(s) attributable to misuse. This
appliance is not intended for commercial use.
Congratulations on the purchase of your new
appliance. You have selected a high-quality
product. The operating instructions are part
of this product. They contain important infor-
mation about safety, usage and disposal.
Before using the product, please familiarise
yourself with all operating and safety instru-
ctions. Use the product only as described
and for the range of applications specified.
Please also pass these operating
instructions on to any future owner.
The following types of warning are used in
these operating instructions:
DANGER indicates a hazardous situation
that/ which, if not avoided, will result in
death or serious injury.
WARNING indicates a hazardous situation
that, if not avoided, could result in death or
serious injury.
CAUTION indicates a hazardous situation
that, if not avoided, could result in minor or
moderate injury.
►
►
►
►
■
This word is understood to be permissive.
May:
Shall:
Should:
■
This word is understood to be mandatory.
■
This word is understood to be advisory.
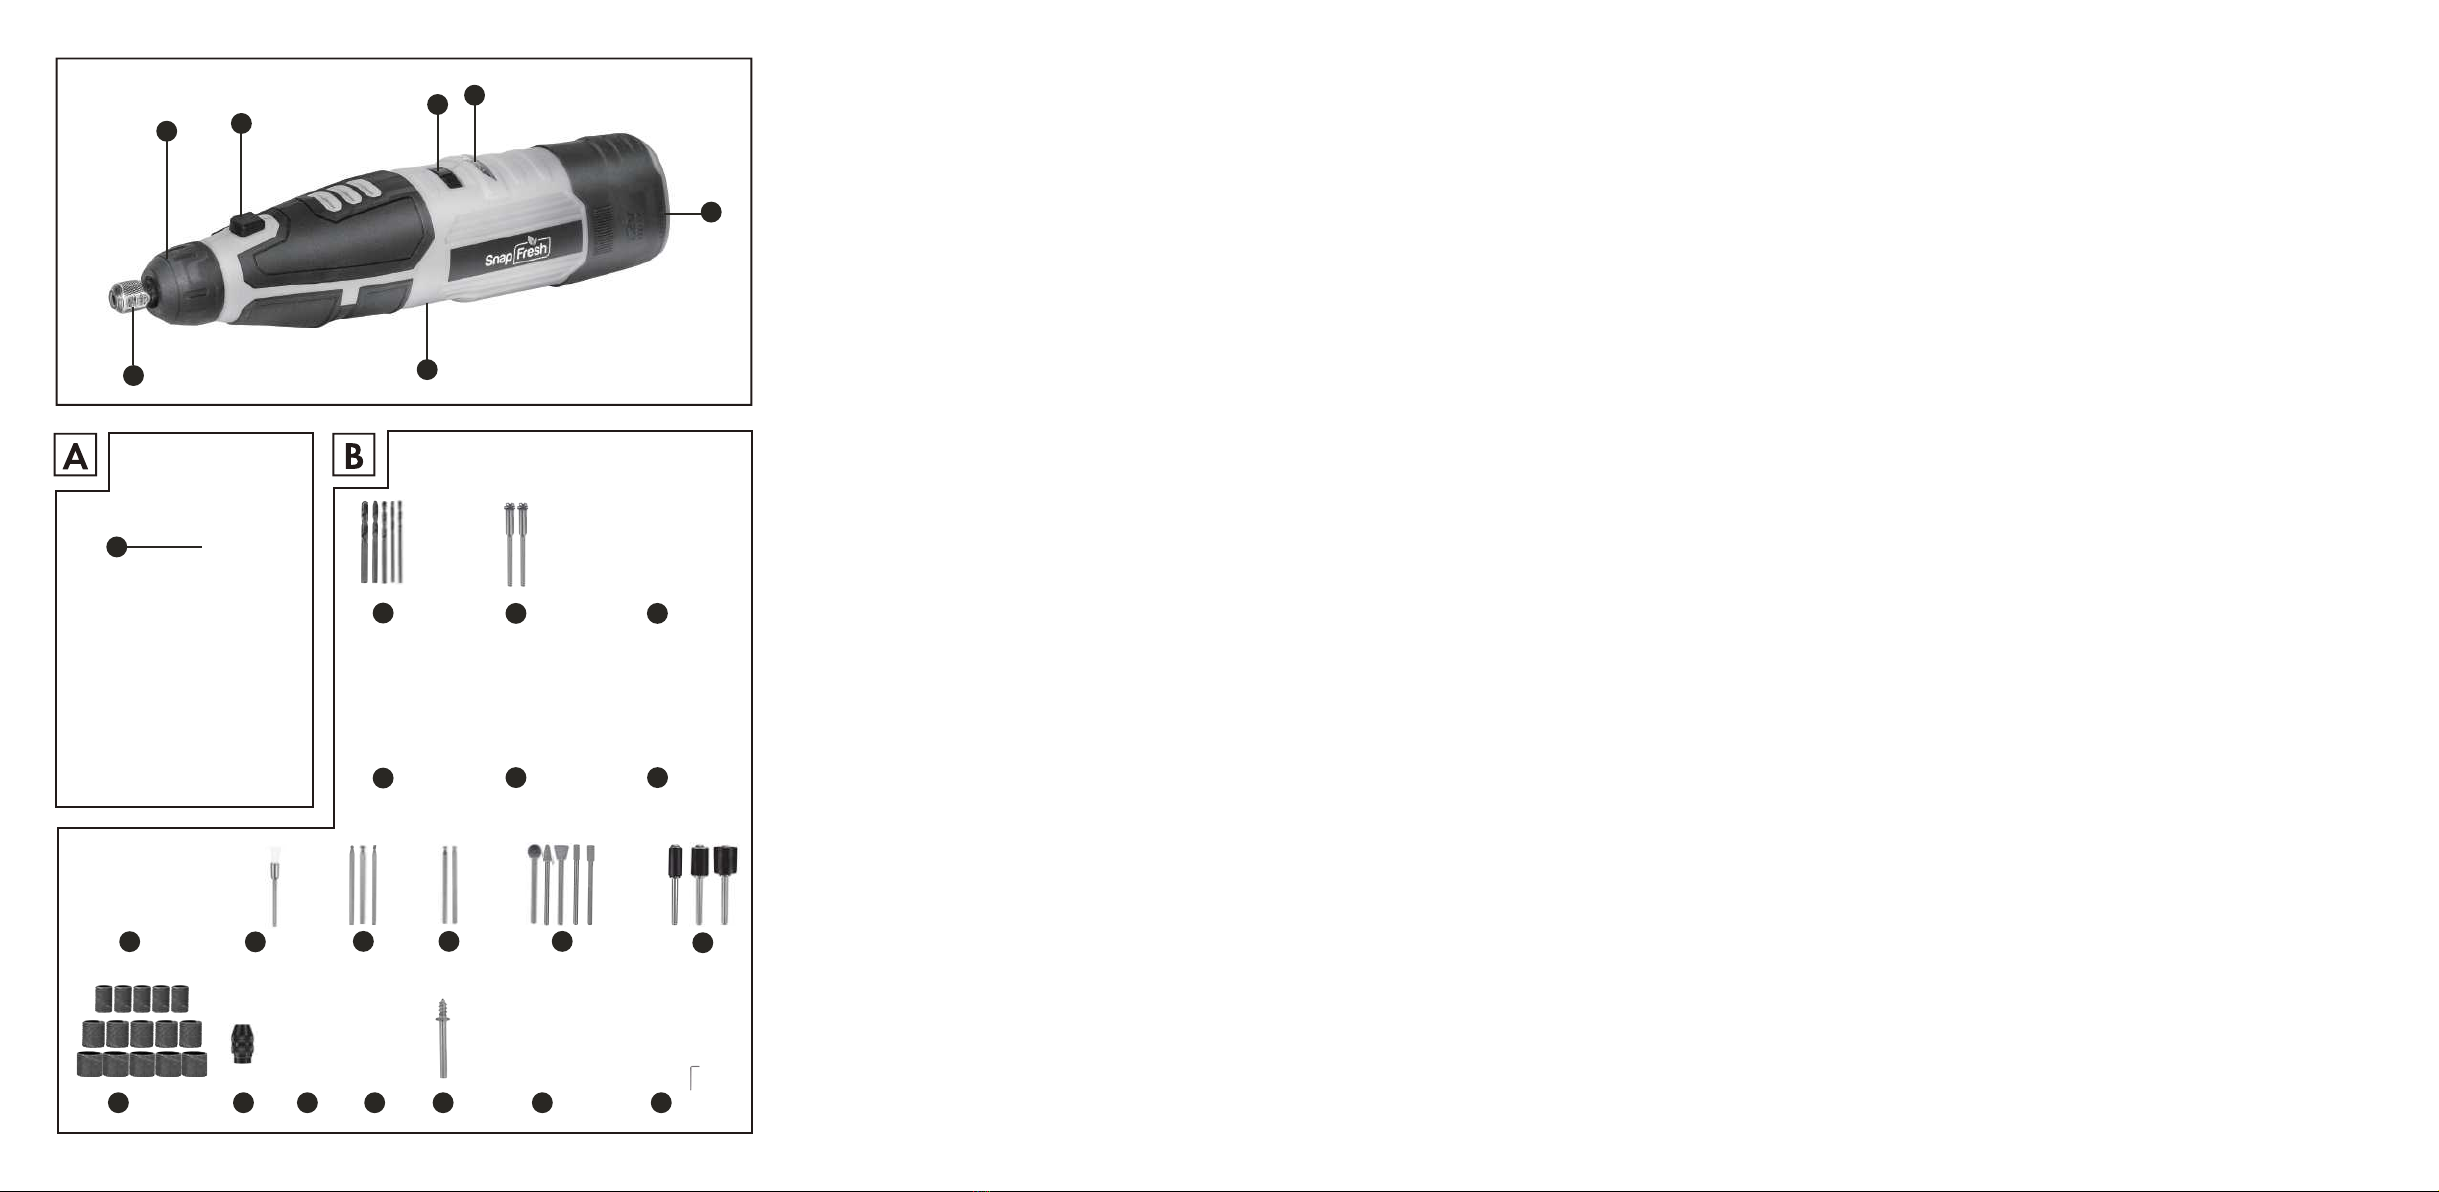
Features
Cordless precision rotary tool:
Variable speed dial
Battery LED
ON/OFF switch
Charging socket
Collet nut
Nose cap
Shaft lock
Battery charger (See Fig. A):
Charger
Accessories (See Fig. B):
5 HSS drill bits
2 mandrels as tool holders
4+4 felt polishing wheels
8 grinding discs
1 coppered steel wire brush
16 cutting discs
3 collet chuck(1/16", 3/32", 1/8")
DANGER
WARNING
CAUTION
NOTICE
TIP
1
2
3
4
5
6
7
8
9
10
11
12
13
14
15
1 hour
Attachments (See Fig. B):
2 nylon brush
3 milling cutters
2 engraving bits
3 ■
Package contents
1 cordless precision rotary tool
1 battery charger
1 accessories set (79 pieces)
1 plastic case
1 operating manual
Technical details
Model BBT-KP526:
Rated voltage: 12 V (DC)
Rated idle speed: n 5000–28000 rpm
Max. disc ø: max.
Chuck clamping
range: max.
ø 1/8 (3
ø 31/32 (25mm)
.2 mm)
Capacity: 1500 mAh
Battery (integrated): LITHIUM-ION
Cells: 3
Battery charger XZ1350-1500:
Primary (input):
Rated voltage: 100-240 V~, 50/60 Hz
(AC)
Rated power
consumption: 0.8 A
Secondary (output):
Rated voltage: 12 V (DC)
Rated current: 1 .5 A
Charging time: approx.
Polarity:
General Power Tool Safety
warnings
WARNING!
►Read all safety warnings and all
instructions. Failure to follow the
warnings and instructions may
result in electric shock, fire and/
or serious injury.
Save all warnings and instructions for
future reference.
The term "power tool" in the warnings refers
to your mains-operated (corded) power tool
or battery-operated (cordless) power tool.
a)
b)
c)
a)
b)
.
1. Work area safety
2. Electrical safety
16
17
18
5 grinding bits
3 sanding drum mandrels
15 grit sanding bands
19
20
21
1 keyless chuck
1 combination spanner
1 grinding wheels
22
23
24
1 screw mandrel
25
1 cutting/drilling guide
26
1 flex shaft
27
Keep work area clean and well lit.
Cluttered or dark areas invite accidents.
Do not operate power tools in explo-
sive atmospheres, such as in the
presence of flammable liquids, gases
or dust. Power tools create sparks which
may ignite the dust or fumes.
Keep pets, children and bystanders
away while operating a power tool.
Distractions can cause you to lose control.
Power tool plugs must match the
outlet. Never modify the plug in any
way. Do not use any adapter plugs with
earthed (grounded) power tools. Unmo-
dified plugs and matching outlets will
reduce risk of electric shock.
Avoid body contact with earthed or
grounded surfaces, such as pipes,
radiators, ranges and refrigerators.
There is an increased risk of electric
shock if your body is earthed or grounded.

a)
c)
d)
f)
g)
a)
b)
e)
f) 4. Power tool use and care
3. Personal safety
■ 4
b) Use personal protective equip-
ment. Always wear eye protection.
Protective equipment such as
c)
d)
e)
Prevent unintentional starting. Ensure
the switch is in the off-position before
connecting to power source and/or battery
pack, picking up or carrying the tool.
Carrying power tools with your finger on
the switch or energising power tools that
have the switch on invites accidents.
Remove any adjusting key or wrench
before turning the power tool on. A
wrench or a key left attached to a rotating
part of the power tool may result in
personal injury.
Do not overreach. Keep proper footing
and balance at all times. This enables
better control of the power tool in
unexpected situations.
Do not expose power tools to rain or
wet conditions. Water entering a power
tool will increase the risk of electric shock.
Do not abuse the cord. Never use the
cord for carrying, pulling or unplugging
the power tool. Keep cord away from
heat, oil, sharp edges or moving parts.
Damaged or entangled cords increase
the risk of electric shock.
Dress properly. Do not wear loose cloth-
ing or jewellery. Keep your hair, clothing
and gloves away from moving parts.
Loose clothes, jewellery or long hair can
be caught in moving parts.
If devices are provided for the connec-
tion of dust extraction and collection
facilities, ensure these are connected
and properly used. Use of dust collection
can reduce dust-related hazards.
Do not force the power tool. Use the
correct power tool for your application.
The correct power tool will do the job better
and safer at the rate for which it was
designed.
Do not use the power tool if the switch
does not turn it on and off. Any power
tool that cannot be controlled with the
switch is dangerous and must be repaired.
c) Disconnect the plug from the power
source and/or the battery pack from the
power tool before making any adjust-
ments, changing accessories, or stor-
ing power tools. Such preventive safety
measures reduce the risk of starting the
power tool accidentally.
d) Store idle power tools out of the reach
of children and do not allow persons
unfamiliar with the power tool or these
instructions to operate the power tool.
Power tools are dangerous in the hands
of untrained users.
e) Maintain power tools. Check for misalign-
ment or binding of moving parts, breakage
of parts and any other condition that may
affect the power tools operation. If dama-
ged, have the power tool repaired before
use. Many accidents are caused by poorly
maintained power tools.
When operating a power tool outdoors,
use an extension cord suitable for
outdoor use. Use of a cord suitable for
outdoor use reduces the risk of electric
shock.
If operating a power tool in a damp
location is unavoidable, use a residual
current device (RCD) protected supply.
Use of an RCD reduces the risk of electric
shock.
Stay alert, watch what you are doing
and use common sense when operat-
ing a power tool. Do not use a power tool
while you are tired or under the influence
of drugs, alcohol or medication. A moment
of inattention while operating power tools
may result in serious personal injury
dust mask, non-skid safety shoes, hard hat,
or hearing protection used for appropriate
conditions will reduce personal injuries.

5. Use and handling of the cordless
electrical power tool
Safety instructions for all
applications
5 ■
6. Service
f) Keep cutting tools sharp and clean.
Properly maintained cutting tools with
sharp cutting edges are less likely to bind
and are easier to control.
g) Use the power tool, accessories and
tool bits, etc. in accordance with these
instructions, taking into account the
working conditions and the work to be
performed. Use of the power tool for
operations different from those intended
could result in a hazardous situation. a)
a) Charge a rechargeable battery unit
using only the charger recommended
by the manufacturer. Chargers are often
designed for a particular type of recharge-
able battery unit. There is the danger of
fire if other types of rechargeable battery
units are used.
b) Only the rechargeable battery units
supplied are to be used with an
electrical power tool. The use of other
rechargeable battery units may lead to the
danger of injury or fire.
c) When they are not being used, store re-
chargeable battery units away from
paper clips, coins, keys, nails, screws
or other small metal objects that could
cause the contacts to be bridged.
Short-circuiting the contacts of a recharge-
able battery unit may result in heat damage
or fire.
d) Fluids may leak out of rechargeable
battery units if they are misused. If this
happens, avoid contact with the fluid. If
contact occurs, flush the affected area with
water. Seek additional medical help if any
of the fluid gets into your eyes. Escaping
battery fluid may cause skin irritation or
burns.
CAUTION! RISK OF EXPLOSION!
Never charge non-rechargeable
batteries!
Protect the rechargeable battery
from heat, for example from
continuous exposure to sunlight,
fire, water and moisture. There is
a risk of explosion.
Have your power tool serviced by a quali-
fied repair person using only identical
replacement parts. This will ensure that
the safety of the power tool is maintained.
This power tool is intended for use as
a grinder, sandpaper sander, wire brush,
polisher, milling machine and abrasive
cutting appliance. Please follow all safety
instructions, instructions, diagrams and
data that you receive with the appliance.
If you do not observe the following instruc-
tions, this can lead to electrical shock, fire
and/or serious injuries.
b)
a)
General safety instructions for grinding, san-
dpaper sanding, working with wire brushes,
polishing, milling and abrasive cutting:
Wear personal protective equipment.
Depending on the application, ensure
that you use full face protection, eye
protection or goggles. If required, use a
dust mask, ear protectors, protective
gloves or special apron to protect you
from grindings and material particles.
Protected your eyes from flying debris
that may be created during certain app-
lications. Dust or filter masks must be
used to filter any dust created by the app-
lication. If you are exposed to loud noise
for any length of time, you may suffer
hearing loss.

■ 6
Do not use any accessories that have
not been provided or recommended
by the manufacturer for this power
tool. Just because you can attach the
accessories to your power tool, does not
ensure they are safe to use.
The permissible speed of the accessory
tool used must be at least as high as
the maximum speed specified for the
power tool. Accessories that rotate faster
than the permissible rate can break and
throw pieces into the air.
The external diameter and thickness of
the accessory tool used must comply
with the dimensions of the power tool.
Incorrectly dimensioned accessory tools
cannot be sufficiently shielded or controlled.
d)
Grinding discs, sanding drums or other
accessories must match the grinding
spindle or collet chuck of your power
tool exactly. Accessory tools which do
not fit precisely into the take-up of the
power tool will rotate unevenly, vibrate
severely and can lead to a loss of control.
e)
Discs, grinding cylinders, cutting tools
or other accessories mounted on a
mandrel must be completely inserted
in the collet or chuck. Any "protrusion"
or exposed parts of the mandrel between
the grinding tool and the collet or chuck
must be kept to a minimum. If the mandrel
is not sufficiently tightened or the grinding
tool protrudes too far, the tool could come
loose and been thrown out at high speed.
f)
Never use damaged accessory tools.
Before each use, check accessory tools
such as grinding discs for chips or cracks,
sanding drums for cracks, wearing or ex-
cessive wear and tear and wire brushes
for loose or broken wires. If the power tool
or the accessory tool in use is dropped,
check to see if it is damaged or use an
undamaged accessory tool. When you
have checked and inserted the accessory
tool, ensure that you and any other people
in the vicinity remain outside of the range
of the rotating accessory tool and allow
the tool to rotate at maximum speed for
one minute. Damaged accessory tools
usually break during this test period.
j)
g)
h)
c) Ensure that other people remain at a
safe distance to your workspace.
Anyone who enters the workspace must
wear personal protective equipment.
Fragments of the workpiece or broken
accessory tools can fly off and cause
injury – even outside the immediate
working area.
i)
Never put the power tool down until the
accessory tool has come to a complete
standstill. The rotating accessory tool can
come into contact with the surface and
cause you to lose control of the power tool.
n)
Hold the power tool only by the insulated
gripping surfaces when performing an
operation where the accessory tool may
contact hidden wiring or its own cord.
Contact with a live cable can also make
metal parts of the appliance live and could
result in an electric shock.
k) Always hold the power tool firmly. When
running up to full speed, the torque of the
motor can cause the power tool to twist.
l) If possible, use clamps to hold the work-
piece in position. Never hold a small work-
piece in one hand and the power tool in
the other while you are using it. By clamp-
ing small workpieces, you keep both
hands free for better control of the power
tool. When cutting round workpieces such
as dowels, rods or pipes, be aware that
these can roll away and this can cause
the tool to jam and be thrown towards you.
m)Hold the power cord away from any
rotating accessories. If you lose control
of the appliance, the cord may get cut or
caught and your hand or arm could get
caught in the rotating accessory tool.

Additional safety instructions
for all applications
7 ■
Kickback is a sudden reaction caused when
a rotating accessory tool, e.g. grinding disc,
abrasive band, wire brush, etc., catches or
jams. Catching or jamming leads to an abrupt
stop of the rotating accessory tool. If this
happens, an uncontrolled power tool will turn
rapidly against the direction of rotation of the
accessory tool.
a)
When changing accessory tools or
changing settings, tighten the collet
nut, the chuck or other fixing elements
tightly. Loose fixing elements can shift
unexpectedly and lead to loss of control;
unfixed, rotating components will fly off
violently.
o)
p) Do not leave the power tool running
whilst carrying it. Accidental contact
between your clothing and the rotating
accessory tool could lead to physical
injury.
q)
r)
Clean the ventilation slits of your
power tool regularly. The engine fan
draws dust into the housing and a strong
accumulation of metal dust can cause
electrical hazards
Do not use the power tool in the
vicinity of flammable materials. Sparks
can ignite such materials.
Do not use any accessory tools which
require liquid coolant. The use of water
or other liquid coolants may lead to electric
shock.
Do not touch the bit or collet after use.
After use the bit and collet are too hot to
be touched by bare hands.
u)
t)
s)
Kickback and corresponding safety
instructions
Do not alter or misuse tool. Any altera-
tion or modification is a misuse and may
result in serious personal injury. This
product is not intended for use as a dental
drill, in human or veterinary medical
applications. Serious injury may result.
A kickback is caused by incorrect use or
misuse of the power tool. This can be
avoided by taking proper precautions as
given below.
Hold the power tool firmly in both
hands and position your body and
arms so they can absorb the force of
a kickback. By taking adequate precau-
tions, the operator can stay in control of
the kickback forces.
b) Take special care when working around
corners, sharp edges, etc. Avoid allowing
the accessory tool to bounce back from
the workpiece or jam in the workpiece.
The rotating accessory tool is more likely
to jam in corners or sharp edges or if it
rebounds off them. This can cause a loss
of control or kickback.
c) Do not use toothed saw blades. Such
accessories often cause a kickback or
loss of control over the power tool.
d) Always move the accessory tool in the
same direction in the material in which
the cutting edge leaves the material (in
other words, the same direction in
which the dust is thrown out). Guiding
the power tool in the wrong direction will
cause the cutting edge of the accessory
tool to jump out of the workpiece which
can lead to the accessory tool being pulled
in this direction.
If, for example, a grinding disc catches or
jams, the edge of the grinding disc that is
projecting into the workpiece can get caught
and break off the grinding disc or cause a
kickback. The grinding disc can then fly in
the direction of the operator or away from
him, depending on the direction of rotation
of the disc at the blockage. This can also
break grinding discs.

Supplementary safety instructions
for grinding and abrasive cutting
Supplementary safety instructions
for working with wire brushes
■ 8
Special safety instructions for grinding
and abrasive cutting
Special safety instructions for working
with wire brushes:
e)
a)
Always fix the workpiece when using
rotary files, cutting discs, high-speed
milling tools or hard-metal tools. Even
a minimal tilting in the groove can cause
these tools to jam and lead to a kickback.
When the cutting disc jams, it usually
breaks. When a rotary file, high-speed
milling tool or hard-metal milling tool jams,
the accessory tool can jump out of the
groove and lead to loss of control of the
power tool.
Use only the grinding accessories
approved for your power tool and only
for the recommended applications.
Example: Never grind with the side
surface of a cutting disc. Cutting discs are
designed to remove material with the
edge of the disc. Any lateral application
of force on these grinding tools can lead
to breakage.
b) Use only undamaged mandrels of the
correct size and length and without
undercut on the shoulder for conical
and straight pencil grinders. Using an
appropriate mandrel reduces the risk of
breakages.
c) Avoid cutting disc jams or excessive
contact pressure. Do not make any ex-
cessively deep cuts. Overloading the
cutting disc increases the stress and
likelihood of tilting or jamming and thus
the possibility of kickback or breakage of
the grinding tool.
d) Avoid putting your hand in the area in
front of or behind the rotating cutting
disc. When you move the cutting disc
away from your hand, it is possible, in the
event of a kickback, that the power tool
along with the rotating disc could be
thrown out directly towards you.
e) If the cutting disc jams or you stop
working, switch the tool off and hold
it steady until the disc has completely
stopped turning. Never attempt to pull
a rotating cutting disc out of a cut. This
could lead to kickback. Identify and
remove the cause of the jam.
f) Do not restart the cutting operation in
the workpiece. Let the wheel reach full
speed and carefully re-enter the cut. The
wheel may bind, walk up or kickback if
the power tool is restarted in the
workpiece.
g) Support panels or large workpieces to
reduce the risk of the cutting disc
jamming and causing a kickback. Large
workpieces can bend under their own
weight. The workpiece must be supported
on both sides, namely in the vicinity of the
cut, and also at the edge.
h) Be particularly careful when making
"pocket cuts" into existing walls or
other obscured areas. The inserted
cutting disc may cut into gas or water
pipes, electrical wiring or other objects
that can cause kickback.
a) Be aware that the brush can lose wire
bristles even during normal operation.
Do not overstress the wires by applying
excessive pressure to the brush. The wire
bristles can easily penetrate light clothing
and/or skin.
b) Allow the brush to run at working
speed for at least one minute before
applying it to the workpiece. Ensure
that no one is standing in front of or in line
with the brush during this time. Loose
pieces of wire could fly off during the
run-in period.

Safety guidelines for battery
chargers
■
9 ■
WARNING
a)
b)
c)
c)
d)
Aim the rotating steel brush away from
yourself. When working with these brush-
es, small particles and minute pieces of
wire can fly off at great speed and pierce
skin.
GFCI and personal protection devices
like electrician’s rubber gloves and
footwear will further enhance your
personal safety.
Do not use AC only rated tools with a
DC power supply. While the tool may
appear to work, the electrical components
of the AC rated tool are likely to fail and
create a hazard to the operator.
Keep handles dry, clean and free from
oil and grease. Slippery hands cannot
safely control the power tool.
Develop a periodic maintenance
schedule for your tool. When cleaning
a tool be careful not to disassemble any
portion of the tool since internal wires may
be misplaced or pinched or safety guard
return springs may be improperly mounted.
Certain cleaning agents such as gasoline,
carbon tetrachloride, ammonia, etc. may
damage plastic parts.
Some dust created by power sanding,
sawing, grinding, drilling, and other
construction activities contains chemicals
known to cause cancer, birth defects or
other reproductive harm. Some examples
of these chemicals are:
Your risk from these exposures varies,
depending on how often you do this type of
work. To reduce your exposure to these
chemicals: work in a well ventilated area,
and work with approved safety equipment,
such as those dust masks that are specially
designedto filter out microscopic particles.
This appliance may be used by
children aged 8 years and above and
by persons with limited physical,
sensory or mental capabilities or lack
of experience and knowledge, provided
that they are under supervision or have
been told how to use the appliance
safely and are aware of the potential
risks. Do not allow children to use the
appliance as a plaything. Cleaning and
user maintenance tasks may not be carried
out by children unless they are supervised.
■
■
■
■
■
■
To avoid potential risks, damaged mains
cables should be replaced by the manu-
facturer, their customer service depart-
ment or a similarly qualified person.
• Lead from lead-based paints,
• Crystalline silica from bricks and cement
and other masonry products, and
• Arsenic and chromium from chemically-
treated lumber.
Additional safety warnings
This manual contains instructions for
battery charger model BBT-KP526. Do
not substitute with any other charger.
Before using charger, read all instruc-
tions and cautionary markings on
battery charger.
Charge only SnapFresh rotary tool
BBT-KP526.
Charge battery in temperatures above
+32 degrees F (0 degrees C) and below
+113 degrees F (45 degrees C). Store
tool in locations where temperatures will
not exceed 120 degrees F (49 degrees C).
This is important to prevent serious
damage to the battery cells.
Do not recharge battery in damp or wet
environment. Do not expose charger to
rain or snow. Water entering battery charger
may result in electric shock or fire.

FCC Caution
WARNING!
■
Use
■
■
■
■
■
■
■
■
Charging the battery pack
NOTICE
►A new battery pack or a battery pack
which has not been used for a long time
will need to be charged before first use/
reuse. It will reach its full capacity after
3–5 charge cycles. The charging
process lasts around 60 minutes.
Insert the battery charger plug into the
charging socket on the appliance and
then plug the mains plug into a mains
socket. Once the battery is fully charged,
the battery LED lights up RED/
ORANGE/ GREEN.
■ 10
■
Keep the Charging socket clean by
blowing compressed air. Contamination
may result in electric shock or fire.
The charger is suitable for indoor
use only.
Do not operate the appliance with a
damaged cable, power cable or power
plug. A damaged power cable poses a
threat of fatal electric shock.
Never use the appliance for other purposes
and only original parts/accessories. Using
attachments or accessory tools other than
those recommended in the operating
instructions can lead to a risk of injury.
The manufacturer is not responsible for radio
interference caused by unauthorized
modifications to this equipment. Such
modifications could void the user’s authority
to operate the equipment.
8
CAUTION!
►Do not use the tool while charging
because it will harm the battery.
4
2
■First unplug the charger from the mains
power socket and then the charger plug
from the charging socket on the
appliance.
8
8
4
Battery leakage may occur under extre-
me usage or temperature conditions.
Avoid contact with skin and eyes. The
battery liquid is caustic and could cause
chemical burns to tissues. If liquid comes
in contact with skin, wash quickly with soap
and water. If the liquid contacts your eyes,
flush them with water for a minimum of 10
minutes and seek medical attention.
Place tool on flat nonflammable surfac-
es and away from flammable materials
when recharging the battery. Carpeting
and other heat insulating surfaces block
proper air circulation which may cause
overheating of the charger and the battery.
If smoke or melting of the charger or tool is
observed, unplug the charger immediately
and do not use the tool or charger. Contact
customer service immediately.
Make sure cord is located so that it will
not be stepped on, tripped over, or
otherwise subjected to damage or
stress. Damaged plug and cord may result
in electric shock or fire.
Disconnect the charger by pulling the
plug rather than the cord. Do not operate
charger with damaged cord or plug; have
them replaced immediately. Damaged plug
or cord may result in electric shock or fire.
Do not disassemble charger or operate
the charger if it has received a sharp
blow, been dropped or otherwise
damaged in anyway. Incorrect reassembly
or damage may result in electric shock or
fire. Before each use, check the battery
charger, cable and plug. If damage is
detected, do not use the battery charger.
Never open the charger yourself, Incorrect
reassembly may result in electric shock or
fire.
Do not use attachments not recommend-
ed or sold by SnapFresh. Using attach-
ments not recommended may result in
electric shock or fire.
4

■
■
■
■
■
■
■
CAUTION!
►
Checking the battery charge level
Never recharge a battery pack again
immediately after charging. There is a
risk that the battery pack will become
overcharged.
CAUTION!
►Do not press the shaft lock button
while the rotary tool is running.
If the appliance is switched on, the status/
remaining charge will be shown on the
battery LED as follows:
RED / ORANGE / GREEN = maximum
charge
RED / ORANGE = medium charge
RED = low charge – charge the battery
Changing/inserting the tool/collet
chuck
Press the shaft lock and hold it down
Turn the collet nut until the lock clicks
into place
Undo the collet nut from the thread
using the combination spanner.
Remove any tool which is inserted.
First push the intended tool through the
collet nut before inserting it into the
appropriate collet chuck for the tool shaft.
■
■
Press the shaft lock and hold it down.
Push the collet chuck into the thread
insert and screw the collet nut tight
with the combination spanner .
NOTICE
►Use the screwdriver side of the
combination spanner to undo and
tighten the screw on the mandrel .
Switching on and off/setting speed
range
Switching on/setting the speed range:
Set the ON/OFF switch to the position
between "I".
Set the variable speed dial to a position
between “1” and “MAX”.
Switching off:
Set the ON/OFF switch to the "O"
position.
Notes on working with materials/tools
/speed range
■Determine the rotational speed range for
working on zinc, zinc alloys, aluminium,
copper and lead by trying it out on test
pieces.
■Use the cutting wheels for working on
the steel and iron at maximum speed or
speed "6".
■Use a low rotational speed for work on
plastics and materials with a low melting
point.
■Use a high rotational speed for working on
wood.
■Carry out cleaning, polishing and buffing
work in the medium speed range.
The following are recommendations only
and not binding. When carrying out
practical work, carry out your own tests
to see which tool and which settings are
ideal for the material you are working on.
The best way to determine the correct speed
for work on any material is to practice for a
few minutes on a piece of scrap.
You can quickly learn that a slower or faster
speed is more effective just by observing
what happens as you make a pass or two at
different speeds. When working with plastic,
for example, start at a slow rate of speed and
increase the speed until you observe that the
plastic is melting at the point of contact. Then
reduce the speed slightly to get the optimum
working speed.
11 ■
7
7
3
3
1
7
5
5
5
5
23
23
10
15
15
2
14

■ 12
Setting a suitable rotational speed:
Number on the
variable speed dial
1–3 6
Max
4–5
Material being
worked
Material being
worked
Application examples/selecting a suitable tool:
Function Accessories Use Protrusion
(min–max) in
Drilling HSS drills
Plastics and
materials with a
low melting point
Hardwood
Steel
Stone, ceramics
Soft wood, metal
Drilling on wood or plastic
3/64"(1.4mm),
1/16"(1.6mm),
5/64"(2.0mm),
3/32"(2.4mm),
1/8'(3.0mm)
Are made for intricate work on wood carvings,
e.g. creating recesses, hollows, forms, grooves
or slits. They should not be used on steel and
other hard materials but are good on wood,
plastic.
3/32" shank.
3/32" shank.
Carve intricate details, etch metal, glass,
stoneware, terracotta.
3/32" shank.
Use for metal cleaning or rust removal.
3/32" shank.
Felt polishing wheel used for polishing plastics,
metals, jewelry and small parts. Polishing
points make a very smooth surface, but a high
luster is obtained using felt and polishing
compound. For best results polishing
accessories should be used at speeds not
greater than Speed 5.
0.7–0.98 in,
using the
smallest drill,
the protrusion
is 0.39 in
Milling Milling bits 0.7–0.98 in
1
9
17
Number on the
variable speed dial 1
5
0.7–0.98 in
0.35–0.59 in
0.47–0.7 in
Carving/
Engraving
Diamond carving
bits
Coppered steel wire
brush
Thinner felt polishing
wheels
(use with mandrel )
Thicker felt polishing
wheels
(use with mandrel )
CAUTION!
18
13
10
11
11
25
Polishing,
rust removal
Exert only
slight pressure
when applying
the tool to the
workpiece.

13 ■
0.35–0.59 in
0.47–0.7 in
0.39 in
0.47–0.7 in
Synthetic brushes The nylon wire brushes are good for general
purpose cleaning. These are excellent
cleaning tools on silverware, jewelry and
antiques. The two shapes make it possible
to get into tight corners and other difficult
places.
3/32" shank.
Aluminum Oxide Grinding Wheel/Stones
(Pink/brown) These are made of aluminum
oxide and cover virtually every possible kind
of grinding application on metal. Use them
for sharpening lawn mower blades,
screwdriver tips, knives, scissors and other
cutting tools. Use to remove flash from metal
castings, deburring any metal after cutting,
smoothing welded joints and removing rust.
These grinding stones can be resharped
with a dressing stone. 3/32" or 1/8" shank.
These thin discs are used for slicing,
cutting off and similar operations on
metal, plastic and wood. Use them
for cutting off frozen bolt heads and
nuts, or to reslot a screw head which
has become so damaged that the
screwdriver won’t work in it. Fine for
cutting small rods, small tubing,
cable.
Warning: Do not grind with the side
of a cut off wheel. Abrasive cut-off
wheels are intended for peripheral
grinding, side forces applied to these
wheels may cause them to shatter.
3/32" shank.
Cleaning
Gringding/
sharpening
Cutting
16
Grinding wheels
(use with mandrel )
12
10
10
Grinding bits 19 24
Cutting discs
(use with mandrel )
14
Silicon Carbide Grinding Wheel/Stones
(gray/green) Tougher than aluminum oxide
points, these are made especially for use on
hard materials such as glass and ceramics.
Typical uses might be the removal of stilt
marks and excess glaze on ceramics.
Engraving or grinding on glass.
3/32" shank.
■ 14
Additional instructions for accessories/attachments
■Note that the maximum diameter of the
grinding assembly, and of grinding cones
and pencil grinders with a thread insert,
may not exceed 2.16 in (55 mm) and the
maximum diameter for sandpaper sanding
accessories may not exceed 3.14 in
(80mm).
■Store the accessories in the original box
or store the accessory components
somewhere else to protect them from
damage.
■Store the accessories somewhere dry and
not in the vicinity of aggressive media.
NOTICE
►The max. permissible length of a mandrel
is 1.29 in (33 mm).
0.47–0.7 inSanding Band in S, M and L sizes are made
to fit mandrels . They can be used for
small sanding job, suah as model making,
or furniture finishing. The tiny drum which fits
into the rotary tool and makes it possible to
shape wood, sand inside curves and other
difficult places, and other sanding jobs. You
replace the sanding bands on the drum as
they become worn and lose their grit. They
are used most effectively as a finishing
sander after heavier surface sanding and
material removal is completed. They work
effectively on wood, glass, metal and plastics.
Suggested speed: don't exceed Speed 5.
1/8" shank
Mandrels as tool holders Collet chucks
This is a mandrel with a small screw at its tip, and
is used with cutting wheels , grinding discs
and thinner polishing wheels .
3/32" shank.
Collet chuck(1/16"):
Use with HSS drill bits 3/64"(1.4mm), 1/16"(1.6mm)
Collet chuck(3/32"):
Use with HSS drill bits 5/64"(2.0mm), 3/32"(2.4mm),
and accessories
Collet chuck(1/8"):
Use with HSS drill 1/8'(3.0mm),
and accessories
Sanding 15 Grit sanding
bands 21
10
10 13 16
20 24 25
17 18 19
15
11
1214
(use with drum
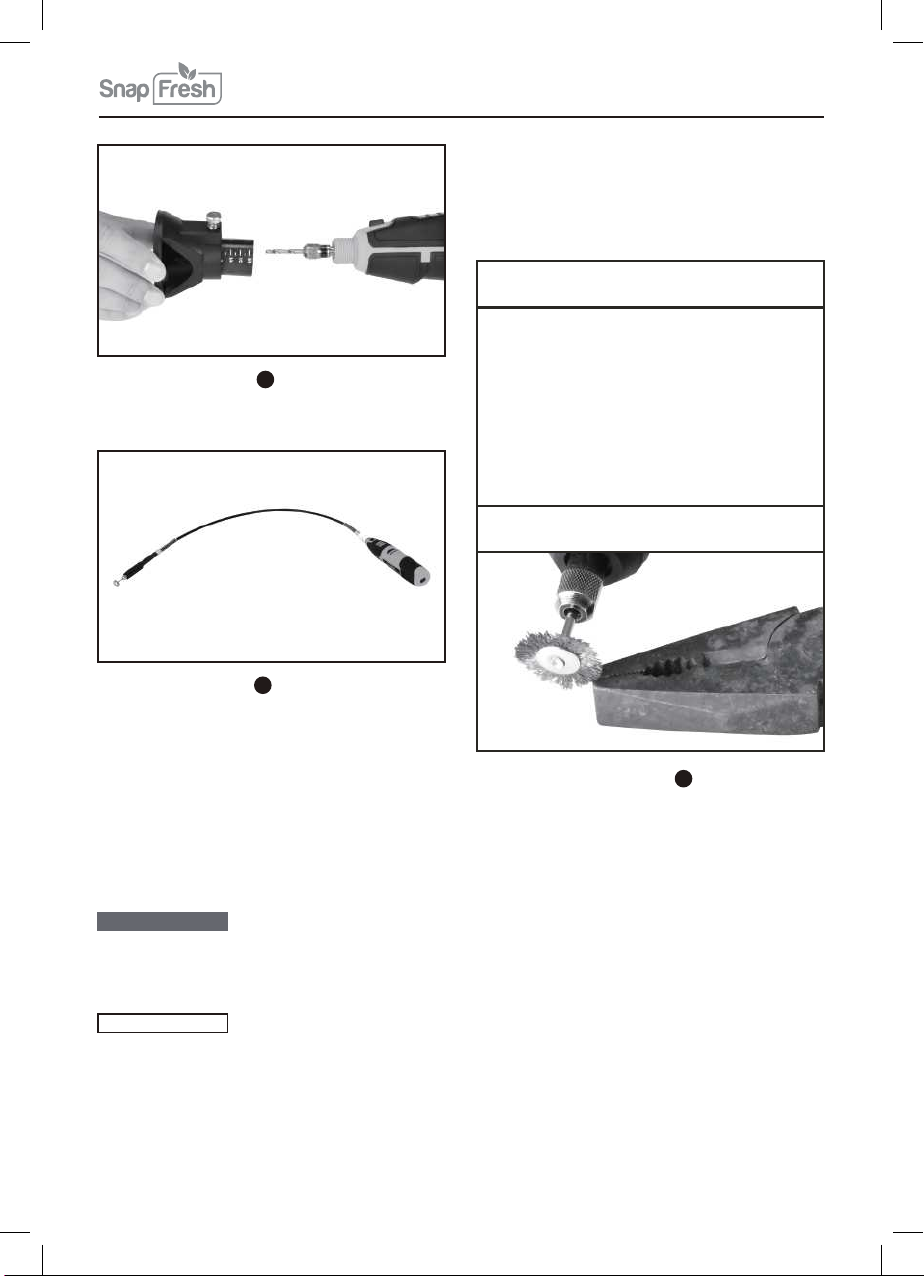
mandrels )
20
20

15 ■
Sanding drum mandrels
Keyless chuck
Use with sanding band
To replace a band on the Drum Sander, loosen the
screw without removing it to contract the drum then
slide the old band off. Slide the new sanding band
on and then expand the drum by tightening the
screw once again.
Ideal for 1/32” (0.8mm) to 1/8” (3.2mm)
This chuck allows you to quickly and easily change
accessories on rotary tools without changing
collets. Accepts accessories with 1/32” - 1/8” shank.
Insert and securely tighten the shank of the
accessory well within the jaws of the chuck.
But we suggest to use 1/16" chuck for 3/64"(1.4mm),
1/16"(1.6mm) drill bit
20
21
22
Combination spanner
Screw mandrel
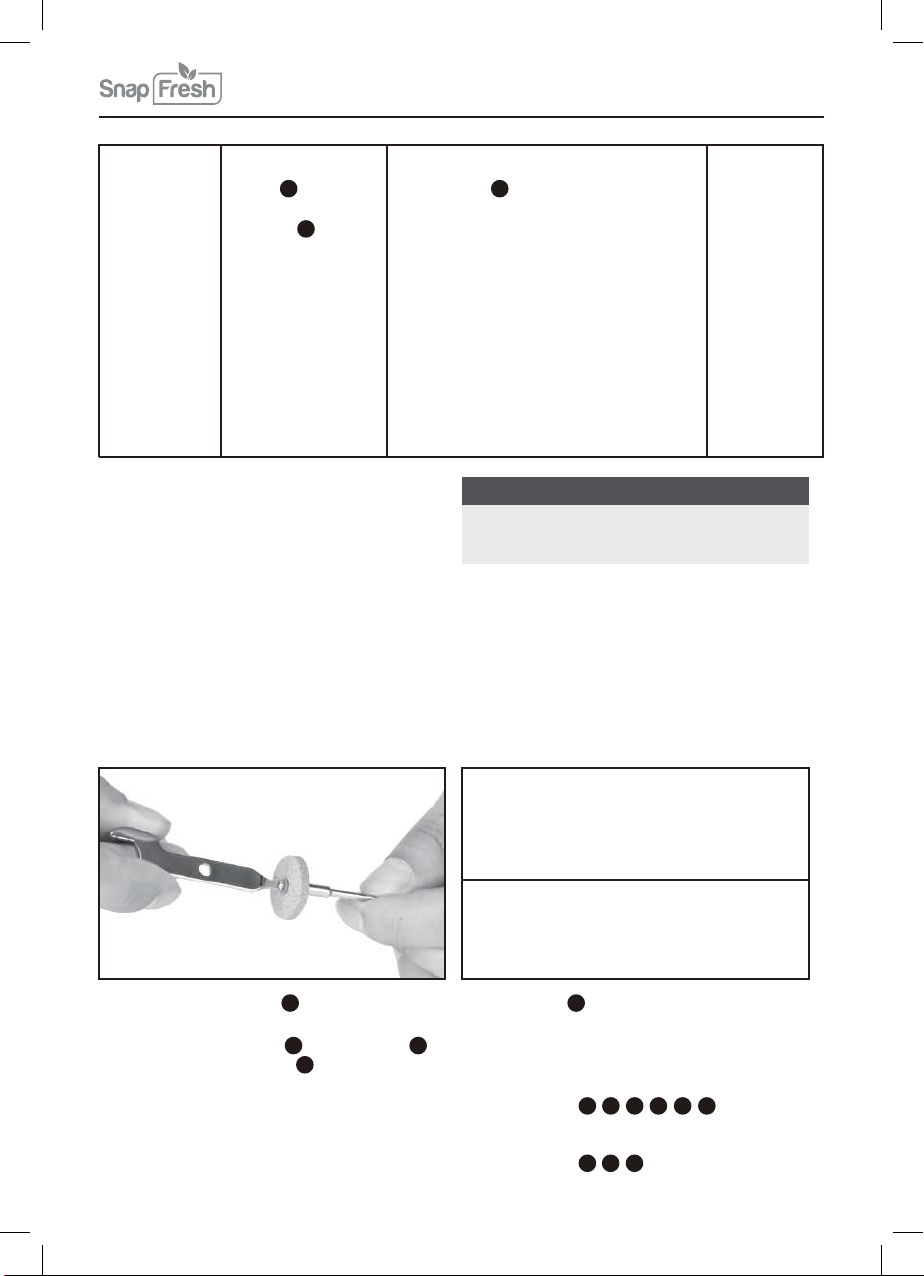
After changing the bits or making any adjustments,
make sure the collet nut, chuck or any other
adjustment devices are securely tightened.
Use spanner to tighten!
Loose adjustment devices can unexpectedly shift,
causing loss of control, loose rotating components
will be violently thrown.
This is a screw mandrel used with the thicker felt
wheels of the felt polishing wheel .
Thread the thicker wheels on to the screw carefully.
The felt wheel must thread down straight on the
screw Mandrel, and be turned all the way to the
collar.
23
25
11
WARNING
Before each use, check to make certain that all
components are assembled to accessory shank and
that the drum is sufficiently expanded to secure the
band during use. If sanding band is loose on the
drum during operation it may fly off and strike you or
bystanders.
■ 16
Cutting/drilling guide
Flex shaft length 43"
Depth adjustment quickly sets correct cutting/drilling
depth up to 3/4"
Pre-installed with a 1/8"(3.2mm) collet chuck, also
will fit other collet chucks for SnapFresh rotary tool.
Ergonomic pen design makes easy, comfortable
carving, sanding and polishing. It can used with
polishing kits, drill bits, wire brushes, cut off wheels,
grinding wheels, sanding bands and more working
in tight spaces, ideal for engraving and jewelry
making the 43" Flexible Shaft rotary tool simplifies
working in cramped spaces and allows the user more
freedom while working on DIY projects.
26
27
Coppered steel wire brush
If excessive pressures are used, the wires will
be overstressed, resulting in a wiping action;
and if this is continued, the life of the brush will
be shortened due to wire fatigue.
13
TIP
It may cause heat or shock depending on the speed
or the degree of bending, the higher rotating speed
with higher degree of bending may burn the cover.
Do not use the flexible shaft for a long time, stop
the tool and let it cool down every 5-10 minutes;
NOTICE
a)
b)
c)
Try to keep it straight while working as possible
as you can and don't bend it too much;
Suggested speed: don't exceed Speed 3;
d) For best performance and long life, be sure to
apply a greasing lubricant to the inner flex shaft
parts as needed. Like all tools proper care and
attention will extend the longevity of the tool.
Overall length: 43 inches
a)
b)
Remember, the tips of a wire brush do the work.
Operate the brush with the lightest pressure so
only the tips of the wire come in contact with the
work.
INCORRECT:
Excessive pressure can cause wire breakage.
CORRECT:
Wire tips doing the work.

17 ■
Operating Instructions
SnapFresh rotary tool BBT-KP526
Thank you for purchasing the SnapFresh
rotary tool BBT-KP526.
It has a wide speed range including a high
performance motor that allows the tool to
maintain its speed under load. The design
of the tool also contains plenty of soft grip
so the tool can be held comfortably in many
positions. The quick collet lock mechanism
makes locking the output shaft easier for
changing accessories.
Rotary Tool Introduction
The rotary tool has a small, powerful
electric motor, is comfortable in the hand,
and is made to accept a large variety of
accessories including abrasive wheels, drill
bits, wire brushes, polishers, engraving
cutters, router bits, cutting wheels and
attachments.
Getting the most out of your rotary tool is
a matter of learning how to let this speed
work for you. To learn about more uses and
the versatility of accessories and attachmen-
ts refer to this Owner's Manual.
Using the rotary tool
Always hold the tool
away from your face.
Accessories can be
damaged during
handling, and can fly
apart as they come
up to speed. This is not common, but it does
happen.
Wear eye protection
WARNING
TIP
The rotary tool operates at speeds up to
28,000 revolutions per minute, it's almost 10
times faster than the electric drill. The electric
drill is a low-speed, high torque tool; the
Rotary Tool is just the opposite – a high-
speed, low torque tool, so excessive pressure
will make the rotating stop. You don’t apply
much pressure to the tool, but simply hold
and guide it.
The speed enables it to do jobs low speed
tools cannot do, such as cutting hardened
steel, engraving glass, etc.
a)
b)
c)
d) Do not press the shaft lock button while
the rotary tool is running.
If you exert excessive pressure, the
fitted tool can break and/or the work-
piece could be damaged, also if the
rotating stopped by excessive pressure,
the protection system may be triggered,
resulting in shut down. If it happened,
the Battery LED lights will turn off, you
need to restart the tool. Then you can
continue to use the tool, but exert
lighter pressure. You will achieve
optimum working results by moving the
tool over the workpiece at a steady speed.
Increasing the pressure on the tool is not
the answer when it is not performing as
you think it should. Perhaps you should be
using a different accessory, and perhaps
an adjustment in speed would solve the
problem. Leaning on the tool does not help.
When carrying out cutting work, hold the
appliance firmly with both hands.
Observe the data and the information in
the table to prevent the end of the spindle
from touching the perforated base of the
grinding tool.
7
Always Wear Eye Protection
■ 18
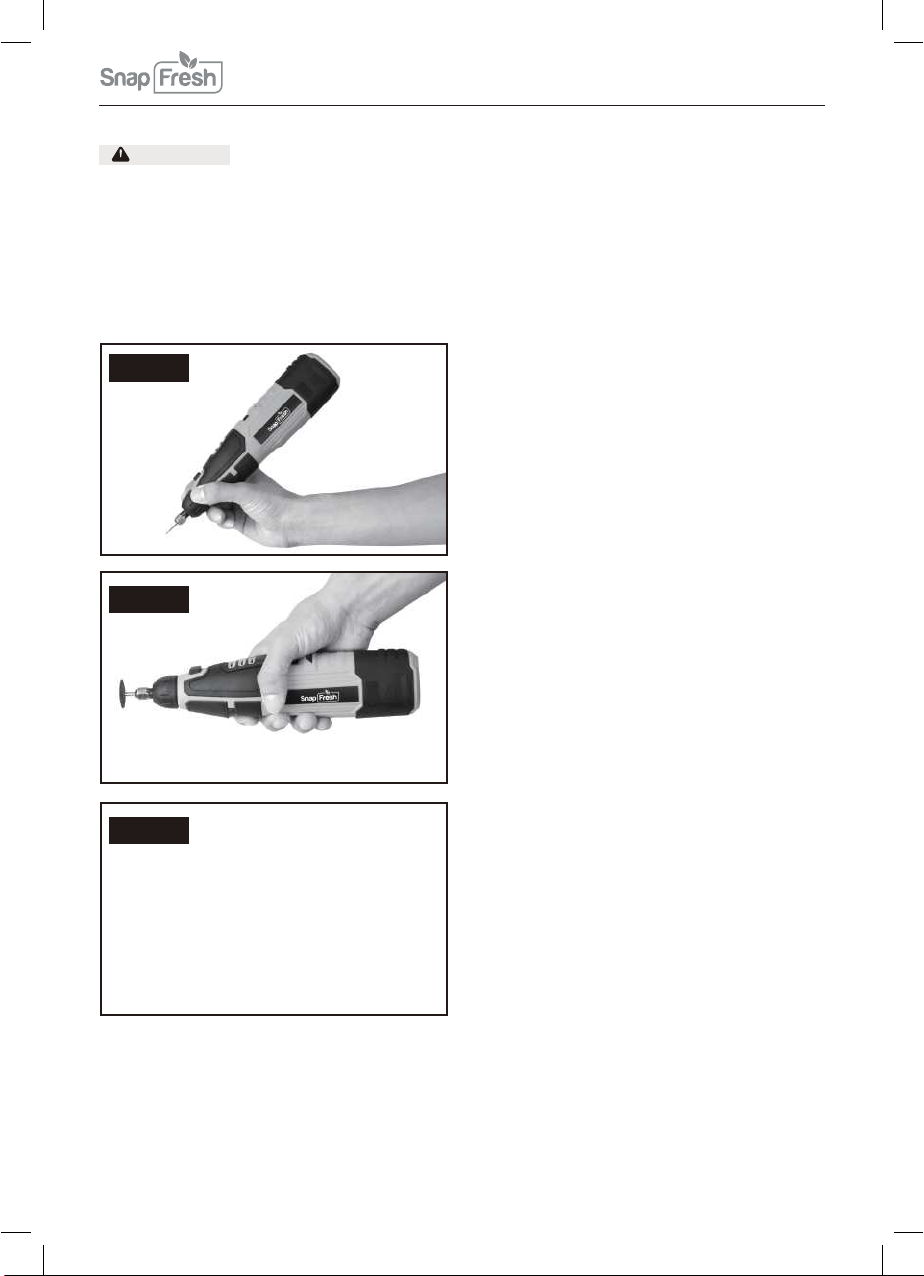
CAUTION
For best control in close work, grip the rotary
tool like a pencil between your thumb and
forefinger (Figure A).
Whenever you hold the tool, be careful
not to cover the air vents with your hand.
This blocks the air flow and causes the
motor to overheat.
Usually, it is best to make a series of passes
with the tool rather than attempt to do all the
work in one pass. To make a cut, for example,
pass the tool back and forth over the work,
Cut a little material on each pass until you
reach the desired depth. For most work, the
gentle touch is best. With it, you have the
best control, are less likely to make errors,
and will get the most efficient work out of the
accessory.
The “Golf Grip” method of holding the tool
can be used for more aggressive operations
such as grinding a flat surface or using cutoff
wheels (Figure B and Figure C).
Practice on scrap materials first to see how
the rotary tool's high speed action performs.
Keep in mind that the work is done by the
speed of the tool and by the accessory in the
collet. You should not lean on or push the
tool during use.
Instead, lower the spinning accessory lightly
to the work and allow it to touch the point at
which you want cutting (or sanding or etching,
etc.) to begin. Concentrate on guiding the
tool over the work using very little pressure
from your hand. Allow the accessory to do
the work.
Figure A
Figure B
Figure C
Table of contents
Other Snap Fresh Power Tools manuals

Popular Power Tools manuals by other brands

Henry Tools
Henry Tools 46 ARA General safety and maintenance manual

Far Tools
Far Tools DPC 35E Original manual translation

Far Tools
Far Tools SN36 Original manual translation

Delta
Delta ShopMaster CL180JS instruction manual

Beveltools
Beveltools Bevel Mite EBI-06 Premium Quick start manual

Power Fist
Power Fist CETL 3072101 user manual


