Solax GENIE+ User manual

www.solaxmobilityscooters.com.au
Instruction
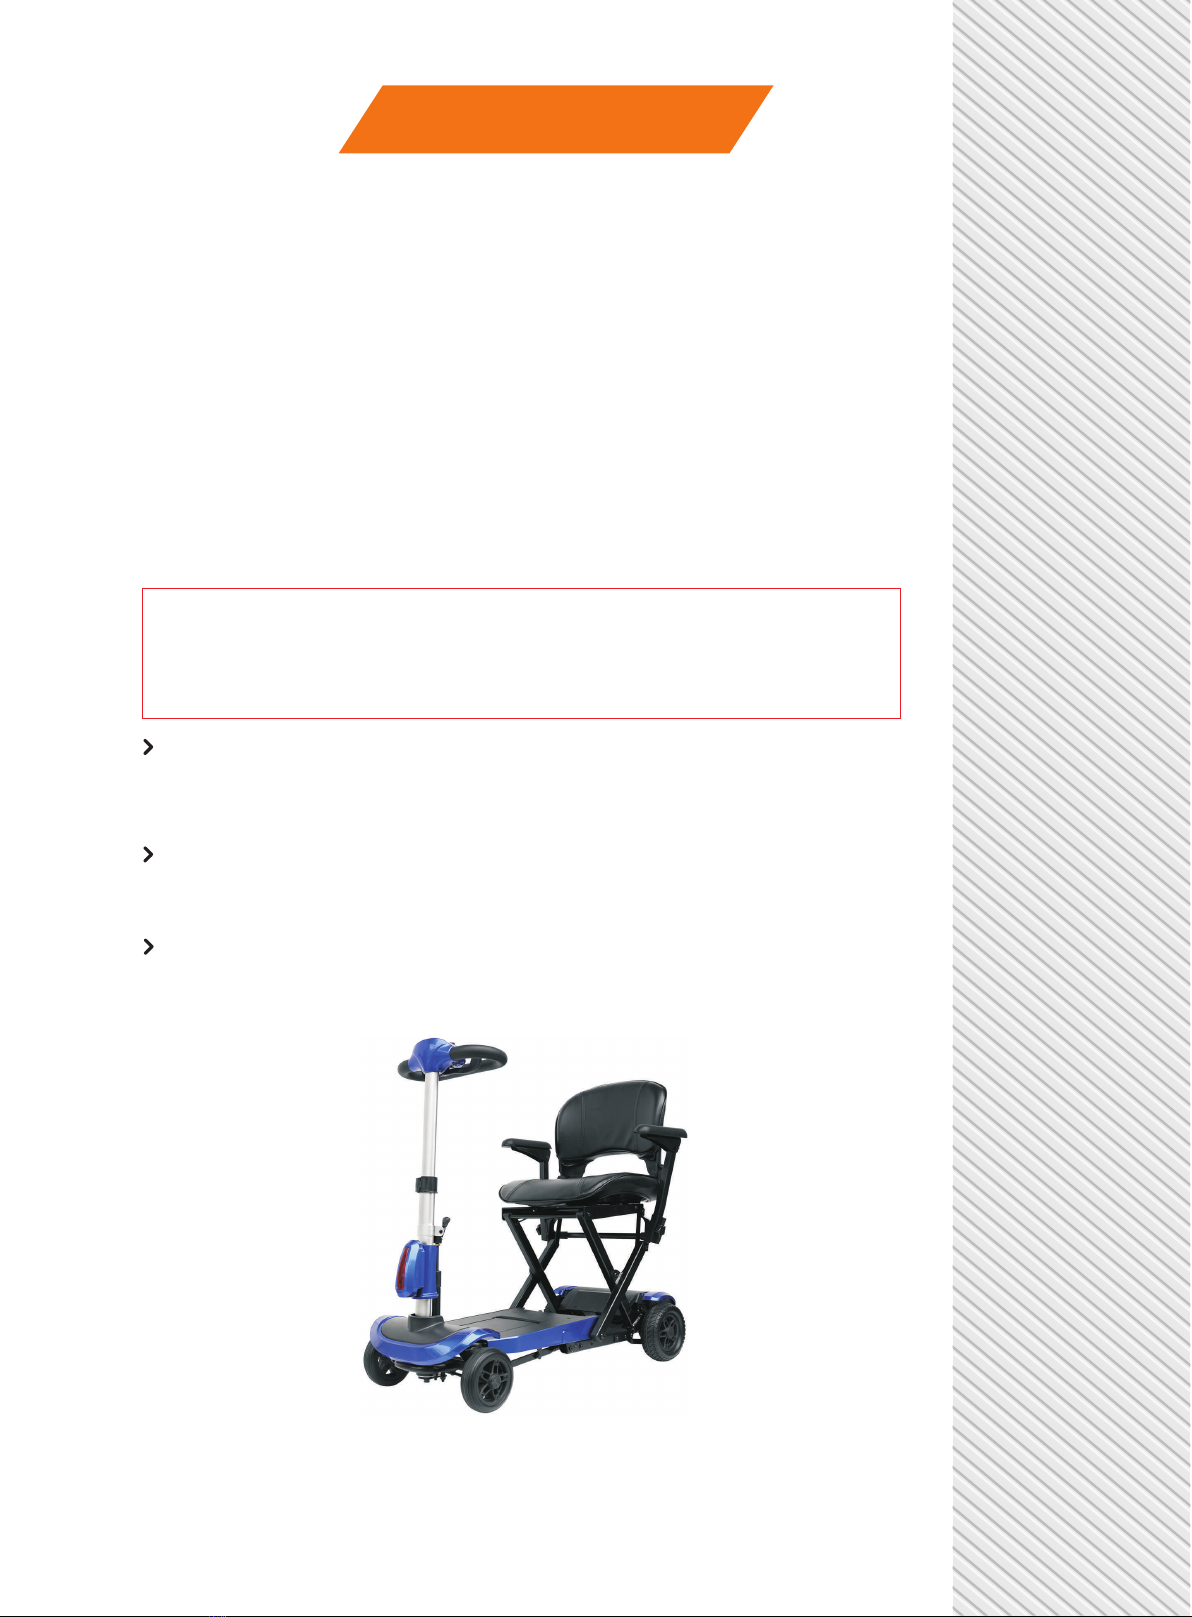
Thank you for choosing the foldable scooter — GENIE !
Fig.1 GENIE
Please read this manual carefully before operating the GENIE because this
Warning: Failure to note the warnings from this manual will cause
your personal injury.
Notification: Failure to note the notification from this manual will
damage the GENIE .
This manual covers the GENIE main structure characteristics, main
function of each part, safety requirements and instructions, battery instructions, matters
need attention, the methods of dealing with emergencies, and scooter's maintenance.
components,
The following symbols used in this manual are to indicate warning and matters need
to pay attention; therefore, it is important for you to fully understand and master the
content.
All of the information and pictures in this manual are subject to the factory's
( Fig. 1 ) and only for customer reference. The product will continue to be improved
and modified without prior notice. Please do understand and support us.
products
Finally, we believe that the GENIE will lead you to the comfortable, convenient,
and wonderful life.
+86 (0)769 859 22501
+86 (0)769 859 22505
1
manual will help you to operate the GENIE smoothly-This manual is applicable
to the manual and automatic version. If you can't understand all of the content
comp-letely or you need the assistance, please c ontact the scooter dealer of
or with the following.GENIE
Solax Technology Limited
+
Dear Customer
+
+
+
+
+
+
+

Contents
GENIE Feature Guide
Product Specifications and Relevant Parameters
Main Parts and Relevant Function
The Folding and Unfolding
Safety Requirements
Battery and Battery Charging
Operation Instruction
Basic Troubleshooting
Maintenance
3
5
6
9
10
12
15
16
16
2
GENIE Feature Guide
(There are manual and automatic versions of this scooter; they are basically the same in structure and
shape. The main difference is that the folding and unfolding of the manual version is operated manually,
while the automatic version is operated by the remote controller. )
3
+
Please refer to the diagram below to identify your scooter parts. Familiarize yourself with the
terminology to better understand part references throughout the Owner’s Manual.(Fig. 2 )
1
2
3
Control Panel
Adjustable Height Handle
Forward / Reverse Control Lever
Tiller Angle Adjustment
Handle Switch
Front Cover
Battery / Compartment
Front Wheel
Foot Board
Manual Fold Release Lever
Seat Supporting Frame
Rear Wheel
Anti-tip Wheel
Rear Cover
Rotary Locking Handle
for Arm Rest
Armrest Supporting
Frame
Armrest
Backrest
Seat
Fig.2
1
2
3
4
5
6
7
8
9
10
11
12
13
14
15
16
17
18
19
4
5
6
7
89
10
11 12
13
14
15
16
17
18
19

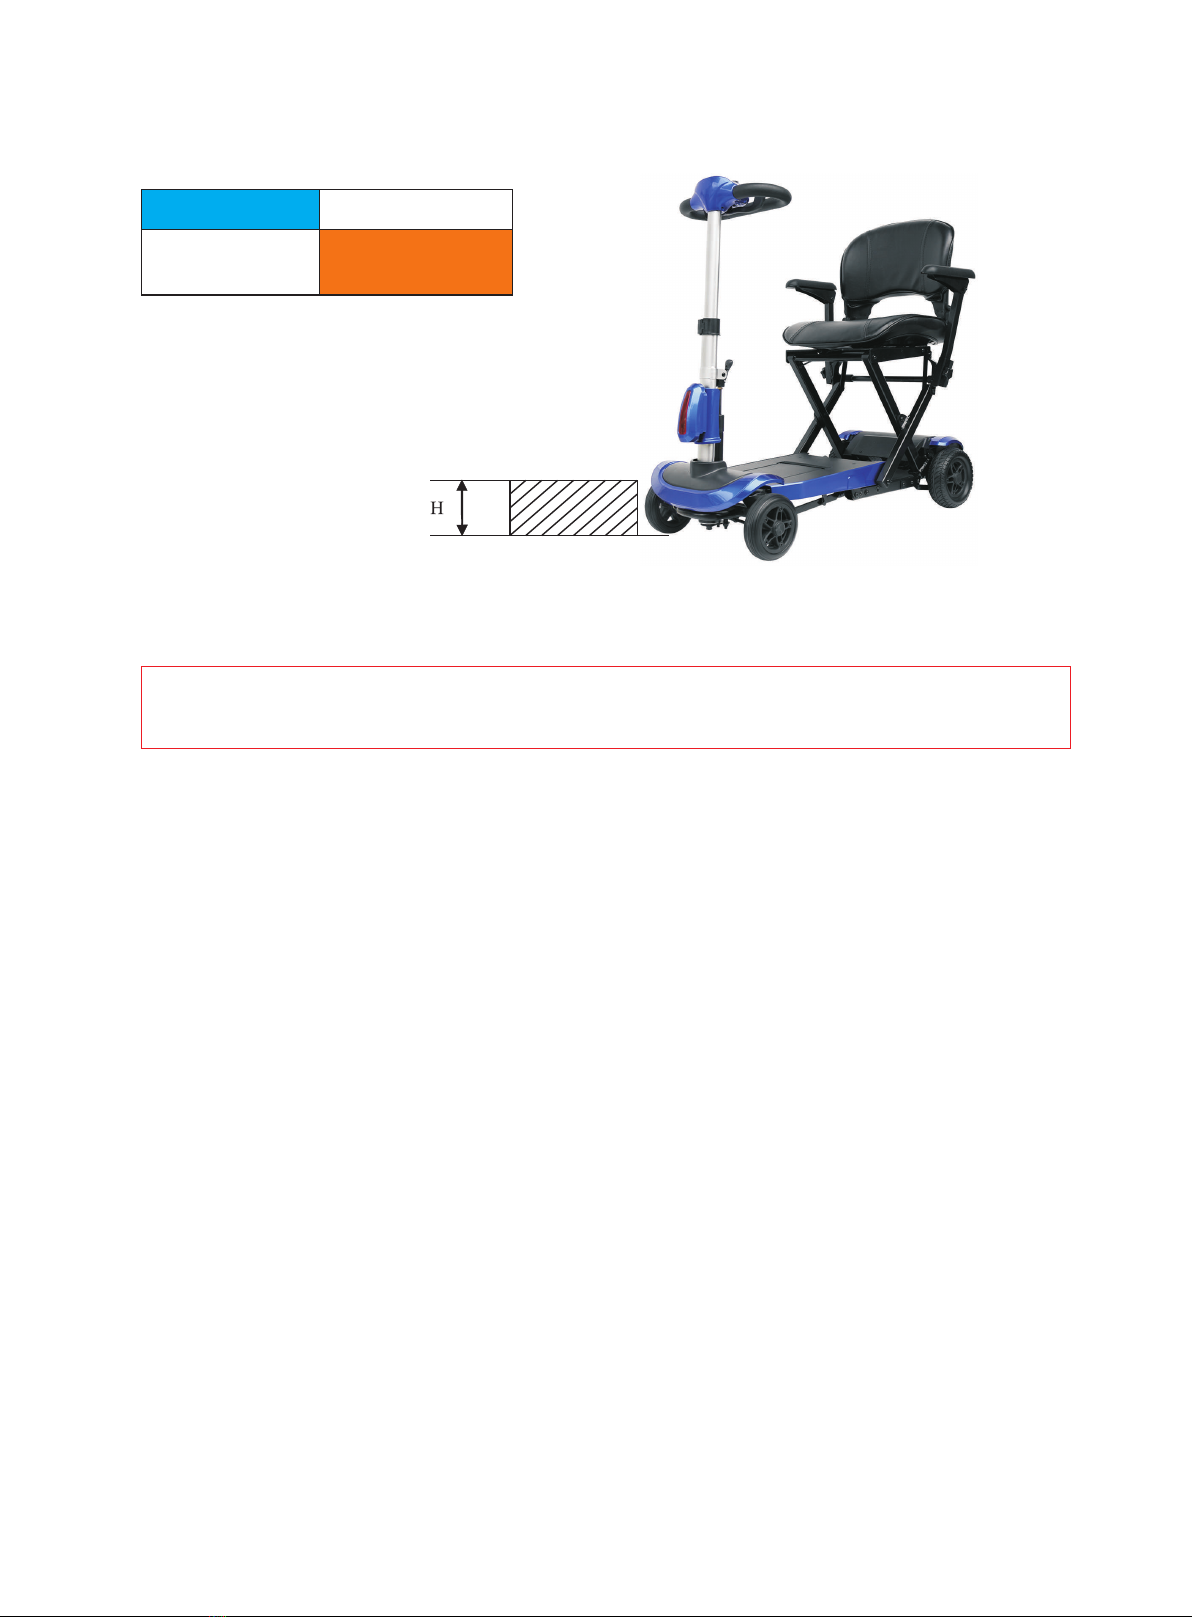
The overall design of The GENIE is full of modern recreational flavor. It's safe and comfortable,
easy operation, convenient to be folded and carried, lightweight and steady. It mainly has the following
characteristics:
1. The frame is consisting of advanced aluminum alloy with features of light, strong and durable.
2. It can be folded and unfolded without any tool used. Easy operation.
3. Seat, front and rear frames can be folded, which make it easy to carry.
4. It can be put in the trunk or take it with you when taking the public transportation for its light weight
and small size
5. Battery is easy to load and unload, and also convenient for user to carry.
6. Comfortable—with the ergonomic seat and the handle tube can be adjusted to a comfortable height
and gradient.
7. 6 inch solid front tires and 7 inch solid rear tires.
8. Start smoothly and brake flexible and stableBody shape, the stream is beautiful and elegant, surface
is smooth and bright, environmental protection and durable.
In conclusion, The GENIE is a unique scooter, for middle age, elderly, disabled, walking
weak and lack endurance elder people, cripple or physically disabled people. The scooter is a trustworthy
product. It also used for theme park, amusement park, zoo, museum etc. , meanwhile it is ideal ride
ead of walking, shopping tools for middle aged and elderly people.(Fig.3 )
difficulties,
inst
Fig.3
4
+
+

5
Fig.4 Unfolded Size Fig.5 Folded Size
Model
Overall Length
Overall Width
Tires (solid wheels)
Maximum Speed
Safe Gradient /
Maximum Gradient
Range Up To
Turning Circle
Weight (without battery pack)
Color
Maximum Weight Capacity
Seat Height (from the ground)
Battery
Motor
Battery Charger
GENIE
0.96 m (37.9 in)
Tire Size Front 6 x 1.5
Tire Size Rear 7 x 2.36 in
0.45 m (17.7 in)
6 km/h (3.7 mph)
0-12°
15 km (9.32 miles)
1.4 m (55 )in
24 kgs (53 lbs)
125 kgs
0.56 m (22 )in
24V 120W
Specifications
Brake
Drive system
Handlebar
Intelligent, Regenerative, and Electromagnetic
S-drive 45A
PU Foam
Seat Width 0.43 m (17 in)
Product Specifications and
Relevant Parameters
Dynamic Type/Lithum Battery, 25.9V 10Ah
29.4V 2A
+
965mm
450mm
940mm
640mm
450mm
450mm
6
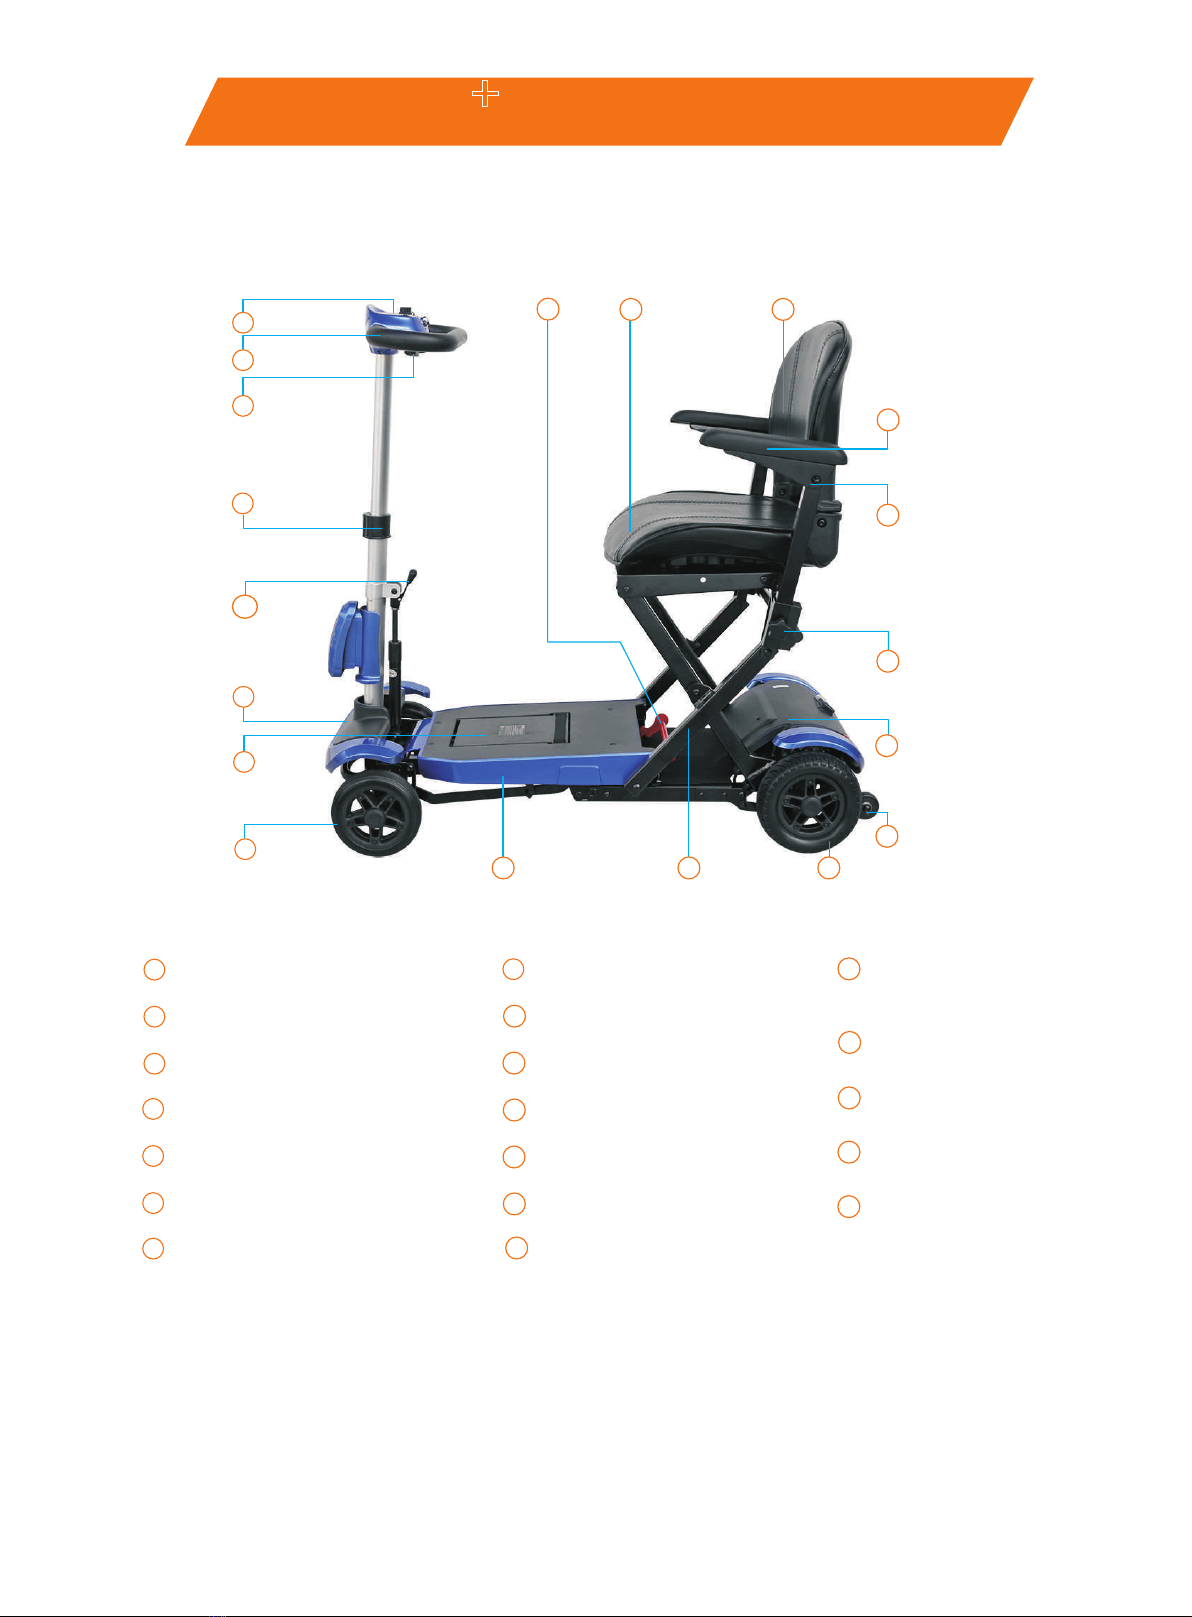
Main Parts and Relevant Function
Control Panel
The control panel is an operating controlling component, which is mainly to control the connecting and
cutting of the power, moving forward and backward as well as show the battery level. It consists of
power switch (Key switch/rocker switch), speed control switch, direction control lever, battery condition
indicator, control panel, top and bottom cover, etc.(Fig.6 )
Battery Condition
Indicator
Direction
Control Lever
Top and Bottom Cover
Speed Control Switch
Horn Button Handle
Key Switch
Control Panel
Fig.6
Notice: Do not put the control panel in the humid area. If the control panel has been affected by
moisture before using, please ensure it is dry when you operate it.
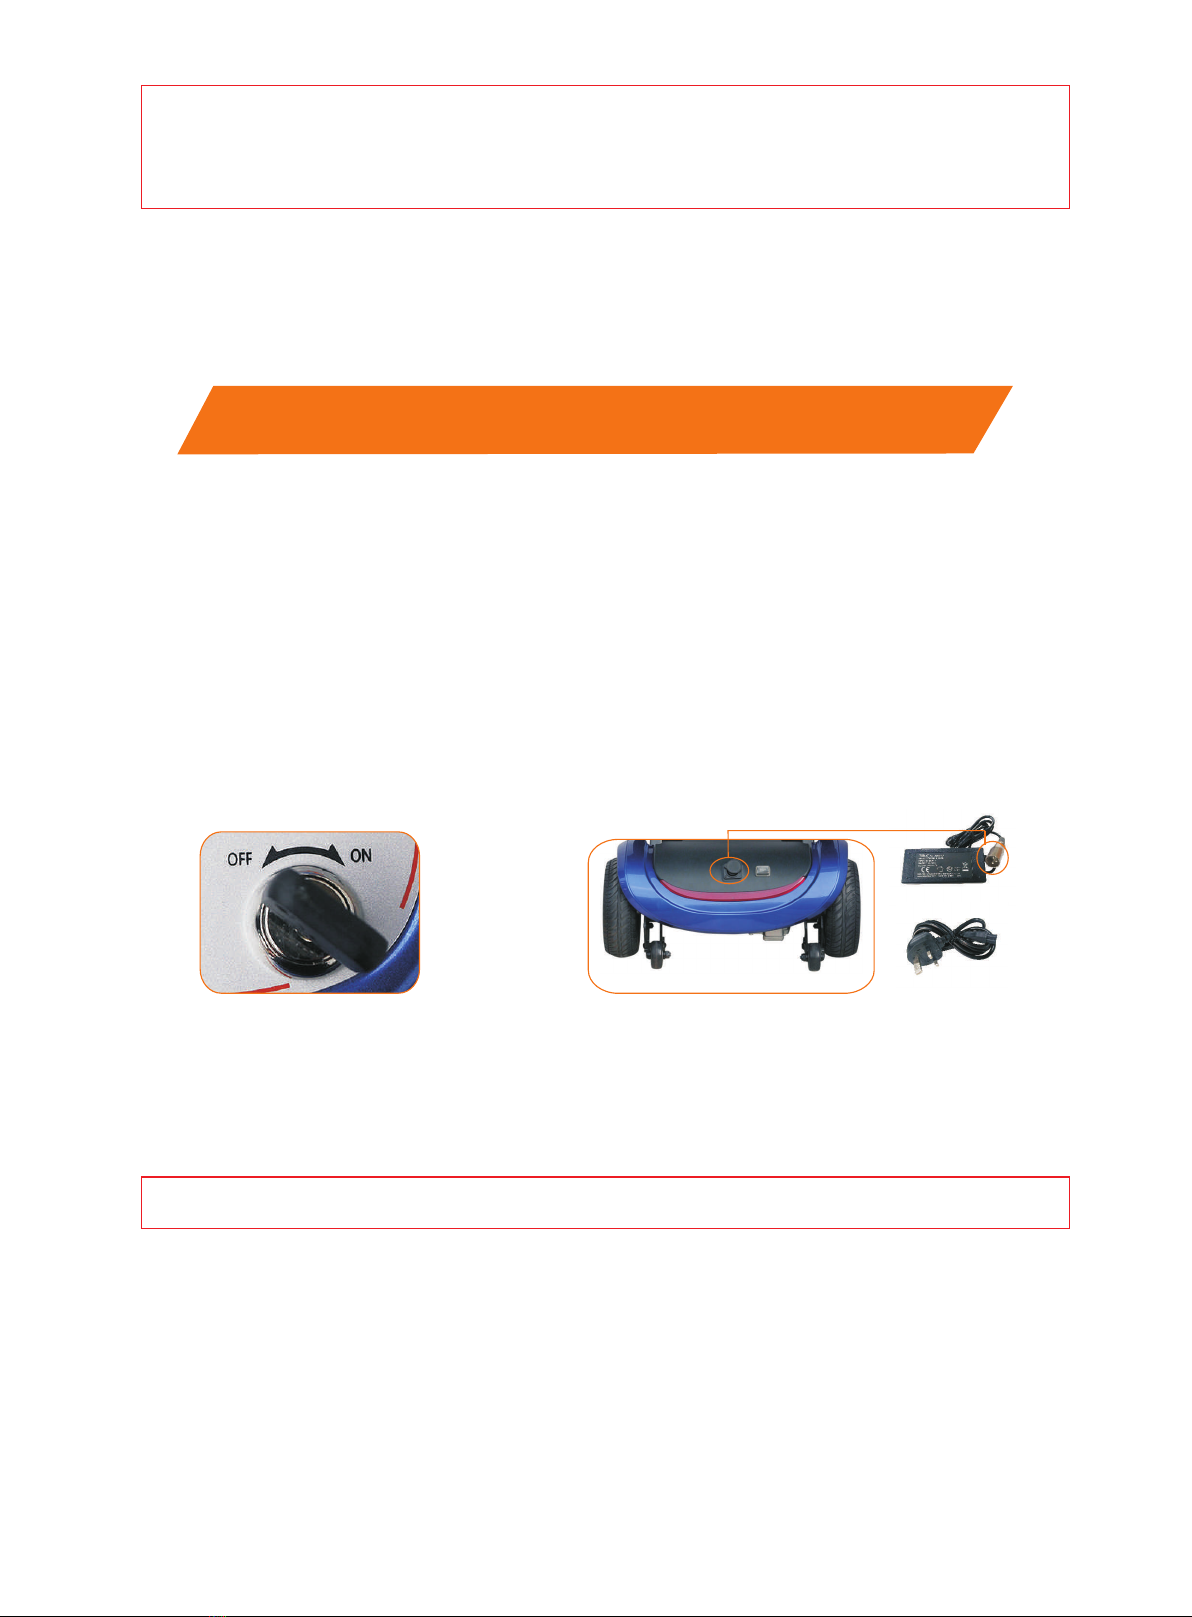
Power Switch
Key switch (Fig.7 )
1. Turn the key switch clockwise to ON, can drive.
2. Turn the key switch anticlockwise to OFF, can't drive. Please turn the
power off when stop driving.
Warning: If turn off the battery during operating. The electromagnetic brake will
your scooter will stop suddenly.
be locked and
Speed Controller (Fig.8 )
The speed controller is used for controlling the speed when
driving. You can set the speed from 0km/h to 6km/h. When you
adjust the knob to the left end (the tortoise ), it's the minimum
speed; when you adjust the knob to the right end (the rabbit),
it's the maximum speed.
Warning: when you turning or driving backward, please do not adjust the speed
speed.
to the maximum
Fig.8
Fig.7
7
Fig.9
Fig.10
Fig.11
Fig.12 Fig.13
Open the handle switch outward (Fig. 12) and make it in loose state. Then the handle
back down. Buckle up the handle switch after the handle drawtube draw back in place (Fig.13 ).
drawtube will draw
Telescopic Handle
When you press the button, it will sound the beeping alarm.
In order to prevent accidents and injury, please use it in time.
Horn Button (Fig.11 )
● Hold the rubber handlebar with both hands.
● Pull the control lever on the right, the scooter will go forward.
● Pull the control lever on the left the scooter will go backward.
● When the scooter moves backward, the horn will start the beeping.
● The control lever will return to the center position when released
and the brake will be locked.
The direction control lever is used to control the forward and
backward.
Direction Control Lever (Fig.10 )
Power Indicator (Fig.9 )
Switch the rocker switch to[ON],the power indicator will show the
power condition. Green means the power is enough; yellow means
the power is weak; red means it needs recharging.

8
Fig.14
A - Fold Button
B - Unfold Button
Fig.15
Fig.16
Fig.17
Controller
Controller is fixed in the rear cover and it receives the signal from the control panel and transfers the
signal to motor, brake and bulb.
Notice: Do not store the controller in the moisture environment. If the controller
by moisture, make sure to dry it before operation.
hasbeen affected
Brake
GENIE install the electromagnetic brake and it can not brake by manual. You can raise the headstock
to move the scooter or pull the scooter after fold.
Motor/Transmission component
Motor/ Transmission component as a mechanical and electrical part will convert the electrical energy
rear wheel drive.
to
Remote control[automatic] (Fig. 14)
Automatically Unfold and Fold the
scooter by remotes:
Genies install the electromagnetic brake and
it can not brake by manual. You can raise the
headstock to move the scooter or pull the
scooter after fold.
1. Press B button and do not release your hand.
2. Scooter will folding automatic (Fig.15-16 )
3. After folded completely ,you will hear “click” sound.
Then release your hand.
4. Press A button and do not release your hand.
Unfolding totally (Fig.17)
Folding operation
+

The Folding and Unfolding
Fig.18
Fold Unfold
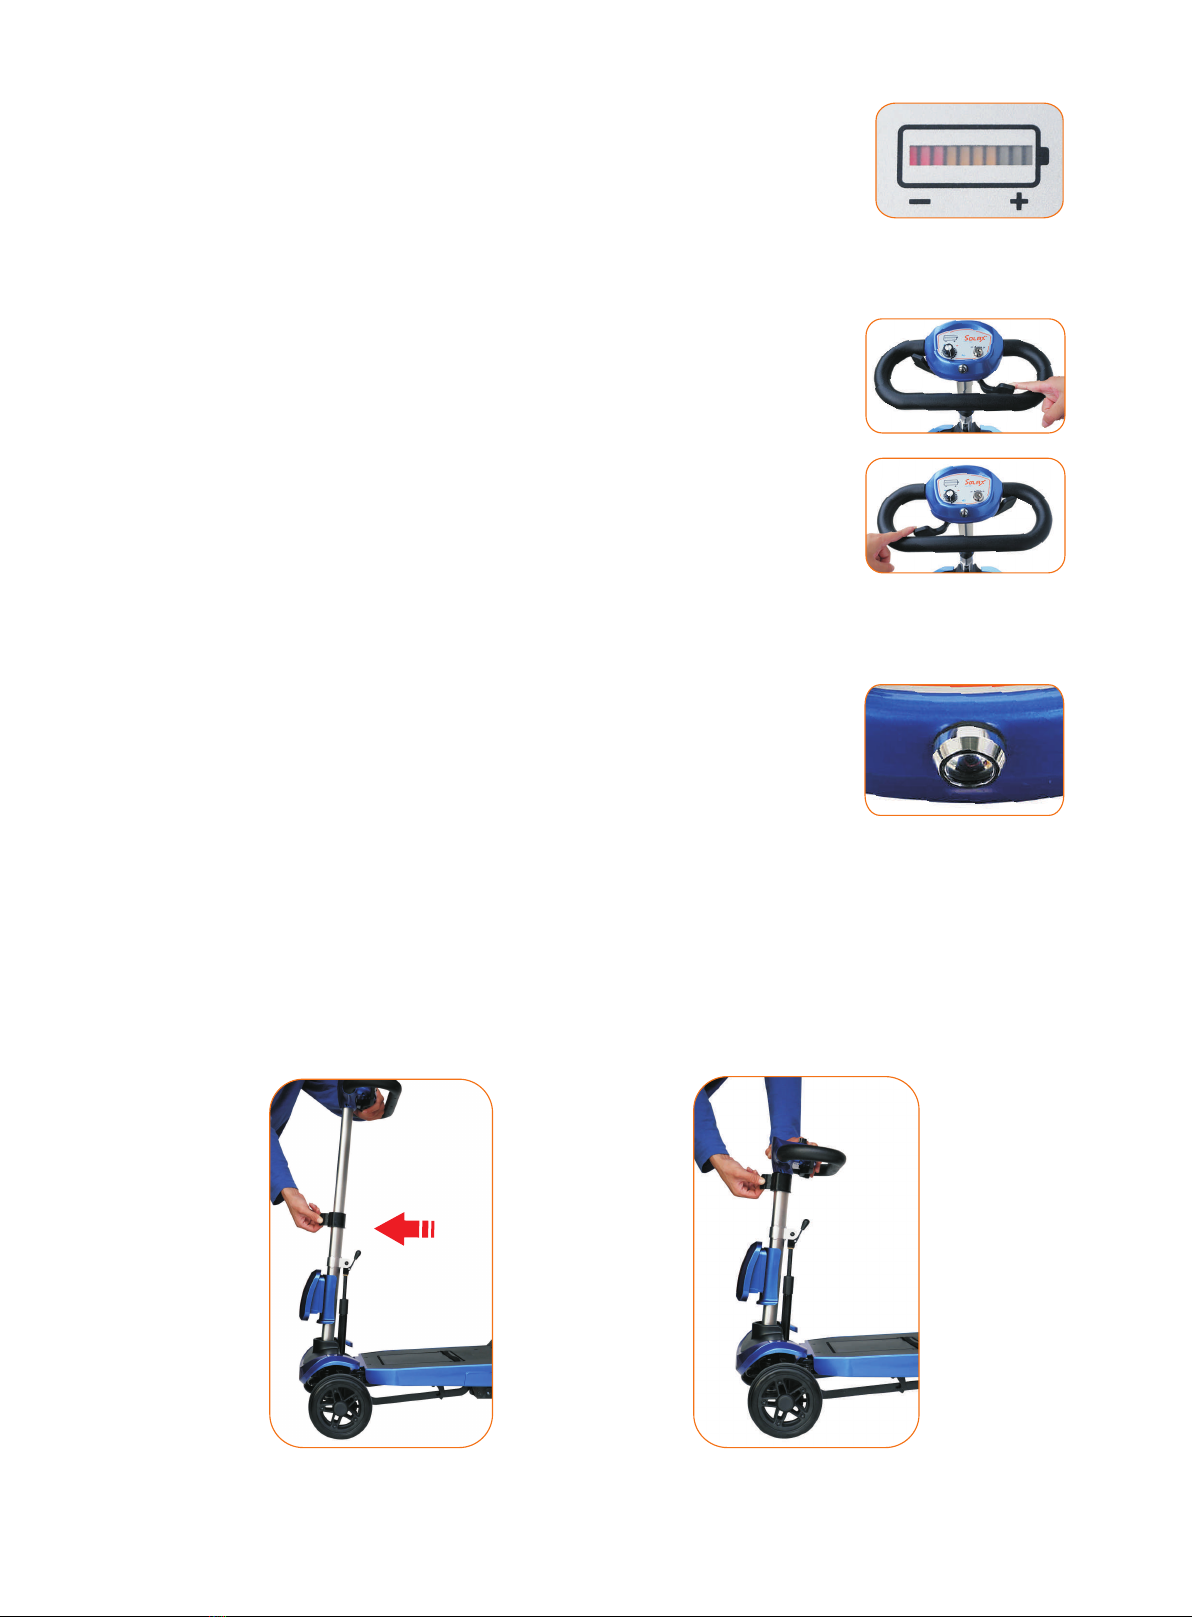
Manual for unfolding:(Fig.19-22)
Note: The manual one don't have the automatic function and remote control. The folding and
unfolding operation, please reference to the “Folding and unfolding”.
Automatic Fold Switch on the scooter (Fig.18 )
● Open the outer carton, the remote contorl and scooter has been matched well.
● Put the battery into battery box. "A" mean open. "B" mean close.
● When the remote control didn't match with the scooter, or use another remote contol.
● Please take out the battery from the battery box, wait for 5 seconds, then put the battery back to
box, long press "A" button for 5 seconds.
battery
● If you can heard a ticking sound the unlimited controller, that means it works.
● If you haven't heard a ticking sound, please match it again.
9
1.Leave folded scooter on the
smooth ground.
2.Pull the manual switch forward
(to the tiller direction)
3.One hand on the front tiller the
other one on the seat, move
reverse to unfold the car.
4.Pushh down the foot pad
until .“click”
Fig.19 Fig.20
Fig.21 Fig.22

10
Safety Requirements
Please read this manual before driving the scooter.
● Make sure about your physical condition before driving the scooter.
● The scooter can be used in the park and grass safely.
● Try to avoid driving in the loose gravel, covered soil and sandstone.
● Do not drive the scooter if you can't tell the condition of the roads.
● GENIE scooter can stride over an obstacle with a certain height, but you must minimize the
and slowly drive over the obstacle. (Fig.27 )speed
Driving Surface
The Scooter has the best stability under the normal driving conditions(such as dry level ground with the
constituent concrete or asphal). However. It may meet other grounds, such as grassland, gravel and etc.
So there are some requirements before riding the scooter :
1.Pull up the manual switch.
3.One hand on the front tiller
the other one on the seat to
fold the car.
4.Keep pushing until “click”.
2.keep pulling to fold the car.
Manual for folding:(Fig.23-26 )
Fig.23 Fig.24
Fig.25 Fig.26
+
11
Load Capacity Height
≤125 kgs
FIG.27
Warning: Do not exceed the specify climbing angle (0-12°). Please do follow the manual instruction
before operation.
Safety precautions
● Do not operate your scooter before you fully read and understand this manual.
● Do not carry passengers or drunk driving when you drive the scooter.
● Ensure the seat is fixed and fastened.
● Please slow down when driving on the uneven or soft ground.
● Please slow down before turning.
● Do not park on slopes.
● Approach slope end, slopes, raised group and unprotected edge zone (such as curbside, vestibule
and stairs ets.) with extra care.
● Changing initial setting or refitting your scooter is forbidden.
● Please be careful when driving in the busy steets, market or shopping center; driving in the unsafe
zone. Prohibited area is forbidden. Please consult local authorities about the traffic rules for scooters.
● Hold the handle with both hands and put both feet on the footboard when driving.
● Using your scooter as a seat on moving vehicle is forbidden.
● Please ensure the safety of the batteries when your scooter is on the other vehicles for transportation.
● Climbing or driving along the edges of roads is forbidden, otherwise, the scooter will be
permanently.
damaged
● Do not exceed the maximum tolerance gradient when driving.
● Do not carry passengers or exceed the maximum weight capacity.
● Do not reverse on uneven slopes or uneven ground; be careful when passing over slopes.
36 mm
12
Then open the rear charging
socket and insert the plug
Close the ship stype
switch or key switch
FIG.28
Battery and Battery Charging
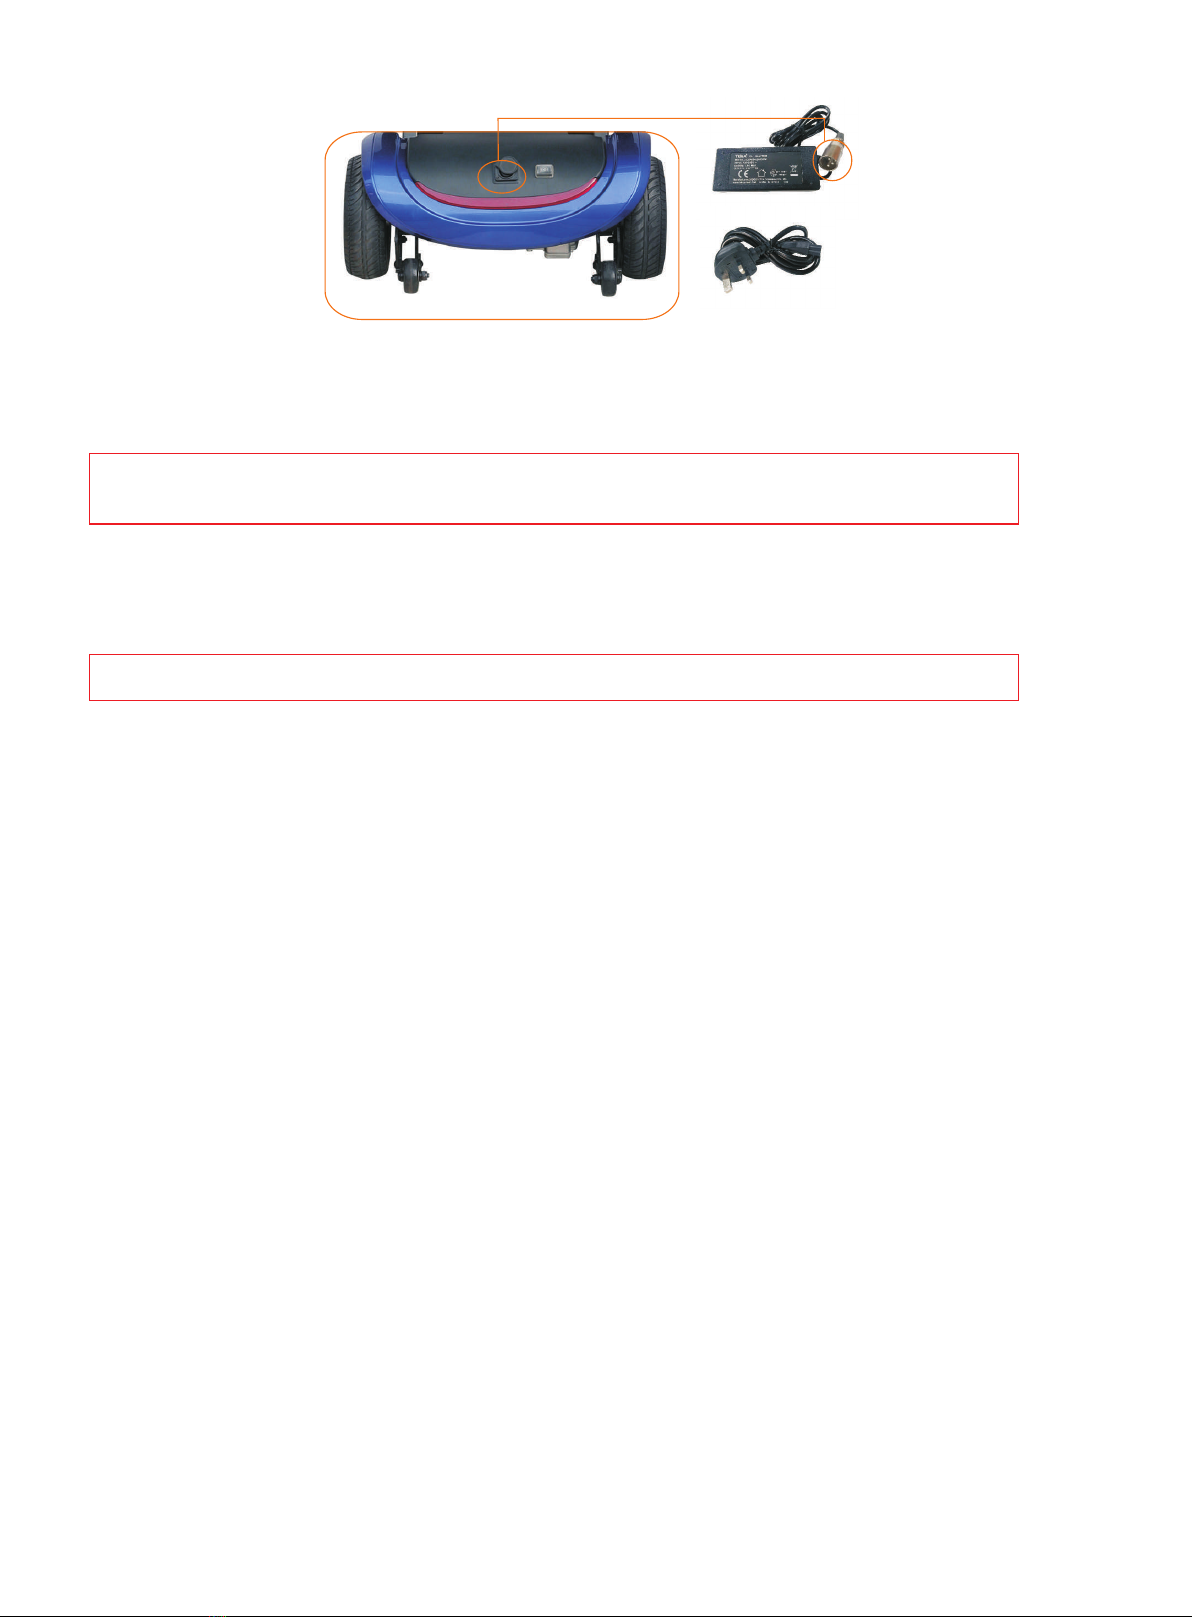
2. Insert one end of the AC power wire into the scoket of household power then insert the other plug
the socket of the charger. ( FIG.29 ) Verify the connection before you turn on the main power switch.
Red light indicates power on, orange light indicates on charging and green light means fully charged.
into
Warning: Match the charger socket and charger plug properly.
1. Close (the ship stype switch or key switch) and place the charger. Then switch off its power and open
the bottom charger cap and insert the plug into the charge socket. (FIG.28 )
The guide for charging steps:
● Charge the battery before the first operation. Please charge the battery every 3 months.
● If you don't use your scooter for a long time, please take off after charging full. Do not put in the scooter.
This scooter is designed with one maintenance free of power Li-polymer battery with a long usage time
as well as a long useful life. Charging with a 29.4V/2A charger makes it easy to use.
Warning: The battery should be protected in freezing temperature! Do not charge the frozen
battery. Otherwise, it will damage the battery and may cause personal injury.
Warning: Do not drive on freezing, slippery or salty ground, otherwise, you may suffer accident
and personal injury.
13
FIG.29
The charge time depend on the following elements:
● Driving scooter all day.
● Driving scooter occasionally for few times.
How often should charge the battery?
In order to charge safely and efficiently, we suggest using the charger supplied by original manufacturer.
Other chargers can be used?
There are two LED indicator lights in the charger. The red indicator light is the power indicator light.
Regarding the other one, it is orange when charging and it will become green when the battery is charged
fully. The red one will sometimes still on after pulling the charger plug out from the power socket; then you
may think there is some thing wrong with the charger, however, in fact, it needs seconds for the red light
to snuff out when the battery voltage is up to 26V.
How does the indicator light (LED) in charger display.
When the battery vollage is low, the battery charger outputs a large current to charge the battery. When
battery vollage is close to full, the battery charger outputs a small current.
When battery is full, the battery charger will output very little current which is almost zero. Therefore.
The battery will continually charge after connecting the charge, but will not overcharge. It is better to
charge no more than 24 hours.
How does charger work?
Guide to safe and lasting battery
Note: The scooter has a self-locking function to prevent driving when you charge the battery.
4. If the red light is off when the power on, please check whether the power plug is properly inserted.
5. Normally allows 8-14 hours for charging.
Warning: You must turn off the power switch once the battery is fully charged and then
the plug otherwise you may shorten the working life of the battery.
take out
3. Turn off the power switch first when the battery is fully charged. Then take out the DC charging
connector before you take out the AC input power socket.

14
Following information will offer the safe and reliable charge method.
● If you driving scooter everyday, you should charge it after using. So that it is convenient for you to use
it next day. Charging of the battery should be vary from 8 up to 12 hours.
● If driving scooter once a week, then charge battery once a week. Charging the battery should be vary
from 12 up to 14 hours.
● Make sure your battery fully charged and saturation.
How can you get the maximum operating distance?
Some driving conditions such as hills, sidewalk gaps, uneven and soft surface, turning and against the
wind will affect the driving distance and time after per battery charging.
Several methods for obtaining the maximum driving distance
● Fully charged your battery before driving it.
● Avoid hills, gaps, macadam and soft surface.
● Only to carry the necessities and reduce the luggage weight.
● Keep a constant speed.
● Avoid intermittent driving.
Warning: Please do not dismantle the battery and do not add water. Failure to observe Li-polymer
this note will invalidate the warranty, and damage the battery and scooter.
Why the power of the new battery is weak?
Deep-cycle battery uses the unique chemical technology and design. It can be charged quickly and can
be used for a long time after full-charged. The battery is fully charged already before leaving the factory,
but may change its initial performance during the transportation due to the temperature. The power of
the battery will lose in high temperature and it will extend the charging time in low temperature. The
battery needs few days to adapt to the surrounding environment before it gets stable performance.
More importantly, deep-cycle battery can only get high performance after using for several times of
charging-discharging cycles.
Please follow the steps to improve the battery performance as below:
1. New battery must be fully charged before using and it can reach 88% capacity.
2. Please drive in the safe and the familiar area. Low speed is recommended at the first time. Do not
travel too far until you are familiar with the operation and the battery should be fully charged.
3. Please give the battery another fully charging after operated it in the second times and this will make
the battery up to 90% capacity.
4. The battery capacity will top to 100% and extend the driving time after four to five charging and
discharging cycles.
How to ensure the battery life?
A fully charged battery will provide good performance and extend battery life, so keep the battery full
charged whenever possible. It will affect performance and shorten battery life if you over discharging,
seldom charging or do not fully charge.

15
1. Make scooter fully stopped
2. Off the switch and remove the key or press the rocker switch “OFF”.
3. Get down scooter in safety.
4. Fold the scooter according to the instruction: pictures FIG.23 to 26.
Finish operating
Please follow the instructions after you choose your route:
● Please unfold the scooter fully according to the instruction (picture19-22) after you read the manual.
● Unfold the seat to right position, and adjust the tiller for the suitable position, then lock it.
● Please seat on the seat and grasp the handlebars, then turn on the power switch.
● Press the speed control lever gently by your right thumb.
● Brake releases automatically and scooter will move forward (Remark: do not press the speed control
lever too fast)
● Push right handlebar moves scooter turn left when operating.
● Push left handlebar moves scooter turn right when operating.
● Steer the handlebar in the middle, scooter will move in forward direction.
● Release the speed control lever, until scooter has slowed down or fully stopped.
● Brake can be automatic locked when scooter fully stopped.
Driving
● Please inspect the battery is fully charged or not. (Refers to “6. Battery and Battery Charging)
● Please make sure you know the route well. (Including the crowd, animal, obstacle)
● Avoid the un-flat and slope road condition.
● Check if the key is inserted into the key switch or the end of rocker switch is pressed.
(Refers to “3. Function Introduction”)
● Make sure your hands are steering the handle bar. (Refers to “3. Function Introduction”)
● Please check the horn is working or not.
Please check the tiller quick release is locked or not.
Inspection before operating:
If you will leave the scooter for a long time, please lay a plate under the footboard to support scooter.
It can reduce stains of tires when wheels pressing on the ground.
Warning: If battery was frost, it should be kept warming for several days before charging.
Operation Instruction
If you don't operate your scooter, please follow the instructions:
● Charge your battery fully before you store it.
● Disconnect the battery from controller attachment joint.
● Store your scooter in a dry and warm place.
● Avoid to store scooter in temperature variation place.
How to store scooter and battery?

16
● The components have injected lubricant and are sealed; therefore, it is unnecessary to inject lubricant
any more.
● Protect all the electronic components from moisture, such as control panel, battery charger and other
electric controlled components.
● If some components become damp, please dry it before use.
Bearings and Motor/ Transmission Parts
● Control panel, front cover, footboard and back cover are all made by durable ABS plastic with baking
finish on the surface. Do not use oil or other chemical liquids to wipe the scooter. In order to prevent the
electrical components from damage, do not wash the scooter from the tap directly.
ABS Plastic Cover
● Check all the wire connectors regularly.
● Check all the wiring insulation condition, including the plug of the charger regularly.
● Repair or change the damaged connector and connector joint.
Wire Connector
● Ensure the electrode connections are tight and have no corrosion.
● The battery should be placed flatly inside the battery holder.
The connection of the battery and electrodes
There are few parts of SOLAX scooter require maintenance.
The following issues must be checked and maintained periodically:
If met the problem that you can not solve it by yourself, please contact your dealer for further consult
and assistance.
● Battery capacity is insufficient.
● Battery aging.
Speed suddenly slows down when driving
● Battery line is loose.
● Motor carton bush is damaged.
Scooter can not work continually when you are driving it
● Please check the key is inserted into the switch /rocker switch, and keep it “ON”.
● Check it if the battery is fully charged or not. (Refers to “6. Battery and Battery Charging”)
● If the battery capacity is insufficient, please increase the charging time/ cycles. (Refers to “6. Battery
and Battery Charging”)
● If the issue continued, then battery capacity testing is needed.
The main reason is battery without sufficient capacity or performance declined, and most of the electrical
equipment issue can be solved by yourself.
Maintenance
Basic Troubleshooting

17
Warranty Statement
Materials, manufacturing or assembling problems under the normal usage is
for the repair or replacement of parts.
responsibility of the dealer
Warranty Exclusions:
1. Failure to follow the proper use of operation and maintenance;
2. Not using regular spare parts and cause damage;
3. Mechanical damage cause by accidents;
4. Consumables such as the inner core and outer tires, bearings, light bulbs, etc.
limits of warranty;
are not covered in the
5. Any unauthorized changes to vehicle design;
6. Any nature disasters or accidents such as typhoons, hurricanes, floods and earthquakes.
months warranty
(Stamp or Signture)
Phone No. and
Address
Warranty Period
User Name
Electric Vehicle Product Warranty Card
Solax Technology Limited
Address
Model
Purchasing Date
Manufacturer
Dealer
12 months warranty from purchasing date, battery is 6
Solax Technology Limited
YMD
ID No.
Phone No.
Item No.
This manual suits for next models
1
Other Solax Scooter manuals


Popular Scooter manuals by other brands


Yamaha
Yamaha MAJESTY 400 owner's manual

Jiangsu Niu Electric Technology
Jiangsu Niu Electric Technology N1S Operation & maintenance manual

Trikke
Trikke uPT owner's manual

Baja motorsports
Baja motorsports SC50 owner's manual

Denver Electronics
Denver Electronics DBO-10050 MK2 instructions

Yamaha
Yamaha SLIDER EW50 NAKED owner's manual


