Hiboy NEX5 User manual

The manufacturer reserves the right to make changes to the product and manual at any time
Visit www.hiboy.com to download the latest user materials
ELECTRIC SCOOTER
USER MANUAL
1.
2.
3.
4.
5.
6.
7.
8.
9.
10.
11.
12.
13.
Unfolding Steps
Folding Instruction
Charging
Handlebar Operation Instructions
Riding Instructions
Safety Notice
Safety Instructions
Daily Care and Maintenance
14. 22
Specifications
Limited Warranty Statement
Assembly
Product Overview
LED Display
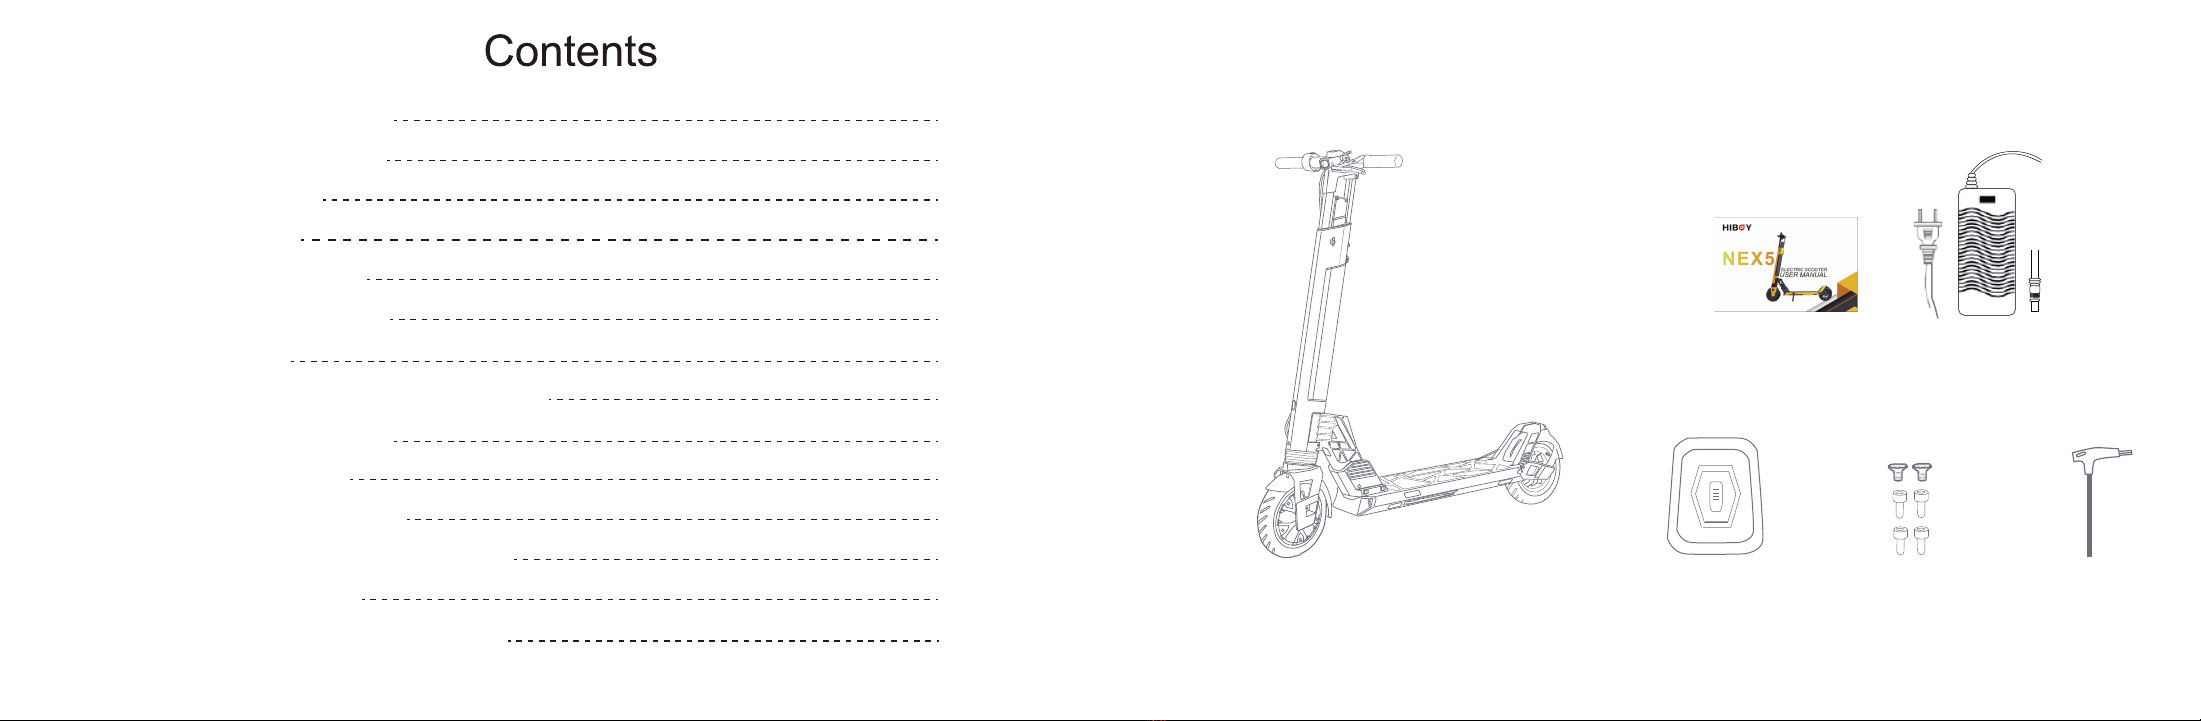
1. Package Contents
Package Contents
Carefully check package contents, if anything is missing or
damaged, please contact Hiboy customer service for support:
us.support@hiboy.com
Manual
Screws*6 Hex key
Power adapter
Charger base
1
01
02
03
05
07
08
09
11
12
14
18
19
20

80%-100% 60%-80% 40%-60% 20%-40% <20%
M1-M5 Light up M1-M4 Light up M1-M3 Light up M1-M2 Light up M1 Flash
2. Product Overview 3. LED Display
3
2
Display
Bell
Disc Brake Lever
Controller
Lithium Battery 1
Headlight
Alert Cruise Control
Bluetooth
Speed Mode
Real-Time Speed
Throttle Strength
Battery
Pedestrian mode
Brake Strength
Total Mileage
Non-slip Silicone Pad
Rear Fender
Built-in Shock
Absorption System
Rear Wheel
Kickstand
Front Wheel
Built-in Shock Absorption System
Charging Port
LED Front Light
Right Thumb Accelerator
Power / Gear / Headlight Switch
Lithium Battery 2
Folding Lock
Battery Display
Each battery bar represents 20% power, when the battery is below 20%, the battery bar will flash.

Function
Headlight
Pedestrian
Brake Strength
Total Mileage
Alert
Cruise Control
Speed Mode
Throttle Strength
Real-Time Speed
Zero/Non-Zero start
(Not on the screen)
Bluetooth Download "HIBOY NEX5" from "App store"(iPhone) or "Google Play"(Android), then connect to your scooter.
Description
When the scooter is on, press the power button one time will turn on/off the light.
Double press the power button to activate pedestrian mode
Light up when you press the brake, each bar indicates 15% strength.
Default current mileage, short press 4 times to display total mileage, 5 seconds switch back to the default.
When the alert lights up, check page 24 for more detail about error code.
Turn on/off the cruise control on App. When the icon lights up, you have activated cruise.
Double press to switch modes. Modes can be set to pedestrian mode, Level 1, Level 2, Level 3.
Light up when you press the throttle, each bar indicates 15% strength.
Showing the real-time speed with MPH or KM/H. Change the speed unit on the App.
Triple press the power button to switch the non-zero or zero mode.
1. Unfold the scooter and open the kickstand
(Refer to Unfolding Instructions on page 7)
2. Faucet butt wiring, butt up and down
HIBOY NEX5 APP
Download "HIBOY NEX5" from "App Store"(iPhone) or "Google Play"(Android),
or scan the QR code to download the APP, then connect to your scooter.
1. Install the App.(Please keep the Bluetooth on)
2. Register: Enter the Email to obtain the verification code and set the login password.
3. Login: Use the Email and the password to login.
4. After successful login, click on the Bluetooth search, select the scooter name that needs
to be connected (the scooter that has bound to can be directly connected).
(Refer to unfolding instructions)
Up and down docking faucet connection
Align the upper and lower screw holes
a. Open the carriage support downwards
b. Flip the lock down
c. Pull the folding handle up and out
d. Press the lock inward to lock
4. Assembly
5
4
0
km/h
0 MILE 0.0 MPH

5. Unfolding Steps
1. Open the security lock upwards
then the shackle downwards 2. Open the kickstand
4. Push the Shackle inward then the
security lock inward until you hear a click
3. Lift the head of the scooter
Safety Tips: Make sure the shackle is locked before riding. You will hear a sound once you push the
shackle into the security lock. Do not put your hands near any moving parts when raising the front of the
scooter.
76
3. Use the allen wrench included in the
package to tighten the screws on the front of
the handlebar
Safety Tips: Before each ride, please check to ensure that the screws, folding switches and other link parts
are not loose.
4. Use the allen wrench included in the package
to tighten the screws, and check the power
switch after assembly

9
8
6. Folding Instruction
1. Open the security lock and
keep it still. Pull the shackle
downwards.
2. Press down and
fold the handle
3. Push the security lock
inward, then retract kickstand
complete folding.
Note: For your safety, it is recommended to switch the power off before folding.
7. Charging
1. Charging
Open the rubber protective
cover of the charging port
When the charger LED indicator is colored, this means it is charging, and when the charger indicator turns green, this means
the battery is fully charged.
Connect the charger After charging,cover the charging
port by the rubber protective cap.
WARNING!
Do not use this product while it is charging to avoid damage. It is recommended to charge at room temperature.

1110
2. Charging Base
Make sure the lock is under the lock line when you put battery back. You must turn the keyhole back to its original position to lock
the battery, otherwise, the battery may drop out.
Vertical means locked
Do Not Ride
Horizontal means unlock
1. Insert key 2. Turn right 3. Lift the lock up to the unlock line
and take out the battery.
8. Handlebar Operation Instructions
1. Hold the handlebar tightly with both hands, never with just one hand.
2. Hold the handlebar and turn left and right by twisting to that direction.
3. Do not rotate the handlebar 360 degrees.
4. The handbrake and bell are on the left side of the handlebar.
5. Use your left hand to operate the brake.
6. The button for power & gear switches are on the right side of the handlebar.
7. Press the right thumb accelerator to control the speed when riding.
8. Ring the bell when crossing crowded areas.
9. Front baskets are not allowed to be installed.
10. The HAV (Hand-arm vibration) of this scooter should not exceed 1.78 m/s2.
please check carefully to avoid unnecessary vibration.
(1) Do not hang heavy objects on the handlebars when riding, which will affect the stability of the scooter and cause potential safety
issues.
(2) Regularly check the tightness of the screw in the handle, whether the frame, fork, brake, and some other parts can be used
normally. If there is an issue found, please stop using the scooter and repair or replace the part properly.
WARNING!
lock
unlock
lock
unlock
13
12
9. Riding Instructions
1. Select an appropriate riding area.
2. Ride on a paved flat road.
3. Prepare the product according to the instructions and bring the protective gear.
4. Wear flat sneakers.
5. Keep away from vehicles and crowded areas.
Preparation for riding
1. Press the power button and turn on the scooter.
2. Put one foot on the scooter and the other foot on the ground.
3. Make the scooter body slide forwards and gently press the right thumb accelerator,
the scooter will slowly run forwards, when the scooter is running steadily, shift the other
foot onto the footboard.
The more you twist the accelerator, the faster you will move.
Note: For the riding safety, the NEX5 has non-zero start or zero start modes.
The accelerator cannot be used until the scooter is already moving forward for a certain
distance.
Riding
1. Under normal circumstances, if you hold the left brake lever, the motor will be
immediately powered off and subject to braking, the greater the holding force, the
greater the braking force.
2. Under emergency conditions, you can hold the left brake lever tightly to simultane-
ously enable the front electromagnetic brake and rear wheel friction brake. Be careful,
the brake will heat up quickly during use, do not touch.
Stop
Provide appropriate pre-cycling training by the dealer

14 15
10. Safety Notice
Note: Please read the following important safety information carefully before use and follow it.
1. This product is an electric scooter for adults. Usage is
limited to one person. Do not carry others at the same
time.The NEX5 is recommended for persons aged between
13 and 65 years old.
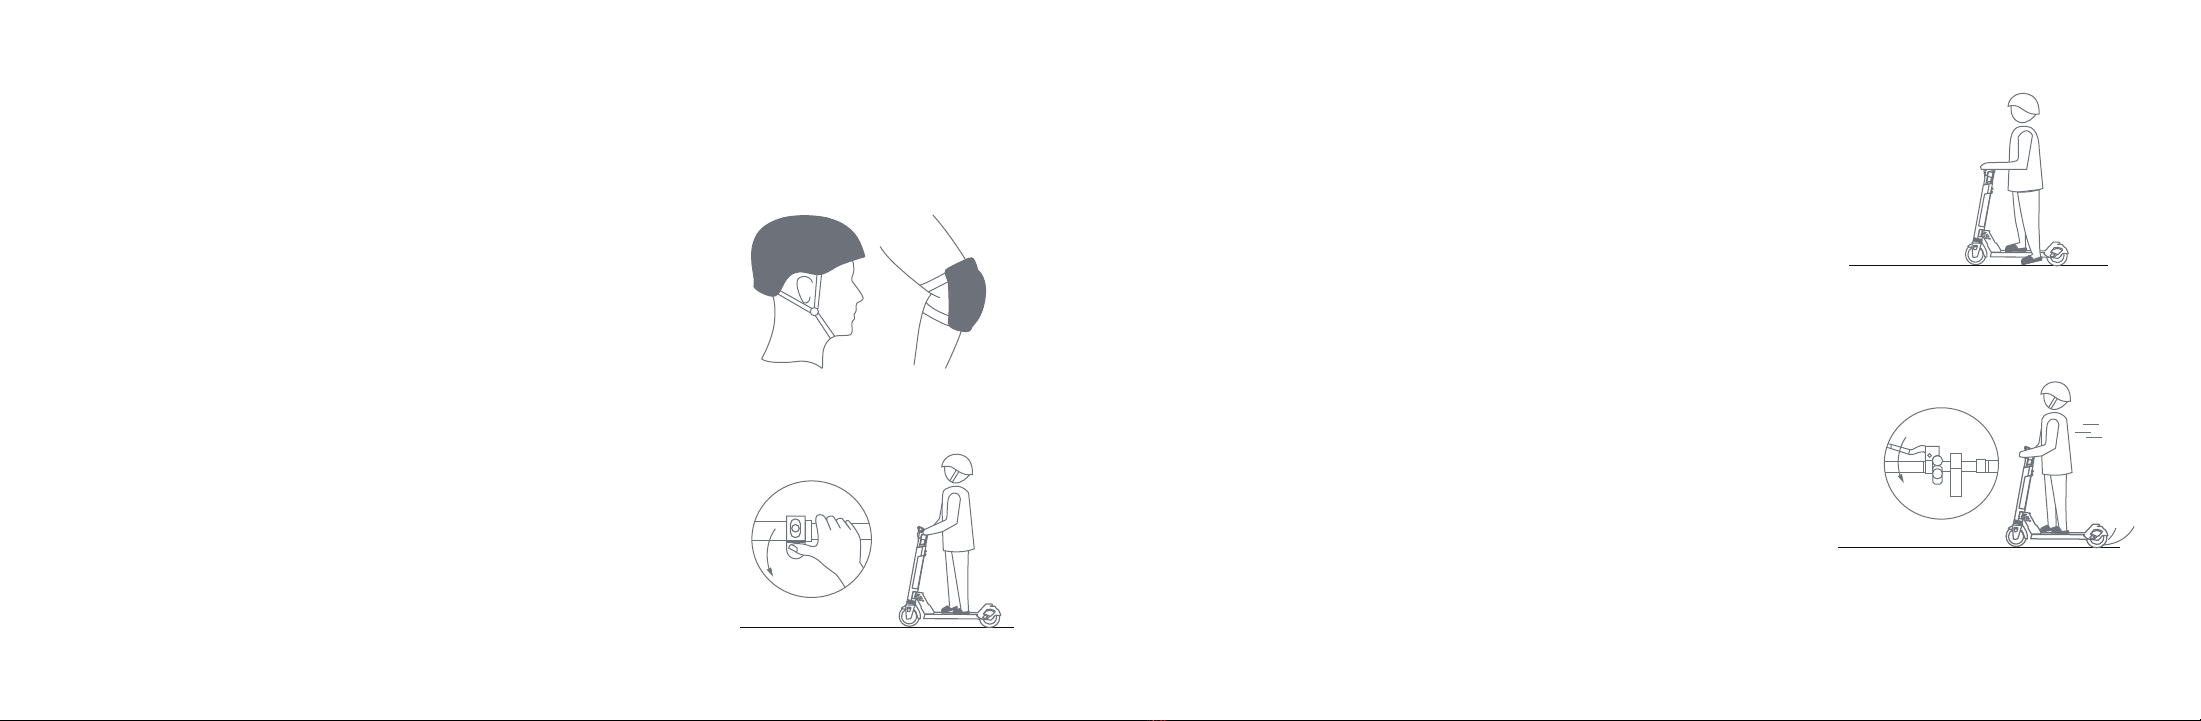
2. When riding the NEX5, please wear a safety
helmet and other protective equipment, as well as
well as fitting sports shoes.
3. Do not ride this product in unsafe or illegal places. 4. Please practice in an open area first, avoid riding
on a traffic line, and then use this product until you
are skilled in operation.
5. Do not take dangerous actions such as riding with one
hand while operating the NEX5 and keep both feet on the
scooter.
6. Do not go over bumps that are steeper than 1.2
inches. This may cause the scooter to overturn and
cause the injury to the driver or damage the
scooter. Bumps or potholes less than 3cm should
also be avoided as much as possible.
7. For your driving safety, please keep the speed within
15mph. Avoid using the NEX5 at night. If you are riding
after sunset, please switch on the lights and operate at
9.5mph or below.
8. Do not use the NEX5 in environments below
23°F (-5°C).
23°F
1. Press the power button and turn on the scooter.
2. Put one foot on the scooter and the other foot on the ground.
3. Make the scooter body slide forwards and gently press the right thumb accelerator,
the scooter will slowly run forwards, when the scooter is running steadily, shift the other
foot onto the footboard.
The more you twist the accelerator, the faster you will move.
16 17
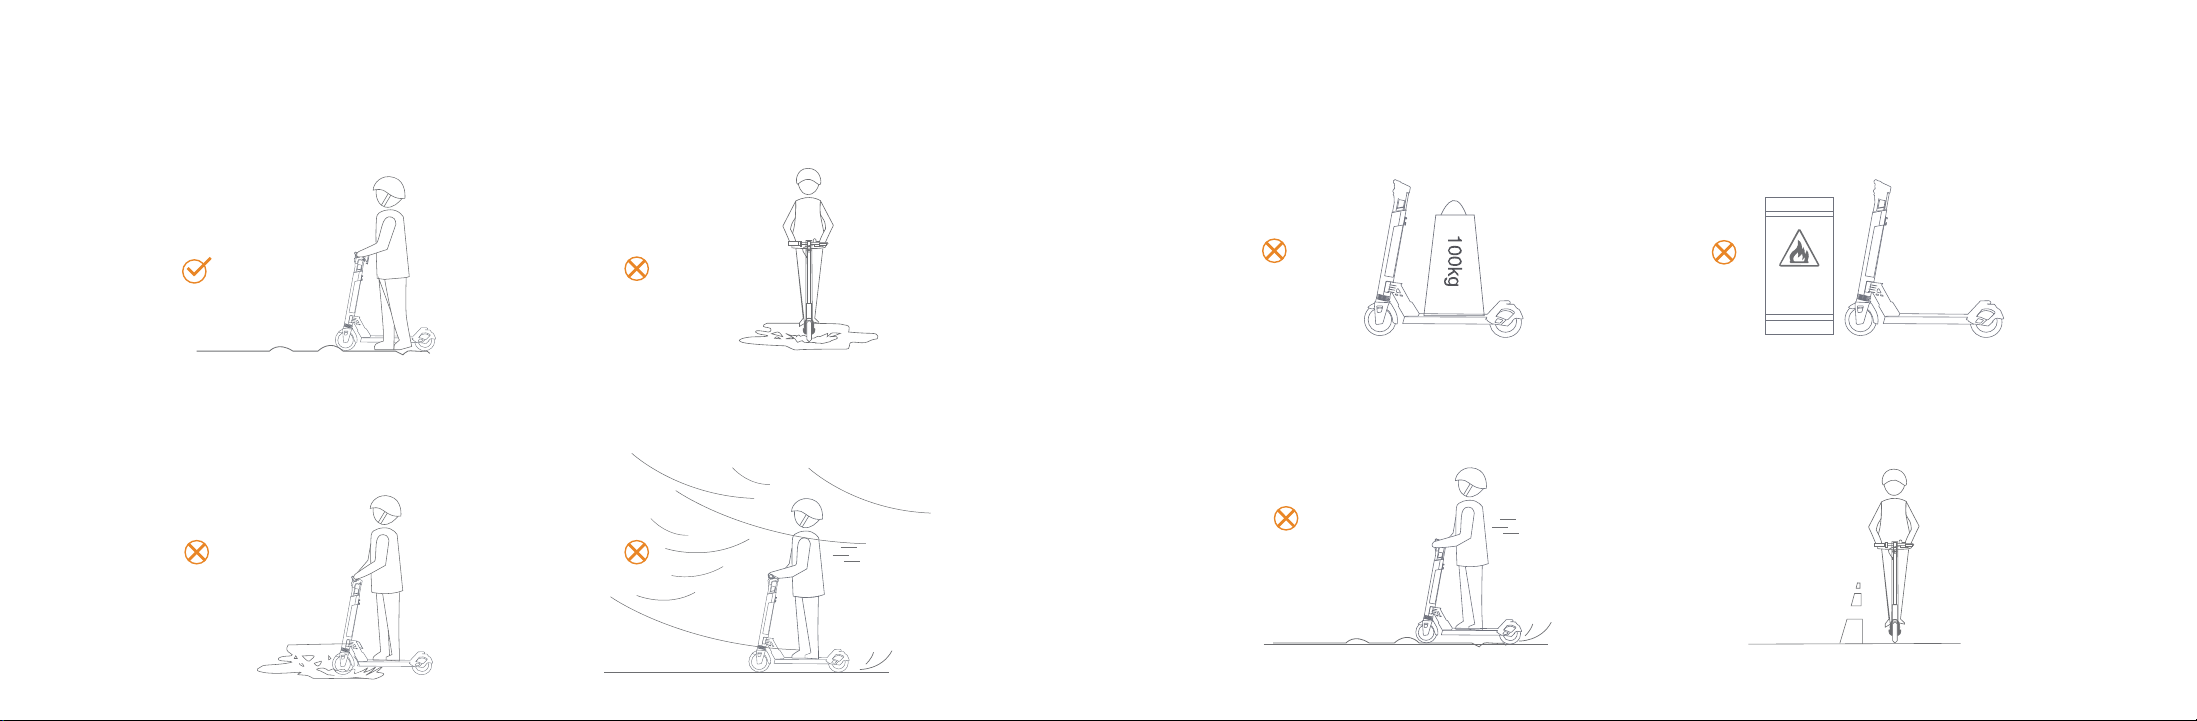
13. The user should use this product in accordance with
the relevant instructions in this product manual, and not
exceed the load that the NEX5 can bear (Maximum weight:
220lbs).
14. Please avoid using or placing the NEX5 in high
or low temperature environments. Please don't
store this product near flammable materials.
15. The scooter is a special riding product, please try to
ride on smooth roads and avoid potholes.
16. Ride legally in strict accordance with the local
laws and regulations.
9. In the event of bumps or poor road conditions, please
operate the NEX5 slowly or get off the scooter and manually
push until conditions improve.
10. Do not ride the NEX5 on oily terrains or icy
surfaces.
11. Do not immerse the product in water deeper than
1.5 inches to avoid damage to the electrical parts of the
vehicle.
12. In severe weather such as rain, snow, or strong
winds, please avoid riding as much as possible to
avoid possible damage. Ensure more distance
between cars to avoid sudden braking on rainy
days.
WATCH FOR FIRES

18 19
11. Safety Instructions
The Hiboy NEX5 electric scooter is a leisure device. But once they're in a public area, they'll be seen as vehicles, subjecting to any
risks faced by vehicles. For your safety, please follow instructions in the manual and traffic laws and regulations set forth by
government and regulatory agencies.
● At the same time, you should understand that risks cannot be entirely avoided as others may violate traffic regulations and drive
incautiously, and you're exposed to road accidents just as when you're walking or biking. The faster the scooter is, the longer it
takes to stop. On a smooth surface, the scooter may slip, lose balance, and even result in a fall. Thus it is crucial that you use
caution, keep proper speed and distance, especially so when you're unfamiliar with the place.
● Respect pedestrians' Right of Way. Try not to startle them while driving, especially children. When you ride from behind pedestri-
ans, ring your bell to give them a heads-up and slow your scooter to pass from their left (applicable to countries where vehicles drive
on the right). When you ride across pedestrians, keep to the right at a low speed. When you drive across pedestrians, keep the
lowest speed or getting off the vehicle.
● Closely follow the safety instructions in the manual. Hiboy shall not be liable for any financial losses, physical injuries, accidents,
legal disputes and other interest conflicts resulted from actions that violate user instructions.
● Do not lend your scooter to whoever doesn't know the operations. And when you do lend it to your friends, please take the
responsibility to ensure he/she knows the operation and wears the safety gear.
● Check the scooter before every use. When you note loosen parts, low battery alerts, excessive wear, strange sounds, malfunc-
tions and other abnormal conditions, stop riding.
● WARNING – Risk of Fire – No User Serviceable Parts.
12. Daily Care and Maintenance
Cleaning and storage
Battery maintenance
If you see stains on the scooter's body, wipe them off with a damp cloth. If the stains won't scrub off, put on some toothpaste, and
brush them with a toothbrush, then wipe them off with a damp cloth.
Notes: do not clean the scooter with alcohol, gasoline, kerosene or other corrosive and volatile chemical solvents to prevent dire
damage. Do not wash the board with a high-pressure water spray. During cleaning, make sure that the scooter's turned off, the
charging cable is unplugged, and the rubber flap is closed as water leakage may result in electric shock or other major
problems.When the scooter not in use, keep it indoors where it is dry and cool. Do not put it outdoors for a long time. Excessive
sunlight, overheating and overcooling accelerate the battery pack's lifespan.
1. Use original battery packs, use of other models or brands may bring about safety issues;
2. Do not touch the contacts. Do not dismantle or puncture the casing. Keep the contacts away from metal objects to prevent short
circuit which may result in battery damage or even injuries and deaths;
3. Use original power adapter to avoid potential damage or fire;
4. Mishandling of used batteries may do tremendous harm to the environment. To protect natural environment, please follow local
regulations to properly dispose used batteries.
5. After every use, fully charge the battery to prolong its lifespan.
Storage and Disposal
1.Please try to store the scooter in a cool and dry place between 14℉and 104℉. In extremely humid environments the interior of the
scooter may suffer condensation or even water accumulation, which may damage the battery rapidly.Devices are not intended for
use at elevations greater than 2000 m above sea level Prolonged Exposure to UV Rays, Rain and the Elements May Damage the
Enclosure Materials, Store Indoors When Not in Use.
2. In daily use, try to avoid recharging the scooter after completely exhausting the battery. If the battery is low, charge it as soon as
possible.
3. Please charge the scooter every other month to preserve the battery.

20 21
Parameter Name
L* W * H
After folding: L*W * H
Net weight
Maximum load capacity
Maximum speed
Range
Max slope
Scope of application
Tires
Damping system
Noise test
Dustproof and waterproof
grade
Brake system
LED display
Lighting system
Motor Power
NEX5
1150*485*1125 mm / 45.3*19.1*44.3 inch
1150*485*440 mm / 45.3*19.1*17.3 inch
Approximately 18.5±1kg / 40.8±2 lbs
100 kg / 220 lbs
Approximately 30 km/h / 19 mph
50-65 km / 31-41 miles(Depends on factors such as environment, angle,
speed, driving habits, etc.)
Approximately 15%
Stable and smooth road surface, with bumps less than 2cm and
depressions less than 3cm
8.5-inch solid tire
3-Weight shock absorption; front and rear shock absorption +
tubeless tire shock absorption
The A-weighted emission sound pressure level of the vehicle in
operation is less than 70 dB(A)
IPX4
Rear wheel disc brake + front wheel(motor) electric brake,
braking distance 4.4m (20km/h)
Speed, KM, mile, gear, brake
LED Highlight headlights
350W
Size
Weight
State
Parameters
Charging parameters
Adapter charging
Lithium battery
Charging time
Smart charger/42V/2A/short circuit protection
36V-7.5AH x 2
Approximately 8-10 h
13. Specifications

22 23
30 DAY SATISFACTION GUARANTEED RETURN POLICY
If you are unsatisfied with your purchase, Hiboy’s return policy allows you to return the product purchased on the Authorization channel
within 30 days counting from the date of receipt of shipment, and request a refund from the Authorization channel for any reason.
Note: Express shipping cost is non-refundable.
For the return request, Hiboy is not responsible for lost packages due to the carrier, or products received that cannot be verified.
Received products that have damage determined
to have been caused by the end-user may be subject to denial of the return request.
LIMITED PRODUCT WARRANTY
Hiboy warrants the original purchaser that your Hiboy product shall be free from defects in materials and workmanship under normal
use for a period aforementioned.
Hiboy does not warrant the operation of the product will be uninterrupted or error-free.
TO QUALIFY FOR A REFUND, ALL THE FOLLOWING CONDITIONS MUST BE MET:
1.A Return Merchandise Authorization (RMA) must be requested from Hiboy within 30 days from the date of receipt of shipment. To
request an RMA, contact Hiboy Service Team at us.support@hiboy.com.
2.The cost of return shipping will be borne by the customer.
3.For warranty service, please keep your receipt and/or invoice to validate proof of purchase.
4.Returned product must be in good physical condition (not physically broken or damaged).
5.All accessories originally included with your purchase must be included with your return.
6.If you return a product to Hiboy, (a) without an RMA from Hiboy(b) without all parts included in the original package, Hiboy retains the
right to refuse delivery of such return.
14. Limited Warranty Statement REMEDIES
If a hardware defect is found and a valid claim is received by Hiboy within the Warranty Period, Hiboy will, at its option and to the
extent permitted by law, either (1) repair the product at no charge, using new or refurbished replacement parts or, (2) replace the
product with a new or refurbished product. In the event of a defect, to the extent permitted by law, these are your sole and exclusive
remedies. Shipping and handling charges may apply except where prohibited by applicable law. This Limited Warranty is valid only
in the jurisdictions where the products are sold by www.hiboy.com, and is valid to the extent permitted by the applicable laws of such
jurisdictions. Any replacement hardware product will be warranted for the remainder of the original warranty period or thirty (30)
days, whichever is longer, or for any additional period of time that may be applicable in your jurisdiction.
HOW TO OBTAIN WARRANTY SERVICE
A Warranty Service Order must be requested from Hiboy within Warranty Period from the date of receipt of shipment. To request a
Warranty Service Order, contact Hiboy Service Team us.support@hiboy.com.
To obtain warranty service, you must deliver the product, in either its original packaging or packaging providing an equal degree of
protection, to the address specified by Hiboy. In accordance with applicable law, Hiboy may require the customer to furnish proof
of purchase details and/or comply with registration requirements before receiving warranty service.period or thirty (30) days,
whichever is longer, or for any additional period of time that may be applicable in your jurisdiction.
LIMITATION OF DAMAGES
Except to the extent prohibited by applicable law, Hiboy shall not be liable for any incidental, indirect, special, or consequential
damages, including but not limited to loss of profits, revenue or data, resulting from any breach of express or implied warranty or
condition, or under any other legal theory, even when Hiboy has been advised of the possibility of such damages. Some jurisdictions
do not allow the exclusion or limitation of special, indirect, incidental or consequential damages, so the above limitation or exclusion
may not apply to you.

24 25
Common Problem & Solutions
4. lf this product does not work properly, perform the following check
a. Check power supply is turned on
b. Check the battery power level on the display
c. Check the left brake lever and rear brakes are in their original positions.
d. Check that all jacks and cables are connected correctly.
If all the steps are completed but the product is still not working properly, contact the manufacturer or dealer.
1. The display is black
Cause: the product is subject to long-time exposure to sunlight.
Solution: keep the product in shade for some time to recover.
2. The value does not match the actual value
Cause: Parameters are set improperly or lost
Solution: Press and hold the power button to turn off and then press it again to restart the scooter
3. The displayed value is dim.
Cause: The battery is in poor contact or empty. Solution: Turn off the power supply and then turn it on again. If this problem still
occurs, contact the manufacturer or dealer.
The Warning LED flickers the displayed value E1-E7 also flickers
Communication
Failures E1/E7
E2
E3
E4
E5
Brake failure
Referral Failure
Motor Failure
Controller
Failure
Malfunction Code Solution
Check whether the brake taillight is on, if the brake taillight is not on, it indicates that the controller is not
powering the controller or instrument. If the brake taillight is on, check that the connecting cable between
the instrument and the controller are connected properly.
If the brake is pressed release it
Check whether the brake is
pressed
Please check if the finger is
pressed
Check whether the motor is
connected to the controller line
No connection, connect the cable between the motor and the controller
If there is a connection, please disconnect the connecting wire and
measure whether the internal resistance between the three-phase wires
of the motor is within a reasonable range, generally within 0.1-1 ohm.
The motor needs to be replaced if it exceeds the range.
If the controller is damaged, replace the controller
Note: Regularly check the tightness of various screw components especially the axle, folding system, steering
system and brake shaft.
If you press
No, please check the connection
line between the dial and the meter
for a short or open circuit
Open or short circuit. Replace the
cable
Change finger
Check the connecting cable
between brake and instrument for
short or open circuits
In case of open or short circuit,
replace the connecting cable
Replace brake lever

26 27
@hiboyscooter
HiboyUS
www.hiboy.com
hiboyus
Contact Us
Contact us if you experience issues relating to riding, maintenance and safety, or errors/faults with your Hiboy NEX5
HIBOY INTELLIGENT INC
4045 Cheyenne Ct,
Chino, CA 91710
E-mail Service: us.support@hiboy.com
5. The screws at the junction of the handlebar and the pole are loose
Cause: The lock screw of the handlebar and vertical rod is loose.
Solution: Tighten this lock screw with accessories screw tools.
6. The controller is damaged, replace the controller.
Replacement: Do not damage or bend when taking out the controller.
4. lf this product does not work properly, perform the following check
a. Check power supply is turned on
b. Check the battery power level on the display
c. Check the left brake lever and rear brakes are in their original positions.
d. Check that all jacks and cables are connected correctly.
If all the steps are completed but the product is still not working properly, contact the manufacturer or dealer.
As the picture shows
As the picture shows
Table of contents
Other Hiboy Scooter manuals


