Solux GALAXY PRO 340w 900e LED User manual

340 w
PRO
GALAXY
Product
Manual
Manual del producto
PLEASE READ THESE INSTRUCTIONS
FIRST BEFORE INSTALLATION
Thank you for purchasing the Pro 340W LED ML. This manual describes the mounting and
installing of the product and also describes how to use the product. Mounting and installing of the
LED xture may only be executed by certied service personnel. Please read and understand this
manual completely before using the product. Only use the product as specied in this manual.
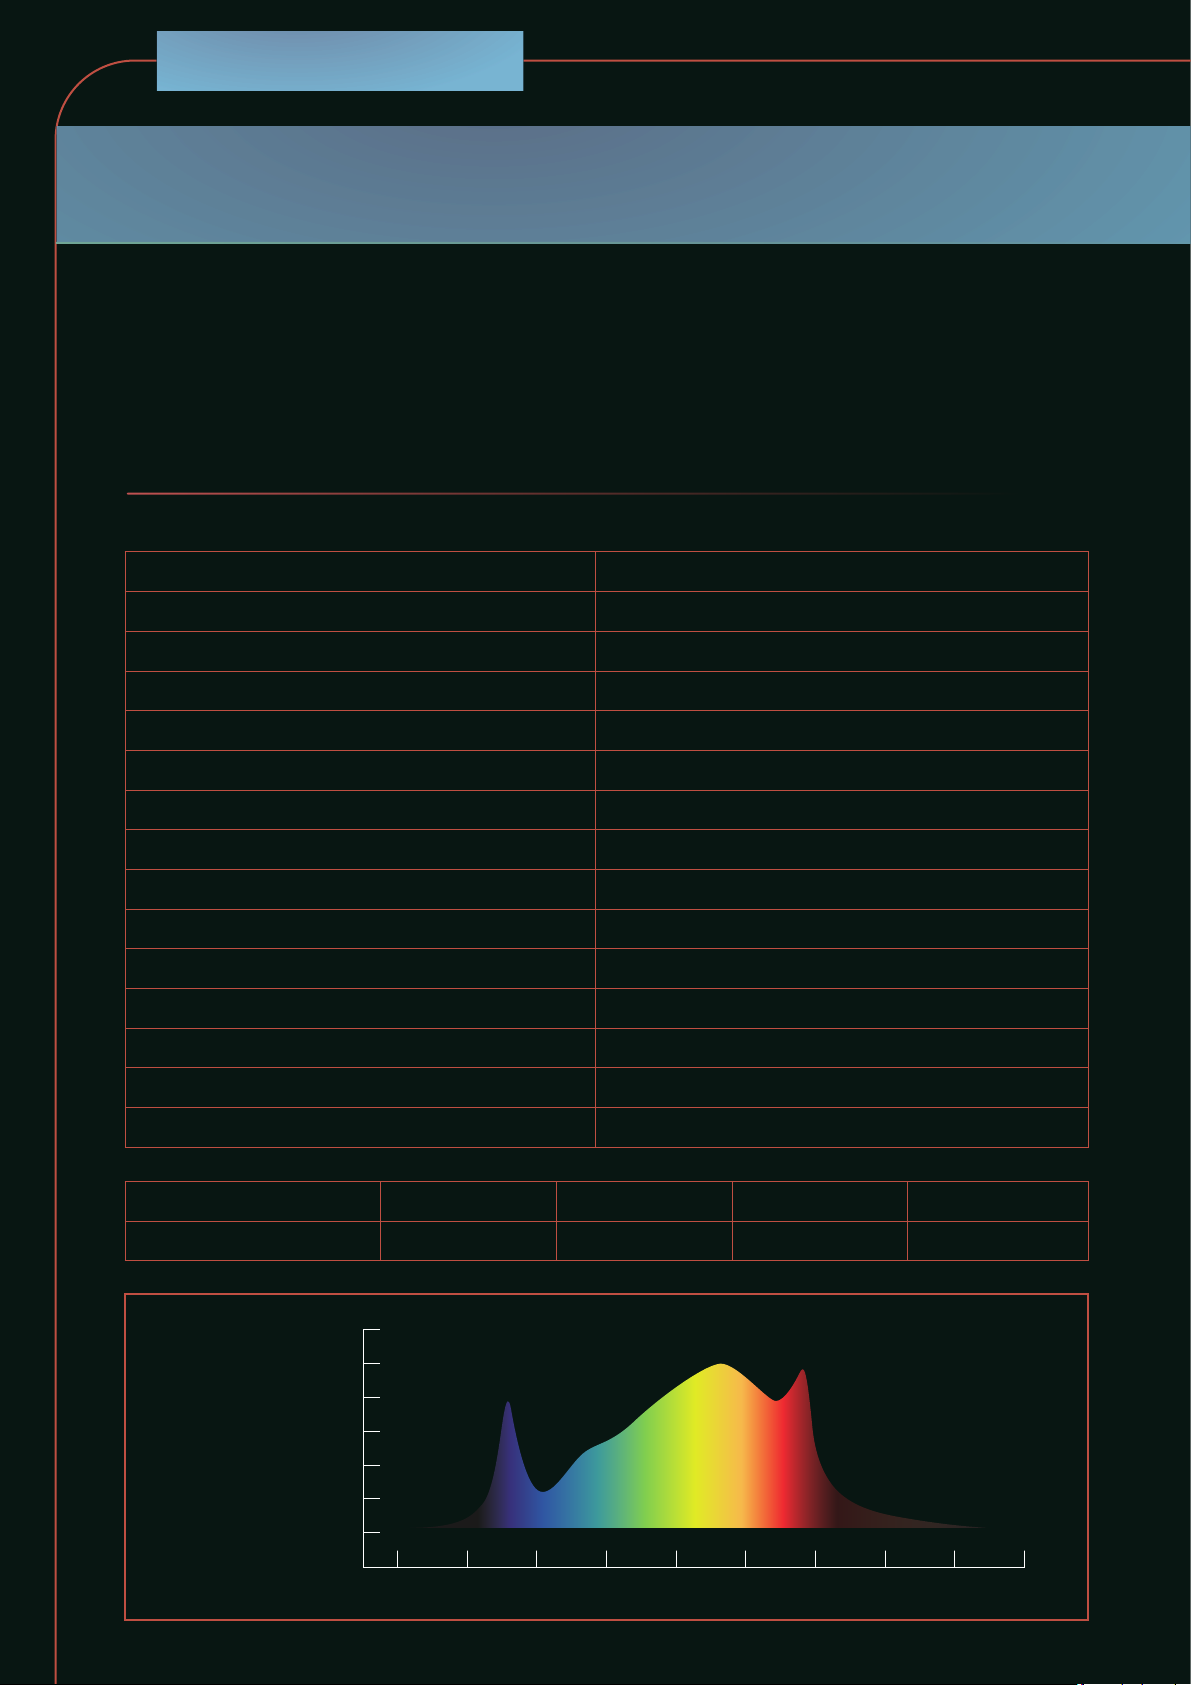
Light Source LED
Spectrum Full spectrum
PPF 856 μmol/s
Input Power 340 W
Efcacy 2.35 μmol/J
Input Voltage Autosensing 100-277V
Fixture Dimensions | Weight 80 X80 X3 cm | 10kg
Mounting Height ≥6" (15.2 cm) Above Canopy
Thermal Management Passive
Dimming 0-10V
Light Distribution 120°
Lifetime L90:>54,000hrs
Power Factor > 90%
CertiPcations IP66, CE, Power supply UL
Warranty 2 Year Standard Warranty
VOLTAGE 120V 208V 240V 277V
AMPERAGE 3.3A 1.89A 1.62A 1.33A
TECHNICAL SPECIFICATIONS
100%
80%
60%
40%
20%
0%
360 430 480 530 580 630 680 360 730 780
FULL SPECTRUM
FULL
SPECTRUM
Adjustable Brightness
EN
340 w
PRO
GALAXY
PRODUCT DESCRIPTION
ENVIRONMENT
MOUNTING
INSTALLATION
The Pro 340W LED ML is an electronic
horticultural LED xture. It drives 4 LED rails.
The Pro 340W LED ML is intended to be
used in greenhouses or in climate rooms. In
this manual, the Pro 340W LED ML will be
referred to as: “the LED xture”.
The product is intended to be used in greenhouses and climate rooms.
The product can be used in damp environments. The product may not be used in
wet environments or outdoors. The LED xture functions optimal when the ambient
temperature is between 68 ~ 86° F / 20 ~ 30° C.
The LED xture ship with your choice of hanging hardware. To mount the LED xture,
start by identifying a suitable support structure to hang your xture from. For optimal
results, two people are recommended to mount the xtures.
COMPLY WITH LOCAL INSTALLATION REGULATIONS
WARNING! Mounting and installing of the LED xture may only be executed by
certied service personnel, in accordance with the applicable local
laws and regulations.
WARNING! The installer is responsible for correct and safe installation.
WARNING! Do not connect or disconnect the LED xture under load.
WARNING! Ensure the local cabling can support the voltage and current
requirements of the LED xture.
WARNING! Avoid coiled cords and keep mains leads separated. This prevents
electromagnetic interference.

EN
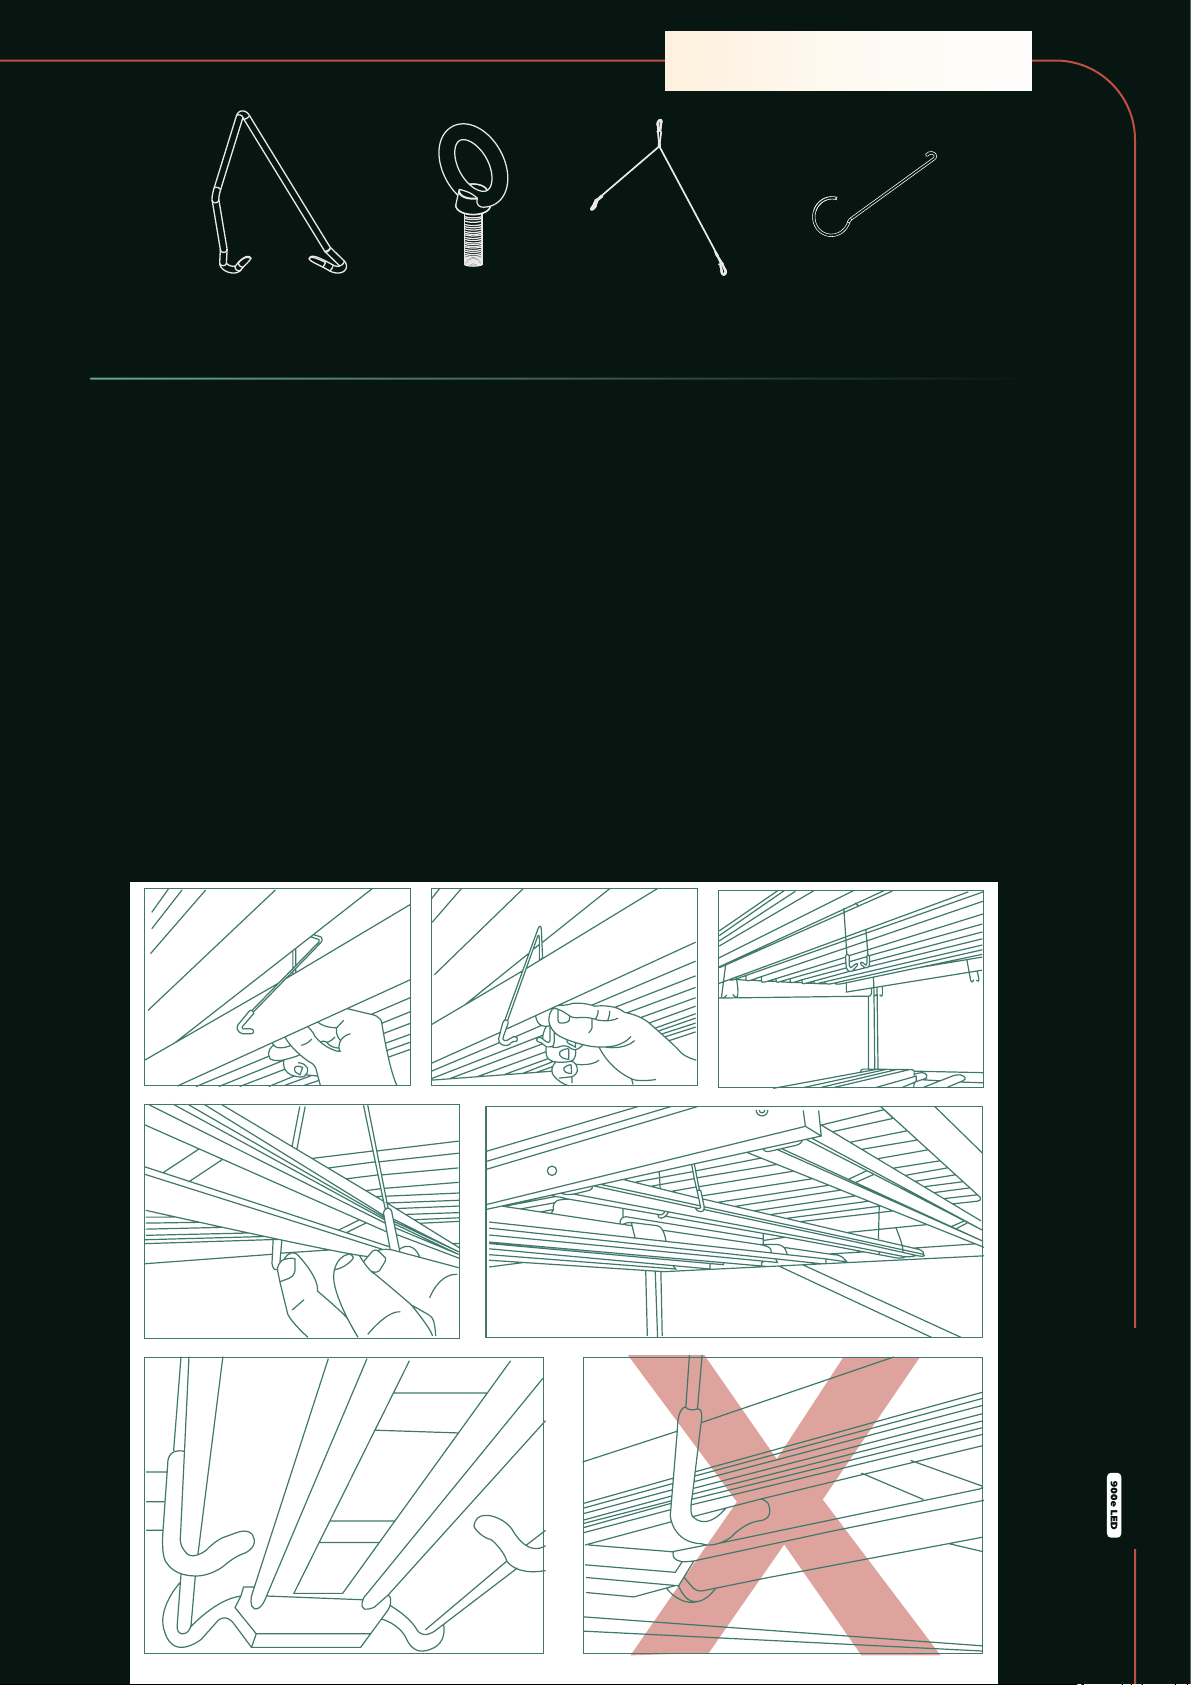
MOUNTING WITH SOLID DECKING MOUNTS
Suggested application: ideal for hanging on cross bars in a rack system with solid
decking. Hardware included: Solid decking mounts. For proper uniformity and exibility
for adjustments, position the LED xture with light bars parallel to the length of the rack.
1. Put 4 the 1# hooks on the installation site (between the beams of the shelf)
2. Adjust the position of 4 hooks
3. Must 2 people jointly lift the LED xture, the second and the fth light bars are
linked to the hooks.
4. Adjust the hang position, must be balance.
5. The input power cord of the LED xture connects the power supply, which can
be used.
1 2 3 4

340 w
PRO
GALAXY
MOUNTING WITH LANCE HANGERS AND
ADJUSTABLE KIT
Suggested application: Ideal for two-point hanging from areas with high clearance, such
as ceilings or other support structures.
1. Put 4 the 2# rings into 4 round holes in the lamp stand.
2. Hang 2 the 3# ropes into the rings.
3. MUST 2 or more people jointly pull up the rope and lift the LED xture. Put the
top of the rope xed at the installation place.
4. The rope can be adjusted height, must be balanced.
5. The input power cord of the LED xture connects the power supply,
which can be used.
3 4
12

• Remove the dummy from the input
port on the rst LED xture. Note: Keep
the dummy in a safe place! The dummy
is necessary to operate the LED xture
in standalone mode.
• Use the black controller cable (item is
supplied with controller) to connect
the controller input port on the rst
LED xture.
• Remove the dummy from the input
port on the second LED xture.
• Use a grey 6PC6 modular jack
interconnect cable with integrated
ferrite cores to connect the output
port of the rst LED xture to the
input port of the second LED xture.
The indicator light will blink when the
connection is unsuccessful.
• Repeat these steps to connect up to
100 LED xtures.
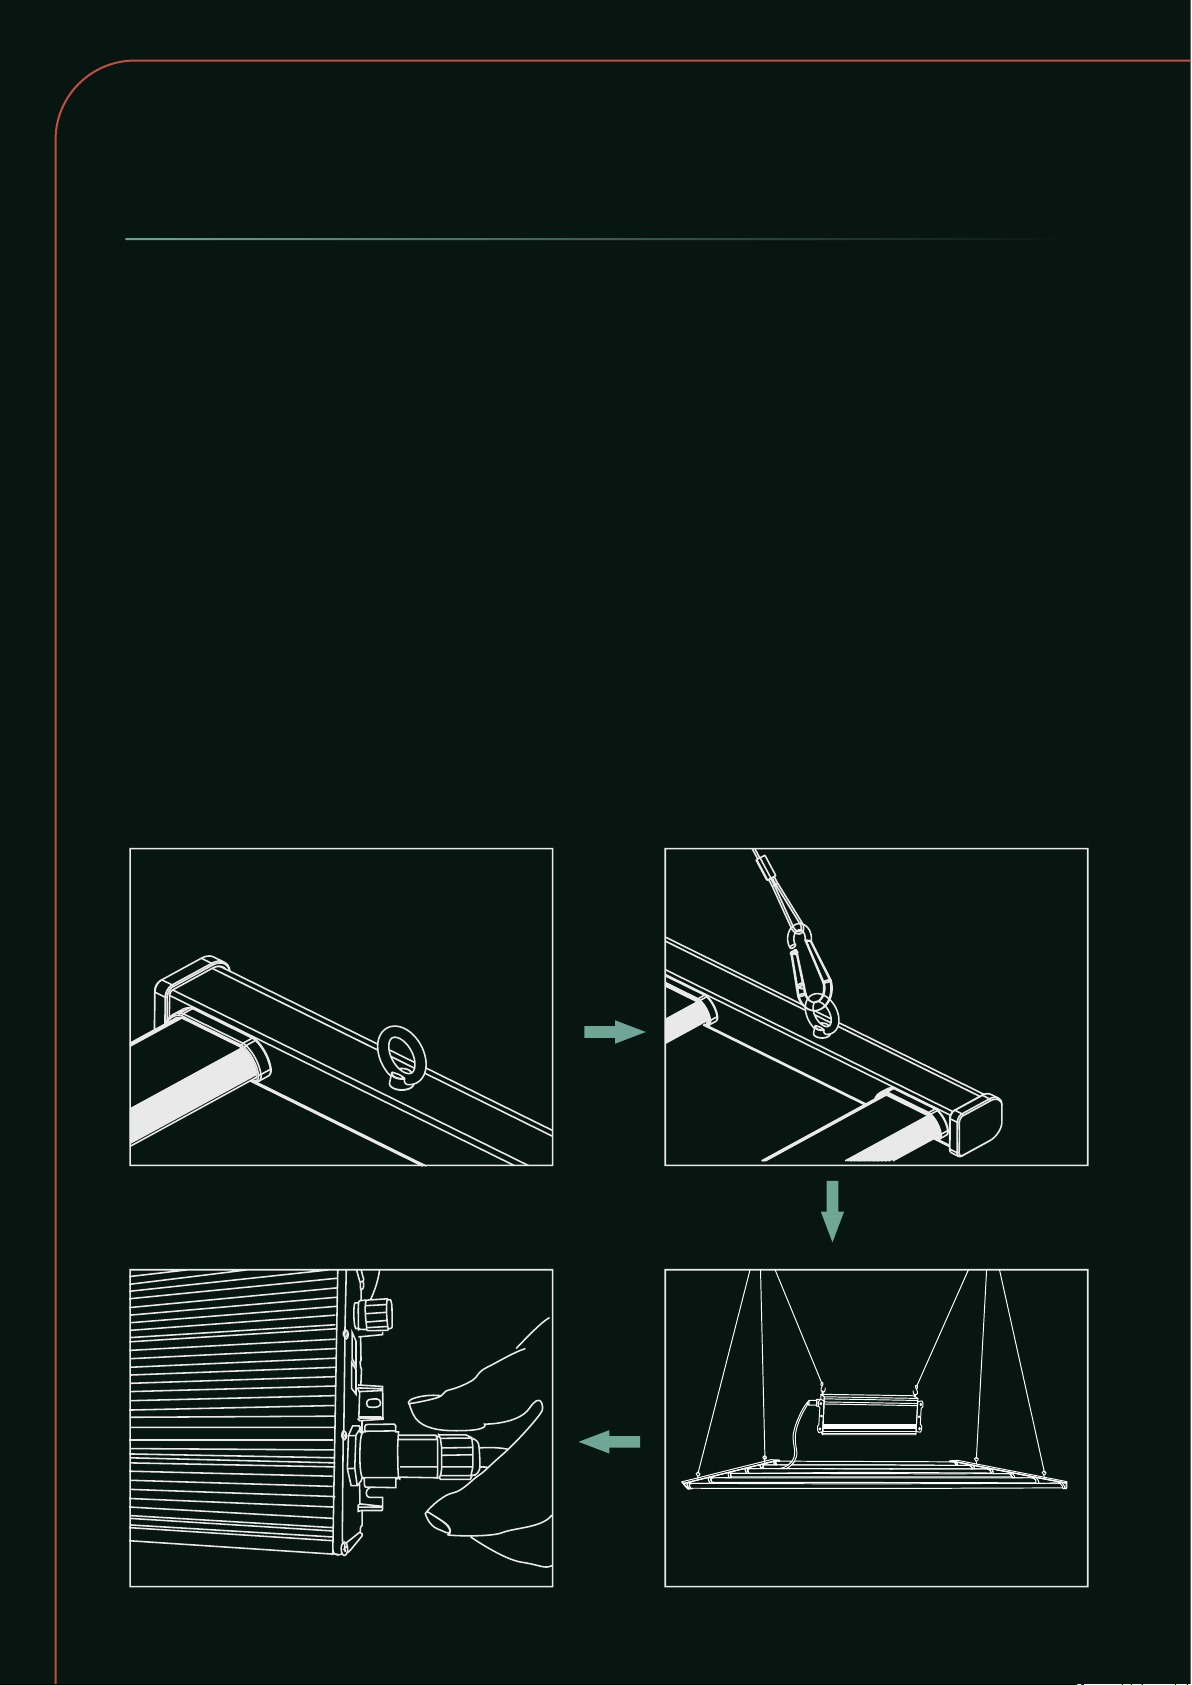
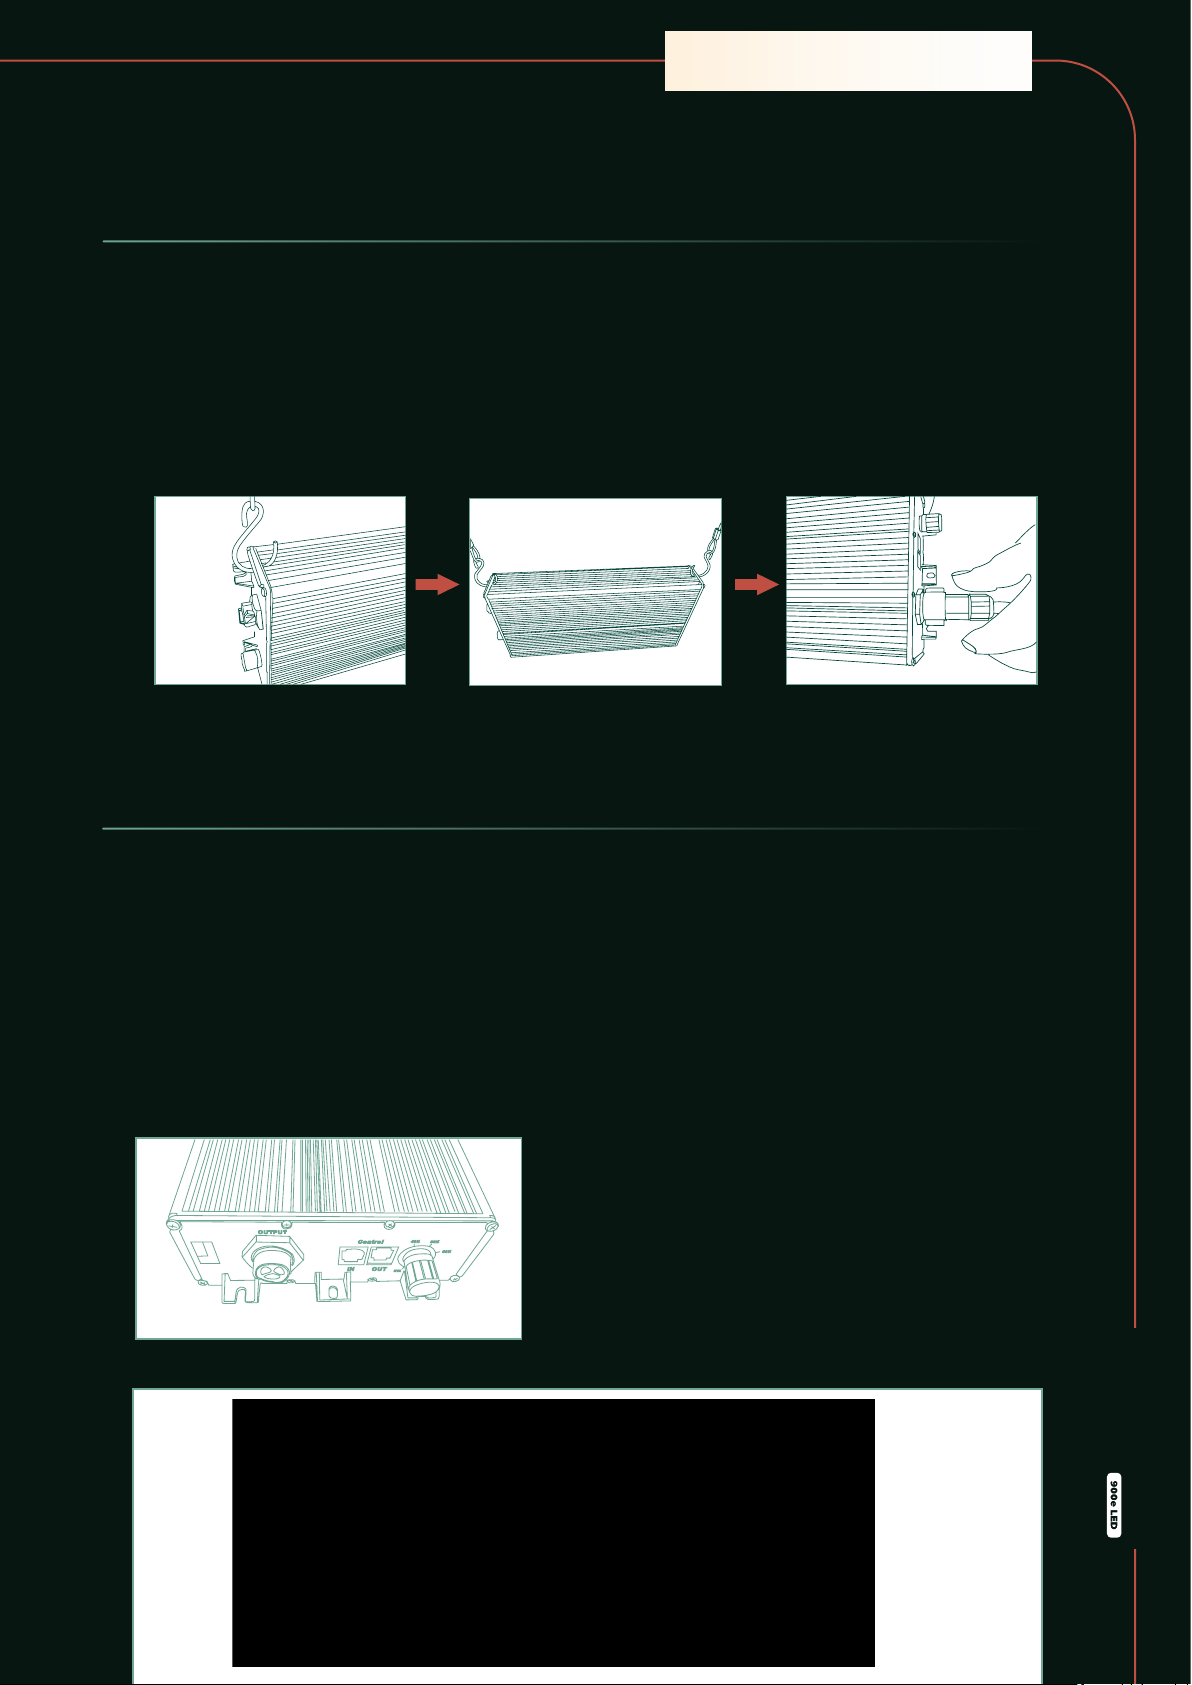
MOUNTING THE POWER SUPPLY
ENCLOSURE
1. Hang 2 the 4# ropes into the holes on both sides of the power supply.
2. Fix the rope to the location where it needs to be installed.
3. The input power cord of the LED xture connects the power supply, which can
be used.
1 2 3
CONNECTING UP TO 100 LED FIXTURES
EN

340 w
PRO
GALAXY
ES
LEA LAS INSTRUCCIONES ANTES
DE LA INSTALACIÓN
Muchas gracias por comprar Pro 340W LED ML. Este manual describe el montaje, la instalación y
el uso del producto. El montaje y la instalación del dispositivo de luces LED deberán llevarlos a cabo
únicamente personal de servicio certicado. Lea y entienda todo el manual antes de utilizar el pro-
ducto. Utilice el producto exclusivamente de la forma que se indica en el presente manual.
Fuente de luz Luz LED
Espectro Espectro completo
PPF 856μmol/s
Potencia de entrada 340W
Eciencia 2,35μmol/J
Voltaje de entrada Sensor automático de 100-277V
Medidas del dispositivo | Peso 80X80X3cm | 10kg
Altura de montaje ≥ 6" (15,2cm) Sobre la cubierta
Gestión térmica Pasiva
Atenuación 0-10V
Distribución de luz 120°
Vida útil L90:>54000h
Factor de potencia >90%
Certicaciones IP66, CE, fuente de alimentación con UL
Garantía 2años de garantía estándar
ESPECIFICACIONES TÉCNICAS
100%
80%
60%
40%
20%
0%
360 430 480 530 580 630 680 360 730 780
FULL SPECTRUM
ESPECTRO
Brillo ajustable
VOLTAJE 120V 208V 240V 277V
AMPERAJE 3.3 A 1.89 A 1.62 A 1.33A

DESCRIPCIÓN DEL PRODUCTO
ENTORNO
MONTAJE
INSTALACIÓN
El Pro 340W LED ML es un dispositivo de
luces LED electrónico para horticultura.
Cuenta con cuatro rieles de luces LED.
El Pro 340W LED ML está diseñado para su uso
en invernaderos o en salas climatizadas. En el
presente manual, nos referiremos al Pro 340W
LED ML como: «el dispositivo de luces LED».
El producto se puede usar en entornos húmedos. El producto no se puede usar en entor-
nos mojados ni a la intemperie. El funcionamiento óptimo del dispositivo de luces LED
se alcanza cuando la temperatura ambiente se encuentra entre 20 ~ 30°C/68 ~ 86°F.
El dispositivo de luces LED se envía con el material para colgar de su elección. Para mon-
tar el dispositivo de luces LED, empiece por identicar una estructura de soporte ade-
cuada de donde colgar el dispositivo. Se recomienda que dos personas monten los dis-
positivos para conseguir resultados óptimos.
CUMPLA LAS NORMATIVAS DE INSTALACIÓN LOCALES
ADVERTENCIA El montaje y la instalación del dispositivo de luces LED deberán
llevarlos a cabo únicamente personal de servicio certicado, de
acuerdo con las leyes y regulaciones locales de aplicación.
ADVERTENCIA El instalador es responsable de una instalación correcta y segura.
ADVERTENCIA Asegúrese de que el cableado local soporte el voltaje y los
requisitos actuales del dispositivo de luces LED.
ADVERTENCIA Evite enrollar los cables y mantenga separados los cables de
alimentación. Así evitará interferencias electromagnéticas.
ADVERTENCIA No conecte ni desconecte el dispositivo de luces LED bajo carga.
340 w
PRO
GALAXY
MONTAJE CON SOPORTES SÓLIDOS
Aplicación sugerida: ideal para colgar en barras transversales en un sistema de bastidor
con soporte sólido. Material incluido: soportes sólidos. Para conseguir una uniformidad y
exibilidad adecuadas para los ajustes, coloque el dispositivo de luces LED con las barras
de luz paralelas a la longitud del bastidor.
1. Coloque cuatro ganchos del tipo 1 en el lugar de la instalación (entre los ángulos
del estante).
2. Ajuste la posición de los cuatro ganchos.
3. Entre dos personas, levanten el dispositivo de luces LED. La segunda y la quinta
barra de luces se corresponden con los ganchos.
4. Ajuste la posición donde va a colgarlo para que esté equilibrado.
5. Conecte el cable de alimentación de entrada del dispositivo de luces LED a la
fuente de alimentación que vaya a usar.
1 2 3 4
ES
MONTAJE CON COLGADORES
DE LANZA Y KIT AJUSTABLE
Aplicación sugerida: Ideal para colgadores de dos puntas en áreas de gran claridad, como
techos u otras estructuras de soporte.
1. Coloque cuatro anillas del tipo 2 en los cuatro agujeros del soporte de la lámpara.
2. Cuelgue dos cables de tipo 3 de las anillas.
3. Entre dos o más personas, estiren del cable y levanten el dispositivo de luces
LED. Fije la parte superior del cable al lugar de instalación.
4. La altura del cable puede ajustarse, pero debe estar equilibrada.
5. Conecte el cable de alimentación de entrada del dispositivo de luces LED a la
fuente de alimentación que vaya a usar.
3 4
12
340 w
PRO
GALAXY
MONTAJE DE LA CAJA DE LA
FUENTE DE ALIMENTACIÓN
1. Cuelgue dos cables del tipo 4 en los agujeros a ambos lados de la fuente de
alimentación.
2. Fije el cable al lugar donde debe instalarse.
3. Conecte el cable de alimentación de entrada del dispositivo de luces LED a la
fuente de alimentación que vaya a usar.be used.
CONECTAR HASTA 100 DISPOSITIVOS
DE LUCES LED
• Retire el protector del puerto de entra-
da del primer dispositivo de luces LED.
Nota: Guarde el protector en un lugar
seguro. El protector es necesario para
utilizar el dispositivo de luces LED de
manera independiente.
• Repita estos pasos para conectar hasta
100 dispositivos de luces LED.
• Retire el protector del puerto de entrada
del segundo dispositivo de luces LED.
• Utilice un cable gris de interconexión de
conector modular 6PC6 con núcleos de
ferrita integrados para conectar el puer-
to de salida del primer dispositivo de
luces led al puerto de entrada del segun-
do dispositivo de luces LED. La luz del
indicador parpadeará si no se ha conec-
tado bien.
• Utilice el cable negro del controlador
(viene con el controlador) para conectar
el puerto de entrada del controlador en
el primer dispositivo de luces LED.
ES
1 2 3
MAINTENANCE
There are no serviceable parts inside the luminaire. Opening the luminaire will void
warranty. Keep housing clean from dust and dirt with a dry or damp cloth to ensure
optimal cooling. When using a damp cloth disconnect from the power rst. Check
your electrical connections regularly.
WARRANTY
We warrant the mechanical and electronic components of this product to be free
of defects in material and workmanship if used under normal operating conditions
for a period of 2 years from the original date of purchase. If the product shows any
defects within this period and that defect is not due to user error or improper use
our shall, at its discretion, either replace or repair the product using suitable new or
refurbished parts.
MANTENIMIENTO
No hay piezas reparables dentro de la luminaria. Si abre la luminaria, la garantía no será
válida. Limpie el polvo y la suciedad de la carcasa con un paño seco o húmedo para
asegurar una refrigeración óptima. Si utiliza un paño húmedo, desconéctela primero.
Compruebe sus conexiones eléctricas de manera regular.
GARANTÍA
Garantizamos que los componentes mecánicos y electrónicos de este producto no
presentan defectos materiales ni de fabricación en unas condiciones normales de uso
por un periodo de 2 años desde la fecha original de compra. Si el producto presenta
algún defecto durante este periodo y dicho defecto no está causado por un uso
erróneo o no adecuado por parte del usuario, podrá optar entre que le cambiemos el
producto o lo reparemos con piezas nuevas o reacondicionadas.
ES
EN
Table of contents
Languages:
Other Solux Lighting Equipment manuals


