SOMFY Soliris Smoove UNO User manual

EN A detailed manual can be found on the
website:
NL Een handleiding bevindt zich op de
website:
www.wiredcontrols.somfy.com
Somfy SAS
50 avenue du Nouveau Monde
F - 74300 Cluses
www.somfy.com
EN
Somfy hereby declares that the radio
equipment covered by these instructions is in
compliance with the requirements of Radio
Directive 2014/53/EU and the other essential
requirements of the applicable European
Directives.
The full text of the EU declaration of conformity
is available at www.somfy.com/ce.
NL
Hierbij verklaart Somfy dat de
radioapparatuur die behandeld wordt in dit
document in overeenstemming is met de
Richtlijn Radioapparatuur 2014/53/EU en de
andere relevante bepalingen van de Europese
richtlijnen voor toepassing binnen de Europese
Unie.
De volledige EU-conformiteitsverklaring
staat ter beschikking op de website
www.somfy.com/ce.
The images are not contractually binding. Copyright © 2016 Somfy SAS. All rights reserved. Somfy SAS, capital of 20.000.000 euros, RCS Annecy 303.970.230 - 11/2016 1/2 / Afbeeldingen zijn niet contractueel bindend. Copyright © 2016 Somfy SAS. All rights reserved. Somfy SAS, kapitaal van 20.000.000 euro, RCS Annecy 303.970.230 - 11/2016 1/2
www.somfy.com
Ref. 5128405A
SOLIRIS SMOOVEUNO
w
w
w
.
s
o
m
f
y
.
i
n
f
o
EN INSTALLATION GUIDE
NL INSTALLATIEGIDS
automatically in accordance with the brightness using
an optional sunlight, wind or rain sensor. The product
parameters can be modified from the backlit screen.
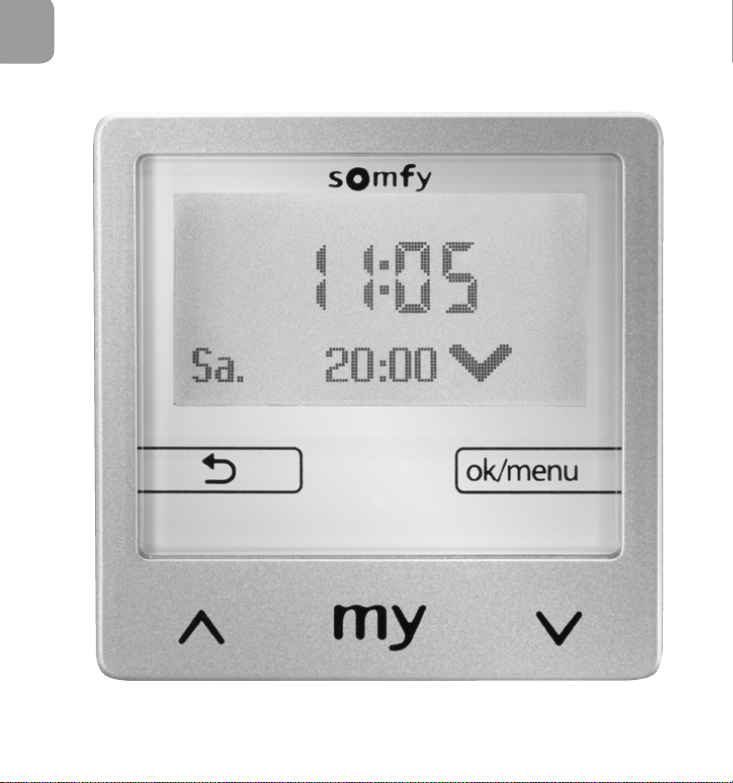
3. Description of the control buttons
(FigureA)
Arrow :
-Manual raising and lowering control in normal
operation.
-Navigation or changing the value in the settings menu.
Brief press (less than 2 seconds):
-When moving: stop function
-When stationary: switch to position
Brief press (less than 2 seconds):
-Return to the upper part of the menu or to the main
screen.
-On the main screen, the functions used are displayed.
-Brief press (less than 2 seconds) from the main screen:
access to the quick menu.
-Press and hold down (longer than 2 seconds) from the
main screen: direct access to the settings menu.
-Activation in the settings menu: confirms an entry.
Aer 3 minutes, the appliance will enter standby mode
and the display will switch off. Stand-by mode ends once
a key is activated.
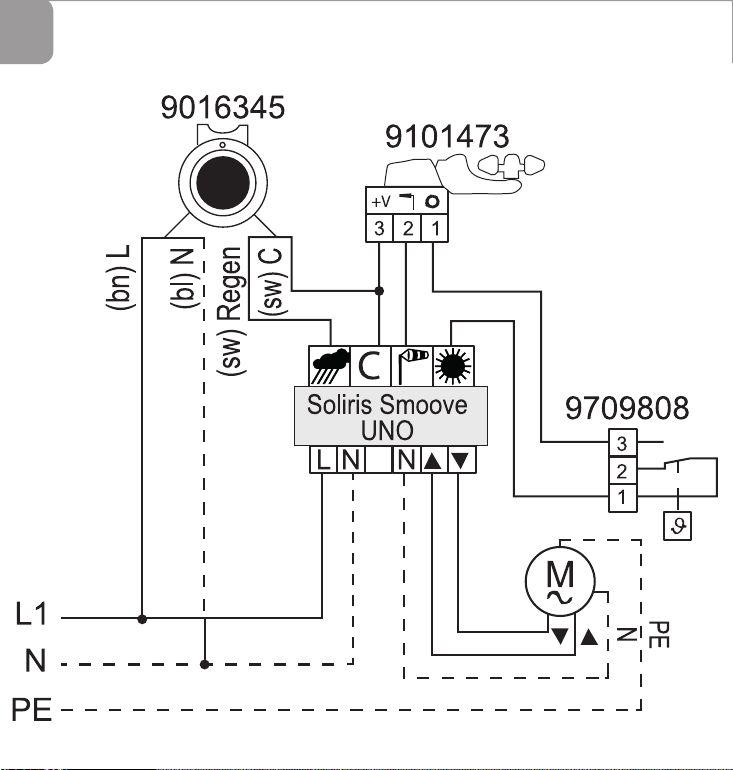
4. Connection (FigureB)
The installation, testing and commissioning of the
appliance must be carried out by qualified personnel.
Switch off all the connecting cables. Ensure that they
cannot be accidentally switched on.
Observe the wiring of Neutral and Live.
Keep the “up” wiring and “down” wiring in the right
directions.
Refer to the sensor instructions for information
about their connection.
Connection Line Max. distance
Motor 0.75 - 1.5 mm² 150 m
230 V AC 1.5 mm² -
Sensors 0.6 - 0.75 mm² 50 m
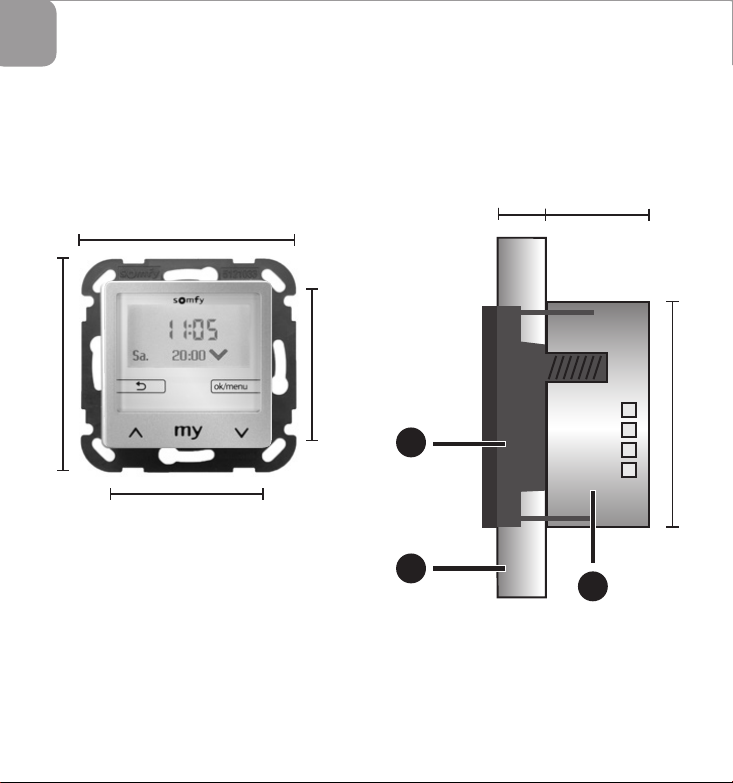
5. Installation
5. 1. Dimensions and parts
(Figure C)
Dimensions: see figure
a
Electronic module
b
Cover frame
c
Power supply module
5. 2. Installation
(Figure D)
1) Connect up the connection cables and secure the
power supply module in the flush mounted box.
2) Position the electronic module with its cover frame in
the power supply module. Switch on the power supply.
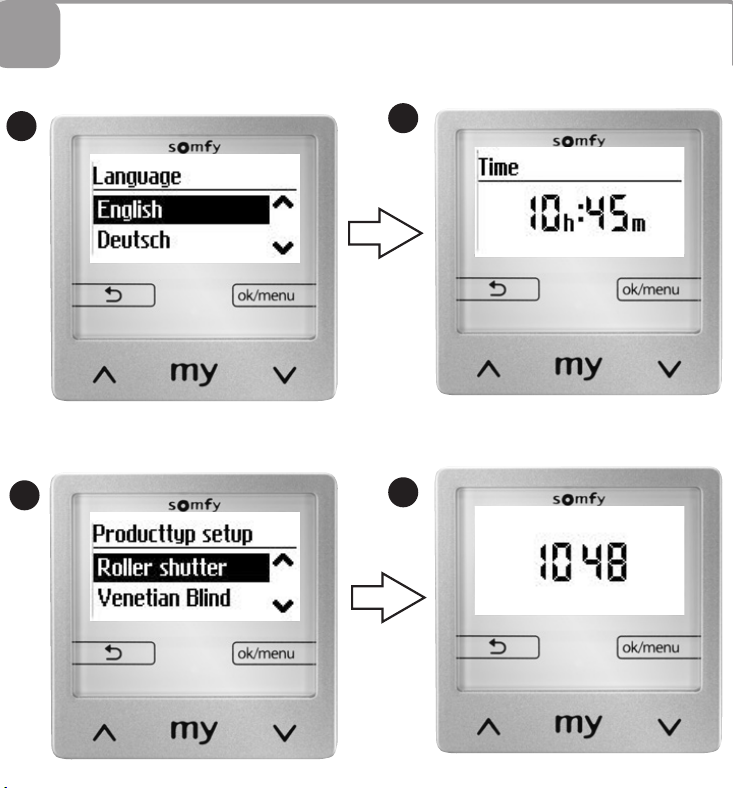
6. Initial commissioning
(FigureE)
If the appliance has already been commissioned, the main
screen displays (image
d
).
If the appliance is in its original configuration, carry out
the settings
a
,
b
and
c
step by step.
Each setting must be confirmed with the “ok” button
in order to access the next step: language, time,
date(dd/mm/yy), type of equipment, linear travel(*1) and
using the sensors.
When setting is complete, the appliance operates and
the main screen is displayed (image
d
).
(*1) The linear travel time is the time required for a
roller shutter, an external venetian blind or an awning
to move from the open position to the fully closed
position.
Setting the travel in automatic mode:
To raise the product, select “Start”. To stop it, select
“Stop” as soon as the product is at the end of the upper
end limit. Press the button .
To lower the product, select “Start”. To stop it, select
“Stop” as soon as the product reaches the lower end
limit. Press the button .
The travel time is set.
All information on the basic settings are in the online
manual.
The motor end limits must be set in advance.
Advice for operating the external venetian blind:
if the product does not move or barely moves
aer jogging, adjust the maximum tilting time of
the slats or the start-up delay time (see the
online manual).
1. Safety and liability
1. 1. Liability
Before installing and using this product, please read
these instructions carefully. This Somfy product must be
installed by a home drive and automation professional.
Moreover, the installer must comply with standards
and legislation in the country in which the product
is being installed, and inform his customers of the
operating and maintenance conditions for the product.
He must give them these instructions. Any use outside
the sphere of application defined by Somfy is prohibited.
This invalidates the warranty and discharges Somfy
of all liability, as does any failure to comply with the
instructions given herein. Never begin installing without
first checking the compatibility of this product with the
associated equipment and accessories.
1. 2. Safety instructions
Keep out of reach of children.
Never drop, knock, drill or submerge.
Do not use abrasive products or solvents to clean it.
2. Product description
Soliris Smoove Uno is a timer that can automatically
and manually control a roller shutter, awning or external
venetian blind type motor. Soliris Smoove Uno is pre-set
to open at 7:30 am from Monday to Friday and at
8:30 am at the weekend, and to close at 8:00 pm. Soliris
Smoove Unoalso enables applications to be controlled
EN
DB
min. 50 mm
min. 40 mm
1)
2)
C
71 mm
50 mm
71 mm
50 mm
51 mm
31 mm
11 mm
a
bc
AE
ab
cd
1. Veiligheid en aansprakelijkheid
1. 1. Aansprakelijkheid
Voordat dit product geïnstalleerd en gebruikt wordt,
moet deze handleiding zorgvuldig gelezen worden. Dit
Somfy product moet geïnstalleerd worden door een
erkende installateur van automatiseringssystemen
in woningen. De installateur moet zich altijd
aan de in het land van installatie geldende
normen en wettelijke voorschrien houden en
zijn klanten informeren over de gebruiks- en
onderhoudsomstandigheden van het product.
Hij moet hun de handleiding overhandigen. Elk gebruik
buiten het door Somfy bepaalde toepassingsgebied
is verboden. Hierdoor en door het negeren van de
instructies in deze handleiding, vervallen iedere
aansprakelijkheid en garantie van Somfy. Vóór de
installatie aangevat wordt, moet gecontroleerd
worden of dit product compatibel is met de aanwezige
apparatuur en accessoires.
1. 2. Veiligheidsvoorschrien
Buiten het bereik van kinderen houden.
Laat het product niet vallen, sla er niet tegen,
boor er niet in en dompel het niet in een vloeistof.
Geen schuur- of oplosmiddelen gebruiken om
het schoon te maken.
2. Productbeschrijving
Soliris Smoove Uno is een klok voor het automatisch
of met de hand bedienen van een motor voor
een rolluik, zonnescherm of draaibare zonwering.
Soliris Smoove Uno is vooringesteld om open te gaan om
7:30 uur van maandag tot en met vrijdag en om 8:30 uur
in het weekend en om te sluiten om 20:00 uur. Met behulp
van een optionele zonnesensor/windsensor/regensensor
kunnen met de Soliris Smoove Uno de toepassingen
ook op basis van de lichtintensiteit/wind/regen worden
bestuurd. De parameters van het product kunnen op het
scherm worden veranderd.
3. Beschrijving van de bedieningstoetsen
(figuurA)
Pijl :
-Handmatig omhoog en omlaag zetten met normale
werking.
-Navigeren of een waarde veranderen in het instelmenu.
Korte druk (minder dan 2 seconden):
-Tijdens een beweging: stop-functie
-Gestopt: verplaatsing naar de positie
Korte druk (minder dan 2 seconden):
-Terug naar een hoger niveau van het menu of naar het
hoofdscherm.
-Op het hoofdscherm, visualisatie van de gebruikte
functies (zie de handleiding).
-Korte druk (minder dan 2 seconden) vanuit het
hoofdscherm: het snelmenu openen.
-Lange druk (meer dan 2 seconden) vanuit het
hoofdscherm: direct het instelmenu openen.
-Inschakelen in het instelmenu: bevestigen van een
invoer.
Na 3 minuten gaat het apparaat in de stand-bymodus
en wordt het scherm donker. Zodra een toets wordt
aangeraakt wordt de stand-bymodus weer verlaten.
4. Aansluiting (figuurB)
Het installeren, testen en in bedrijf stellen van het
systeem moeten gebeuren door een gekwalificeerde
vakman.
Zorg ervoor dat alle aansluitkabels spanningsloos
zijn. Zorg ervoor dat er niet onverwacht spanning op
kan worden gezet.
Houd u aan de aansluiting van de nul- en de
fasedraad.
Respecteer de aansluiting van de richtingen “Op’ en
“Neer”.
Zie de handleiding van de sensoren voor de
aansluiting ervan.
Aansluiting Lijn Max. afstand
Motor 0,75 - 1,5 mm² 150 m
230V AC 1,5 mm² -
Sensoren 0,6 - 0,75 mm² 50 m
5. Montage
5. 1. Afmetingen en onderdelen
(figuur C)
Afmetingen: zie figuur
a
Elektronische module
b
Sierlijst
c
Voedingsmodule
5. 2. Installatie
(figuur D)
1) Sluit de verbindingskabels aan en zet de
voedingsmodule vast in de inbouwdoos.
2) Plaats de elektronische module met zijn sierlijst in de
voedingsmodule. Schakel de spanning in.
6. Eerste inbedrijfstelling
(figuurE)
Als het apparaat reeds in bedrijf is gesteld, verschijnt het
hoofdscherm (afbeelding
d
).
Als het apparaat in de oorspronkelijke configuratie is,
voer dan stap voor stap de instellingen
a
,
b
en
c
uit.
Elke instelling moet worden bevestigd met de toets “ok“
om naar de volgende stap te kunnen gaan: taal, tijd,
datum (dd/mm/jj), type systeem, lineaire slag (*1) en
gebruik van de sensoren.
Als het instellen klaar is, werkt het apparaat en verschijnt
het hoofdscherm (afbeelding
d
).
(*1) De lineaire slag is de tijd die nodig is om een rolluik,
een zonnescherm of een draaibare zonwering vanuit de
open positie geheel te sluiten.
Instellen van de slag in de automatische modus:
Om het product omhoog te zetten, selecteert u “Start”
(Start). Selecteer “Stop” (Stop) om te stoppen zodra het
product zich bij het bovenste eindpunt bevindt. Druk op
de toets .
Om het product omlaag te zetten, selecteert u “Start”.
(Start) Selecteer “Stop” (Stop) om te stoppen zodra het
product zich bij het onderste eindpunt bevindt. Druk op de
toets .
De bewegingstijd is ingesteld.
Alle bijzonderheden over de basisinstelling staan in de
online handleiding.
Voorafgaand moeten de eindpunten van de motor
reeds zijn ingesteld.
Tip voor de werking van de draaibare zonwering: als
het product niet of weinig beweegt na korte
impulsen, stel dan de maximale draaitijd van de
lamellen of de startvertragingstijd af (zie de online
handleiding).
NL
EN A detailed manual can be found on the
website:
NL Een handleiding bevindt zich op de
website:
www.wiredcontrols.somfy.com
Somfy SAS
50 avenue du Nouveau Monde
F - 74300 Cluses
www.somfy.com
EN
Somfy hereby declares that the radio
equipment covered by these instructions is in
compliance with the requirements of Radio
Directive 2014/53/EU and the other essential
requirements of the applicable European
Directives.
The full text of the EU declaration of conformity
is available at www.somfy.com/ce.
NL
Hierbij verklaart Somfy dat de
radioapparatuur die behandeld wordt in dit
document in overeenstemming is met de
Richtlijn Radioapparatuur 2014/53/EU en de
andere relevante bepalingen van de Europese
richtlijnen voor toepassing binnen de Europese
Unie.
De volledige EU-conformiteitsverklaring
staat ter beschikking op de website
www.somfy.com/ce.
The images are not contractually binding. Copyright © 2016 Somfy SAS. All rights reserved. Somfy SAS, capital of 20.000.000 euros, RCS Annecy 303.970.230 - 11/2016 1/2 / Afbeeldingen zijn niet contractueel bindend. Copyright © 2016 Somfy SAS. All rights reserved. Somfy SAS, kapitaal van 20.000.000 euro, RCS Annecy 303.970.230 - 11/2016 1/2
www.somfy.com
Ref. 5128405A
SOLIRIS SMOOVEUNO
w
w
w
.
s
o
m
f
y
.
i
n
f
o
EN INSTALLATION GUIDE
NL INSTALLATIEGIDS
automatically in accordance with the brightness using
an optional sunlight, wind or rain sensor. The product
parameters can be modified from the backlit screen.
3. Description of the control buttons
(FigureA)
Arrow :
-Manual raising and lowering control in normal
operation.
-Navigation or changing the value in the settings menu.
Brief press (less than 2 seconds):
-When moving: stop function
-When stationary: switch to position
Brief press (less than 2 seconds):
-Return to the upper part of the menu or to the main
screen.
-On the main screen, the functions used are displayed.
-Brief press (less than 2 seconds) from the main screen:
access to the quick menu.
-Press and hold down (longer than 2 seconds) from the
main screen: direct access to the settings menu.
-Activation in the settings menu: confirms an entry.
Aer 3 minutes, the appliance will enter standby mode
and the display will switch off. Stand-by mode ends once
a key is activated.
4. Connection (FigureB)
The installation, testing and commissioning of the
appliance must be carried out by qualified personnel.
Switch off all the connecting cables. Ensure that they
cannot be accidentally switched on.
Observe the wiring of Neutral and Live.
Keep the “up” wiring and “down” wiring in the right
directions.
Refer to the sensor instructions for information
about their connection.
Connection Line Max. distance
Motor 0.75 - 1.5 mm² 150 m
230 V AC 1.5 mm² -
Sensors 0.6 - 0.75 mm² 50 m
5. Installation
5. 1. Dimensions and parts
(Figure C)
Dimensions: see figure
a
Electronic module
b
Cover frame
c
Power supply module
5. 2. Installation
(Figure D)
1) Connect up the connection cables and secure the
power supply module in the flush mounted box.
2) Position the electronic module with its cover frame in
the power supply module. Switch on the power supply.
6. Initial commissioning
(FigureE)
If the appliance has already been commissioned, the main
screen displays (image
d
).
If the appliance is in its original configuration, carry out
the settings
a
,
b
and
c
step by step.
Each setting must be confirmed with the “ok” button
in order to access the next step: language, time,
date(dd/mm/yy), type of equipment, linear travel(*1) and
using the sensors.
When setting is complete, the appliance operates and
the main screen is displayed (image
d
).
(*1) The linear travel time is the time required for a
roller shutter, an external venetian blind or an awning
to move from the open position to the fully closed
position.
Setting the travel in automatic mode:
To raise the product, select “Start”. To stop it, select
“Stop” as soon as the product is at the end of the upper
end limit. Press the button .
To lower the product, select “Start”. To stop it, select
“Stop” as soon as the product reaches the lower end
limit. Press the button .
The travel time is set.
All information on the basic settings are in the online
manual.
The motor end limits must be set in advance.
Advice for operating the external venetian blind:
if the product does not move or barely moves
aer jogging, adjust the maximum tilting time of
the slats or the start-up delay time (see the
online manual).
1. Safety and liability
1. 1. Liability
Before installing and using this product, please read
these instructions carefully. This Somfy product must be
installed by a home drive and automation professional.
Moreover, the installer must comply with standards
and legislation in the country in which the product
is being installed, and inform his customers of the
operating and maintenance conditions for the product.
He must give them these instructions. Any use outside
the sphere of application defined by Somfy is prohibited.
This invalidates the warranty and discharges Somfy
of all liability, as does any failure to comply with the
instructions given herein. Never begin installing without
first checking the compatibility of this product with the
associated equipment and accessories.
1. 2. Safety instructions
Keep out of reach of children.
Never drop, knock, drill or submerge.
Do not use abrasive products or solvents to clean it.
2. Product description
Soliris Smoove Uno is a timer that can automatically
and manually control a roller shutter, awning or external
venetian blind type motor. Soliris Smoove Uno is pre-set
to open at 7:30 am from Monday to Friday and at
8:30 am at the weekend, and to close at 8:00 pm. Soliris
Smoove Unoalso enables applications to be controlled
EN
DB
min. 50 mm
min. 40 mm
1)
2)
C
71 mm
50 mm
71 mm
50 mm
51 mm
31 mm
11 mm
a
bc
AE
ab
cd
1. Veiligheid en aansprakelijkheid
1. 1. Aansprakelijkheid
Voordat dit product geïnstalleerd en gebruikt wordt,
moet deze handleiding zorgvuldig gelezen worden. Dit
Somfy product moet geïnstalleerd worden door een
erkende installateur van automatiseringssystemen
in woningen. De installateur moet zich altijd
aan de in het land van installatie geldende
normen en wettelijke voorschrien houden en
zijn klanten informeren over de gebruiks- en
onderhoudsomstandigheden van het product.
Hij moet hun de handleiding overhandigen. Elk gebruik
buiten het door Somfy bepaalde toepassingsgebied
is verboden. Hierdoor en door het negeren van de
instructies in deze handleiding, vervallen iedere
aansprakelijkheid en garantie van Somfy. Vóór de
installatie aangevat wordt, moet gecontroleerd
worden of dit product compatibel is met de aanwezige
apparatuur en accessoires.
1. 2. Veiligheidsvoorschrien
Buiten het bereik van kinderen houden.
Laat het product niet vallen, sla er niet tegen,
boor er niet in en dompel het niet in een vloeistof.
Geen schuur- of oplosmiddelen gebruiken om
het schoon te maken.
2. Productbeschrijving
Soliris Smoove Uno is een klok voor het automatisch
of met de hand bedienen van een motor voor
een rolluik, zonnescherm of draaibare zonwering.
Soliris Smoove Uno is vooringesteld om open te gaan om
7:30 uur van maandag tot en met vrijdag en om 8:30 uur
in het weekend en om te sluiten om 20:00 uur. Met behulp
van een optionele zonnesensor/windsensor/regensensor
kunnen met de Soliris Smoove Uno de toepassingen
ook op basis van de lichtintensiteit/wind/regen worden
bestuurd. De parameters van het product kunnen op het
scherm worden veranderd.
3. Beschrijving van de bedieningstoetsen
(figuurA)
Pijl :
-Handmatig omhoog en omlaag zetten met normale
werking.
-Navigeren of een waarde veranderen in het instelmenu.
Korte druk (minder dan 2 seconden):
-Tijdens een beweging: stop-functie
-Gestopt: verplaatsing naar de positie
Korte druk (minder dan 2 seconden):
-Terug naar een hoger niveau van het menu of naar het
hoofdscherm.
-Op het hoofdscherm, visualisatie van de gebruikte
functies (zie de handleiding).
-Korte druk (minder dan 2 seconden) vanuit het
hoofdscherm: het snelmenu openen.
-Lange druk (meer dan 2 seconden) vanuit het
hoofdscherm: direct het instelmenu openen.
-Inschakelen in het instelmenu: bevestigen van een
invoer.
Na 3 minuten gaat het apparaat in de stand-bymodus
en wordt het scherm donker. Zodra een toets wordt
aangeraakt wordt de stand-bymodus weer verlaten.
4. Aansluiting (figuurB)
Het installeren, testen en in bedrijf stellen van het
systeem moeten gebeuren door een gekwalificeerde
vakman.
Zorg ervoor dat alle aansluitkabels spanningsloos
zijn. Zorg ervoor dat er niet onverwacht spanning op
kan worden gezet.
Houd u aan de aansluiting van de nul- en de
fasedraad.
Respecteer de aansluiting van de richtingen “Op’ en
“Neer”.
Zie de handleiding van de sensoren voor de
aansluiting ervan.
Aansluiting Lijn Max. afstand
Motor 0,75 - 1,5 mm² 150 m
230V AC 1,5 mm² -
Sensoren 0,6 - 0,75 mm² 50 m
5. Montage
5. 1. Afmetingen en onderdelen
(figuur C)
Afmetingen: zie figuur
a
Elektronische module
b
Sierlijst
c
Voedingsmodule
5. 2. Installatie
(figuur D)
1) Sluit de verbindingskabels aan en zet de
voedingsmodule vast in de inbouwdoos.
2) Plaats de elektronische module met zijn sierlijst in de
voedingsmodule. Schakel de spanning in.
6. Eerste inbedrijfstelling
(figuurE)
Als het apparaat reeds in bedrijf is gesteld, verschijnt het
hoofdscherm (afbeelding
d
).
Als het apparaat in de oorspronkelijke configuratie is,
voer dan stap voor stap de instellingen
a
,
b
en
c
uit.
Elke instelling moet worden bevestigd met de toets “ok“
om naar de volgende stap te kunnen gaan: taal, tijd,
datum (dd/mm/jj), type systeem, lineaire slag (*1) en
gebruik van de sensoren.
Als het instellen klaar is, werkt het apparaat en verschijnt
het hoofdscherm (afbeelding
d
).
(*1) De lineaire slag is de tijd die nodig is om een rolluik,
een zonnescherm of een draaibare zonwering vanuit de
open positie geheel te sluiten.
Instellen van de slag in de automatische modus:
Om het product omhoog te zetten, selecteert u “Start”
(Start). Selecteer “Stop” (Stop) om te stoppen zodra het
product zich bij het bovenste eindpunt bevindt. Druk op
de toets .
Om het product omlaag te zetten, selecteert u “Start”.
(Start) Selecteer “Stop” (Stop) om te stoppen zodra het
product zich bij het onderste eindpunt bevindt. Druk op de
toets .
De bewegingstijd is ingesteld.
Alle bijzonderheden over de basisinstelling staan in de
online handleiding.
Voorafgaand moeten de eindpunten van de motor
reeds zijn ingesteld.
Tip voor de werking van de draaibare zonwering: als
het product niet of weinig beweegt na korte
impulsen, stel dan de maximale draaitijd van de
lamellen of de startvertragingstijd af (zie de online
handleiding).
NL

I
EN
Optional wired wind,
rain and sunlight sensor
NL
Optionele bedrade
wind-/regen-/zonnesensor
H
GF
ab
cd
e
1)
2)
EN
Optional QuickCopy™
setting tool
NL
Optioneel
instelgereedschap
QuickCopy™
EN
Radio-controlled
optional Sunis Wirefree™
sunlight sensor
NL
Draadloze
zonnesensor optioneel
Sunis Wirefree™
7. Quick menu
(Figure F)
On the main screen, briefly press the button .
Several operating modes will appear:
a
Automatic mode: all the automatic functions are
activated. Manual control is possible.
b
Automatic mode stand-by: the automatic
functions are deactivated for 6, 12 or 18 hours. The
automatic functions then automatically re-activate.
c
Holiday mode: a presence is simulated if the
clock function with fixed times is activated (see online
manual).
d
Manual mode: automatic mode is deactivated.
e
Settings: access to the settings menu (see the
instructions).
EN
8. Saving and deleting the favourite position
(Figure G)
Prerequisite: the travel time should be accurately set (see
the commissioning section).
8. 1. Saving the favourite position
Position the product in the required position and stop it by
briefly pressing the button .
Press button again for at least 5sec.
The position is saved.
8. 2. Deleting the favourite position
Position the product in position .
Press button for at least 5sec.
The position has been deleted.
9. Restoring the original configuration
(Figure H)
1) Set the user profile in professional mode in
“Configuration menu” / “Configuration” / “User mode
set-up”.
Confirm the “Professional” option by pressing button
.
2) In the “Configuration” sub-menu chose the “Service”
option.
Confirm “Factory reset”.
Press the down button and select “Yes”.
Confirm by pressing button .
The basic settings must be carried out again.
10. Optional (Figure I)
10. 1. QuickCopy™ setting tool
Using this setting tool and the corresponding PC soware
(available free-of-charge to download), the settings can be
configured very easily and transferred to other products.
(See the QuickCopy™ instructions)
10. 2. Sunis Wirefree io™ radio-controlled
sunlight sensor
This sensor enables the twilight and sunlight functions to
be used. (See the Sunis Wirefree io™ instructions)
10. 3. Wired sensor (wind, rain, sunlight)
These sensors enable the wind, rain and sunlight functions
to be used with the Soliris Smoove Uno (see the sensor
instructions).
11. Technical data
Operating voltage: 230 V AC ~ 50/60 Hz
Output voltage: 230 V AC ~ 50/60 Hz
Maximum output current: 3 A/cos phi > 0.9
Motor travel time: Max. 6 min.
Protection rating: IP 20
Protection class: II
Operating temperature: 0 °C to + 40 °C
Do not dispose of this product with the household
waste. Please take it to a collection point or an
approved centre to ensure it is recycled correctly.
The images are not contractually binding. Copyright © 2016 Somfy SAS. All rights reserved. Somfy SAS, capital of 20.000.000 euros, RCS Annecy 303.970.230 - 11/2016 2/2 / Afbeeldingen zijn niet contractueel bindend. Copyright © 2016 Somfy SAS. All rights reserved. Somfy SAS, kapitaal van 20.000.000 euro, RCS Annecy 303.970.230 - 11/2016 2/2
7. Snelmenu
(figuur F)
Druk op het hoofdscherm kort op de toets .
Er verschijnen verschillende werkingsmodi:
a
Automatische modus: alle automatische functies
zijn ingeschakeld. Handmatige bediening is mogelijk.
b
Automatische modus in stand-by: de
automatische functies zijn uitgeschakeld gedurende
6 u, 12 u of 18 u. Daarna worden de automatische
functies weer ingeschakeld.
c
Vakantiemodus: de aanwezigheid wordt
gesimuleerd als de klok met vaste tijden is
ingeschakeld (zie de online handleiding).
d
Manuele modus: uitschakelen van de
automatische modus.
e
Instellingen: het instelmenu openen (zie de
handleiding).
8. Opslaan en wissen van de favoriete positie
(figuur G)
Voorwaarde: de bewegingstijd moet precies zijn ingesteld
(zie het hoofdstuk van de inbedrijfstelling).
8. 1. Opslaan van de favoriete positie
Zet het product op de gewenste positie en stop het met
een korte druk op de toets .
Druk gedurende ten minste 5 seconden opnieuw op de
toets .
De positie is nu geprogrammeerd.
8. 2. Wissen van de favoriete positie
Zet het product op de positie .
Druk gedurende ten minste 5 seconden op de toets .
De positie wordt gewist.
9. Terug naar de oorspronkelijke configuratie
(figuur H)
1) Stel het gebruikersprofiel in op vakman in onder
“Configuratiemenu” (Configuration menu) /
“Configuratie” (Configuration) / “Gebruikersprofiel”
(User mode set-up).
Bevestig de optie “Vakman” (Professional) door te
drukken op de toets .
2) Kies in het submenu “Configuratie” (Configuration)
de optie “Service” (Service).
Bevestig “Fabrieksinstellingen resetten” (Factory
reset).
Druk op de NEER toets en selecteer “Ja” (Yes).
Bevestig door de drukken op de toets .
De basisinstelling moet opnieuw worden uitgevoerd.
10. Optioneel (Figuur I)
10. 1. Instelgereedschap QuickCopy™
Met dit instelgereedschap en de bijbehorende pc-soware
(gratis te downloaden), kunnen de instellingen heel
eenvoudig worden uitgevoerd en naar andere producten
verzonden. (Zie de handleiding van QuickCopy™)
10. 2. Draadloze zonnesensor Sunis
Wirefree io™
Deze sensor maakt het gebruik van de schemerfuncties
en de zonnefunctie mogelijk. (Zie de handleiding van Sunis
Wirefree io™)
10. 3. Bedrade sensor (wind, regen, zon)
Met deze sensoren kunnen de wind-/regen-/zonfuncties
van de Soliris Smoove Uno worden gebruikt (zie de
handleiding van de sensoren).
11. Technische gegevens
Werkspanning: 230 V AC ~ 50 / 60 Hz
Uitgangsspanning: 230 V AC ~ 50 / 60 Hz
Maximale uitgangsstroom: 3 A / cos phi > 0,9
Werktijd van de motor: max. 6 min.
Beschermingsgraad: IP 20
Beschermingsklasse: II
Bedrijfstemperatuur: 0 °C tot +40 °C
Gooi het product niet weg met het huishoudelijk
afval. Let er op dat u het bij een inzamelpunt of
depot inlevert zodat het gerecycleerd kan worden.
NL
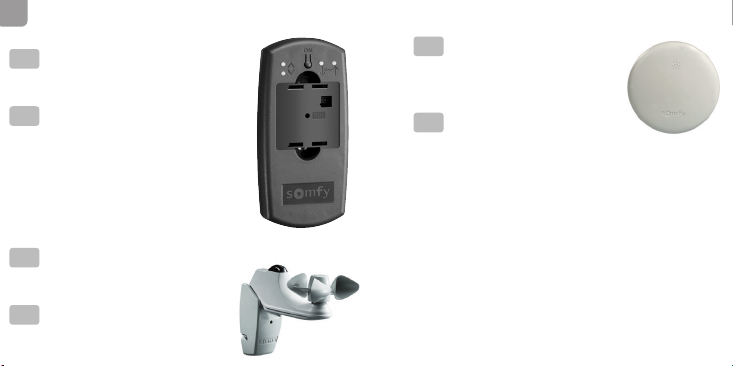

EN A detailed manual can be found on the
website:
NL Een handleiding bevindt zich op de
website:
www.wiredcontrols.somfy.com
Somfy SAS
50 avenue du Nouveau Monde
F - 74300 Cluses
www.somfy.com
EN
Somfy hereby declares that the radio
equipment covered by these instructions is in
compliance with the requirements of Radio
Directive 2014/53/EU and the other essential
requirements of the applicable European
Directives.
The full text of the EU declaration of conformity
is available at www.somfy.com/ce.
NL
Hierbij verklaart Somfy dat de
radioapparatuur die behandeld wordt in dit
document in overeenstemming is met de
Richtlijn Radioapparatuur 2014/53/EU en de
andere relevante bepalingen van de Europese
richtlijnen voor toepassing binnen de Europese
Unie.
De volledige EU-conformiteitsverklaring
staat ter beschikking op de website
www.somfy.com/ce.
The images are not contractually binding. Copyright © 2016 Somfy SAS. All rights reserved. Somfy SAS, capital of 20.000.000 euros, RCS Annecy 303.970.230 - 11/2016 1/2 / Afbeeldingen zijn niet contractueel bindend. Copyright © 2016 Somfy SAS. All rights reserved. Somfy SAS, kapitaal van 20.000.000 euro, RCS Annecy 303.970.230 - 11/2016 1/2
www.somfy.com
Ref. 5128405A
SOLIRIS SMOOVEUNO
w
w
w
.
s
o
m
f
y
.
i
n
f
o
EN INSTALLATION GUIDE
NL INSTALLATIEGIDS
automatically in accordance with the brightness using
an optional sunlight, wind or rain sensor. The product
parameters can be modified from the backlit screen.
3. Description of the control buttons
(FigureA)
Arrow :
-Manual raising and lowering control in normal
operation.
-Navigation or changing the value in the settings menu.
Brief press (less than 2 seconds):
-When moving: stop function
-When stationary: switch to position
Brief press (less than 2 seconds):
-Return to the upper part of the menu or to the main
screen.
-On the main screen, the functions used are displayed.
-Brief press (less than 2 seconds) from the main screen:
access to the quick menu.
-Press and hold down (longer than 2 seconds) from the
main screen: direct access to the settings menu.
-Activation in the settings menu: confirms an entry.
Aer 3 minutes, the appliance will enter standby mode
and the display will switch off. Stand-by mode ends once
a key is activated.
4. Connection (FigureB)
The installation, testing and commissioning of the
appliance must be carried out by qualified personnel.
Switch off all the connecting cables. Ensure that they
cannot be accidentally switched on.
Observe the wiring of Neutral and Live.
Keep the “up” wiring and “down” wiring in the right
directions.
Refer to the sensor instructions for information
about their connection.
Connection Line Max. distance
Motor 0.75 - 1.5 mm² 150 m
230 V AC 1.5 mm² -
Sensors 0.6 - 0.75 mm² 50 m
5. Installation
5. 1. Dimensions and parts
(Figure C)
Dimensions: see figure
a
Electronic module
b
Cover frame
c
Power supply module
5. 2. Installation
(Figure D)
1) Connect up the connection cables and secure the
power supply module in the flush mounted box.
2) Position the electronic module with its cover frame in
the power supply module. Switch on the power supply.
6. Initial commissioning
(FigureE)
If the appliance has already been commissioned, the main
screen displays (image
d
).
If the appliance is in its original configuration, carry out
the settings
a
,
b
and
c
step by step.
Each setting must be confirmed with the “ok” button
in order to access the next step: language, time,
date(dd/mm/yy), type of equipment, linear travel(*1) and
using the sensors.
When setting is complete, the appliance operates and
the main screen is displayed (image
d
).
(*1) The linear travel time is the time required for a
roller shutter, an external venetian blind or an awning
to move from the open position to the fully closed
position.
Setting the travel in automatic mode:
To raise the product, select “Start”. To stop it, select
“Stop” as soon as the product is at the end of the upper
end limit. Press the button .
To lower the product, select “Start”. To stop it, select
“Stop” as soon as the product reaches the lower end
limit. Press the button .
The travel time is set.
All information on the basic settings are in the online
manual.
The motor end limits must be set in advance.
Advice for operating the external venetian blind:
if the product does not move or barely moves
aer jogging, adjust the maximum tilting time of
the slats or the start-up delay time (see the
online manual).
1. Safety and liability
1. 1. Liability
Before installing and using this product, please read
these instructions carefully. This Somfy product must be
installed by a home drive and automation professional.
Moreover, the installer must comply with standards
and legislation in the country in which the product
is being installed, and inform his customers of the
operating and maintenance conditions for the product.
He must give them these instructions. Any use outside
the sphere of application defined by Somfy is prohibited.
This invalidates the warranty and discharges Somfy
of all liability, as does any failure to comply with the
instructions given herein. Never begin installing without
first checking the compatibility of this product with the
associated equipment and accessories.
1. 2. Safety instructions
Keep out of reach of children.
Never drop, knock, drill or submerge.
Do not use abrasive products or solvents to clean it.
2. Product description
Soliris Smoove Uno is a timer that can automatically
and manually control a roller shutter, awning or external
venetian blind type motor. Soliris Smoove Uno is pre-set
to open at 7:30 am from Monday to Friday and at
8:30 am at the weekend, and to close at 8:00 pm. Soliris
Smoove Unoalso enables applications to be controlled
EN
DB
min. 50 mm
min. 40 mm
1)
2)
C
71 mm
50 mm
71 mm
50 mm
51 mm
31 mm
11 mm
a
bc
AE
ab
cd
1. Veiligheid en aansprakelijkheid
1. 1. Aansprakelijkheid
Voordat dit product geïnstalleerd en gebruikt wordt,
moet deze handleiding zorgvuldig gelezen worden. Dit
Somfy product moet geïnstalleerd worden door een
erkende installateur van automatiseringssystemen
in woningen. De installateur moet zich altijd
aan de in het land van installatie geldende
normen en wettelijke voorschrien houden en
zijn klanten informeren over de gebruiks- en
onderhoudsomstandigheden van het product.
Hij moet hun de handleiding overhandigen. Elk gebruik
buiten het door Somfy bepaalde toepassingsgebied
is verboden. Hierdoor en door het negeren van de
instructies in deze handleiding, vervallen iedere
aansprakelijkheid en garantie van Somfy. Vóór de
installatie aangevat wordt, moet gecontroleerd
worden of dit product compatibel is met de aanwezige
apparatuur en accessoires.
1. 2. Veiligheidsvoorschrien
Buiten het bereik van kinderen houden.
Laat het product niet vallen, sla er niet tegen,
boor er niet in en dompel het niet in een vloeistof.
Geen schuur- of oplosmiddelen gebruiken om
het schoon te maken.
2. Productbeschrijving
Soliris Smoove Uno is een klok voor het automatisch
of met de hand bedienen van een motor voor
een rolluik, zonnescherm of draaibare zonwering.
Soliris Smoove Uno is vooringesteld om open te gaan om
7:30 uur van maandag tot en met vrijdag en om 8:30 uur
in het weekend en om te sluiten om 20:00 uur. Met behulp
van een optionele zonnesensor/windsensor/regensensor
kunnen met de Soliris Smoove Uno de toepassingen
ook op basis van de lichtintensiteit/wind/regen worden
bestuurd. De parameters van het product kunnen op het
scherm worden veranderd.
3. Beschrijving van de bedieningstoetsen
(figuurA)
Pijl :
-Handmatig omhoog en omlaag zetten met normale
werking.
-Navigeren of een waarde veranderen in het instelmenu.
Korte druk (minder dan 2 seconden):
-Tijdens een beweging: stop-functie
-Gestopt: verplaatsing naar de positie
Korte druk (minder dan 2 seconden):
-Terug naar een hoger niveau van het menu of naar het
hoofdscherm.
-Op het hoofdscherm, visualisatie van de gebruikte
functies (zie de handleiding).
-Korte druk (minder dan 2 seconden) vanuit het
hoofdscherm: het snelmenu openen.
-Lange druk (meer dan 2 seconden) vanuit het
hoofdscherm: direct het instelmenu openen.
-Inschakelen in het instelmenu: bevestigen van een
invoer.
Na 3 minuten gaat het apparaat in de stand-bymodus
en wordt het scherm donker. Zodra een toets wordt
aangeraakt wordt de stand-bymodus weer verlaten.
4. Aansluiting (figuurB)
Het installeren, testen en in bedrijf stellen van het
systeem moeten gebeuren door een gekwalificeerde
vakman.
Zorg ervoor dat alle aansluitkabels spanningsloos
zijn. Zorg ervoor dat er niet onverwacht spanning op
kan worden gezet.
Houd u aan de aansluiting van de nul- en de
fasedraad.
Respecteer de aansluiting van de richtingen “Op’ en
“Neer”.
Zie de handleiding van de sensoren voor de
aansluiting ervan.
Aansluiting Lijn Max. afstand
Motor 0,75 - 1,5 mm² 150 m
230V AC 1,5 mm² -
Sensoren 0,6 - 0,75 mm² 50 m
5. Montage
5. 1. Afmetingen en onderdelen
(figuur C)
Afmetingen: zie figuur
a
Elektronische module
b
Sierlijst
c
Voedingsmodule
5. 2. Installatie
(figuur D)
1) Sluit de verbindingskabels aan en zet de
voedingsmodule vast in de inbouwdoos.
2) Plaats de elektronische module met zijn sierlijst in de
voedingsmodule. Schakel de spanning in.
6. Eerste inbedrijfstelling
(figuurE)
Als het apparaat reeds in bedrijf is gesteld, verschijnt het
hoofdscherm (afbeelding
d
).
Als het apparaat in de oorspronkelijke configuratie is,
voer dan stap voor stap de instellingen
a
,
b
en
c
uit.
Elke instelling moet worden bevestigd met de toets “ok“
om naar de volgende stap te kunnen gaan: taal, tijd,
datum (dd/mm/jj), type systeem, lineaire slag (*1) en
gebruik van de sensoren.
Als het instellen klaar is, werkt het apparaat en verschijnt
het hoofdscherm (afbeelding
d
).
(*1) De lineaire slag is de tijd die nodig is om een rolluik,
een zonnescherm of een draaibare zonwering vanuit de
open positie geheel te sluiten.
Instellen van de slag in de automatische modus:
Om het product omhoog te zetten, selecteert u “Start”
(Start). Selecteer “Stop” (Stop) om te stoppen zodra het
product zich bij het bovenste eindpunt bevindt. Druk op
de toets .
Om het product omlaag te zetten, selecteert u “Start”.
(Start) Selecteer “Stop” (Stop) om te stoppen zodra het
product zich bij het onderste eindpunt bevindt. Druk op de
toets .
De bewegingstijd is ingesteld.
Alle bijzonderheden over de basisinstelling staan in de
online handleiding.
Voorafgaand moeten de eindpunten van de motor
reeds zijn ingesteld.
Tip voor de werking van de draaibare zonwering: als
het product niet of weinig beweegt na korte
impulsen, stel dan de maximale draaitijd van de
lamellen of de startvertragingstijd af (zie de online
handleiding).
NL

I
EN
Optional wired wind,
rain and sunlight sensor
NL
Optionele bedrade
wind-/regen-/zonnesensor
H
GF
ab
cd
e
1)
2)
EN
Optional QuickCopy™
setting tool
NL
Optioneel
instelgereedschap
QuickCopy™
EN
Radio-controlled
optional Sunis Wirefree™
sunlight sensor
NL
Draadloze
zonnesensor optioneel
Sunis Wirefree™
7. Quick menu
(Figure F)
On the main screen, briefly press the button .
Several operating modes will appear:
a
Automatic mode: all the automatic functions are
activated. Manual control is possible.
b
Automatic mode stand-by: the automatic
functions are deactivated for 6, 12 or 18 hours. The
automatic functions then automatically re-activate.
c
Holiday mode: a presence is simulated if the
clock function with fixed times is activated (see online
manual).
d
Manual mode: automatic mode is deactivated.
e
Settings: access to the settings menu (see the
instructions).
EN
8. Saving and deleting the favourite position
(Figure G)
Prerequisite: the travel time should be accurately set (see
the commissioning section).
8. 1. Saving the favourite position
Position the product in the required position and stop it by
briefly pressing the button .
Press button again for at least 5sec.
The position is saved.
8. 2. Deleting the favourite position
Position the product in position .
Press button for at least 5sec.
The position has been deleted.
9. Restoring the original configuration
(Figure H)
1) Set the user profile in professional mode in
“Configuration menu” / “Configuration” / “User mode
set-up”.
Confirm the “Professional” option by pressing button
.
2) In the “Configuration” sub-menu chose the “Service”
option.
Confirm “Factory reset”.
Press the down button and select “Yes”.
Confirm by pressing button .
The basic settings must be carried out again.
10. Optional (Figure I)
10. 1. QuickCopy™ setting tool
Using this setting tool and the corresponding PC soware
(available free-of-charge to download), the settings can be
configured very easily and transferred to other products.
(See the QuickCopy™ instructions)
10. 2. Sunis Wirefree io™ radio-controlled
sunlight sensor
This sensor enables the twilight and sunlight functions to
be used. (See the Sunis Wirefree io™ instructions)
10. 3. Wired sensor (wind, rain, sunlight)
These sensors enable the wind, rain and sunlight functions
to be used with the Soliris Smoove Uno (see the sensor
instructions).
11. Technical data
Operating voltage: 230 V AC ~ 50/60 Hz
Output voltage: 230 V AC ~ 50/60 Hz
Maximum output current: 3 A/cos phi > 0.9
Motor travel time: Max. 6 min.
Protection rating: IP 20
Protection class: II
Operating temperature: 0 °C to + 40 °C
Do not dispose of this product with the household
waste. Please take it to a collection point or an
approved centre to ensure it is recycled correctly.
The images are not contractually binding. Copyright © 2016 Somfy SAS. All rights reserved. Somfy SAS, capital of 20.000.000 euros, RCS Annecy 303.970.230 - 11/2016 2/2 / Afbeeldingen zijn niet contractueel bindend. Copyright © 2016 Somfy SAS. All rights reserved. Somfy SAS, kapitaal van 20.000.000 euro, RCS Annecy 303.970.230 - 11/2016 2/2
7. Snelmenu
(figuur F)
Druk op het hoofdscherm kort op de toets .
Er verschijnen verschillende werkingsmodi:
a
Automatische modus: alle automatische functies
zijn ingeschakeld. Handmatige bediening is mogelijk.
b
Automatische modus in stand-by: de
automatische functies zijn uitgeschakeld gedurende
6 u, 12 u of 18 u. Daarna worden de automatische
functies weer ingeschakeld.
c
Vakantiemodus: de aanwezigheid wordt
gesimuleerd als de klok met vaste tijden is
ingeschakeld (zie de online handleiding).
d
Manuele modus: uitschakelen van de
automatische modus.
e
Instellingen: het instelmenu openen (zie de
handleiding).
8. Opslaan en wissen van de favoriete positie
(figuur G)
Voorwaarde: de bewegingstijd moet precies zijn ingesteld
(zie het hoofdstuk van de inbedrijfstelling).
8. 1. Opslaan van de favoriete positie
Zet het product op de gewenste positie en stop het met
een korte druk op de toets .
Druk gedurende ten minste 5 seconden opnieuw op de
toets .
De positie is nu geprogrammeerd.
8. 2. Wissen van de favoriete positie
Zet het product op de positie .
Druk gedurende ten minste 5 seconden op de toets .
De positie wordt gewist.
9. Terug naar de oorspronkelijke configuratie
(figuur H)
1) Stel het gebruikersprofiel in op vakman in onder
“Configuratiemenu” (Configuration menu) /
“Configuratie” (Configuration) / “Gebruikersprofiel”
(User mode set-up).
Bevestig de optie “Vakman” (Professional) door te
drukken op de toets .
2) Kies in het submenu “Configuratie” (Configuration)
de optie “Service” (Service).
Bevestig “Fabrieksinstellingen resetten” (Factory
reset).
Druk op de NEER toets en selecteer “Ja” (Yes).
Bevestig door de drukken op de toets .
De basisinstelling moet opnieuw worden uitgevoerd.
10. Optioneel (Figuur I)
10. 1. Instelgereedschap QuickCopy™
Met dit instelgereedschap en de bijbehorende pc-soware
(gratis te downloaden), kunnen de instellingen heel
eenvoudig worden uitgevoerd en naar andere producten
verzonden. (Zie de handleiding van QuickCopy™)
10. 2. Draadloze zonnesensor Sunis
Wirefree io™
Deze sensor maakt het gebruik van de schemerfuncties
en de zonnefunctie mogelijk. (Zie de handleiding van Sunis
Wirefree io™)
10. 3. Bedrade sensor (wind, regen, zon)
Met deze sensoren kunnen de wind-/regen-/zonfuncties
van de Soliris Smoove Uno worden gebruikt (zie de
handleiding van de sensoren).
11. Technische gegevens
Werkspanning: 230 V AC ~ 50 / 60 Hz
Uitgangsspanning: 230 V AC ~ 50 / 60 Hz
Maximale uitgangsstroom: 3 A / cos phi > 0,9
Werktijd van de motor: max. 6 min.
Beschermingsgraad: IP 20
Beschermingsklasse: II
Bedrijfstemperatuur: 0 °C tot +40 °C
Gooi het product niet weg met het huishoudelijk
afval. Let er op dat u het bij een inzamelpunt of
depot inlevert zodat het gerecycleerd kan worden.
NL
Table of contents
Other SOMFY Timer manuals


