SOMFY P03 User manual

1
Page
© by Somfy GmbH
Rev. 01-03/2009 vm
Operating Instructions
Weather Station P03
for Climax / AS 315N

3
Page
© by Somfy GmbH
Contents
Safety Notes for Installation ........................................................3
1 General
1.1 Item Number............................................................................................4
1.2 Included in Delivery.................................................................................4
1.3 Technichal Data........................................................................................4
1.4 Application...............................................................................................4
1.5 Components............................................................................................5
2 Installation
2.1 Installation ...............................................................................................6
2.1.1 Installation Recommendations .......................................................6
2.1.2 Installation of wall/mast holder .......................................................6
2.1.3 Drilling plan for holder.....................................................................7
2.2 Electrical connection............................................................................7, 8
2.3 Positioning of the DCF antenna...............................................................9
2.4 Securing the Weather Station..................................................................9
3 Maintenance.......................................................................................9
4 Notes.....................................................................................................10
Safety Notes for Installation
Installation, checking, start-up and correction of faults in the Weather Station
must be carried out only by a qualified technician.
When connecting the Weather Station, ensure that there is no voltage on the
intended wiring (switch off fuses in the conservatory circuit).
Take safety measures against unintentional switching on.
Pay attention to correct wiring connections. Awrong connection can lead to
destroying the Weather Station or the electronic devices connected to it.
When the Weather Station is damaged it must not be put into operation.
Do not open the Weather Station whenever water (rain or snow) can enter. Even
small drops can damage the electronics.
When installing, it is important that the temperature sensor (a small chip on the
underside of the housing) is not damaged.
The wiring connections between the chip and rain sensor must not be torn off or
bent.

4
Page © by Somfy GmbH
1 General
Operating Voltage: 24 V DC
Operating Temperature: -30°C up to +50°C
Protection Type: IP 44
Protection Class: III
Temperature sensor: - 30°C bis +50°C
Wind sensor: 0m/s up to 70m/s
Brightness sensor: 0 Lux up to 99kLux
Rain sensor: (heated) approx. 1,2W
Weight: approx. 148 g
To be able to take full advantage of the fault-free functions of the product please read
through these operating instructions carefully. Somfy can not be held liable for faults
and damages due to wrong use or neglected operating instructions (wrong installation,
wrong start-up, incorrect operation, etc.). Herewith, SOMFY declares this device to be in
accordance with the essential requirements and within other relevant regulations of gui-
deline 1999/5/EG. Astatement of compliance is available on the Somfy website, www.
somfy.com/CE.
For questions, enquiries and requests please call the Service Hotline
+49 (0) 18 05/25 21 31 (0,14 €/min. German network tariff, mobile tariff may vary) as well as under the
email address: service@somfy.de
1.1 Item Number
Ref. 9 015 079
1.2 Included in Delivery
1 X Weather Station (1)
1 X Wall / mast holder (2)
1 X Operating Instructions
12
1.3 Technical Data
1.4 Application
The Weather Station measures temperature, wind speed as well as brightness. It
recognises rain and receives a DCF radio signal for date and time. The Weather Station
is included in delivery with the conservatory controls Climax, as well as AS 315N and
intended for use in combination with these.

5
Page
© by Somfy GmbH
1 General
1.5 Component
Brightness sensor
Wind sensor (heated)
Rain sensor (heated)
Temperature sensor
Integrated DCF antenne
1 +24V DC
2 GND
3 data
Wiring inlet
Connection rain sensor
Connection control cable
LED DCF signal setting DCF antenne
Brightness sensor
Brightness sensor Brightness /
twilight sensor
Brightness sensor
Brightness /
twilight sensor
6
Page © by Somfy GmbH
2 Installation
Select the position for installation on the building or in the conservatory where wind and
rain can be determined by the sensors without hindrance. No construction parts may be
placed above the Weather Station from which water drops can fall onto the rain sensor
after it has stopped raining or snowing. The Weather Station may not be positioned in the
shade of the building or in tree shade. 60 cm free space must be allowed under the Wea-
ther Station in order to attain a correct wind measurement and to hinder snowing-over in
snowy conditions.
Metal constructions or large surface metal sheets directly behind or near the Weather Sta-
tion reduce the receiving quality of the built-in radio receiver. Please take this into consi-
deration when selecting the position for installation. Likewise, magnetic fields, transmitters
and interference from electrical devices (e.g. strip lamps, lighted signs, switching circuits
etc.) can negatively influence the reception of the DCF signal.
2.1 Installation
2.1.1 Installation Recommendations
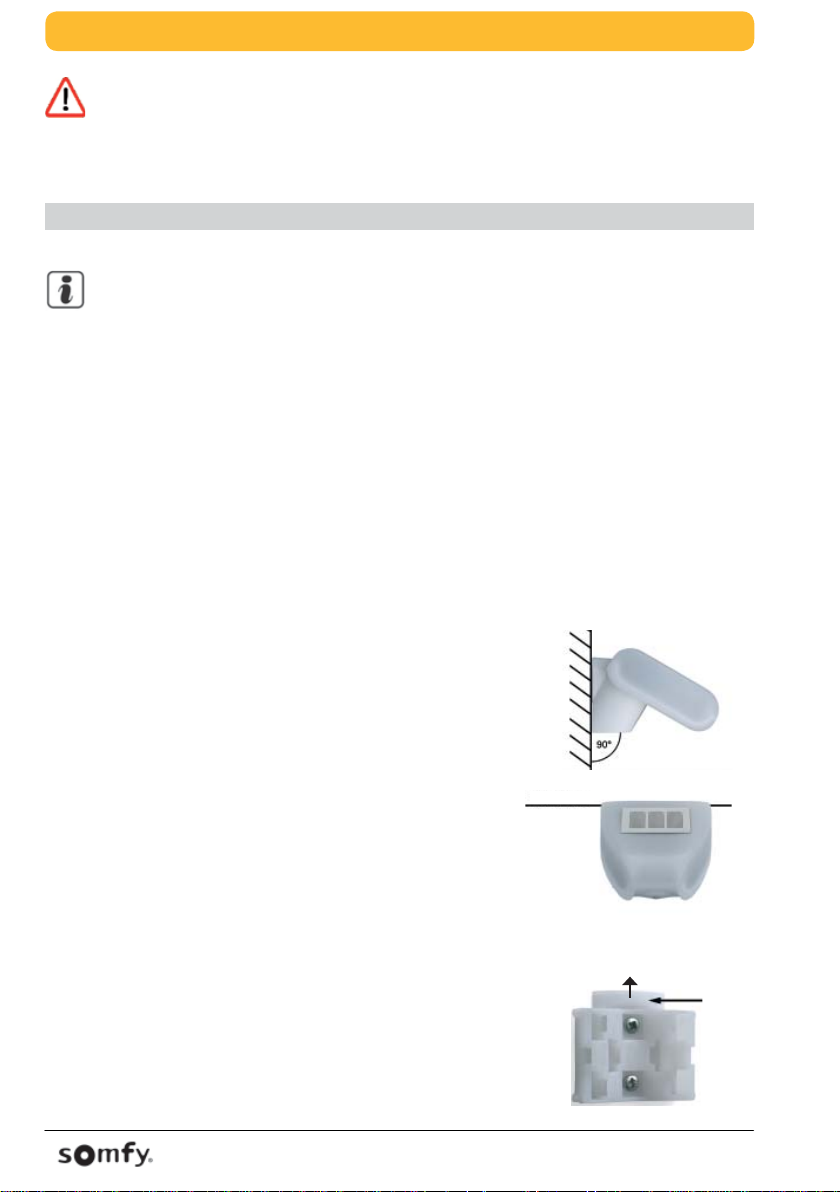
Secure the Weather Station on a vertical wall or mast.
•Install the Weather Station in the horizontal position.
Note: The supply cable must not exceed 30m in length.
Attention: Setting up, checking, start-up and correcting faults in the
system must be carried out only by a qualified technician
(VDE 0100 - 0200)!
Connect the intended wiring for installation without voltage.
Ensure safety measures against unintentional switching on.
• secure the holder vertically on the wall or mast.
With wall installation:
• Install the holder with the flat side facing the wall. The
shoulder (1) must be facing upwards.
2.1.2 Installation of the wall or mast holder
1
Wall
or
mast
Horizontal
7
Page
© by Somfy GmbH
2.1.2 Installation of the wall / mast holder
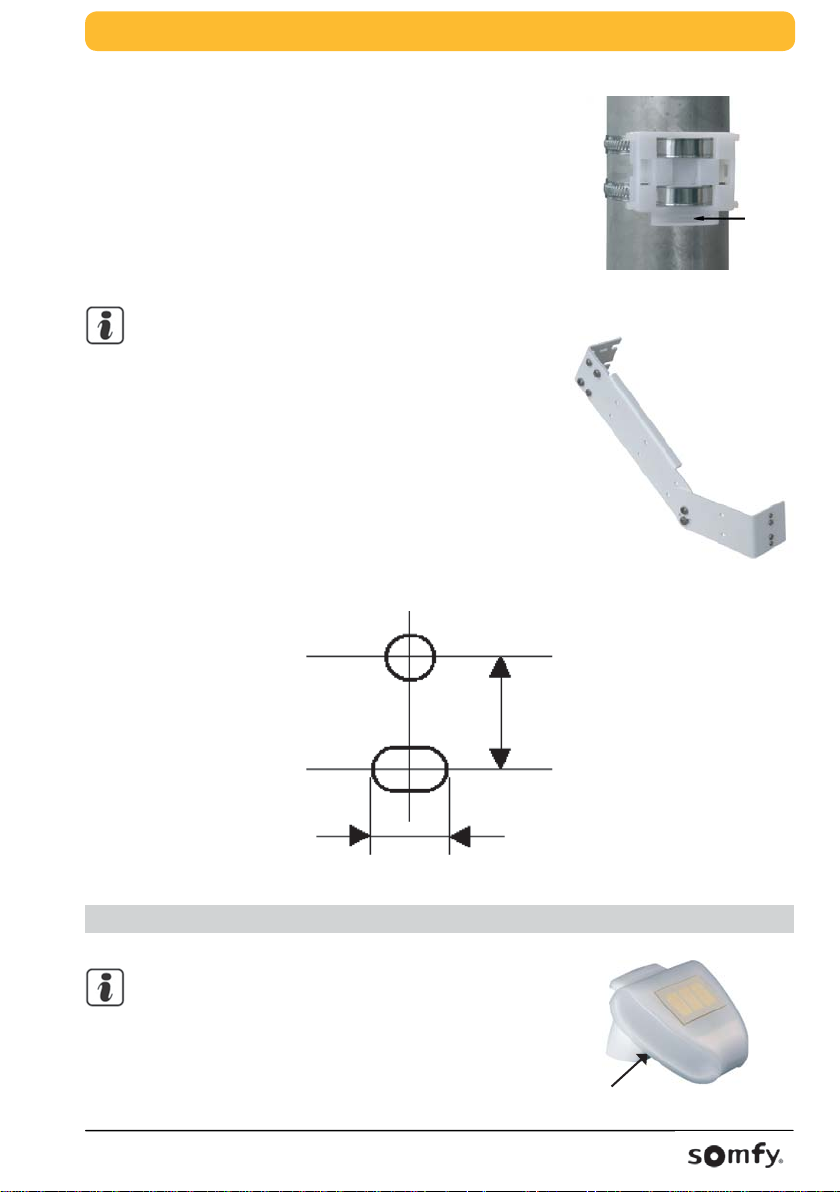
With mast installation:
• Install the holder with the rounded side to the mast. The
shoulder (1) must be facing downwards.
• Secure the holder with two suitable screw-thread clamps
(not included in delivery). 1
Note: When installing the Weather Station on a wall, pipe or on a
beam, the optional arm bracket, Ref. 9014588, can be used.
2.1.3 Drilling diagram of the holder
22 mm
7,5 X 5 mm
Ø 5 mm
2 Installation
Note: The top housing part of the Weather Station
with the rain sensor is clicked-in left and
right on the under edge of the base.
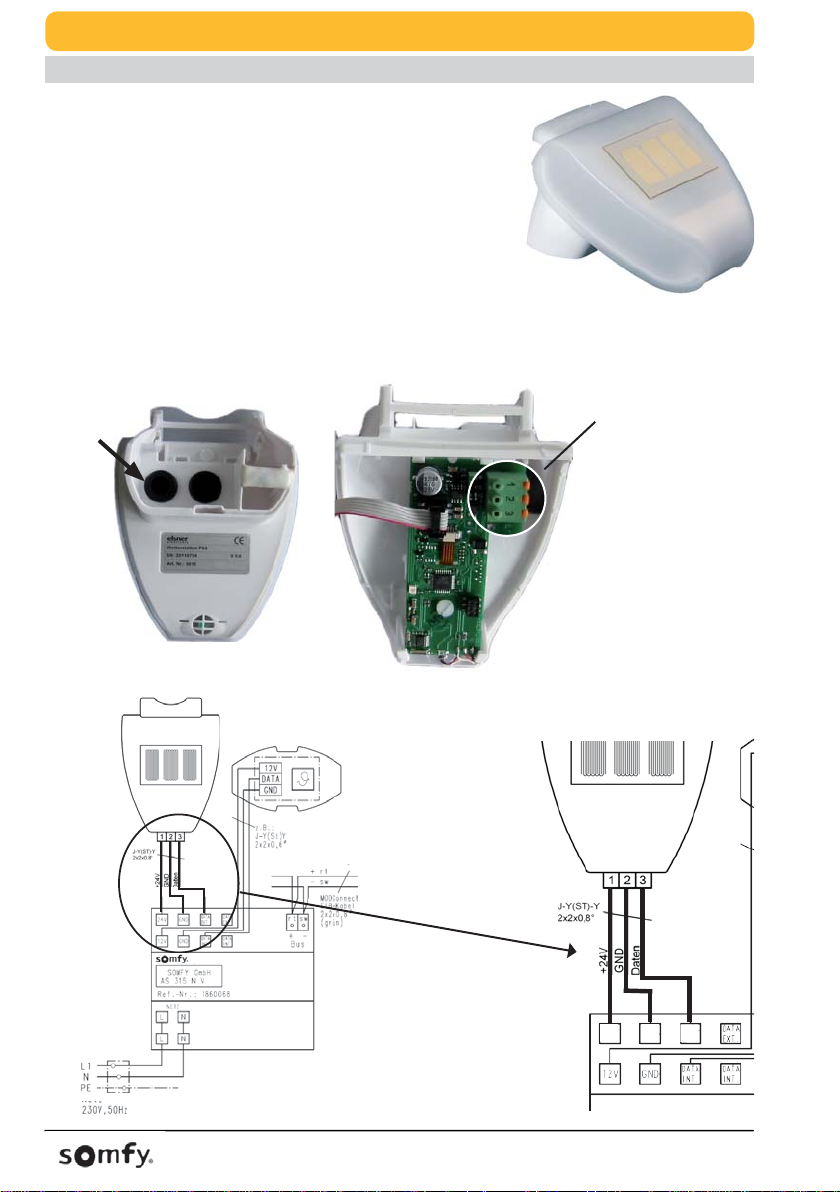
2.2 Electrical connection
8
Page © by Somfy GmbH
2 Installation
• Take off the top part of the Weather Station housing.
Be careful not to tear off the wiring connections
between the chip in the under part of the rain sensor
(wire with plug).
• Feed the cable (voltage supply, bus connection) through
the rubber seal (1) on the bottom of the Weather Station
and connect voltage and bus to the intended clips (2).
The supply line to the Weather Station must not
exceed 30m in length. The connection is made with
standard telephone cable, (J-Y(ST)Y 2 x 2 x 0,8).
1 +24V DC
2 GND
3 data
12
2.2 Electrical Connection
24V GND DATA
EXT.
KNX/EIB- Kombisensor AS 315N
1.4
Weather Station
9015079
Inside temperature sensor
9001461
EIB BUS cable
Mains
Branch
socket

9
Page
© by Somfy GmbH
2 Installation
Using the adjusting screw (1), the antenne can be turned
in an angle of 180° for optimum positioning. Reception
occurs when the LED control light (2) blinks once per
second (in the 59th second blinking will stop once).
Note: The antenna for DCF reception of date
and time is situated in the housing under
the chip.
1
2
• Close the housing by bringing the top part of the
housing over the base.
The top part must click in with a clear “click“ sound.
• Move the Weather Station from above in the mounted
holder.
The edged peg sides of the holder must click in to
the grooves of the housing
The Weather Station can be taken off the holder by
pushing it upwards carefully against the resistance of the
grooves.
3 Servicing the Weather Station
The Weather Station should be checked regularly twice a year for dirt and cleaned
when necessary. When the wind sensor is subject to a lot of dirt it may malfunction by
recognising a continuous rain message or that there is no more sunshine.
Attention: When servicing the Weather Station and damage is identi-
fied, it must be taken out of operation.
2.3 Positioning of the DCF antenna
2.4 Mounting the Weather Station
Groove
Groove

10
Page © by Somfy GmbH
4 Notes
__________________________
__________________________
__________________________
__________________________
__________________________
__________________________
__________________________
__________________________
__________________________
__________________________
__________________________
__________________________
__________________________
__________________________
__________________________
__________________________
__________________________
__________________________

12
Page © by Somfy GmbH
Rev. 01-0403/2009 vm
03/2009 vm • Somfy GmbH • Felix-Wankel-Strasse 50 • D-72108 Rottenburg / N • www.somfy.de
Germany
Somfy GmbH
Felix-Wankel-Straße 50
D-72108 Rottenburg / N
Service Hotline +49 (0)180/5 25 21 31
(0,14 €/min. German network tariff, mobile tariff may vary)
e-mail: service@somfy.de
Austria
SOMFY GmbH
Johann-Herbst-Str. 23
A-5061 Elsbethen-Glasenbach
Tel.: +43 (0)662 625308 0
Fax.: +43 (0)662 625308 22
e-mail: office@somfy.at
Switzerland
Somfy AG
Vorbuchenstrasse 17
CH-8303 Bassersdorf
Telefon +41 44 838 40 30
Fax +41 44 836 41 95
e-mail: support@somfy.ch
Table of contents
Other SOMFY Weather Station manuals

SOMFY
SOMFY Soliris io 1W 230V User manual

SOMFY
SOMFY animeo Connect Weather Station M25 User manual

SOMFY
SOMFY Weather Station M8 User manual

SOMFY
SOMFY Home Motion Eolis WireFree io User manual

SOMFY
SOMFY animeo Solo User manual

SOMFY
SOMFY animeo Solo User manual

SOMFY
SOMFY 1870932 User manual

SOMFY
SOMFY Weather Station M8 User manual

SOMFY
SOMFY animeo Connect Weather Station M10 User manual


