manuals.online logo
Brands
  1. Home
  2. •
  3. Brands
  4. •
  5. Songmics
  6. •
  7. Rack & Stand
  8. •
  9. Songmics LLR04 User manual

Songmics LLR04 User manual

This manual suits for next models

2

Other Songmics Rack & Stand manuals

Songmics ULHR30 User manual

Songmics

Songmics ULHR30 User manual

Songmics LLR13 User manual

Songmics

Songmics LLR13 User manual

Songmics LGR23/023 User manual

Songmics

Songmics LGR23/023 User manual

Songmics LSA13G User manual

Songmics

Songmics LSA13G User manual

Songmics GLR030B11 User manual

Songmics

Songmics GLR030B11 User manual

Songmics HSR60 User manual

Songmics

Songmics HSR60 User manual

Songmics LMR03/003 User manual

Songmics

Songmics LMR03/003 User manual

Songmics VASAGLE HSR66 User manual

Songmics

Songmics VASAGLE HSR66 User manual

Songmics HSR61 User manual

Songmics

Songmics HSR61 User manual

Songmics RTG01 User manual

Songmics

Songmics RTG01 User manual

Songmics HSR13 User manual

Songmics

Songmics HSR13 User manual

Songmics LLD201 User manual

Songmics

Songmics LLD201 User manual

Songmics LSN63 User manual

Songmics

Songmics LSN63 User manual

Songmics LLR40102 User manual

Songmics

Songmics LLR40102 User manual

Songmics VASAGLE HSR065 User manual

Songmics

Songmics VASAGLE HSR065 User manual

Songmics HSR05 Instruction Manual

Songmics

Songmics HSR05 Instruction Manual

Songmics HSR13BK User manual

Songmics

Songmics HSR13BK User manual

Songmics HSR01 User manual

Songmics

Songmics HSR01 User manual

Songmics HSR06 User manual

Songmics

Songmics HSR06 User manual

Songmics GFS102 User manual

Songmics

Songmics GFS102 User manual

Songmics ULLD201 User manual

Songmics

Songmics ULLD201 User manual

Songmics BCB12 User manual

Songmics

Songmics BCB12 User manual

Songmics GSA320 User manual

Songmics

Songmics GSA320 User manual

Songmics VASAGLE HSR47 User manual

Songmics

Songmics VASAGLE HSR47 User manual

Popular Rack & Stand manuals by other brands

Dynex DX-MP3MT Quick setup guide

Dynex

Dynex DX-MP3MT Quick setup guide

Konig & Meyer 24185 manual

Konig & Meyer

Konig & Meyer 24185 manual

ECG LD 326501 instruction manual

ECG

ECG LD 326501 instruction manual

Philips SB7S19S/00 quick start guide

Philips

Philips SB7S19S/00 quick start guide

Woodline KIT-250 lb instructions

Woodline

Woodline KIT-250 lb instructions

ricoo S1222 installation instructions

ricoo

ricoo S1222 installation instructions

Kanto P301 user manual

Kanto

Kanto P301 user manual

VidaBox VB MNT FFS2 installation guide

VidaBox

VidaBox VB MNT FFS2 installation guide

PROEL PLWIN60C user manual

PROEL

PROEL PLWIN60C user manual

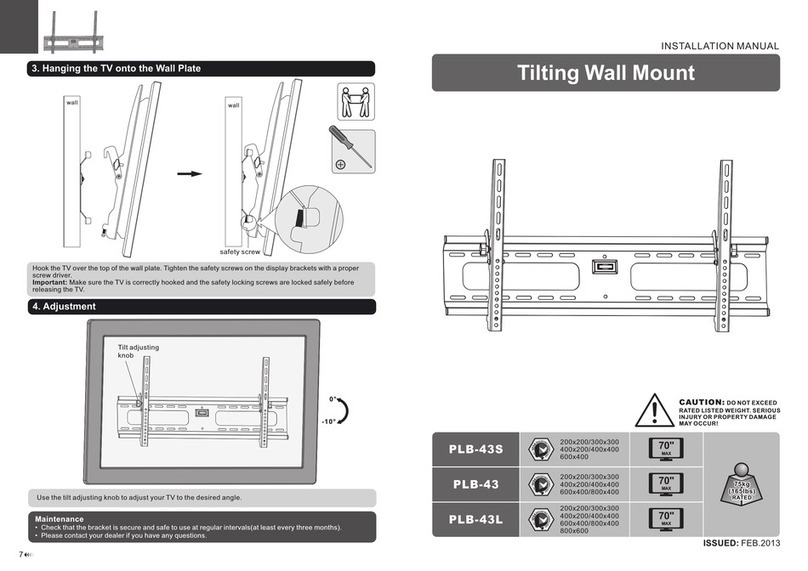
AllMounts PLB-43S instruction manual

AllMounts

AllMounts PLB-43S instruction manual

VMP VH-001 instruction sheet

VMP

VMP VH-001 instruction sheet

Nederman SYSTEM 920/400 instruction manual

Nederman

Nederman SYSTEM 920/400 instruction manual

Glasdon ORBIS POST MOUNTING KIT installation guide

Glasdon

Glasdon ORBIS POST MOUNTING KIT installation guide

Grape GM401 user manual

Grape

Grape GM401 user manual

FourStarGroup 11225296 manual

FourStarGroup

FourStarGroup 11225296 manual

CHIEF FLR100 installation instructions

CHIEF

CHIEF FLR100 installation instructions

FEC XDCAM EX PMW-EX30 manual

FEC

FEC XDCAM EX PMW-EX30 manual

OYPLA DIY 4122 user manual

OYPLA DIY

OYPLA DIY 4122 user manual

manuals.online logo
manuals.online logoBrands
  • About & Mission
  • Contact us
  • Privacy Policy
  • Terms and Conditions

Copyright 2025 Manuals.Online. All Rights Reserved.

LLR04/401/41L
2
DE
FR
EN
Notes
ŸPlease fix the tubes into the bottom of plastic connectors.
ŸDo not touch the edges of the tube, it is very sharp.
ŸPlease place the clothes rack on a level floor and keep balance when hanging clothes.
ŸKeep away from fire sources.
ŸClean with a moistened cloth and mild detergent. Do not use aggressive chemicals or abrasives
ŸFold and store the rack in a dry place when not in use.
ŸPlease tighten the screws before use.
ŸPlease loose the screws before fold.
Hinweise
ŸBitte fassen Sie die Rohrkante nicht, es ist sehr scharf.
ŸStellen Sie sicher, dass die Rohre bis zum Ende des Plastikteils eingesetzt werden, und alle Einzelteile
richtig zusammengesetzt sind.
ŸStellen Sie sicher, dass der Kleiderständer auf eine horizontale Ebene stellen, und hängen Sie die
Kleidung gleichmäßig auf die Stange, damit die beiden Seiten des Kleiderständers sich im Gleichgewicht
halten.
ŸBitte halten Sie den Kleiderständer von Hitze- und Zündquellen fern.
ŸBei der Reinigung benutzen Sie bitte einen nassen Wischlappen und den Neutralreiniger. Verwenden Sie
keinesfalls den aggressive Reiniger oder das Schleifmitteln.
ŸWenn der Kleiderständer nicht in Gebrauch ist, nehmen Sie den Kleiderständer auseinander, und lagern
Sie ihn kühl und trocken.
Notes
ŸNe touchez pas la frontière aiguisée.
ŸGardez le portant à l’environnement sec et frais.
ŸVeuillez assurer que toutes pièces sont montées correctement.
ŸIl faudrait mettre le portant sur une surface plate. Faites attention à l’équilibre des 2 côtés.
ŸGardez le portant loin de la chaleur.
ŸIl est recommandé de nettoyer le portant par détergent neutre. N’utilisez pas des détergents forts. Il est
interdit de polir le portant.
ŸDémontez le portant et le conservez à un environnement frais et sec après l’utilisation.
ŸSerrez le boulon avant toute utlisation.
ŸDeserrez le boulon avant de plier le portant.
ŸIl est facile de conserver le portant et gagner de l’espace.
IT
ES
3
Note
ŸNon toccare il bordo del tubo, è molto affilato.
ŸSi deve inserire i tubi alle parti plastiche completamente.
ŸAssicurarsi che tutte le parti siano ben assemblate.
ŸIl prodotto deve essere disposto su un piano orizzontale, e tenerlo in bilancia quando si appendono I
vestiti.
ŸTenere il prodotto lontano da calore.
ŸPulire con acqua e detergente neutro, non usare detergenti abrasivi.
ŸSmontare il prodotto e conservarlo ad un posto asciutto quando non sia in uso.
ŸUsare il prodotto dopo aver stretto le viti.
ŸPiegare il prodotto dopo aver allentato le viti.
Notas
ŸPor favor, no toque el borde del tubo, es muy agudo.
ŸInserte el tubo en la parte inferior de las piezas plásticas.
ŸAsegúrese de que todos los elementos estén correctamente montados.
ŸPor favor, asegúrese de colocar el perchero en una posición nivelada y mantener el equilibrio al colgar la
ropa.
ŸPor favor, manténgalo alejado de la estufa y el fuego.
ŸNo lo limpie con productos químicos agresivos o abrasivos sino con un trapo mojado y detergentes
neutros.
ŸDesmonte el perchero y guárdelo en un lugar ventilado y seco cuando no se usa.
ŸPor favor, apriete el tornillo antes del uso.
ŸPor favor, destornille el tornillo antes de plegarlo.
ŸEs conveniente para guardarse y ahorrar el espacio.
4
1
2
3
4
5
6× 2 × 2
86cm
× 2
× 1
× 1
× 2
× 1
7× 4
5
1
2
4
5
6
5
6
7
3
6
2
3
ŸPlease make sure that the tubes have been inserted into the bottom of the plastic connectors.
EN
DE ŸBitter stellen Sie sicher, dass die Rohre bis zum Ende in das Plastik-Verbindungsstück
eingesetzt werden.
7
4
7
1
5
8
ŸNach der Montage oder der Höhenverstellung drehen Sie die Plastikteile zum Fixieren
bitte fest.
ŸPlease tightening the plastic connectors after assembling or height adjustment.
EN
DE
Version QM:1.0
Stand:25.03.2020
6
9
EUZIEL International GmbH
!
!
!
!
!
ŸBei der Höhenverstellung beachten bitte, dass die geschnitzte Linie nicht
überschritten werden soll.
ŸDO not extend this item beyond scale line to achieve the optimum using effect.
EN
DE