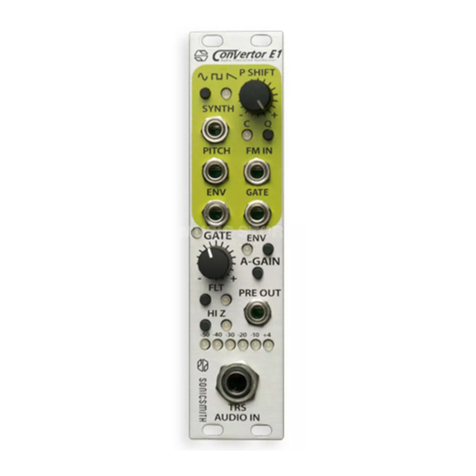
Sonicsmith ConVertor E1 User manual

1) Connecting and powering
To use the ConVertor E1 you need to supply your own 12V powered Eurorack
case with 6HP (3cm) available space, one available power connection and
about 90 mA of current available. Connect the power cable to the back, place
and screw the panel to the rack using the two included standard M3 screws.
Avoid exposing it to sun, fluids or unchecked physical abuse/shocks.
Please Avoid patching any audio signal stronger than +4dBu or CV signals
into the audio input.The audio & CV outputs of this device are very loud
potentially around 10V scale. Always test a signal’s loudness before patching it
with speakers or headphones on.
PITCH FM IN
GATE
SYNTH
ENV GATE
P SHIFT
+-
+
-
3) The two encoders: GATE & P SHIFT
Turn the P SHIFT knob to shi the DCO’s semi-tones
SYNTH & the PITCH CV outputs up to -2 - +2 octaves. Press on
the P SHIFT knob to bypass the shi back to unison. Press it
again to come back to the shi. The resulting pitch shi is
relative to the FM IN 1V/oct CV input so you can try arpeg-
giating the pitch from a sequencer 1/V per octave output,
patched into the FM IN. When in VCO/DCO mode, the FM IN will
be the only pitch control on the internal synth.
Turn the GATE knob to increase/decrease the gate’s threshold in 1dB incre-
ments. The gate will effect the ENV CV output by shutting the ENV CV out to 0V
and the SYNTH OUT audio off. PRE OUT is analogue copy of the same signal
going to the ADC. Connect the pre-out mini-jack TS to an +18dBu-capable desti-
nation like Eurorack gear. The gate’s threshold can vary between -6dbFS to
-65dbFS.
PITCH FM IN
GAT E
SYNTH
A-GAIN
ENV GAT E
PRE OUT
ENV
TRS
AUDIO IN
+4-10-20-30-40-50
HI Z
FLT
P SHIFT
C Q
+-
+
-
Audio Controlled Synthesizer
2) Preamp section buttons
Connect a TS or TRS Mic/Inst./Line 1/4” plug into the audio input
If you play a pickup inst. press the HI Z
Press F LT To toggle between
Analogue input HPF frequencies:
Press A-GAIN To activate Auto-GAIN detection, play
loudly, briefly, during 2.5 seconds. Aer 2.5 seconds, the gain
will be set and the meter will go back to showing input levels.
The gate will not effect the PRE OUT signal. Press the GATE
knob and dial to change the gain manually (metered in
red) and initiating another 2.5 second count. The ConVertor
E1 will remember all gain, preamp & comp settings. The gain
can amplify the input up to +54db. If you turn the GATE
encoder and see the meters change value in green, then you
are changing the gate’s threshold (see square #3).
LOW Z: 50 kOhm
25 Hz 75 Hz
RED
GREEN RED
150 Hz
HI Z: 2M Ohm
A-GAIN
PRE OUT
ENV
TRS
AUDIO IN
+4-10-20-30-40-50
HI Z
FLT
Mic/Inst/line input
Synth out
FM CV in
Pitch CV
ENV CV
GATE CV
Preamp out
“Sonicsmith bus” 4 pin header
to MIDVertor E1 (optional)
Balanced/unbalanced
GATE
+
-
Sonicsmith 2023 ConVertor E1 User Guide - Firmware 1.0 Sonicsmith 2023 ConVertor E1 User Guide - Firmware 1.0
Sonicsmith 2023 ConVertor E1 User Guide - Firmware 1.0 Sonicsmith 2023 ConVertor E1 User Guide - Firmware 1.0
PITCH FM IN
GATE
SYNTH
A-GAIN
ENV GATE
PRE OUT
ENV
TRS
AUDIO IN
+4-10-20-30-40-50
HI Z
FLT
P SHIFT
C Q
+-
+
-
User Guide Firmware 1.0
Thank you for pre-ordering the ConVertor E1.
The ConVertor will analyse an analogue monophonic audio signal
into its Pitch, ENV and GATE Control Voltages, DC signals to control
external analogue synths. It also provides its own internal digital
synth that is always in tune. It can work by itself with external
synths or act as an independent synth. You can also expand it via a
MIDVertor E1 adding sustain pedal, MIDI i/o, arpeggio and central-
ized control for up to 7 ConVertors in parallel. Check periodically
for new firmware on our product page: sonicsmith.com/products.
Feel free to write us with any feedback, question or concern at:
Aug 2023
Audio Controlled Synthesizer

4) SYNTH, memory & ENV dynamics 5) LPF effect & Pitch tracking speeds
SYNTH
Press the SYNTHbutton to
select WAVE/ Synth preset Press the ENV + FLT buttons to activate the 2-pole
LPF. The ENV LED will light up in green. Press both of them
again to bypass the low pass filter effect. The LPF cutoff
frequency will be modulated by the ENV and the pitch frequen-
cy at varying amounts.
Press the ENV + SYNTH buttons to select between
the 3 pitch detection speeds. Choose fast if you audio source
has little harmonics, but if you get “glitches” in your pitch track-
ing you can try the slower “medium” / “sticky” and see if it helps.
GRN= unchanged
Red = changed
1:2
EXP Comp Comp Comp Comp
OctavesChroma 1+3+5Oct+5th 1+3m+5 1+4+6 1+4+6m
1:1 2:1 3:1 4:1 8:1
ENV
A-GAIN
++
+
Press the ENV + A-GAIN buttons to change the
Compressor/Expander of the internal VCA & ENV CV out
6) Quantizing the FM IN 7) VCO / DCO mode
As of firmware 1.0 the ConVertor E1 will SAVE all its settings
automatically and will recall them the next time you power it up
so you can continue working where you le off. Saving the
settings will occur within 3 seconds aer inactivity as soon as the
gate shuts off.
Press the Qbutton to toggle between quantization (led
on) & continuous (led off), of the FM CV input. If 0V CV is
injected into the FM input, and FM IN is calibrated, then the
ConVertor E1 synth should stay in unison +/- the P SHIFT applied
via its own encoder. If Unplugging the FM IN, and pressing the P
SHIFT knob doesn’t cancel the pitch shi to unison, you may
need to calibrate FM IN. A CV source into FM IN can modulate the
int. synth’s frequency within 8 octaves range. It’s possible to
modulate the int. synth at audio frequencies as well, opening up
the possibility of FM synthesis. Press the Qbutton to turn quan-
tizer on and keep pressing Q to select the desired musical scale
to quantize to (1/6). Aer 5 seconds of inactivity, you will be able
to toggle it off, back to continuous. The musical scales available
are as follows:
Press both encoders down to enter VCO mode, during
which, The int. synth will be completely detected from the pitch
detection and by default will play middle C without VCA nor
gate. The int. SYNTH pitch will be controlled by the FM 1V/oct CV
input (or an incoming MIDI from a connected MIDVertor) and the
P SHIFT knob only. The preamp audio input will continue to
track the audio’s pitch, and provide the PITCH CV, GATE, and ENV
CV out as usual, just not affecting the internal synth.
To route the internal synth sound through the VCA modulated by
the ENV follower, press the ENV button while in VCO mode).
The ENV compressor will work as usual. You can also route the
internal VCF effect as well, by pressing
ENV+FLT. To add MIDI control you will have to join the
MIDVertor E1, optional expansion module.
ENV
FLT
+
Q
Fast Sticky
Medium
Sonicsmith 2023 ConVertor E1 User Guide - Firmware 1.0 Sonicsmith 2023 ConVertor E1 User Guide - Firmware 1.0
Sonicsmith 2023 ConVertor E1 User Guide - Firmware 1.0Sonicsmith 2023 ConVertor E1 User Guide - Firmware 1.0
+LFO
If countdown finished and you want to change the musical scale
then you will have to press Q twice to enter Q mode again.
ENV
GATE
P SHIFT
+-
+
-

9) Calibrations 10) Calibrating the ENV CV out
11) Calibrating the PITCH CV out
Sonicsmith 2023 ConVertor E1 User Guide - Firmware 1.0 Sonicsmith 2023 ConVertor E1 User Guide - Firmware 1.0
Sonicsmith 2023 ConVertor E1 User Guide - Firmware 1.0 Sonicsmith 2023 ConVertor E1 User Guide - Firmware 1.0
12) Calibrating the FM / unison
ENV offset
FM IN
(Unison adjust)
ENV offset
Pitch DC offset
Pitch scale
ADC differential
offset
Pitch DC offset
Pitch scale
The ConVertor E1 is shipped
calibrated and ready to play. But
aer a few years (or aer accidental-
ly touching the trim-pots), there
may be a need to calibrate them
again. For calibration you will need a
sound source of known frequency
(we use 100Hz and 800Hz tones), a
voltmeter with 3 decimal precision
with a probe-to-mini-jack cable. The
next sections will take you through
the calibration procedures of the
different parts and why would you
think you need one. It’s better to
make sure you need it before you
start. In any case there is a problem,
please contact us at:
If you are controlling an external synth
with the ENV CV output but when you
stop playing you still hear the external
oscillator in low volume, you may
either suffer noise from your audio source or there
may be a need to calibrate the ENV CV output.
Follow the next steps to calibrate it:
1) Unplug the audio input, set gain to minimum
and make sure the HI Z LED is off.
2) Plug the Volt meter probe’s mini-jack to the
ENV CV out, and set the V-meter to DC
3) Turn the ENV offset trim-pot until the V-meter
shows 0V
If you press the top encoder to
tune back to unison but the pitch
of the int. synth does not tune to
the same frequency of the audio
input, you may need to tune the unison point. Aer
tuning the unison point, the FM input should also
be unison when receiving a 0V DC source (0V CV
signal). To tune the unison, do the following:
1) Disconnect the FM IN from any cable
2) Press the top encoder to go to unison
3) Make sure the Q LED is off
4) Listen to your source audio and SYNTH out
side by side to hear your tuning
5) Turn the “FM in/unison adjust” trim-pot until
you hear the audio input is in tune with
the SYNTH output
6) Press Q to turn the Q LED on/off to make sure
both stay in the same pitch
If you control an external synth with
the pitch CV output and the tuning
accuracy change across different
octaves, you may need to calibrate the pitch CV
out of the ConVertor E1 (the receiving synth may
also need calibration). Follow these steps:
1) Patch the tone source to the audio input
playing 100 Hz
2) Plug the V-meter mini-jack probe to the
PITCH CV out and set it to DC
3) make note of the value and change the tone
source to 800Hz.
4) Turn the pitch scale until the difference
between 100Hz and 800Hz is 3V. If needed,
repeat 3-4, until the diff. is 3V.
5) Aer that, play 100Hz and turn the DC offest
until it shows -
FM IN
(Unison adjust)
+
-

If you want to play the internal oscillator through an external
VCA modulated via ext. ENV, you may want to either turn the
internal ENV-to-VCA off, or using the internal ENV in 8:1 compres-
sion. Using max compression will help with avoiding hearing a
wrong pitch when we stop the input audio’s note while the ext.
ENV may continue with its release phase.
To turn the ENV on/off press the ENV button. This
will only apply to the internal ENV follower-to-VCA, and will not
change the ENV CV output. The gate will still shut off the sound
when gate is below threshold. When in DCO mode: the ENV will
continue to function as ENV on/off applying the int. ENV-to-VCA
on the int. synth sound.
15) Troubleshooting
13) Using ext. ENV (int. ENV on/off)
Sonicsmith 2023 ConVertor E1 User Guide - Firmware 1.0
To Flash the ConVertor E1 Firmware we need to
copy the firmware files on to a micro SD card which is formatted in
FAT 32 file system and not any bigger than 32 GB. Aer you insert
the SD card at the back of the module, power the device off, hold
the FLT & HI Z buttons together (illustrated on the le), then while
holding them, power the module on to initiate flashing. Keep the 4
buttons pressed until you see a meter LED blinking. Aer that, you
can let the buttons go, and you should see another LED blinking (if
the second uC is flashing). Firm 1.0 should be downloadable from
our product page.
Please visit www.sonicsmith.com/products for periodical updates
and products availability.
16) Flashing the firmware/s
14) About Int. Vs. ext. oscillator
HI Z
FLT
+
ENV
Other Sonicsmith Synthesizer manuals
