SONIQ iV220T Qvision User manual

- 1 -
iV220T

- 2 -
CONTENTS
CONTENTS ............................................ 2
SAFETY PRECAUTIONS ................... 3 - 5
INTRODUCTION ........................................ 6
DISC FORMATS ........................................ 7
MAIN UNIT CONTROL ........................ 8 - 9
REMOTE CONTROL ...................... 10 - 11
GETTING STARTED ........................... 12
CONNECTIONS ................................... 13 - 14
Connecting a TV antenna ................... 13
Connecting devices with a composite (Yellow
RCA-Type) video output ................. 13
Connecting devices with a video input ... 13
Connecting a PC ................................ 14
Connecting HDMI ............................. 14
Connect the power cord .................. 14
USING HEADPHONES .................. 15
UNIT OPERATION ................................ 15
SOUND SYSTEM ................................ 15
BASIC OPERATION ...................... 16 - 17
Turning the unit on for the rst time ... 16
Electronic programme guide (EPG) for
digital TV (DTV) ............................... 17
Audio language for DTV ................. 17
TV / DTV SETUP ....................... 18 - 21
TV setting ..................................... 18
Picture menu ................................ 19
Sound menu .................................. 19
Time menu ................................... 20
Setup menu .................................. 20
Lock menu ................................... 21
TELETEXT ...................................... 22
CD/DVD OPERATION ..................... 23 - 24
Playing a disc ........................................ 23
Playing a picture le disc .................... 23
Pausing playback (still mode) ............. 23
Stopping playback ................................. 23
Skipping to a different track ................ 23
Fast forward / fast reverse ................. 24
Slow-motion play (DVD) ....................... 24
Audio selection (DVD) ......................... 24
Subtitle selection (DVD) ....................... 24
Angle Selection (DVD) .......................... 24
SPECIAL FUNCTIONS ........................... 25
Display function ..................................... 25
Locating a specic title (DVD) ............... 25
Locating a specic chapter/track .......... 25
Locating a specic time ........................ 25
REPEAT PLAYBACK ...................... 25 - 26
Repeating a chapter (DVD) .................. 25
Repeating a single track (CD) .............. 26
Repeating a specic section (DVD) (CD) ...
................................................................ 26
DVD PROGRAMMABLE MEMORY ........ 26
Programmable memory ...................... 26
CUSTOMIZING THE DVD FUNCTION
SETTINGS ....................................... 27 - 28
Language setup .................................... 27
Video setup ........................................... 27
TV type ............................................. 27
System setup ........................................ 28
Parental Ctrl ....................................... 28
Password ............................................. 28
Default ............................................... 28
MAINTENANCE ...................................... 28
USING TO YOUR iPOD ................. 29 - 32
Connecting your iPod .......................... 29
Playing music ...................................... 29
Playing video ........................................ 29
Using a iPod Classic / iPod Nano 3rd
gereration to watch the video .......... 30
Using a iPod Touch to watch the video
..................................................... 30
Playing Photos ................................. 31
Using a iPod Classic / iPod Nano to view
the photo ..................................... 31
Using a iPod Touch to view the photo .
....................................................... 31
Settings ............................................... 32
TROUBLE SHOOTING GUIDE ........... 33 – 34

- 3 -
SAFETY PRECAUTIONS
The symbol for Class II
(Double lnsulation)
WARNING:
TO PREVENT FIRE OR SHOCK HAZARD, DO NOT
EXPOSE THIS UNIT TO RAIN OR MOISTURE. DO NOT
PLACE OBJECTS FILLED WITH LIQUIDS ON OR NEAR
THIS UNIT.
CAUTION:
DANGER OF EXPLOSION IF BATTERY IS INCORRECTLY
REPLACED. REPLACE ONLY WITH THE SAME OR
EQUIVALENT TYPE.
This product contains a
low power laser device.
The exclamation point within a triangle alerts
you to the presence of important operating,
maintenance and servicing instructions in
this user’s manual.
The lightning ash with an arrowhead within a
triangle alerts you to uninsulated dangerous
voltage within the product’s enclosure that
could cause an electric shock.
CAUTION
RISK OF ELECTRIC SHOCK
DO NOT OPEN
WARNING: TO REDUCE THE RISK OF ELECTRIC
SHOCK, DO NOT REMOVE COVER (OR BACK).
NO USER-SERVICEABLE PARTS INSIDE. REFER
SERVICING TO QUALIFIED PERSONNEL.
1. Read Instructions - All the safely and operating
instructions should be read before the appliance
is operated.
2. Retain Instructions - The safety and operating
instructions should be retained for future
reference.
3. Heed Warnings - All warning on the appliance
and in the operating instructions should be
adhered to.
4. Follow Instructions - All operating instructions
should be followed.
5. Water and Moisture - The unit should not be
used near water.
6. Cart and Stands - The unit
should only be used with a cart or
stand that is recommended by the
manufacturer.
7. Wall or Ceiling Mounting - The unit should
be mounted to a wall or ceiling only as
recommended by the manufacturer.
8. Ventilation - The unit should be well situated
so that its location or position does not interfere
with its proper ventilation.
9. Heat - This unit should be placed away from
heat sources such as radiators, heat registers
and stoves.
10. Power Sources - The unit should only be
connected to a power supply as described in the
Instruction Manual or as marked on the unit.
11. Grounding or Polarization - Precautionsshould
be taken.
12. Power Cord Protection - Power supply cord
should be routed so that it is not likely to be
walked on pinched by items placed upon it
against the cord and its end.
13. Cleaning - The unit should be cleaned only as
recommended by the manufacturer.
14. Power Lines - An outdoor antenna should be
located away from power lines.
15. Outdoor Antenna Grounding - If an outside
antenna is connected to the receiver, the antenna
system must be grounded so as to provide
against voltages and built-up static charges.
16. Non-use Periods - The power cord of the unit
should be unplugged from the outlet when left
unused for a long period of time.
17. Object and Liquid Entry - Care should be taken
so that objects do not fall, and liquids are not
spilled into the enclosure through openings.
18. Conditions Requiring Service - The unit should
be serviced by qualied service personnel
when:
• The power-supply cord or the plug has been
damaged.
• Objects have fallen on or liquid has been
spilled into the unit.
• The unit has been exposed to rain.
• The unit does not appear to operate normally or
exhibits a marked change in performance.
19. This unit should not be exposed to water and
no objects lled with liquids such as a vase
should not be placed on the unit. Where the
MAINS plug or the unit coupler is used as the
disconnect device, the disconnect device shall
remain readily operable.

- 4 -
SAFETY PRECAUTIONS
Warning
High voltages are used in the operation of this
unit.
Do not remove the back cover of the cabinet.
Refer servicing to qualied service personnel.
Warning
To prevent re or electrical shock hazard, do
not expose the main unit to rain or moisture.
Warning
Do not drop or push objects into the television
cabinet slots or openings. Never spill any kind
of liquid on the television.
Caution
Never stand on, lean on, push suddenly the
unit or its stand.
You should pay special attention to children.
Caution
If the television is to be built into a
compartment or similarly enclosed,
the minimum distances must be
maintained.
Heat build up can reduce the service
life of your television, and can also
be dangerous.

- 5 -
SAFETY PRECAUTIONS
Caution
Do no placed the main unit on an unstable cart
stand, shelf or table.
Serious injury to an individual, and damage to
the television, may result should it fall.
Caution
Avoid exposing the main unit to direct sunlight
and other sources of heat. Do not position
television receiver directly on other products
which give off heat. E.g. video cassette players,
audio ampliers. Do not block the ventilation
holes in the back cover.
Ventilation is essential to prevent electrical
failure. Do not squash power supply cord under
the main unit.
Caution
When the unit is not used for an extended
period of time, it is advisable to disconnect
the AC power cord from the AC outlet.
Caution
The panel used in this product is made
of glass.
It can break when the unit is dropped
or applied with force. Individuals should
execute caution when dealing with broken
glass should the panel break.
Exemptions
• SONIQ is not liable for any damage caused by res, natural disaster (such as thunder,
earthquake, etc.), acts by the third parties, accidents, owner’s misuse or use in other
improper conditions.
• SONIQ is not liable for incidental damages (such as prot loss or interruption in business,
modication or erasure of record data, etc.) caused by use or inability to use of unit.
• SONIQ is not liable for any damage caused by neglect of the instructions described in the
instruction manual.
• SONIQ is not liable for any damage caused by misuse or malfunction through simultaneous
use of this unit and the connected equipment.

- 6 -
Package Contents
Main Unit
Quick Start Guide
Warranty Card
Remote Control
AAA Batteries (x2)
INTRODUCTION
Introduction
Thank you for purchasing the unit. Your unit will bring you years of high-quality viewing
enjoyment. The television is easy to operate and provides exceptionally high quality image. The
manual will explain the operation of the unit, including its functions features and other important
features. Before installing or operating your unit, please take the time to thoroughly read this
manual, particularly the sections on safety.
Instruction Manual
iV220T
DVD
VIDEOOUT
Wa ll
Antenna
Socket
Outd oorAn tenn a
(VHF,UHF)
RF Coaxial
Wire
(75 ohm)
Quick Reference Quick Reference
Thank you for purchasing the unit. Your unit integrated digital and analog tuner in the same unit.
You can enjoy both digital and analog broadcasting under following set-up easily.
The latest news, software, utility, driver, product, manual and Q&A will be found at SONIQ
website http://www.soniqav.com.
Antenna Connection
Your unit already pre-install a loop through cable. You simply connect outdoor antenna to DTV
antenna input to receive broadcasting signals.
You can enjoy both analog and digital TV broadcasting now by switching toTV and DTV mode.
For detail operation, you can refer to Instruction manual.
810-712295W030
Turning the unit on for the rst time
The rst time you turn the unit on, it will go straight into Auto scan mode. Simply follow the screen
prompts as below to tune in the channels.
1. Use the / button to select the screen menu language you prefer.
2. Use the button to move to Auto Tuning, press the ENTER•OK button to enter Auto Tuning
menu.
3. Use the button to move to Start. Press the ENTER•OK button conrm Start. The system will
automatically start to scan and preset all available programmes.
4. After scanning has nished, the TV will display the rst programmes stored.
Language
Time Zone
AutoTuning
English
Victoria GMT + 10
Language
Time Zone
AutoTuning
Australia
English
Victoria GMT + 10
Power on the unit
Connecting the power cord to AC wall outlet. Press the / Ibutton at the unit or STANDBY/
ON button on the remote control. Press the FUNCTION button to select the desired mode
(DTV, TV, AV, DVD, iPod, PC or HDMI).
Note:
When the unit is not going to be used for a long time, disconnect the power cord
from AC wall outlet.

- 7 -
DISC FORMATS
The unit can play:
DVDs
[8cm/12cm disc]
Audio CDs
[8cm/12cm disc]
CD-R CD-RW
Compatible
REGION MANAGEMENT INFORMATION
Region Management Information: This unit is
designed and manufactured to respond to the
Region Management Information that is encoded
on DVDs. If the region number printed on the DVD
does not correspond to the region number of this
unit, this unit cannot play that disc.
The region number of this equipment is .
DISC FUNCTION OR OPERATION
THAT IS NOT AVAILABLE
When the symbol appears on the screen, it
indicates that the function or operation attempted
is not available at that time. This occurs because
the DVD manufacturer determines the specific
functions. Certain functions may not be available
on some discs. Be sure to read the documentation
provided with the DVD.
ICONS USED ON DVDs
Sample Icons:
Language selections for audio
Language selections for subtitles
Screen aspect ratio
Multiple camera angles
Region code indicator
NOTE
When playing back a CD-G (Graphics) or CD
EXTRA disc, the audio portion will be played, but
the graphic images will not be shown.
TITLES, CHAPTERS AND TRACKS
• DVDs are divided into “TITLES” and “CHAPTERS”.
If the disc has more than one movie on it, each
movie would be a separate “TITLE”. “CHAPTERS”
are sections of titles.
• Audio CDs are divided into “TRACKS”. A “TRACK”
is usually one song on an Audio CD.
NOTE
Numbers identify each title, chapter and track on a
disc. Most discs have these numbers recorded on
them, but some do not.
NOTES ON UNAUTHORIZED DISCS
You may not be able to playback some DVDs on this
equipment if they were purchased from outside your
geographic area or made for business purposes.

- 8 -
78 910
11
12
1
2
3
4
5
6
MAIN UNIT CONTROL
Front & Side Panel
No.
1
2
3
4
5
6
7
8
9
10
11
12
Name
/ I button
PLAY button
MENU button
FUNCTION button
CH buttons
button
button
Description
Turns the unit on and off.
Press to start or resume playback of a disc.
Press to display the on-screen TV menu.
Select DTV, TV, AV, DVD, iPod or PC.
Press to change the TV channels and highlight
selections (Up & Down) on the menu screen.
Press to select previous chapters or tracks on a disc.
Press to select next title, chapter or track on a disc.
– VOLUME + controls
Colour LCD Screen
Speakers
Remote Sensor
Standby Indicator
Dock for iPod®
Disc Door
OPEN button
Adjust the volume level.
Push gently to close the disc door.
Press to open the disc door.
Do not block this sensor or the remote control will
not work.
Indicates whether the unit is ON or in STANDBY
(OFF) mode.
Light On: The unit is in STANDBY.
Light Off: The unit is turned ON.

- 9 -
13 14 15 16 17
19 20
18
MAIN UNIT CONTROL
Rear Panel
No.
13
14
15
16
17
19
18
20
Name
Power Cord
DVD VIDEO OUT
Description
Connect to the AC wall outlet.
Connect the PC audio output of your personal
computer.
Connect composite Audio/Video output of your AV
device.
Connect to external antenna.
AUDIO Jack (PC IN)
MONITOR / VGA
(PC IN)
HDMI IN jack
AUDIO/VIDEO IN
Jacks
PHONES jack
TV Antenna Cable
Terminal - Coaxial TV
antenna input
Connect the PC VGAsignal output of your personal
computer
HDMI (High Definition Multimedia Interface)
supports both video and audio on a single digital
connection for use with DVD players, DTV, set-top
boxes and other digital AV devices.
Connect the AV device with HDMI output jack.

- 10 -
REMOTE CONTROL
1. STANDBY/ON button
Press to turn ON the unit or press again to switch
to STANDBY (OFF) mode.
2. TV / DTV button
Press to switch to TV / DTV mode.
3. DVD/iPod button
Press to switch DVD / iPod mode.
4. Number (0 - 9) buttons
Use to change the TV / DTV channels.
5. REVEAL button
Press to reveal answers on a quiz or game
pages from Teletext.
iPod RETURN button
Press to return to the previous menu in iPod
mode.
6. MUTE button
Press to turn off the sound.
Press again to cancel mute.
7. VOLUME + / – buttons
Press to adjust the volume level.
8. CURSOR ( , , , ) buttons
Press to highlight selections on a menu screen
and adjust certain settings.
ENTER • OK button
Press to conrm selections on a menu screen.
9. MIX button
Press to select Teletext with a TV programme.
EXIT button
Press to exit the menu and return directly to
normal viewing.
/ button
: Fast reverse playback.
: Fast forward playback.
10. HOLD button
Press to stop the automatic page change from
Teletext.
PREV button
Press to select previous title, chapter or track
on a disc.
11. ANGLE button
Press to switch the camera angle of the video
presentation when scenes with multiple camera
angles are recorded on a DVD.
SIZE button
Press to set the letters size of teletext on the
screen.
12. SUBTITLE button
Press to select one of the subtitle languages
programmed on a DVD/DTV.
13. TITLE Button
Press to select the title menu screen.
14. GOTO button
Press to skip directly to a specic location on a
DVD/CD.
15. button
Press to directly select Mono/Stereo (or Dual I/
Dual II) for some signals.
16. TEXT button
Press to directly selects Teletext mode.
17. PC AUTO button
Set picture settings for PC mode automatically.
18. SLEEP button
Press to set the SLEEP timer. The unit will
remain ON for the time that is set, and will
automatically shut off afterwards.
19. MEMORY button
In play mode, press to enter the number of a
selected chapter or track.
20. CLEAR button
Press to clear input selections and cancel certain
playback functions.
21. REPEAT A-B button
Press to perform point-to-point repeat playback
on a DVD or CD.
REPEAT DISC button
Repeat chapter/ title of a DVD.
Repeat single track or whole CD.
1
2
3
4
5
6
7
8
9
10
11
12
13
14
15
16
17
18
19
20
21

- 11 -
22. FUNCTION button
Press to switch between DTV / TV / AV / DVD /
iPod / PC / HDMI.
23. RADIO button
Press to select DTV digital radio programmes.
Press again to exit to normal DTV programmes
mode.
24. AV button
Press to switch to source connected to AV.
25. LAST CH button
Press to switch repeatedly between the last two
channels displayed.
26. TV MENU button
Press to display the on-screen TV menu.
27. CH/PAGE / buttons
Press to change the TV / DTV channels.
Press to go forward or backward the page of
Teletext screen in TV mode.
Press to go forward or backward the page of
Programme Edit & Favourite in TV/DTV mode.
28. FAV button
Press to display the Favourites program in TV
/ DTV mode. (You should setup your favourite
TV / DTV channels in Programme Edit menu.)
NEXT button
Press to select next title, chapter or track on a
disc.
29. STOP button
Press to stop playing a disc.
LIST button
Press to display the channel list in TV / DTV
mode.
PLAY button
Press to start and resume playback of a disc.
GUIDE button
Press to display the Electronic Programme
Guide (EPG) in DTV mode.
PAUSE button
Press to pause playback and single frame
advance.
INFO button
Press to display the channel information in DTV
mode.
30. SLOW button
Press to play a DVD in slow-motion.
INDEX button
Press to select the page number of the index
from Teletext.
31. AUDIO button
Press to select audio soundtracks of a DVD or
change the output mode of a CD.
CANCEL button
Press to cancel the Teletext menu.
32. DVD MENU button
Press to enter the main menu of the disc you
are watching.
33. SETUP button
Press to enter and exit the SETUP menu of the
DVD player.
34. SOUND button
Press to select from preset sound settings
(Standard, Music, Theatre, Voice, Personal) to
match the type of show you are watching.
35. DISPLAY button
Press to change disc status information
displayed on the screen.
36. PICTURE button
Press to select from preset screen display
settings to match the type of show you are
watching (Standard, Movie, Dynamic, Soft,
Personal).
37. LCD MODE button
Press to set the size of LCD display.
38. RED/GREEN/YELLOW/BLUE button
Press to select the relevant page quickly from
Teletext.
22
23
24
25
26
27
28
29
30
31
32
33
34
35
36
37
38
REMOTE CONTROL

- 12 -
GETTING STARTED
USING THE REMOTE CONTROL
When using the remote control, aim it at remote sensor on the unit. If there is an object between the remote
control and the signal remote sensor on the unit, the unit may no operate.
• Point the remote control at the remote sensor located on the unit.
• When there is a strong ambient light source, the performance of the infrared remote sensor may be
degraded, causing unreliable operation.
• The effective distance for remote operation is about 16 feet (5 meters).
TO INSTALL THE BATTERIES
1. Open the battery door. 2. Insert 2 “AAA” batteries.
BATTERY REPLACEMENT
You will need to install the supplied batteries into the remote control to make it operate following the
instruction below.
When the batteries become weak, the operating distance of the remote control will be greatly reduced
and you will need to replace the batteries.
Notes on Using Batteries:
The use of the wrong type of batteries may cause chemical leaks and/or explosion. Please note the
following:
• Always ensure that the batteries are inserted with the positive and negative terminals in the correct
direction as shown in the battery compartment.
• Different types of batteries have different characteristics. Do not mix different types.
• Do not mix old and new batteries. Mixing old and new batteries will shorten battery life and/or cause
chemical leaks from the old batteries.
• When batteries fail to function, replace them immediately.
• Chemicals which leak from batteries may cause skin irritation. If any chemical matter seeps out of the
batteries, wipe it up immediately using a dry cloth.
• Due to varying storage conditions, the battery lift for the batteries included with your unit may be shorten.
If the remote control is not used for a long period of time, remove the batteries.
• The battery shall not be exposed to excessive heat such as sunshine, re or the like.
CAUTION:
Danger of explosion if batteries are incorrectly replaced. Replace only with the same or equivalent
type.

- 13 -
CONNECTING A TV ANTENNA
To view television channels correctly, a signal must be received from
an indoor or outdoor aerial antenna.
NOTE
For receiving over-the-air TV broadcasts, we recommend that you use
an external xed antenna. Should you require the use of a temporary
antenna, please ensure that you purchase an antenna with sufcient
ability to receive in weak signal areas. Only when you are in close
proximity to a transmitter will a temporary antenna reproduce a signal
as strongly as a xed antenna.
TV antenna cable to TV
ANTENNA terminal (cable
not included)
CONNECTING DEVICES WITH A COMPOSITE (YELLOW RCA-TYPE) VIDEO
OUTPUT
To connect A/V devices such as a VCR, video game system or camcorder.
Connecting to a VCR / Video Game System / Camcorder
Connect the AUDIO / VIDEO cable (not included) as shown.
Make sure you connect the cable from the other equipment (AUDIO and VIDEO OUT) to this unit (AUDIO
and VIDEO IN).
NOTE
Please refer to the user manual for the other equipment for more information.
To AUDIO / VIDEO
IN jacks (AV IN)
To AUDIO / VIDEO
OUT jacks
CONNECTIONS
CONNECTING DEVICES WITH A VIDEO INPUT
Connect the AUDIO cable (included) and VIDEO
cable (not included) as shown.
Make sure you connect the cable from the other
equipment (AUDIO and VIDEO IN) to this unit
(Headphone jack and VIDEO OUT). Press the
FUNCTION or DVD button to select DVD mode.
Note:
Please refer to the user manual for the other
equipment for more information.
AUDIO CABLE
VIDEO
CABLE
VIDEO OUT
DVD
VCR / DVD RECORDER /
OTHER DISPLAY DEVICE
- 14 -
CONNECTIONS
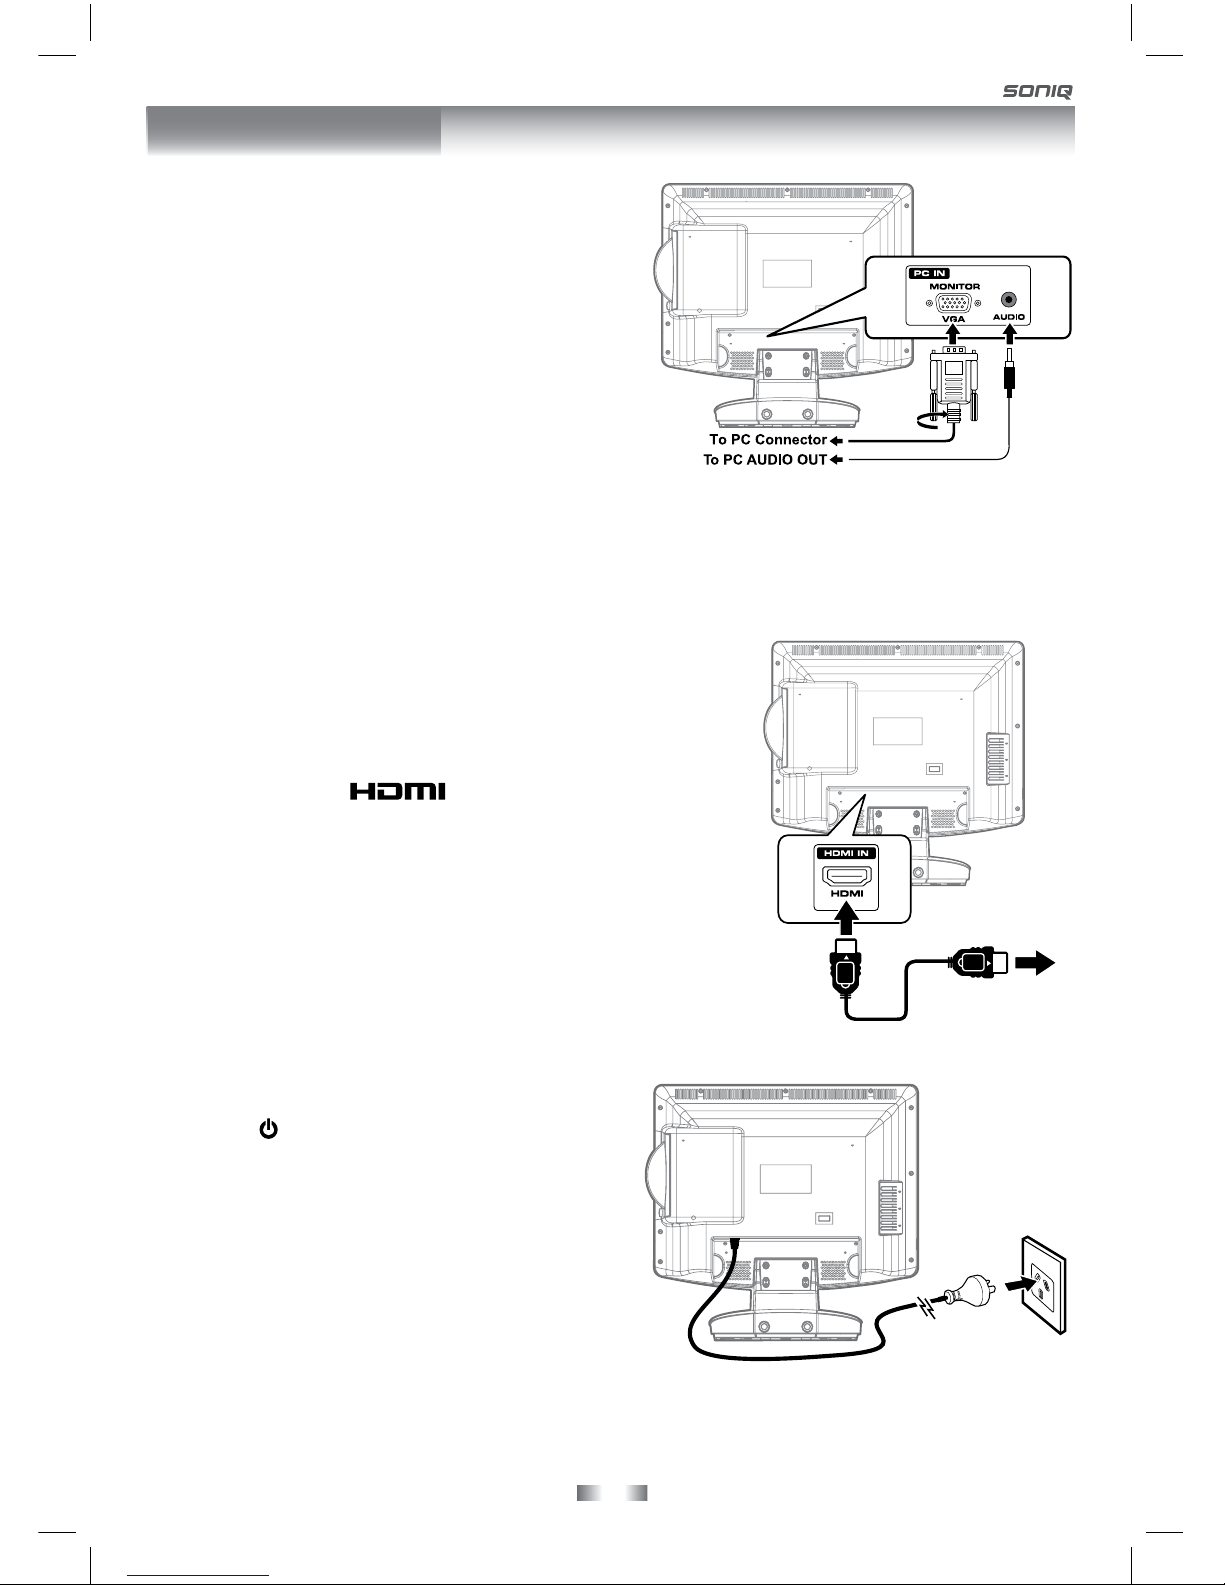
CONNECTING A PC
Connect the 15-pin D-SUB PC/VGA connector from
your computer to the 15-pin D-SUB PC/VGA input on
this unit using a monitor cable and an audio cable (not
included) as shown.
Make sure you connect the cable from the computer
(PC Connector and AUDIO - PC OUT) to this unit
(MONITOR / VGA and AUDIO - PC IN).
CONNECTING HDMI
HDMI (High Denition Multimedia Interface) supports both video and audio on a single digital connection for
use with DVD players, DTV, set-top boxes and other digital AV devices. HDMI was developed to provide the
technologies of High Bandwidth Digital Content Protection (HDCP) as well as Digital Visual Interface (DVI)
in one specication. HDCP is used to protect digital content transmitted and received by DVI-compliant or
HDMI-compliant displays.
HDMI has the capability to support standard, enhanced or high-
denition video plus standard to multi-channel surround-sound audio.
HDMI feature include uncompressed digital video, one connector
(instead of several cables and connectors), and communication
between the AV source and AV devices such as DTVs.
HDMI, the HDMI logo and High-Denition Multimedia
Interface are trademarks or registered trademarks of HDMI licensing
LLC.
Connect the HDMI cable (not included) as shown.
Make sure you connect the cable from the device (HDMI OUT) to
this unit (HDMI IN).
To operate the connected device and play the source, rst press
the FUNCTION button to select the HDMI mode.
To AC wall
outlet
CONNECT THE POWER CORD
• Connect the AC power cord into a wall outlet.
• Press the / I button on the unit or remote control
to turn on the unit.
NOTE
• Be sure the AC power cord is disconnected and all
functions are off before making connections.
• Make sure that all the components are connected
correctly.
• When you are not going to use the unit for a long
period of time, disconnect the power cord.
• The apparatus shall not be exposed to dripping or
splashing and no objects lled with liquids, such as vases, shall be placed on apparatus.
• The mains plug is used as the disconnecting device. It should remain readily accessible and should not
be obstructed during use. To be completely disconnected from the supply mains, the mains plug of the
apparatus should be physically disconnected from the mains socket outlet.
To HDMI OUT jack
To HDMI
IN jack

- 15 -
TURNING THE UNIT ON
When the AC power cord is connected, press the / I button on the unit to turn it
on. Press the FUNCTION button to select the desired mode (DTV / TV / AV / DVD
/ iPOD / PC / HDMI). If you select DVD, the DVD logo will appear on the screen.
NOTE
When the unit is not going to be used for a long time, disconnect the AC power
adapter from AC power outlet.
DOLBY DIGITAL (FOR DVD)
Dolby Digital is a sound system developed by Dolby Laboratories Inc. This unit automatically recognizes
DVDs that have been recorded with Dolby Digital.
Not all Dolby Digital sources are recorded with 6 channels.
Some sources marked Dolby Digital may be recorded in Dolby Surround, a 2 channel system. Look for this
logo on your unit.
Manufactured under license from Dolby Laboratories.
‘Dolby’ and the double-D symbol are trademarks of Dolby Laboratories.
SOUND SYSTEM
UNIT OPERATION
• Turn down the volume before connecting
headphones to the unit, then adjust the
volume to your desired level.
• When headphones are connected, no sound
will come from the front speakers.
NOTE
Avoid listening to sound at high levels for
prolonged periods of time. This may be harmful
to you and may cause hearing loss.
Headphones
(1/8” [3.5mm diameter plug)
USING HEADPHONES

- 16 -
Language
Time Zone
Auto Tuning
English
Victoria GMT + 10
Auto T
Language
Time Zone
uning
Australia
English
Victoria GMT + 10
When you turn on your television set for the rst
time, be sure to place it on a solid stable surface.
To avoid danger, do not expose the TV to water,
or a heat source (e.g. lamp, candle, radiator).
Do not obstruct the ventilation grid at the rear
and be sure to leave sufcient gaps around the
unit as shown.
TURNING THE UNIT ON FOR THE FIRST TIME
The rst time you turn the unit on, it will go straight into Auto scan mode. Simply follow the screen prompts
as below to tune in the channels.
1. Use the / button to select the screen menu language you prefer.
2. Use the button to move to Auto Tuning, press the ENTER•OK button to enter Auto Tuning menu.
3. Use the , , , button to move to Start. Press the ENTER•OK button conrm Start. The system will
automatically start to scan and preset all available programmes.
4. After scanning has nished, the TV will display the rst programmes stored.
BASIC OPERATION

- 17 -
• Use the , , , button select a programme, the programme time and name displays, press the INFO
button to display detailed information if available. Press the INFO button again to return.
• Press the YELLOW button to highlight programme date, use the / button to display information for
other dates.
• Press the ENTER•OK button to watch the selected channel.
• Press the EXIT button to exit the PROGRAMME GUIDE menu.
NOTE
Guide information display may be different according to the DTV programmes.
ELECTRONIC PROGRAMME GUIDE (EPG) FOR DIGITAL TV (DTV)
While watching a DTV programme, you can press the GUIDE button to display the PROGRAMME GUIDE
menu, and check for programme information.
AUDIO LANGUAGE FOR DTV
While watching a DTV programme, you can press the button
to display the Audio Language menu, and select audio language,
audio format and sound track.
• Use the or button to select an audio language or audio format
if available, press the or button to select sound track between
L/R (Stereo), L/L (Mono Left) and R/R (Mono Right). Press the
ENTER•OK button to confrim.
• Press the or EXIT button to exit the Audio Language
menu.
NOTE
For analogue TV, press the button to select Mono / Stereo -
Dual I / Dual II directly.
BASIC OPERATION

- 18 -
TV SETTING (only in ATV or DTV mode)
1. Press the TV MENU button.
2. Use the or button to select TV SETTING.
3. Use the or button to select the options (Auto Tuning,
DTV Manual Tuning, ATV Manual Tuning, Programme
Edit), adjust them using the or button
4. Press the TV MENU button to return to previous menu,
repeat step 2 to adjust other settings.
5. To exit the setup menu and return to the normal screen,
press the EXIT button.
• Auto Tuning : Automatically scan, sort and store all
available programmes.
• DTV Manual Tuning : Perform manual search for DTV
(Digital TV) programmes.
• ATV Manual Tuning : Perform manual search and ne tune for ATV (Analog TV) programmes.
• Programme Edit : All channels stored are listed in the Programme Edit menu, you can edit the channels
by the following steps:
1. Use the or button to select a channel. (Press the CH/PAGE / button to skip to previous/next
page.)
2. Press the RED / GREEN / YELLOW / BLUE button or the FAV button to edit the channel.
• DELETE
Press the RED button to delete the selected channel, press the
ENTER•OK
button to conrm. Press the TV MENU button to stop delete.
• RENAME (for ATV mode only)
Press the GREEN button to rename the selected channel. Use the or
button to select the characters to represent the station name, use the
or button to move to the next character, press the TV MENU button to
conrm.
• MOVE (for ATV mode only)
Press the YELLOW button and use the or button to move the selected
channel, then press the TV MENU button to conrm.
• SKIP
Press the BLUE button to skip or not skip the selected channel.
• FAV (Favourite)
Press the FAV button to set or cancel the selected channel as one of the
favourite programmes.
TV / DTV SETUP

- 19 -
PICTURE MENU
1. Press the TV MENU button.
2. Use the or button to select the options (Picture Mode,
Contrast, Brightness, Colour, Sharpness, Tint, Colour
Temp), adjust them using the or button.
3. Press the TV MENU button to return to previous menu.
4. To exit the setup menu and return to the normal screen,
press the EXIT button.
• Picture Mode : Select from four preset screen display
settings (Standard, Movie, Dynamic and Soft), or
select Personal in which your own settings of Contrast,
Brightness, Colour and Sharpness are stored.
• Contrast : Adjust the contrast of the picture. The black portions of the picture become richer in
darkness and the white become brighter.
• Brightness : Adjust the brightness of the picture.
• Colour : Adjust the colour of the picture.
• Sharpness : Adjust the sharpness level to improve detail in the picture.
• Tint (only for AV mode with NTSC signal) : Adjust the tint of the picture.
•Colour Temp : Select the colour temperature of the picture. Select Normal (balanced)/ Warm (red
white)/Cold (blue white) mode.
NOTE
You can also select Picture Mode simply by pressing the PICTURE button on the remote control.
SOUND MENU
1. Press the TV MENU button.
2. Use the or button to select the SOUND.
3. Use the or button to select the options (Sound Mode,
Treble, Bass, Balance), adjust them using the or
button.
4. Press the TV MENU button to return to previous menu.
5. To exit the setup menu and return to the normal screen,
press the EXIT button.
Experiment with different sound settings until you nd
the settings you prefer.
• Sound Mode : Select from four preset sound settings
(Standard, Music, Theatre and Voice), or select Personal
in which your own settings of Treble, Bass and Balance
are stored.
• Treble : Adjust the treble range.
• Bass : Adjust the bass range.
• Balance : Adjust the balance level toward the left or right speakers.
NOTE
You can also select Sound Mode simply by pressing the SOUND button on the remote control.
TV / DTV SETUP

- 20 -
TIME MENU
1. Press the TV MENU button.
2. Use the or button to select the TIME.
3. Use the or button to select the options (Clock, Sleep
Timer, Time Zone), adjust them using the or button.
4. Press the TV MENU button to return to previous menu.
5. To exit the setup menu and return to the normal screen,
press the EXIT button.
• Clock : The clock is set automatically when receiving a
digital signal.
• Sleep timer : Select the time to turn the unit to Standby
mode automatically: Off -> 5min - - - - -> 90min -> 120min.
• Time Zone : Select your time zone.
SETUP MENU
1. Press the TV MENU button.
2. Use the or button to select the SETUP.
3. Use the or button to select the options (Language,
Audio Language, Subtitle Language, PC Setup,
Restore Setting), adjust them using the or button.
4. Press the TV MENU button to return to previous menu.
5. To exit the setup menu and return to the normal screen,
press the EXIT button.
• Language : Select your preferred On Screen Display
language.
• Audio Language : Select your preferred audio language.
(Available for digital channels if multiple audio languages are broadcasted.)
• Subtitle Language : Select your preferred subtitle language or turn off subtitle. (Available for digital
channels if multiple subtitle languages are broadcasted.)
TV / DTV SETUP
•PC Setup
Use the or button to select the options (H-offset, V-offset,
Size, Phase, Auto Adjust) and adjust them by using the
or buttons.
It supports the resolution of display :
• H-offset : Centre the image by moving it left or right.
• V-offset : Centre the image by moving it up or down.
• Size : Adjust the screen size.
• Phase : Adjust when characters have low contrast or when the image ickers.
• Auto Adjust : Adjust the image automatically.
• Restore Setting : Press the ENTER•OK button to restore the system settings to the factory default.
800 x 600 x 60Hz
1024 x 768 x 60Hz
1280 x 1024 x 60Hz
1280 x 800 x 60Hz
1440 x 900 x 60Hz
1680 x 1050 x 60Hz
Table of contents
Other SONIQ LCD TV manuals

SONIQ
SONIQ U42V14B-AU User manual

SONIQ
SONIQ Qvision L26V10A-AU User manual

SONIQ
SONIQ E32S12A User manual

SONIQ
SONIQ Qvision LCDTV15/A User manual

SONIQ
SONIQ qv220lti User manual

SONIQ
SONIQ E23Z13A-AU User manual

SONIQ
SONIQ E40V16A-AU User manual

SONIQ
SONIQ QSL230XT User manual

SONIQ
SONIQ E24Z15B-AU User manual

SONIQ
SONIQ G75UW40A User manual

SONIQ
SONIQ G75UW62A User manual

SONIQ
SONIQ E32HV40A User manual

SONIQ
SONIQ U58V14A-AU User manual

SONIQ
SONIQ Qvision QV195LT User manual

SONIQ
SONIQ E42FV40A User manual

SONIQ
SONIQ Qvision QV325L User manual

SONIQ
SONIQ E24HB40A User manual

SONIQ
SONIQ qsl322tv4 User manual

SONIQ
SONIQ E40W13A-AU User manual

SONIQ
SONIQ L32V11B-AU User manual


