Operation and maintenance documentation HEATER CONDENS EC v202301
12. TECHNICAL PARAMETERS HEATER CONDENS
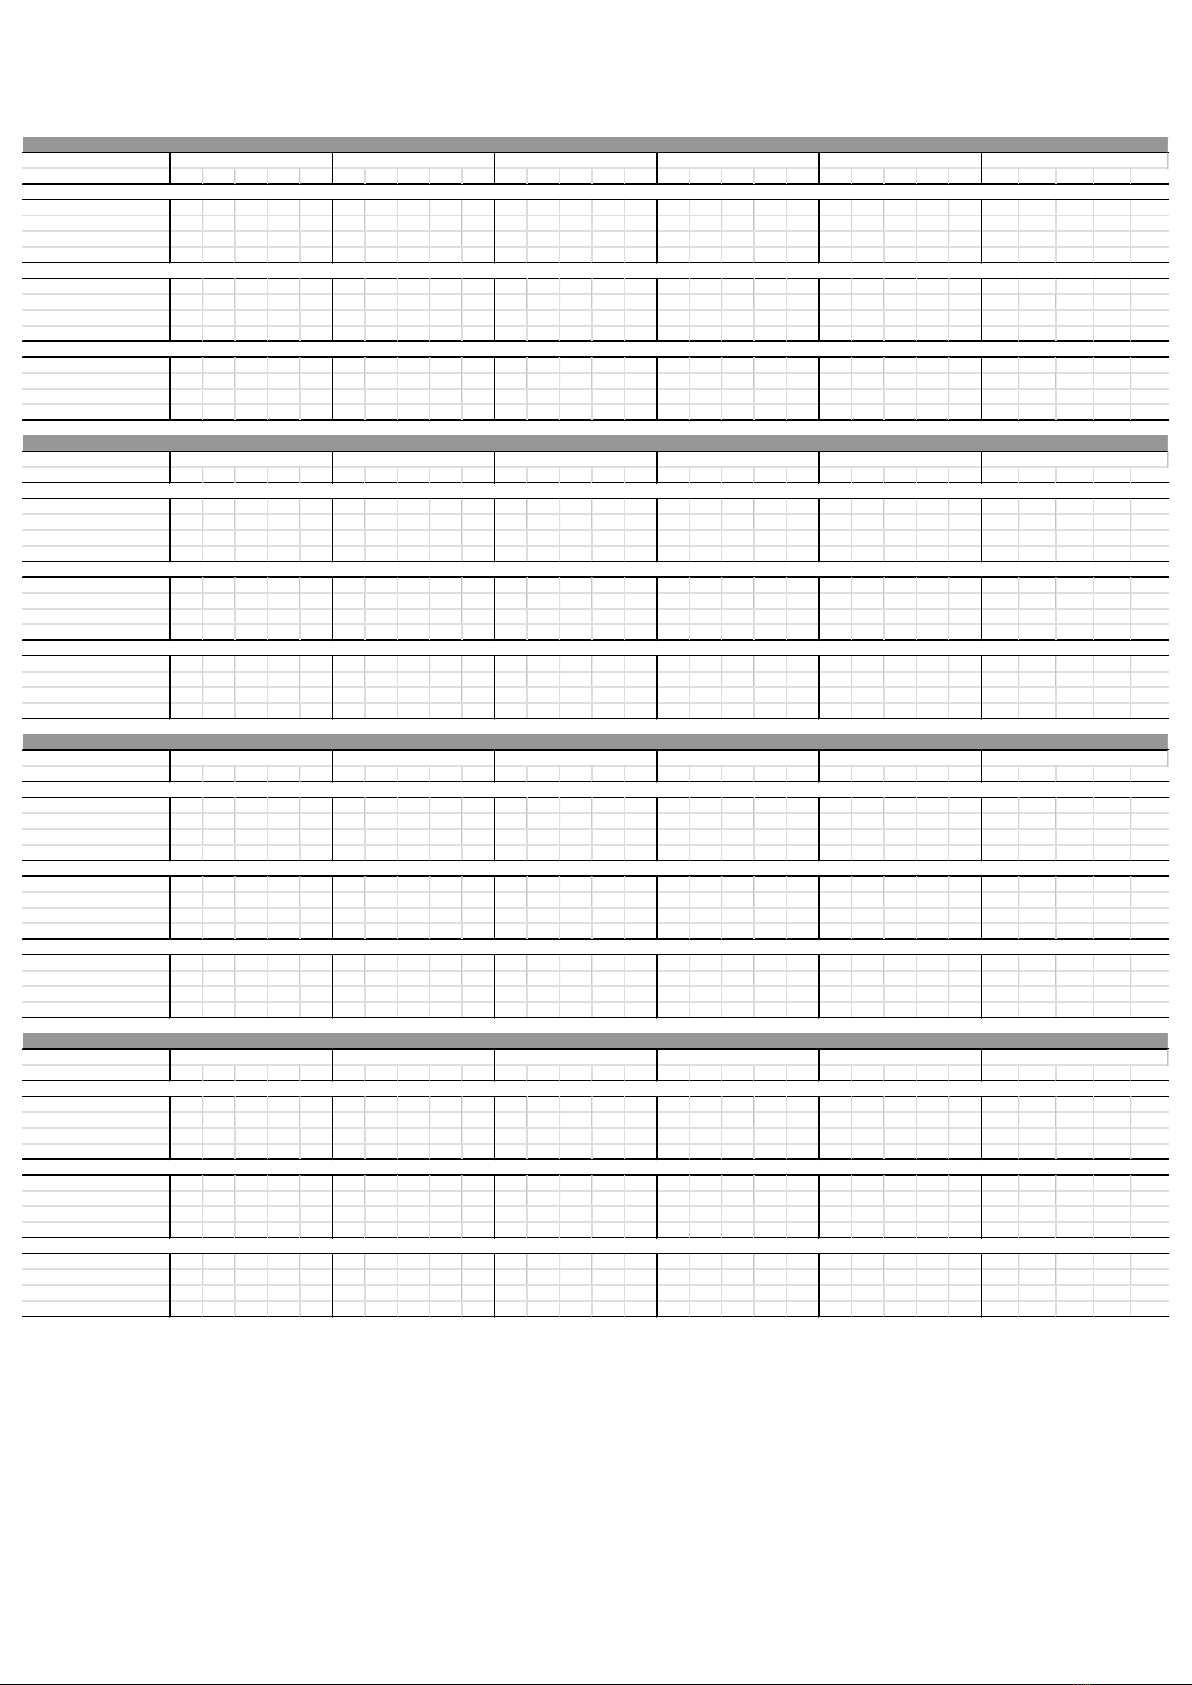
0 5 10 15 20 0 5 10 15 20 0 5 10 15 20 0 5 10 15 20 0 5 10 15 20 0 5 10 15 20
heat output kW 6,7 5,6 4,6 3,4 1,8 9,7 8,6 7,5 6,3 5,2 12,5 11,4 10,2 9,1 7,9 15,6 14,4 13,2 12,0 10,8 18,7 17,5 16,2 15,0 13,8 25,7 24,4 23,1 21,8 20,5
outlet air temperature ˚C 14,4 16,7 19,0 21,1 22,2 19,8 22,2 24,7 27,1 29,4 24,9 27,4 29,9 32,3 34,8 29,9 32,4 35,0 37,5 40,0 35,0 37,5 40,1 42,6 45,2 46,4 49,0 51,6 54,1 56,6
w ater f low m3/h 0,4 0,3 0,3 0,2 0,1 0,5 0,4 0,4 0,3 0,3 0,6 0,6 0,5 0,4 0,4 0,7 0,7 0,6 0,6 0,5 0,9 0,8 0,7 0,7 0,6 0,8 0,7 0,7 0,6 0,6
pressure drop kPa 5,0 3,6 2,5 1,5 0,5 8,0 6,5 5,0 3,7 2,6 11,5 9,7 8,0 6,5 5,1 15,4 13,3 11,4 9,6 8,0 19,6 17,4 15,2 13,2 11,3 14,7 13,4 12,2 11,0 9,8
heat output kW 5,6 4,7 3,8 2,8 1,6 8,1 7,1 6,2 5,3 4,3 10,4 9,4 8,5 7,5 6,6 12,9 11,9 11,0 10,0 9,0 15,5 14,5 13,5 12,5 11,5 21,3 20,2 19,2 18,1 17,1
outlet air temperature ˚C 16,0 18,1 20,0 21,8 23,1 21,9 24,1 26,3 28,5 30,6 27,6 29,8 32,1 34,3 36,5 33,1 35,5 37,7 40,0 42,3 38,7 41,1 43,3 45,7 47,9 51,4 53,8 56,0 58,3 60,6
w ater f low m3/h 0,3 0,3 0,2 0,2 0,1 0,4 0,4 0,3 0,3 0,2 0,5 0,5 0,4 0,4 0,3 0,6 0,6 0,5 0,5 0,4 0,7 0,7 0,6 0,6 0,5 0,6 0,6 0,6 0,5 0,5
pressure drop kPa 3,6 2,6 1,8 1,0 0,4 5,8 4,6 3,6 2,7 1,9 8,3 7,0 5,8 4,6 3,6 11,0 9,5 8,2 6,9 5,7 14,0 12,4 10,9 9,5 8,1 10,5 9,6 8,7 7,8 7,1
heat output kW 4,0 3,4 2,7 1,8 1,3 5,9 5,2 4,5 3,8 3,1 7,6 6,9 6,2 5,5 4,8 9,4 8,7 8,0 7,3 6,6 11,3 10,5 9,8 9,1 8,3 14,8 14,7 14,0 13,2 12,4
outlet air temperature ˚C 18,6 20,1 21,6 22,1 24,6 25,5 27,4 29,2 30,9 32,5 32,1 33,9 35,9 37,7 39,4 38,6 40,4 42,4 44,2 46,0 45,0 47,0 48,8 50,8 52,6 59,8 61,8 63,7 65,5 67,4
w ater f low m3/h 0,2 0,2 0,1 0,1 0,1 0,3 0,3 0,2 0,2 0,2 0,4 0,3 0,3 0,3 0,2 0,4 0,4 0,4 0,3 0,3 0,5 0,5 0,5 0,4 0,4 0,5 0,4 0,4 0,4 0,4
pressure drop kPa 2,0 1,5 1,0 0,5 0,3 3,3 2,6 2,1 1,5 1,1 4,7 3,9 3,3 2,6 2,1 6,2 5,4 4,6 3,9 3,3 7,9 7,0 6,1 5,3 4,6 5,9 5,4 4,9 4,4 4,0
0 5 10 15 20 0 5 10 15 20 0 5 10 15 20 0 5 10 15 20 0 5 10 15 20 0 5 10 15 20
heat output kW 8,7 7,1 5,4 3,6 1,7 12,4 10,8 9,3 7,7 6,1 16,0 14,4 12,9 11,3 9,7 21,1 19,4 17,6 15,9 14,2 23,0 21,4 19,7 17,9 16,1 37,9 35,9 33,9 31,9 29,9
outlet air temperature ˚C 7,3 10,5 14,2 17,8 21,3 10,2 14,4 18,5 22,7 26,9 12,8 16,9 21,2 25,3 29,4 17,2 21,7 26,3 30,8 35,5 18,0 25,8 30,7 35,5 40,3 30,7 36,0 41,3 46,6 51,9
w ater f low m3/h 0,4 0,3 0,2 0,2 0,1 0,5 0,5 0,4 0,3 0,3 0,7 0,6 0,6 0,5 0,4 0,8 0,8 0,7 0,6 0,6 0,8 0,8 0,7 0,7 0,6 0,9 0,8 0,8 0,7 0,7
pressure drop kPa 2,8 1,9 1,2 0,6 0,2 4,8 3,8 2,9 2,1 1,4 7,1 5,9 4,8 3,8 2,9 9,7 8,4 7,1 5,9 4,8 9,7 8,7 7,7 6,8 5,9 9,4 8,5 7,7 6,9 6,1
heat output kW 6,7 5,5 4,2 2,1 1,5 9,7 8,5 7,2 6,0 4,7 12,5 11,3 10,0 8,8 7,6 16,4 15,1 13,8 12,4 11,1 21,0 19,5 18,1 16,6 15,2 29,6 28,0 26,5 24,9 23,4
outlet air temperature ˚C 8,8 11,6 15,0 17,6 21,8 12,4 16,3 20,2 24,1 28,0 15,6 19,5 23,3 27,2 31,1 20,9 25,2 29,4 33,7 38,0 25,6 30,1 34,6 39,0 43,6 37,4 42,3 47,3 52,2 57,3
w ater f low m3/h 0,3 0,2 0,2 0,1 0,1 0,4 0,4 0,3 0,3 0,2 0,5 0,5 0,4 0,4 0,3 0,7 0,6 0,5 0,5 0,4 0,8 0,7 0,7 0,6 0,6 0,7 0,6 0,6 0,6 0,5
pressure drop kPa 1,8 1,2 0,8 0,2 0,1 3,1 2,4 1,9 1,3 0,9 4,6 3,8 3,1 2,5 1,9 6,3 5,4 4,6 3,8 3,1 8,0 7,1 6,2 5,3 4,5 6,0 5,5 4,9 4,4 4,0
heat output kW 5,6 4,5 3,4 2,0 1,4 8,1 7,1 6,1 5,0 3,9 10,5 9,5 8,4 7,4 6,4 13,8 12,7 11,6 10,4 9,3 17,6 16,4 15,2 14,0 12,8 24,8 23,5 22,2 20,9 19,6
outlet air temperature ˚C 9,9 12,4 15,5 18,2 22,3 14,0 17,8 21,5 25,1 28,6 17,7 21,4 25,1 28,7 32,3 23,6 27,7 31,8 35,8 39,8 29,0 33,2 37,5 41,8 45,9 42,3 47,0 51,8 56,4 61,2
w ater f low m3/h 0,3 0,2 0,2 0,1 0,1 0,4 0,3 0,3 0,2 0,2 0,5 0,4 0,4 0,3 0,3 0,5 0,5 0,5 0,4 0,4 0,6 0,6 0,6 0,5 0,5 0,6 0,5 0,5 0,5 0,4
pressure drop kPa 1,3 0,9 0,5 0,2 0,1 2,3 1,8 1,4 1,0 0,6 3,4 2,8 2,3 1,8 1,4 4,6 3,9 3,3 2,8 2,3 5,9 5,2 4,5 3,9 3,3 4,4 4,0 3,6 3,2 2,9
0 5 10 15 20 0 5 10 15 20 0 5 10 15 20 0 5 10 15 20 0 5 10 15 20 0 5 10 15 20
heat output kW 12,5 10,5 8,4 6,1 2,8 19,6 17,3 15,0 12,6 10,2 26,2 23,7 21,3 18,8 16,3 32,5 30,0 27,5 24,9 22,4 39,3 36,7 34,0 31,4 28,8 53,4 50,7 48,0 45,3 42,6
outlet air temperature ˚C 10,7 14,3 16,9 19,5 21,9 16,6 19,0 21,2 23,5 25,8 22,1 24,6 27,1 29,5 32,0 27,2 29,7 32,2 34,8 37,3 32,4 35,0 37,6 40,2 42,7 45,0 47,6 50,4 53,1 55,9
w ater f low m3/h 0,7 0,6 0,5 0,3 0,2 1,0 0,8 0,7 0,6 0,5 1,2 1,1 1,0 0,9 0,8 1,5 1,3 1,2 1,1 1,0 1,7 1,6 1,5 1,4 1,2 1,5 1,4 1,3 1,3 1,2
pressure drop kPa 4,4 3,2 2,1 1,2 0,3 7,2 5,8 4,4 3,3 2,2 10,5 8,8 7,2 5,8 4,5 14,1 12,2 10,4 8,8 7,2 18,2 16,0 14,0 12,1 10,4 13,6 12,4 11,2 10,1 9,0
heat output kW 9,1 7,6 6,0 4,2 2,4 14,2 12,6 10,9 9,2 7,4 19,0 17,2 15,5 13,7 11,9 23,5 21,7 19,9 18,1 16,3 28,4 26,5 24,6 22,7 20,9 38,6 36,7 34,8 32,8 30,9
outlet air temperature ˚C 12,9 19,4 21,4 23,0 24,5 20,2 22,1 23,9 25,8 27,7 26,9 28,9 30,9 33,0 35,0 32,9 35,0 37,1 39,2 41,3 39,2 41,4 43,5 45,6 47,8 54,5 56,7 59,0 61,2 63,4
w ater f low m3/h 0,5 0,4 0,3 0,2 0,1 0,7 0,6 0,5 0,4 0,4 0,9 0,8 0,7 0,6 0,5 1,1 1,0 0,9 0,8 0,7 1,2 1,1 1,1 1,0 0,9 1,1 1,0 1,0 0,9 0,9
pressure drop kPa 2,5 1,8 1,2 0,6 0,2 4,1 3,3 2,5 1,9 1,3 5,9 4,9 4,1 3,3 2,6 7,9 6,8 5,8 4,9 4,1 10,1 8,9 7,8 6,8 5,8 7,6 6,9 6,3 5,7 5,1
heat output kW 7,3 6,1 4,8 2,9 2,1 11,5 10,2 8,8 7,4 6,0 15,3 13,9 12,5 11,1 9,6 19,0 17,5 16,1 14,6 13,2 22,9 21,4 19,9 18,4 16,9 31,2 29,6 28,1 26,5 25,0
outlet air temperature ˚C 14,4 21,0 22,5 22,6 25,5 22,5 24,1 25,8 27,3 28,8 29,9 31,7 33,5 35,2 37,0 36,6 38,4 40,2 42,1 43,9 43,5 45,4 47,3 49,2 51,1 60,6 62,5 64,6 66,5 68,4
w ater f low m3/h 0,4 0,3 0,3 0,2 0,1 0,6 0,5 0,4 0,4 0,3 0,7 0,6 0,6 0,5 0,4 0,8 0,8 0,7 0,7 0,6 1,0 0,9 0,9 0,8 0,7 0,9 0,8 0,8 0,7 0,7
pressure drop kPa 1,7 1,2 0,8 0,3 0,2 2,8 2,2 1,7 1,3 0,9 4,0 3,4 2,8 2,2 1,8 5,4 4,7 4,0 3,4 2,8 6,9 6,1 5,3 4,6 4,0 5,2 4,7 4,3 3,9 3,5
0 5 10 15 20 0 5 10 15 20 0 5 10 15 20 0 5 10 15 20 0 5 10 15 20 0 5 10 15 20
heat output kW 20,0 17,0 14,0 10,8 7,2 27,9 24,8 21,7 18,6 15,3 35,3 32,1 29,0 25,8 22,6 42,5 39,4 36,2 33,0 29,8 50,1 46,9 43,6 40,4 37,2 67,1 63,8 60,5 57,2 54,0
outlet air temperature ˚C 20,1 21,5 22,8 24,0 24,9 27,2 28,8 30,2 31,6 33,0 34,2 35,8 37,3 38,7 40,2 41,0 42,6 44,1 45,7 47,2 47,9 49,5 51,0 52,6 54,1 63,5 65,0 66,5 68,0 69,5
w ater f low m3/h 1,0 0,9 0,7 0,5 0,4 1,3 1,2 1,0 0,9 0,7 1,7 1,5 1,4 1,2 1,1 2,0 1,8 1,7 1,5 1,4 2,3 2,1 2,0 1,9 1,7 2,0 1,9 1,8 1,7 1,6
pressure drop kPa 7,9 5,9 4,1 2,6 1,3 12,5 10,1 8,0 6,0 4,3 17,8 15,0 12,5 10,1 8,0 23,6 20,5 17,6 14,9 12,4 29,9 26,5 23,3 20,3 17,5 22,5 20,6 18,7 16,9 15,2
heat output kW 13,5 11,5 9,4 7,2 3,9 18,7 16,7 14,6 12,6 10,4 23,6 21,5 19,5 17,4 15,3 28,3 26,3 24,2 22,1 20,0 33,3 31,2 29,1 27,0 24,9 44,7 42,5 40,4 38,2 36,1
outlet air temperature ˚C 23,9 24,8 25,5 26,3 27,0 32,3 33,2 34,2 35,1 35,9 40,4 41,4 42,4 43,4 44,4 48,3 49,3 50,4 51,4 52,4 56,2 57,3 58,4 59,4 60,5 74,6 75,6 76,7 77,7 78,7
w ater f low m3/h 0,7 0,6 0,5 0,4 0,2 0,9 0,8 0,7 0,6 0,5 1,1 1,0 0,9 0,8 0,7 1,3 1,2 1,1 1,0 0,9 1,5 1,4 1,3 1,2 1,1 1,4 1,3 1,2 1,2 1,1
pressure drop kPa 3,9 2,9 2,0 1,3 0,4 6,1 5,0 3,9 3,0 2,1 8,6 7,3 6,1 5,0 3,9 11,3 9,9 8,5 7,2 6,1 14,3 12,7 11,2 9,8 8,5 10,8 9,9 9,0 8,2 7,4
heat output kW 10,4 8,8 7,2 5,4 3,4 14,4 12,9 11,3 9,7 8,0 18,1 16,6 15,0 13,4 11,8 21,7 20,2 18,6 17,0 15,4 25,5 23,9 22,3 20,7 19,1 34,2 32,6 31,0 29,4 27,8
outlet air temperature ˚C 26,1 27,9 29,6 31,1 32,3 35,2 36,0 36,6 37,1 37,6 44,0 44,7 45,5 46,2 46,9 52,4 53,3 54,0 54,8 55,5 60,4 61,1 61,9 62,7 63,4 79,6 80,4 81,2 81,9 82,7
w ater f low m3/h 0,5 0,4 0,4 0,3 0,2 0,7 0,6 0,5 0,5 0,4 0,9 0,8 0,7 0,6 0,6 1,0 0,9 0,9 0,8 0,7 1,2 1,1 1,0 0,9 0,9 1,0 1,0 0,9 0,9 0,8
pressure drop kPa 2,4 1,8 1,3 0,8 0,3 3,8 3,1 2,5 1,9 1,3 5,4 4,6 3,8 3,1 2,5 7,0 6,1 5,3 4,5 3,8 8,8 7,9 6,9 6,1 5,3 6,7 6,1 5,6 5,1 4,6
120/90
120/90
air flow 1600 m3/h (speed 3)
air flow 1200 m3/h (speed 2)
inlet air temperature
90/70
90/7080/60
80/60
60/40
70/50
70/50
inlet/outlet w ater temperature
120/90
50/30 60/40
inlet air temperature
120/90
air flow 1450 m3/h (speed 1)
inlet/outlet w ater temperature 50/30 60/40 80/60
80/60
inlet/outlet w ater temperature 90/7050/30
inlet/outlet w ater temperature 50/30
air flow 1200 m3/h (speed 1)
air flow 1700 m3/h (speed 2)
air flow 2950 m3/h (speed 3)
air flow 750 m3/h (s peed 1)
air flow 1850 m3/h (speed 1)
air flow 2500 m3/h (speed 2)
air flow 3900 m3/h (speed 3)
air flow 3350 m3/h (spee d 3)
air flow 2000 m3/h (speed 2)
inlet air temperature
90/70
60/40
inlet air temperature
70/50
70/50