Sonos ARC User manual

Sonos
Sonos
User Guide
T

SONOS USER GUIDE
Arc
The premium smart soundbar for TV, movies, music, and more—
• 3D sound with Dolby Atmos.
• Eleven high-performance drivers, including custom elliptical woofers and angled side tweeters for rich
bass and clear dialogue.
• Arc’s advanced processing creates five phased-array channels that deliver sound to your ears from all
directions.
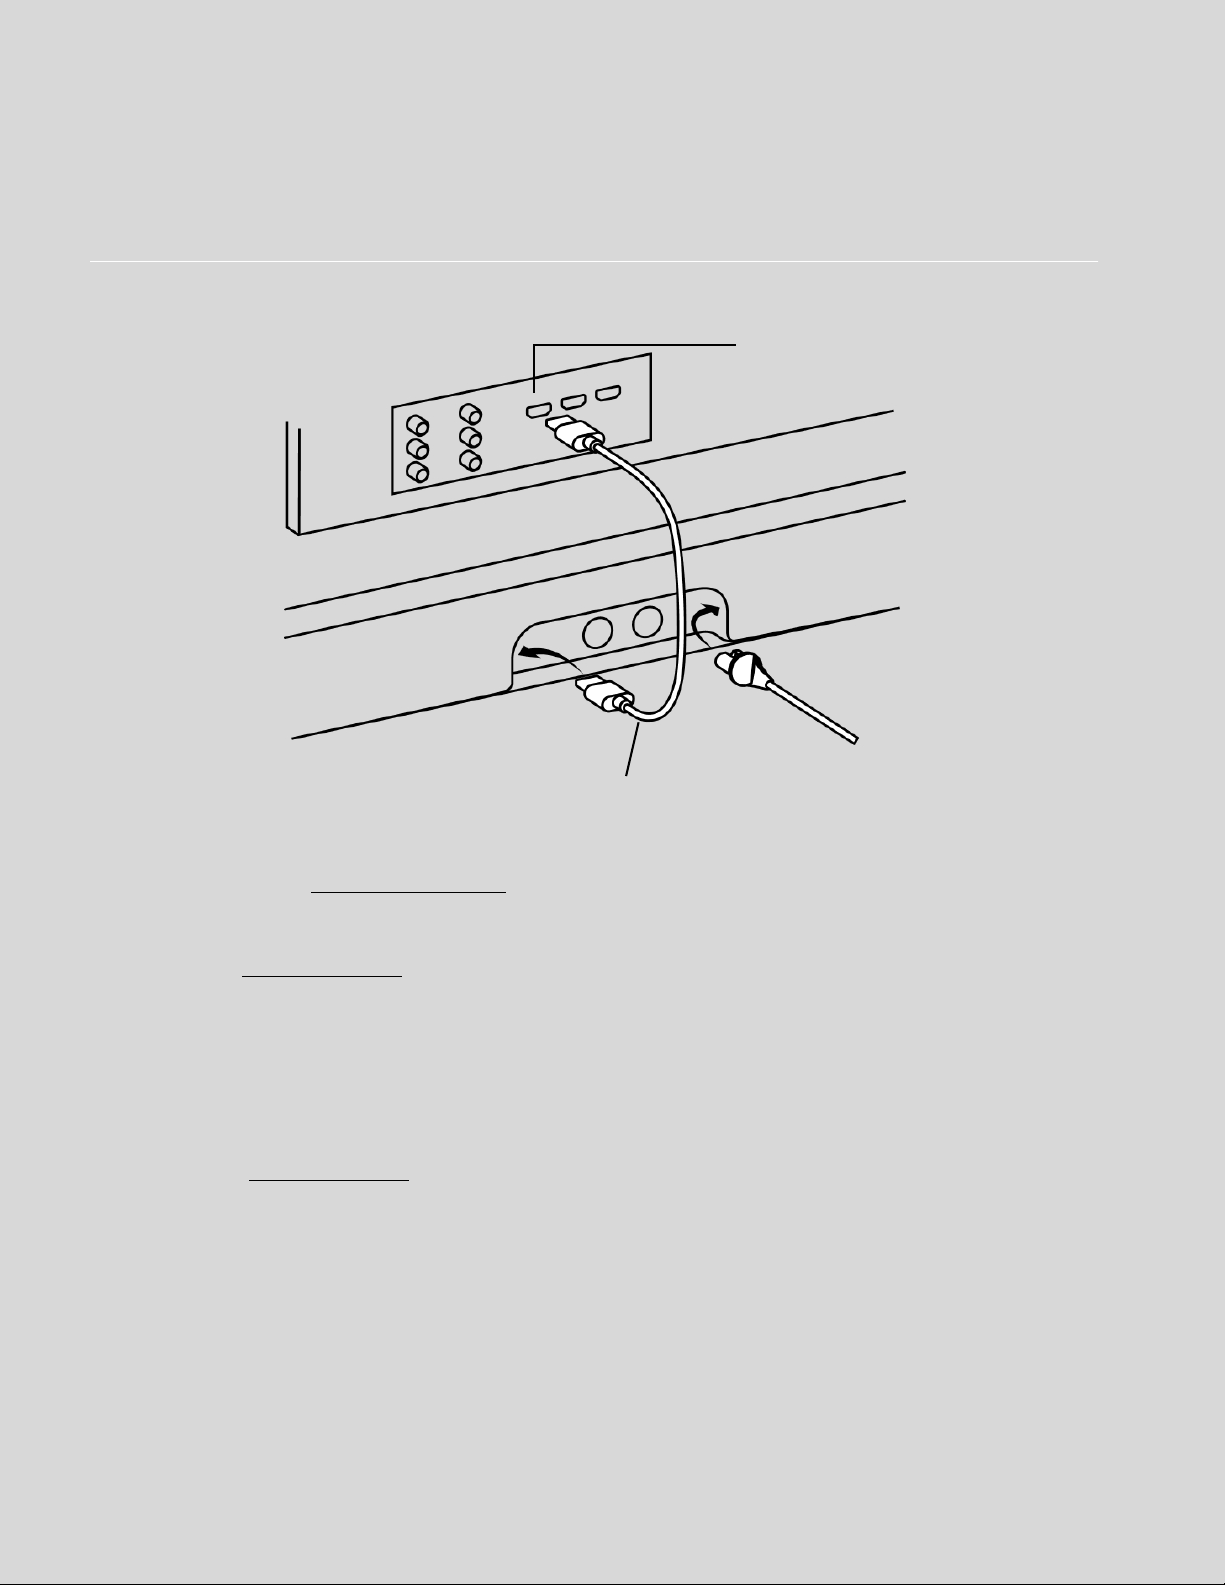
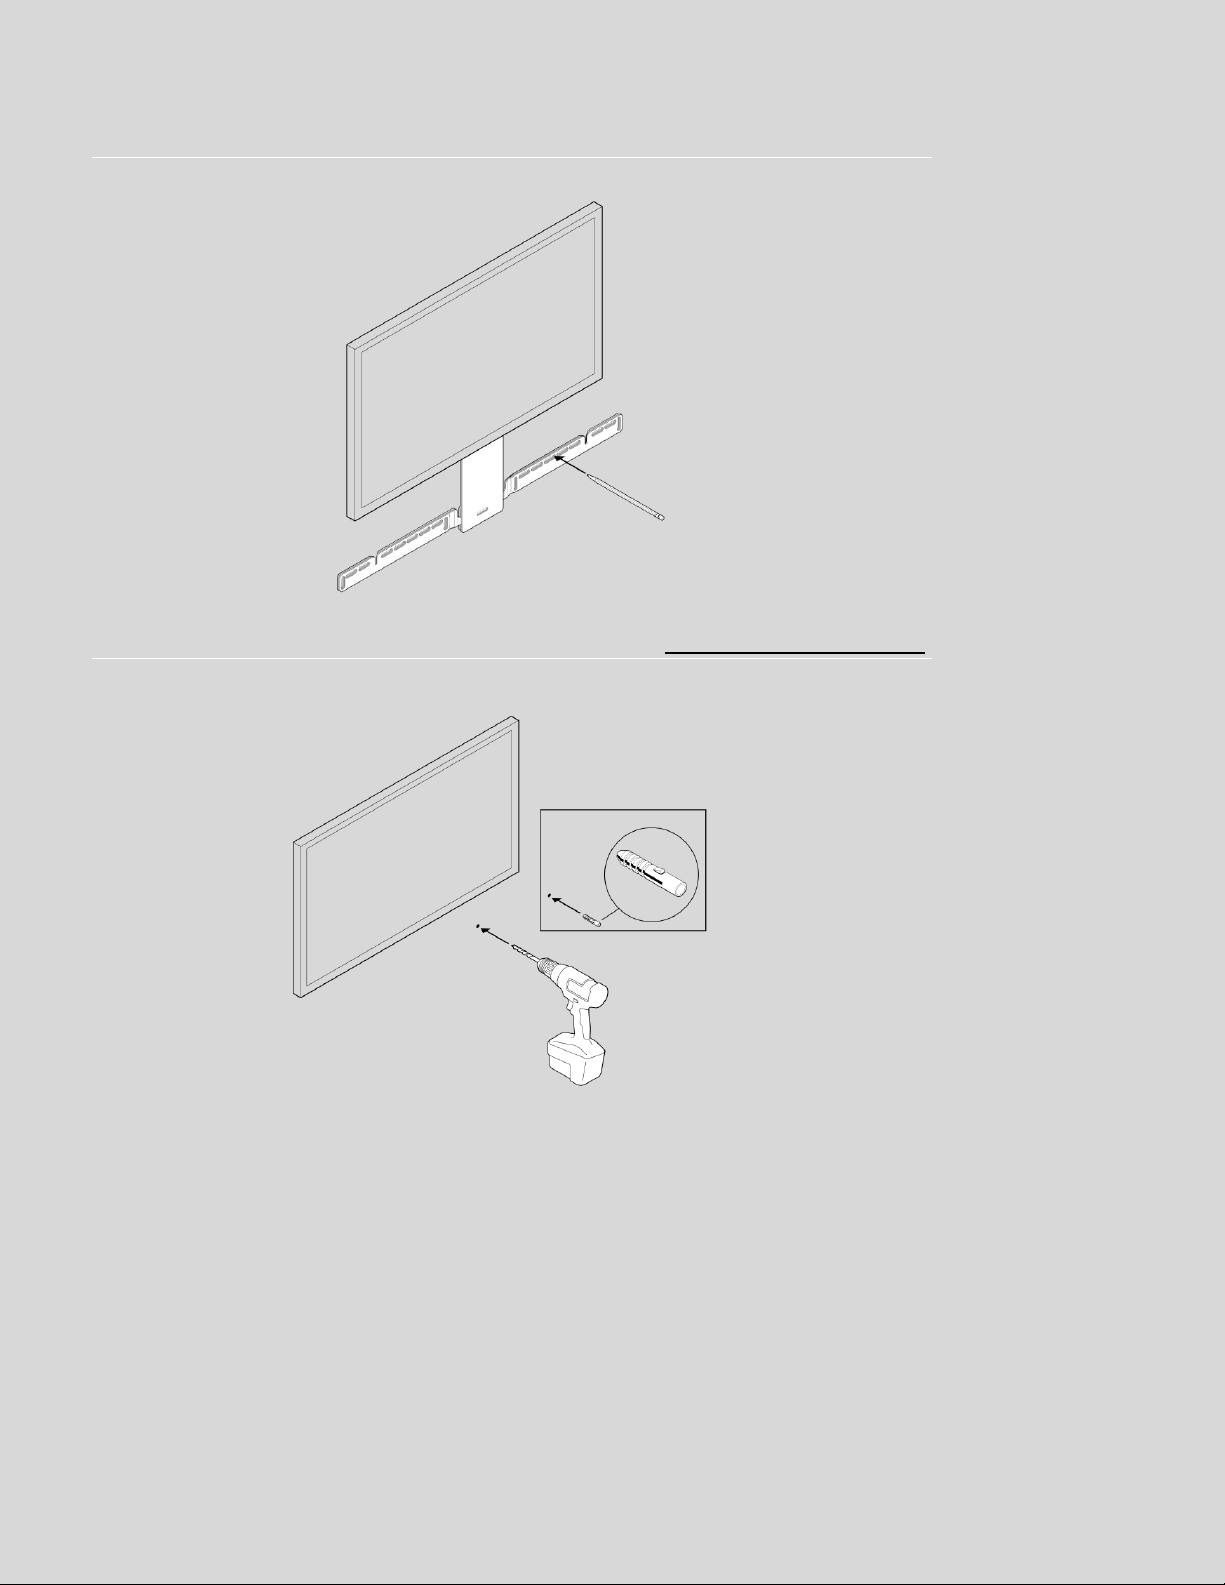
• Quick and easy setup, with only one cable to connect to your TV. Elegant design discreetly mounts to
the wall or sits on a credenza beneath the TV.
• Expandable. Add a Sub and a pair of Sonos speakers (Sonos One or Sonos Five), for 5.1 surround sound.
For more information, see Sonos home theater.
• Set up and control with the Sonos app (for Android and iOS).
• See Getting started when you’re ready to add Arc to your Sonos system.
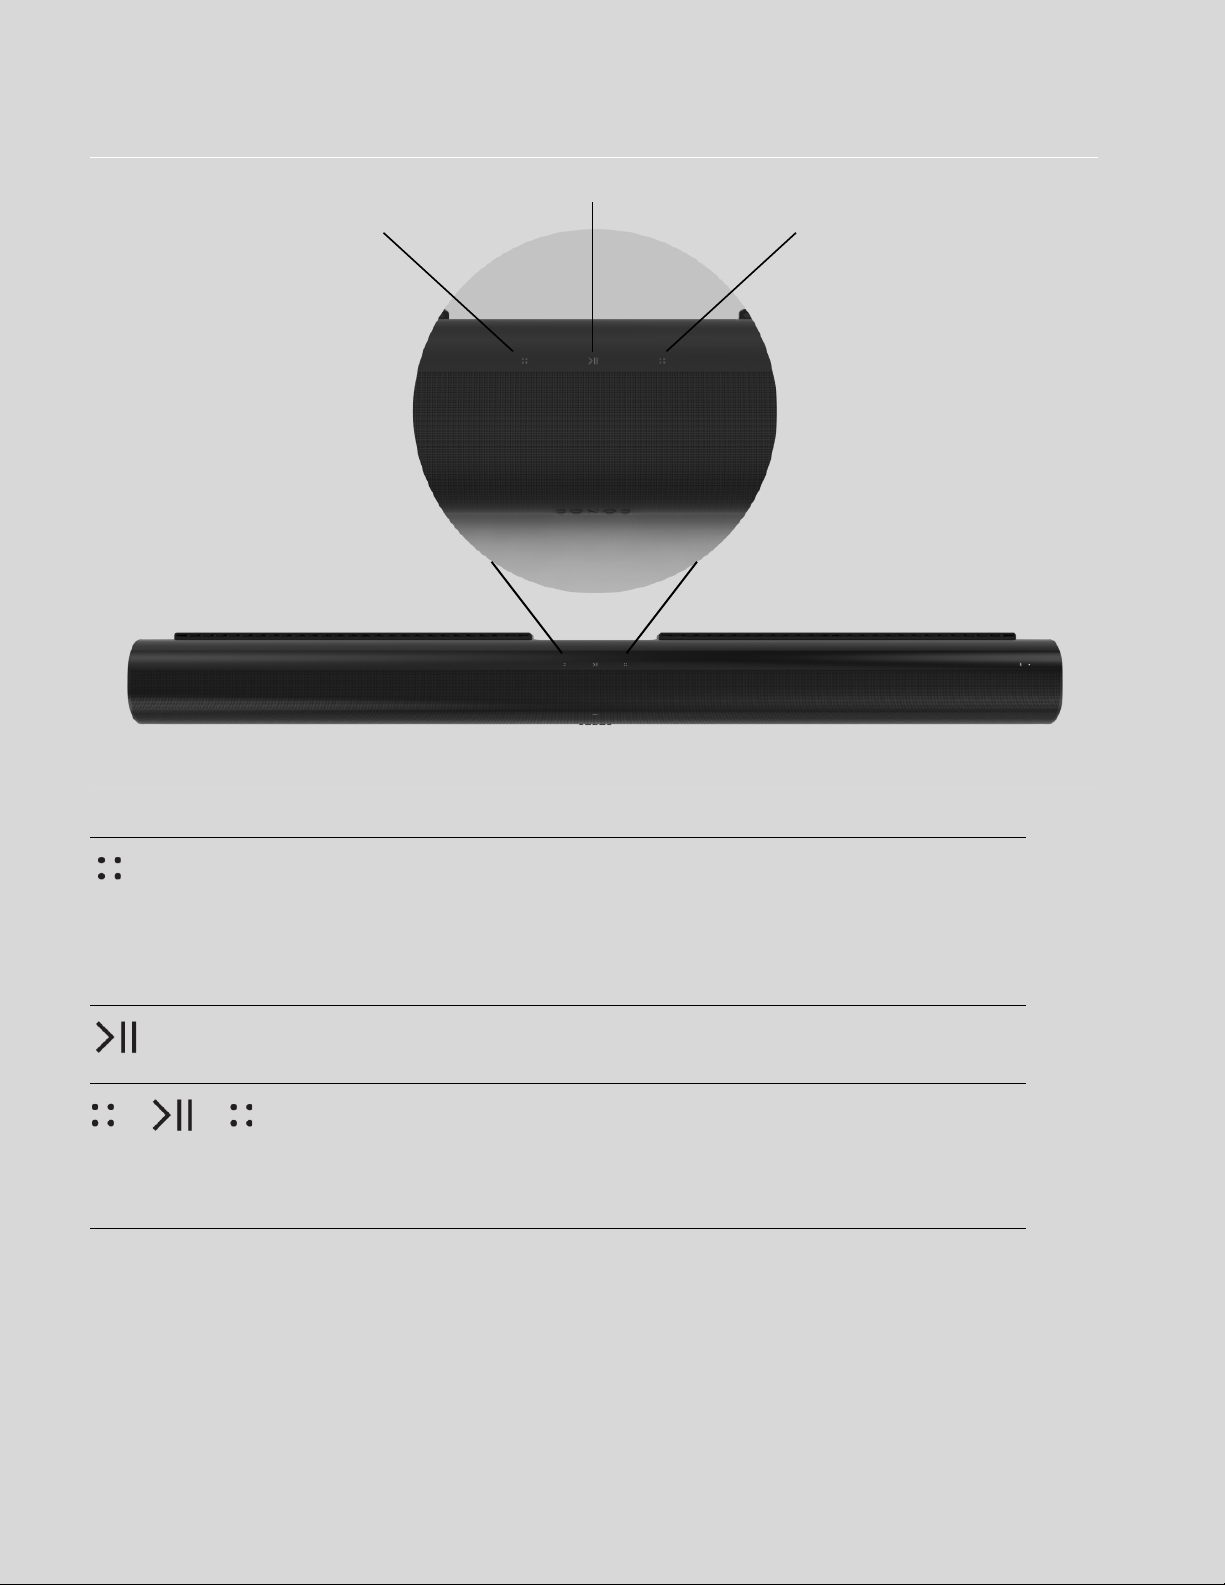
Controls and lights
Swipe, touch, tap, or ask—with Sonos Arc you’ve got choices on how to control sound.
• Use the touch controls—touch or swipe across the controls.
• Voice control—set it up and use your voice to turn the TV on or off, adjust the volume, or play music.
• Use the Sonos S2 app.
• Use your TV remote control.

SONOS USER GUIDE
Volume control Touch for small adjustments or touch and hold to
quickly change the volume:
• Volume up (right)
• Volume down (left)
Note: You can also use the Sonos app, voice control,
or your TV remote.
Play/Pause Touch to play or pause sound.
Next/Previous
(Music only)
• Swipe right across the touch controls to skip to the
next song.
• Swipe left to go to the previous song.
Note: You can’t skip forward or go back when listening
to a radio station.
Volume down Volume up
Play/Pause

SONOS USER GUIDE
Connector panel
Microphone
indicator
• Tap the microphone light to turn the microphone on
or off.
• When the light is on, voice control is on and you can
use voice commands.
• When the light is off, voice control is off.
Note: If the light is off, you can press and hold the
Microphone indicator to talk to your voice
service. Release the button to turn voice control
off again.
Status light Indicates the status. Learn more
AC power (mains) input Use only the supplied power cord (using a third-party
power cord will void your warranty).
Note: Insert the power cord firmly until it is flush with
the speaker.
Join button Press to connect during setup.
AC power (mains) input
HDMI port
Join button
Ethernet port

SONOS USER GUIDE
Select a location
You can wall mount Sonos Arc under your TV or place it on a credenza.
Place on a credenza
• Place horizontally on a stable and level surface.
• Keep 4.0" (102 mm) space (minimum) between the top of Sonos Arc and the bottom of your TV (if placing
Arc below the TV).
• Don’t place vertically or on its side.
• Make sure the touch controls are facing up.
Wall mount
To put Sonos Arc on a wall, see Wall mount.
Connect the cables
Before you start
1. Disconnect existing home theater or surround sound equipment from your TV.
2. Connect any external devices, like a cable box or DVD player, directly to your TV.
3. Turn your TV on.
Ethernet port Use an Ethernet cable if you want to connect to a router,
computer, or network-attached storage (NAS) device
(optional).
HDMI port Use to connect Sonos Arc to your TV.

SONOS USER GUIDE
Connect the power cord
1. Insert the power cord firmly into Arc’s power port until it’s fully connected.
2. Plug the other end into a power outlet.
Caution: Use only the supplied power cord (using a third-party power cord will void your warranty).
Power port

SONOS USER GUIDE
Connect Sonos Arc to your TV
Use the HDMI cable to connect the soundbar to your TV. If your TV doesn’t have an ARC or eARC port, you’ll
need to use the optical adapter too (the app guides you through it during setup).
1. Fully insert the HDMI cable into Arc’s HDMI port.
2. Connect the HDMI cable to your TV:
• If your TV has an HDMI ARC or eARC port, plug the HDMI cable directly into the TV port labeled ARC,
eARC, or ARC/eARC.
• If your TV doesn’t have an HDMI ARC port, you’ll need to connect the optical audio adapter (included) to
your TV’s Digital audio out instead.
HDMI ARC or eARC
HDMI ARC is a special port that looks like a standard HDMI port—it may be on the back or side of your TV.
The ports look similar, but the ARC port will be labeled ARC, eARC, or ARC/eARC. If you connect Sonos Arc
to a standard HDMI port instead, you won’t hear any sound.
Note: For TVs that don’t have an ARC port, use the optical audio adapter (included) to connect Sonos Arc to
your TV’s Digital audio out.
HDMI cable
HDMI ARC or eARC port

SONOS USER GUIDE
Digital audio out
If your TV doesn’t have an HDMI ARC or eARC port, you’ll use the optical audio adapter (included) to connect
to your TV’s digital audio out port.
1. Remove the protective cap from the adapter.
2. Attach the optical adapter to the HDMI cable.
3. Connect the optical adapter to the TV’s optical digital OUT port.
Note: The optical adapter’s port is “D-shaped”—make sure the connector aligns correctly into the port.
Inserting the adapter incorrectly may damage the cable.
If you don’t have the free Sonos app, download it from the app store. You’ll need it to set up and control your
Sonos system. See Getting started.
Microphone on/off
Touch on your Sonos Arc to turn the microphone on and off. (If you don’t have a voice service installed, the
microphone is inactive.)
When the microphone light is on, voice control is on and your voice assistant is ready to respond. When the
microphone light is off, voice control is off.
Note: If you’ve installed a voice service and the microphone is off, you can still use voice commands. Just
press and hold —no need to start with a wake word. When you release the microphone button,
voice control turns off again.
Optical adapter
HDMI cable
Remove the
protective cap

SONOS USER GUIDE
Wall mount
Guidelines
• Use the Sonos Arc wall mount kit. You can buy it on www.sonos.com. Follow the instructions in the kit.
• Keep 4.0" (102 mm) space (minimum) between Sonos Arc and your TV.
• Make sure the touch controls are facing up.
• For best sound quality, keep both ends of Arc at least 1' (30cm) from a wall or other obstruction.
Mount kit contents
• Wall mount bracket
• Positioning guide (don’t discard—it may look like packing material)
•2knobs
• 6 wall anchors
•6screws
Note: Don’t discard the positioning guide. It may look like packing material.
1. If your TV is wall-mounted, place the positioning guide against the wall, aligning the top edge with the
bottom of your TV. There should be 5.5" (140 mm) between the top of the wall mount bracket and the TV.

SONOS USER GUIDE
2. Mark the screw locations and remove the guide. Refer to Wall mounting information for placement help.
3. If you’re using the included wall anchors, use a 5/16" drill bit to drill the pilot holes and then insert the wall
anchors. Don’t use the anchors if you’re drilling into wood or plastic.

SONOS USER GUIDE
4. Position the wall mount bracket over the marked screw locations, using a level to confirm accuracy. Use a
Phillips-head screwdriver or a power drill to screw the bracket to the wall, making sure the arrows in the
center are pointing up.
5. Screw the 2 knobs into the back of the soundbar until they are fully tightened.

SONOS USER GUIDE
6. Connect the power and HDMI cables to the back of the soundbar.
Note: If you’re connecting the cables to the TV at this time, be sure to plug the HDMI cable into the HDMI
ARC or eARC port on your TV.
7. Slide the soundbar down so the knobs fit into the slots on the wall bracket. Make sure the touch controls
are facing up, and the soundbar is fully seated.

SONOS USER GUIDE
Wall mounting information
Specifications
Wall Material Pre Drill Use Wall Anchors Use Screws
Wood Stud 1/8" / 3 mm bit No 2
Drywall (no stud) 5/16" / 8 mm bit Yes 6
Plaster 5/16" / 8 mm bit No, requires toggle bolt
(not included)
2-6
Concrete or Brick 5/16" / 8 mm bit Yes 2-6
Feature Description
Audio
Amplifier Eleven Class-D digital amplifiers.
Elliptical Woofer Eight full-range woofers ensure you’ll hear the faithful playback of mid-range
vocal frequencies plus deep, rich bass.
Tweeter Three silk dome tweeters create a crisp and clear high-frequency response.
Microphones • Four microphone array.
• LED hard-wired to voice microphones for privacy control so you know
when the microphone is active.
Voice Control Integrated voice control.
System Requirements TV with HDMI ARC or optical digital audio output, broadband internet, and
the Sonos S2 app.
Networking*
Wireless Connectivity Connects to WiFi network with any 802.11 b/g/n, 2.4 GHz broadcast-
capable router.
Ethernet Port One 10/100 Mbps Ethernet port. You can wire directly to your router if your
WiFi is unstable.
General
Power Supply Auto-switching 100-240 V, 50-60 Hz 3.5 A AC universal input.
Dimensions (H x W x D) 3.4 x 45 x 4.5 in. (87 x 1141.7 x 115.7 mm)
Weight 13.78 lb (6.25 kg)
Operating Temperature 32° F to 104° F (0° C to 40° C)

SONOS USER GUIDE
* Specifications subject to change without notice.
Storage Temperature -4° F to 122° F (-20° C to 50° C)
Control Use your remote control, voice, touch controls, or the Sonos S2 app.
Supported Devices Connects to TV with HDMI cable (with or without an attached optical
adapter). Plays sources connected to the TV, including cable boxes and
game consoles.
Package Contents Sonos Arc, AC power cord, HDMI cable, optical audio adapter, Quickstart
Guide.
Feature Description
Other manuals for ARC
3
Table of contents
Other Sonos Speakers System manuals
Popular Speakers System manuals by other brands

Kindermann
Kindermann 8715000300 Mounting and operating instructions

Hybrid Audio Technologies
Hybrid Audio Technologies Imagine I69-2 user manual

Beyerdynamic
Beyerdynamic Headzone PRO XT operating instructions

LG
LG DSP2 owner's manual

Recon Outdoors
Recon Outdoors Scout PMD 1000 user manual

Yamaha
Yamaha NS-625 owner's manual