SonoSite TEExi User manual
TEExi Transducer
User Guide

SonoSite M-Turbo, SonoSite Edge II, SonoSite S Series, Sonosite, and the Sonosite logo are trademarks and registered trademarks of
FUJIFILM Sonosite, Inc. in various jurisdictions. Value from Innovation is a trademark of FUJIFILM Holdings America Corporation.
All other trademarks are the property of their respective owners.
Patents: US 6,371,918, CA 2,373,065, DE 60021552.0, FR 1175173 and GB 1175173.
Part Number: P21458-05
Publication date: April 2018
Copyright © 2018 FUJIFILM SonoSite, Inc. All rights reserved.
Manufacturer
FUJIFILM SonoSite, Inc.
21919 30th Drive SE
Bothell, WA 98021 USA
T: 1-888-482-9449 or 1-425-951-
1200
F: 1-425-951-1201
EC Authorized Representative
FUJIFILM SonoSite B.V.
Joop Geesinkweg 140
1114 AB Amsterdam,
The Netherlands
Australia Sponsor
FUJIFILM SonoSite Australasia Pty Ltd
114 Old Pittwater Road
BROOKVALE, NSW, 2100
Australia
Caution United States federal law restricts this device to sale by or on the order of a
physician.

iii
CONTENTS
1. Introduction
About the user guide .......................................................................................................................................... 1-1
Changes in this version ............................................................................................................................. 1-2
Conventions .................................................................................................................................................... 1-2
Warranty statement ............................................................................................................................................. 1-2
Technical Support .................................................................................................................................................. 1-3
2. Getting Started
About the TEExi transducer ............................................................................................................................. 2-1
How scan plane rotation works ............................................................................................................ 2-2
Intended uses .......................................................................................................................................................... 2-2
Contraindications ................................................................................................................................................... 2-2
Unpacking .................................................................................................................................................................. 2-3
Inspecting contents .............................................................................................................................................. 2-4
Transducer and system interface .................................................................................................................. 2-5
TEExi transducer controls .................................................................................................................................. 2-6
Tip deflection .................................................................................................................................................. 2-7
Tip deflection brake .................................................................................................................................... 2-8
Scan plane rotation ..................................................................................................................................... 2-9
3. Examination
Pre-exam inspection ............................................................................................................................................ 3-1
Precautions ............................................................................................................................................................... 3-2
Bite guard ......................................................................................................................................................... 3-3
Sterile sheath ................................................................................................................................................. 3-3
Emergency retraction .......................................................................................................................................... 3-4

iv
CONTENTS
4. Cleaning, disinfecting, transporting, storing, and disposing
of the transducer
Cleaning and disinfecting .................................................................................................................................. 4-1
Cleaning the transducer ........................................................................................................................... 4-3
Disinfecting the transducer ..................................................................................................................... 4-5
Identifying the transducer as clean .............................................................................................................. 4-7
Transporting the transducer ............................................................................................................................. 4-7
Storing the transducer ........................................................................................................................................ 4-9
Disposing of the transducer ............................................................................................................................. 4-9
5. Safety
Standards compliance ......................................................................................................................................... 5-1
Annual inspection .................................................................................................................................................. 5-1
Safe operational use ............................................................................................................................................ 5-2
Thermal safety ........................................................................................................................................................ 5-3
Thermal limits ................................................................................................................................................. 5-3
Reducing temperature .............................................................................................................................. 5-4
Temperature calibration test .................................................................................................................. 5-4
Electrical safety ....................................................................................................................................................... 5-5
Electrical leakage testing and bite hole detection ...................................................................... 5-5
Testing the endoscopic shaft ................................................................................................................. 5-9
Transducer temperature rise .........................................................................................................................5-12
Output display .......................................................................................................................................................5-12
Acoustic output ....................................................................................................................................................5-13
6. Transducer Specifications
TEExi/8-3 MHz transducer ............................................................................................................................... 6-1

Introduction 1-1
CHAPTER 1
Introduction
The TEExi transducer is a transesophageal echocardiographic transducer designed to
operate with the FUJIFILM SonoSite M-Turbo, SonoSite S Series, or SonoSite Edge II
ultrasound system.
Transesophageal procedures carry a variety of inherent risks to the patient. The information
and instructions in this user guide are intended to help you minimize those risks. In addition,
the TEExi transducer is a highly complex and delicate precision instrument. Misuse or poor
handling may severely shorten the service life.
About the user guide
This user guide provides information on the TEExi transducer. It is designed for a reader
familiar with ultrasound and proper endoscopic techniques; it does not provide training in
sonography, cardiology, or clinical practices. For information about the ultrasound system,
see its user guide and other appropriate literature.
To aid in safeguarding the patient and ensuring reliable transducer operation, FUJIFILM
SonoSite recommends having this user guide available for reference during all stages of
TEExi transducer handling.
WAR NING To help avoid conditions that may cause harm to the patient or
damage to the transducer, it is important that personnel using or
handling this transducer read and understand the instructions,
warnings, cautions, and training material contained in this user
guide. If you have questions about any of the information
contained in this user guide, contact FUJIFILM SonoSite or your
local representative.

1-2 Introduction
Changes in this version
Conventions
The user guide follows these conventions:
A WARNING describes precautions necessary to prevent injury or loss of life.
A Caution describes precautions necessary to protect the products.
A Note provides supplemental information.
Numbered steps in procedures must be performed in order.
Single-step procedures begin with .
Items in bulleted lists do not require performance in sequence.
For labeling symbols used, see the ultrasound system user guide.
Warranty statement
The TEExi transducer is warranted for material and workmanship only, for a period of 12 months from date
of shipment from FUJIFILM SonoSite.
The warranty does not cover damage caused by patient bite, misuse by the end user, disinfecting or
sterilizing incorrectly or with chemicals not recommended by FUJIFILM SonoSite, or circumstances beyond
what is considered normal for the product’s intended application.
Chapter Description
Chapter 4 Updated cleaning and disinfecting guidelines

Introduction 1-3
Technical Support
To order sheaths, biteguards, tip covers, and other supplies, see www.civco.com.
For technical support, contact FUJIFILM SonoSite as follows.
Phone
(U.S. or Canada)
877-657-8118
Phone
(outside U.S. or
Canada)
425-951-1330, or call your local representative
Fax 425-951-6700
Email ffss-service@fujifilm.com
Web www.sonosite.com
Europe Service Center Main: +31 20 751 2020
English support: +44 14 6234 1151
French support: +33 1 8288 0702
German support: +49 69 8088 4030
Italian support: +39 02 9475 3655
Spanish support: +34 91 123 8451
Asia Service Center +65 6380-5581

1-4 Introduction

Getting Started 2-1
CHAPTER 2
Getting Started
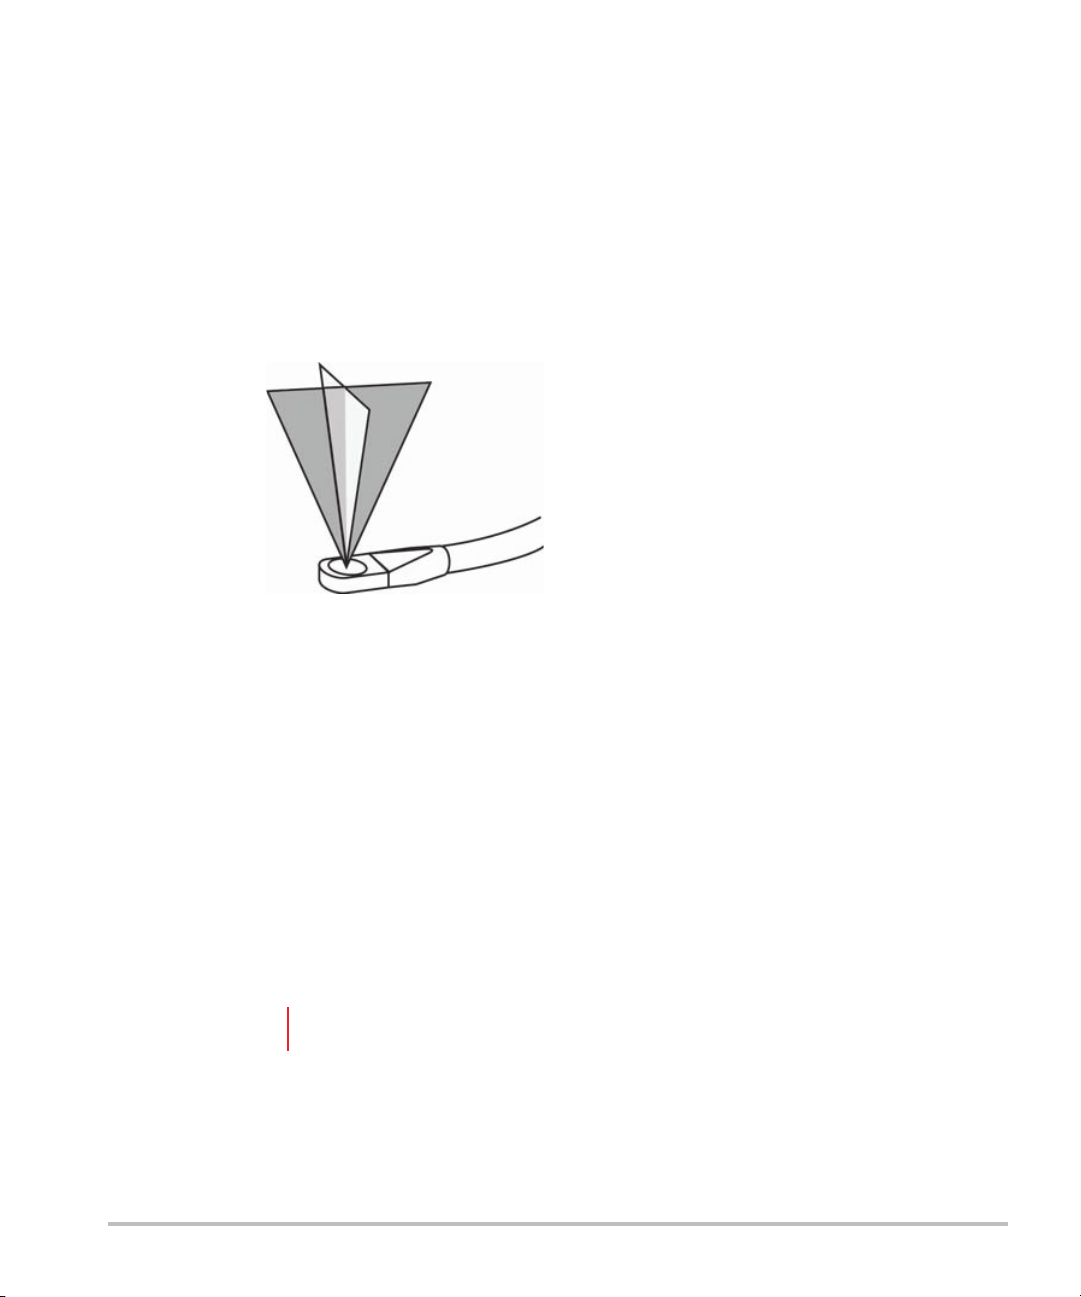
About the TEExi transducer
The TEExi transducer is an electronically steered phased array ultrasound transducer
assembly, mounted in a sealed tip at the end of a conventional endoscope.
The TEExi transducer is used to generate a set of ultrasound images or slices within a cone
from the same position in the esophagus. The rotation of the scan plane is driven by a
motor in the control handle.
WAR NING FUJIFILM SonoSite does not recommend the use of
high-frequency electromedical devices in proximity to its
systems. FUJIFILM SonoSite equipment has not been validated
for use with high-frequency electrosurgical devices or
procedures. Use of high-frequency electrosurgical devices in
proximity to its systems may lead to abnormal system behavior
or shutdown of the system.
To avoid the risk of a burn hazard, do not use the transducer
with high-frequency surgical equipment. Such a hazard may
occur in the event of a defect in the high-frequency surgical
neutral electrode connection.
To avoid injury to a patient, the TEExi transducer is intended for
use by a licensed physician who has received appropriate
training in endoscopic techniques as dictated by current
relevant medical practices, as well as in proper operation of the
ultrasound system and transducer.
Caution To avoid inadvertent damage to the transducer, read this user
guide before handling and cleaning the TEExi transducer.
2-2 Getting Started
How scan plane rotation works
To familiarize yourself with scan plane rotation, you may choose to start scanning in one of the transverse
planes — for example, 0° on the system screen is the standard monoplane. If you rotate the scan plane 90°,
you are now scanning in the longitudinal plane, sweeping through two opposite quadrants of the cone.
If you continue to rotate the scan plane another 90° in the same direction, scanning occurs in the mirror
image of the first transverse plane. The only two planes that are equivalent are the two transverse planes at
0° and 180°, one being the mirror image of the other. As shown in Figure 2-1 on page 2-2, a 180° rotation
of the scan plane fills all four quadrants of the conic imaging volume.
Figure 2-1 Rotating to different imaging planes
The direction of the tip of the endoscope is easily steered using the deflection control wheels on the handle
of the transducer to allow exact positioning of the transducer in the esophagus.
Intended uses
The TEExi transducer is designed for 2D, M Mode, color Doppler (Color), pulsed wave (PW) Doppler, and
continuous wave (CW) Doppler imaging by applying ultrasound energy through the esophagus or stomach
of the patient into the heart. The TEExi transducer is intended to be used on adults only. Backscattered
ultrasound energy from the patient’s heart forms images of the heart to detect abnormalities in structure or
motion, to evaluate the velocity of blood flowing within the heart, and to obtain a color depiction of the
velocities of blood flowing in the heart.
Contraindications
Contraindications for using the TEExi transducer include, but are not limited to, the following:
Fetal imaging
Pediatric imaging
WAR NING The physician must consider all possible factors before starting the examination.
0° imaging plane
90° imaging plane
Scan head

Getting Started 2-3
Imaging when the patient exhibits the following or similar conditions:
Esophageal stricture, spasms, lacerations, and trouble swallowing (dysphagia)
Esophageal diverticula, esophageal varices (swollen veins)
Gastrointestinal bleeding
Peptic ulcers, hiatal hernia, esophageal webs and rings
Recent radiation treatment to the esophagus
Inability to swallow or accommodate the transducer
History of gastroesophageal diseases
Unpacking
Proper care and maintenance are essential. Follow the unpacking procedures. Contact FUJIFILM SonoSite or
your local representative immediately to report any damage or discrepancies.
To unpack the transducer
1Visually examine the shipping box, shipping case, and the TEExi transducer for any damage.
2Note any breakage or other apparent damage, retain the evidence, and notify the carrier or shipping
agency.
3Verify that the shipping case contains the components listed on the packing list:
TEExi transducer
TEExi Transducer User Guide
TEE Transducer Care (contains cleaning and disinfection instructions)
Puncture test tool
Bite guards (3)
Non-sterile tip covers (3)
WARNING To avoid injury to patient/operator, carefully inspect all equipment after receipt
and prior to each use.

2-4 Getting Started
Figure 2-2 Shipping case with TEExi transducer
Inspecting contents
After unpacking the contents, perform the following on the TEExi transducer:
Visual and tactile inspection. See “To visually and tactilely inspect the transducer” on page 2-6.
Tip deflection inspection. See “To inspect Tip Deflection” on page 2-8.
Brake inspection. See “To inspect the tip deflection brake” on page 2-9.
Scan plane rotation inspection. See “To inspect scan plane rotation” on page 2-11.
Leakage test. See “Electrical safety” on page 5-5.
WAR NING To avoid injury to patient:
Proper care and maintenance are essential for safe operation of the TEExi
transducer.
The medical professional performing the exam must exercise sound medical
judgment in selecting this transducer for use in a procedure.
Cautions To avoid permanently damaging the transducer’s internal control wires, do not
deflect the transducer tip using finger pressure directly on the tip.
To avoid inadvertent damage to the transducer, read this user guide before
handling and cleaning the TEExi transducer.
TEExi transducer
Bite guards (3)
Tip covers (3)
Puncture test tool
Getting Started 2-5
Contact FUJIFILM SonoSite or your local representative immediately to report any damage or discrepancies.
See “Technical Support” on page 1-3.
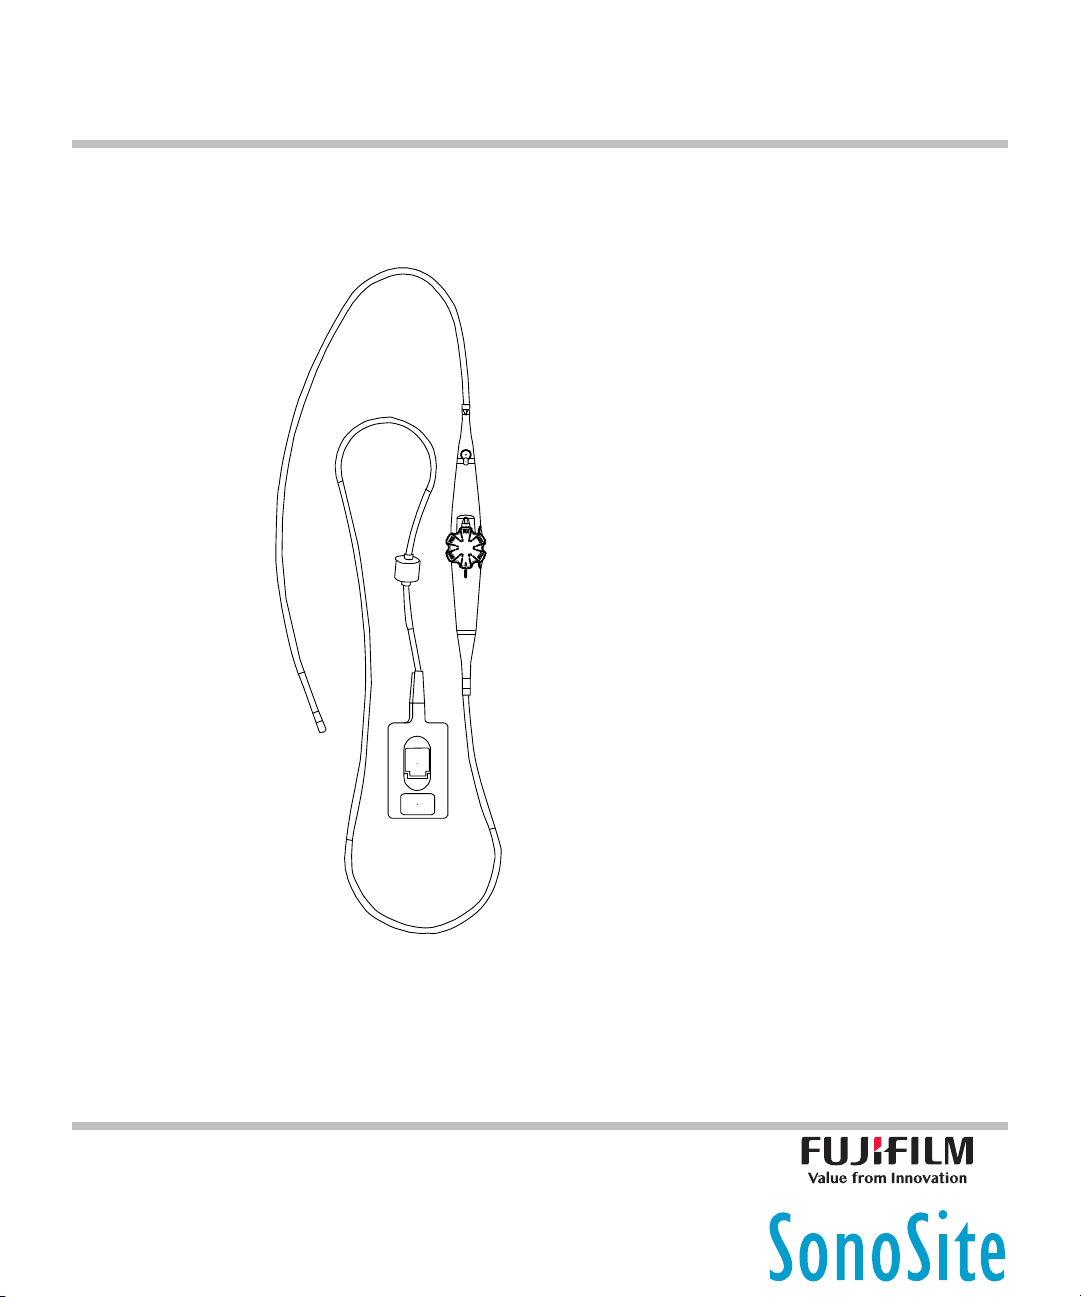
Transducer and system interface
The TEExi transducer consists of an electronically steered phased array ultrasound transducer assembly
mounted in a sealed tip at the end of a conventional endoscope. It connects to the ultrasound system with
a cable and connector. See Figure 2-3.
Figure 2-3 TEExi transducer:
WAR NING To avoid injury to the patient, do not use the TEExi transducer if any irregularity,
substandard function or unsafe condition is observed or suspected.
1 Flexible endoscopic shaft 7 Transducer cable
1
2
3
4
5
7
8
9
10
6
11

2-6 Getting Started
TEExi transducer controls
The endoscope is designed for one-hand operation of the deflection and scan plane controls. Figure 2-4
shows the user holding the endoscope handle in the left hand. Thumb and first and second fingers operate
the deflection and scan plane controls.
Check the mechanical operation and physical integrity of the transducer after taking it out of the box and
before each exam.
Figure 2-4 Transducer in left hand
To visually and tactilely inspect the transducer
You should inspect the TEExi transducer visually and tactilely after taking it out of the box and before
disinfecting.
1Visually examine and feel the entire surface of the flexible shaft and deflection section with the transducer
in both straight and deflected position.
2 Articulation section 8 Transducer connector
3 Transducer tip with scan head 9 Scan plane control buttons
4 Deflection brake 10 Attachment ring
5 Deflection control wheels 11 Handle
6 Neutral marker
WAR NING To avoid injury to the patient:
Do not use the TEExi transducer if any irregularity, substandard function or
unsafe condition is observed or suspected.
Do not use the TEExi transducer if any metallic protrusions, holes, rough spots,
cracks, or dents are found.
Getting Started 2-7
2Examine the transducer tip for any holes or dents.
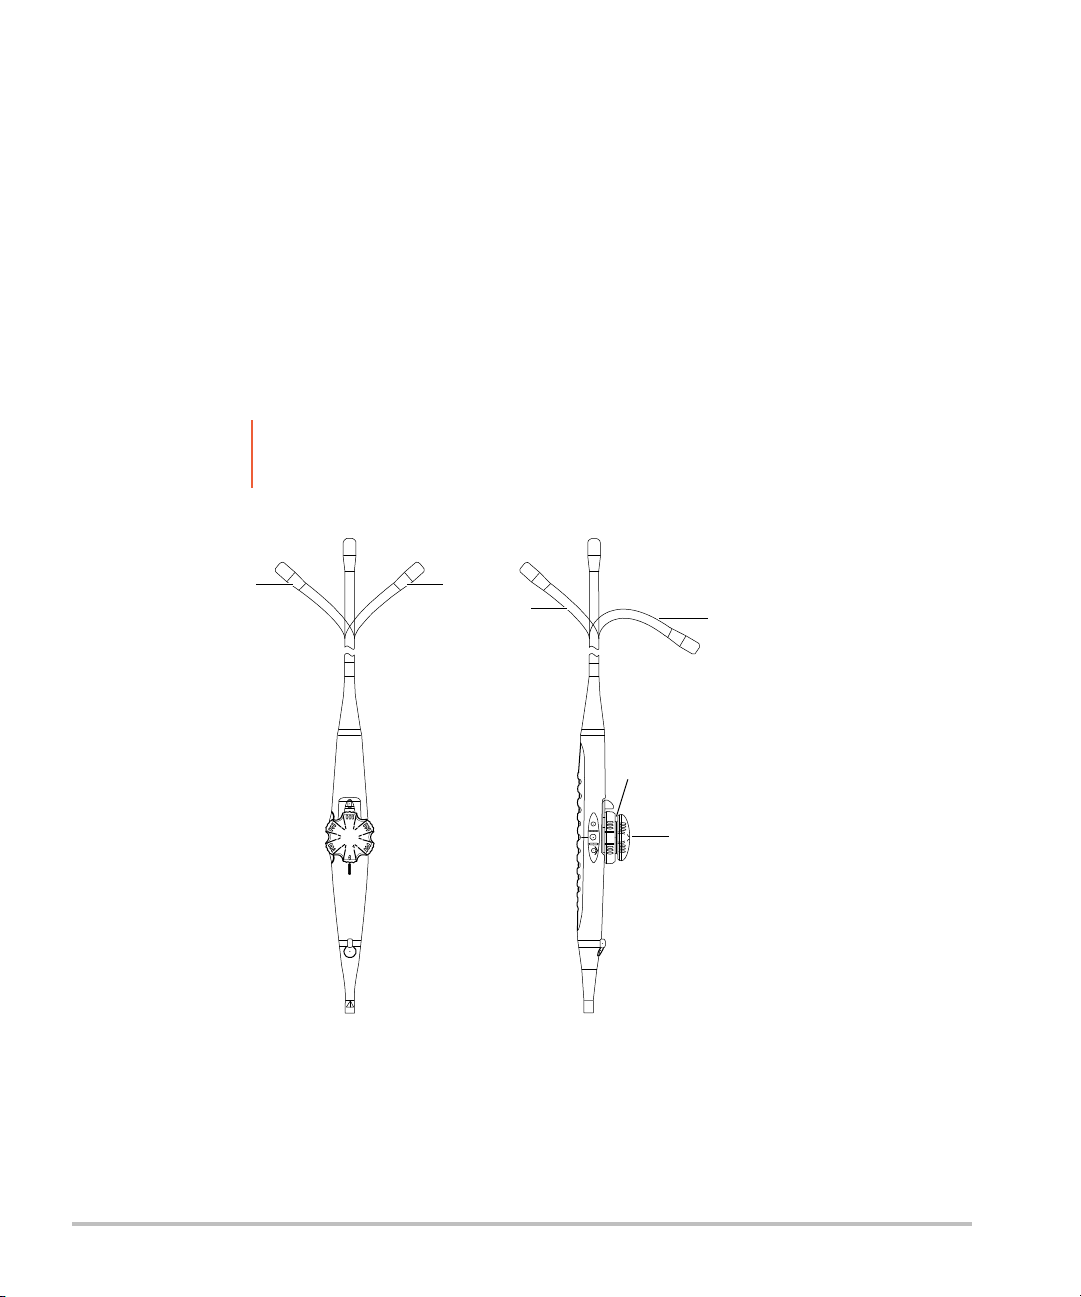
Tip deflection
The TEExi transducer handle has two wheels for controlling the transducer tip deflection.
The wheels control anterior/posterior and left/right tip deflection. Figure 2-5 on page 2-7 shows the
deflection wheels in the neutral (undeflected) position. (There is no brake for left/right deflection.)
The lower wheel has brake and freely-moving modes. In the brake mode, the movement of the deflection
wheel is restrained. This is for holding the tip in a certain position.
Special care should be taken when inserting and removing the transducer.
Figure 2-5 Deflection controls. For orientation purposes, hold the transducer pointing away with control
wheels up and the flexible shaft in a straight position.
Caution To avoid damaging the transducer, do not deflect the distal tip of the transducer
by direct application of force. Use the deflection wheels for this task.
1 Turn upper wheel counterclockwise to move the tip to the left.
2 Turn upper wheel clockwise to move the tip to the right.
1 2
6
5
34
2-8 Getting Started
To inspect Tip Deflection
Inspect the tip deflection on the TEExi transducer after taking it out of the box and before each exam. For
orientation purposes, hold the transducer pointing away with control wheels up and the flexible shaft in a
straight position.
1Deflect the tip in all four directions.
2Confirm that the deflection controls operate smoothly.
3Check that when the deflection controls are in the neutral position that the transducer tip is also in a
neutral position (undeflected).
Tip deflection brake
To retain the tip in a deflected position, friction can be applied to the anterior/posterior deflection control.
The brake for the anterior/posterior deflection is a handle under the deflection wheel (see Figure 2-6).
There is no brake for the right/left deflection.
3 Turn lower wheel counterclockwise to move the tip posterior.
4 Turn lower wheel clockwise to move the tip anterior.
5 Lower deflection control wheel
6 Upper deflection control wheel
WAR NING To avoid injury to the patient, if you observe a sharp “U-turn” of the transducer tip
during the tip deflection inspection, do not use the transducer.
2
34
5
1

Getting Started 2-9
Figure 2-6 Tip deflection brake operation
To inspect the tip deflection brake
Inspect the tip deflection brake on the transducer after taking it out of the box and before each exam.
1Confirm that the brake is in the unlocked position.
2Deflect the tip to the anterior direction.
3Move the brake to the locked position.
4Confirm that the tip is locked in the deflected position.
5Unlock the brake and confirm that the tip straightens easily.
6Repeat steps 1-5 for the posterior direction.
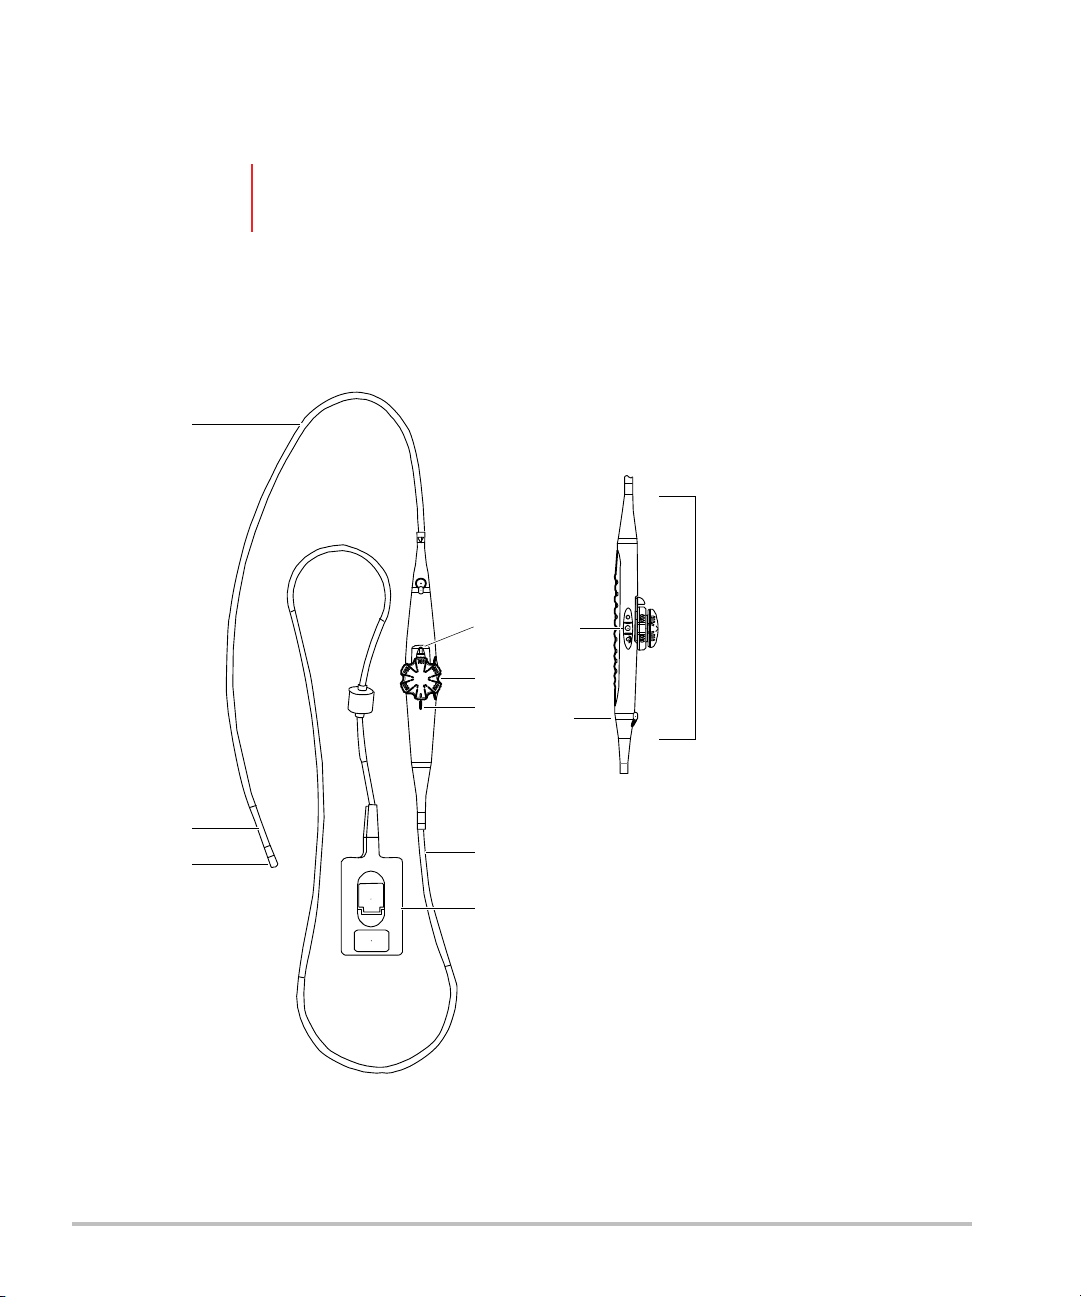
Scan plane rotation
The scan plane rotation is driven by a motor in the transducer handle and is controlled by buttons on the
handle (see Figure 2-7).
Figure 2-7 Scan plane rotation controls
1 Transducer tip 4 Neutral position marker
2 Tip control in unlocked position (brake off) 5 Wheel position markers
3 Tip control in locked position (brake on)
1 Transducer tip
2 Counterclockwise button (increases angle)
3 Biplane button (rotates angle to orthogonal biplane)
4 Clockwise button (decreases angle)
1
2 43

2-10 Getting Started
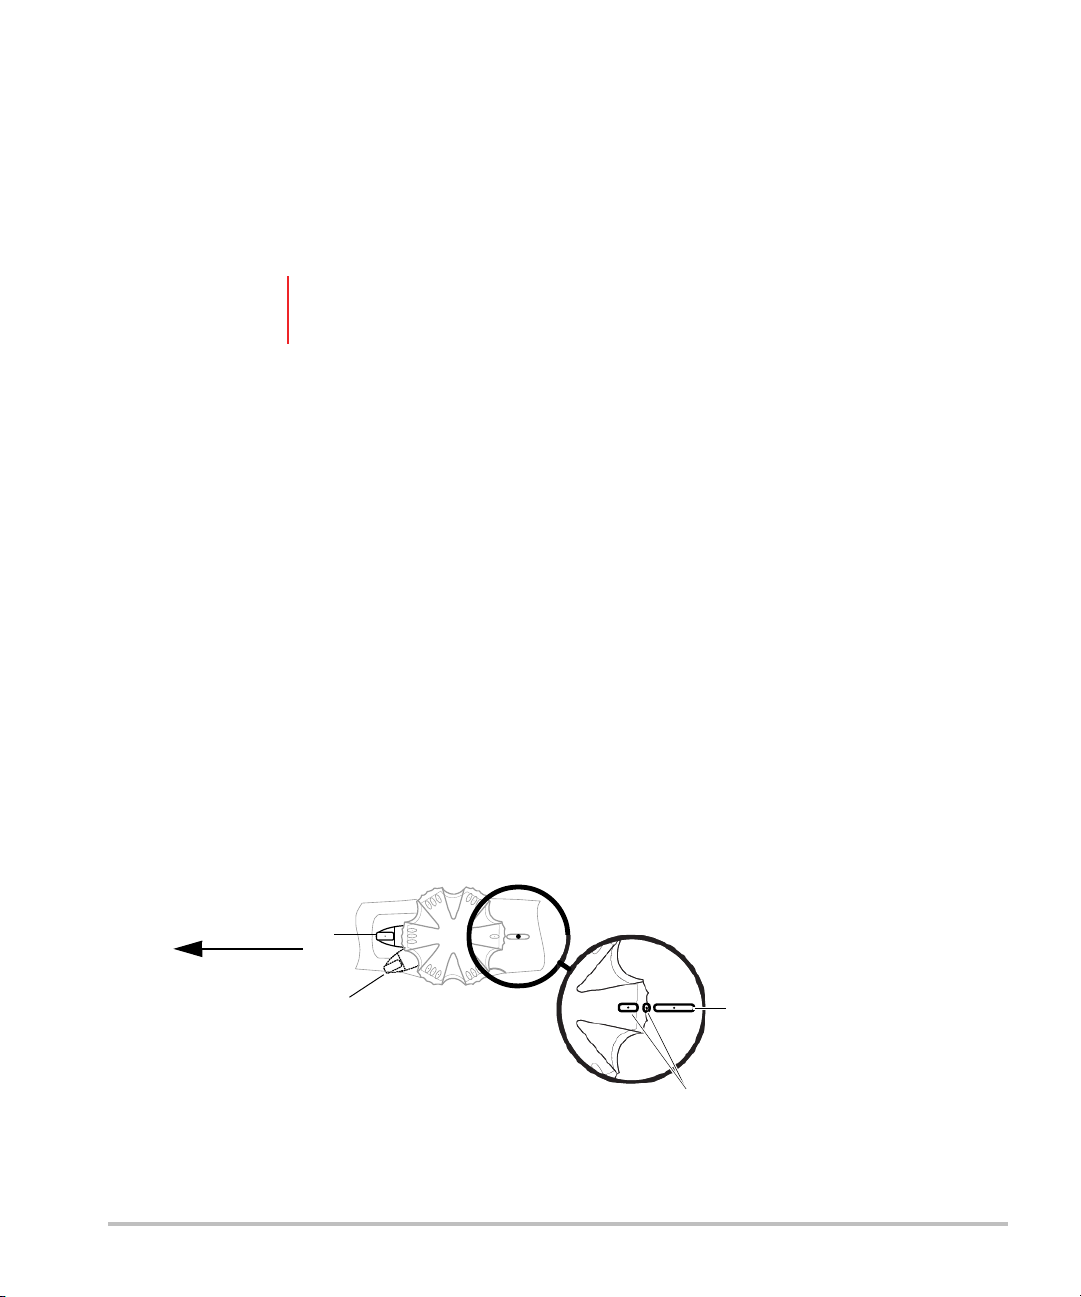
A scan plane indicator on the system screen shows the orientation. The scan plane angle is indicated by a
marker and a value. See Figure 2-8. The screen shows the angle relative to the standard monoplane,
displayed as 0°. The scan plane angle ranges from 0° to 180°.
Figure 2-8 Scan plane indicator
To initialize the scan plane to 0 degree plane
1Connect the transducer, and turn on the ultrasound system. (For instructions, see the ultrasound system
user guide.)
2Press the scan plane rotation buttons.
To rotate the scan plane
Press the outer buttons on the transducer handle:
The button closest to the transducer tip rotates the scan plane counterclockwise (scan plane angle
increases).
The button farthest from the transducer tip rotates the scan plane clockwise (scan plane angle
decreases).
The scan plane rotates 180° from a standard transverse plane (short axis) to the longitudinal plane (long
axis), ending at the mirror image of the first transverse plane (short axis). The angular position appears on
the system screen. The 0° short axis reference position is defined as follows: When you view the
transducer through the acoustic window of the transducer tip, the transducer is in the extreme clockwise
position.
To change the Biplane
Press the biplane button (the center button) on the transducer handle. See Figure 2-7 on page 2-9.
The scan plane rotates at full speed from the current position to the orthogonal position. (For example, if
the present position is 22°, the scan plane rotates to 112°. If the present position is 162°, the scan plane
rotates to 72°.)
Pressing the button again rotates the scan plane back to the previous position.
Caution To avoid damaging the transducer connector, protect the connector from dirt and
moisture.
Marker
Angle

Getting Started 2-11
To inspect scan plane rotation
Inspect the scan plane rotation on the transducer after taking it out of the box and before each exam.
1Connect the TEExi transducer to the ultrasound system.
2Without inserting the transducer, place a small amount of sterile gel on the transducer, and then turn up
the gain to obtain an image.
3Press the scan plane control buttons on the handle to rotate the scan plane counterclockwise (0° to 180°)
and clockwise (180° to 0°). See Figure 2-7 on page 2-9.
4Confirm that the image on-screen changes in relation to the numbers on the scan plane indicator. See
Figure 2-8 on page 2-10.
While you press the scan plane rotation buttons, the transducer motor should be running as the image is
changing.
Note Do not rely only on the scan plane indicator on-screen to verify that the scan
plane is rotating.

2-12 Getting Started
Table of contents
Other SonoSite Transducer manuals


