When using HDR-CX170/CX155/CX150/CX116/CX115/CX110, DCR-SX83/SX73
(See illustration -3-B)
Open the jack cover and connect the plug.
Pull the grip strap of the camera forward and arrange it as you install the camera
into this unit.
Aer installing the camera, arrange the cable so that it is hooked to the cable holder
in the rear body.
When using DCR-SX63/SX53/SX44/SX43/SX34/SX33 (See illustration -3-C)
Li the grip strap of the camera, open the jack cover and connect the plug. Aer
connecting, make sure the grip strap is higher than the jack cover and the plug.
Pull the grip strap of the camera forward and arrange it as you install the camera
into this unit.
When using HDR-CX180/CX160/CX130, DCR-SX85/SX65/SX45 (See illustration
-3-D)
Open the jack cover and connect the plug.
Arrange the grip strap of the camera as illustrated and pull it to the camera lens
side.
Check that the grip strap of the camera does not cover the jack cover or plug.
Lightly press the grip strap against the camera body and install the camera into this
unit.
Aer installing the camera, arrange the cable so that it is hooked to the cable holder
in the rear body.
4Insert the desiccant.
Insert the supplied desiccant. For details, refer to “Desiccant” in the operating
instructions.
5Close the rear body.
Press the rear body shut and fasten the buckles until they click in place.
Notes
Be careful not to pinch the cables when closing the rear body.
ˎ
Although the center of the lens of some camera models may be out of line with the
ˎ
center of the front glass of this unit when installed, this does not cause any problems
when recording.
When hooking the cable to the cable holder, pass the cable rmly through the loop
ˎ
so that no part of it gets caught.
Préparation
Remarques
Les modèles de caméscopes HD numériques Sony et de caméscopes numériques Sony
(appelés ci-dessous le « caméscope ») mentionnés ci-dessous peuvent ne pas être
commercialisés dans tous les pays ou toutes les régions.
Préparation du caisson sport
1Ouvrez la partie arrière et retirez l’entretoise
.
2Fermez la partie arrière et bloquez les fermoirs.
3Réglez la sangle.
Réglez la longueur de la sangle tout en tenant ce boîtier de manière à toucher
facilement les touches START/STOP, Téléobjectif, Grand-angle et PHOTO du bout des
doigts.
4Fixez la bandoulière.
Sélection du sabot de montage de caméscope
1Ouvrez ce boîtier.
Faites glisser le bouton UNLOCK dans le sens de la èche et maintenez-le ainsi,
puis faites glisser le bouton OPEN et relâchez le fermoir.
Ouvrez la partie arrière.
2Débranchez la che Audio/Commande à distance
du sabot de
montage de caméscope.
3Détachez le sabot de montage de caméscope xé à cet appareil.
Tout en maintenant le bouton sur le côté du sabot de montage de caméscope pressé
dans le sens de la èche pour libérer le verrou, sortez lentement le sabot de montage de
caméscope en le faisant glisser.
Le sabot de montage de caméscope C a été xé à ce boîtier en usine.
4Choisissez le sabot de montage et le numéro en vous reportant au
tableau suivant.
Sabot de montage
de caméscope
Numéro Caméscope
A
1 HDR-CX370V/CX370/CX350V/CX350/CX305/CX300
2HDR-CX170/CX155/CX150/CX116/CX115/CX110,
DCR-SX83/SX73
B 1 DCR-SX63/SX53/SX44/SX43/SX34/SX33
C 1 HDR-CX180/CX160/CX130,
DCR-SX85/SX65/SX45
5Si vous utilisez un autre sabot de montage que le C, détachez la
plaquette à vis
du sabot de montage de caméscope C. Alignez
ensuite la plaquette à vis sur le numéro correcte sur le sabot de
montage de caméscope choisi, puis appuyez dessus de sorte qu’elle
s’encliquette.
La plaquette à vis a été xée au sabot de montage C en usine. Si vous utilisez le sabot de
montage C, cette étape est inutile.
Préparation du caméscope
Pour le détail, reportez-vous au mode d’emploi fourni avec le caméscope.
1Détachez l’accessoire.
Retirez le ltre, le convertisseur, le capuchon d’objectif, le pare-soleil ou la bandoulière
du caméscope.
Si le caméscope que vous utilisez est pourvu d’un obturateur central manuel, ouvrez
cet obturateur.
2Installez la batterie.
Installez une batterie complètement rechargée.
3Introduisez le support.
Pour les types de cartes mémoire (« Memory Stick Duo », carte SD) compatibles avec
votre caméscope, reportez-vous au mode d’emploi du caméscope.
Remarques
Assurez-vous que l’espace sur la carte mémoire et dans la mémoire interne est susant
pour l’enregistrement.
4Fixez la bague antireet (-2-
) sur le letage de l’objectif du
caméscope.
La bague antireet empêche la lumière extérieure de se rééchir dans le caisson sport
(appelé ci-dessous « ce boîtier ») et de pénétrer dans l’objectif.
Si vous utilisez un caméscope sans bague antireet, la lumière extérieure venant de
l’arrière se rééchira sur ce boîtier. Dans la mesure du possible évitez de lmer avec le
soleil dans le dos.
Bague antireet Caméscope
Bague antireet
(M30 × ø 39)
HDR-CX370V/CX370/CX350V/CX350/CX305/CX300
Bague antireet
(M30 × ø 47)
HDR-CX170/CX155/CX150/CX116/CX115/CX110,
DCR-SX83/SX73
Bague antireet
(M37 × ø 49)
HDR-CX180/CX160/CX130,
DCR-SX85/SX65/SX45
Impossible de xer la bague
antireet fournie
DCR-SX63/SX53/SX44/SX43/SX34/SX33
5Tournez le panneau LCD vers l’extérieur et appliquez-le contre le
caméscope.
6Réglez la mise au point, l’éclairage, etc. sur AUTO.
Installation du caméscope
Si vous utilisez un caméscope avec interrupteur POWER, réglez l’interrupteur POWER
sur arrêt. Laissez aussi ce boîtier éteint. Si vous utilisez un caméscope avec interrupteur
d’alimentation interne activé par l’écran LCD, vous n’avez pas besoin d’éteindre le
caméscope.
Remarques
Après avoir installé le caméscope dans ce boîtier, vous pouvez allumer et éteindre le
caméscope en appuyant sur le bouton POWER de ce boîtier.
1Enlevez les matières étrangères, poussière, sable ou cheveux, du
joint torique, de la rainure et des surfaces au contact du caméscope,
et appliquez de la graisse régulièrement sur tout le joint torique.
Si vous fermez le boîtier sans nettoyer ces parties, celles-ci risquent d’être endommagées
et de laisser l’eau pénétrer à l’intérieur.
Pour le détail sur l’entretien du joint torique, reportez-vous à « Entretien du joint
torique » dans le mode d’emploi.
2Fixez le sabot de montage de caméscope.
Alignez la vis du sabot de montage sur le letage de pied sous le caméscope.
Fixez le sabot de montage de caméscope au caméscope en utilisant les pièces
métalliques (-4-
) de la bandoulière, comme indiqué sur l’illustration.
3Raccordez la che et installez le caméscope.
Insérez à fond la che Audio/Commande à distance dans la prise A/V, la prise A/V
OUT ou la prise de commande à distance A/V selon le caméscope utilisé.
Lorsque vous installez le caméscope dans ce boîtier, alignez le sabot de montage de
caméscope sur le guide dans la partie avant de ce boîtier, puis poussez l’arrière du sabot
de montage caméscope jusqu’à ce que le sabot s’encliquette.
Remarques
Veillez à tenir ce boîtier à l’horizontale lorsque vous installez le sabot de montage
ˎ
de caméscope. Si vous installez le sabot de montage de caméscope en inclinant le
caméscope, vous risquez d’endommager le sabot ainsi que la partie avant du boîtier.
Attention de ne pas masquer l’objectif, l’écran LCD, le viseur, le levier de zoom ou le
ˎ
bouton PHOTO avec le câble.
Si vous utilisez un caméscope avec un interrupteur d’alimentation interne relié à
ˎ
la fonction de commutation par écran LCD, le mode d’enregistrement de photos
du caméscope bascule sur le mode d’enregistrement vidéo lorsque la che Audio/
Commande à distance est branchée.
Si vous utilisez le HDR-CX370V/CX370/CX350V/CX350/CX305/CX300 (Voir
l’illustration -3-A)
Ouvrez le cache-prise et branchez la che. Ensuite, assurez-vous que la sangle du
caméscope est en dessous de la che.
Pressez légèrement la sangle du caméscope contre le boîtier du caméscope, puis
tirez la sangle vers l’avant et rangez-la correctement lorsque vous installez le
caméscope dans ce boîtier.
Après avoir installé le caméscope, rangez le câble de manière à l’accrocher au
support de câble dans la partie arrière.
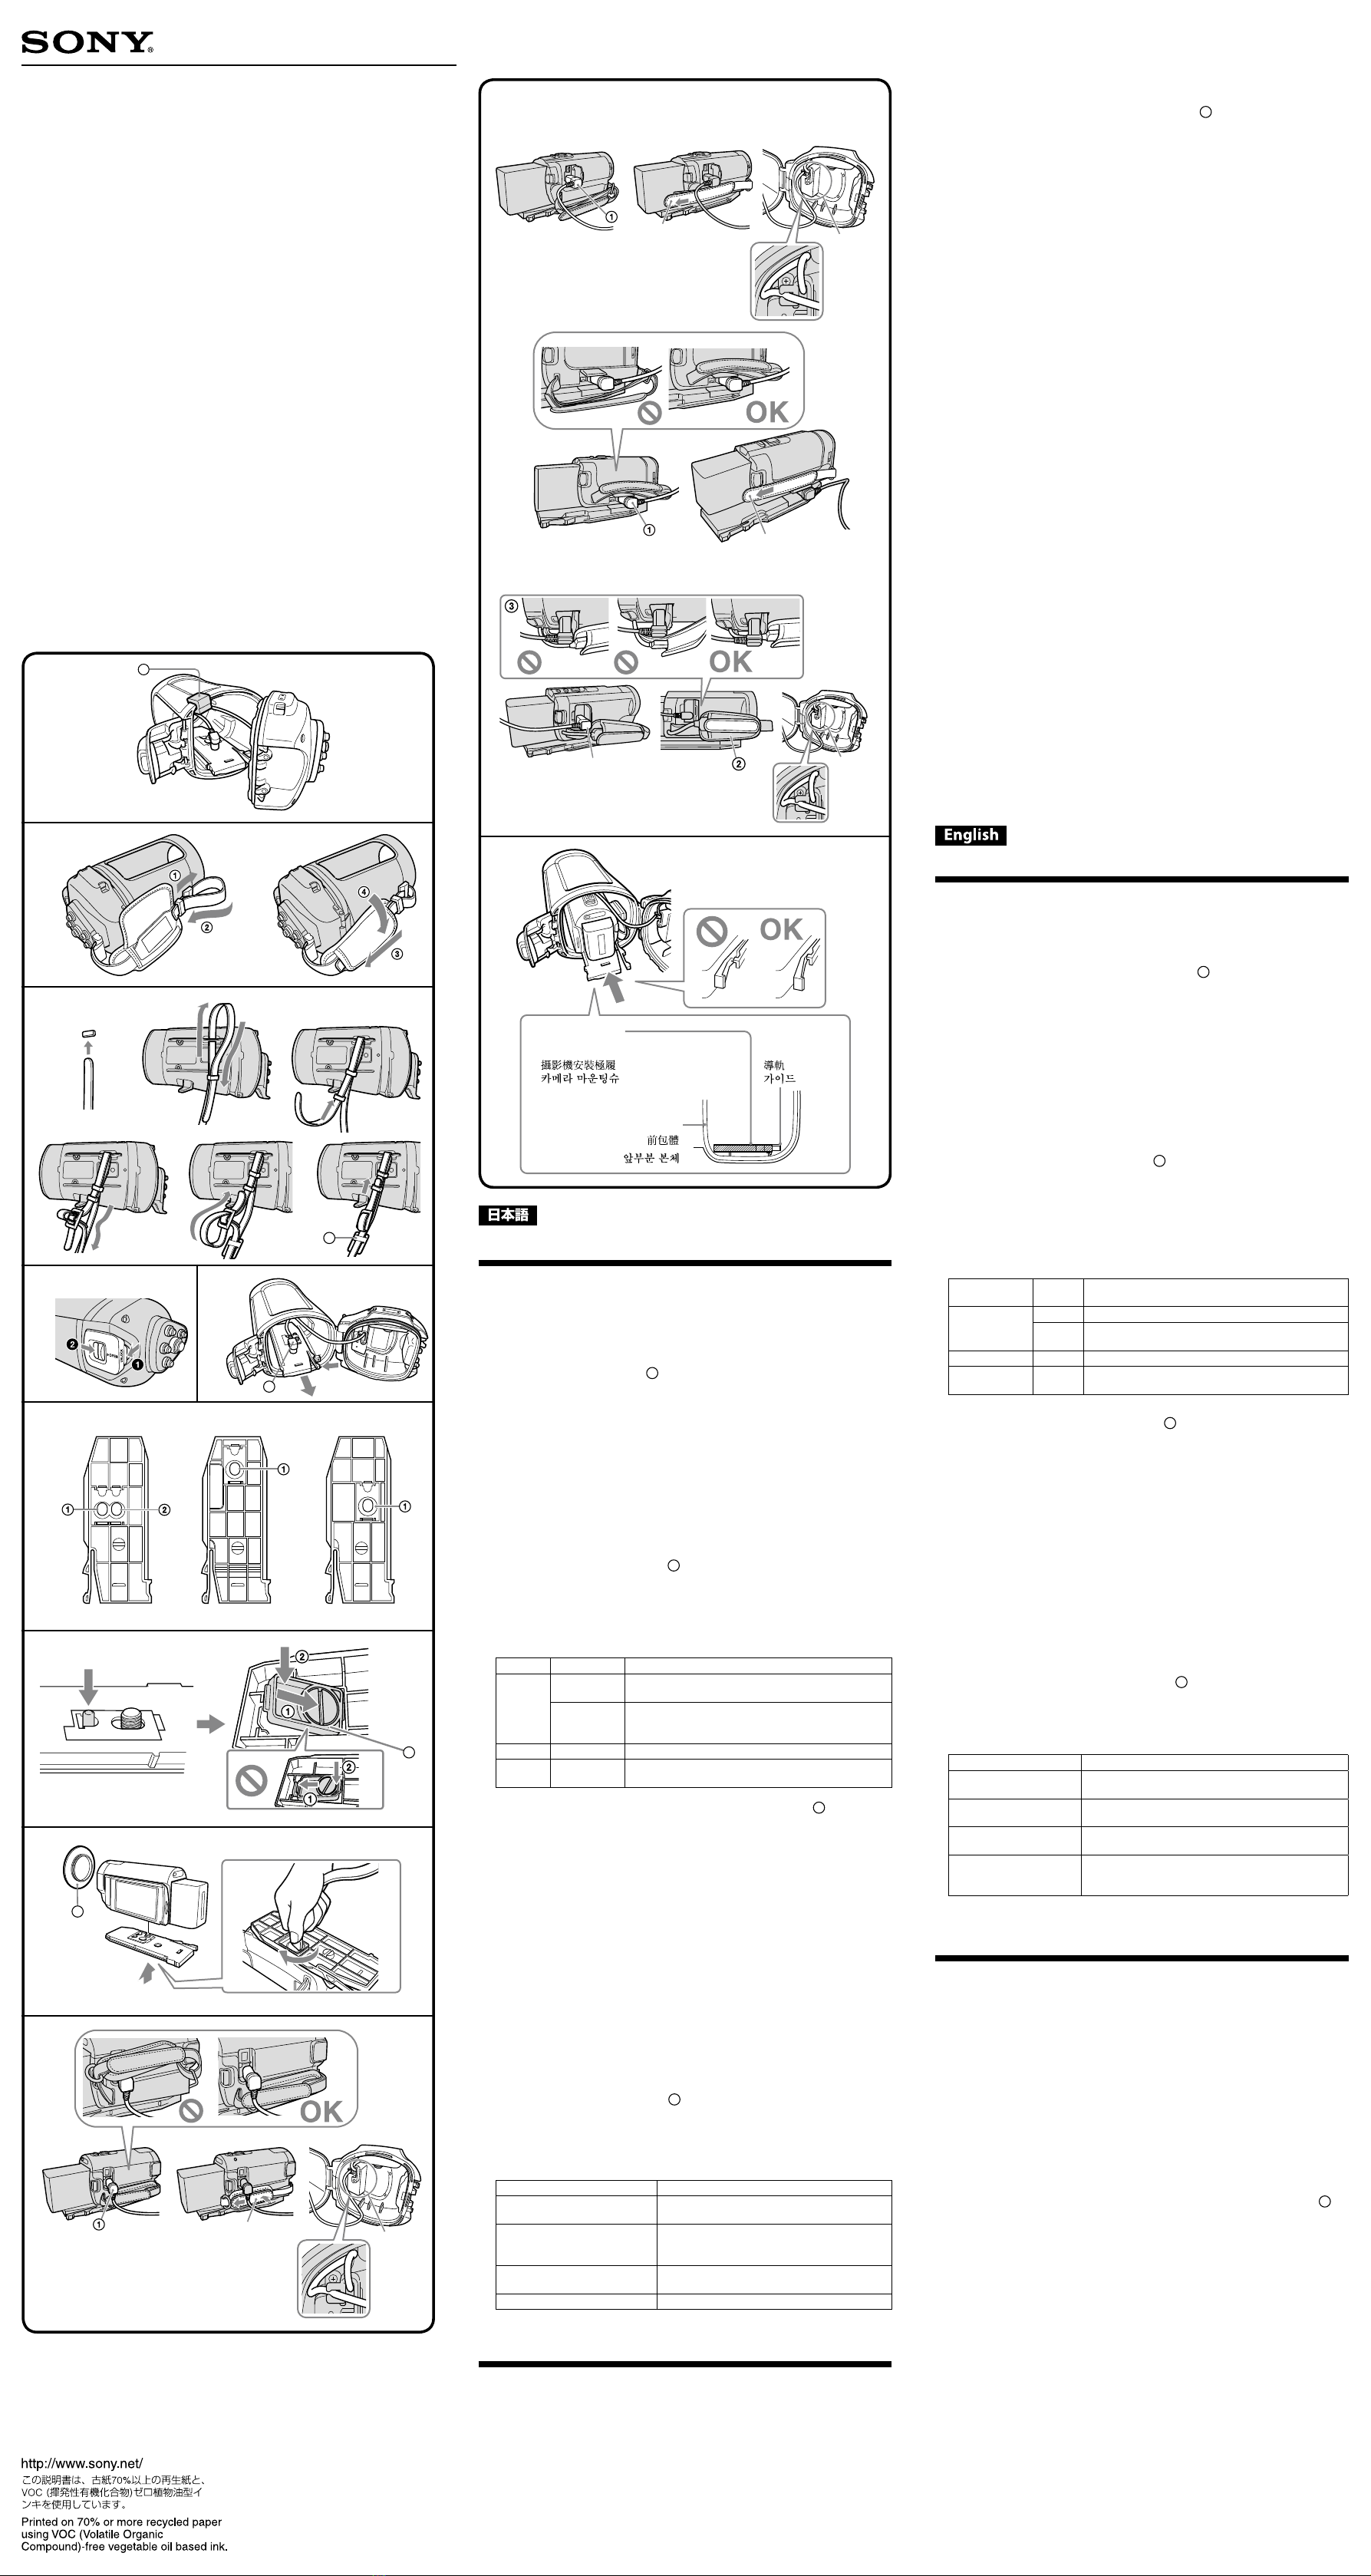
Si vous utilisez le HDR-CX170/CX155/CX150/CX116/CX115/CX110, DCR-SX83/
SX73 (Voir l’illustration -3-B)
Ouvrez le cache-prise et branchez la che.
Tirez la sangle du caméscope vers l’avant et rangez-la correctement lorsque vous
installez le caméscope dans ce boîtier.
Après avoir installé le caméscope, rangez le câble de manière à l’accrocher au
support de câble dans la partie arrière.
Si vous utilisez le DCR-SX63/SX53/SX44/SX43/SX34/SX33 (Voir l’illustration
-3-C)
Levez la sangle du caméscope, ouvrez le cache-prise et branchez la che. Ensuite,
assurez-vous que la sangle est plus haute que le cache-prise et la che.
Tirez la sangle du caméscope vers l’avant et rangez-la correctement lorsque vous
installez le caméscope dans ce boîtier.
Si vous utilisez le HDR-CX180/CX160/CX130, DCR-SX85/SX65/SX45 (Voir
l’illustration -3-D)
Ouvrez le cache-prise et branchez la che.
Disposez la sangle du caméscope de la façon indiquée sur l’illustration et tirez-la du
côté objectif du caméscope.
Assurez-vous que la sangle du caméscope ne recouvre pas le cache-prise ou la
che. Pressez légèrement la sangle contre le boîtier du caméscope et installez le
caméscope dans ce boîtier.
Après avoir installé le caméscope, rangez le câble de manière à l’accrocher au
support de câble dans la partie arrière.
4Insérez le dessiccatif.
Insérez le dessiccatif fourni. Pour le détail, reportez-vous à « Dessiccatif » dans le mode
d’emploi.
5Fermez la partie arrière.
Appuyez sur la partie arrière du boîtier pour le refermer et serrez les fermoirs jusqu’à ce
qu’ils s’encliquettent.
Remarques
Veillez à ne pas coincer les câbles lorsque vous fermez la partie arrière.
ˎ
Bien que le centre de l’objectif de certains modèles de caméscopes ne soit pas aligné
ˎ
sur le centre de la vitre avant de ce boîtier lorsque le caméscope est installé, la prise
de vue s’eectue normalement.
Lorsque vous accrochez le câble au support de câble, faites passer le câble par la
ˎ
boucle de manière à ne le coincer nulle part.
(Continued from the front side.)
準備工作
注意
下述 Sony 數位 HD 攝影機及數位攝影機(以下稱“攝影機”)型號並非在所在
國家及地區皆有販售。
準備戶外包
1 打開背面主體並取下墊片 a。
2 關閉背面主體,然後扣緊扣環。
3 調整腕帶。
握持本產品並調整腕帶長度,使指尖能輕易碰到 START/STOP 按鈕、遠攝按
鈕、廣角按鈕和 PHOTO 按鈕。
4 裝上肩帶。
選擇攝影機安裝極履
1 打開戶外包。
依箭頭方向滑動 UNLOCK 按鈕 並按住,接著再滑動 OPEN 按鈕 ,
然後解開扣環。
打開背面主體。
2 從攝影機安裝極履拔出音頻/遙控器插頭 b 。
3 拆下連接本產品的攝影機安裝極履。
依箭頭方向持續按住攝影機安裝極履一側的旋鈕,然後慢慢滑出攝影機安裝極
履。
出廠時,攝影機安裝極履 C 已安裝於本產品上。
4 根據下表選擇攝影機安裝極履和號碼。
攝影機
安裝極履
號碼 攝影機
A
1HDR-CX370V/CX370/CX350V/CX350/CX305/
CX300
2
HDR-CX170/CX155/CX150/CX116/CX115/
CX110,
DCR-SX83/SX73
B 1 DCR-SX63/SX53/SX44/SX43/SX34/SX33
C1
HDR-CX180/CX160/CX130,
DCR-SX85/SX65/SX45
5 若使用攝影機安裝極履 C 以外的攝影機安裝極履,請從攝影機安裝極
履 C 拆下三腳架螺旋盤 c,接著將三腳架螺旋盤的正確號碼和攝影機
安裝極履上所選的號碼對齊,然後按壓三腳架螺旋盤,直到發出定位
固定聲。
出廠時,三腳架螺旋盤已安裝於攝影機安裝極履 C 上。若您使用攝影機安裝極
履 C,則可跳過此步驟。
準備攝影機
詳情請參閱攝影機隨附的使用說明書。
1 拆下配件。
從攝影機上卸下濾鏡、轉換鏡頭、鏡頭蓋、鏡頭遮光罩或肩帶。
使用帶有手動鏡頭快門的攝影機時,請開啟鏡頭快門。
2 安裝電池。
請安裝完全充滿電的電池。
3 插入記憶卡。
有關攝影機相容記憶卡(“Memory Stick Duo”,SD 卡)的資訊,請參閱攝
影機的使用說明書。
注意
請確定記憶卡和內部記憶體有足夠的空間可記錄影像。
4 將防反射環 (-2- d) 安裝至攝影機的濾鏡固定螺絲上。
防反射環可以防止光線在戶外包(以下稱“本產品”)內被反射並進入鏡頭。
使用無防反射環的攝影機時,來自後方的外部光線會對本產品造成反射。請盡
可能讓戶外包遠離陽光。
防反射環 攝影機
防反射環
(M30 × φ 39)
HDR-CX370V/CX370/CX350V/CX350/CX305/
CX300
防反射環
(M30 × φ 47)
HDR-CX170/CX155/CX150/CX116/CX115/
CX110,
DCR-SX83/SX73
防反射環
(M37 × φ 49)
HDR-CX180/CX160/CX130,
DCR-SX85/SX65/SX45
無法裝上隨附的防反射環 DCR-SX63/SX53/SX44/SX43/SX34/SX33
5 翻轉 LCD 面板使其面朝外,然後放回攝影機。
6 將調焦和閃光等功能設為 AUTO。
安裝攝影機
使用設有 POWER 開關的攝影機時,請關閉 POWER 開關。同時也請關閉本產品
的電源。若使用的攝影機設有連結 LCD 螢幕切換動作的內部電源開關,則不需關
閉攝影機。
注意
將攝影機安裝於本產品後,您可按下本產品的 POWER 按鈕,開啟與關閉攝影機
的電源。
1 清除如O型環、溝槽和與攝影機的任何接觸面上黏附的灰塵、沙粒或
毛髮等外來物質,然後在O型環上均勻塗上潤滑脂。
若在夾雜此類物質的狀況下關閉主體,可能會使該處損壞並導致漏水。
有關使用O型環的詳細資訊,請參閱使用說明書的“O型環使用須知”。
2 安裝攝影機安裝極履。
將攝影機安裝極履的螺絲位置與攝影機底部的三腳架螺絲對齊。
依圖示使用肩帶的金屬部分 (-4- e) ,將攝影機安裝極履安裝至攝影機。
3 連接插頭並安裝攝影機。
視攝影機而定,將音頻/遙控器插頭牢牢地插入 A/V 插孔、A/V OUT 插孔或
A/V 遙控器插孔。
將攝影機裝入本產品時,請將攝影機安裝極履與本產品的正面主體內側對齊,
然後推動攝影機安裝極履的後部,直到發出定位固定聲。
注意
安裝攝影機安裝極履時,請確認本產品保持水平狀態。若在垂直狀態下安裝
攝影機安裝極履,可能會損壞攝影機安裝極履及正面主體。
確認電線不會遮蓋鏡頭、液晶螢幕、取景器、變焦桿或 PHOTO 按鈕。
若使用的攝影機設有連結 LCD 螢幕切換動作的內部電源開關,連接音頻/遙
控器插頭會將攝影機的靜態影像錄製模式切換為動態影像錄製模式。
使用 HDR-CX370V/CX370/CX350V/CX350/CX305/CX300 型號時(見圖
-3-A)
打開插孔蓋並連接插頭。連接後,請將攝影機腕帶保持在插頭的下方。
朝攝影機機身的方向輕壓攝影機腕帶,將攝影機裝進本產品時,將腕帶向前
拉並將它放好。
安裝完相機後,將電線放置好並鉤住攝影機背面的線夾。
使用 HDR-CX170/CX155/CX150/CX116/CX115/CX110, DCR-SX83/SX73
型號時(見圖 -3-B)
打開插孔蓋並連接插頭。
將攝影機裝進本產品時,將攝影機腕帶向前拉並將它放好。
安裝完攝影機後,將電線放置好並鉤住攝影機背面的線夾。
使用 DCR-SX63/SX53/SX44/SX43/SX34/SX33 型號時(見圖 -3-C)
將攝影機腕帶向上拉、打開插孔蓋並連接插頭。連接後,請將腕帶保持在插
孔蓋和插頭的上方。
將攝影機裝進本產品時,將攝影機腕帶向前拉並將它放好。
使用 HDR-CX180/CX160/CX130, DCR-SX85/SX65/SX45 型號時(見圖
-3-D)
打開插孔蓋並連接插頭。
依圖示調整攝影機的腕帶,將其拉至攝影機的鏡頭側。
確定攝影機的腕帶未擋住插孔蓋或插頭。
朝攝影機主體輕壓腕帶,將攝影機裝入本產品中。
攝影機安裝完成後,將電線放置好並鉤住背面主體的線夾。
4 放入乾燥劑。
放入隨附的乾燥劑。詳情請參閱使用說明書中的“乾燥劑” 。
5 關閉後方主體。
關緊後方主體,並扣緊扣環直至發出定位固定聲。
注意
關閉後方主體時,請小心不要夾住電線。
某些型號的攝影機鏡頭中心在安裝時可能無法對齊本產品前鏡片的中心,但
在錄製時不會造成任何問題。
將電線纏繞在線夾時,請將電線穿過線孔並繞緊,避免電線被夾住。
ⷪ⌮㩂ጚ
ⷦⱂ⳺
⾻∏ぇ#⮛⓼㿓#Vrq|#ᾋ㐷㮯#KG#⢻ᾋ゛#㣫Ⓥ⇳#≿㧋#⚆#ᾋ㐷㮯#⢻ᾋ゛#㣫Ⓥ⇳#
≿㧋+㿏#%㍞Ἶᱦ%⇳#㿟,㇏#┟ㆷ#┟ὗ#៤ᙷ2㐷つぇ⮓#⬣ㄠ㿗#ⲏ#ㇿᴋ#
ㆷ#⾻ᵐᴿᵛ1
#➎㣖㌊㠓#ⷪ⌮㩂ጚ
1#ᦡ#⇢㆞Ṧ#⫞ᇊ#➎㢂ⱞ☆# a#Ṧ#ⴆᅚ㩓ឲ៎1
2#ᦡ#⇢㆞Ṧ#៕Ⱚ#㮮#Ⅾ㕞Ⱞ#ⵚⱯឲ៎1
3#ዢầ#➎㞢ᲓⰮ#ⵚⳲ㩓ឲ៎1
❯#ᢧᢧ⏳#㈘ㆷ#⬸㭓⋓#ᡯ#ⴛ㴯∠㇏#⏳#㋧㉿㿫⮓#VWDUW2VWRS#
⛻㴳/#Whohskrwr#⛻㴳/#Zlgh#⛻㴳#⚆#SKRWR#⛻㴳ㆻ#Ⰷᙷ⇴ㆳ⋓#㋧㈈㿏ᢧ#
ḻ⋔#㿫#㍳ⵤⵓ゛1
4#⪞ፒ#ᔲⰮ#ⲏㄓ㩓ឲ៎1#
㍞Ἶᱦ#Ẳ⮞㟯#❲#☊㗇㩂ጚ
1#➎㣖㌊㠓Ⱞ#⫧ឲ៎1#
#XQORFN#⛻㴳##ㆻ#䃋⬫㻓#⚠䀜ㆳ⋓#ⴣ⇳ὓⵓ㬟#⬸㭓⋓#RSHQ#⛻㴳#
#ㆻ#ⴣ⇳ὓⵓ㦓⮓#⛻㫫ㆻ#㼀ᴿᵛ1
#Ἦ⓫#❯㜫⏳#ぴᴿᵛ1
2#㍞Ἶᱦ#Ẳ⮞㟯#❲ᵆ≪㘚#⬎᧾⬎2ẖᾒ㞢#㧶᳖ዢ# b#Ṧ#᪦⪞ᖯឲ៎1
3#⇢#ጚጚ⪺#≪ㄓᤆ#㍞Ἶᱦ#Ẳ⮞㟯#❲Ṧ#ⴆᅚ㩓ឲ៎1#
䃋⬫㻓#⚠䀜ㆳ⋓#㣫Ⓥ⇳#ㄫ㵼#⳿㇏#㿓㔴#ᯯ⢃⏳#ᱻ⏯#⬸㭓⋓#㿫⮓#
㈗㈜㣏⏳#㻷#㣫Ⓥ⇳#ㄫ㵼#⳿⏳#㜓㜓䇿#ⴣ⇳ὓⵓ㬬ᴿᵛ1
❯#ᢧᢧ⏳#㠓㿏㿓#ῃぇᴋ#㣫Ⓥ⇳#ㄫ㵼#⳿#Fᙷ#❯#ᢧᢧぇ#⟷㚠ẏ〫#ㇿᴿᵛ1
4#៎ⰶ#㥆⪺☆#㍞Ἶᱦ#Ẳ⮞㟯#❲⬪#ⅲ㬢Ṧ#☊㗇㩓ឲ៎1
㣫Ⓥ⇳#ㄫ㵼#
⳿
⛿䂯 㣫Ⓥ⇳
D
4KGU0F[6:3Y2F[6:32F[683Y2F[6832
F[6382F[633
5
KGU0F[4:32F[4882F[4832F[4492
F[4482F[443/
GFU0V[;62V[:6
E 4 GFU0V[962V[862V[772V[762V[672V[66
F4
KGU0F[4;32F[4932F[463/#
GFU0V[;82V[982V[78
5#㍞Ἶᱦ#Ẳ⮞㟯#❲#F#ⱞ⭢ⱂ#㍞Ἶᱦ#Ẳ⮞㟯#❲Ṧ#▖⮓㩂#
ᆧ⮚⪺#▦ძ#ᖂ▖#㧶ᳲⱞ㞢# c#Ṧ#㍞Ἶᱦ#Ẳ⮞㟯#❲#Fᵆ≪㘚#
᪦⪞ᖞ⟗⟆⬎1#ዢẖᇊᖂ☆#▦ძ#ᖂ▖#㧶ᳲⱞ㞢Ṧ#☊㗇㩆#㍞Ἶᱦ#
Ẳ⮞㟯#❲ⱂ#⬖Ṣ#ⅲ㬢⬪#Ỉ㉾ᇊ#ⴆⱺẖ⪺#Ⲋጢ#ᨶጶ⺪#ᛶ᳖#
ⷦ⟗⟆⬎1
❯#ᢧᢧ㇏#ᝬ㈜#㠓㿏#ⵓ#⬳ᙸᵷ#ᬏ⬣#㾃≿㴯ᴋ#㣫Ⓥ⇳#ㄫ㵼#⳿#Fぇ#
㈜㚠ẏ〫#ㇿᴿᵛ1#㣫Ⓥ⇳#ㄫ㵼#⳿#F⏳#⬣ㄠ㿏ᴋ#᜴ㄧぇᴋ##ᵟᙷ#
㾻ㄋ㿏㐷#⿁ᴿᵛ1
⌮᧾⬎#㍞Ἶᱦ#ⷪ⌮㩂ጚ
㈇⮯㿓#ᬫㄠㆷ#㣫Ⓥ⇳㇏#⬣ㄠ⮛⓼⮓ḻ#㚯㋧㿏ⵤⵓ゛1
1#⩋☢☆ẖṦ#᪦⪞ᖯឲ៎1
㣫Ⓥ⇳ぇ⮓#㾻㮧/#㥟⛻㉻#⊃㏿/#⊃㏿#㤘/#⊃㏿#䄻ὓ#₇ᴋ#〫ᣟ#ㆻ#
⟻␣㿠ᴿᵛ1
ⲏṐ#⊃㏿#⯋㮧⏳#⬣ㄠ㿫⮓#㣫Ⓥ⇳⏳#⬣ㄠ㿏ᴋ#᜴ㄧぇᴋ#⊃㏿#⯋㮧⏳#に〫#
㍳ⵤⵓ゛1
2#ℚ㘚ẖ㠓Ⱞ#ⲏㄓ㩓ឲ៎1#
⑃㠠㉻㿓#⚧㮧␣㶠ㆻ#㈜㚠㿏っ#㍳ⵤⵓ゛1
3#᧾⪞Ṧ#ᘍ➟ឲ៎1#
⬣ㄠ㎈㇯#㣫Ⓥ⇳シ#䂯䃏㿏ᴋ#Ⓥ┟␣#㣫ὓ+%Phpru|#Vwlfn#Gxr%#/#VG#
㣫ὓ,㇏#㋼⏏ぇ#㿫⮓ᴋ#㣫Ⓥ⇳㇏#⬣ㄠ⮛⓼⮓⏳#㚯㋧㿫#㍳ⵤⵓ゛1
ⷦⱂ⳺
Ⓥ┟␣#㣫ὓ#⚆#ᬫ⟷#Ⓥ┟␣ぇ#♯㐷⏳#㉷㈜㿗#ⲏ#ㇿᴋ#㠠⟻㿓#ᝬᙻ#ㇿᴋ㐷#
䃌㇯㿏ⵤⵓ゛1
4#ℂ▖#ℓ⺪#ẫ#+050 d,#Ⱞ#㍞Ἶᱦⱂ#㨮㘚#ⲏㄓ#ᖂ▖⪺#ⲏㄓ㩓ឲ៎1
⚏⬣#⚠㐷#ㆷ#ワ⟷㇏#⣒#ⴛ㹣㢗㶠#+㿏#%⇢#ጚጚ%⇳#㿟,#ᬫ⟷⋓#
⚏⬣ẏ〫#⊃㏿⋓#Ὓ〫゛ᴋ#ㆻ#⚠㐷㿠ᴿᵛ1
⚏⬣#⚠㐷##〽ᴋ#㣫Ⓥ⇳#┟ㆻ#⬣ㄠ㿏ᴋ#᜴ㄧぇᴋ#Ἓ⋓⟷㮧㇏#ワឈ#❯#
ᢧᢧぇ⮓#⚏⬣Ạᴿᵛ1#ᙷᴜ㿓㿓#ㇳឈぇ#Ὠㆻ#ṃ␣㐷#⿁ḻ⋔#㿏ⵤⵓ゛1
⚏⬣#⚠㐷# 㣫Ⓥ⇳
⚏⬣#⚠㐷#
+P63#啑#堬#6<,
KGU0F[6:3Y2F[6:32F[683Y2F[6832
F[6382F[633
⚏⬣#⚠㐷#
+P63#啑#堬#7:,
KGU0F[4:32F[4882F[4832F[4492F[4482
F[443/
GFU0V[;62V[:6
⚏⬣#⚠㐷#
+P6:#啑#堬#7<,
KGU0F[4;32F[4932F[463/#
GFU0V[;82V[982V[78
⟷Ⰴẓ#⚏⬣#⚠㐷#ㆻ#
⟷㚠㿗#ⲏ#〽ᴿᵛ
GFU0V[962V[862V[772V[762V[672V[66
5#OFG#㠒ᗺⰮ#ᢶᴎ☆#℀Ⱞ#㪏㩂ᵇ#㩞☆#៎⟆#㍞Ἶᱦ⪺#៕⨮#
ᘍ➟ឲ៎1#
6#ㇲ⳺ⱞᖂ#ⵚὯ#ⱂ#ጚតⰮ#DXWRᵆ#☎⳿㩓ឲ៎1#
⌮᧾⬎#㍞Ἶᱦ#ⲏㄓ㩂ጚ
SRZHU#ⴛㅻ㣏ᙷ#ㇿᴋ#㣫Ⓥ⇳⏳#⬣ㄠ㿏ᴋ#᜴ㄧぇᴋ#SRZHU#ⴛㅻ㣏⏳#
ᤳ#㍳ⵤⵓ゛1#₇㿓#❯#ᢧᢧ㇏#㉻ㅇḻ##⬸㭓⋓#㿫#㍳ⵤⵓ゛1#OFG#䃋⓫㇏#
ⴛㅻ㣤#㋧㈈ぇ#㫣ẓ#ᬫ⟷#㉻ㅇ#ⴛㅻ㣏ᙷ#㈜㚠ẓ#㣫Ⓥ⇳⏳#⬣ㄠ㿏ᴋ#᜴ㄧぇᴋ#
㣫Ⓥ⇳㇏#㉻ㅇㆻ##㾻ㄋᙷ#〽ᴿᵛ1
ⷦⱂ⳺
❯#ᢧᢧぇ#㣫Ⓥ⇳⏳#㈜㚠㿓#䄻ᴋ#❯#ᢧᢧ㇏#SRZHU#⛻㴳ㆻ#ᲃ≣⮓#㣫Ⓥ⇳㇏#
㉻ㅇㆻ#㦓ᛧᬏ##ⲏ#ㇿᴿᵛ1
1#Rẫⱞᖂ#㬲##ዢ#℀ⱂ#⳻ㇳ⪺☆#ἦ⺪ᖂ#ᾒᲂ/#ἢẖ㍞ᱧ#ⱂ#ⱞ…⺲Ⱞ#
ⴆᅚ㩆#㮮/#Rẫ⪺#ዊ㩂ᅶ#ዢẖ➎Ṧ#ṯឲ៎1
△㐿ㆻ#㊓ᛧ㿏㐷#⿁#❯㜫⏳#ᵢㆳ⓫#ᡯ#⟷⟻#Ⰷ⬸ẏ#△#⭇#び⊛ᙷ#
ㇿᴿᵛ1
R㇏#㡟ᢀぇ#㿓#㈇⮯㿓#ᬫㄠㆷ#⬣ㄠ⮛⓼⮓㇏#%R㇏#㡟ᢀ%ㆻ#㚯㋧㿏っ#
㍳ⵤⵓ゛1
2#㍞Ἶᱦ#Ẳ⮞㟯#❲Ṧ#ⲏㄓ㩓ឲ៎1
#㣫Ⓥ⇳#⚈⓫㇏#⬳ᙸᵷ#㈜㚠#ᬏ⬣ぇ#㣫Ⓥ⇳#ㄫ㵼#⳿㇏#ᬏ⬣#ㅻ㣏⏳#
㠋ⵤⵓ゛ 1
#ᡯᝳ#ᚐ#〫ᣟ#㇏#Ⰴ#⟷㻿#+070 e,#ㆻ#⬣ㄠ㿫⮓#㣫Ⓥ⇳ぇ#㣫Ⓥ⇳#
ㄫ㵼#⳿⏳#⟷㚠㿠ᴿᵛ 1
3#㧶᳖ዢṦ#⫚ᆚ㩂ᇊ#㍞ἾᱦṦ#ⲏㄓ㩓ឲ៎1
㣫Ⓥ⇳ぇ#㠋〫#゛ᾋ゛2␣┟㴯#㾃≣ᡯ⏳#D2Y#ᵟ㈇/#D2Y#RXW#ᵟ㈇#₇ᴋ#
D2Y#␣┟㴯#ᵟ㈇ぇ#ᵟᵟ䇿#⬴ㇼ㿏ⵤⵓ゛1#
❯#ᢧᢧぇ#㣫Ⓥ⇳⏳#㈜㚠㿗#ῃぇᴋ#㣫Ⓥ⇳#ㄫ㵼#⳿⏳#❯#ᢧᢧ#⿕#⟷⟻#
⾿㔴㇏#ᙷὓぇ#㠏#ᵛ㇃/#㊌ẏᴋ#Ⰳ␣ᙷ#ᬗ#ῃᣃ㐷#㣫Ⓥ⇳#ㄫ㵼#⳿㇏#
Ἦ#⟷⟻ㆻ#ᲃ≣#ᮚᴿᵛ1
ⷦⱂ⳺
㣫Ⓥ⇳#ㄫ㵼#⳿⏳#㈜㚠㿗#ῃぇᴋ#❯#ᢧᢧ⏳#ⲏ㹀ㆳ⋓#㆗㐷㿫#㍳ⵤⵓ゛1##
㣫Ⓥ⇳#ㄫ㵼#⳿⏳#⮯⋓#⚠䀜ㆳ⋓#㈜㚠㿏⓫#㣫Ⓥ⇳#ㄫ㵼#⳿シ#⿕㔴#
❯㜫ᙷ#Ⰷ⬸ẗ#び⊛ᙷ#ㇿᴿᵛ1
⊃㏿/#OFG#䃋⓫/#⡧㶃㇯㮧/#㎃#≿⛻#₇ᴋ#SKRWR#⛻㴳ぇ#㥷⢋#ᛯ␣㐷##
⿁ḻ⋔#㍳㇏㿏ⵤⵓ゛1
OFG#䃋⓫㇏#ⴛㅻ㣤#㋧㈈ぇ#㫣ẓ#ᬫ⟷#㉻ㅇ#ⴛㅻ㣏ᙷ#㈜㚠ẓ#㣫Ⓥ⇳⏳##
⬣ㄠ㿏ᴋ#᜴ㄧぇᴋ#゛ᾋ゛2␣┟㴯#㾃≣ᡯ⏳#でᜧ㿏⓫#㣫Ⓥ⇳㇏#㊌㐷へ⬸#
㞣へ#┟ὓ⏳#Ṑへ⬸#㞣へ#┟ὓ⋓#✷᜴ⵓ㬬ᴿᵛ1
KGU0F[6:3Y2F[6:32F[683Y2F[6832F[6382F[633 Ⱞ#▖⮓㩂#
ᆧ⮚ + ዢẦ#060D ㄢⵚ ,
#ᵟ㈇#㥛⛻⏳#に#㾃≣ᡯ⏳#でᜧ㿠ᴿᵛ 1#でᜧ㿓#䄻ぇ /#㣫Ⓥ⇳㇏#ᡯ#
ⴛ㴯∠#㾃≣ᡯ#⾻∏⋓#ẏ〫#ㇿᴋ#ㆻ#䃌㇯㿠ᴿᵛ 1
#㣫Ⓥ⇳㇏#ᡯ#ⴛ㴯∠ㆻ#㣫Ⓥ⇳#❯㜫⋓#⬫ⓧⵓ#♳#䄻 /#ᡯ#ⴛ㴯∠ㆻ#
⿕ㆳ⋓#ᵰᜟ⮓#❯#ᢧᢧぇ#㣫Ⓥ⇳⏳#⮛㣏㿗#ῃぇ#㊌⊣㿠ᴿᵛ 1
#㣫Ⓥ⇳⏳#⮛㣏㿓#䄻ぇ#Ἦ⓫#❯㜫㇏#㥷⢋#䂷ぇ#㥷⢋#ᛯ␣ḻ⋔#
㿠ᴿᵛ 1
KGU0F[4:32F[4882F[4832F[4492F[4482F[443/#GFU0V[;62
V[:6 Ⱞ#▖⮓㩂#ᆧ⮚ + ዢẦ#060E#ㄢⵚ ,
#ᵟ㈇#㥛⛻⏳#に#㾃≣ᡯ⏳#でᜧ㿠ᴿᵛ 1
#㣫Ⓥ⇳㇏#ᡯ#ⴛ㴯∠ㆻ#⿕ㆳ⋓#ᵰᜟ⮓#❯#ᢧᢧぇ#㣫Ⓥ⇳⏳#⮛㣏㿗#ῃぇ#
㊌⊣㿠ᴿᵛ 1
#㣫Ⓥ⇳⏳#⮛㣏㿓#䄻ぇ#Ἦ⓫#❯㜫㇏#㥷⢋#䂷ぇ#㥷⢋#ᛯ␣ḻ⋔#
㿠ᴿᵛ 1
GFU0V[962V[862V[772V[762V[672V[66 Ⱞ#▖⮓㩂#ᆧ⮚ + ዢẦ#
060F#ㄢⵚ ,
#㣫Ⓥ⇳㇏#ᡯ#ⴛ㴯∠ㆻ#Ὓ〫#ィ⊛⮓#ᵟ㈇#㥛⛻⏳#に#㾃≣ᡯ⏳#
でᜧ㿠ᴿᵛ 1#でᜧ㿓#䄻ぇ /#ᡯ#ⴛ㴯∠#ᵟ㈇#㥛⛻#⚆#㾃≣ᡯ#ㅻ⋓#ẏ〫#
ㇿᴋ#ㆻ#䃌㇯㿠ᴿᵛ 1
#㣫Ⓥ⇳㇏#ᡯ#ⴛ㴯∠ㆻ#⿕ㆳ⋓#ᵰᜟ⮓#❯#ᢧᢧぇ#㣫Ⓥ⇳⏳#⮛㣏㿗#ῃぇ#
㊌⊣㿠ᴿᵛ 1
KGU0F[4;32F[4932F[463/#GFU0V[;82V[982V[78 Ⱞ#▖⮓㩂#
ᆧ⮚ + ዢẦ#060G#ㄢⵚ ,
#ᵟ㈇#㥛⛻⏳#に#㾃≣ᡯ⏳#でᜧ㿠ᴿᵛ 1
#㣫Ⓥ⇳㇏#ᡯ#ⴛ㴯∠ㆻ#ᡯᝳ#ᚐ#㊌⊣㿓#䄻 /#㣫Ⓥ⇳#⊃㏿㢘ㆳ⋓#
ᵰᢸᴿᵛ 1
#㣫Ⓥ⇳㇏#ᡯ#ⴛ㴯∠#ᵟ㈇#㥛⛻#₇ᴋ#㾃≣ᡯ⏳#㐷#⿁ᴋ#ㆻ#
䃌㇯㿏ⵤⵓ゛ 1
㣫Ⓥ⇳#❯㜫⋓#ᡯ#ⴛ㴯∠ㆻ#ᙷ❄ᜃ#ᲃ≣⮓#㣫Ⓥ⇳⏳#❯#ᢧᢧぇ#
⮛㣏㿠ᴿᵛ 1
#㣫Ⓥ⇳⏳#⮛㣏㿓#䄻ぇ#㥷⢋ㆻ#㊌⊣㿫⮓#Ἦ⓫#❯㜫㇏#㥷⢋#䂷ぇ#
ᛯ␣ḻ⋔#㿠ᴿᵛ 1
4#ᅞⵚⴆṦ#ᘍ➟ឲ៎1#
⟷Ⰴẓ#᛫㋧㊓⏳#ᮚᴿᵛ1#⬸⮯㿓#ᬫㄠㆷ#⬣ㄠ⮛⓼⮓㇏#%᛫㋧㊓%⏳#㚯㋧㿏っ#
㍳ⵤⵓ゛1
5#ᦡ#⇢㆞Ṧ#៕➟ឲ៎1
Ἦ⓫#❯㜫⏳#ᲃ≣⮓#ᵢ#㈗ᢧᴋ#Ⰳ␣ᙷ#ᬗ#ῃᣃ㐷#⛻㫫ㆻ#㈗ᢀᴿᵛ1
ⷦⱂ⳺
Ἦ⓫#❯㜫⏳#ᵢㆻ#ῃぇᴋ#㥷⢋#㐷#⿁ḻ⋔#㍳㇏㿏ⵤⵓ゛1#
ㇳ⟷#㣫Ⓥ⇳#┟㇏#⊃㏿#㎈ⵣㆷ#⮛㣏㿗#ῃ#⊃㏿㇏#㎈ⵣ#❯#ᢧᢧ㇏#⿕##
㆗␣#㎈ⵣᝳ#ㇳ㣏㿏㐷#⿁ᴋ#᜴ㄧᙷ#ㇿ㐷⑃#㞣へぇᴋ#▯㊓#〽ᴿᵛ1
㥷⢋#䂷ぇ#㥷⢋ㆻ#ᛯ#ῃぇᴋ#⍟㽻⋓#㥷⢋ㆻ#セ㉻䇿#㰬ᝳⵓ㦓⮓##
ㇳ⟷ᙷ#ᛯ␣㐷#⿁ḻ⋔#㿏ⵤⵓ゛1