Sony VCV-OH1 User manual

Avant de faire fonctionner cet appareil, lisez attentivement le présent mode
d’emploi et conservez-le ensuite pour toute référence ultérieure.
Le parasoleil pour oscilloscope VCV-OH1 est conçu pour être utilisé avec
un Mavica numérique Sony. Le parasoleil vous permet d’enregistrer une
onde claire sur l’écran de l’oscilloscope.
Cet appareil est uniquement destiné à une utilisation avec un MVC-FD5/
FD51/FD7/FD71.
Vérifiez si les accessoires suivants sont fournis avec l’appareil avant de
l’utiliser. (Voir Illustration A.)
aElément frontal (1), bSupports de montage (2), cVis de parasoleil (4),
dVis de caméscope (1), eBague antireflet (1)
Installation du Mavica numérique sur
l’unité Voir Illustration B.
Utilisez le support de montage adapté à votre Mavica numérique.
aSupport de montage A (MVC-FD5/FD51/FD7)
bSupport de montage B (MVC-FD71)
1 Fixez le support sur le parasoleil et serrez ensuite légèrement
les vis du parasoleil.
2 Sélectionnez la position du support de montage (inférieure ou
supérieure).
Supérieure : MVC-FD5/FD51/FD71
Inférieure : MVC-FD7
3 Serrez les vis fermement.
Vérifiez la position de l’orifice de vissage de caméscope:
Support de montage A-1 : MVC-FD5/FD51
Support de montage A-2 : MVC-FD7
Support de montage B-3 : MVC-FD71
4 Installez le Mavica numérique sur le support de montage et
fixez-le au moyen de la vis de caméscope.
Remarque (Voir Illustration C.)
Si vous utilisez un MVC-FD5, FD51 ou FD71, montez la bague antireflet sur
l’objectif au moment de la prise de vue afin d’empêcher que le Mavica
numérique n’enregistre la lumière diffuse venant de derrière.
Enregistrement Voir Illustration D.
Recouvrez l’écran de l’oscilloscope du parasoleil et démarrez
l’enregistrement.
Pour plus de détails sur l’enregistrement, reportez-vous au mode d’emploi
fourni avec votre Mavica numérique.
Remarques
• Réglez le contraste de l’écran de l’oscilloscope sur la valeur la plus faible
possible de façon à obtenir une image claire.
• Vous ne pouvez pas enregistrer l’échelle si vous utilisez l’oscilloscope
sans la fonction d’illumination de l’échelle.
• Si vous utilisez un MVC-FD5, réglez la mise au point manuellement.
• Si vous utilisez le Mavica numérique avec la fonction de zoom, ajustez le
format de l’image au moyen du commutateur de zoom.
• Désactivez la fonction de flash.
Après l’enregistrement
Desserrez la vis de caméscope et retirez le Mavica numérique.
Spécifications
Dimensions 125 x 145 x 194 mm
(5 ×5 3/4×7 3/4po)
Dimensions intérieure du parasoleil 105 x 122 mm (4 1/4 × 4 7/8po)
Masse 250 g (9 oz)
Accessoire fourni Mode d’emploi (1)
La conception et les spécifications sont sujettes à modifications sans préavis.
Ce symbole indique que ce produit est un accessoire
d’origine conçu pour les appareils vidéo Sony.
Lorsque vous faites l’acquisition de produits vidéo
Sony, Sony vous conseille d’acheter des accessoires
identifiés par la mention “GENUINE VIDEO
ACCESSORIES”.
VCV-OH1
Operating Instructions
Mode d’emploi
Bendienungsanleitung
Manual de instrucciones
Sony Corporation © 1998 Printed in Japan
Before operating the unit, please read this manual thoroughly and retain it
for future reference.
The VCV-OH1 Oscilloscope Hood is designed for use with the Sony digital
Mavica. The hood allows you to record a clear waveform on the
Oscilloscope screen.
This unit is intended to be used only with the MVC-FD5/FD51/FD7/FD71.
Check that the following accessories are supplied with the unit before use.
(See illustration A.)
aHood (1), bCamera mounting shoes (2), cHood set screws (4),
dCamera set screw (1), eFlare-prevention ring (1)
Installing the digital Mavica on the unit
See illustration B.
Use the appropriate camera mounting shoe for your digital Mavica.
aCamera mounting shoe A (MVC-FD5/FD51/FD7)
bCamera mounting shoe B (MVC-FD71)
1 Attach the camera mounting shoe to the hood, then gently
tighten the hood set screws.
2 Select the position of the camera mounting shoe (upper or
lower.)
Upper: MVC-FD5/FD51/FD71
Lower: MVC-FD7
3 Tighten the screws firmly.
Ensure the position of the camera screw hole:
Camera mounting shoe A-1: MVC-FD5/FD51
Camera mounting shoe A-2: MVC-FD7
Camera mounting shoe B-3: MVC-FD71
4 Install the digital Mavica on the camera mounting shoe and
secure it with the camera set screw.
Note (See illustration C.)
If you use MVC-FD5, FD51 or FD71, attach the supplied flare-prevention
ring to the lens upon shooting to keep the digital Mavica from picking up
unnecessary lights from behind.
Recording See illustration D.
Cover the oscilloscope screen with the hood and start recording.
For details on recording, refer to the operating instructions supplied with
your digital Mavica.
Notes
• Set the contrast as low as possible on the oscilloscope screen to obtain a
clear picture.
• You cannot record the scale when you use the oscilloscope without the
scale illumination function.
• When using the MVC-FD5, adjust the focus manually.
• When using the digital Mavica with the zoom function, adjust the size of
the picture using the zoom switch.
• Turn off the flash function.
After recording
Loosen the camera set screw and detach the digital Mavica.
Specifications
Dimensions 125 ×145 ×194 mm (5 ×5 3/4×7 3/4inches)
Dimensions inside the hood 105 ×122 mm (4 1/4 × 4 7/8inches)
Mass 250 g (9 oz)
Supplied accessory Operating instructions (1)
Design and specifications are subject to change without notice.
This mark indicates that this product is a genuine
accessory for Sony video product.
When purchasing Sony video products, Sony
recommends that you purchase accessories with this
“GENUINE VIDEO ACCESSORIES” mark.
FrançaisEnglish
3-864-419-12(1)
Oscilloscope Hood
A
1
2
3
a
D
b
C
B
ab
ced

EspañolDeutsch
Lesen Sie diese Anleitung vor Inbetriebnahme des Geräts bitte genau durch,
und bewahren Sie sie zum späteren Nachschlagen sorgfältig auf.
Die VCV-OH1 ist eine Oszilloskopabdeckung, die mit den digitalen
Mavicas von Sony eingesetzt werden kann. Wenn Sie die Abdeckung
anbringen, können Sie das Oszillogramm auf dem Oszilloskopbildschirm in
guter Bildqualität aufzeichnen.
Das Gerät kann nur mit den Modellen MVC-FD5/FD51/FD7/FD71
eingesetzt werden.
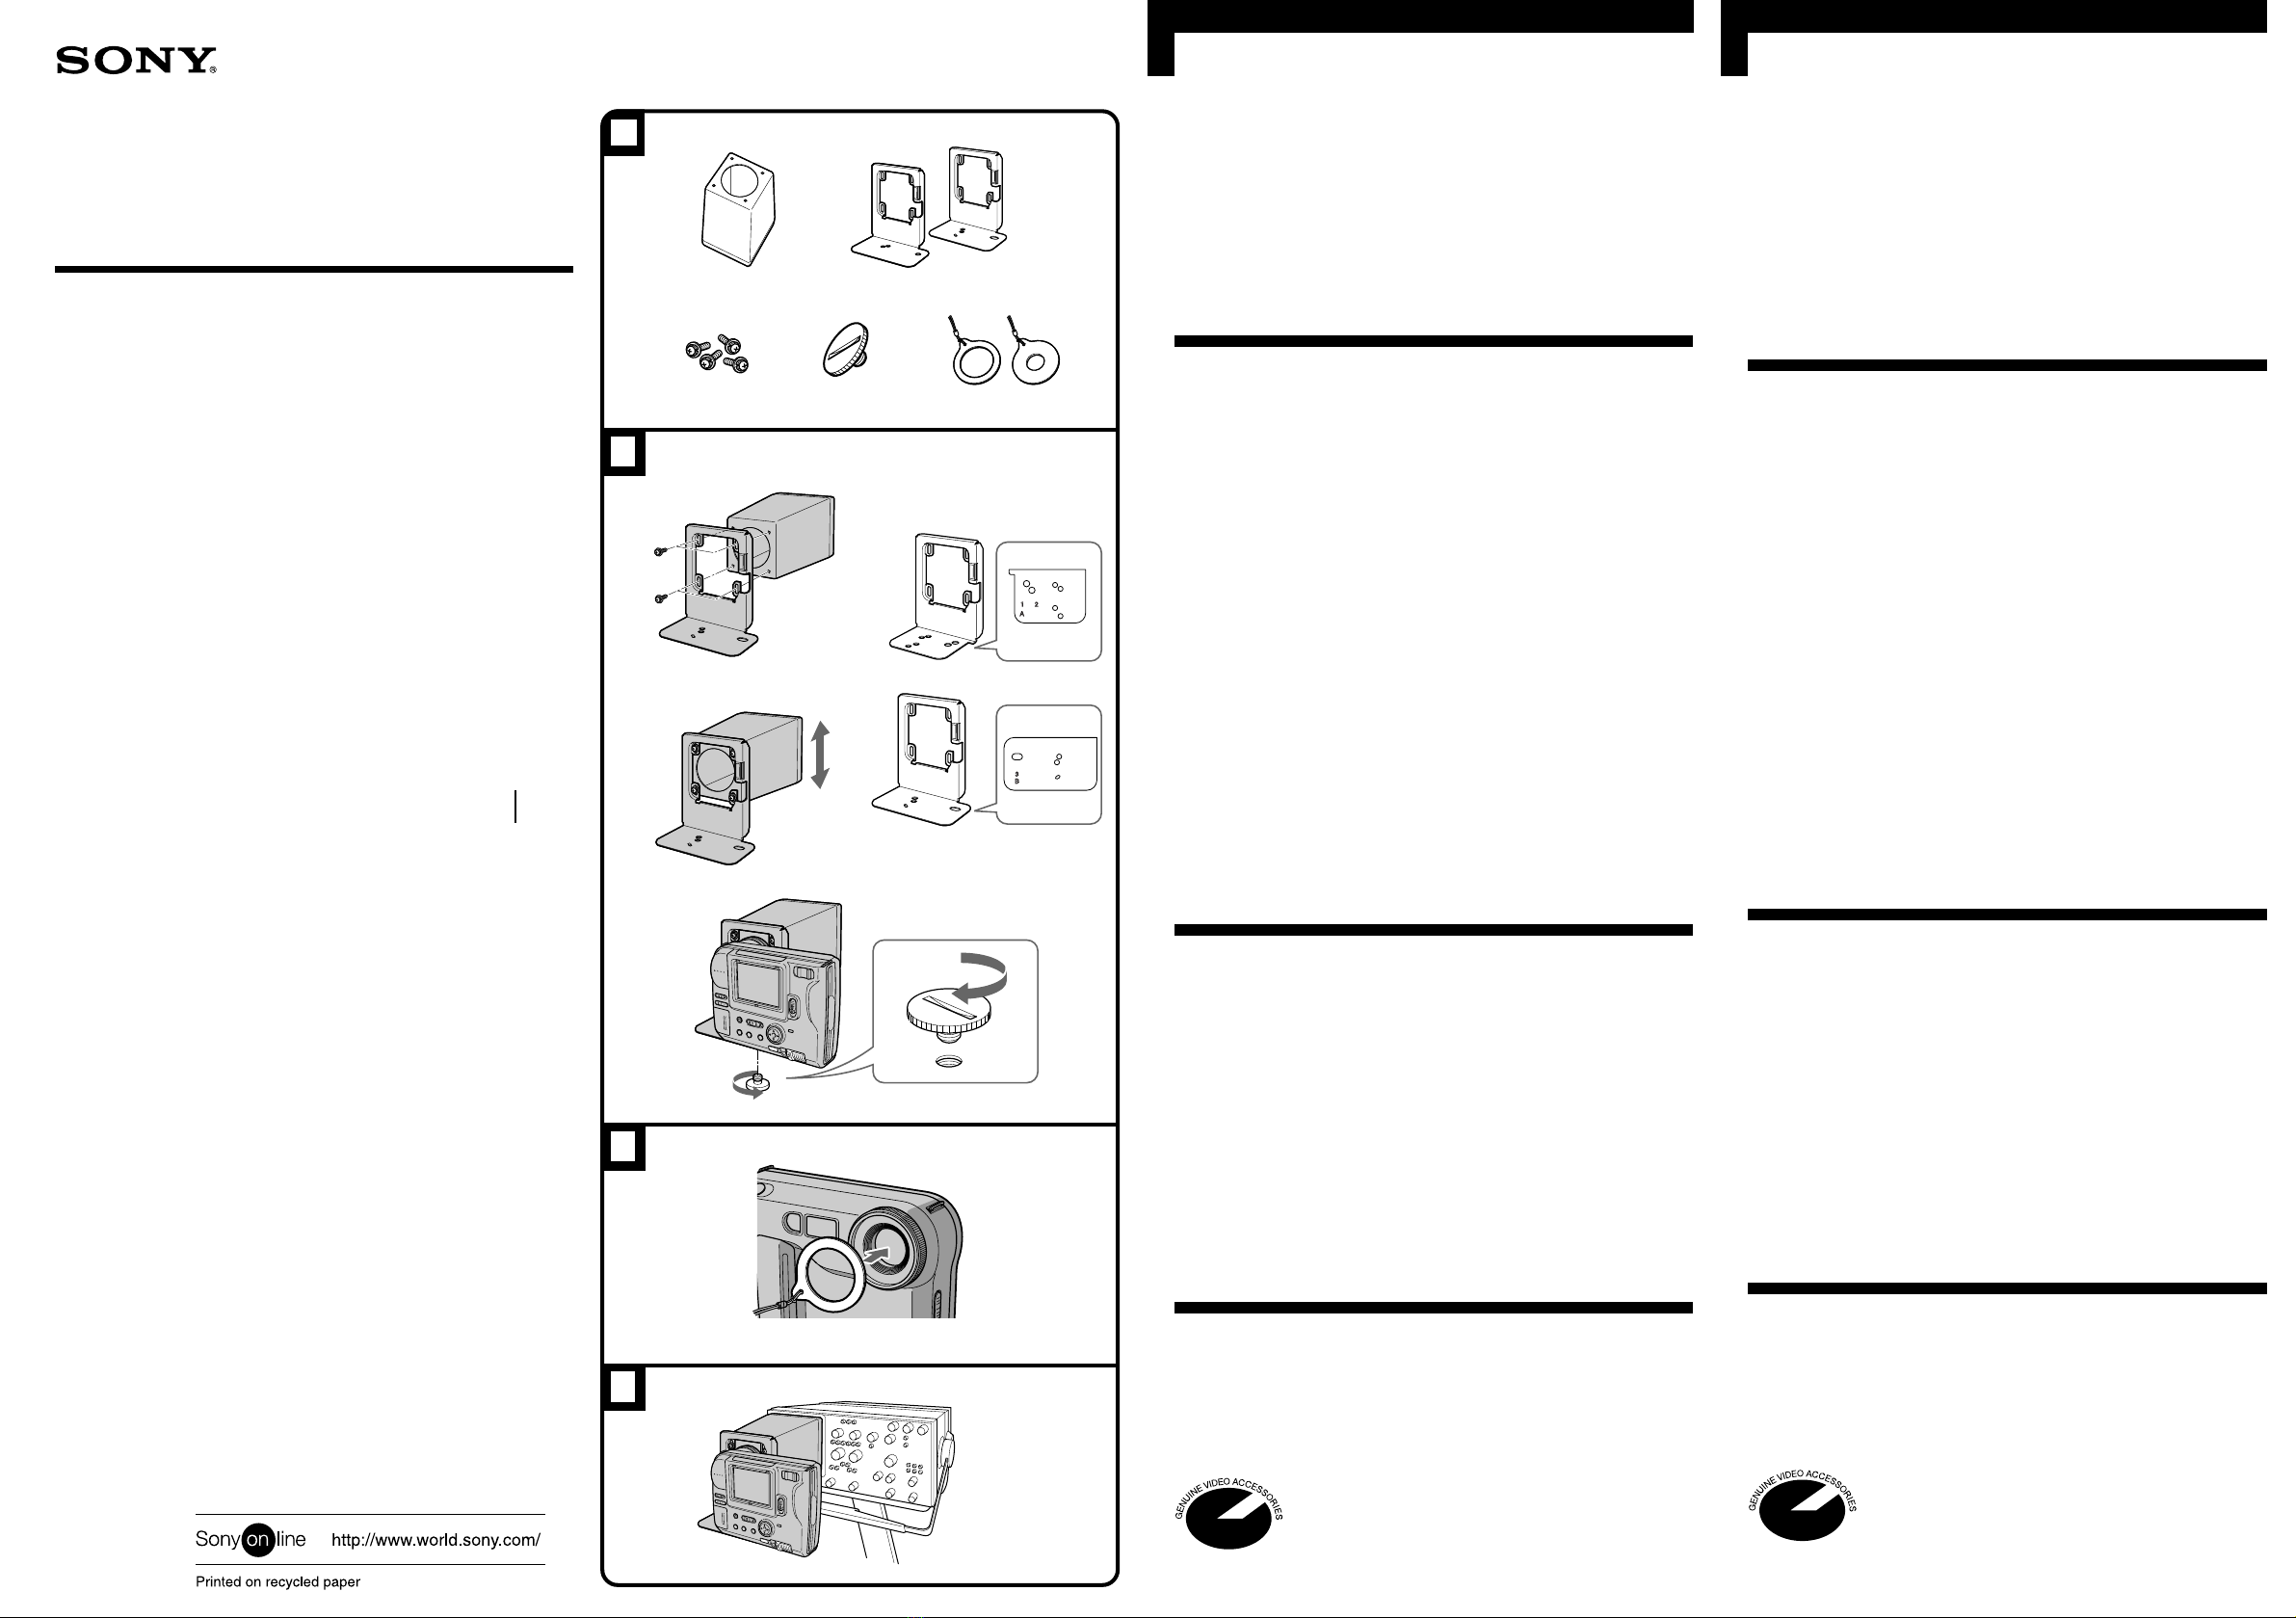
Überprüfen Sie bitte vor der Inbetriebnahme, ob folgendes Zubehör mit
dem Gerät geliefert wurde. (Siehe Abbildung A.)
aAbdeckung (1), bKameramontageschuhe (2), cSchrauben für die
Abdeckung (4), d
Kameramontageschraube (1),
eAntireflex-Ring (1)
Installieren der digitalen Mavica an der
Abdeckung Siehe Abbildung B.
Verwenden Sie den für Ihre digitale Mavica geeigneten
Kameramontageschuh.
aKameramontageschuh A (MVC-FD5/FD51/FD7)
bKameramontageschuh B (MVC-FD71)
1 Bringen Sie den Kameramontageschuh an der Abdeckung an,
und ziehen Sie die Schrauben für die Abdeckung leicht an.
2 Wählen Sie die Position für den Kameramontageschuh (oben
oder unten).
Oben: MVC-FD5/FD51/FD71
Unten: MVC-FD7
3 Ziehen Sie die Schrauben fest an.
Überprüfen Sie die Position der Bohrung für die
Kameramontageschraube:
Kameramontageschuh A-1: MVC-FD5/FD51
Kameramontageschuh A-2: MVC-FD7
Kameramontageschuh B-3: MVC-FD71
4 Bringen Sie die digitale Mavica am Kameramontageschuh an,
und befestigen Sie sie mit der Kameramontageschraube.
Hinweis (Siehe Abbildung C.)
Wenn Sie die Modelle MVC-FD5, FD51 oder FD71 benutzen, bringen Sie
zum Aufnehmen den mitgelieferten Antireflex-Ring am Objektiv an, damit
die digitale Mavica nicht unnötiges Streulicht von hinten aufnimmt
Aufzeichnen Siehe Abbildung D.
Decken Sie den Oszilloskopbildschirm mit der Abdeckung ab, und
beginnen Sie mit dem Aufzeichnen.
Näheres zum Aufzeichnen schlagen Sie bitte in der mit der digitalen
Mavica gelieferten Bedienungsanleitung nach.
Hinweise
• Stellen Sie den Kontrast des Oszilloskopbildschirms so niedrig wie
möglich ein, um ein möglichst scharfes Bild zu erzielen.
• Sie können die Skala nicht aufzeichnen, wenn Sie ein Oszilloskop ohne
Skalenbeleuchtungsfunktion benutzen.
• Wenn Sie mit dem Modell MVC-FD5 arbeiten, stellen Sie den Fokus von
Hand ein.
• Wenn Sie die digitale Mavica mit Zoom-Funktion verwenden, stellen Sie
die Größe des Bildes mit dem Zoom-Schalter ein.
• Schalten Sie die Blitz-Funktion aus.
Nach dem Aufnehmen
Lösen Sie die Kameramontageschraube, und nehmen Sie die digitale
Mavica ab.
Technische Daten
Abmessungen 125 x 145 x 194 mm
Abmessungen innerhalb der Abdeckung 105 x 122 mm
Gewicht 250 g
Mitgeliefertes Zubehör Bedienungsanleitung (1)
Änderungen, die dem technischen Fortschritt dienen, bleiben vorbehalten.
Dieses Logo zeigt an, daß es sich bei diesem Produkt
um Originalzubehör für Videogeräte von Sony
handelt.
Wenn Sie Videogeräte von Sony erwerben, achten Sie
bitte auch beim Kauf von Zusatzkomponenten und -
geräten darauf, daß sie mit dem Logo “GENUINE
VIDEO ACCESSORIES” gekennzeichnet sind.
Antes de emplear la unidad, lea este manual atentamente y consérvelo para
consultarlo en el futuro.
La visera de osciloscopio VCV-OH1 se ha diseñado para utilizarse con la
unidad Mavica digital de Sony. Dicha visera permite grabar con nitidez los
oscilogramas mostrados en la pantalla del osciloscopio.
Esta unidad está destinada para utilizarse solamente con la unidad MVC-
FD5/FD51/FD7/FD71.
Compruebe que ha recibido los siguientes accesorios junto con la unidad
antes del empleo. (Consulte la ilustración A.)
aVisera (1), bZapatas para montaje de videocámara (2), cTornillos de
sujeción de la visera (4), dTornillo de sujeción de la cámara (1), eAnillo
antidestellos (1)
Instalación de la Mavica digital en la
unidad Consulte la ilustración B.
Emplee la zapata para montaje de videocámara apropiada para la Mavica
digital.
aZapata para montaje de videocámara A (MVC-FD5/FD51/FD7)
bZapata para montaje de videocámara B (MVC-FD71)
1 Fije la zapata para montaje de videocámara a la visera y, a
continuación, apriete con suavidad los tornillos de sujeción de
la visera.
2 Seleccione la posición de la zapata para montaje de
videocámara (superior o inferior).
Superior: MVC-FD5/FD51/FD71
Inferior: MVC-FD7
3 Apriete los tornillos firmemente.
Fije la posición del orificio del tornillo de cámara:
Zapata para montaje de videocámara A-1: MVC-FD5/FD51
Zapata para montaje de videocámara A-2: MVC-FD7
Zapata para montaje de videocámara B-3: MVC-FD71
4 Instale la Mavica digital en la zapata para montaje de
videocámara y fíjela con el tornillo de sujeción de la cámara.
Nota (Consulte la ilustración C.)
Si utiliza la unidad MVC-FD5, FD51 o FD71, fije al objetivo el anillo
antidestellos suministrado cuando filme para evitar que la Mavica digital
recoja iluminaciones innecesarias de detrás.
Grabación Consulte la ilustración D.
Cubra la pantalla del osciloscopio con la visera e inicie la grabación.
Para más información sobre la grabación, consulte el manual de
instrucciones suministrado con la Mavica digital.
Notas
• Ajuste el contraste en el menor nivel posible en la pantalla del
osciloscopio para obtener imágenes nítidas.
• No es posible grabar la escala si utiliza un osciloscopio sin función de
iluminación de escalas.
• Cuando utilice la unidad MVC-FD5, ajuste el enfoque manualmente.
• Cuando utilice la Mavica digital con la función de zoom, ajuste el tamaño
de la imagen con el interruptor de zoom.
• Desactive la función de flash.
Después de la grabación
Afloje el tornillo de sujeción de la cámara y extraiga la Mavica digital.
Especificaciones
Dimensiones 125 x 145 x 194 mm
Dimensiones en el interior de la visera 105 x 122 mm
Peso 250 g
Accesorio suministrado Manual de instrucciones (1)
Diseño y especificaciones sujetos a cambios sin previo aviso.
Esta marca indica que este producto es un accesorio
genuino para productos de vídeo Sony.
Al adquirir productos de vídeo Sony, Sony
recomienda adquirir accesorios con la marca
“GENUINE VIDEO ACCESSORIES”.
A
1
2
3
a
D
b
C
B
ab
ced
Other Sony Camera Accessories manuals

Sony
Sony VCT-970RM User manual

Sony
Sony LCS-EMB1A User manual

Sony
Sony AKA-FGP1 User manual

Sony
Sony COMP-CR1 User manual

Sony
Sony FDA-5V7 User manual

Sony
Sony SRK-R302 User manual

Sony
Sony SPK-DVF5 User manual

Sony
Sony DVP-FX700 - Portable Dvd Player User manual

Sony
Sony HDVF-C35W User manual

Sony
Sony VCT-SGR1 User manual

Sony
Sony VCT-570RM User manual

Sony
Sony NP-F330 Operating Instructions (primary... Service manual

Sony
Sony HDVF-C730W User manual

Sony
Sony XDCU-50 User manual

Sony
Sony FA-SHC1AM User manual

Sony
Sony VAD-WB User manual

Sony
Sony VCT-D680RM User manual

Sony
Sony Cyber-shot Marine Pack MPK-WB User manual

Sony
Sony BRBK-HSD1 User manual

Sony
Sony SRMASTER SR-PC4 User manual