Français
Des informations relatives à l’utilisation de chaque objectif sont
disponibles dans ce manuel. La section « Précautions avant toute
utilisation », qui fait l’objet d’un document séparé, contient des
précautions relatives aux objectifs, telles que des remarques sur leur
utilisation. Veuillez lire attentivement ces deux documents avant d’utiliser
l’objectif.
Cet objectif est conçu pour les appareils à monture αSony (modèles équipés
d’un capteur d’image au format APS-C). Vous ne pouvez pas l’utiliser avec des
appareils photos au format 35 mm.
Remarques sur l’utilisation
Lorsque cet objectif est utilisé avec un appareil photo à monture E, rattachez
un adaptateur pour monture d’objectif vendu séparément. Ne rattachez pas
directement l’objectif à l’appareil photo à monture E sinon l’objectif et l’appareil
pourraient être endommagés.
Tenez fermement à la fois l’appareil photo et l’objectif lorsque vous transportez
l’appareil photo avec l’objectif xé.
Ne tenez pas l’appareil par une partie saillante de l’objectif lors d’une opération de
zoom ou d’une mise au point.
Précaution concernant l’utilisation du ash
Dans le cas de certaines combinaisons objectif/ash, l’objectif peut
partiellement bloquer la lumière du ash, ce qui génère une ombre en bas de
l’image. Lorsque vous utilisez un ash intégré, veillez à retirer le pare-soleil et
à prendre la photo à une distance d’au moins 1 m (3,3 pieds) du sujet.
Vignetage
Lorsque vous utilisez l’objectif, les coins de l’écran peuvent s’assombrir par rapport
au centre. Pour réduire ce phénomène (appelé vignetage), l’ouverture doit être
réglée à une valeur comprise entre 1 et 2 par rapport à la position de fermeture
complète.
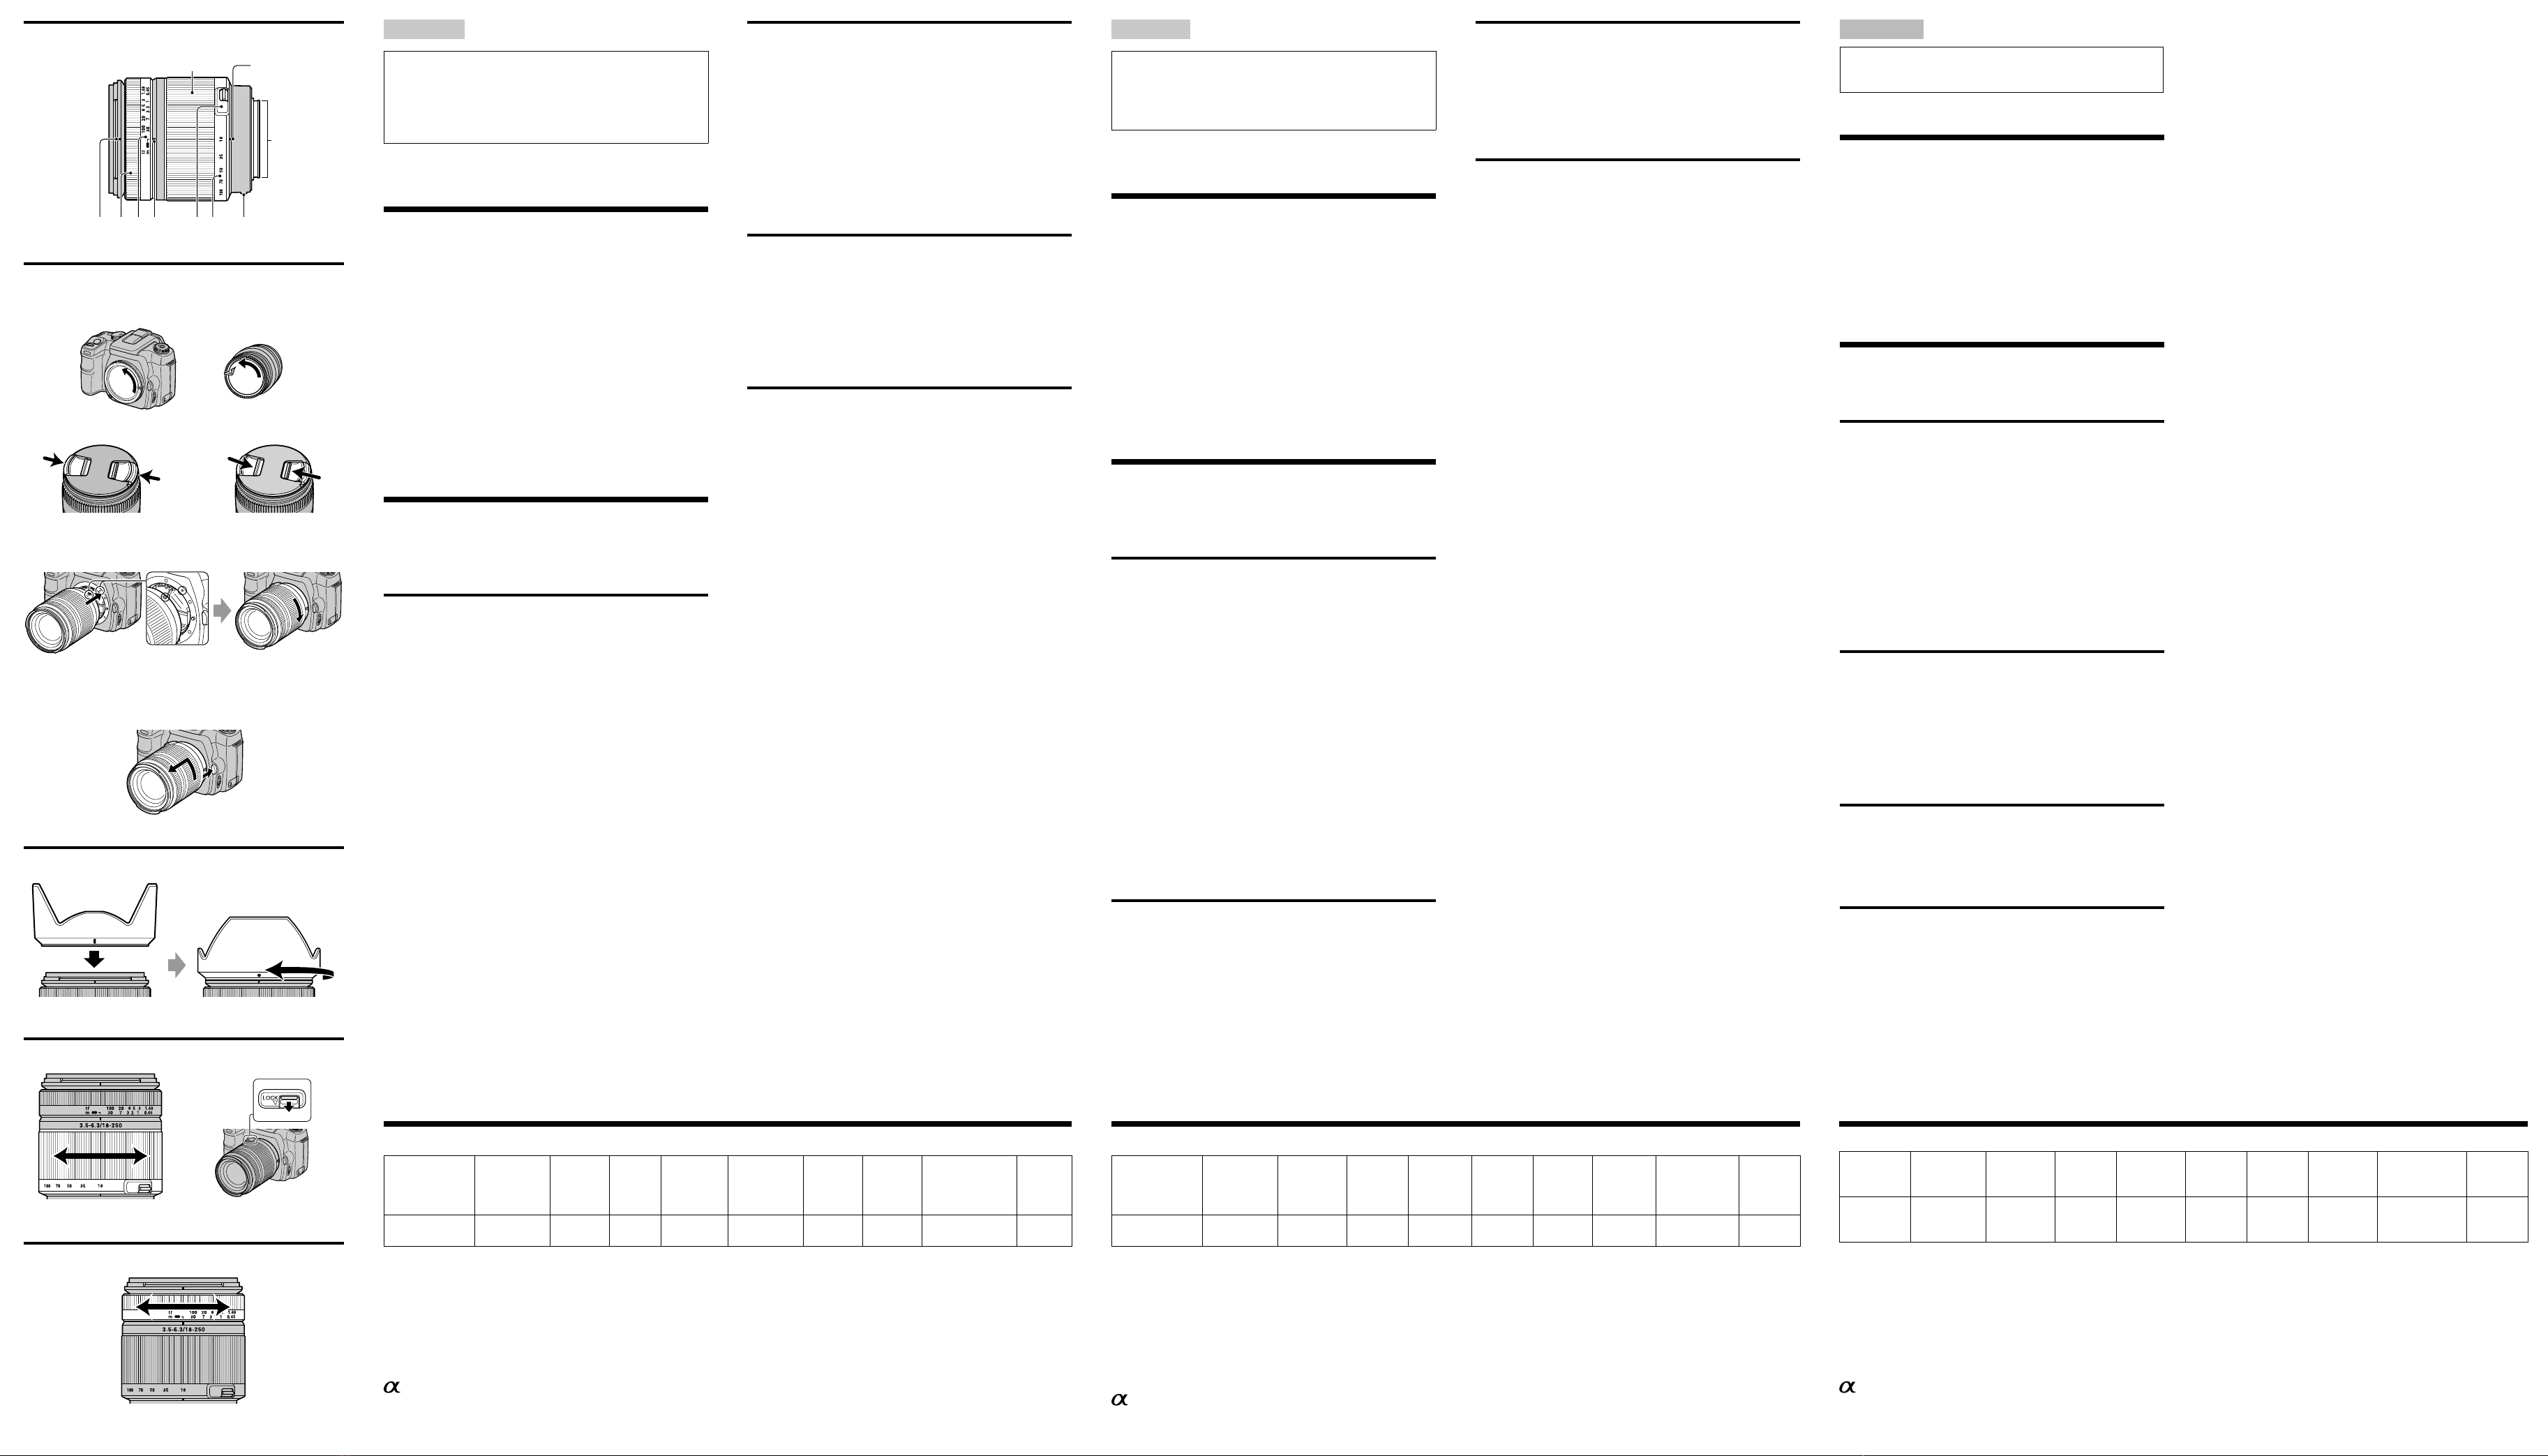
Noms des pièces
1···Bague du zoom 2···Repère de la longueur focale 3···Contacts de l’objectif
4···Repère de montage 5···Echelle de longueur focale 6··· Commutateur
de verrouillage du zoom 7···Index de distance 8···Echelle de mise au point
9···Bague de mise au point 10···Index du pare-soleil
Fixation/retrait de l’objectif
Fixation de l’objectif (Voir l’illustration –.)
1Retirez les capuchons d’objectif situés à l’avant et l’arrière, ainsi que
le capuchon de l’appareil photo.
Vous pouvez xer/détacher le capuchon avant de deux façons, (1) et (2).
Lorsque vous xez/détachez le capuchon d’objectif alors que le pare-soleil
est en place, utilisez la méthode (2).
2Alignez le repère orange situé sur la monture de l’objectif sur le
repère orange de l’appareil (repère de montage), puis insérez l’objectif
dans la monture de l’appareil et tournez-le dans le sens horaire
jusqu’à ce qu’il se bloque.
N’appuyez pas sur le bouton de déblocage de l’objectif de l’appareil lorsque
vous xez l’objectif.
Ne xez pas l’objectif de travers.
Retrait de l’objectif (Voir l’illustration –.)
Tout en appuyant et en maintenant enfoncé le bouton de déblocage
de l’objectif sur l’appareil, tournez l’objectif dans le sens anti-horaire
jusqu’à la butée, puis détachez l’objectif.
Fixation du pare-soleil
Il est recommandé d’utiliser un pare-soleil an de réduire la lumière parasite
et d’assurer une qualité d’image maximale.
Alignez la ligne rouge du pare-soleil sur la ligne rouge de l’objectif
(index du pare-soleil). Tournez le pare-soleil dans le sens horaire
jusqu’à ce que la ligne rouge de l’objectif se trouve sur le point rouge
du pare-soleil et que celui-ci émette un déclic de mise en place.
Lorsque vous utilisez un ash intégré, veillez à retirer le pare-soleil an d’éviter
que la lumière du ash ne soit bloquée.
Fixez correctement le pare-soleil. Sinon, le pare-soleil risque de perturber l’eet
souhaité ou d’apparaître sur les images.
Lorsque vous le rangez, retournez le pare-soleil et placez-le sur l’objectif à
l’arrière.
Utilisation du zoom
Tournez la bague du zoom pour obtenir la longueur focale de votre
choix.
Verrouillage du zoom
Empêche le barillet de se déployer sous le poids de l’objectif, lorsque vous le
transportez.
Pour verrouiller le zoom, faites glisser son commutateur de verrouillage. Pour
le déverrouiller, faites-le glisser dans le sens inverse.
Mise au point
Lorsque vous utilisez la mise au point automatique, l’appareil photo fait la mise au
point automatiquement au niveau de l’objectif.
Lors de la mise au point automatique, ne touchez pas la bague de mise au point quand
elle tourne. Ne tournez la bague de mise au point manuellement que lorsque l’appareil
photo est en mode de mise au point manuelle, sous peine de provoquer un problème de
fonctionnement.
Pour eectuer une mise au point manuelle, réglez votre appareil en mode de mise au
point manuelle et tournez la bague de mise au point tout en regardant dans le viseur.
Le signal de mise au point dans le viseur indique les conditions actuelles de mise au
point.
La bague de mise au point peut être tournée légèrement au-delà de l’inni an
d’obtenir une mise au point précise à diverses températures de fonctionnement.
Ne tournez pas la bague de mise au point au maximum lorsque vous eectuez
une mise au point manuelle, même sur l’inni. Regardez dans le viseur et réglez
la mise au point avec précision.
Sur le modèle d’objectif DT 18-250mm F3.5-6.3, la bague de mise au point
tourne dans le sens contraire de celui des objectifs standard à monture A.
Spécications
Nom (Désignation
du modèle)
Longueur focale
équivalente au
format 35 mm
*1
(mm)
Elément en
groupes de
l’objectif
Angle de
vue*1
Mise au point
minimale*2
(m (pieds))
Agrandissement
maximum
(X)
Valeur
f minimale
Diamètre du
ltre
(mm)
Dimensions (diamètre
maximum × hauteur)
(mm (po))
Poids
(g (on.))
DT 18-250mm
F3.5-6.3 (SAL18250)
27-375 13-16 76°-6°30’ 0,45(1,48) 0,29 f/22-40 62 Environ 75×86
(3×3 3/8)
Environ 440
(15 4/8)
*1Les valeurs pour une longueur focale et un angle de vue au format équivalent à 35 mm sont basées sur des appareils photos reex numériques à un objectif équipés d’un
capteur d’image au format APS-C.
*2La mise au point minimale est la distance la plus courte entre le capteur d’image et le sujet.
Cet objectif dispose d’un encodeur de distance. L’encodeur de distance permet d’eectuer des mesures plus précises (ADI) en utilisant un ash pour l’ADI.
Selon le mécanisme d’objectif, la longueur focale peut varier en fonction de la distance de prise de vue. La longueur focale suppose que l’objectif est réglé sur l’inni.
Articles inclus: Objectif (1), Capuchon d’objectif avant (1), Capuchon d’objectif arrière (1), Pare-soleil (1), Jeu de documents imprimés
La conception et les spécications peuvent être modiées sans préavis.
est une marque commerciale de Sony Corporation.
Español
En este manual encontrará información sobre la utilización de cada
objetivo. Las precauciones comunes que se aplican a los objetivos, como
por ejemplo las notas sobre la utilización, se encuentran en una hoja
separada con el título “Precauciones previas a la utilización del producto”.
Asegúrese de leer ambos documentos antes de utilizar el objetivo.
Este objetivo está diseñado para cámaras de montura Sony α(modelos
equipados con sensor de imágenes de tamaño APS-C). No se puede utilizar
en cámaras de formato de 35 mm.
Notas sobre el uso
Cuando utilice este objetivo en una cámara con montura E, fíjele un adaptador
de montura de objetivo a la venta por separado. No je el objetivo directamente
al la cámara con montura E o podría dañar ambos.
Cuando transporte la cámara con el objetivo colocado, sujete rmemente tanto la
cámara como el objetivo.
No sujete ninguna parte sobresaliente del objetivo al utilizar el zoom o realizar el
enfoque.
Precaución en el uso del ash
Con algunas combinaciones de objetivo y ash, el objetivo puede bloquear
parcialmente la luz del ash, lo que podría provocar una sombra en la parte inferior de
la imagen. Al usar una cámara con ash incorporado, asegúrese de extraer el parasol y
tomar fotografías desde como mínimo 1 m de distancia desde el motivo.
Viñeteado
Si utiliza el objetivo, las esquinas de la pantalla se vuelven más oscuras que el centro.
Para reducir este fenómeno (llamado viñeteado), cierre la abertura de 1 a 2 puntos.
Nombres de las piezas
1···Anillo de zoom 2···Índice de distancia focal 3···Contactos del objetivo
4···Índice de montaje 5···Escala de distancia focal 6··· Interruptor de bloqueo
del zoom 7···Índice de distancia 8···Escala de distancia 9···Anillo de enfoque
10···Índice del parasol
Colocación/extracción del objetivo
Para colocar el objetivo (consulte la ilustración –.)
1Extraiga las tapas frontal y posterior del objetivo y la tapa del cuerpo
de la cámara.
Puede colocar o extraer la tapa frontal del objetivo de dos modos, (1) y (2).
Cuando coloque o extraiga la tapa del objetivo con el parasol colocado,
utilice el método (2).
2Alinee el índice naranja del tambor del objetivo con el índice naranja
de la cámara (índice de montaje) y, a continuación, inserte el objetivo
en la montura de la cámara y gírelo hacia la derecha hasta que quede
encajado.
No pulse el botón de liberación del objetivo de la cámara cuando monte el
objetivo.
No monte el objetivo inclinado.
Para extraer el objetivo (consulte la ilustración –.)
Gire el objetivo hacia la izquierda hasta que se detenga mientras
mantiene el botón de liberación del objetivo pulsado y, a
continuación, extráigalo.
Colocación del parasol
Es recomendable utilizar un parasol para reducir los reejos y garantizar la
máxima calidad de imagen.
Alinee la línea roja del parasol con la línea roja del objetivo (Índice del
parasol). Gire la cubierta hacia la derecha hasta que la línea roja del
objetivo se ajuste en el punto rojo de la cubierta.
Cuando utilice una cámara con ash incorporado, asegúrese de extraer el parasol
para evitar el bloqueo de la luz del ash.
Fije el parasol correctamente. Si no, es posible que la cubierta impida el efecto
deseado o puede que aparezca en las fotografías.
Cuando la guarde, gire el parasol y colóquelo al revés en el objetivo.
Utilización del zoom
Gire el anillo de zoom hasta la distancia focal que desee.
Bloqueo del zoom
Evita que el cuerpo del objetivo se extienda debido al peso del objetivo
mientras se transporta.
Deslice el interruptor de bloqueo del zoom hacia la posición de bloqueo. Para
desbloquearlo, deslícelo de nuevo a la posición original.
Enfoque
Cuando utilice el enfoque automático, la cámara enfocará el objetivo
automáticamente.
Cuando utilice el enfoque automático, no toque el anillo de enfoque mientras éste
gira. Gire manualmente el anillo de enfoque únicamente cuando la cámara esté
ajustada en el modo de enfoque manual directo. De lo contrario, podría provocar
un fallo de funcionamiento.
Cuando enfoque manualmente, ajuste la cámara en el modo de enfoque
manual y gire el anillo de enfoque mientras mira a través del visor. La señal
de enfoque del visor indica el estado actual del enfoque.
El anillo de enfoque puede girarse ligeramente hasta el innito para proporcionar
un enfoque adecuado en diferentes temperaturas de funcionamiento. No gire
el anillo de enfoque por completo hasta el nal cuando enfoque manualmente,
incluso al innito. Mire a través del visor y ajuste el enfoque con precisión.
En el modelo de objetivo DT 18-250mm F3.5-6.3, el anillo de enfoque gira en
dirección contraria a los objetivos de montura A estándar.
Especicaciones
Nombre (Nombre
del modelo)
Distancia focal*1
(mm) equivalente
al formato de 35
mm
Elementos y
grupos del
objetivo
Ángulo de
visión*1
Enfoque
mínimo*2(m)
Ampliación
máxima (X)
F-stop
mínimo
Diámetro del
ltro (mm)
Dimensiones
(diámetro máximo
× altura) (mm)
Peso (g)
DT 18-250mm
F3.5-6.3 (SAL18250)
27-375 13-16 76°-6°30’ 0,45 0,29 f/22-40 62 Aprox. 75×86 Aprox. 440
*1Los valores de la distancia focal equivalente al formato de 35 mm y al ángulo de visión se basan en cámaras réex digitales de objetivo único equipadas con sensor de
imágenes de tamaño APS-C.
*2El enfoque mínimo es la distancia más corta desde el sensor de imágenes al motivo.
Este objetivo está equipado con un codicador de distancia El codicador de distancia permite una medición más exacta (ADI) a través de un ash para ADI.
En función del mecanismo del objetivo, es posible que la distancia focal varíe si la distancia de toma de imagen también lo hace. La distancia focal asume que el objetivo está
enfocado al innito.
Elementos incluidos: Objetivo (1), Tapa frontal del objetivo (1), Tapa posterior del objetivo (1), Parasol (1), Juego de documentación impresa
El diseño y las especicaciones están sujetos a cambio sin previo aviso.
es una marca comercial de Sony Corporation.
–1
(1) (2)
–2
中文(简)
您可以在本手册中找到关于使用各镜头的信息。有关使用注意事项
等镜头的一般注意事项可以在单页的“使用前的注意事项”中找到。
务必在使用镜头前阅读以上两份文件。
本镜头是专为 Sony α 可拆卸相机(配有 APS-C 尺寸影像传感器的机
型)设计的。您不能用于 35mm 规格的相机。
使用注意事项
• 在 E 卡口系统相机上使用本镜头时,请安装另售的卡口适配器。切勿将镜
头直接安装在 E 卡口系统相机上,以免造成二者损坏。
• 当您携带安装了镜头的相机时,务必同时握稳相机和镜头。
• 请勿握住变焦或对焦时镜头突出的任何部分。
闪光灯使用注意事项
使用镜头/闪光灯的某种组合时,镜头可能会遮住闪光灯的部分亮光,而
造成图片的底部阴影。使用内置相机闪光灯时,务必拆下镜头遮光罩并
在距离拍摄物至少 1m 的地方拍摄。
晕影
使用镜头时,屏幕的角落要比其中心暗。为避免这种现象
(称之为晕影),
请将光圈推近 1 ~2 圈。
部件名
1…可变焦距圈 2…焦距标记 3…镜头接点 4…安装标记 5…焦距刻度
6…缩放锁开关 7…距离标记 8…距离刻度 9…对焦环 10…镜头遮光罩
刻度
安装/拆下镜头
安装镜头
(参见插图 –。)
1
拆下前、后镜头盖和相机机身罩。
• 可以 (1)和(2)两种方式装上/取下前镜头盖。在不取下镜头遮光罩的
情况下装上/取下镜头盖时,请使用方法 (2)。
2 将镜头镜身上的橙色标记与相机上的橙色标记
(安装标记)
对
准,然后将镜头插入相机安装部位并顺时针旋转直至镜头锁紧。
• 请勿在安装镜头时按相机上的镜头释放按钮。
• 请勿倾斜安装镜头。
拆下镜头
(参见插图 –。)
当按住相机上的镜头释放按钮时,逆时针转动镜头直至其停止,然后
拆下镜头。
安装镜头遮光罩
建议使用镜头遮光罩以减少炫光,从而确保最佳画质。
将镜头遮光罩上的红线对准镜头上的红线(镜头遮光罩刻度)。顺时
针转动遮光罩直至镜头上的红线与遮光罩上的红点对齐并且遮光罩
咔嗒入位。
• 使用内置相机闪光灯时,确保拆下镜头遮光罩以免遮住闪光灯的亮光。
• 正确安装镜头遮光罩。否则镜头遮光罩可能会影响拍摄效果或可能出现在
照片上。
• 存放时,翻转遮光罩并将其倒过来放在镜头上。
变焦
将可变焦距圈转至所需焦距。
缩放锁
当携带时,此装置可以防止由于镜头重量导致镜头伸出。
滑动缩放锁开关以进行锁定。若要解锁,向后滑动缩放锁开关。
对焦
使用自动对焦时,相机自动调整镜头的焦点。
• 当相机正在自动对焦时,请勿在其转动时触碰对焦环。只有当相机设定为
直接手动对焦时再手动转动对焦环,否则可能会引起故障。
使用手动对焦时,将相机设定为手动对焦并在透过取景器查看的同时旋
转对焦环。取景器中的对焦信号表示当前对焦状况。
• 可将对焦环稍微旋过无限远,以便在不同的操作温度下提供精确的焦距。
当手动对焦时,请勿将对焦环一直旋到底,即使可旋至无限远也不行。透过
取景器查看并精确设置焦距。
• 对于镜头型号 DT 18-250mm F3.5-6.3,对焦环沿着与标准 A卡口系统镜
头相反方向旋转。
制造商 : 索尼公司
总经销商 : 索尼(中国)有限公司
总经销商地址 :北京市朝阳区太阳宫中路12号楼冠城大厦701
原产地 : 中国(主机)
出版日期 :2011年12月
规格
名称
(型号名称)
相当于
35mm 规格
焦距*1(mm)
镜头组-片 视角*1最小对焦*2
(m)
最大放大
倍数
(倍) 最小光圈值 滤光镜
直径 (mm)
尺寸
(最大
直径×高)(mm) 质量 (g)
DT 18-250mm
F3.5-6.3
(SAL18250)
27-375 13-16 76°-6°30’ 0.45 0.29 f/22-40 62 约75×86 约440
*1 相当于 35mm 规格焦距和视角的数值是基于配备 APS-C 尺寸图像传感器的数码单反相机。
*2 最小对焦是从图像传感器至物体的最短距离。
• 该镜头具有距离编码器。通过使用支持 ADI 的闪光灯,距离编码器可进行更高精度的测量
(ADI)。
• 视镜头结构而定,焦距可能会随拍摄距离的改变而变化。假设镜头对焦在无限远处。
所含物品 :镜头 (1)、前镜头盖 (1)、后镜头盖 (1)、镜头遮光罩 (1)、成套印刷文件
设计或规格如有变动,恕不另行通知。
是Sony Corporation 的商标。


