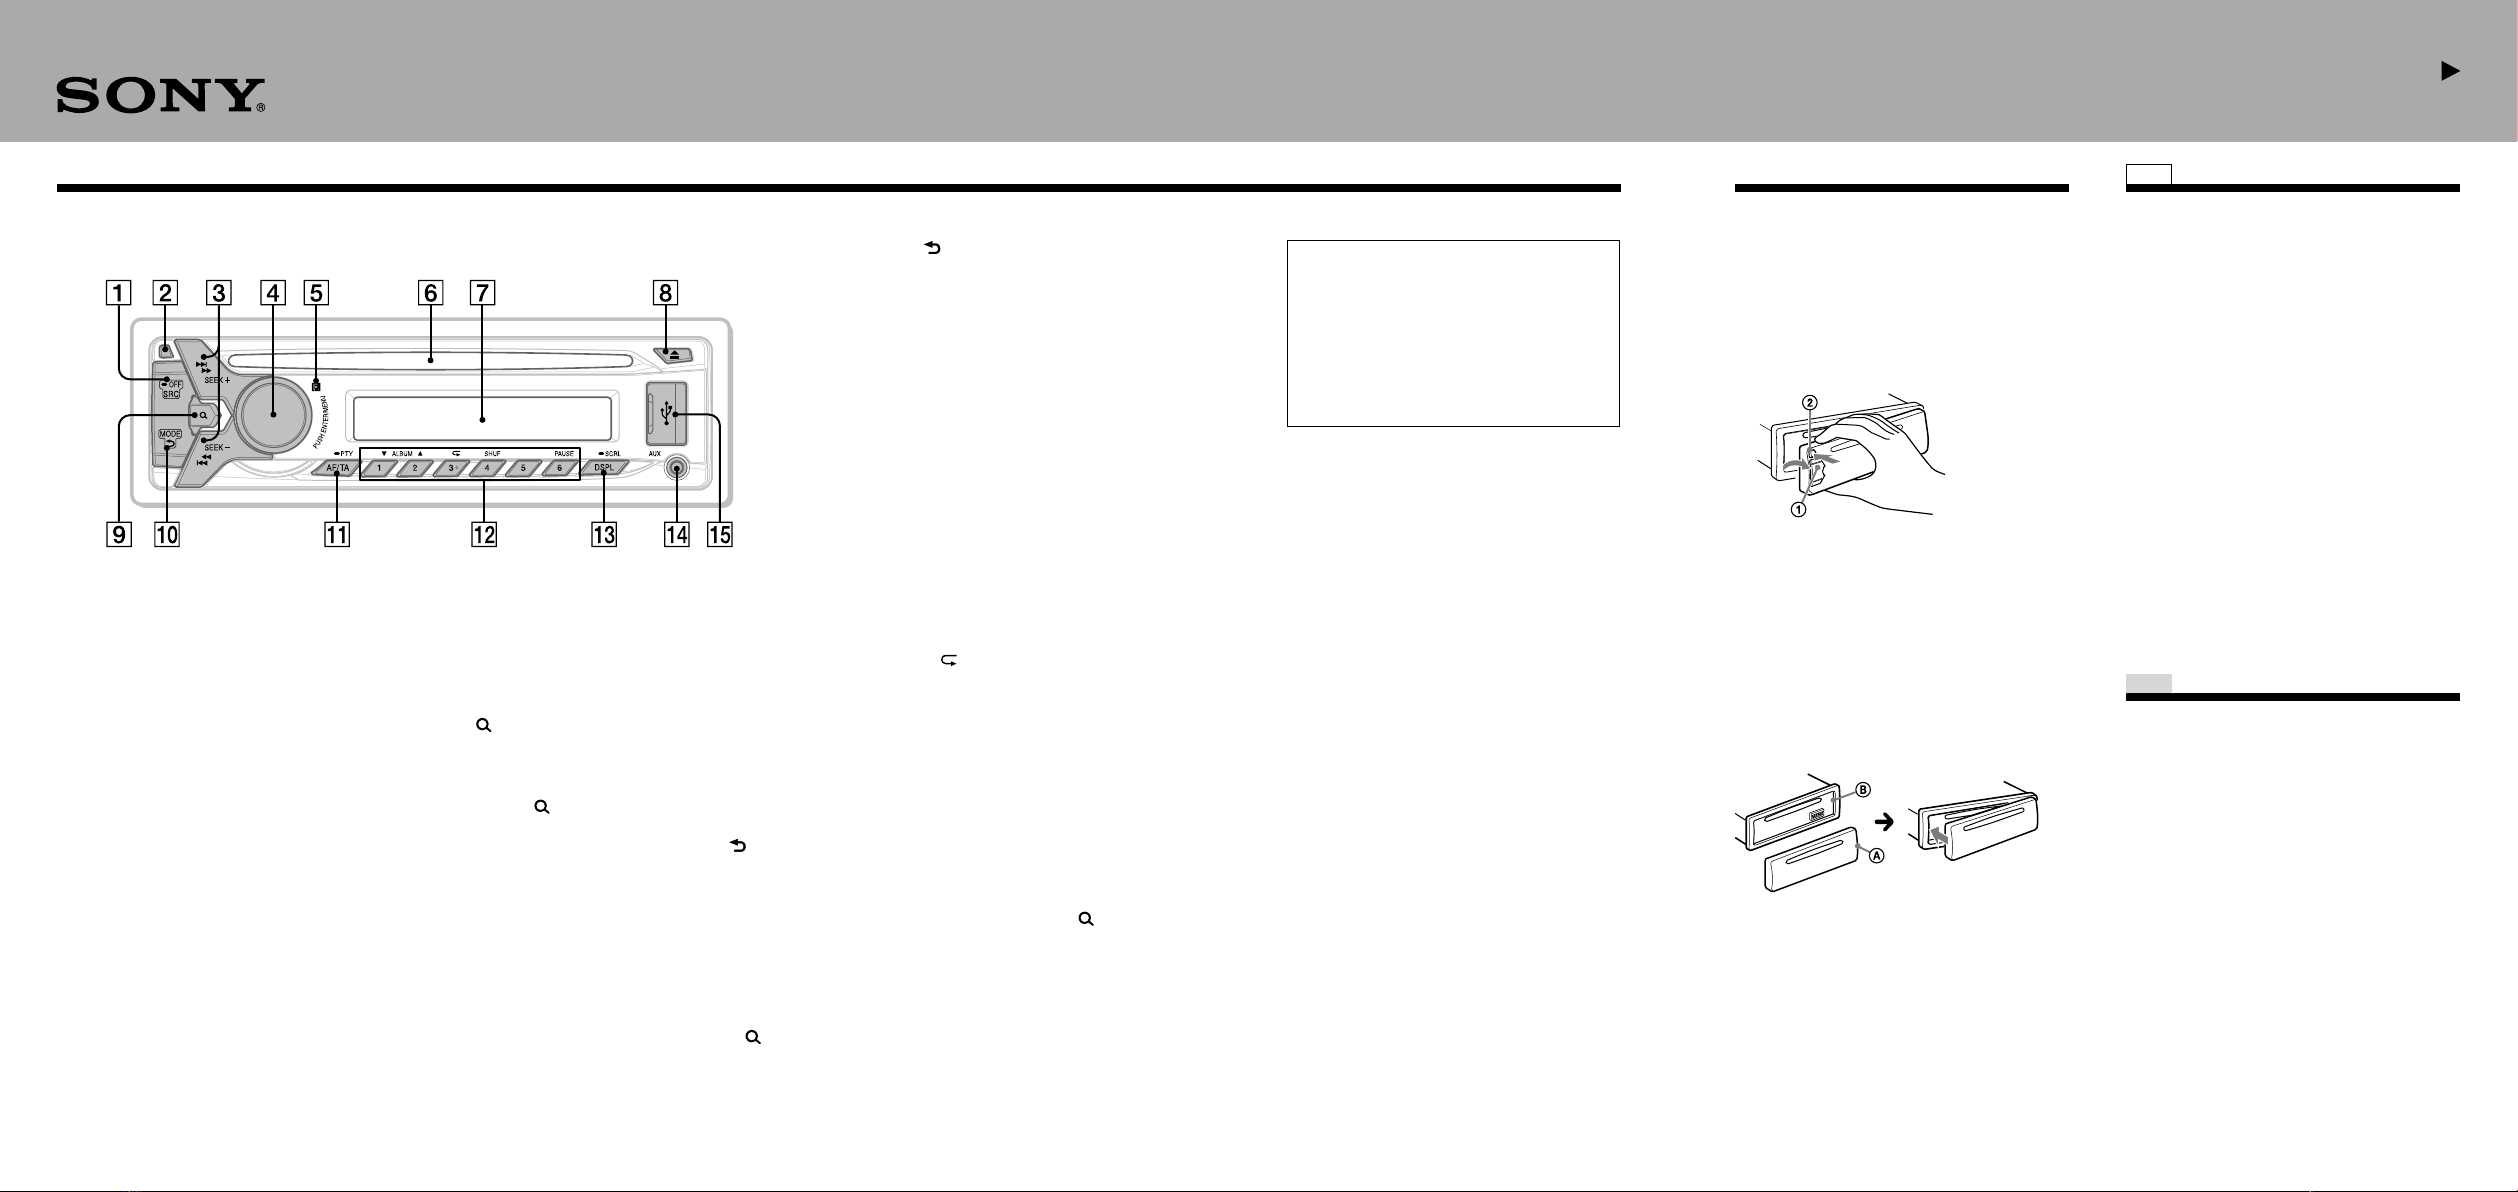
manuals.online logo
Brands
  1. Home
  2. •
  3. Brands
  4. •
  5. Sony
  6. •
  7. Car Receiver
  8. •
  9. Sony CDX-G1001U User manual

Sony CDX-G1001U User manual

SRC (source)
Press to turn on the power; select the
source (Radio/CD/USB/AUX).
OFF
Press and hold for 1 second to turn off the
power.
Press and hold for more than 2 seconds to
turn off the power and the display
disappears.
Front panel release button
SEEK +/–
/(prev/next)
/(fast-reverse/fast-forward)
Radio:
Tune in stations automatically (press); find a
station manually (press and hold).
CD/USB:
Skip a track (press); skip tracks continuously
(press, then press again within about 2
seconds and hold); reverse/fast-forward a
track (press and hold).
Control dial
Rotate to adjust the volume.
ENTER
Enter the selected item.
(back)
Return to the previous display.
MODE
Press to select the radio band (FM1, FM2,
FM3, MW or LW).
AF (alternative frequencies)/TA (traffic
announcement)
Set AF and TA.
PTY (program type)
Press and hold to select PTY in RDS.
Number buttons (1 to 6)
Radio:
Receive stored stations (press); store
stations (press and hold).
CD/USB:
1/2: ALBUM /(during MP3/WMA
playback)
Skip an album (press); skip albums
continuously (press and hold).
3: (repeat)*2
4: SHUF (shuffle)
6: PAUSE
Pause playback. Press again to resume
playback.
DSPL (display)
Press to change display items.
SCRL (scroll)
Press and hold to scroll a display item.
AUX input jack
USB port
*1During USB playback, press (browse) for more
than 2 seconds to directly return to the beginning of
the category list.
*2This button has a tactile dot.
Warning if your car’s ignition has no ACC
position
Be sure to set the AUTO OFF function. The
unit will shut off completely and
automatically in the set time after the unit is
turned off, which prevents battery drain. If
you do not set the AUTO OFF function, press
and hold OFF until the display disappears
each time you turn the ignition off.
Location of controls and basic operations
Main unit
MENU
Open the setup menu.
Receptor for the remote commander
Disc slot
Display window
(disc eject)
(browse)
Enter the Quick-BrowZer™ mode.
(You can search for a track in a CD or USB
device easily by category.)
1 Press (browse)*1to display the list of
search categories.
When the track list appears, press
(back) repeatedly to display the desired
search category.
2 Rotate the control dial to select the
desired search category, then press it to
confirm.
3 Repeat step 2 to search the desired
track.
Playback starts.
To exit the Quick-BrowZer mode, press
(browse).
Setting the clock
The clock uses a 24-hour digital indication.
1 Press MENU, rotate the control dial to
select [GENERAL], then press it.
2 Rotate the control dial to select [CLOCK-
ADJ], then press it.
The hour indication flashes.
3 Rotate the control dial to set the hour and
minute.
To move the digital indication, press SEEK
+/–.
4 After setting the minute, press MENU.
The setup is complete and the clock starts.
To display the clock
Press DSPL.
Tip
You can set the clock automatically with the RDS
feature. For details, see “Adjusting setup items” on the
reverse side of the sheet, and set to [CT-ON] (clock
time).
Storing stations automatically
Caution
When tuning in stations while driving, use Best
Tuning Memory (BTM) to prevent an accident.
1 Press SRC repeatedly to select [TUNER].
To change the band, press MODE repeatedly.
2 Press MENU, rotate the control dial to
select [GENERAL], then press it.
3 Rotate the control dial to select [BTM], then
press it.
The unit stores stations in order of frequency
on the number buttons.
SET UP
RADIO
Detaching the front panel
You can detach the front panel of this unit to
prevent theft.
1 Press and hold OFF .
The unit is turned off.
2 Press the front panel release button ,
then remove the panel by pulling it
towards you.
Caution alarm
If you turn the ignition switch to the OFF
position without detaching the front panel, the
caution alarm will sound for a few seconds. The
alarm will only sound if the built-in amplifier is
used.
Attaching the front panel
Engage part of the front panel with part of
the unit, as illustrated, and push the left side
into position until it clicks.
CDX-G1001U
Playing back a USB device / Playing tracks in various modes /
Adjusting the sound characteristics / Adjusting setup items
©2014 Sony Corporation
Adjusting setup items
1 Press MENU, rotate the control dial to
select the desired category, then press it.
2 Rotate the control dial to select the desired
item, then press it.
3 Rotate the control dial to select the setting,
then press it.*
The setting is complete.
4 Press (back) to return to the previous
display.
* For CLOCK-ADJ and BTM settings, step 4 is not
necessary.
The following items can be set depending on
the source and setting:
GENERAL Setup:
CLOCK-ADJ (clock adjust)
Adjust clock.
CAUT ALM*1(caution alarm)
Activates the caution alarm: [ON], [OFF]. (Available
only when the unit is turned off.)
BEEP
Activates the beep sound: [ON], [OFF].
AUTO OFF
Shuts off automatically after a desired time when
the unit is turned off: [NO], [30S] (30 seconds),
[30M] (30 minutes), [60M] (60 minutes).
SET UP RADIO CD USB
Adjusting the sound
characteristics
1 During reception/playback, press MENU,
rotate the control dial to select [SOUND],
then press it.
2 Rotate the control dial to select the desired
item, then press it.
3 Rotate the control dial to select the setting,
then press it.
The setting is complete.
4 Press (back) to return to the previous
display.
The following items can be set depending on
the source and setting:
SOUND Setup:
EQ3 PRESET
Selects an equalizer curve from 7 equalizer curves
or off: [XPLOD], [VOCAL], [EDGE], [CRUISE],
[SPACE], [GRAVITY], [CUSTOM], [OFF].
The equalizer curve setting can be memorized for
each source.
SET UP RADIO CD USB
Playing back a USB device
1 Open the USB cover, then connect a USB
device to the USB port.
Playback starts.
If a device is already connected, to start
playback, press SRC to select [USB].
2 Adjust the volume on this unit.
To stop playback
Press and hold OFF for 1 second.
To remove the device
Stop playback, then remove the device.
USB
Playing tracks in various modes
Available play modes differ depending on the
selected sound source.
1 During playback, press (repeat) or SHUF
(shuffle) repeatedly to select the desired
play mode.
Playback in selected play mode may take
time to start.
CD USB
AUX-A*1(AUX audio)
Activates the AUX source display: [ON], [OFF].
(Available only when the unit is turned off.)
CT (clock time)
Activates the CT function: [ON], [OFF].
REGIONAL*2
Restricts reception to a specific region: [ON],
[OFF]. (Available only when FM is received.)
BTM*3
Stores radio stations automatically.
*1When the unit is turned off.
*2When FM is received.
*3When the tuner is selected.
SOUND Setup:
For details, see “Adjusting the sound
characteristics.”
DISPLAY Setup:
DEMO (demonstration)
Activates the demonstration: [ON], [OFF].
DIMMER
Changes the display brightness: [ON], [OFF].
AUTO SCR (auto scroll)
Scrolls long items automatically: [ON], [OFF].
M.DISPLAY (motion display)
Shows moving patterns: [ON], [OFF].
EQ3 SETTING
Sets [CUSTOM] of EQ3.
Selects the equalizer settings: [LOW], [MID],
[HIGH].
To restore the factory-set equalizer curve, press
and hold ENTER before the setting is complete.
BALANCE
Adjusts the sound balance: [RIGHT-15] – [CENTER]
– [LEFT-15].
FADER
Adjusts the relative level: [FRONT-15] – [CENTER]
– [REAR-15].
LOUDNESS (dynamic loudness)
Reinforces bass and treble for clear sound at low
volume levels: [ON], [OFF].
SW LEVEL (subwoofer level)
Adjusts the subwoofer volume level:
[+2 dB] - [0 dB] - [-2 dB].
AUX VOL* (AUX volume level)
Adjusts the volume level for each connected
auxiliary device: [+18 dB] - [0 dB] - [-8 dB].
This setting negates the need to adjust the
volume level between sources.
* When the AUX is selected.
Location of controls and basic operations /
Detaching the front panel / Setting the clock /
Storing stations automatically

Other Sony Car Receiver manuals

Sony CDX-RW300 - Fm/am Compact Disc Player Product guide

Sony

Sony CDX-RW300 - Fm/am Compact Disc Player Product guide

Sony CDX-CA900 Product guide

Sony

Sony CDX-CA900 Product guide

Sony CDX-C760 - Fm/am Compact Disc Player User manual

Sony

Sony CDX-C760 - Fm/am Compact Disc Player User manual

Sony CDX-GT410U - Fm/am Compact Disk Player Product guide

Sony

Sony CDX-GT410U - Fm/am Compact Disk Player Product guide

Sony DSX-A30 Product guide

Sony

Sony DSX-A30 Product guide

Sony CDX-F5700 - Fm/am Compact Disc Player Product guide

Sony

Sony CDX-F5700 - Fm/am Compact Disc Player Product guide

Sony CDX-C5750 User manual

Sony

Sony CDX-C5750 User manual

Sony CDX-R5715X - Fm/am Compact Disc Player User manual

Sony

Sony CDX-R5715X - Fm/am Compact Disc Player User manual

Sony CDX-GT500EE Product guide

Sony

Sony CDX-GT500EE Product guide

Sony MEX-BT3700U Product guide

Sony

Sony MEX-BT3700U Product guide

Sony XR-C6090 User manual

Sony

Sony XR-C6090 User manual

Sony HCD-GTZ4 User manual

Sony

Sony HCD-GTZ4 User manual

Sony XR-3690RDS User manual

Sony

Sony XR-3690RDS User manual

Sony HCD-BX50BTi - Compact Disc Receiver User manual

Sony

Sony HCD-BX50BTi - Compact Disc Receiver User manual

Sony XR-C440RDS User manual

Sony

Sony XR-C440RDS User manual

Sony WX-VX55S User manual

Sony

Sony WX-VX55S User manual

Sony CDX-F5700 - Fm/am Compact Disc Player User manual

Sony

Sony CDX-F5700 - Fm/am Compact Disc Player User manual

Sony CDX-C5000RV User manual

Sony

Sony CDX-C5000RV User manual

Sony CDX-RW300 - Fm/am Compact Disc Player User manual

Sony

Sony CDX-RW300 - Fm/am Compact Disc Player User manual

Sony CDX-GT420U User manual

Sony

Sony CDX-GT420U User manual

Sony XR-CA320 User manual

Sony

Sony XR-CA320 User manual

Sony HCD-GR3 User manual

Sony

Sony HCD-GR3 User manual

Sony XR-F5100 Installation/Connections Product guide

Sony

Sony XR-F5100 Installation/Connections Product guide

Sony GT620U - CDX Radio / CD Product guide

Sony

Sony GT620U - CDX Radio / CD Product guide

Popular Car Receiver manuals by other brands

Convex CM-2001MP user manual

Convex

Convex CM-2001MP user manual

Jensen Heavy Duty JHD3620 Installation and operation manual

Jensen

Jensen Heavy Duty JHD3620 Installation and operation manual

AnyTone AT-D578UV HOW TO UPDATE FIRMWARE

AnyTone

AnyTone AT-D578UV HOW TO UPDATE FIRMWARE

AudioBahn A1200N operating instructions

AudioBahn

AudioBahn A1200N operating instructions

Pioneer DEH-6250BT Operation manual

Pioneer

Pioneer DEH-6250BT Operation manual

AMX DAS-AMFM installation guide

AMX

AMX DAS-AMFM installation guide

Pyle PLCD45MP3 owner's manual

Pyle

Pyle PLCD45MP3 owner's manual

Kia 2010 CEED user guide

Kia

Kia 2010 CEED user guide

Eclipse AVN20D manual

Eclipse

Eclipse AVN20D manual

Jensen VM9224 operating instructions

Jensen

Jensen VM9224 operating instructions

JVC KW-V41BT instruction manual

JVC

JVC KW-V41BT instruction manual

Blaupunkt Monterey CDM83 Owner's record

Blaupunkt

Blaupunkt Monterey CDM83 Owner's record

Pioneer KEX-M8406ZT/UC Service manual

Pioneer

Pioneer KEX-M8406ZT/UC Service manual

Mopar Uconnect installation manual

Mopar

Mopar Uconnect installation manual

Denon CEOL RCD-N11DAB owner's manual

Denon

Denon CEOL RCD-N11DAB owner's manual

Dual XHD7714 - V3 Installation & owner's manual

Dual

Dual XHD7714 - V3 Installation & owner's manual

JVC KS-F100 instructions

JVC

JVC KS-F100 instructions

Clarion XDZ616w owner's manual

Clarion

Clarion XDZ616w owner's manual

manuals.online logo
manuals.online logoBrands
  • About & Mission
  • Contact us
  • Privacy Policy
  • Terms and Conditions

Copyright 2025 Manuals.Online. All Rights Reserved.