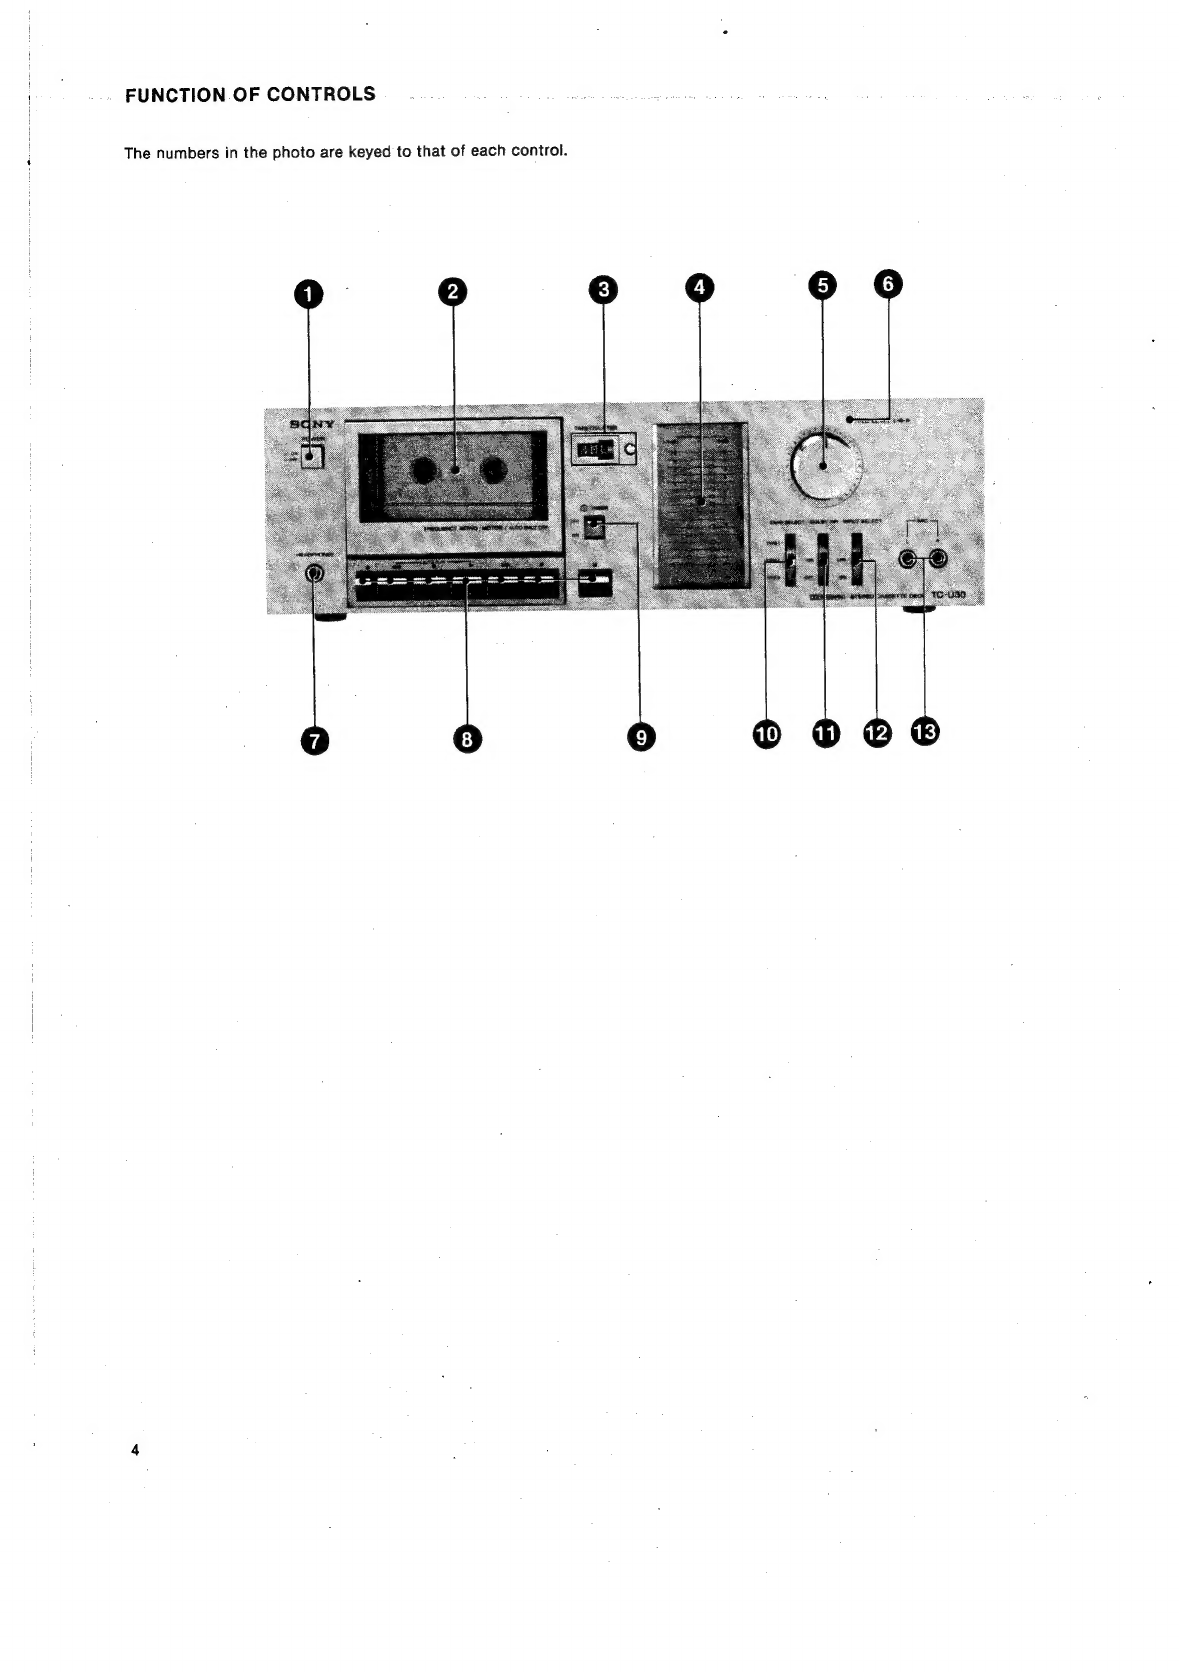
Sony TC-U30 User manual

SONY.
STEREO
CASSETTE
DECK
C-U30
OPERATING
INSTRUCTIONS
Page
2
Before
operating
the
unit,
please
read
this
manual
thoroughly.
This
manual
should
be
retained
for
future
reference.
MODE
D’EMPLOI
page
14
Avant
toute
opération,
lire
attentivement
ce
mode
d’emploi.
Conserver
ce
manuel
pour
toute
référence
ultérieure.
BEDIENUNGSANLEITUNG
ss
seite
26
Vor
Inbetriebnahme
lesen
Sie
bitte
diese
Bedienungsanleitung
sorgfaltig
durch.
Bewahren
Sie
diese
Anleitung
zum
spateren
Nachschlagen
gut
auf.
MANUAL
DE
INSTRUCCIONES
Pagina
38
Antes
de
manipular
el
aparato,
lea
usted
este
manual
detenida-
mente.
Conserve
este
manual
para
futuras
referencias.
©
1979
by
Sony
Corporation

FEATURES
@
Newly
developed
LED
peak
program
meters
enable
the
recording
of
programs
making
full
use
of
the
dynamic
range
of
tapes.
e@
Dolby
NR
(Noise
Reduction)
system
which
reduces
tape
hiss
noise.
@
Auto
play
function
available
for
automatic
replay
promptly
after
the
tape
is
rewound.
@
Three-way
tape
selector
to
obtain
maximum
tape
characteristics.
@
Timer-activated
recording
and
playback
function.
@
DC
servo-motor
with
built-in
frequency
generator
for
low
wow
and
flutter
and
free
from
line
voltage
and
frequency
variations
WARNING
To
prevent
fire
or
shock
hazard,
do
not
expose
the
unit
to
rain
or
moisture.
To
avoid
electrical
shock,
do
not
open
the
cabinet.
Refer
servicing
to
qualified
personnel
only.
For
the
Customers
in
the
United
Kingdom
Important
The
wires
in
the
mains
lead
are
coloured
in
accordance
with
the
following
code:
Blue:
Neutral
Brown:
Live
:
As
the
colours
of
the
wires
in
the
mains
lead
of
this
apparatus
may
not
correspond
with
the
coloured
markings
identifying
the
ter-
minals
in
your
plug
proceed
as
follows:
The
wire
which
is
coloured
blue
must
be
connected
to
the
terminal
which
is
marked
with
the
letter
N
or
coloured
black.
The
wire
which
is
coloured
brown
must
be
connected
to
the
ter-
minal
which
is
marked
with
the
letter
L
or
coloured
red.
Notes
on
ac
power
cord
The
three
kinds
of
ac
power
cord
plugs
equipped
with
your
tape
deck
are
illustrated
below
:
|
Power
cord
plug
A
detachable
power
cord
adaptor
is
supplied
with
the
type
B
plug,
and
it
permits
a
direct
connection
to
an
ac
outlet
in
your
house.
TABLE
OF
CONTENTS
Operating
voltage.
2...
ee
ee
:
Precautions:
-«...
60.
ara.
Sis
Baw
BG
Se
Ree
el
ge
ae
‘
Functionofcontrols
.......-6
002.
ec
ee
es
‘
Connections.
<2.
sso
ks
eek
a
ee
AS
ce
he
ae
ee
Bee
eS
(
RECOrdINg
ss
20%
Geceedea
Beg
ee
ceie
SSE
ahs
es
GE
RES
d
Smoother
recording
Starts...
..........0.-0008.
¢
Recording
new
material
while
the
tapeisrunning.......
:
Recording
level
adjustment...................
i
Tape
selector
recommendations
................
{
Playback
¥.5..ce-c00:5,
G05
ae
ey
ee
ee
eS
ee
Ae
:
Erasing.
e
hak
pat
ot
ad
a
Sa
a
oh
ee
aos
Ee
§
Timer-activated
recording
and
playback
.............6.
:
AUtO
Pplayics
ics
ee
ae
Ew
a
Be
Wee
eR
a
1
Notesion
cassettes
.
cc
eee
ee
ee
ee
ee
1
Maintenance.
.
2.0...
2.
ee
ee
ee
es
1
Speclfications..-%
65
t-6
ore
eee
ce
wee
wee
Pa
eels
Aha
1
Trouble
CHECKS.»
52
ics
<a
ca
ag
ein
a
ca
GO
IS
acl
nae,
GE
1
OPERATING
VOLTAGE
Before
connecting
the
unit
to
the
power
source,
check
that
the
operating
voltage
of
your
unit
is
the
same
as
the
local
power
lini
voltage.
The
model
in
European
countries
(type
1):
operates
on
220
Vac
(or
240
V
ac
~
adjustable
by
authorized
Sony
personnel).
The
model
in
the
United
Kingdom
(type
2):
operates
on
240
Vac
(or
220
V
ac ~
adjustable
by
authorized
Sony
personnel).
The
model
in
other
countries
(type
3):
operates
on
110,
120,
220
or
240
Vacr.
The
voltage
selector
is
located
on
the
rear
panel.
If
the
selec
tor
must
be
reset,
disconnect
the
ac
power
cord
and
turn
th«
selector
with
a
coin
so
that
the
arrow
mark
of
the
selecto
points
to
the
proper
voltage
figure.
t™
PN
be
o>
=m
+Elw—
1c
Ee:
adaptor
.
wall
outlet
However,
when
making
power
connections
among
the
amplifie
the
program
timer,
and any
equipment
on
the
list
below,
this
aday
tor
is
not
needed.
A
line-up
of
Sony
audio
components
and
timers
available
Tuner:
ST-636,
ST-333L/S
Tape
deck:
TC-U60,
TC-U30
Receiver:
STR-434L/S,
STR-333L/S
Turntable:
PS-636,
PS-434,
PS-333
—
Program
timer:
PT-79R,
PT-59
Amplifier:
TA-636,
TA-535,
TA-333

PRECAUTIONS...
..
On
safety
@
Before
operating
the
set,
be
sure
that
the
operating
voltage
of
your
unit
is
identical
with
that
of
your
local
power
supply.
@
Should
any
liquid
or
solid
object
fall
into
the
cabinet,
unplug
the
unit
and
have
it
checked
by
qualified
personnel
before
operating
it
any
further.
‘
@
Unplug
the
unit
from
the
wall
outlet
if
it
is
not
to
be
used
for
an
extended
period
of
time.
To
disconnect
the
cord,
pull
it
out
by
the
plug.
Never
pull
the
cord
itself.
,
On
installation
©
@Good
air
circulation
is
essential
to
prevent
internal
heat
build-up
in
the
unit.
Place
the
unit
in
a
location
with
sufficient
air
circula-
tion.
e@Do
not
install
the
unit
in
a
location
near
heat
sources
such
as
radiators
or
air
ducts,
or
in
a
place
subject
to
direct
sunlight,
ex-
cessive
dust
or
mechanical
vibration.
@Place
the
unit
with
the
front
panel
facing
toward
you.
Do
not
operate
the
unit
in
an
inclined
position.
On
operation
|
Press
a
function
button
fully
so
that
it
locks.
|
@To
release
any
locked
button,
press
the
stop
button.
(To
release
the
pause
button,
press
the
pause
button
again.)
Never
pull
up
a
locked
button
forcibly.
|
@The
record
button
cannot
be
pressed
when:
There
is
no
cassette
in
the
cassette
holder.
The
tab
on
the
cassette
has
been
removed.
Never
press
the
record
button
forcibly.
-
@Do
not
press
the
eject
button
while
the
tape
is
in
motion.
To
take
:
out
the
inserted
cassette,
first
press
the
stop
button
and
then
press
-
the
eject
button.
|
|
1
\
1
}
i
\
if
\
|
if
t
\
|
!
On
head
cleaning
The
best
performance
of
your
unit
is
dependent
on
the
periodic
cleaning
of
the
heads
and
all
surfaces
over
which
the
tape
travels.
Dirty
heads
and
tape
path
cause:
Loss
of
high
frequency
response
Loss
of
sound
volume
Sound
drop-outs
Cleaning
should
be
done
every
after
10
hours
of
operation.
For
details,
see
“Maintenance”
on
page11.
Playback
waveform
at
10
kHz
With
a
clean
head
With
a
dirty
head
(The
output
level
fluctuates.)
Frequency
response
ith
a
clean
head
a
0
3
2
-5
2
~~
a
—10
-
5
dust
layer
°
is
es
frequency
100
1k
10k
Frequency
(Hz)
On
cassette
Before
inserting
a
cassette,
take
up
any
slack
in
the
tape
to
prevent
it
from
becoming
entangled
around
the
capstan.
cb
les
\f
you
have
any
question
or
problem
concerning
your
unit,
please
contact
your
nearest
Sony
service
facility.

FUNCTION
OF
CONTROLS
The
numbers
in
the
photo
are
keyed
to
that
of
each
control.

|
\
|
:
@
POWER
switch
This
turns
the
power
on
or
off.
The
lamp
in
the
cassette
holder
and
peak
program
meters
will
light
up
when
the
unit
is
turned
on.
©
Cassette
holder
_
@
TAPE
COUNTER
and
reset
button
:
The
tape
counter
is
used
for
numerical
reference
during
recording
‘and
numerical
indexing
of
recorded
cassettes.
To
return
the
numbers
to
zero,
press
the
reset
button.
@
LED
peak
program
meters
The
meters
show
the
input
peak
level
of
each
channel
during
rec-
.
ording,
and
recorded
levels
in
the
playback
mode.
“
The
peak
program
meters
follow
the
transient
peaks
of
occasional
high
level
inputs
that
cannot
be
followed
by
conventional
VU
meters,
assuring
accurate
recording
level
adjustment.
_
©
REC
LEVEL
controls
_
These
controls
adjust
the
recording
level.
The
inner
knob
is
for
the
'
right
channel
and
the
outer
for
the
left
channel.
i
|
@
Record
indicator
lamp
.
This
jamp
will
ituminate
when
the
record
button
is
depressed.
-
@
HEADPHONES
jack
_
Headphones
may
be
inserted
to
either
monitor
the
input
signals
to
be
recorded
or
to
listen
to
a
recording
in
the
playback
mode.
|
©
Function
buttons
<
a
ee
Eject
button[
4]:
Press
this
button
to
open
the
cassette
holder.
Eject
is
non-operational
in
recording
and
playback
modes.
Pressing
in
fast-forward
and
rewind
modes
may
damage
the
(
tape.
Rewind
button
[<4]:
Press
this
button
for
rewind
the
tape.
If
you
press
the
forward
button
while
holding
the
rewind
button
pressed,
this
button
will
be
released
after
rewind,
and
the
play-
back
will
begin
automatically.
i
See
“Auto
play”
on
page
10.
Stop
button
[lf]:
To
stop
the
tape
motion,
press
this
button.
|
When
a
tape
is
entirely
wound
in
any
operating
mode,
the
engaged
mode
will
be
shut
off
automatically.
Forward
button
[>]:
Press
this
button
for
playing
back
the
tape.
Pressing
this
button
together
with
the
rewind
button
makes
auto
play
and
memory
play
possible.
For
recording
press
this
button
while
holding
the
record
button
pressed.
Fast-forward
button
[»»]:
Press
this
button
for
fast
winding
of
the
tape.
_
Record
button
[@]:
To
adjust
the
recording
level,
press
this
i
button.
To
start
recording,
while
holding
this
button
pressed,
press
the
forward
button.
:
Pause
button
[mm]:
To
momentarily
pause
during
recording
or
playback,
press
this
button.
To
restart,
press
it
again.
Also
use
this
button
for
smooth
start
of
recording.
:
See
‘‘Recording”
on
page
7.
©
TIMER
switch
Automatic
recording
and
playback
at
any
desired
time
is
possible
using
a
commercially
available
timer.
;
See
‘‘Timer-activated
recording
and
playback”
on
page
9.
@
TAPE
SELECT
switch
Select
the
correct
position
for
the
tape
to
be
used
in
both
recording
and
playback
modes.
See
“Tape
selector
recommendations”
on
page
8.
@®
DOLBY
NR
switch
For
recording
and
playback
with
Dolby
NR*
(Noise
Reduction)
pro-
cess,
set
this
switch
to
ON.
For
recording
and
playback
without
Dolby
NR
process,
set
it
to
OFF.
*
Through
the
Dolby
NR
system,
tape
hiss
is
reduced
and
signal-to-noise
ratio
is
improv-
ed.
During
recording
low-level
high-frequency
signals,
which
are
either
partially
or
totally
con-
cealed
by
tape
noise,
are
boosted
;
thereby,
allowing
the
recorded
material
to
be
heard
above
the
tape
hiss
level.
When
playing
back
this
recording,
the
reproduction
level
is
fowered
to
the
original
input
level.
Simuitaneously,
the
noise
tevel
which
was
mixed
with
the
recorded
material
is
also
reduced
in
volume,
eliminating
much
of
the
background
noise
from
these
fow-level
high-frequency
passages.
“Dolby”
and
the
double-D
symbol
are
trade
marks
of
Dolby
Laboratories.
Noise
reduction
system
manufactured
under
license
from
Dolby
Laboratories.
@
INPUT
SELECT
switch
For
recording
through
MIC
jacks,
set
this
switch
to
the
MIC
posi-
tion.
For
recording
through
LINE
IN
jacks,
set
it
to
the
LINE
posi-
tion.
@®
MIC
jacks
Any
low-impedance
microphone
equipped
with
a
phone
plug
may
be
used.
If
your
microphone
is
equipped
with
a
mini
plug,
an
adap-
tor
for
converting
to
phone
plug
is
required.

CONNECTIONS.
.
@
Turn
off
the
amplifier
before
making
connections.
@
The
red
plug
of
the
connecting
cord
should
be
connected
to
the
@8e
sure
to
insert
the
cable
connectors
firmly
into
the
jacks.
right
channel
and
the
other
plug
to
the
left
channel.
Loose
connections
may
cause
hum
and
noise.
Amplifier
connection
5
For
recording
oo.
‘For
playback
Zt
;
to
tape
inputs
to
signal
flow
(or
auxiliary
inputs)
recording
as.
outputs
Amplifier
LINEIN
LINE
OUT
no,
to
wall
outlet
Tape
duplication
connection
For
duplication
from
another
tape
deck
For
duplication
to
another
cX.
tape
deck
to
line
outputs
Another
tape
deck
LINE
IN
LINE
OUT
<<),
tO
wall
outlet
Connection
on
front
panel

}
}
Follow
the
numbered
diagram
to
begin
recording.
2
Press
the
eject
button
and
insert
a
cassette.
Take
up
the
slack
in
the
tape.
Tape
surface
downwards
si
Press
(ON)
Recording
from
MIC
jacks...
.
.
MIC
Recording
from
LINEIN.....
LINE
While
holding
the
record
button
|
8
pressed,
press
the
forward
button.
Recording
will
begin.
Press
the
record
button.
|
i
t
Recording
with
Dolby
NR
process.
...
.
ON
Recording
without
Dolby
NR
process...
.
OFF
Set
according
to
the
tape
to
be
used
as
shown
in
the
tape
list.
See
page
8.
Set
the
recording
level
referring
to
the
“Recording
level
adjustment”
on
page
8.
SMOOTHER
RECORDING
STARTS
Smoother
starts
are
possible
by
using
the
pause
button
to
begin
recording.
After
step
@of
the
recording
section,
proceed
as
follows
:
@
Press
and
lock
the
pause
button.
i
@
While
holding
the
record
button
pressed,
press
the
forward
but-
i
ton.
i
©
Adjust
the
recording
level.
|
@
Just
before
you
want
to
start
recording,
press
the
pause
button
.
again
to
start
tape
travel.
The
recording
will
then
begin.
.
RECORDING
NEW
MATERIAL
WHILE
THE
TAPE
IS
RUNNING
i
:
To
change
directly
from
play
to
record
during
playback
mode,
press
i
the
record
button
while
holding
the
forward
button
pressed.
This
:
:
operation
is
useful
for
after-recording
of
new
material
or
re-
;
recording
in
your
dissatisfied
spot
on
a
recorded
tape.

RECORDING
LEVEL
ADJUSTMENT
A
high
recording
level
is
recommended
to
reduce
annoying
tape
noise,
but
overloaded
and
distorted
tapes
could
result
if
the
level
is
too
high.
Recording
level
should
be
set
at
the
maximum
permissi-
ble
for
each
type
of
tape.
The
higher
the
tape
maximum
output
level
is,
the
higher
the
recording
level
can
be
set,
which
provides
the
full
dynamic
range
of
the
tape
and
a
better
signal-to-noise
ratio.
Note
the
general
points
on
adjusting
the
recording
level
as
follows.
Setting
too
high
(distorted
recording):
The
peak
program
meters
deflect
continuously
to
full
scale.
PEAK
PROGRAM
METER
+dB
+dB
—§—_
1
——1-
5—
Setting
too
low
(noisy
recording):
The
peak
program
meters
deflect
only
to
about
—10
dB.
PEAK
PROGRAM
METER
+dB
+dB
—$§
G5
Proper
setting
(Good
recording):
The
peak
program
meters
deflec
at
the
highest
signal
level
passages
to
about
0
dB
for
TYPE
|
tape
(Sony
AHF,
BHF,
CHF),
about
+4dB
for
TYPE
Il
or
TYPE
Ill
tape
(Sony
CD-@,
FeCr).
TYPE
|
PEAK
PROGRAM
METER
+dB +dB
—§—O-——1
-5—
TYPE
It
or
Hl
PEAK
PROGRAM
METER
+dB
However,
consideration
has
to
be
given
to
the
fact
that
tape
satur.
tion
and
distortion
at
higher
frequencies
occur
at
lower
level
When
recording
programs
containing
strong,
sharp
pulses,
such
é
certain
live
programs,
the
level
may
be
too
high
if
adjusted
in
tr
way
described,
and
distorted
tapes
could
result.
In
such
a
cas
set
the
recording
level
lower
than
usual.
The
peak
program
meters
may
indicate
differently
in
recording
ar
playback
modes,
but
these
small
differences
are
not
significant.
TAPE
SELECTOR
RECOMMENDATIONS
The
following
list
shows
our
recommended
settings,
which
hav
been
determined
through
critical
listening
tests
and
electrical
cha
acteristic
measurements,
on
commercially
available
cassette
These
settings
may
be
changed
to
adhere
to
your
person.
preference.
For
Sony
cassettes,
be
sure
to
use
the
recommended
settings
|
obtain
the
optimum
tape
characteristics.
Tapes
(C-60
and
C-90)
TAPE
SELECT
AGFA:
FERRO
COLOUR
BASF:
LH
super
FUJI:
FX-DUO
MAXELL:
SLN
PHILIPS:
FERRO
SCOTCH:
DYNARANGE
SONY:
AHF,
BHF,
CHF
AGFA:
SUPER
FERRO
DYNAMIC
BASF:
ferrosuper
LH!
FUJI:
FX-
MAXELL:
UD,
UD-XL
|
PHILIPS:
SUPER
FERRO-
SCOTCH:
MASTERI
TDK:
SD
SONY:
CD-@
AGFA:
STEREO
CHROM
:
BASF:
chromdioxid
FUJI:
FX-l
MAXELL:
UD-XL
II
PHILIPS:
CHROMIUM
SCOTCH:
MASTER
II
TYPE
Il
TDK:
SA
SONY:
FeCr
AGFA:
CARAT
BASF:
ferrochrom
PHILIPS
:
FERRO
CHROMIUM
SCOTCH:
MASTER
Ill
TYPE
Ill

’
PLAYBACK
|
Follow
the
numbered
diagram
to
begin
playback.
w@®
Press
(ON)
Press
the
eject
button
and
insert
a
cassette.
Take
up
the
siack
in
the
tape.
Tape
surface
downwards.
Press
the
forward
button.
Playback
will
begin.
Set
according
to
the
tape
to
be
used
as
shown
in
the
tape
list.
See
page
8.
Playback
of
Dolby
NR
processed
tape.....
ON
Playback
of
non-Dolby
NR
processed
tape.....
OFF
ERASING
_
When
the
tape
deck
functions
in
recording
mode,
the
erase
head
Operates
and any
previously
recorded
material
is
automatically
erased.
To
erase
the
recorded
contents
without
recording
:
@
Make
sure
that
the
tab
of
the
cassette
is
intact
or
is
replaced
by
plastic
tape.
@
Set
the
REC
LEVEL
controls
fully
to
0”.
(Disconnection
of
all
of
the
inputs
will
result
in
a
more
complete
erasure.)
®
While
holding
the
record
button
pressed,
press
the
forward
but-
ton.
_
TIMER-ACTIVATED
RECORDING
AND
PLAYBACK
.
Automatic
recording
and
playback
at
any
desired
time
is
possible
using
a
commercially
available
timer.
Read
the
instruction
manual
of
the
timer
satatully
before
using.
TC-U30
to
wall
outlet
Recording
@
Make
power
connection
between
the
tape
deck,
receiver
and
timer.
Set
the
timer
so
that
power
is
applied
to
the
connected
equipment.
@
Turn
on the
receiver,
and
tune
in
the
station
of
the
program
to
be
recorded.
©
Turn
on
the
tape
deck
and
insert
a
cassette.
Note
that
erasure-
proof
tab
is
intact
or
replaced
by
plastic
tape.
@
Set
the
controls
for
recording
and
adjust
the
recording
level.
@
Set
the
timer
for
the
desired
time.
(At
this
stage,
power
is
inter-
rupted
to
all
the
equipment
in
link.)
Be
sure
to
read
the
instruction
under
“Notes”
for
setting
the
time
the
equipment
is
turned
off.
@
Set
the
tape
deck
TIMER
switch
to
ON.
@
While
holding
the
record
button
pressed,
press
the
forward
but-
ton.
The
timer
is
now
ready
for
automatic
start
of
recording
at
the
timer-set
time.
Playback
@
Connection
for
playback
is
the
same
as
that
for
recording.
@
Turn
on
the
tape
deck
and
insert
the
recorded
tape.
©
Set
the
receiver
controls
for
reproduction.
@
Set
the
timer
for
the
desired
time.
©
Set
the
tape
deck
TIMER
switch
to
ON.
@
Press
and
lock
the
forward
button.
The
tape
deck
is
now
ready
for
automatic
start
of
playback
at
the
timer-set
time.
Notes
e@
Set
the
timer
so
that
the
tape
deck
is
turned
off
after
the
locked
buttons
are
released
by
the
automatic
shut-off
mechanism
at
the
tape
end.
For
example,
if
a
cassette
giving
30
minutes
of
recor-
ding
on
one
side
is
used
on
a
program
beginning
at
8
:
00
a.m.,
the
locked
buttons
will
be
automatically
released
at
8:30
and
there-
fore
the
timer
should
be
set
to
turn
off
at
about
8:
40
or
8:
45
to
be
on
the
safe
side.
If
the
deck
is
turned
off
with
buttons
being
lock-
ed,
the
pinch
roller
may
be
damaged.
@When
not
using
a
timer
during
recording
or
playback,
do
not
set
the
TIMER
switch
to
ON.
Otherwise,
the
tape
will
stop.

AUTO
PLAY...
Auto-play
is
possible
right
after
the
tape
is
rewound
to
the
tape
end.
When
starting
to
rewind
the
tape,
hold
the
rewind
button
pressed
and
press
the
forward
button.
At
end-of-tape
only
the
rewind
but-
ton
is
released
and
the
tape
is
then
played
back
automatically.
=—
AUTO PLAY
——=
«<4
a
>
Rewinding
starts
When
the
tape
is
rewound
av,
playback
starts
automatically.
=—
AUTO
PLAY
——=
Fal
a
>
i
q
y
TI
>>
e
Note
Never
press
the
forward
button
and
the
fast-forward
button
simultaneously,
as
this
may
damage
the
tape.
=—
AUTO
PLAY
—~=
<<
[|
>
>>
.
10.
_
NOTES
ON
CASSETTES
To
protect
recording
from
accidental
erasure
Remove
the
tab
as
illustrated
so
that
the
record
button
cannot
be
pressed.
To
record
ona
cassette
whose
tabs
have
been
removed
simply
cover
the
slot
with
plastic
tape.
Do
not
stick
any
other
material
To
protect
side
A
recording
except
on
the
portion
marked.
Cassette
care
@
Avoid
touching
the
tape
surface
of
a
cassette,
as
any
dirt
or
dus
may
cause
contamination
of
the
heads.
@
Do
not
stick
thick
paper
or
tape
into
the
cassette,
as
this
may
af
fect
proper
cassette
alignment
and
prevent
proper
tape
contac
with
the
head.
@
Protect
cassettes
from
dust
by
storing
them
in
their
cases.
Evel
minor
dirt
or
dust
could
cause
contamination
of
the
heads
resulting
in
noise
and
sound
drop-outs.
e@Keep
cassettes
away
from
magnetic
equipment
such
a:
speakers,
amplifiers,
etc.,
as
erasure
or
distortion
on
your
recordec
tape
could
occur.
@Do
not
expose
a
cassette
to
direct
sunlight,
extremely
cok
temperature
or
moisture.
@
Avoid
fast-winding
just
before
storing
a
cassette
tape,
as
thi:
may
cause
stretching
of
the
tape
edge
if
the
cassette
is
left
unuse:
over
a
period
of
time.
Which
cassette
to
use
This
unit
is
preadjusted
at
the
factory
using
the
Sony
FeC
Cassette,
the
Sony
CD-@
Cassette
and
the
Sony
BHI
Cassette.
All
commercially
available
cassettes
perform
well
witl
this
unit.
However,
for
optimum
recording
and
playback
results
we
recommend
Sony
cassettes.
The
letter
A
on
the
Sony
cassette
is
embossed
to
help
yo
distinguish
that
side
of
the
cassette
in
a
dimly
lighted
area.

|
MAINTENANCE
’
Cleaning
of
heads
and
tape
path
.
-
Generally,
cleaning
after
every
10
hours
of
operation
will
be
suffi-
_
cient.
However,
for
the
highest
quality
recordings,
clean
all
sur-
:
faces
over
which
the
tape
travels
prior
to
every
recording.
:
@
Press
the
eject
button
to
open
the
cassette
holder
and
remove
-
the
lid.
{
}
@
Push
the
frame
in.
®
Set
the
POWER
switch
to
ON.
Press
the
forward
button
and
_
wipe
the
heads.
Cleaning
tip
slightly
moistened
with
alcohol
@
Wipe
the
pinch
roller
as
illustrated.
Then
press
the
pause
but-
ton
and
wipe
the
capstan.
slightly
alcohol
from
the
side
jamming
the
cotton.
ran
moistened
with
shown
to
avoid
@
When
the
cleaning
is
finished,
press
the
pause
button
and
then
the
stop
button.
@
Press
the
eject
button
to
open
the
frame,
and
replace
the
lid.
@
After
cleaning
the
heads
and
tape
path,
do
not
insert
a
cassette
until
the
cleaning
fluid
has
dried
completely.
Demagnetizing
heads
Residual
magnetism
will
gradually
build
up
on
the
heads
through
continuous
use
and
cause
erasure
of
high
frequencies
and
hiss
build-up.
The
heads
and
metallic
parts
of
the
tape
path
should
be
demagnetized
after
20
to
30
hours
of
operation
with
the
use
of
a
commercially
available
head
demagnetizer.
Be
sure
the
unit
is
turned
off
while
demagnetizing
the
heads
and
tape
path.
Cleaning
the
cabinet
Clean
the
cabinet,
panel
and
controls
with
a
soft
cloth
lightly
moistened
with
mild
detergent
solution.
Do
not
use
any
type
of
abrasive
pad,
scouring
powder
or
solvent
such
as
alcohol
or
ben-
zine.
Inside
check
Consult
your
nearest
Sony
service
facility
to
maintain
optimum
per-
formance.
Hi

aaa
a
SPECIFICATIONS
—
Power
requirements
Power
consumption
Type
1:
220V
ac
~,
50/60
Hz
(or
240
V
ac
by
internal
rewiring)
Type
2:
240V
ac
~,
50/60
Hz
(or
220
V
ac
by
internal
rewiring)
Type
3:
110,
120, 220,
or
240V
ac,
50/60
Hz
16W
Fast-forward
and
rewind
time
Recording
system
Bias
frequency
Signal-to-noise
ratio
Approx.
90
sec.
(with
C-60)
4-track
2-channel
stereo
105
kHz
DOLBY
NR
OFF
e
With
TYPE
IIl
cassette
(Sony
FeCr)
56
dB
at
peak
level
(NAB)
55
dB
(DIN,
1975
rev.)
¢
With
TYPE
I!
cassette
(Sony
CD-@)
54
dB
at
peak
level
(NAB)
DOLBY
NR:ON
Improved
by
5
dB
at
1
kHz,
10
dB
above
5
kHz
Total
harmonic
distortion
Frequency
response
Wow
and
flutter
Inputs
Outputs
Dimensions
Weight
Supplied
accessory
12
1.7%
(with
Sony
FeCr
cassette)
DOLBY
NR
OFF
¢
With
TYPE
III
cassette
(Sony
FeCr)
30
-
15,000
Hz
50
-
13,000
Hz
(+3
dB)
50
-
13,000
Hz
(DIN)
¢
With
TYPE
I!
cassette
(Sony
CD-@)
30
-
15,000
Hz
50
-
13,000
Hz
(+3
dB)
50
-
13,000
Hz
(DIN)
e
With
TYPE
|
cassette
(Sony
BHF)
30.-
13,000
Hz
.
0.05%
WRMS
(NAB)
+0.14%
(DIN)
Microphone
inputs
(phone
Jacks)
............
sensitivity
0.25
mV
(—70
dB)
for
a
low-impedance
microphone
Line
inputs
(PHONO
plUGS)
.......-.
sees
nese
sensitivity
77.5
mV
(-20
dB)
input
impedance
50
k
ohms
Line
outputs
(DNONO
PlUGS)
....-.....eseeeeeeeee
output
fevel-0.435
V
(—5
dB)
at
load
impedance
50
k
ohms
suitable
load
impedance
more
than
10
k
ohms
Headphone
Output
.........cceeneeeeeeceneeeeee
output
level
—26
dB
at
load
impedance
8
ohms
Approx.
430
x
130
x
290
mm
(w/h/d)
(17
x
5%s
x
114/72
inches)
including
projecting
parts
and
controls
Approx.
5.4
kg
(11
Ibs
15
oz)
Head
cleaning
tipS
............ceeeeeeeeeeeeee
-
LED
peak
program
meters
Response
range
~40dB
to
+5dB
Response
time
1
millisecond
Decay
time
(from
0
dB
to
—20
dB)
750
milliseconds
Overshoot
None
Indicator
elements
16
elements
for
each
channel
While
the
information
given
is
correct
at
the
time
of
printing,
small
production
changes
in
the
course
of
our
company’s
policy
of
im-
provement
through
research
and
design
might
not
necessarily
be
indicated
in
the
specifications.
We
ask
you
to
check
with
your
ap-
pointed
Sony
dealer
if
clarification
on
any
point
is
required.
Note
Appliance
conforms
with
EEC
Directive
76/889
regarding
interfer-
‘ence
suppression.

TROUBLE
CHECKS
The
following
checks
will
assist
in
the
correction
of
most
problems
which
you
may
encounter
with
your
unit.
Before
going
through
the
check
list
below,
first
Pay
attention
to
the
following
fundamental
points.
@
The
power
cord
must
be
connected
firmly.
‘@
Connection
to
the
amplifier
must
also
be
firm.
‘@
Heads,
capstan
and
pinch
roller
should
be
cleaned.
‘@
The
amplifier
controls
and
switches
should
be
set
correctly.
|
FUNCTION
BUTTONS
AND
TAPE
PATH
{
The
record
button
cannot
be
pressed.
@No
cassette
in
the
cassette
holder.
©The
tab
is
removed
from
the
cassette.
See
page
10.
|
The
record
button
or
the
forward
button
cannot
be
pressed.
‘@
The
cassette
holder
is
not
fully
closed.
|
The
eject
button
cannot
be
pressed.
@This
button
is
inoperative
in
recording
and
playback
modes.
The
automatic
shut-off
mechanism
activates
just
after
pressing
the
torward
button.
@The
tape
is
completely
wound
onto
the
right
reel.
Tape
does
not
move
even
when
the
forward
button
is
pressed.
@
The
pause
button
is
pressed.
The
automatic
shut-off
mechanism
activates
before
the
end-of-
tape.
The
tape
is
slack.
@This
situation
may
also
be
caused
by
the
cassette
used.
Tape
running
noise
is
loud
in
rewind
or
fast-forward
mode.
@
This
situation
depends
upon
the
cassette
used
and
not
a
prob-
em.
}
RECORDING
OR
PLAYBACK
Recording
or
playback
cannot
be
made
or
there
is
a
decrease
in
sound
level.
*
®
Dirty
heads.
See
page
11.
»
Magnetic
contamination
or
build-up
on
the
record/playback
head.
3ee
page
11.
pimproper
connection.
elmproper
setting
of
the
amplifier
controls.
=xcessive
wow
or
flutter
or
drop-out
»
Contamination
of
the
capstan
or
pinch
roller.
See
page
11.
it
nsufficient
erasure
»
Magnetic
contamination
of
the
erase
head.
See
page
11.
t
nerease
of
noise
or
erasure
of
high
frequencies
»
Magnetic
build-up
on
the
head.
See
page
11.
|
Inbalanced
tone
in
higher
frequencies
plmproper
setting
of
the
DOLBY
NR
switch.
If
recorded
with
the
‘witch
set
to
ON,
play
back
with
it
at
ON.
If
recorded
with
it
set
to
2FF,
play
back
with
it
at
OFF.
plmproper
setting
of
the
Tape
select
switch.
See
page
8.
If
ecorded
in
the
wrong
position,
adjust
the
tone
of
the
amplifier
in
Nlayback.
i
BOE
SAA
G
NS
nt
geet
eA
Se
Reece
ho
[
HOWLING
OR
HUM
NOISE
Oscillation
occurs
when
trying
to
record
from
microphones.
@The
microphone
is
too
near
the
speaker.
Keep
the
microphone
away
from
the
speaker
or
reduce
the
amplifier
volume.
Hum
noise
@
The
tape
deck
is
stacked
just
on
or
below
the
amplifier.
Should
any
problem
persist
after
you
have
made
these
checks,
con-
sult
your
nearest
Sony
service
facility.
13
Table of contents
Other Sony Cassette Player manuals

Sony
Sony DNW-75 User manual

Sony
Sony Walkman WM-EX527 User manual

Sony
Sony Walkman WM-FS233 User manual

Sony
Sony CFM-A50 User manual

Sony
Sony WN-FX653 User manual

Sony
Sony Walkman WM-FX467 User manual

Sony
Sony Walkman WM-SR10 User manual

Sony
Sony WM-FX321 User manual

Sony
Sony TC-WR545 Primary User manual

Sony
Sony TC-W345 User manual

Sony
Sony WM-FX521 - Walkman User manual

Sony
Sony Walkman WM-FX193 User manual

Sony
Sony TC-126CS Setup guide

Sony
Sony CFD-V8 User manual

Sony
Sony CFS-515S User manual

Sony
Sony TC-WR670 User manual

Sony
Sony Walkman WM-GX670 User manual

Sony
Sony Walkman WM-EX610 User manual

Sony
Sony CFM-2300 User manual

Sony
Sony TC-TX313 User manual