Sony HDC-3300R User manual

HD COLOR CAMERA
HDC3300R
OPERATION MANUAL [English]
2nd Edition

2Table of Contents
Table of Contents
Overview ................................................................................. 3
Features........................................................................................3
System Configuration Example...................................................5
Precautions ............................................................................ 6
Phenomena Specific to CCD Image Sensors...............................6
Locations and Functions of Parts ........................................ 7
Accessory Attachments ...............................................................7
Controls and Connectors .............................................................8
Preparations ......................................................................... 15
Attaching a Lens........................................................................15
Adjusting the Flange Focal Length ...........................................15
Attaching a Viewfinder .............................................................16
Attaching the Cable Clamp Belt (Supplied)..............................18
Adjusting the Shoulder Pad Position.........................................19
Mounting the Camera to a Tripod .............................................19
Adjustments and Settings for Shooting ............................ 20
Adjusting the Black Balance and White Balance......................20
Setting the Electronic Shutter....................................................22
Setting the Focus Assist Functions............................................22
Setting the Flicker-Reduction Function.....................................24
Viewfinder Screen Status Display ...................................... 26
Menu Operations.................................................................. 27
Starting Menu Operations..........................................................27
Selecting Pages..........................................................................28
Setting the Menu Items..............................................................29
Editing the USER Menu............................................................30
Menu List .............................................................................. 34
OPERATION Menu ..................................................................34
PAINT Menu .............................................................................40
MAINTENANCE Menu ...........................................................44
FILE Menu ................................................................................47
DIAGNOSIS Menu ...................................................................49
Using a “Memory Stick” ...................................................... 50
Specifications....................................................................... 51

3
Overview
Overview
The HDC3300R is the camera unit of a high-definition
super-slow-motion video camera system with a 2/3-type
CCD for 2,200,000 pixels.
It incorporates the latest pickup elements and digital
signal-processing LSI and yields higher picture quality and
higher stability in image creation at HD 3-times speed in a
system with the HDCU3300R HD Camera Control Unit,
while maintaining conventional popular functions and
operability. (This product is not designed for standalone
operations.)
Features
High picture quality and high performance
The new 2/3-type IT CCD for 2,200,000 pixels conforms
to driving formats of 3-times conventional speed,
achieving high sensitivity and low smear. In addition, the
built-in 16-bit A/D converter provides picture quality of
optimal grade in combination with the signal-processing
LSI built in the HDCU3300R.
Multiple formats
The camera is compatible with the 1080/50i and 59.94i
interlace, the 720/50P and 59.94P, and 1080/50P and
59.94P progressive scan systems.
Newly designed integrated unit with low
center of gravity
A stylish appearance with low-slung design has been
adopted. When used in combination with the HDLA1500-
series Large Lens Adaptor, it permits the viewfinder to be
mounted at a low position, making the viewfinder position
closer to the optical axis of the lens.
Optimized handle shape and VF slide
mechanism for stable shooting
A new handle design has been adopted. A slight protrusion
of the upper front part of the handle enables stable holding
of the camera while you are shooting, by holding the front
part of the handle.
Furthermore, the movable range of a front-rear slide
mechanism for the viewfinder attachment has been
widened. Any difference in weight balance caused by
having a different lens attached can be counteracted by
adjusting the viewfinder attachment position, in
combination with the movable shoulder pad position. This
provides the best balance for shooting with the camera on
your shoulder.
Swing handle
The swinging structure of the handle enables the large
viewfinder mounted on the HDLA1500-series Large Lens
Adaptor to be shifted forward, giving it the same total
longitudinal size as a standard studio-use camera, for
operability equivalent to that of a standard studio-use
camera.
Position-adjustable shoulder pad
The position of the shoulder pad can be adjusted for stable
shooting according to the build of the camera operator, the
type of lens in use, or the shooting style.
A low-repulsion shoulder pad (position fixed) is available
as an option (Part No.: A-8286-346-A).
Function-assignable switches
The camera has a switch to which various functions can be
assigned on the side panel. You can activate your desired
function, such as electronic color-temperature conversion,
instantly when shooting by assigning it to the switch in
advance.
Switches on the handle are also available as function
assignable switches.
Focus assist functions
The VF detail function and focus assist indicator function
facilitate focusing.
VF detail
Various functions are provided for the VF detail signal,
which can be added only on images on the viewfinder
screen in order to facilitate focusing in various situations:
Functions for coloring the VF detail signal, flickering the
VF detail signal by adding modulation, thickening the VF
detail signal, and automatically compensating the VF
detail level according to the zoom position.
Focus assist indicator
The focusing level indicator on the viewfinder screen
provides a guide for focusing. The best focus setting can be
easily determined by observing fluctuation of the level
indicator as a guide.
“Memory Stick” 1) operation
The camera is equipped with a “Memory Stick” port,
which enables setup data storage and software upgrading
using a “Memory Stick.”
1) Memory Stick and are trademarks of Sony
Corporation.

4Overview
Various color-reproduction functions (in
combination with HDCU3300R)
Selection of multiple gamma tables
Seven types of standard and 4 types of hyper gamma tables
are provided with this camera. The hyper gamma values
enable cinemalike image creations with wide dynamic
range, which are different from those achieved with
conventional video gamma.
Multimatrix color correction
In addition the standard 6-axis matrix function, the camera
has a multimatrix function that permits you to adjust the
hue and chroma for color components in 16-axis directions
independently. This is quite useful in color matching
among multiple cameras.
Knee saturation
Change of hue and decrease in chroma that occur in
highlighted areas can be compensated.
This enables reproduction of natural skin tones under
strong lighting.
Low key saturation
Hue and saturation in low-key zones can be compensated.
Thus, compensation for color reproduction in all zones is
enabled in combination with matrix color compensation
and knee saturation functions.
Versatile detail control functions (in
combination with HDCU3300R)
Skin-tone detail function
This function allows control (emphasis or suppression) of
the detail level for just a certain hue or chroma area in the
image, by creating a detail gate signal from color
components of your specified hue, such as skin tones.
The detail levels of three hues can be adjusted
independently at the same time.
Detail boost-frequency control
The boost frequency can be adjusted from 20 to 30 MHz.
This allows the detail thickness to be set appropriately for
the subject, thus enabling more subtle image expression.
H/V ratio control
The ratio between horizontal and vertical detail can be
adjusted.
White/black limiter
The white and black details can be limited independently.
Flicker-reduction function
Flicker may occur in slow-motion playback of images
recorded at 3 times normal speed. Variations in the video
levels caused by the power-supply frequency for artificial
lighting under which shooting is undertaken are not
averaged across the fields during supermotion shooting,
with which exposure time is one-third that with normal
speed shooting. This may result in differences in video
levels to be played back, i.e., a phenomenon called flicker.
To reduce flicker, this camera system is provided for the
flicker-reduction function, with which real-time
processing for averaging differences in video levels across
fields is performed.
Easy menu-based setting
Selections and settings for viewfinder display items,
safety-zone marker 2) or center marker,3) screen size
marker, etc. can be made quickly and easily, using setup
menus displayed on the viewfinder screen or an external
monitor.
2) Safety zone marker:
A box-shaped marker displayed on the viewfinder screen which indicates
80%, 90%, 92.5%, or 95% of the total screen area
3) Center marker:
A cross-shaped marker which indicates the center of the viewfinder screen
Wide variety of viewfinder display options
Along with items such as operation messages, a zebra
pattern,4) a safety-zone marker, and a center marker,
camera settings may also be displayed on the viewfinder
screen. Furthermore, there are other indicators arranged
above and below the viewfinder, such as a tally lamp,
battery warning indicator, and an indicator to tell you that
one or more settings are other than standard. This makes it
simple to check the status of the camera.
4) Zebra pattern:
A stripe pattern displayed on the viewfinder screen which indicates the
portions where the video level is above about 70% or 100%. Used to check
the video level of the subject.
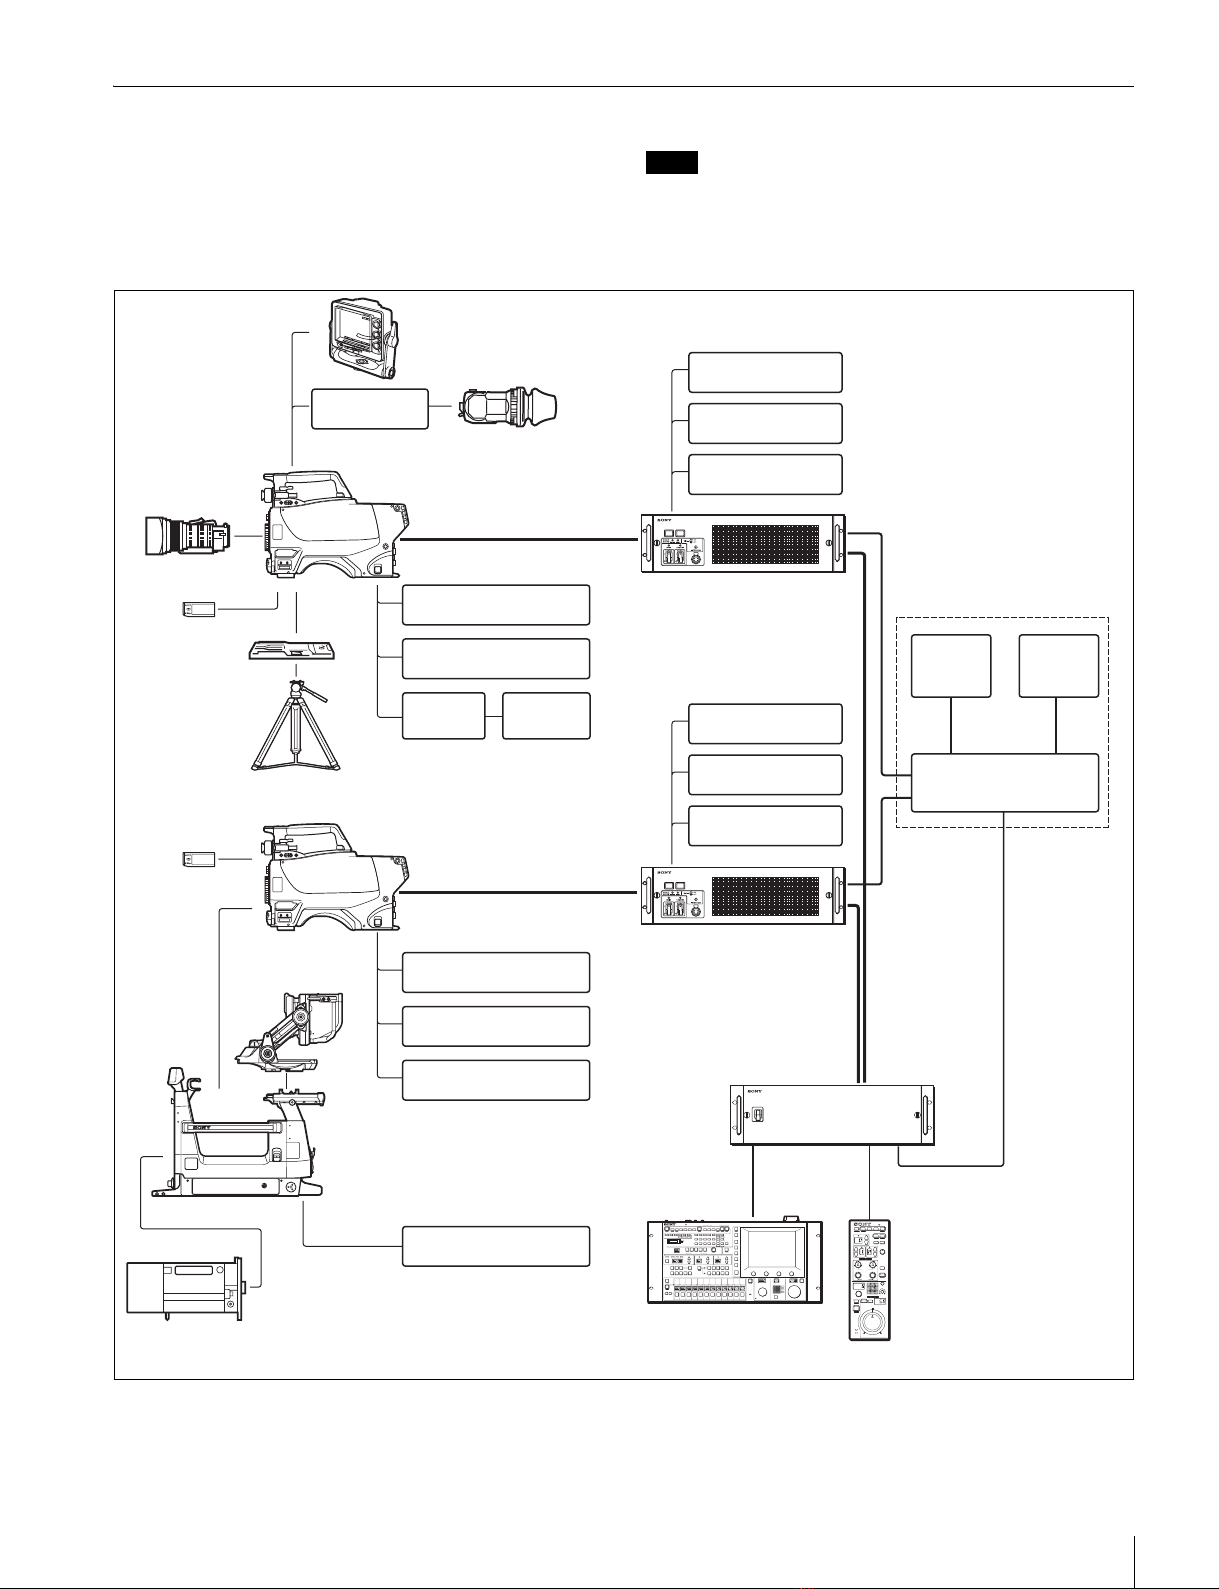
New 10-gigabit optical digital transmission
The camera uses electro-optical coding cable for 10-
gigabit optical digital transmission between the camera
and a Camera Control Unit.
High-resolution monochrome and color
multiformat viewfinders (optional)
The HDVF-20A/200 multiformat 2-type monochrome
CRT viewfinders and the HDVF-C35W (3.5-type) /
HDVF-C30WR (2.7-type) multiformat color LCD
viewfinders are available as options to cover various
applications.
Prevention of electrical shock
When the power connection is unsafe, the power supply
from the connected Camera Control Unit will be shut off.

5
Overview
System Configuration Example
Peripherals and related devices for the camera are shown in
a figure. Production of some of the peripherals and related devices
shown in the figures has been discontinued. For advice for
choosing devices, please contact your Sony dealer or a
Sony sales representative.
Note
Zoom Lens
(for ENG/EFP)
“Memory Stick”
VCT-14
Tripod Adaptor
Tripod
Zoom Lens
(for studio use)
“Memory Stick”
HDLA1500
Large Lens Adaptor
HDVF-550/C730W/C550W/
EL75 Viewfinder
BKW-401
Viewfinder
Rotation Bracket
HDVF-20A
HDVF-200
HDVFC30WR
HDVF-C35W
Viewfinder
HDC3300R
Optical Fiber Cable
CAC-6
Return Video Selector
Intercom Headset
CAC-12
Microphone
holder
Microphone
HDVF-EL70/700A
Viewfinder
HDC3300R
CAC-6
Return Video Selector
Intercom Headset
Microphone
BKP-7911 Script Holder
HKCU1001
HKCU1003 a)
HKCU1005
HDCU3300R
Camera Control Unit
HKCU1001
HKCU1003 a)
HKCU1005
HDCU3300R
Camera Control Unit
CNU-700
Camera Command
Network Unit
MSU-1000-series
Master Setup Unit
RCP-1000-series
Remote Control Panel
BNC (SD)BNC (SD)
BNC
(VBS)
BNC
(VBS)
CCA-5
CCA-5 CCA-5
CCA-5
With HKCU1001
or HKCU1003
Picture
Monitor
Waveform
Monitor
VCS-700
Video Selector
CCA-5
Optical Fiber Cable
a) SD component outputs of the
HKCU1003 are not supported.

6Precautions
Precautions
Note on laser beams
Laser beams may damage the CCDs. If you shoot a scene
that includes a laser beam, be careful not to let a laser beam
become directed into the lens of the camera.
Do not subject to severe shocks
Damage to the case or internal components may result.
When finished using
Set the power switch to OFF.
Operation and storage environment
Store in a level place with air conditioning.
If the unit gets wet, make sure it is completely dry before
storage.
Avoid use or storage in the following places:
• Extremely hot or cold places
• Places with high humidity
• Places with strong vibration
• Near strong magnetic fields
• In places where it receives much direct sunlight, or near
heating equipment
Condensation
If you move the camera from a very cold place to a warm
place, or use it in a damp location, condensation may form
on the lens or inside the camera.
The camera has no built-in condensation indicator. If you
find condensation on the body or lens, switch the camera
off and wait for the condensation to disappear for about
one hour.
Phenomena Specific to CCD Image
Sensors
The following phenomena that may appear in images are
specific to CCD (Charge Coupled Device) image sensors.
They do not indicate malfunctions.
White flecks
Although the CCD image sensors are produced with high-
precision technologies, fine white flecks may be generated
on the screen in rare cases, caused by cosmic rays.
This is related to the principle of CCD image sensors and
is not a malfunction.
The white flecks especially tend to be seen
• when operating at a high environmental temperature
• when you have raised the master gain (sensitivity)
This product has a compensation function and the problem
may be alleviated by automatic black balance adjustment
(see page 20).
Smear
When an extremely bright object, such as a strong spotlight
or flashlight, is being shot, vertical tails may be produced
on the screen, or the image may be distorted.
Aliasing
When fine patterns, stripes, or lines are shot, they may
appear jagged or flicker.

7
Locations and Functions of Parts
Accessory Attachments
aVF (viewfinder) connector (20-pin)
Connect the cable of the viewfinder (not supplied).
bShoulder strap fitting post
Attach one end of a shoulder strap (not supplied) to this
fitting post, and the other end to the fitting post on the other
side of the camera.
cAccessory shoe
To attach an accessory using a 1/4-inch screw.
dViewfinder left-right positioning ring
Loosen this ring to adjust the viewfinder position towards
the left or right.
eViewfinder front-rear positioning lever and lock
knob
Loosen the lever and knob to adjust the viewfinder position
towards the front or rear.
For details on adjusting the viewfinder position, see
“Attaching a Viewfinder” on page 16.
fLens cable clamp
To secure the cable of the lens (not supplied).
gLens fixing lever
To secure the lens in the lens mount.
hLens mount cap
The cover can be removed by moving the lens fixing lever
upward. Keep the lens mount covered with this cap when
a lens is not attached.
iLens mount
To attach a lens (not supplied).
SERIES
lShoulder pad
bShoulder strap fitting post
aVF connector
dViewfinder left-right positioning
ring
eViewfinder front-rear positioning
lever and lock knob
fLens cable clamp
gLens fixing lever
hLens mount cap
iLens mount
jLENS connector
kTripod mount (bottom)
cAccessory shoe

8Locations and Functions of Parts
jLENS connector (12-pin)
Connect the lens cable. The camera can control the lens
functions through this cable.
kTripod mount
Attach the VCT-14 Tripod Adaptor when mounting the
camera on a tripod.
lShoulder pad
You can adjust the position so that you can get the best
balance for shooting with the camera on your shoulder.
For details, see “Adjusting the Shoulder Pad Position” on
page 19.
Controls and Connectors
Front right
aINCOM (intercom 1) button
The intercom 1 microphone is ON while this button is held
pressed.
You can also assign other functions to this button, using the
menu displayed on the viewfinder screen.
bRET 1 (return video 1) button
The return video 1 signal from the camera control unit is
monitored on the viewfinder screen while this button is
pressed. It function the same as the RET 1 button on the
side (page 10) and that on the operation panel on the rear
of the camera (page 12 or 13).
You can also assign other functions to this button, using the
menu displayed on the viewfinder screen.
cAssignable switch
You can assign a function using the menu displayed on the
viewfinder screen.
dFilter select buttons
You can switch the built-in ND and CC (color temperature
conversion) filters by pressing the selectors while holding
the FILTER LOCAL button depressed.
Pressing the left button selects the available ND filters
(clear, 1/4ND, 1/8ND, 1/16ND,1/64ND) in sequence.
Pressing the right button selects the available CC filters
(cross, 3200K, 4300K, 6300K, 8000K) in sequence.
mMENU SEL knob/ENTER
button
aINCOM button
bRET 1 button
cAssignable switch
gGAIN switch
hOUTPUT/AUTO KNEE switch
iWHITE BAL switch
jDISPLAY switch
kCANCEL/STATUS switch
fAUTO W/B BAL switch
dFilter select buttons
eFILTER LOCAL button
l“Memory Stick” section

9
Locations and Functions of Parts
eFILTER LOCAL button
While holding this button depressed, press either of the
filter select buttons to select the ND or CC filters.
fAUTO W/B BAL (white and black balance
automatic adjustment) switch
This switch does not function.
Use a camera control unit or a remote control device, such
as MSU or RCP series.
gGAIN switch
This switch does not function.
Use a camera control unit or a remote control device, such
as MSU or RCP series.
hOUTPUT (output signal selection)/AUTO KNEE
switch
Select the signal (color bar signal or camera’s video signal)
to be used as output to the viewfinder or the TEST OUT
connector when the camera control unit is not connected
and only the camera is on.
BARS: Output is a color bar signal.
CAM: Output is the camera’s video signal.
AUTO KNEE: Not used.
When a camera control unit is connected, output signal
selection is controlled from the external control device,
and this switch of the camera is disabled.
iWHITE BAL (white balance memory selection)
switch
This switch does not function.
Use a camera control unit or a remote control device, such
as MSU or RCP series.
jDISPLAY switch
The functions of the DISPLAY switch are as follows:
DISPLAY: Characters and messages showing the camera
settings and operating status may be displayed on the
viewfinder screen.
OFF: Status messages will not appear on the viewfinder
screen.
MENU: Menus for camera settings will be displayed on
the viewfinder screen.
kCANCEL/STATUS switch
CANCEL: When a menu is displayed on the viewfinder
screen, you can cancel any changed settings or return
the display to the previous menu.
STATUS: When no menu is displayed on the viewfinder
screen, the status information of this camera is
displayed.
l“Memory Stick” section
A slot to accommodate a “Memory Stick” and an access
lamp are provided behind the panel.
The access lamp lights in red while writing or reading data
to/from a “Memory Stick.”
When the access lamp is lit, do not insert/remove the
“Memory Stick” or turn off the camera.
mMENU SEL (menu select) knob/ENTER button
(rotary encoder)
To select settings from menus displayed on the viewfinder
screen (by rotating the knob) and to confirm settings (by
pushing the button).
Note
Note

10 Locations and Functions of Parts
Front left
aRET 1 (return video 1) button
The return video 1 signal from the camera control unit is
monitored on the viewfinder screen while this button is
pressed. It function the same as the RET 1 buttons on the
handle (page 8) and that on the operation panel on the rear
of the camera (page 12 or 13).
You can also assign other functions to this button, using the
menu displayed on the viewfinder screen.
bMIC 1 IN (microphone 1 input) connector (XLR 3-
pin)
Connect a microphone.
This connector and the AUDIO IN CH-1 connector (page
15) on the operation panel on the rear of the camera are
alternately activated with the CH1 audio input select
switch (page 15).
cMIC (microphone) power switch
+48V: To supply a power of +48 V to the connected
microphone.
OFF: Not to supply a power to the connected microphone.
dSHUTTER switch
This switch does not function.
eINTERCOM LEVEL control
To adjust the intercom/earphone volume level.
The intercom level adjustment is enabled when the
INTERCOM 1 and 2 LEVEL/MIC switches (on the SY-
type operation panel, page 12) or the LEVEL switch (on
the European-type operation panel, page 13) on the rear of
the camera are set to “FRONT.”
fRET 2 (return video 2) button
When this button is pressed, the picture on the viewfinder
changes to the return video signal selected with the RET 2
select switch (page 12 or 13) on the operation panel on the
rear of the camera.
You can also assign other functions to this button, using the
menu displayed on the viewfinder screen.
SERIES
dSHUTTER switch
eINTERCOM LEVEL control
fRET 2 button
bMIC 1 IN connector
aRET 1 button
cMIC power switch

11
Locations and Functions of Parts
Rear
aCAMERA POWER switch
CCU: Power supply will be received from the camera
control unit.
OFF: Power supply to the camera is shut down.
EXT: Power supply will be received through the DC IN
connector.
bTally lamp and switch
ON: The tally lamp lights when a tally signal is input to the
connected camera control unit or a call signal is
generated in response to pressing of a CALL button.
OFF: The tally lamp is prevented from lighting.
cCCU (Camera Control Unit) connector (optical/
electrical multi-connector)
Connect a camera control unit using an optical electro-
composite cable.
dPROMPTER 2 connector (BNC type)
For output of a prompter 2 signal from the CCU.
eCALL button
When you press this button, the red tally lamp of the RCP-
1000-series Remote Control Panel or the MSU-1000-
series Master Setup Unit, will light. Use to call the operator
of the RCP or MSU.
aCAMERA POWER switch
Shoulder strap fitting post (page 7)
cCCU connector
dPROMPTER 2 connector
eCALL button
Operation panel (page 12 or 13)
Connector panel (page 14)
bTally lamp and switch
Not used

12 Locations and Functions of Parts
Operation panel
SY type: For JN4 (East Asia) and SYL (USA, Canada, and other countries) models (for NTSC areas)
aINTERCOM 1 and INTERCOM 2 controls and
switches
There are PGM1 and 2 controls incorporated with a line
select switch, a LEVEL/MIC switch, and INCOM level
control each for intercom line 1 and 2.
PGM1 (program 1) control
Adjust the audio listening level of program 1.
PGM2 (program 2) control
Adjust the audio listening level of program 2.
LEVEL/MIC switch
REAR/ON: The intercom headset microphone is turned
on. The intercom audio listening level is adjusted with
the INCOM level control.
REAR/OFF: The intercom headset microphone is turned
off. The intercom audio listening level is adjusted with
the INCOM level control.
FRONT/OFF: The intercom headset microphone is
turned off. The intercom audio listening level is
adjusted with the INCOM level control and the
INTERCOM LEVEL control on the front of the camera
(page 10).
INCOM level control
Adjust the intercom audio listening level.
Line select switch
Select the intercom line.
PROD: Producer line
ENG: Engineer line
bRET1 (return video 1) button and select switch
The return video signal selected with the switch is
displayed on the viewfinder screen while the button is
pressed.
cRET2 (return video 2) button and select switch
When other return video systems are used in addition to
return video 1, you can monitor the signal selected with the
switch on the viewfinder screen while pressing the button.
The RET1 button has priority over the RET 2 button if both
buttons are pressed.
dLIGHT switch
Set to ON to illuminate the operation panel.
RET1
PGM1 PGM2
1
23
4
RET2
1
23
4
LIGHT
INCOM
INTERCOM 1
ON
OFF
PROD
LEVEL
REAR
FRONT
MIC
ON
OFF ENG
PGM1 PGM2
INCOM
INTERCOM 2
PROD
LEVEL
REAR
FRONT
MIC
ON
OFF ENG
PGM1 PGM2
INCOM
INTERCOM 1
PROD
LEVEL
REAR
FRONT
MIC
ON
OFF ENG
PGM1 PGM2
INCOM
INTERCOM 2
PROD
LEVEL
REAR
FRONT
MIC
ON
OFF ENG
bRET1 button and select switch
cRET2 button and select switch
dLIGHT switch
aINTERCOM1 and INTERCOM2 controls and switches
PGM1 control
PGM2 control
INCOM level control
Line select switch
LEVEL/MIC switch
Note

13
Locations and Functions of Parts
European type: For CED (Europe) and E33 (China and South Asia) models (for PAL areas)
aINTERCOM 1 and INTERCOM 2 controls and
switches
The reception level controls are common to intercom 1 and
intercom 2. The talk lines can be set independently for
intercom 1 and intercom 2.
ENG (engineer line) control:
Adjust the intercom audio listening level of the engineer
line.
PROD (producer line) control
Adjust the intercom audio listening level of the producer
line.
PGM1 (program 1) control
Adjust the audio listening level of program 1.
PGM2 (program 2) control
Adjust the audio listening level of program 2.
TRACKER control
Adjust the intercom audio listening level at the TRACKER
connector (page 14) on the connector panel when using the
connector for intercom.
MIC LINE1 (intercom microphone line 1) switch
Select the talk line for intercom 1.
PROD: To talk over the producer line
OFF: To turn off the headset microphone for intercom
line 1
ENG: To talk over the engineer line
MIC LINE2 (intercom microphone line 2) switch
Select the talk line for intercom 2.
PROD: To talk over the producer line
OFF: To turn off the headset microphone for intercom
line 2
ENG: To talk over the engineer line
LEVEL switch
REAR: The intercom audio listening level is adjusted with
the controls on this panel.
FRONT: The intercom audio listening level is adjusted
with the INTERCOM LEVEL control on the front of
the camera.
bRET1 (return video 1) button and select switch
The return video signal selected with the switch is
displayed on the viewfinder screen while the button is
pressed.
cRET2 (return video 2) button and select switch
When other return video systems are used in addition to
return video 1, you can monitor the signal selected with the
switch on the viewfinder screen while pressing the button.
The RET1 button has priority over the RET2 button if both
buttons are pressed.
dLIGHT switch
Set to ON to illuminate the operation panel.
RET1
ENG PROD
1
23
4
RET2 LIGHT
INTERCOM 1
ON
OFF
MIC
LINE1 PROD
OFF
ENG
MIC
LINE2 PROD
OFF
ENG
PGM1 PGM2
TRACKER
INTERCOM 2
LEVEL
REAR
FRONT
1
23
4
ENG PROD
INTERCOM 1
MIC
LINE1 PROD
OFF
ENG
MIC
LINE2 PROD
OFF
ENG
PGM1 PGM2
TRACKER
INTERCOM 2
LEVEL
REAR
FRONT
bRET1 button and select switch
cRET2 button and select switch
dLIGHT switch
aINTERCOM1 and INTERCOM2 controls and switches
PGM1 control
PGM2 control
TRACKER control
LEVEL switch
MIC LINE1 switch
ENG control
PROD control
MIC LINE2 switch
Note

14 Locations and Functions of Parts
Connector panel
aEARPHONE jack (stereo minijack)
For connecting an earphone or headset to hear the intercom
audio.
bRET CTRL (return control) connector (6-pin)
For connection to a CAC-6 Return Video Selector.
cCRANE connector (12-pin)
For external interface, such as viewfinder and external
data.
dTRACKER connector (10-pin)
For external interface, such as intercom and tally.
eDC OUT (DC power supply output) connector
(4-pin)
To supply power to devices such as a wireless receiver
(optional).
fDC IN (DC power supply input) connector
(XLR 4-pin)
For connection to the AC-DN10 AC Adaptor to supply
power to the camera.
gINTERCOM 1 and 2 connectors (XLR 5-pin)
For input and output of intercom audio signals.
hREMOTE connector (8-pin)
For connection to an RM-B170/B750 Remote Control
Unit, RCP-1000-series Remote Control Panel, or MSU-
1000-series Master Setup Unit.
When the camera is connected to a CCU, do not connect
any device to this connector.
iPROMPTER (prompter 1 signal output) connector
(BNC type)
For output of the prompter 1 signal (only when a CCU is
connected).
jTEST OUT connector (BNC type)
To output the analog signal.
This also supplies the VBS signal, an HD signal nearly
equal to the signal output from the VF connector, an HD-
SYNC signal, or an SD-SYNC signal depending on which
of these you have selected on the menu.
kSDI 2 (serial digital interface) connector (BNC type)
For HD-SDI or SD-SDI signal output.
INTERCOM 1
OFF
+48V
MIC
FRONT MIC
DC OUT AUDIO IN
CH 1 CH 2
TEST
OUT
SDI 2
DC IN 10.5-17V
RET IN
GENLOCK IN
LINE
OFF
+48V
MIC
AES/EBU
LINE
INTERCOM 2
EARPHONE
REMOTE
RET CTRL
CRANE
TRACKER
PROMPTER
gINTERCOM 1 and 2 connectors
aEARPHONE jack
dTRACKER connector
cCRANE connector
iPROMPTER connector
lAUDIO IN CH1 and CH2 connectors and switches
bRET CTRL connector hREMOTE connector
jTEST OUT connector
eDC OUT connector
fDC IN connector
kSDI 2 connector
Note

15
Preparations
lAUDIO IN CH1 and CH2 connectors (XLR 3-pin)
and switches
Connect audio signals. An input select switch and
microphone power switch are provided for each channel.
CH1 audio input select switch
Set to the appropriate position according to the equipment
connected to the AUDIO IN CH1 connector.
LINE: When a line-level (0 dBu) signal source is
connected
FRONT MIC: When using the microphone connected to
the MIC 1 IN connector
MIC: When an external microphone is connected
CH2 audio input select switch
Set to the appropriate position according to the equipment
connected to the AUDIO IN CH2 connector.
LINE: When a line-level (0 dBu) signal source is
connected
AES/EBU: When a digital audio signal is connected. (The
signal must be in synchronization with the camera
output.)
MIC: When an external microphone is connected
Microphone power switches
When a microphone is connected to the corresponding
AUDIO IN connector, set whether or not to supply a power
to the microphone.
+48V: To supply a power of +48 V
OFF: Not to supply a power
(No function has been assigned to the lowermost position.
No power is supplied to the microphone.)
In the case of supplying +12 V, contact a Sony service or
sales representative.
Preparations
Attaching a Lens
For information on handling lenses, refer to the lens’
operation manual.
Attaching procedure
1
Push the lens fixing lever upwards and remove the lens
mount cap from the lens mount.
2
Align the lens’ alignment pin with the notch in the
upper part of the lens mount and insert the lens into the
mount.
3
While supporting the lens, push the lens fixing lever
downwards to secure the lens.
4
Connect the lens cable to the LENS connector.
5
Secure the lens cable with the cable clamp.
Adjusting the Flange Focal Length
Adjustment of the flange focal length (the distance
between the lens mount attachment plane and the imaging
plane) is necessary in the following situations:
• The first time a lens is attached
• When changing lenses
• When zooming and the focus is not sharp at both
telephoto and wide angle
The flange focal length can be more precisely adjusted by
using the focus assist indicators.
See “Displaying the focus assist indicators” on page 23
for the focus assist indicators.
Note
CH 1
48V
OFF
MIC
LINE
48V
OFF
MIC
LINE
AES/EBU
FRONT MIC
AUDIO IN
CH 2
CH2 audio input select switch
CH1 audio input select switch
Microphone power switches
AUDIO IN CH1 connector AUDIO IN CH2 connector
1,3425

16 Preparations
The various parts of the lens used in adjusting the flange
focal length are in different positions on different lenses.
Refer to the lens’ operation manual.
Attaching procedure
1
Set the iris control to manual, and open the iris fully.
2
Place a flange focal length adjustment chart
approximately 3 meters from the camera and adjust the
lighting to get an appropriate video output level.
3
Loosen the Ff (flange focal length) ring lock screw.
4
With either manual or power zoom, set the zoom ring
to telephoto.
5
Aim at the flange focal length adjustment chart and
turn the focus ring to focus the image.
6
Set the zoom ring to wide angle.
7
Turn the Ff ring to bring the chart into focus. Take care
not to move the distance ring.
8
Repeat steps 4through 7until the image is in focus at
both telephoto and wide angle.
9
Tighten the Ff ring lock screw.
Attaching a Viewfinder
When the viewfinder is attached, do not leave the camera
with the eyepiece facing the sun. Direct sunlight can enter
through the eyepiece, be focused in the viewfinder and
cause fire.
Attaching a viewfinder
The instructions are made using the HDVF-20A/200/
C30WR/C35W viewfinder as an example.
For details on the viewfinder, refer to the instruction
manual of the viewfinder.
Attaching procedure
1
Slide the viewfinder in the direction of the arrow.
The viewfinder stopper automatically pops down.
2
Loosen the viewfinder left-right positioning ring, slide
the viewfinder side to side to the most convenient
position and tighten the ring. (See “To adjust the
position to the left or right” below.)
3
Connect the viewfinder cable to the VF connector of
the camera.
4
Connect the microphone cable to the MIC 1 IN
connector of the camera.
Adjusting the viewfinder position
The viewfinder position may be adjusted towards the front
and rear and to the left and right to make it easy to see into
it.
To adjust the position to the left or right
Note
Caution
About 3 meters
(10 ft)
SERIES
Viewfinder stopper
MIC 1 IN connector
VF connector
Viewfinder left-right positioning ring

17
Preparations
1
Loosen the viewfinder left-right positioning ring.
2
Slide the viewfinder left or right to move it into a good
viewing position.
3
Tighten the viewfinder left-right positioning ring.
To adjust the position forward or backward
1
Loosen the viewfinder front-rear positioning lever and
LOCK knob.
2
Slide the viewfinder towards the front or rear of the
camera to move it into a good viewing position.
3
Tighten the viewfinder front-rear positioning lever and
LOCK knob.
Detaching the viewfinder
Loosen the viewfinder left-right positioning ring, pull the
viewfinder stopper, then pull out the viewfinder by sliding
it in the direction opposite to that when attached.
Keeping the viewfinder from hitting your
leg (using BKW-401)
To keep the viewfinder from bumping your leg when
carrying the camera, install the BKW-401 Viewfinder
Rotation Bracket (optional) and rotate the viewfinder
upwards.
Lock the viewfinder in a slightly forward position before
rotating it upwards. If the viewfinder is in its rearmost
position, the arm of the viewfinder rotation bracket will
strike the grip.
Attaching procedure of the BKW-401
1
Turn the arm of the rotation mechanism assembly of
the BKW-401 in the direction of the arrow in the
following illustration.
Next, using a hexagonal wrench 3 mm across flats,
remove the bolts (M4 ×8) together with the washers,
to separate the rotation mechanism assembly from the
viewfinder front-back positioning mechanism
assembly.
2
In the same manner as step 1, remove the viewfinder
shoe of the camera from the front-rear positioning
mechanism.
3
Using the two bolts (M4 ×8) and the washers removed
from the camera in step 2, attach the rotation
mechanism assembly of the BKW-401 to the camera.
Viewfinder front-rear
positioning lever
LOCK knob
Note
Hexagon
socket bolts
(M4 ×8)

18 Preparations
4
Adjust the front-rear position so that the camera
handle does not interfere when you rotate the BKW-
401 arm upwards.
Attaching the Cable Clamp Belt
(Supplied)
You can secure the camera cable to the camera by attaching
the supplied cable clamp belt.
1
Insert the belt bracket into hole Aor Bof the cable
clamp belt.
2
Remove two +B3×5 screws and a blind screw shown
in the figure below from the camera.
3
Secure the cable clamp belt to the camera, using the
two supplied +B3×8 screws.
4
1Release the buckle, 2bundle the cable with the
belt, 3then lock the buckle again.
5
Adjust the length by pulling down the end of the belt.
N
o
t
t
o
i
n
t
er
f
ere
AB
Belt bracket
Blind screw
+B3×5 screws
+B3×8 screws
1
2
3
Camera cable

19
Preparations
Adjusting the Shoulder Pad Position
You can shift the shoulder pad from its center position
(factory setting) backward by up to 10 mm (3/8 inch) or
forward by up to 25 mm (1 inch). This adjustment helps
you get the best balance for shooting with the camcorder
on your shoulder.
Adjusting procedure
1
Raise the lever in the center of the shoulder pad to
unlock the shoulder pad.
2
Slide the shoulder pad backward or forward until it is
in the most convenient position.
3
Move the lever down to lock the shoulder pad in the
selected position.
Mounting the Camera to a Tripod
Mount the camera to a tripod using a VCT-14 Tripod
Adaptor.
• Select an appropriate hole from among those at the
bottom of the tripod adaptor considering the balance of
the weight of the camera and the tripod adaptor. If an
inappropriate hole is selected, the camera may fall over.
• Check that the size of the selected hole matches that of
the screw of the tripod. If they do not match, the tripod
adaptor cannot be attached to the tripod securely.
Mounting procedure
1
Attach the tripod adaptor to the tripod and secure it
with the screw.
2
Place the camera on the tripod adaptor, and slide
forward it along the groove of the tripod adaptor until
it clicks.
3
Make sure that the camera is securely attached by
moving it back and forth.
Caution
2
1,3
Shoulder pad
Shoulder pad lock lever
Bottom of the camera
Tripod adaptor
Tr i p o d

20 Adjustments and Settings for Shooting
To remove the camera from the tripod adaptor
Hold down the red button and pull the lever in the direction
of the arrow.
If the pin of the tripod adaptor does not return to
its original position
After removing the camera, if the pin of the tripod adaptor
does not return to its original position, hold down the red
button and move the lever in the direction of the arrow to
return the pin to its original position. It is not possible to
mount a camera with the pin not seated.
Adjustments and
Settings for Shooting
Adjusting the Black Balance and
White Balance
In order to maintain high picture quality when using the
camera, it is necessary to set the black balance and white
balance appropriately for the conditions.
The AUTO W/B BAL switch and WHITE BAL switch of
this camera do not function. Connect a camera control unit
and operate the function from a remote control device,
RCP or MSU.
Black balance adjustment
The black balance needs adjustment in situations like the
following:
• The first time the camera is used
• When the camera is used after a long period of disuse
• When the surrounding temperature changes greatly
• When the gain value is changed using the setup menus
Normally, there is no need to adjust the black balance
every time the camera is turned on.
White balance adjustment
Always readjust the white balance when lighting
conditions change.
About the viewfinder screen
After the process of adjusting the black balance or white
balance begins, messages about the progress and results of
the adjustment will be displayed on the viewfinder screen.
Adjusted values set through automatic adjustment, and
other settings, are stored in the camera’s memory and
preserved even when the camera power is turned off.
Adjusting the black balance
In automatic adjustment of black balance, both the black
set and black balance are adjusted.
Procedure for adjusting the black balance
Push the ABB (auto black balance) button of the RCP or
MSU.
When the DISPLAY switch is set to the DISPLAY
position, a message like the one in the figure below will be
displayed on the viewfinder screen during adjustment.
Lever
Red button
Pin
Original position
Note
Note
Other manuals for HDC-3300R
1
Table of contents
Other Sony Color Camera manuals