Sony BKM-202FN User manual

3-859-610-01 (1)
Ventilation Fan Unit
冷却用排気ファン
特約店様用取付説明書
Installation Manual for
Dealers
Manuel d’installation
destiné aux vendeurs
Installationsanleitung für
Händler
Manual de instalación para
concesionarios
Manuale di installazione
per i rivenditori
BKM-202FN
Sony Corporation © 1997 Printed in Japan
日本語
以下の手順にしたがって、本機をトリニトロンカラーグラフィックモニター
PGM-200R1Jに取り付けてください。
取り付けかた
本機を取り付ける前に、モニターとモニターにつながれているすべての
機器の電源を切ってください。
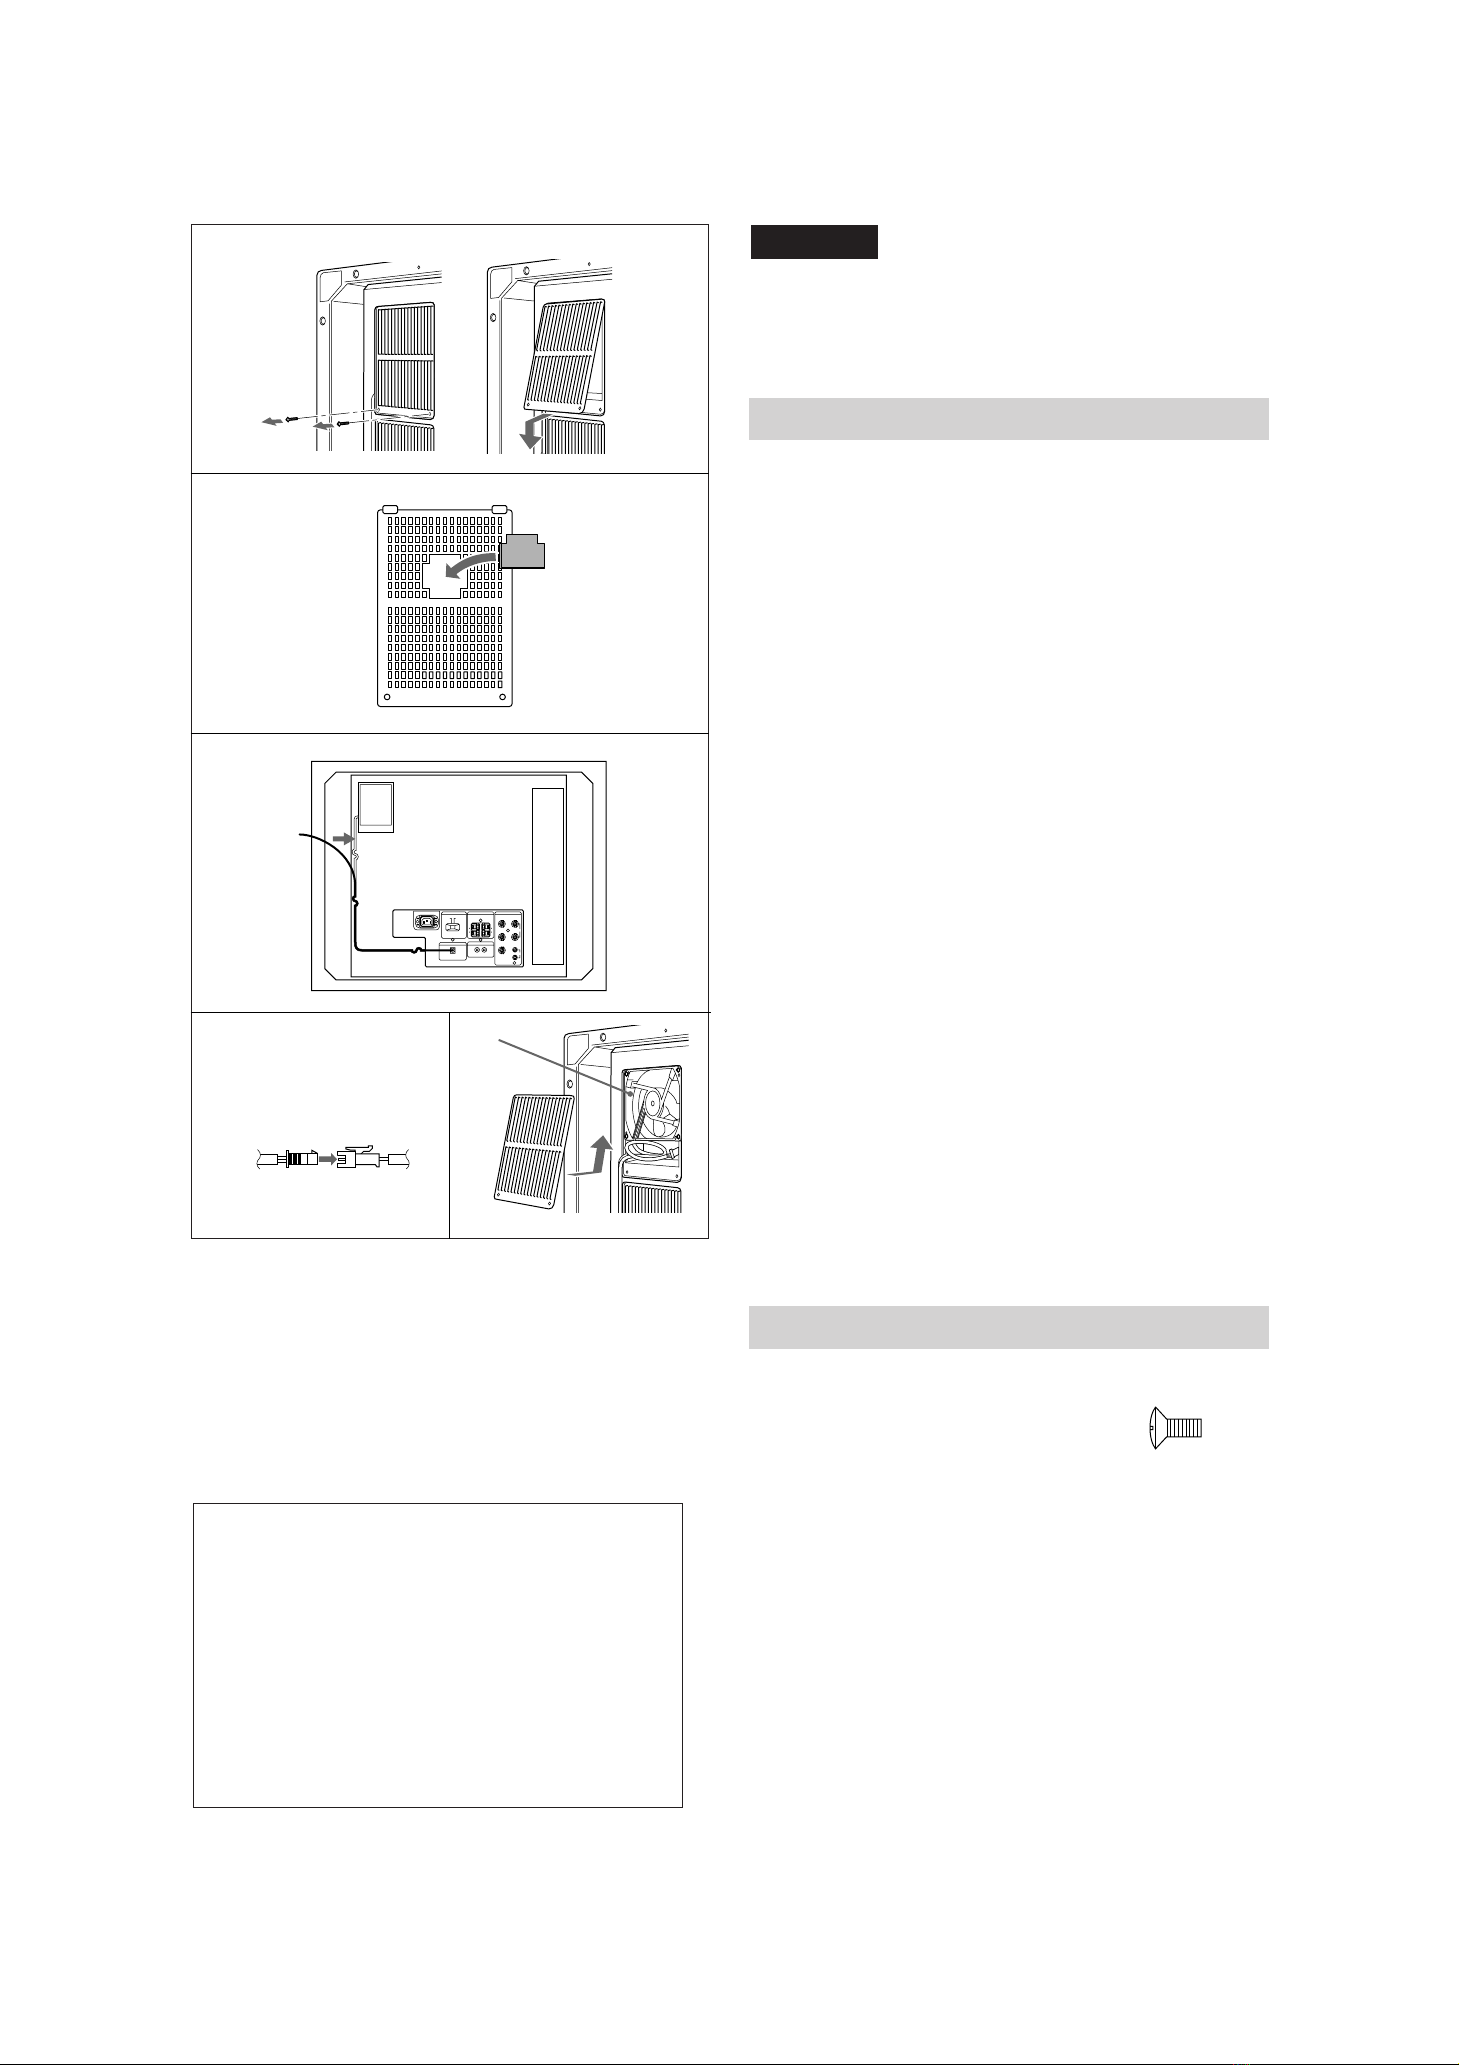
1モニター後面のカバーをはずす。
ネジ(2本)をドライバーではずしてください。
2カバ ー後 面 に付 属 のクッションを貼り付ける。
3付属のコードのDC端子をモニター後面の12VDCOUT端子に差
し込む。
4モニターに差し込んだ端子側から、コードをモニターの溝にそって
取り付ける。
5コードのもう一方の端子を本機に接続する。
6本機を取り付ける。
SONYマークが見える側を手前にして、マークが逆にならないよう
に取り付けてください。
7クッションを貼り付けたカバーを取り付ける。
•手順1ではずしたネジ(2本)をドライバーで締めてください。
•コードがたるまないように、余ったコードをカバーの下に入れ込ん
でからカバーを取り付けてください。
付属品
以下のネジが予備として付属されています。
+RKM3×8(2)
1
2
3, 4
56
(原寸大)
7

Français
Français
Appliquez la procédure suivante pour installer le
ventilateur d’aération dans le moniteur graphique couleur
Trinitron PGM-200R1A/200R1E/200R1U.
Installation du ventilateur
d’aération
Avant de procéder à l’installation, assurez-vous que tous
les appareils ont été mis hors tension.
1Déposez le couvercle arrière du moniteur.
Déposez les deux vis à l’aide d’un tournevis.
2Collez le coussinet fourni à l’arrière du couvercle.
3Branchez la fiche CC du câble fourni sur la prise 12V
DC OUT à l’arrière du moniteur.
4Installez le câble sur le moniteur dans la rainure.
5Branchez l’autre extrémité du câble sur le ventilateur
d’aération.
6Installez le ventilateur d’aération dans le moniteur en
veillant à orienter la marque SONY dans le bon sens.
7Fixez le couvercle avec le coussinet.
• Serrez les deux vis déposées à l’étape 1à l’aide d’un
tournevis.
• Réinstallez le couvercle après avoir placé la
longueur excédentaire de câble sous le couvercle
afin que le câble ne soit pas détendu.
Accessoires fournis
Les vis de réserve suivantes sont fournies.
+RK M3 ×8 (2)
(Real size) (Taille réelle)
English
Follow the steps below to install the Ventilation Fan Unit
into the PGM-200R1A/200R1E/200R1U Trinitron Color
Graphic Monitor.
Installing the Ventilation Fan Unit
Before installation, make sure that the power to all the
equipment is off.
1Remove the cover on the rear of the monitor
Remove the two screws with a screwdriver.
2Stick the supplied cushion on the rear of the cover.
3Connect the DC plug of the supplied cord to the 12V
DC OUT socket on the rear of the monitor.
4Install the cord to the monitor along with the groove.
5Connect the other end of the cord to the Ventilation
Fan Unit.
6Install the Ventilation Fan Unit into the monitor with
the SONY mark facing out in the proper direction.
7Attach the cover with the cushion.
• Tighten the two screws you removed in step 1with a
screwdriver.
• Attach the cover after putting the excessive cord
under the cover to make sure that the cord is not
slack.
Supplied Accessories
The following spare screws are supplied.
+RK M3 ×8 (2)
お問い合わせ
ソニー株式会社 国内営業本部
ソニー株式会社
名古屋
北 陸
京 滋
大 阪
神 戸
中 国
四 国
九 州
北海道
東 北
関 東
新 潟
千 葉
東 京
多 摩
松 本
横 浜
静 岡
〒141東京都品川区北品川6-7-35
営業所(011)231-8121
営業所(022)257-7830
営業所(048)645-6880
出張所(025)270-3253
営業所(043)297-8531
営業所(03)5448-6740
営業所(0425)75-0201
出張所(0263)25-4551
営業所(045)243-6711
営業所(054)253-8162
営業所(052)201-6871
営業所(0762)40-8110
営業所(075)691-7860
営業所(06)531-4111
営業所(078)322-0851
営業所(082)241-9211
営業所(0878)51-3942
営業所(092)741-2761
PrintedinJapa
n
東京システム営業所
(03)5448-6740
システム営業1部/2部
(03)5448-5446
Deutsch
Gehen Sie wie in den Schritten unten beschrieben vor, um
den Ventilator im Trinitron-Farbgrafikmonitor PGM-
200R1A/200R1E/200R1U zu installieren.
InstallierendesVentilators
Achten Sie darauf, alle Komponenten auszuschalten,
bevor Sie mit der Installation beginnen.
1Nehmen Sie die Abdeckung an der Rückseite des
Monitors ab.
Entfernen Sie die zwei Schrauben mit einem
Schraubenzieher.
2Bringen Sie das mitgelieferte Polster an der Rückseite
der Abdeckung an.
3Schließen Sie den Stecker des mitgelieferten
Gleichstromkabels an die Buchse 12V DC OUT an der
Rückseite des Monitors an.
4Verlegen Sie das Kabel zum Monitor in der Kerbe.
5Schließen Sie den Stecker am anderen Ende des
Kabels an den Ventilator an.
6Installieren Sie den Ventilator im Monitor, so daß die
Markierung SONY in der richtigen Richtung nach
außen weist.
7Bringen Sie die Abdeckung mit dem Polster an.
• Ziehen Sie die beiden Schrauben, die Sie in Schritt 1
entfernt haben, mit einem Schraubenzieher an.
• Bevor Sie die Abdeckung wieder anbringen, stecken
Sie überschüssige Kabellänge unter die Abdeckung,
damit das Kabel nicht lose herunterhängt.
Mitgeliefertes Zubehör
Die folgenden Ersatzschrauben werden mitgeliefert.
+RK M3 ×8 (2)
(tatsächliche Größe)
1
2
3, 4
56
7
Italiano
Español
Realice los pasos que aparecen a continuación para
instalar la unidad de ventilación en el monitor gráfico en
color Trinitron PGM-200R1A/200R1E/200R1U.
Instalación de la unidad de
ventilación
Antes de proceder a la instalación, cerciórese de que la
alimentación de todo el equipo está apagada.
1Extraiga la cubierta de la parte posterior del monitor.
Extraiga los dos tornillos con un destornillador.
2Adhiera la almohadilla suministrada en la parte
posterior de la cubierta.
3Conecte el enchufe de CC del cable suministrado en la
clavija 12V DC OUT de la parte posterior del monitor.
4Instale el cable en el monitor a lo largo de la ranura.
5Conecte el otro extremo del cable en la unidad de
ventilación.
6Instale la unidad de ventilación en el monitor con la
marca SONY hacia fuera en la dirección correcta.
7Fije la cubierta con la almohadilla.
• Apriete los dos tornillos que extrajo en el paso 1con
un destornillador.
• Sujete la cubierta después de colocar el cable
sobrante debajo de la cubierta para asegurarse de
que el cable no queda suelto.
Accesorios suministrados
Se suministran los siguientes tornillos de recambio:
+RK M3 ×8 (2)
Seguire i punti indicati sotto per installare l’apparecchio di
ventilazione nel monitor Trinitron Color Graphic Monitor
PGM-200R1A/200R1E/200R1U.
Installazionedellユapparecchiodi
ventilazione
Prima dell’installazione, assicurarsi che l’alimentazione di
tutte le apparecchiature sia disattivata.
1Rimuovere il coperchio nella parte posteriore del
monitor.
Rimuovere le due viti con un cacciavite.
2Applicare il cuscinetto in dotazione nella parte
posteriore del coperchio.
3Collegare la presa CC del cavo in dotazione alla presa
12V DC OUT nella parte posteriore del monitor.
4Collegare il cavo al monitor lungo la scanalatura.
5Collegare l’altra estremità del cavo all’apparecchio di
ventilazione.
6Installare l’apparecchio di ventilazione nel monitor
con il contrassegno SONY rivolto verso l’esterno nella
direzione adeguata.
7Collegare il coperchio con il cuscinetto.
• Avvitare le due viti rimosse al punto 1con un
cacciavite.
• Rimettere il coperchio dopo aver posto il cavo in
eccesso sotto al coperchio per evitare che il cavo non
sia lento.
Accessori in dotazione
Le seguenti viti di riserva sono in dotazione.
+RK M3 ×8 (2)
(Dimensione reale)
(Tamaño real)
Popular Fan manuals by other brands

ELTA FANS
ELTA FANS H03VV-F installation guide

Hunter
Hunter 20714 Owner's guide and installation manual

Emerson
Emerson CARRERA VERANDA CF542ORB00 owner's manual

Hunter
Hunter Caraway Owner's guide and installation manual

Panasonic
Panasonic FV-15NLFS1 Service manual

Kompernass
Kompernass KH 1150 operating instructions


