Deutsch
Gebrauch (siehe Abb. A)
1Schließen Sie die Kopfhörer an das AV-Gerät an.
Diese Kopfhörer lassen sich an eine Fernbedienung mit einer Buchse
für einen Stereoministecker anschließen.
Es gibt zwei Typen von Sony-Fernbedienungen, die mit tragbaren Audio-Playern
geliefert werden. Die einen sind mit einer Buchse für einen Mikrostecker (MP)
ausgestattet, die anderen mit einer Buchse für einen Stereoministecker (SP).
Ve rgewissern Sie sich bitte vor dem Kauf, dass diese Kopfhörer zusammen mit
Ihrem tragbaren Stereogerät verwendet werden können.
2Setzen Sie den Nackenbügel so auf, dass das Kabel vor Ihrer linken Schulter
hängt.
3Stecken Sie das linke Ohr zwischen die mit Lmarkierte Hörmuschel und den
Nackenbügel und das rechte Ohr zwischen die mit Rmarkierte Hörmuschel
und den Nackenbügel.
4Stellen Sie den Winkel des Nackenbügels so ein, dass die Kopfhörer richtig an
den Ohren anliegen.
Austauschen der Kopfhörerkappen (siehe Abb. B)
Die folgenden Schritte beschreiben das Austauschen auf der linken Seite.
1Drehen Sie die Kopfhörerkappe im Uhrzeigersinn und nehmen Sie sie ab (R
der rechten Seite müssen Sie gegen den Uhrzeigersinn drehen).
2Richten Sie die Pfeilmarkierung des Polsters an der Pfeilmarkierung der Kappe
aus, drehen Sie die Kappe gegen den Uhrzeigersinn, bis sie fest sitzt (Rder
rechten Seite müssen Sie im Uhrzeigersinn drehen).
Hinweis
Achten Sie darauf, dass Sie die Spitze des Nackenbügels nicht in die Augen oder
das Gesicht stoßen.
Zusammen- und Aufklappen der Kopfhörer (siehe
Abb. C)
Zusammenklappen
Klappen Sie die Kopfhörer wie in der Abbildung dargestellt auf sich zu.
Español
Utilización (consulte la figura A)
1Conecte los auriculares al equipo audiovisual.
Este producto puede conectarse a un mando a distancia que disponga
de una toma para miniclavija estéreo.
Sony ofrece dos tipos de mando a distancia para reproductores de audio portátiles.
Uno dispone de una toma para microclavija (MP) y el otro, de una toma para
miniclavija estéreo (SP). Antes de adquirir este producto, compruebe que puede
utilizarse con el dispositivo portátil estéreo.
2Coloque la banda para el cuello de manera que el cable descanse sobre su
hombro izquierdo.
3Colóquese los auriculares de modo que su oreja izquierda esté entre el auricular
Ly la banda para el cuello, y que su oreja derecha esté entre el auricular Ry
dicha banda.
4Ajuste el ángulo de la banda para el cuello de manera que pueda ponerse los
auriculares en las orejas.
B
Stereo headphones
MDR-G64SL
© 2004 Sony Corporation Printed in Thailand
Operating Instructions
Mode d’emploi
Bedienungsanleitung
Manual de instrucciones
Istruzioni per l’uso
Manual de Instruções
3-263-314-13(1) English
How to use (see fig. A)
1Connect the headphones to the AV equipment.
This product can be connected to a remote commander with a jack for
a stereo mini-plug.
There are two types of Sony remote commander that come with protable audio
players. One type has a jack for a micro-plug (MP), and the other for a stereo mini-
plug (SP). Make sure this product can be used with your portable stereo before
purchasing.
2Place the neckband with the cord positioned over your left shoulder.
3Wear the headphones with your left ear between the Driver unit (marked L)
and the neckband, and your right ear between the Driver unit (marked R) and
the neckband.
4Adjust the angle of the neckband to fit the headphones on your ears.
Changing the headphone caps (see fig. B)
The following procedure is for changing the left side.
1The headphone cap is turned clockwise and removed (Rside is turned anti-
clockwise).
2Align the arrow mark on the pad aligned with the arrow mark on the cap, turn
the cap anti-clockwise and fix (Rside is turned the clockwise).
Note
Take care that the point of the neckband does not hit your eyes or face.
Folding and unfolding the headphones (see fig. C)
Folding
Fold the headphones toward you as illustrated.
Français
Utilisation (voir fig. A)
1Raccordez le casque à l’appareil audio et vidéo.
Ce produit peut être raccordé à une télécommande équipée d’une prise
pour minifiche stéréo.
Il existe deux modèles de télécommande Sony disponibles pour ces lecteurs audio
portables. Le premier modèle est équipé d’une prise pour fiche micro (MP) et le
second d’une prise pour minifiche stéréo (SP). Vérifiez que ce produit est
compatible avec votre appareil stéréo portable avant d’en faire l’acquisition.
2Placez le serre-nuque en passant le cordon par-dessus votre épaule gauche.
3Le casque doit être porté de façon à ce que votre oreille gauche se trouve entre
le boîtier de l’amplificateur (côté marqué L) et le serre-nuque, et de façon à ce
que votre oreille droite se trouve entre le boîtier de l’amplificateur (côté
marqué R) et le serre-nuque.
4Ajustez l’angle du serre-nuque pour bien maintenir le casque sur vos oreilles.
Changement des coiffes (voir fig. B)
La procédure de changement suivante s’applique à la coiffe gauche.
1Tournez la coiffe dans le sens horaire, puis retirez-la (pour la coiffe droite R) tournez
dans le sens anti-horaire).
2Alignez la flèche de l’oreillette sur la flèche de la coiffe, tournez la coiffe dans le sens
anti-horaire et fixez-la (pour la coiffe droite R) tournez dans le sens horaire).
Remarque
Veillez à tenir la pointe du serre-nuque éloignée des yeux ou du visage.
Pliage et dépliage du casque (voir fig. C)
Pliage
Pliez le casque vers vous, comme illustré sur la figure.
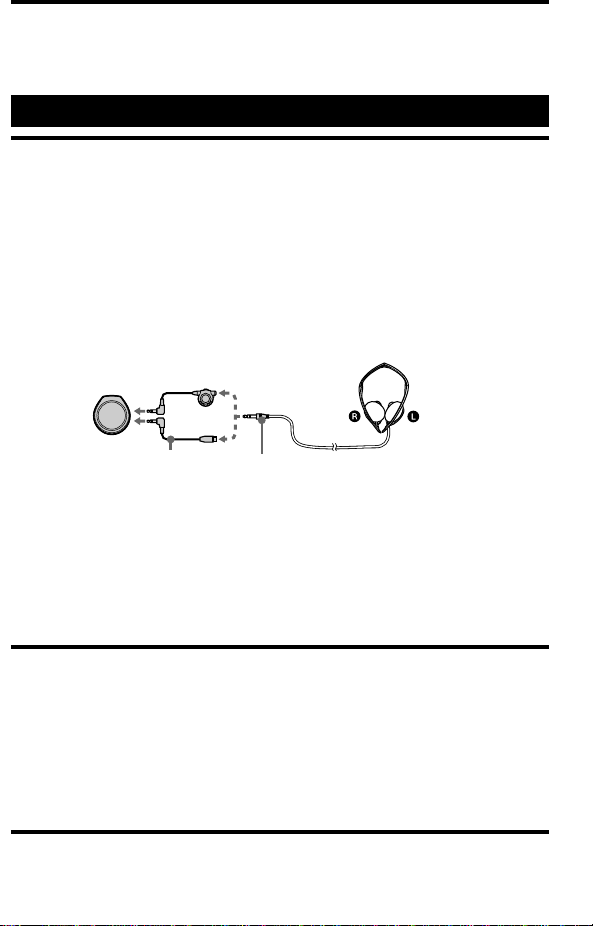
A
headphones
remote commander
stereo mini-plug
extension cord
( supplied )
When connecting to an MD WALKMAN*/ CD
WALKMAN/ WALKMANremote commander
with a jack for a stereo mini-plug.
When directly connecting to an MD
WALKMAN*, CD WALKMANor WALKMAN
with a jack for a stereo mini-plig.
Sustitución de las fundas para los auriculares
(consulte la figura B)
A continuación, le indicamos cómo cambiar el auricular izquierdo.
1Gire la funda para los auriculares hacia la derecha y extráigala (gire el auricular
Ren el sentido contrario).
2Alinee la flecha de la almohadilla con la flecha de la funda, gire la funda hacia
la izquierda y fíjela (gire el auricular Rhacia la derecha).
Nota
Procure que el extremo de la banda para el cuello no le golpee en los ojos o en la cara.
Plegado y desplegado de los auriculares (consulte la
figura C)
Plegado
Pliegue los auriculares hacia usted como se ilustra en la figura correspondiente.
Italiano
Uso (fig. A)
1Collegare le cuffie all’apparecchio AV.
Il presente prodotto può essere collegato ad un telecomando mediante
una presa per minispina stereo.
Esistono due tipi di telecomando Sony progettati per i lettori audio portatili: un tipo
dotato di presa per microspina (MP) e un tipo per minispina stereo (SP). Prima
dell’acquisto, assicurarsi che il presente prodotto possa essere utilizzato con il
lettore stereo portatile in uso.
2Posizionare la fascia con il cavo collocato sulla spalla sinistra.
3Indossare le cuffie con l’orecchio sinistro tra l’unità guida (contrassegnata da L) e la
fascia e l’orecchio destro tra l’unità guida (contrassegnata da R) e la fascia.
4Regolare l’angolazione della fascia in modo che le cuffie si adattino alle orecchie.
Sostituzione delle protezioni per le cuffie (fig. B)
La procedura riportata di seguito si riferisce alla sostituzione delle protezioni del
lato sinistro.
1Ruotare la protezione per le cuffie in senso orario, quindi rimuoverla (lato R,
ruotare in senso antiorario).
2Allineare la freccia sull’auricolare con la freccia sulla protezione, ruotare
quest’ultima in senso antiorario, quindi fissare in posizione (lato R, ruotare in
senso orario).
Nota
Prestare attenzione a non urtarsi il viso o gli occhi con le estremità della fascia.
Come piegare e aprire le cuffie (fig. C)
Per piegare
Piegare le cuffie verso di sé, come illustrato.
Kopfhörer
Fernbedienung
Stereoministecker
Verlängerungskabel
(mitgeliefert)
Beim Anschließen an eine MD WALKMAN/CD
WALKMAN/WALKMAN-Fernbedienung mit
einer Buchse für einen Stereoministecker
Beim direkten Anschließen an einen MD
WALKMAN/CD WALKMANoder WALKMAN
mit einer Buchse für einen Stereoministecker
casque
télécommande
minifiche stéréo
prolongateur
(fourni)
Raccordement à la télécommande d’un
WALKMANMD / WALKMANCD / WALKMAN
équipée d’une prise pour minifiche stéréo.
Raccordement direct à un WALKMANMD,
WALKMANCD ou WALKMANéquipé d’une
prise pour minifiche stéréo.
auriculares
mando a distancia
miniclavija estéreo
cable alargador
(suministrado)
Conexión de los auriculares al mando a distancia de
un MD WALKMAN, CD WALKMANo WALKMAN
con una toma para miniclavija estéreo.
Conexión de los auriculares directamente a un MD
WALKMAN, CD WALKMANo WALKMANcon
una toma para una miniclavija estéreo.
C
Instrukcja obsługi
Használati útmutató
Návod k obsluze
Návod na používanie
Инструкция по эксплуатации
cuffie
telecomando
minispina stereo
prolunga
(in dotazione)
Se viene collegato un telecomando dotato di presa
per minispina stereo da utilizzare con un
WALKMANMD / WALKMANCD / WALKMAN.
Se il collegamento viene effettuato direttamente
ad un WALKMANMD / WALKMANCD /
WALKMANdotato di presa per minispina stereo.
“WALKMAN” and are the registered trademarks of Sony
Corporation.
«WALKMAN» est une marque déposée par Sony Corporation pour représenter les produits
stéréo dotés d’écouteurs.
est une marque de Sony Corporation.