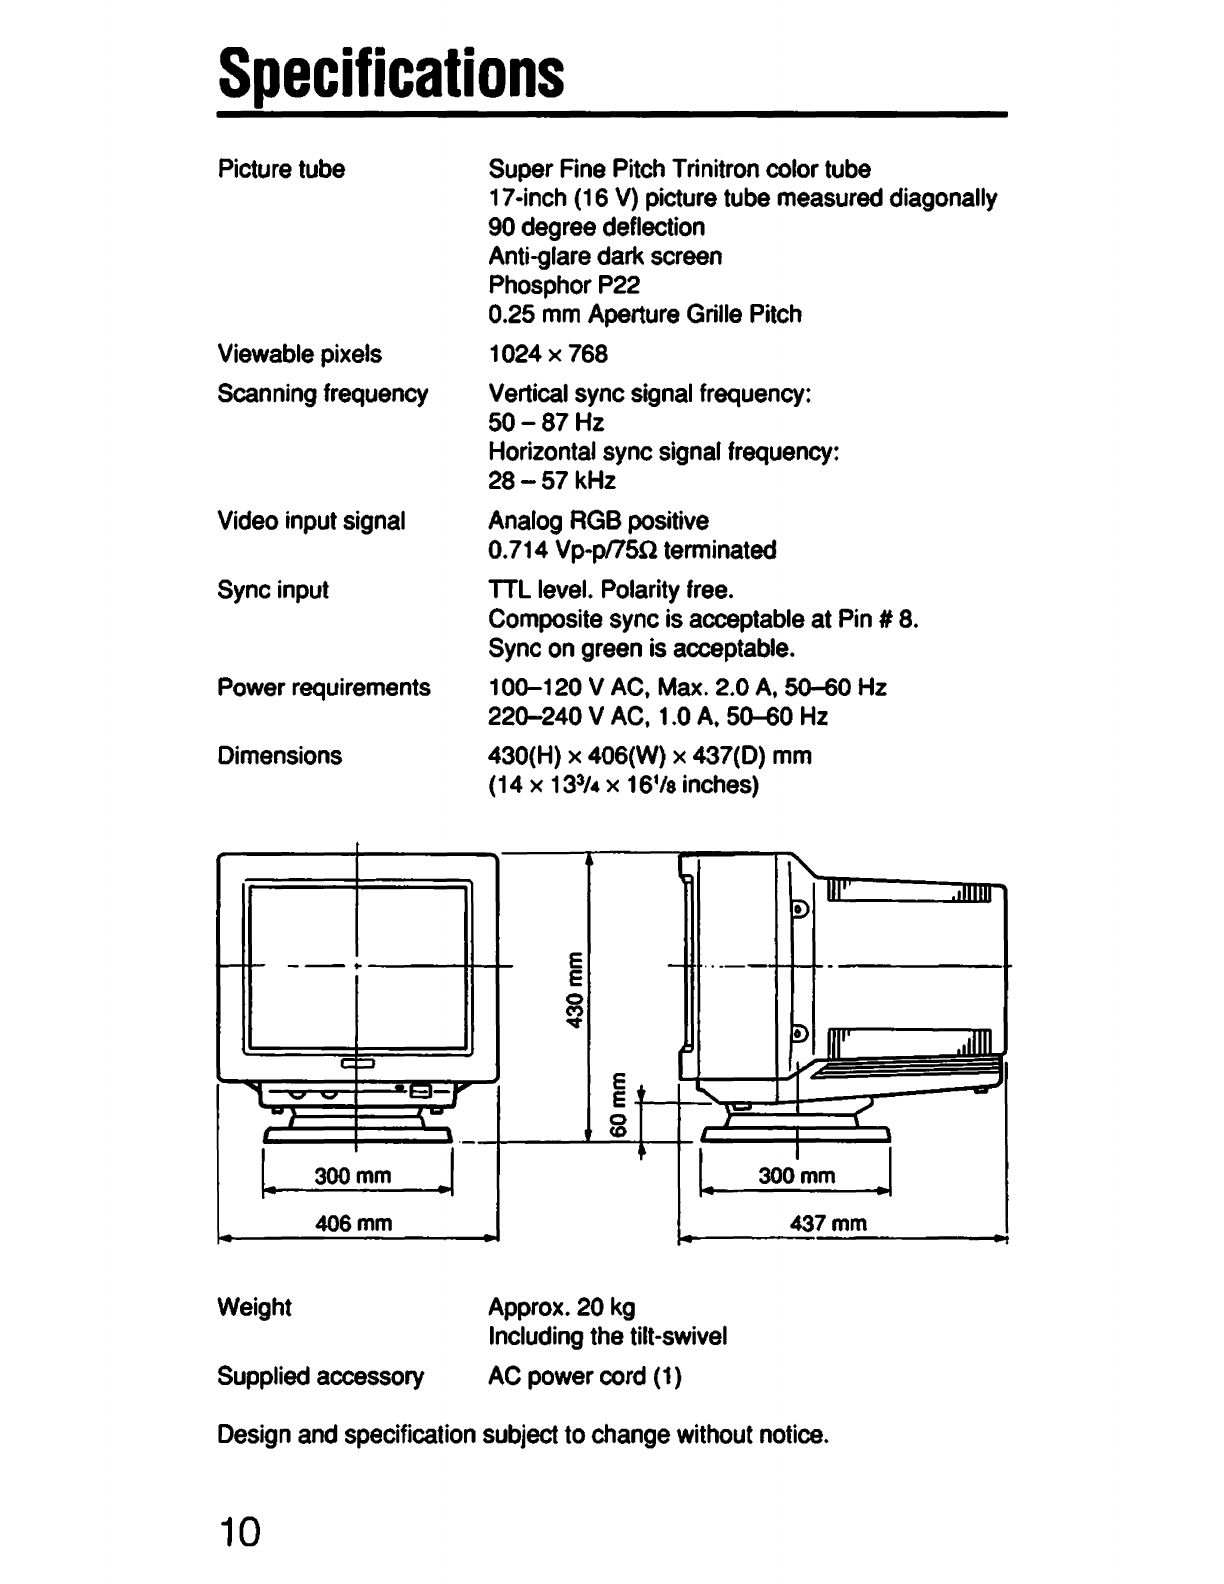
Sony Multiscan CPD-1604S User manual

SONY.
Multiscan@ Color Computer Display
CPD·1604S
Operating Instructions page 2
Mode d'emploi page 16
Owner's
Record
The
model
and
serial
numbers
are
located
at
the
rear
of
the
unit.
Record
the
serial
number
in
the
space
provided
below.
Refer
to
these
numbers
whenever
you
call
upon
your
dealer
regarding
this
product.
Model
No.
CPO-1604S
Serial
No.-------
Multiscan

English
WARNING
To
prevent
fire
or
shock
hazard,
do
not
expose
the
unit
to
rain
or
moisture.
Dangerously
high
voltage
is
present
inside
the
unit.
Do
not
open
the
cabinet.
Refer
servicing
to
qualified
personnel
only.
NOTE:
This
equipment
has
been
tested
and
found
to
comply
with
the
limits
for
a
Class
Bdigital
device,
pursuant
to
Part
15
of
the
FCC
Rules.
These
limits
are
designed
to
provide
reasonable
protection
against
harmful
interference
in
a
residential
installation.
This
equipment
generates,
uses
and
can
radiate
radio
frequency
energy
and,
if
not
installed
and
used
in
accordance
with
the
instructions,
may
cause
harmful
interference
to
radio
communications.
However,
there
is
no
guarantee
that
interference
will
not
occur
in
a
particular
installation.
If
this
equipment
does
cause
harmful
interference
to
radio
or
television
reception,
which
can
be
determined
by
turning
the
equipment
off
and
on,
the
user
is
encouraged
to
try
to
correct
the
interference
by
one
or
more
of
the
following
measures:
-
Reorient
or
rei
ocate
the
receiving
antenna.
-Increase
the
separation
between
the
equipment
and
receiver.
-
Connect
the
equipment
into
an
outlet
on
acircuit different
from
that
to
which
the
receiver
is
connected.
-
Consult
the
dealer
or
an
experienced
radiolTV
technician
for
help.
You
are
cautioned
that
any
changes
or
modifications
not
expressly
approved
in
this
manual
could
void
your
authority
to
operate
this
equip-
ment.
Forthecustomers In Canada
This
apparatus
complies
with
the
Class
B
limits
for
radio
noise
emis-
sions
set
out
in
Radio
Interference
Regulations.

The
CPD-1604S
is
a
high
resolution
computer
display
designed
for
use
with
microcomputers,
or
computers
having
analog
RGB
output.
Features
•
Super
Fine
Pitch
Trinitron
computer
display
with
an
anti-glare
dark
screen.
•
RGB
terminal
which
allows
equipment
with
analog
RGB
output
to
be
connected.
•
Compatible
with
the
PS/2
microcomputers
using
VGA.
•
Multiscan
capacity
which
mal(es
it
compatible
with
a
variety
of
computer graphics standards.

Table
of
Contents
~rEtc:cllJti()rl!)
...•
t
•••••••••••••••••••••••••••••••••••••••••••••••••••••••••••••••••••••••••••••••••••••••••
fi
L.()<:CIti()rl
ilflct
f=lJrlc:ti()rl
()f
~()rltrC)l!t
••••••••••••••••••••••••••••••••••••••••••••••••.••••••••••
E)
~()I1r1Etc:ti()r1!S
•••••••••••••••••••••••••••••••••••••••••••••••••••••••••••••••••••••••••••••••••••••••••••••
fI
lJ!tEt
()f
tllEt
1rilt-~~i"EtI
.....•..•••••••••••••••••••••.•......•••••••••••••••••
•••••••....••..••••••••••
~
S)~ific:ilti()rl!)
•.••••••••••••••••••••••••••••••••.•••.•••••••••••••••••••••••••••••.••••••••••••••••••••••
1()
lril1lirlCJ
<::IlClrt
•••••••••••••••••••••••••••••••••••••••••••••••••••••••••••••••••••••••••••.••••••••••••••••• 11
~~~Etrlcji)(
••••••••••••••••••••••••••••••••••••••••••••••••••••••••••••••••••••••••••••••••••••••••••••••••••
1~

Precautions
Onaafety
•
Operate
the
unit
only
at
100
to
120V
AC,
50-60
Hz.
•
Should
any
liquid
or
solid
object
fall
into
the
cabinet,
unplug
the
unit
and
have
it
checked
by
qualified
personnel
before
operating
it
any
further.
•
Unplug
the
unit
from
the
wan
outlet
if
it
is
not
to
be
used
for
several
days.
•
To
disconnect
the
AC
power
cord.
pull
it
out
by
the
plug.
Never
pull
the
cord
itself.
On Installation
•
Allow
adequate
air
circulation
to
prevent
internal
heat
build-up.
Do
not
place
the
unit
on
surfaces
(rugs,
blankets,
etc.)
or
near
materials
(curtains,
draperies)
that
may
block
the
ventilation
holes.
•
Do
not
install
the
unit
in
a
location
near
heat
sources
such
as
radiators
or
air
ducts,
or
in
places
subject
to
direct
sunlight,
excessive
dust,
mechanical
vibration
or
shock.
On
cleaning
To
keep
the
unit
looking
brand-new,
periodically
clean
it
with
a
soft
cloth.
Stubbom
stains
may
be
removed
with
a
cloth
lightly
dampened
with
a
mild
detergent
solution.
Never
use
strong
solvents
such
as
thinner
or
benzine.
or
abrasive
cleansers
since
these
will
damage
the
cabinet.
As
a
safety
precaution,
unplug
the
unit
before
cleaning
it.
On repacking
Do
not
throw
away
the
carton
and
packing
materials.
They
make
an
ideal
container
in
which
to
transport
the
unit.
When
shipping
the
unit
to
another
location.
repack
it
as
illustrated
on
the
carton.
If
you
have
any
questions
about
this
unit,
contact
your
authorized
Sony
dealer.

Location
and
Function
of
Controls
Iiii.'
,I
,
•
Three-row
D-sub
15
pin
[II
POWER
switchand indicator
To
tum
on
the
power
of
the
unit.
press
this
switch.
The
indicator will
light
up.
To
turn
off
the
unitt
press
it
again.
00
CONTRAST
control
«))
Turn
clockwise
to
increase
contrast,
or
counterclockwise
to
decrease
contrast.
00
BRIGHTNESS
control
(0)
Turn
clockwise
for
a
brighter
display, or
turn
counterclockwise
for
a
darker
display.
[!) AC
IN
connector
Conned
to
an
AC
outlet
with
the
supplied
AC
power
cord.

IIJ
AUTO SIZE switch
Depending
on
the
microcomputer
connected
to
the
display,
set
this
switch
to
the
appropriate
position.
LOCK:
For
the
IBM
PS/2
microcomputer
using
the
VGA
mode.
When
this
switch
is
set
to
LOCK,
the
timing
is
automatically
adjusted
to
the
VGA
mode.
and
the
H
SIZE,
H
SHIFT.
V
SIZE
and
V
CENT
controls
will
have
no
effect.
ADJ:
For
other
microcomputers
having
analog
RGB
output.
When
this
switch
is
set
to
ADJ.
adjust
the
display
with
the
H
SIZE,
H
SHIFT,
V
SIZE
and
V
CENT
controls.
III
H SIZE (horizontal size) control
Turn
this
control
to
adjust
the
horizontal
size
of
the
display.
III
H SHIFT (horizontal shift) control
Turn
this
control
to
adjust
the
center
of
the
display
horizontally.
1!1
V SIZE (vertical size) control
Turn
this
control
to
adjust
the
vertical
size
of
the
display.
lI1
V CENT (vertical center) control
Turn
this
control
to
adjust
the
center
of
the
display
vertically.

Connections
Connect
the
power
cord
and
the
color
monitor
cable.
Be
sure
to
tum
the
power
of
the
unit off
before
making
the
connection.
Rear
of
the
CPD·1604S
"'C=====~
Microcomputer
AC
power
cord
(supplied)
--c::B
'-'I.Iil~
to
AC
IN
~~~~;3~
Threa.row
D-sub
15
pin
(male)
to
AGB
OUT
Color
monitor
cable
1
Align
the
plug
with
the
receptacle.
2
Plug
in
and
tighten
the
screws
by
a
hand.
~
To
disconnect
the
plug.
loosen
the
screws.
RGB
Input
Pin
Assignment
6 0 0 0 0 0 10
00000
..
IS
1 2 3
R G B
10
11
12 13
14
15
GND GND -
HSYNC
V SYNC -
9

Use
of
the
Tilt-Swivel
With
the tilt-swivel, this unit
can
be
adjusted
to
be
viewed
at your desired
angle
within
90
0 horizontally
and
20
0 vertically.
To
tum
the
unit horizontally,
hold
it at its
bottom
with
both
hands
as
illustrated
below.

Specifications
Picture
tube
Viewable
pixels
Scanning
frequency
Video
input
signal
Sync
input
Power
requirements
Dimensions
-
!-
--
c:
?
"
-"'
-
~_
·r
--
I~
300mm J
406mm
Weight
Supplied
accessory
Super
Fine
Pitch
Trinitron
color
tube
17-inch
(16
V)
picture
tube
measured
diagonally
90
degree
deflection
Anti-glare
dark
screen
Phosphor
P22
0.25
mm
Aperture
Grille
Pitch
1024
x
768
Vertical
sync
Signal
frequency:
50-87Hz
Horizontal
sync
signal
frequency:
28-57
kHz
Analog
RGB
positive
0.714
Vp-pI75Q
terminated
TTL
level.
Polarity
free.
Composite
sync
is
acceptable
at
Pin
#
8.
Sync
on
green
is
acceptable.
100-120 V ACt Max. 2.0 At
50-60
Hz
220-240 V
ACt
1.0
A.
50-60
Hz
430(H)
x
406(W)
x437(0)
mm
(14
x
13
3
/4
x
16
1/8
inches)
~
E -
E
0
~
I
E
"-
E
i I
I~
Approx.
20
kg
Including
the
tift-swivel
AC
power
cord
(1)
"-
III'
~
!)
III"
.Y
I
~
I
300mm
437mm
.I
...
nOf
~
Design
and
specification
subject
to
change
without
notice.
10

Timing
Chari
The following timing chart shows approximate values.
MONITOR
ACCEPTABLE
TIMING
EXAMPLE
I I I I
VIDEO
, I
I I
I I
U
I I U
I I
SYNC
I I
I I
f I I
ACTIVE
I I I
BACK
PORCH(B.P)
I··
I~
--I
• I
14 I I
PERIOD
I
...
~I
SYNC
I I I
III
VGA
1 2 3
FREQ.
H
(kHz)
31.47 31.47 31.47
V
(Hz)
70.1
70.1
. 59.9
H
PERIOD
(~S)
31.78
SYNC
3.81
~
~
B.P
1.91
ACTIVE
25.42
V
PERIOD
(H)
449 449 525
SYNC
2 2 2
B.P
34 59
32
ACTIVE
400 350 480
SYNC
H
NEGA
POSI
NEGA
POlARITY
V
pas
I
NEGA
NEGA
CLOCKFREQ. (MHz) 25.175 25.175 25.175

[!I
1024
x
768
interace
(fh =
35.52
kHzIfv
=
87
Hz)
FREa.
H (kHz) 35.52
V
(Hz)
87.0
H
PERIOD
(pS)
28.15
SYNC
3.92
B.P
1.25
ACTIVE
22.81
V
PERIOD
(H)
408.5
SYNC
4
B.P
20120.5
ACTIVE
384
SYNC
POLARITY
H
POSI
V
POS)
CLOCKFREa. (MHz) 44.900
lII,OO:
When
the
AUTO
SIZE
SW
is
in
the
LOCKED
position,
picture
si
is
automatically
adjusted
for
the
above
listed
video
modes
<IIJ.
[!I).
All
sizing
controls
on
the
left
side
of
the
monitor
are
therefore
ineffective.
To
adjust
sizing
for
other
video
modes,
change
the
SW
to
ADJ
and
adjust
the
controls.
Polarity
free
with
the
timing
m,
00
if
the
AUTO
SIZE
SW
is
not
used.
[!]
35
kHz
non-interace
(example)
800 x 600
FREa. H (kHz) 35.16
V (Hz) 56.0
H
PERIOD
(1,18)
28.44
SYNC
3.11
B.P
2.67
DISPLAY
22.22
V
PERIOD
(H) 628
SYNC
14
B.P
7
ACTIVE
600
CLOCKFREa. (MHz) 36.000
12

[!]
48
kHz
non-interace (example)
1024 x 768
FREQ.
H
(kHz)
48.780
V
(Hz)
60.00
H
PERIOD
(IlS) 20.500
SYNC
1.500
B.P
2.000
DISPLAY
16.000
V
PERIOD
(H)
813
SYNC
3
B.P
39
ACTIVE
768
CLOCKFREQ.
(MHz)
64.000
[!I,~:
SYNC
POLARITY
FREE
[!]
57
kHz
non-interace
1024 x 768
FREQ.
H (kHz) 56.476
V
(Hz)
70.069
H
PERIOD
(JtS)
17.707
SYNC
1.813
B.P
1.920
ACTIVE
13.653
V
PERIOD
(H)
806
SYNC
6
B.P
29
ACTIVE 768
CLOCKFREQ.
(MHz)
75.000

Appendix
SonyTrlnltron System
Sony
used
its
skilled
research
and
development
teams
to
create
the
first
Trinitron
TV,
introduced
20
years
ago.
Some
40
million
Trinitrons
have
been
sold
worldwide
so
far.
and
Sony
won
the
Emmy
Award
for
technical
quality
in
19n.
Its
Super
Fine
Pitch
(the
narrowest
dot
pitch
in
the
industry
for
each
CRT
size
class)
provides
images
that
are
just
as
sharp
and
clear
as
prints,
making
it
most
suitable
for
computer
graphics,
not
to
mention
TV
broadcasts.
Features
Clear,
crisp,
and
easy-to-read
screen
Trinitron's
black
screen
increases
the
contrast
by
50
percent.
and
its
1-
gun,
3-beam
system
with
one
large
lens
allows
more
precise
color
beam
focusing.
Thus
colors
are
reproduced
more
distinctly.
Higher
contrast
also
recreates
computer
graphics
and
characters
that
are
crisp.
clear.
and
easy
to
read.
Trinitron's
1-gun,
3-beam
System
Shadow
mask

Display
with
lessglare and distortion
Only
Trinitron
incorporates
a cylindrical
screen
with
a
completely
straight.
vertically
flat
surface.
The
cylindrical
screen
delivers a clear
undistorted
picture,
and
also
eliminates
ambient
light
reflection,
for
long
viewing
without
fatigue.
Trinitron's Flat Screen
Shadow
mask
Brighter picture and more accurate
colors
Sony's
exclusive
Aperture
Grille
with
long
and
unbroken
slits delivers
more
color
and
brightness
to
the
screen.
The
result
is
a brighter
and
more
beautiful
picture.
This
Grille
is
stabilized
with
two
damper
wires.
When
viewing
images
with
light
backgrounds.
these
wires
are
sometimes
visible
as
two
fine
lines.
Trinitron's Aperture Grille
System Shadow
mask
15

AVERTISSEMENT
Ne
jamais
exposer
I'appareil
a
la
pluie
ni
Ie
laisser
dans
un
milieu
humide
car
ceci
favoriserait
eventuellement
un
incendie
ou
une
electrocution.
De
hautes
tensions
circulent
dans
les
circuits
internes
et
caei
constitue
un
danger
potentiel.
Ne
jamais ouvrir
Ie
coffret
de
I'appareil.
Contier
les
reglages
et
les
depannages
a
un
technicien
qualifie.
Pour les utillsateurs au Canada
Cet
appareil
est
conforme
aux
normes
Classe
B
pour
bruits
radioelectriques,
specifies
dans
Ie
Reglement
sur
Ie
brouillage
radioelectrique.
Le
CPD-1604S
est
un
visuel
d'ordinateur a
haute
resolution,
specialement
conqu
pour
etre
utilise
avec
les
micro-ordinateurs
ou
les
ordinateurs
munls
d'une
sortie
RGB
analogique.
Caracteristiques
•
Visuel
d'ordinateur
Trlnitron
a
super
haute
definition
muni
d'un
ecran
noir
anti-eblouissant.
•
Connecteur
RGB
assurant
Ie
raccordement
de
tout
8quipement
muni
d'une
sortie
RGB
analogique.
•
Compatible
avec
Ie
micro-ordinateur
PS/2
munl
du
VGA.
•
Capacite
de
balayage
muhiple
qui
Ie
rend
compatible
avec
une
grande
variete
de
normes
graphiques
d'ordinateur.
Table
des
matieres
Precautions
..•..•..•
,
...............................
I.
I
........
,
.......
I
....................
It
••••
ItItIt
••••••••
17
Emplacement
et
fonction
des
commandes
..............................................
18
Branchements
..•.
II.
ItII
•••
IIII
••••••
IIII
II.
IIII
•••
II.
II
•••••••
II
••••••••
II
••••••••
II
••••••••••
II
••••••
20
Utilisation
du
support
inclinable-orientable...............................................
21
Specifica.tions
•.•.•••••••••••.•.
II
••••••••••••••••••••
It
••••••••••
IIII
••
II
•••••••••••••••••••••••••••••••
22
Diagram
me
de
temps
•....•....•.•.••.•.......•
,
•..•••.•........••••••.•.......••
,
•••••••...•....••.
23
Appendice
.................................................................................................
26
16

Precautions
Securlte
•
L'appareil
fonctionne
uniquement
sur
une
tension
d'alimentation
secteur
de
100
a
120V,
50/60
Hz.
•
Si
un
liquide
ou
un
solide
quelconque
penetre
a
I'interieur
de
I'appareil,
Ie
debrancher
imm9diatement
et
Ie
faire
verifier
par
un
depaneur
professionnel
avant
de
Ie
remettre
en
service.
•
Oebrancher
I'appareil
du
secteur
quand
iI
n'est
pas
appele
a
fonctionner
pendant
plusieurs
jours.
•
Pour
debrancher
Ie
cordon
secteur,
saisir
la
fiche
at
debrancher.
Ne
jamais
tirer
sur
Ie
cordon
proprement
dit.
Installation
•
Assurer
une
circulation
d'air
suffisante
it
I'appareil
pour
empAcher
tout
accroissement
thermique
interne.
Ne
pas
Ie
poser
sur
une
surface
(tapis
ou
couvertures,
etc.)
ou
pres
de
materiaux
(rideaux,
tentures,
etc.)
risquant
de
boucher
les
ouvertures
d'aeration.
•
Ne
pas
placer
l'appareU
pres
de
sources
de
chaleur
telles
que
das
radiateurs
au
des
gaines
de
ventilation
au
directement
au
soleil;
eviler
aussl
la
presence
excessive
de
pousslere
et
de
vibrations
d'orlgine
mecanique.
Entretlen
Pour
que
I'apparell
conserve
en
permanence
son
aspect
neuf,
Ie
nettoyer
regulierement
avec
un
chiffon
doux.
Les
taches
plus
tenaces
peuvent
Atre
retin~es
avec
un
morceau
d'etoffe
I8gerement
impregnee
d'une
solution
detergente
neutre.
Ne
pas
se
servir
de
solvant
fort,
telque
diluant
it
peinture,
benzine
au
produits
d'entretien
abrasifs,
ces
produits
risquant
d'abimer
la
flnitlon
exterieure.
Par
mesure
de
securite,
debrancher
Ie
cordon
secteur
avant
de
procecter
a
I'entretien
de
I'appareil.
Remballage
Ne
pas
se
defaire
du
carton
d'emballage
de
l'appareU
ni
des
elements
de
caJage.
C'est
encore
Ie
meilleur
moyen
d'emballage
qui
permet
de
trans-
porter
I'appareil
en
toute
securite.
Si
I'appareil
dolt
Atre
exp9die,
Ie
remettre
dans
son
emballage
d'origine
en
procedant
comme
indique
sur
Ie
carton.
Le
concessionnaire
auto
rise
Sony
est
tout
afait
qualifie
pour
repondre
a
toute
question
concernant
I'appareil.

Emplacement
et
fonction
des
commandes
CAble
de
moniteur
couleur
15
broches
en
trois
rangs
III Interrupteurd'alJmentatlon et
t'moln
(POWER)
Pour
mettre
I'appareil
sous
tension,
enclencher
eet
interrupteur.
Le
tamoin
s'allume
aussitOt.
Pour
Ie
mettre
hors
tension,
enclencher
de
nouveau
I'interrupteur.
[!) R'sIlage
de
contraste (CONTRAST,
(»
Tourner
ee
raglage
dans
Ie
sans
des
aiguilles
d'une
montre
pour
augmenter
Ie
contraste.
ou
dans
Ie
sans
contraire
pour
diminuer
Ie
contraste.
(!] Reglage
de
lumlnoslte (BRIGHTNESS,
0)
Toumer
ce
raglage
dans
Ie
sens
des
aiguilles
d'une
montre
pour
augmenter
Ia
luminosit8,
ou
dans
Ie
sans
contraire
pour
diminuer
la
luminosita.
[!) Connecteurd·ent
....
d'alimentation secteur(AC IN)
Brancher
ce
connecteur
sur
une
prise
secteur
a
I'aide
du
cordon
d'alimentation
sacteur
foumi.
18

[!]
S8lecteur de dimension automatique
(AUTO
SIZE)
Suivant
Ie
micro-ordinateur
raccords
a
I'Scran,
regler
ce
sslecteur
sur
la
position
appropriee.
LOCK:
Pour
un
micro-ordinateur
IBM
PS/2
fonctionnant
en
mode
VGA.
Lorsque
ce
selecteur
est
regie
sur
LOCK,
la
synchronisation
est
automatiquement
raglee
pour
Ie
mode
VGA,
at
les
reglages
H
SIZE,
H
SHIFT,
V
SIZE
et V
CENT
n'ont
aucun
eftet.
ADJ:
Pour
les
autres
micro-ordinateurs
munis
d'une
sortie
analogique
RGB.
Lorsque
ce
selecteur
est
regie
sur
ADJ.
ajuster
I'Scran
a
I'aide
des
r9glage8
HSIZE, H
SHIFT,
V SIZE
et V
CENT.
[!]
Reglage dedimension horlzontale
(H
SIZE)
Tourner
ce
rsglage
pour
ajuster
la
dimension
horizontale
de
I'eeran.
[!]
Reglage de dacalage horizontal
(H
SHIFT)
Toumer
ce
reglage
pour
ajuster
horizontalement
Ie
centre
de
I'eeran.
I!J
Reglage de dimension vertlcale
(V
SIZE)
Toumer
ce
reglage
pour
ajuster
la
dimension
verticale
de
('eeran.
{I]
Realage
de
cantrage
vertical
(V
CENT)
Toumer
ce
reglage
pour
ajuster
verticalement
Ie
centre
de
I'ecran.
--tr-

Branchements
Brancher
Ie
cordon
d'alimentation
secteur
et
raccorder
Ie
cAble
du
moniteur
couleur.
Prendre
soln
de
mettre
I'appareil
hors
tension
avant
d'effectuer
la
connexion.
Arrh~re
du
CPO-1604S
"r:=:====~
Micro-ordinateur
Cordon
d'alimentation
secteur
(foumi)
•
aune
c:BIl..IWIi~
a
AGB
OUT
prise
O-sub
a
15
broches
murale
en
trois
rangs
(mAle)
aACIN
CAble
du
moniteur
couleur
1
Aligner
la
fIChe
sur
la
prise
femelle.
2
Engager
at
serrer
les
vis
avec
la
main.
~
Pour
desengager
la
fiche,
desserrer
les
vis.
Affectation des broches d'entree
ROB
1 2 3
R G B
10
11
12
13
14
GND GND -HSYNC V
SYNC
20
60
0 0 0 0 10
00000
11
15
15
-
9
Other manuals for Multiscan CPD-1604S
2
Table of contents
Languages:
Other Sony Monitor manuals

Sony
Sony FWD 55W802A User manual

Sony
Sony FWD-42PV1A User manual

Sony
Sony LMD-XH550MD User manual

Sony
Sony BVM-1911 User manual

Sony
Sony SDM-S81 User manual

Sony
Sony SDM-HS75 User manual

Sony
Sony PFM-42V1A User manual

Sony
Sony LDI-D100B User manual

Sony
Sony LMD-151MD User manual

Sony
Sony LMD1541W User manual

Sony
Sony PlasmaPro PFM 42V1 User manual

Sony
Sony SDM-HS95 - 19" LCD Monitor User manual

Sony
Sony CPD-G520P User manual

Sony
Sony Multiscan SDM-N80 User manual

Sony
Sony LMD-4250W User manual

Sony
Sony LDI-100B User manual

Sony
Sony FW-50BZ30L User manual

Sony
Sony BVM-E251 User manual

Sony
Sony TRINITRON PVM-9045QM User manual

Sony
Sony LMD1951MD User manual