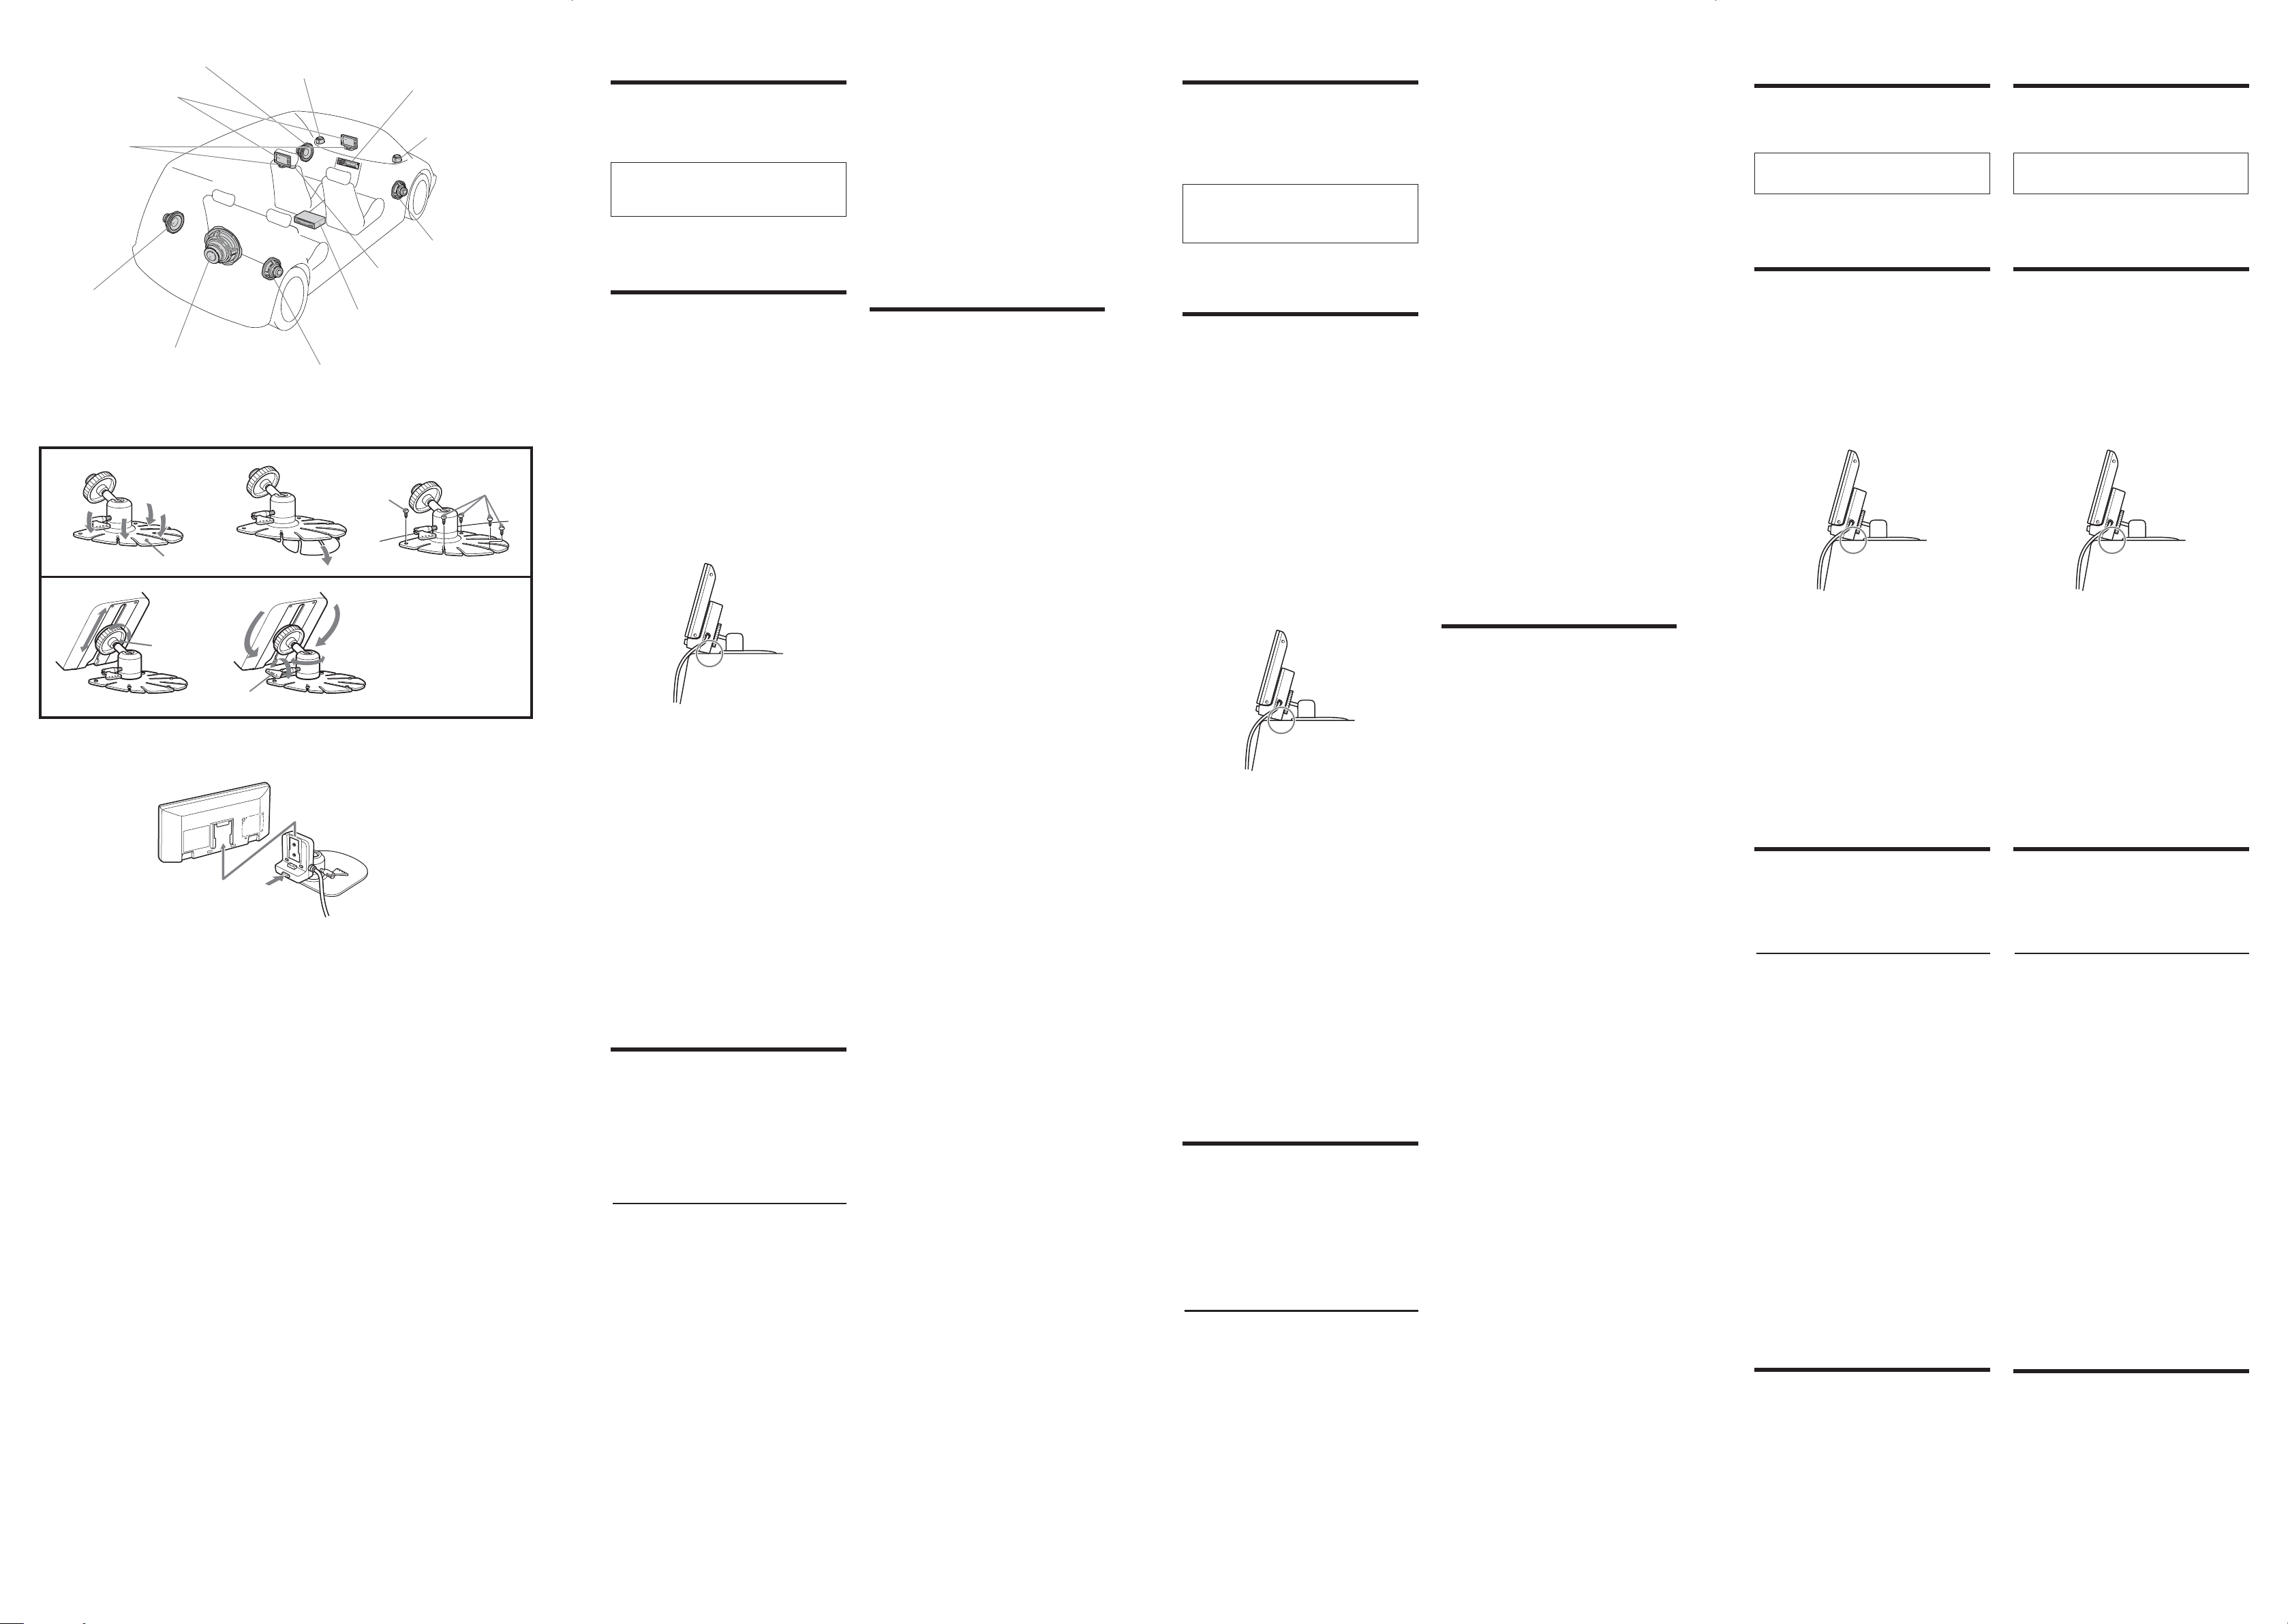
manuals.online logo
Brands
  1. Home
  2. •
  3. Brands
  4. •
  5. Sony
  6. •
  7. Monitor
  8. •
  9. Sony XVM-F65 Product guide

Sony XVM-F65 Product guide

MONITOR
(XVM)
INPUT
VIDEO 1
VIDEO 2
OUTPUT
VLRVLR
POWER
DC 12V
REAR FRONT
LOCATION
REAR/FRONT
INPUT
VIDEO 2
INPUT
VIDEO 1
OUTPUT
Mobile Monitor
Installation/connections
Instalación/conexiones
ڔᓤNjሣവೌ୻
安裝線路連接
2005 Sony Corporation Printed in Korea
XVM-F65
Parts list
Lista de piezas
ഃୈጙಂܭ
零件一覽表
Warning
Do not disassemble or remodel the unit.
This can cause electric shock, personal injury or
fire. Do not connect any other system’s power
supply cord to the unit’s power supply cord
directly. If you are in any doubt about the safe
installation of this unit, please consult your nearest
Sony dealer.
Do not damage any pipes, tubes, fuel tank
or electric wiring system when installing
this unit.
This can cause fire. Before drilling any holes in car
panels for the installation of this unit, make sure
the installation will not damage any hidden car
parts.
Do not use any nuts or bolts connected to
the steering linkage, fuel supply or
braking systems.
This can cause fire or loss of control of the car.
Do not mount the monitor where it will
interfere with the airbag system.
This may cause the airbag to malfunction and
injury to the passenger in case of a crash.
Caution
• This unit is designed for negative earth 12 V DC
operation only.
•Do not get the wires under a screw, or caught in
moving parts (e.g. seat railing).
•Before making connections, turn the car ignition
off to avoid short circuits.
•Connect the red power input leads only after all
other leads have been connected.
• Be sure to connect the red power input lead to
the positive 12 V power terminal which is
energized when the ignition key is in the
accessory position.
After installing and connecting the unit, tape the
cords to tie them up in a bundle so it will not
interfere with normal driving operations. Be sure
that the steering, shift lever and brake pedal do not
get tangled in the cords.
It is very dangerous for the cords to become
tangled with the gearshift lever during driving.
Notes
•Secure the connecting cords away from the seat
adjustment rails and the door frame.
• Make sure all other electric devices such as brake
lights and headlights are working properly after
installation is completed. Also check that the
indicators turn on and the horn works properly.
Fuse replacement
If the fuse blows, check the power connection and
replace the fuse. If the fuse blows again after
replacement, there may be an internal malfunction.
Warning
Use a fuse with the specified amperage rating. Use
of a higher amperage fuse may cause serious
damage to the unit.
Connections
Conexiones
ೌ୻
連接
Notes
•Be sure to connect the power input cord after all
other cords have been connected.
•Be sure to insert each connector securely, as
vibration through driving may cause a poor
connection.
•When removing the cable, hold the connector to
avoid damages.
Fuse (4A)
Fusible (4A)
ۣሙႋ)5B*
保險絲(4A)
Red
Rojo
ྻ
紅色
Black
Negro
ྻ
黑色
Blue
Azul
౸ྻ
藍色
Cigar lighter adaptor (supplied)
Toma de encendedor (suministrado)
࢛ዌ໭ᓞ୻໭)ᄋ৙*
點煙器轉接器(附贈)
To the cigar lighter socket
A la toma de encendedor
ᒗ࢛ዌ໭఻
至點煙器孔
To the parking brake switch cord
Al cable del interruptor del freno de mano
ᒗ໱ޱᒜࣅఎࡴሣ
至汽車制動開關導線
Switch the location you mount the monitor
To use the monitor on dashboard:
Switch to “FRONT” and connect the blue cord to the parking
brake.
To use the monitor behind the headrest:
Switch to “REAR”.
Cambia la ubicación en que instala el monitor
Para utilizar el monitor sobre un tablero:
Seleccione “FRONT” y conecte el cable azul al freno de mano.
Para utilizar el monitor detrás del reposacabezas:
Seleccione “REAR”.
༤ધิჅڔᓤࡼପ၁໭ࡼᆡᒙ
ဧ፿ጥܭۇ࿟ࡼପ၁໭ǖ
༤ધᒗĐGSPOUđ݀ೌ୻౸ྻ୻ሣᒗ࿂ޱᐚă
ဧ፿ᄿణઁෂࡼପ၁໭ǖ
༤ધᒗĐSFBSđă
切換您所安裝的監視器的位置
使用儀錶板上的監視器:
切換至“FRONT”並連接藍色接線至剎車閘。
使用頭靠後面的監視器:
切換至“REAR”。
To other monitor
A otro monitor
ᒗ໚Ⴧପ၁໭
至其他監視器
RCA cable (not supplied)
Cable RCA (no suministrado)
SDB࢟಄)ݙᄋ৙*
RCA 電纜(不附贈)
RCA cable (supplied)
Cable RCA (suministrado)
SDB࢟಄)ᄋ৙*
RCA 電纜(附贈)
From DVD player
Del reproductor de DVD
౶ᔈEWE݃૦
來自 DVD 播放機
Installation cradle
Soporte de instalación
ڔᓤଦ
安裝架
2-630-670-31(1)
RCA cable (not supplied)
Cable RCA (no suministrado)
SDB࢟಄)ݙᄋ৙*
RCA 電纜(不附贈)
Advertencia
No desmonte ni modifique la unidad.
Podría ocasionar descargas eléctricas, lesiones o un
incendio. No conecte ningún otro cable de
alimentación de otro equipo directamente al cable
de alimentación de esta unidad. En caso de dudas
sobre la instalación de esta unidad, consulte a su
distribuidor Sony más cercano.
No dañe ningún conducto, tubo, tanque
de combustible o cableado eléctrico al
instalar esta unidad.
Podría ocasionar un incendio. Antes de realizar
cualquier perforación en los paneles del automóvil,
asegúrese de que la instalación no dañe los
componentes ocultos del automóvil.
No utilice tuercas ni pernos que estén
conectados al mecanismo de la dirección, a
los sistemas de suministro de combustible
o sistemas de frenado.
Podría ocasionar un incendio o producir la pérdida
de control del automóvil.
No instale el monitor donde pueda
obstaculizar el funcionamiento del sistema
de airbag.
Esta instalación puede causar fallos de
funcionamiento del airbag y lesionar al ocupante
en caso de accidente.
Precaución
•Esta unidad ha sido diseñada para funcionar
sólo con CC de 12V de masa negativa.
• No coloque los cables debajo de ningún tornillo,
ni los aprisione con piezas móviles (p. ej., los
raíles del asiento).
•Antes de realizar las conexiones, ponga la llave
de contacto en la posición OFF del automóvil
para evitar cortocircuitos.
• Conecte los cables de entrada de alimentación
rojos sólo después de que todos los demás cables
hayan sido conectados.
•Asegúrese de conectar el cable de entrada de
alimentación rojo en el terminal positivo de 12 V
que recibe alimentación cuando la llave de
contacto está situada en la posición de
accesorios.
Después de instalar y conectar la unidad, agrupe
los cables atándolos con cinta adhesiva de modo
que no interfieran durante las operaciones de
conducción normales. Asegúrese de que la
dirección, palanca de cambios y el pedal de freno
no se enredan con los cables.
Es muy peligroso que los cables se enreden con
la palanca de cambio de velocidades durante la
conducción.
Notas
•Mantenga los cables de conexión alejados de los
rieles para ajustar el asiento y de la puerta.
•Asegúrese de que el resto de los dispositivos
eléctricos como las luces de frenado y faros
inclinables funcionan correctamente una vez
concluida la instalación. Compruebe también que se
encienden los indicadores y que la bocina funciona
correctamente.
Cambio de fusible
Si se fundiera el fusible, revise la conexión de
alimentación y cambie el fusible. Si el fusible se
funde de nuevo tras reemplazarlo quizá exista
algún problema de funcionamiento interno.
Advertencia
Asegúrese de utilizar un fusible cuyo amperaje sea
idéntico al especificado. Si utiliza un amperaje
superior puede dañar seriamente la unidad.
வস
༿ᇖގቘ૞খᓤ۾૦ă
ᑚ્ᐆ߅࢟ૣĂཽ࿽࿛૞໦૜ă༿ᇖڳ໚Ⴧᇹᄻ
ࡼ࢟Ꮞሣᒇ୻Ꭷ۾૦ࡼ࢟Ꮞሣ୻ᄰăྙ࣪۾૦ࡼ
ڔཝڔᓤ඗ᎌڳᆻLj༿௓தሶTpozளሾ࿜ᓽኯă
ڔᓤ۾૦ဟ༿ᇖႼ࿛ࡴĂྟĂᎉረ૞ݚሣ
ᇹᄻă
ᑚ્ᐆ߅໦૜ăᏴ໱ޱጥܭۇ࿟ڔᓤ۾૦ኊᔞ఻
ᒄ༄Lj።ཀྵۣڔᓤᔫጓݙ્Ⴜ࿛໱ޱࡼීഴݝ
ୈă
༿ᇖஐᓐ᎖ሶ๤ೊࣅ૦৩Ă৙ᎉᇹᄻ૞࿂ޱ
ᇹᄻሤೌࡼ൛ඍ૞൛ၴă
ᑚ્ᐆ߅໱ޱ໦૜૞ပ఼ă
ᇖ୓ପ၁໭ᓤᏴᎌڏڔཝ໮ฌࣅᔫࡼ࢐ă
ᑚ્Ᏼညޱૢဟဧڔཝ໮ฌပഉLj࠭࿛߇
ఱă
ᓖፀ
•۾૦ஞ৙ঌ૵୻࢐23Wᒇഗݷᔫ࿸ଐă
•ݙገဧࡴሣଚᏴ൛ၴሆLj૞ླྀᏴጤࣅݝୈ࿟
DŽྙǖᔭጬ၄࿟Džă
•஠ቲೌ୻ᒄ༄Lj༿ሌܕ໱ޱࡼ࢛૜໭Ljጲܜ඾
࣢വă
•ྻ࢟Ꮞၒྜྷ፛ሣᒑᎌ໚Ⴧཝݝ፛ሣ௿ጯೌ୻
ઁݣถೌ୻ă
•ྻ࢟Ꮞၒྜྷ፛ሣᇗܘ୻ᒗࡩ࢛૜Ꮩߓࠀ᎖ᓐ
࿸۸ᆡᒙဟᄰ࢟ࡼᑵ23W࢟Ꮞ࣡ᔇ࿟ă
Ᏼڔᓤೌ୻۾૦ઁLjڳჅᎌࡼሣ಄ᐔ߅ጙၦLjᑚ
ዹ௓ݙ્ছཷᑵޟࡼଧဩݷᔫăཀྵۣଧဩĂܤႥঝ
࿂ޱᒜࣅݙ્Ꭷሣ಄ெஉᏴጙ໦ă
ޱቲဩဟLjࡴሣᎧܤႥঝޖᏴጙ໦ဵလᆉሙࡼă
ᓖ
•ৼࢾೌ୻ࡴሣဧ໚Ꮠಭᔭᆡࢯஂޱඡౖă
•ገཀྵۣ۾૦ڔᓤᅲ܏ઁLj࿂ޱࡾĂ༄ࡾࢀ໚ჇჅᎌ࢟
໭࣒৔ᔫᑵޟLj݀ଶއᒎာࡾࡼ୻ᄰ౰ڪ৔ᔫဵ
೜ᑵޟă
ৎધۣሙႋ
ྙۣሙႋྍࣥLjᐌଶއ࢟Ꮞ୻ሣ݀ৎધۣሙႋă
ྙધઁᏳࠨྍࣥLjกඐభถࡀᏴดݝ৺ᑇă
வস
ገ፿ᒎࢾࢾ࢟ഗ༓ࣞࡼۣሙႋLj঱࢟ഗ༓ࣞࡼ
ۣሙႋᐌ્ዏᒮႼડ۾૦ă
警告
請勿拆卸或改裝本機。
這會造成電擊、人身傷害或起火。請勿把其他系統
的電源線直接與本機的電源線接通。如果對本機的
安全安裝沒有把握,請就近向 Sony 經銷商咨詢。
安裝本機時請勿損傷導管、軟管、油箱或佈線
系統。
這會造成起火。在汽車儀錶板上安裝本機而需鑽孔
之前,應確保安裝作業不會損傷汽車的非明露部
件。
請勿借助於方向盤聯動機構、供油系統或剎車
系統相連的螺帽或螺栓。
這會造成汽車起火或失控。
勿將監視器裝在有礙安全氣囊動作的地方。
這會在發生車禍時使安全氣囊失靈,從而傷害乘
客。
注意
•本機僅供負極接地 12 V 直流操作而設計。
•不要使導線夾在螺栓下,或繞挂在移動部件上
(如:座椅扶手上)。
•進行連接之前,請先關閉汽車的點火器,以避免
短路。
•紅色電源輸入引線只有其他全部引線均已連接好
後才能連接。
•紅色電源輸入引線務必接至當點火鑰匙處於輔助
設備位置時通電的正 12 V 電源端子上。
在安裝和連接本機後,把所有的線纜紮成一束,這
樣就不會干擾正常的駕駛操作。確保駕駛、變速杆
和剎車制動不會與線纜糾結在一起。
車行駛時,導線與變速杆纏在一起是十分危險的。
注
•固定連接導線使其遠離座位調節軌和車門框。
•要確保本機安裝完畢後,剎車燈、前燈等其他所有電
器都工作正常,並檢查指示燈的接通和喇叭工作是否
良好正常。
更換保險絲
如果保險絲熔斷,則檢查電源接線並更換保險絲。
如換後再次熔斷,那麼可能存在內部故障。
警告
要用指定額定電流強度的保險絲,而高電流強度的
保險絲則會嚴重損壞本機。
Notas
•Asegúrese de conectar el cable de entrada de
alimentación después de haber conectado todos los
demás cables.
•Asegúrese de insertar firmemente cada conector ya
que las vibraciones causadas por la conducción
pueden producir que la conexión no sea estable.
•Cuando retire el cable, sujete el conector para evitar
daños.
ᓖ
•࢟Ꮞၒྜྷ፛ሣᇗܘᏴ໚ჇჅᎌࡴሣ௿ጯ୻ઁݣೌ
୻ă
•ᇗܘಐৼ࢐ރྜྷඛৈ୻ሣ໭Ljፐᆐଧޱ߈ᒦࡼᑨࣅ
భถ્፛໦୻߿ݙ೜ă
•ڰሆ࢟಄ဟLj༿෽ᓹ୻ሣ໭ڰጲܜ඾Ⴜડă
注
•電源輸入引線務必在其他所有導線均已接好後才連
接。
•務必牢固地插入每個接線器,因為駕車過程中的震動
可能會引起接觸不良。
•拔下電纜時,請拿著接線器拔以避免損壞。
The numbers in the list are keyed to those in the instructions.
Los números de la lista corresponden a los de las instrucciones.
ܭดኔጲႁීၗࡼኔᆐᓰă
表內序號以說明書的序號為准。
23
56
41
7
×5
LC filter
Filtro LC
MD൉໭
LC 過濾器
Installation
Installation diagram A
Refer to the installation diagram and ask a
qualified technician for the installation of the
unit.
Be sure to securely fasten all equipment to
the car chassis, etc., to prevent them from
moving while your car is in motion.
Note
All equipment other than one Mobile Monitor and
one Connection Box is optional.
Before installing the
monitor
•This monitor is designed for safe operation
during driving.
•Be sure to install the unit in a suitable position.
Improper installation can cause a serious
accident.
•Be sure not to install the unit where it will
interfere with the airbag system.
Tips on the mounting location
•Choose the mounting location of the monitor
unit carefully.
•In order to prevent rattling from the vibration
of the car, make sure that the back or the
bottom of the cradle is touching the mounting
surface when mounting the monitor unit.
Caution on installation
Do not install the unit:
—in a hot place, subject to direct sunlight, near
a heater or in a car with the windows closed
(especially in summer) or in an extremely
cold place.
—in a place subject to excessive dust, moisture.
—in a place which could harm the passenger.
— in a place which could distract the driver.
—on a door or the ceiling.
Notes
•Clean the mounting surface well with a cleaning
cloth.
•Warm the mounting surface and the double-
sided tape to a room temperature of more than
20 °C and then press the base of the stand with
the double-sided tape attached, firmly against the
mounting surface.
•When tightening the screws, make sure that the
nearby wiring does not get caught.
•When drilling holes on the mounting surface,
make sure that there is nothing on the other side.
Installing the monitor
on the dashboard
Make sure the installation surface and monitor
position are suitable before beginning
installation. If you cannot find a suitable
mounting location, consult your car dealer or
your nearest Sony dealer before installation.
B
1Choose the mounting position, then
shape the base of the monitor stand
6to match the mounting surface.
Bend the base gently so there are no gaps
between the base and the mounting surface.
2Peel off the protective film from the
base of the monitor stand 6and
attach the base to the mounting
surface.
Make sure the base attaches to the mounting
surface completely.
Notes
•The double-sided tape will not stick firmly if
the mounting surface temperature is less than
20 °C. Use a hairdryer, etc. to warm up the
mounting surface before mounting.
•Consider carefully the mounting position
beforehand. If you change the position soon
after mounting the double-sided tape will be
weakened.
•When removing the monitor stand, preheat
the mounting surface with a hairdryer then
slowly peel up to remove.
3Fix the stand with the supplied
screws 7.
Note
Before drilling holes in the mounting surface,
make sure there is nothing behind the
dashboard.
4Adjust the height.
When the monitor is at the right height,
tighten the clamp. To keep the monitor from
rattling while driving, make sure the back or
bottom of the cradle is resting firmly on the
mounting surface.
5Adjust the angle.
Loosen the lever and adjust the angle. After
this adjustment, tighten the lever to fix the
angle.
Removing the monitor
from the cradle C
Slide the monitor upwards while pressing the
button on the cradle.
77
6
Clamp
Abrazadera
ଚ৯
夾箍
Lever
Palanca
ᑽঝ
支杆
Mobile Monitor
Monitor móvil
ጤࣅါପ၁໭
移動式監視器
Front Left speaker
Altavoz frontal izquierdo
༄ᔧዯဉ໭
前左揚聲器
Tweeter Left
Realzador de agudos izquierdo
ᔧ঱ፒዯဉ໭
左高音揚聲器
Head unit
Unidad principal
ᓍ૦
主機
Tweeter Right
Realzador de agudos derecho
ᎎ঱ፒዯဉ໭
右高音揚聲器
Front Right speaker
Altavoz frontal derecho
༄ᎎዯဉ໭
前右揚聲器
Rear Right speaker
Altavoz posterior derecho
ઁᎎዯဉ໭
後右揚聲器
Subwoofer
Realzador de graves
ިᒮࢅፒዯဉ໭
超重低音揚聲器
Rear Left speaker
Altavoz posterior izquierdo
ઁᔧዯဉ໭
後左揚聲器
Cradle
Soporte
ᑽଦ
支架
A
B
C
123
45
Instalación
Diagrama de
instalación A
Consulte el diagrama de instalación y solicite la
ayuda de personal técnico cualificado para
instalar esta unidad.
Asegúrese de sujetar con firmeza el equipo en
el chasis del automóvil, etc., para evitar que se
mueva cuando el vehículo esté en movimiento.
Nota
Todo equipamiento a excepción del monitor móvil
y la caja de conexiones es opcional.
Antes de instalar el
monitor
•Este monitor ha sido diseñado para poder ser
utilizado con seguridad durante la conducción.
•Asegúrese de instalar la unidad en una
posición adecuada. La instalación inadecuada
puede provocar un accidente grave.
• Asegúrese de no instalar la unidad donde
pueda obstaculizar el funcionamiento del
sistema de airbag.
Sugerencias para el lugar de
instalación
•Elija detenidamente el lugar donde vaya a
montar la unidad.
•Para evitar ruidos a causa de las vibraciones,
cuando instale el monitor, asegúrese de que la
parte posterior o inferior del soporte de
instalación descansan completamente sobre la
superficie de instalación.
Precauciones durante la instalación
No instale la unidad:
—en un lugar caliente expuesto a la luz solar
directa, cerca de un calentador o en un
automóvil con las ventanas cerradas
(especialmente en verano) o en un lugar
extremadamente frío.
— en un lugar expuesto a demasiado polvo o
humedad.
—en un lugar donde pudiera dañar al pasajero.
—en un lugar que pudiera distraer al conductor.
—sobre una puerta o el techo.
Notas
•Limpie debidamente la superficie de instalación
con el paño de limpieza.
•Caliente la superficie de instalación y el adhesivo
de doble cara hasta una temperatura ambiente de
más de 20 ºC, a continuación, presione
firmemente la base del soporte con el adhesivo
contra la superficie de instalación.
• Cuando apriete los tornillos, asegúrese de que no
quedan atrapados alambres del alrededor.
•Cuando perfore la superficie de instalación,
asegúrese de que no hay nada en la otra parte.
Instalación del monitor
sobre el tablero
Asegúrese de que la superficie de instalación y
la posición del monitor son las adecuadas antes
de comenzar la instalación. Si no encuentra una
posición adecuada para instalarlo, consulte a su
vendedor de automóviles o a su proveedor Sony
más cercano antes de proceder a la instalación.
B
1Elija la posición de instalación, a
continuación ajuste la base del
soporte del monitor 6para que ésta
coincida con la superficie de
instalación.
Doble la base ligeramente para que no
queden huecos entre ésta y la superficie de
instalación.
2Retire la película protectora de la
base del soporte del monitor 6y
una la base a la superficie de
instalación.
Asegúrese de que la base y la superficie de
instalación quedan completamente unidas.
Notas
•El adhesivo de doble cara no se pegará
completamente si la temperatura de la superficie
de instalación es inferior a 20 ºC. Utilice un
secador, etc., para calentar la superficie de
instalación antes de proceder a la instalación.
•Piense con antelación y detenidamente cuál
va a ser la posición de instalación. Si cambia
la posición al poco de haberlo instalado, el
adhesivo de doble cara perderá sus
propiedades.
•Si retira el soporte del monitor, caliente
previamente la superficie de instalación con
un secador y, a continuación, retire el
monitor poco a poco.
3Fije el soporte con los tornillos
suministrados 7.
Nota
Antes de perforar la superficie de instalación,
asegúrese de que no hay nada detrás del
tablero.
4Ajuste la altura.
Cuando el monitor se halle a la altura
adecuada, apriete la abrazadera. Para evitar
que el monitor vibre durante la conducción,
asegúrese de que la parte posterior o inferior
del soporte de instalación descansan
completamente sobre la superficie de
instalación.
5Ajuste del ángulo.
Afloje la palanca y ajuste el ángulo. Después
de esta operación, apriete la palanca para
fijar el ángulo.
Extraer el monitor del
soporte C
Desplace el monitor hacia arriba mientras hace
presión sobre el botón del soporte de instalación.
ڔᓤ
ڔᓤᅄA
۾ᓤᒙࡼڔᓤ༿ݬᑍڔᓤᅄ݀ኯᆰᎌᓾৃࡼଆၣ
ཽᏋă
ཀྵۣჅᎌᓤᒙ௿ڔཝৼࢾᏴ໱ޱౖଦ࿟Ljጲ
ᒏ჈ඣᏴ໱ޱቲ஠ᒦညጤࣅă
ᓖ
߹ጙৈጤࣅါପ၁໭ጙৈ୻ሣጲᅪࡼჅᎌᓤᒙ௿
ᆐኡ৪ୈă
ପ၁໭ڔᓤᒄ༄
•ପ၁໭ဵᆐ೫ଧဩဟࡼڔཝݷᔫ࿸ଐࡼă
•ᇗܘڔᓤᏴးࡼ࢐Ljڔᓤݙࡩ્፛ዏᒮ
ူ৺ă
•ପ၁໭ࡼڔᓤᇗܘݙڏڔཝ໮ฌᇹᄻă
ڔᓤᆡᒙኍᒀ
•ܘኍቃቦ࢐ኡᐋପ၁໭ᓤᒙࡼڔᓤᆡᒙă
•ᆐ၊ࡵ໱ޱᑩࣅ፬ሰLjڔᓤପ၁໭ᓤᒙဟLj
ܘኍཀྵཱྀପ၁໭ᓤᒙࡼ۳ݝ૞࢏ܟဵణᓕڔ
ᓤෂă
ڔᓤဟኍᓖፀ
ݙገڳᓤᒙڔᓤᏴǖ
—ვེࡼ࢐Ljᒇ୻ᑍ࿴ࡵዴLjణதଝེ໭૞
මܕᓹޱࠊࡼ໱ޱดDŽᎄ໚ဵለᄖDž૞ვದࡼ
࢐ă
—ࣶ޺Ljޭဘࡼ࢐ă
—્࿛ࡵ߇ఱࡼᆡᒙă
—્ᔜڏଧဩᑗࡼᆡᒙă
—ޱඡ࿟૞໱ޱᄖઔۇ࿟ă
ᓖ
•፿༹ஈݚݟছுڔᓤܭෂă
•୓ڔᓤෂၷෂᐫୢࡒଝᆨࡉ31ņጲ࿟ࡼ၀ᆨLj
཭ઁڳᄣᎌၷෂᐫୢࡒࡼ૥ᔭᐫᄣᆮᏴڔᓤෂ࿟ă
•ኟஜ൛ႋࢺဟLjኍഔፀএதࡼ࢟ሣ્ۻۏᓕă
•Ᏼڔᓤෂᔞ఻ဟLjጐኍཀྵཱྀ۳ෂဵᎌ૦ୈࢀă
Ᏼጥܭۇ࿟ڔᓤପ၁໭
ఎဪڔᓤ༄።ཀྵۣڔᓤෂପ၁໭ᆡᒙဵး
ࡼăྙิᑊݙ߲းࡩࡼᆡᒙLjభᏴڔᓤ༄ሶิ
ࡼ໱ޱளሾ࿜૞ሶ௓தࡼTpozளሾ࿜ᓽኯă
B
1ኡࢾڔᓤᆡᒙLj཭ઁଝ৔ପ၁໭ଦ࢏ᔭ
6LjဧᒄᎧڔᓤෂປ๼ă
༵༵ᅬᑓ࢏ᔭLjဧᒄᎧڔᓤෂᒄମ඗ᎌମᇺă
2۠བྷପ၁໭ଦ࢏ᔭ6ࡼۣઐۡෞLjڳ
࢏ᔭᄣ᎖ڔᓤෂă
ገཀྵۣ࢏ᔭᅲཝᄣᏴڔᓤෂ࿟ă
ᓖ
•ڔᓤෂࡼᆨࣞྙဵࢅ᎖31ņLjၷෂᐫୢࡒ
ܣభถݙถᐫᄣಐăڔᓤ༄Lj༿፿ࠏ૦ࢀ৊
ڔᓤෂଝེጙሆă
•ኍᎾሌᔄᇼ࢐ఠ൅ڔᓤᆡᒙăጙࡡᐫᄣ࿟೫
᎒খܤڔᓤᆡᒙဟLjၷෂᐫୢࡒࡼᐫᓹቶ୓્
ିࢅă
•ገቘሆପ၁໭ଦဟLj༿፿ࠏ૦ଝེጙሆڔᓤ
ෂLj཭ઁદદ࢐۠ఎᐫୢෂڳ჈ቘሆ౶ă
3፿Ⴥ๼۸ࡼ൛ࢺ7ৼࢾପ၁໭ଦă
ᓖ
ڔᓤෂᔞ఻༄ገཀྵۣጥܭۇઁ඗ᎌྀࣁᇝă
4ࢯᑳ঱ࣞă
ࡩପ၁໭ࠀ᎖ᑵཀྵ঱ࣞဟኟஜଚ৯ă໱ޱቲဩᒦ
ପ၁໭ݙࡻᎌ៫៹ဉLj໚۳ݝ૞࢏ݝᇗܘᆮৼ࢐
ࢎణڔᓤෂă
5ࢯᑳ୯ࣞă
ኟ႕ᑽঝ݀ࢯᑳ୯ࣞLjࢯઁLjኟஜᑽঝጲৼࢾ
୯ࣞă
࠭ᑽଦ࿟ቘሆପ၁໭C
ࡩږሆᑽଦ࿟ࡼږ୆ဟLjሶ༄ઘࣅପ၁໭ă
Press to release
Pulse para soltar
ږሆျ
按下釋放
Sony mobile DVD player DVX-11A, MEX-R1
Reproductor de DVD portátil Sony DVX-11A,
MEX-R1
TpozጤࣅါEWE݃૦EWY.22BLjNFY.S2
Sony 移動式 DVD 播放機 DVX-11A,MEX-R1
Installation kit
Kit de instalación
ڔᓤᔝୈ
安裝組件
安裝
安裝圖 A
本裝置的安裝請參照安裝圖並詢問有資格的技術
人員。
確保所有裝置均安全固定在汽車框架上,以防
止它們在汽車行進中發生移動。
注
除一個移動式監視器和一個接線盒以外的所有裝置均
為選購件。
監視器安裝之前
•監視器是為了駕駛時的安全操作而設計的。
•務必安裝在合適的地方,安裝不當會引發嚴重
事故。
•監視器的安裝務必不妨礙安全氣囊系統。
安裝位置須知
•必須小心地選擇監視器裝置的安裝位置。
•為防受到汽車振動影響,安裝監視器裝置時,
必須確認監視器裝置的背部或底邊是否靠住安
裝面。
安裝時須注意
不要把裝置安裝在:
—太熱的地方,直接照射到陽光,靠近加熱器或
密閉著車窗的汽車內(尤其是夏天)或太冷的
地方。
—多塵,潮濕的地方。
—會傷害到乘客的位置。
—會阻礙駕駛者的位置。
—車門上或汽車天花板上。
注
•用清潔布擦乾淨安裝表面。
•將安裝面和雙面粘膠帶加溫達 20℃ 以上的室溫,
然後把貼有雙面粘膠帶的基座粘貼穩在安裝面上。
•旋緊螺絲釘時,須留意附近的電線會被絆住。
•在安裝面鑽孔時,也須確認背面是否有機件等。
在儀錶板上安裝監視器
開始安裝前應確保安裝面和監視器位置是合適
的。如果您找不出適當的位置,可在安裝前向您
的汽車經銷商或向就近的 Sony 經銷商咨詢。
B
1選定安裝位置,然後加工監視器架底座
6,使之與安裝面匹配。
輕輕彎折底座,使之與安裝面之間沒有間隙。
2剝去監視器架底座 6 的保護薄膜,把
底座貼合於安裝面。
要確保底座完全貼在安裝面上。
注
•安裝面的溫度如果是低於 20℃,雙面粘膠帶
便可能不能粘貼牢。安裝前,請用吹風機等給
安裝面加熱一下。
•須預先仔細地考慮安裝位置。一旦粘貼上了而
又改變安裝位置時,雙面粘膠帶的粘著性將會
減低。
•要卸下監視器架時,請用吹風機加熱一下安裝
面,然後緩緩地剝開粘膠面把它卸下來。
3用所配備的螺釘 7 固定監視器架。
注
安裝面鑽孔前要確保儀錶板後沒有任何東西。
4調整高度。
當監視器處於正確高度時旋緊夾箍。汽車行駛中
監視器不得有哢噠聲,其背部或底部務必穩固地
抵靠安裝面。
5調整角度。
旋松支杆並調整角度,調好後,旋緊支杆以固定
角度。
從支架上卸下監視器 C
當按下支架上的按鍵時,向前滑動監視器。

Other manuals for XVM-F65

3

Other Sony Monitor manuals

Sony Trinitron BVM-D32E1WA User manual

Sony

Sony Trinitron BVM-D32E1WA User manual

Sony LMD-2451MT User manual

Sony

Sony LMD-2451MT User manual

Sony PFM-32C1 Quick start guide

Sony

Sony PFM-32C1 Quick start guide

Sony Glasstron PLM-A35E User manual

Sony

Sony Glasstron PLM-A35E User manual

Sony Trinitron PVM-14M2MDU User manual

Sony

Sony Trinitron PVM-14M2MDU User manual

Sony LMD1751WCC User manual

Sony

Sony LMD1751WCC User manual

Sony LDI-D100B User manual

Sony

Sony LDI-D100B User manual

Sony Multiscan SDM-N50R User manual

Sony

Sony Multiscan SDM-N50R User manual

Sony Trinitron HMD-A200/L User manual

Sony

Sony Trinitron HMD-A200/L User manual

Sony Trinitron GVM-1300 User manual

Sony

Sony Trinitron GVM-1300 User manual

Sony LMD-150S User manual

Sony

Sony LMD-150S User manual

Sony Trinitron CPD-G220S User manual

Sony

Sony Trinitron CPD-G220S User manual

Sony Multiscan HMD-V200/L User manual

Sony

Sony Multiscan HMD-V200/L User manual

Sony Trinitron PVM-14L3 User manual

Sony

Sony Trinitron PVM-14L3 User manual

Sony Bravia FW-100BZ40J User manual

Sony

Sony Bravia FW-100BZ40J User manual

Sony SDM-HX75 User manual

Sony

Sony SDM-HX75 User manual

Sony Trinitron CPD-G200 User manual

Sony

Sony Trinitron CPD-G200 User manual

Sony Trinitron HMD-A240 User manual

Sony

Sony Trinitron HMD-A240 User manual

Sony PlasmaPro FWD-42PV1/B User manual

Sony

Sony PlasmaPro FWD-42PV1/B User manual

Sony SDM-S75ES User manual

Sony

Sony SDM-S75ES User manual

Sony BVM-1911 User manual

Sony

Sony BVM-1911 User manual

Sony LMD-B240 User manual

Sony

Sony LMD-B240 User manual

Sony LMD-2450MD User manual

Sony

Sony LMD-2450MD User manual

Sony Multiscan HMD-V200/L User manual

Sony

Sony Multiscan HMD-V200/L User manual

Popular Monitor manuals by other brands

HP OMEN X 27 Maintenance and service guide

HP

HP OMEN X 27 Maintenance and service guide

AOC 619Fh Specification sheet

AOC

AOC 619Fh Specification sheet

Asus VW247H user guide

Asus

Asus VW247H user guide

Samsung SyncMaster S19A300N user manual

Samsung

Samsung SyncMaster S19A300N user manual

JVC GD-V4210PZW-G Service manual

JVC

JVC GD-V4210PZW-G Service manual

SMART SBID-7075 Installation and maintenance guide

SMART

SMART SBID-7075 Installation and maintenance guide

NewLine LED 75 user manual

NewLine

NewLine LED 75 user manual

Philips 32E1N3600LA/01 user manual

Philips

Philips 32E1N3600LA/01 user manual

Metos DELI VRX1400-395 Installation and user manual

Metos

Metos DELI VRX1400-395 Installation and user manual

Primeview 40" user guide

Primeview

Primeview 40" user guide

Panasonic TH-65PHD8BK Service manual

Panasonic

Panasonic TH-65PHD8BK Service manual

Feelworld FW678 HD Operation manual

Feelworld

Feelworld FW678 HD Operation manual

Compaq P1220 user guide

Compaq

Compaq P1220 user guide

ViewSonic LDS135-151 quick start guide

ViewSonic

ViewSonic LDS135-151 quick start guide

Ganz ZM-CR315NP-EU instruction manual

Ganz

Ganz ZM-CR315NP-EU instruction manual

NEC ESERIES quick guide

NEC

NEC ESERIES quick guide

Samsung SyncMaster P50HP-2 quick start guide

Samsung

Samsung SyncMaster P50HP-2 quick start guide

Lenovo L27m-28 quick start guide

Lenovo

Lenovo L27m-28 quick start guide

manuals.online logo
manuals.online logoBrands
  • About & Mission
  • Contact us
  • Privacy Policy
  • Terms and Conditions

Copyright 2025 Manuals.Online. All Rights Reserved.