STR-DA3500ES 4-144-910-11(1) US/ES
English
Calibrating the appropriate speaker settings
automatically (Auto Calibration)
You can set up the speakers to obtain the desired sound from all
connected speakers automatically by using the Auto Calibration
function.
Before you perform the Auto Calibration
During the calibration, the sound that comes out of the speakers is very loud.
The volume of the sound cannot be adjusted. Pay attention to the presence of
children or to the effect on your neighborhood.
Perform the measurement in a quiet environment to avoid the effect of noise
and get a more accurate measurement.
If there are any obstacles in the path between the optimizer microphone and
the speakers, the calibration cannot be performed correctly. Remove any
obstacle from the measurement area to avoid measurement error.
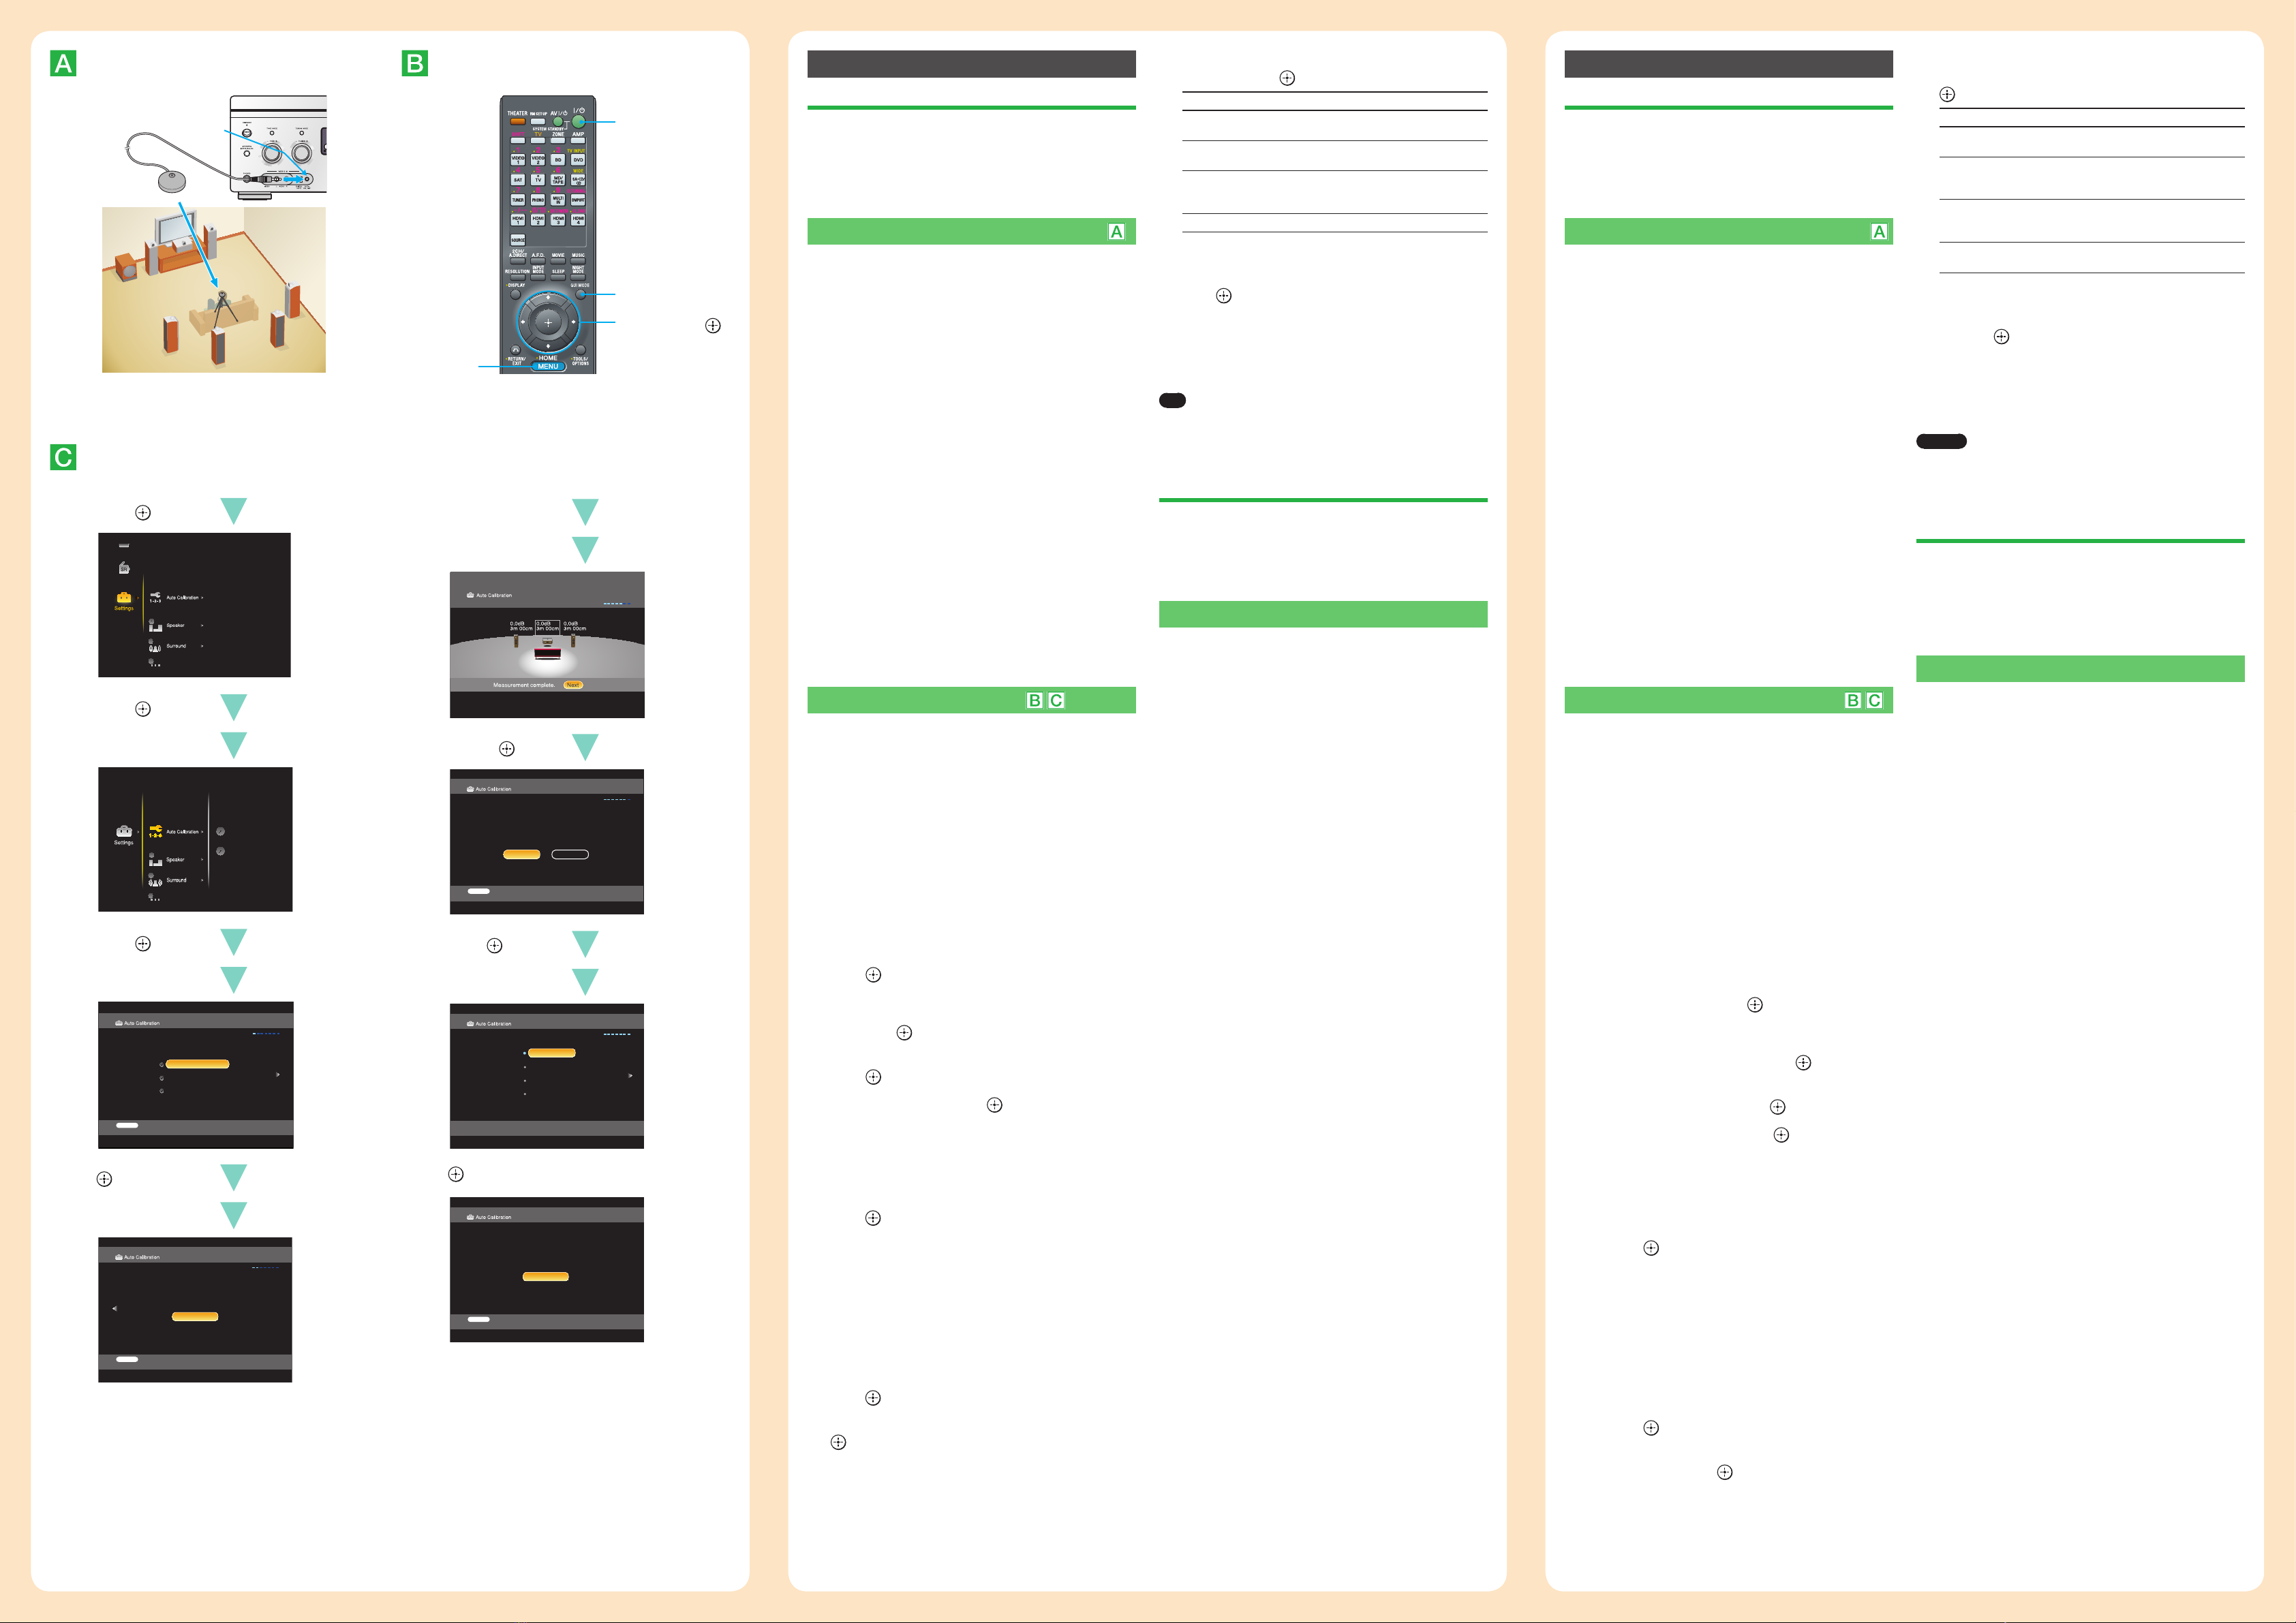
1Install and connect the speakers and TV.
For detail, see front page.
2Connect the supplied optimizer microphone to
the AUTO CAL MIC jack.
The AUTO CAL MIC jack is used for the supplied optimizer
microphone only. Do not connect other microphones. Doing
so may damage the receiver and the microphone.
3Set up the optimizer microphone.
Place the optimizer microphone at your seating position. Use
a stool or tripod so that the optimizer microphone remains at
the same height as your ears.
On setting up the active subwoofer
When a subwoofer is connected, turn on the subwoofer and turn
up the volume beforehand. Turn the MASTER VOLUME knob
to just before the mid-point.
If you connect a subwoofer with the crossover frequency
function, set the value to maximum.
If you connect a subwoofer with an auto standby function, set it
to off (deactivated).
Performing Auto Calibration
The Auto Calibration function allows you to measure the
following: speaker connections, polarity of speakers, speaker
distance, speaker size, speaker level, frequency characteristics.
1Connect a TV to this receiver.
Refer to “3: Connecting the TV” in the operating instructions.
2Turn on the TV.
3Press ?/1to turn on the receiver.
Switch the input of the TV so that an image of the menu is
displayed.
4Press GUI MODE repeatedly to select “GUI ON”.
The GUI menu appears on the TV screen. Press MENU if the
GUI menu does not appear on the TV screen.
5Press /repeatedly to select“Settings”, then
press or .
The Settings menu list appears on the TV screen.
6Press /repeatedly to select“Auto Calibration”,
then press or .
7Press /repeatedly to select“Quick Setup”, then
press .
8Press /repeatedly and to un-check the items
you do not want to measure.
Speaker Distance
Speaker Level
Frequency Characteristic
9Press .
10 Press to select “Start”.
11 The measurement starts in 5 seconds.
12 Measurement starts.
The measurement process will take approximately 30
seconds with a test tone. Wait until the measurement process
completes.
13 The measurement is completed.
When the measurement ends, a beep sounds and the
measurement result appears on the TV screen.
14 Press to select “Next”.
15 Press /repeatedly to select“Yes”, then press
.
16 Press /repeatedly to select the Auto Calibration
type, then press .
Parameter Explanation
Full Flat Makes the measurement of frequency from
each speaker flat.
Engineer Sets the frequency to one that matches that
of the Sony listening room standard.
Front Reference Adjusts the characteristics of all the
speakers to match the characteristics of the
front speaker.
OFF Sets the Auto Calibration EQ to off.
17 Press .
The exit screen appears.
18 Press to exit.
When error codes appear
For details on warning and error codes, see “Message list after
Auto Calibration measurement” in “9: Calibrating the appropriate
speaker settings automatically (Auto Calibration)” in the operating
instructions.
Tip
The size of a speaker (LARGE/SMALL) is determined by the low characteristics.
The measurement results may vary, depending on the position of the optimizer
microphone and speakers, and the shape of the room. It is recommended that
you follow the measurement results. However, you can change those settings
in the Speaker settings menu. Save the measurement results first, then try to
change the settings if you want.
Setting up other components
You should set up each component so that the sound is output
from speakers correctly when you play back a connected
component. The following case describes Sony components. Refer
to the operating instructions supplied with each component.
Sony Super Audio CD player
Select a suitable playback area (multi channel or 2 channel).
Sound may come out from only the front speaker left/right when 2
channel is selected.
After the setting
The receiver is now ready to use. Press the input button on the
remote to select the component you want to play back. Refer to the
operating instruction supplied with the receiver for details.
Español
Calibrando automáticamente los ajustes
apropiados del altavoz (Auto Calibration)
Puede instalar los altavoces para obtener automáticamente el
sonido que desee a través de todos los altavoces conectados
mediante la función de calibración automática.
Antes de realizar la calibración automática
Durante el calibrado, el sonido que proviene de los altavoces es muy fuerte.
El volumen del sonido no puede ajustarse. Ponga atención a la presencia de
niños o al efecto en su vecindario.
Lleve a cabo la medición en un entorno callado para evitar el efecto del ruido
y obtenga una medición más precisa.
Si hay algún obstáculo en la ruta entre el micrófono optimizador y los
altavoces, no se podrá realizar la calibración correctamente. Quite cualquier
obstáculo del área de medición para evitar un error de medición.
1Instale y conecte los altavoces y la TV.
Para detalles, ver a la página frontal.
2Conecte el micrófono optimizador proporcionado
a la toma AUTO CAL MIC.
La toma AUTO CAL MIC es utilizada solamente para el
micrófono optimizador proporcionado. No conecte otros
micrófonos. El hacerlo puede dañar el receptor y el micrófono.
3Configure el micrófono optimizador.
Coloque el micrófono optimizador en su posición sentado.
Utilice una tarima o trípode de modo que el micrófono
optimizador permanezca a la misma altura de sus oídos.
Al configurar el altavoz de subgraves activo
Cuando se conecta un altavoz de subgraves, encienda el altavoz
de subgraves y de antemano suba el volumen. Gire la perilla del
MASTER VOLUME a un poco antes del punto medio.
Si conecta un altavoz de subgraves con la función de frecuencia
de cruce, ajuste el volumen al máximo.
Si conecta un altavoz de subgraves con una función automática
de modo de espera, apague el altavoz de subgraves (desactivado).
Realizando la calibración automática
La función de auto calibrado le permite medir lo siguiente:
conexiones de altavoz, polaridad de altavoces, distancia de altavoz,
tamaño de altavoz, nivel de altavoz, características de frecuencia.
1Conecte un TV a este receptor.
Refiérase a “3: Conectando el televisor” en las manual de
instrucciones.
2Encienda el TV.
3Presione ?/1para encender el receptor.
Conmute la entrada del TV para que se visualice la imagen del
menú.
4Presione repetidamente GUI MODE para
seleccionar“GUI ON”.
El menú GUI aparece en la pantalla del televisor. Presione
MENU si el menú GUI no aparece en la pantalla de TV.
5Presione repetidamente /para seleccionar
“Settings”, luego presione o .
La lista del menú Settings aparece en la pantalla de TV.
6Presione repetidamente /para seleccionar
“Auto Calibration”, luego presione o .
7Presione repetidamente /para seleccionar
“Quick Setup”, luego presione .
8Presione repetidamente /y para quitar la
selección de los puntos que no desea medir.
Speaker Distance
Speaker Level
Frequency Characteristic
9Presione .
10 Presione para seleccionar “Start”.
11 La medición se inicia en cinco segundos.
12 Se inicia la medición.
El proceso de medición tomará aproximadamente 30
segundos con un tono de prueba. Espere hasta que se
complete el proceso de medición.
13 La medición se completa.
Cuando finalice la medición, se oye un pitido y en la pantalla
de TV se visualiza el resultado de la medición.
14 Presione para seleccionar “Next”.
15 Presione repetidamente /para seleccionar
“Yes”, luego presione .
16 Presione repetidamente /para seleccionar el
tipo de calibración automática, luego presione
.
Parámetro Explicación
Full Flat Realiza la medición de frecuencia de cada
base de los altavoces.
Engineer Establece la frecuencia a una que coincida
con la de la norma del cuarto de escucha
Sony.
Front Reference Ajusta las características de todos
los altavoces para coincidir con las
características del altavoz frontal.
OFF Establece la calibración automática EQ a
apagado.
17 Presione .
Aparece la pantalla de salida.
18 Presione para salir.
Cuando aparecen códigos de error
Para detalles sobre advertencias y códigos de error, ver “Lista de
Mensajes después de la Medición de Calibración Automática” en
“9: Calibrando automáticamente los ajustes apropiados del altavoz
(Auto Calibration)” en las manual de instrucciones.
Consejo
El tamaño del altavoz (LARGE/SMALL) es determinado por las características
bajas. Los resultados de medición pueden variar, dependiendo de la posición del
micrófono optimizador y altavoces, y la forma del cuarto. Se recomienda que
siga los resultados de medición. Sin embargo, puede cambiar aquellos ajustes en
el menú de configuraciones de Speaker. Guarde primeramente los resultados de
medición, luego trate de cambiar los ajustes si lo desea.
Configuración de otros componentes
Es necesario configurar cada componente para que el sonido
se emita correctamente a través de los altavoces al reproducir
un componente conectado. En el caso siguiente, se describe la
configuración de componentes Sony. Consulte el manual de
instrucciones suministrado con cada componente en cuestión.
Reproductor de Super Audio CD Sony
Seleccione un área de reproducción adecuada (multicanal o bien
de 2 canales). Es posible que el sonido se emita únicamente a
través de los altavoces frontales izquierdo y derecho si se selecciona
el ajuste de 2 canales.
Tras realizar el ajuste
El receptor está listo para utilizarse. Pulse el botón de entrada
del mando a distancia para seleccionar el componente que desee
reproducir. Consulte el manual de instrucciones suministrado con
el receptor para obtener más información.
AUTO CAL MIC
?/1
/ / / ,
GUI MODE
MENU
5/ , /
6/ , /
Speaker settings
(Auto)
Quick Setup
Enhanced Setup
50
8/ ,
Select items to be measured.
Step
Speaker Level
Frequency Characteristic
Speaker Distance
RETURN
Back
10
Place the supplied microphone on your preferred seating
position to set auto calibration (auto speaker setup)
Step
Start
RETURN
Back
13
15 / ,
Save auto calibration (auto speaker setup)?
Step
RETURN
Back
Yes No
16 / ,
Select calibration type.
Engineer
Front Reference
OFF
Matches frequency characteristics of
all speakers used for better soundsstage
Step
Full Flat
18


