SOPREMA VersiJack C User manual

ASSEMBLY MANUAL
VersiJack®C & VersiJack®CF
STEP 1: Check the following jobsite conditions before starting your project.
H = Height from roof surface to paver surface
Note: This is the desired finished height.
T = Thickness of Paver
S = Need for Slope Correction
(0-10% slope)
X = Calculated Pedestal Height
Note: Conditions often vary within the same project zone, so
Step 1 should be carried out thoroughly.
STEP 2: Use measurements from Step 1 to select your pedestal size: (H - T = X).
If not using slope correction, use H –T = X to identify Pedestal Height required. Then turn to Appendix B and use the
Pedestal Sizing Chart to select your pedestal for this location on the roof.
Example: Lloyd has H of 5” and T of 2.25”. Using H – T = X, Lloyd calculates 5” – 2.25” = 2.75”. So the correct
pedestal selection is CF2.
If using slope correction, please contact a sales rep for assistance in calculating your Pedestal Height.
STEP 3: Become Familiar With The Basic Pedestal Components.
Component
Function
1
Shim
Reduces or eliminates rocking of paver and reduces vibration/shifting
of paver. Available in 1mm or 2mm. Optional add-on.
2
Top Slope Corrector
Compensates for roof slope (up to 5% or more). Optional add-on. This
component adds approx 1/4” of height to the pedestal (varies with %
slope).
3
Pedestal Top
Provides the adjustable vertical rise.
4
Locking Ring
Minimizes movement after final pedestal adjustment.
5
X-245E Extender
Added to CF4 or CF5 to achieve pedestal heights over 11”. Optional
add-on.
6
Pedestal Base
Provides stability.
7
Base Extender
Added to any CF pedestal to add 3/8” height. Optional add-on.
8
Pedestal Base Pad
Protects roof membrane and reduces vibration.
1
2
3
4
5
8
7
6
310 Quadral Drive | Wadsworth, OH 44281 | soprema.us | 800.356.3521 2
STEP 4: Optional Pedestal Base Pad.
Option: If project requires Pedestal Base Pad, place Pad on the membrane
before moving to the next step. This pad will rest just underneath the pedestal.
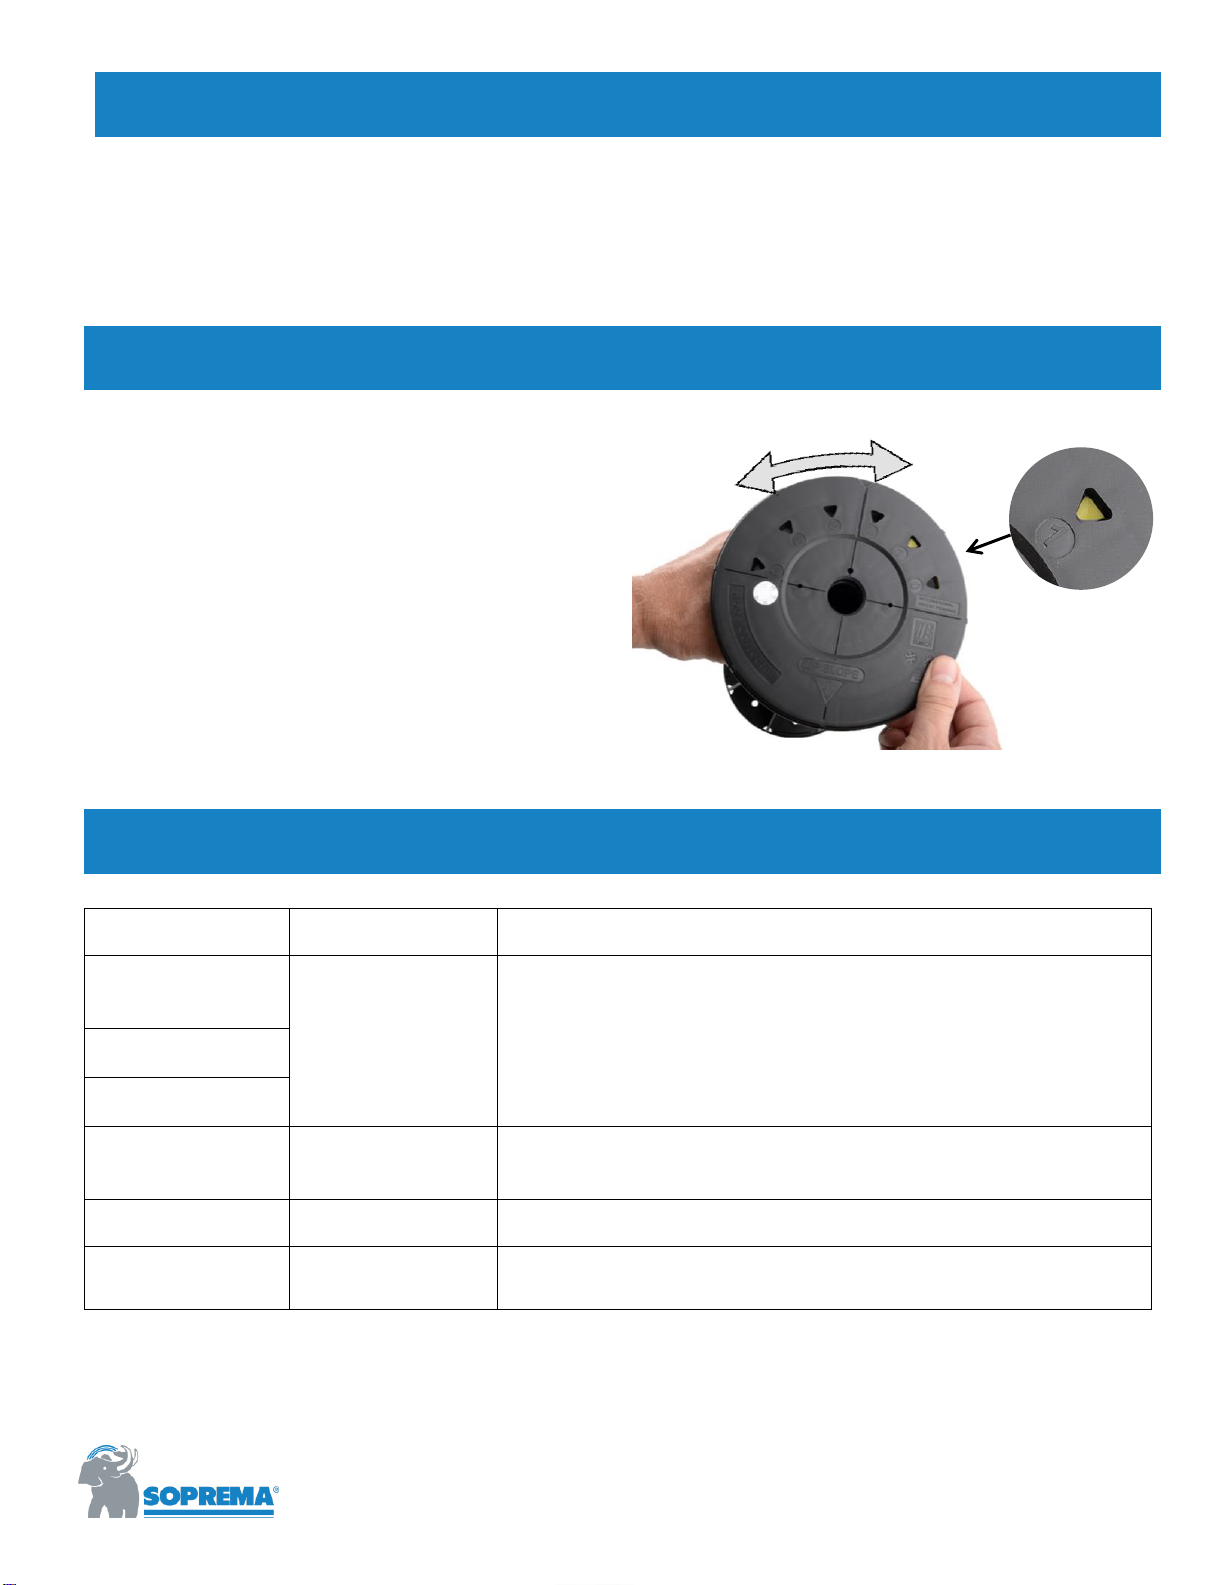
STEP 5: If correcting slope, install Slope Corrector. Otherwise, skip to Step 6.
If project requires Slope Corrector (refer to Step 1, see X),
attach Slope Corrector to the Pedestal before moving to
the next step. Use this process:
Rotate the Slope Corrector to the desired Slope % using
the triangle indicator, then firmly press Slope Corrector
onto Pedestal Top. At this time, make a note of the words
“UP SLOPE” and arrow on top of the slope corrector. When
correctly installed, this arrow will be pointed in the direction
that is up slope on this part of the roof.
Note: On some models, the triange indicator is yellow, while
on others it is red. These color differences have no impact
on function or proper use.
STEP 6: Use this table to select the correct Mounting Accessory for your paver type.
Type of Paver
(Surface Material)
Mounting
Accessory
Primary
Function
Concrete Paver
(Slab Paver)
Spacer Tab
Provides consistent spacing between pavers
Stone Paver
Porcelain Paver
Perimeter Paver
(at parapet wall)
Wall Spacer
Provides expansion joint between paver and parapet wall. Optional but
recommended
Deck Boards
Bearer Holder
Provides mounting bracket for wooden joist system, upon which
deckboards can be installed
Wooden Deck Tile
Deck Tile Assembly
Provides mounting hardware for wooden deck tiles, upon which most
wooden deck tiles can be installed
Slope
Indicator

310 Quadral Drive | Wadsworth, OH 44281 | soprema.us | 800.356.3521 3
STEP 7: Attach the Mounting Accessory.
Press the Accessory from Step 6 firmly into the top of the
Pedestal. All Mounting Accessories are mounted in the
same manner as shown here.
Note: Top Accessories will attach to Slope Corrector (if
using Top Slope Corrector). When using Bottom Slope
Corrector, Top Accessories will attach directly to the
Pedestal Top.
STEP 8: If using shims, install Pedestal Shim.
Some installers may elect to utilize a Pedestal Shim to the
top of the Pedestal Assembly in order to reduce slippage or
vibration of the paver. Others only use Pedestal Shims to
adjust for the variances in paver thickness that cause a
“rocking effect” after the paver has been placed. The
decision regarding this Accessory should be made by the
Design/Install team.
STEP 9: Adjust the Pedestal Height.
First, loosen the Locking Ring to allow Pedestal
adjustment.
Note: to loosen ring, turn counter-clockwise
Next, rotate the top to adjust pedestal to approximate height
needed.
Note: To increase height, turn top counterclockwise. To
lower pedestal, turn top clockwise.
Place the Pedestal underneath the paver and adjust to
approximate finished height.
If not using Slope Corrector, skip to Step 11.

310 Quadral Drive | Wadsworth, OH 44281 | soprema.us | 800.356.3521 4
STEP 10: If using Slope Corrector, orient the entire assembly in the correct direction.
Using two hands, grip the Slope Corrector and the
Pedestal Top in a manner that keeps them both moving
together as you rotate the entire Pedestal Assembly.
Rotate the Assembly until the UP SLOPE indicator is
pointed in the correct direction.
Note: The “Up Slope” indicator should be pointing in the
direction toward the highest elevation for that paver unit.
STEP 11: Perform final height adjustment.
Make final height adjustment by micro-adjusting the Pedestal Top to final desired height. The use of a bubble level on
the paver surface may be necessary to achieve satisfactory results. The ideal installation shall result in a solid contact
between the Pedestal Assembly and the bottom of the Paver while maintaining a level paving surface. The use of
Shims may be necessary in certain situations to achieve this outcome.
STEP 12: Tighten Locking Ring.
Turn the Locking Ring clockwise (from top) until firmly
secure against Pedestal Base.
Note: Do not overtighten the Locking Ring. Doing so
could result in permanent damage to the Locking Ring.
STEP 13: Repeat Steps 4-12 Until Project Completion.
310 Quadral Drive | Wadsworth, OH 44281 | soprema.us | 800.356.3521 5
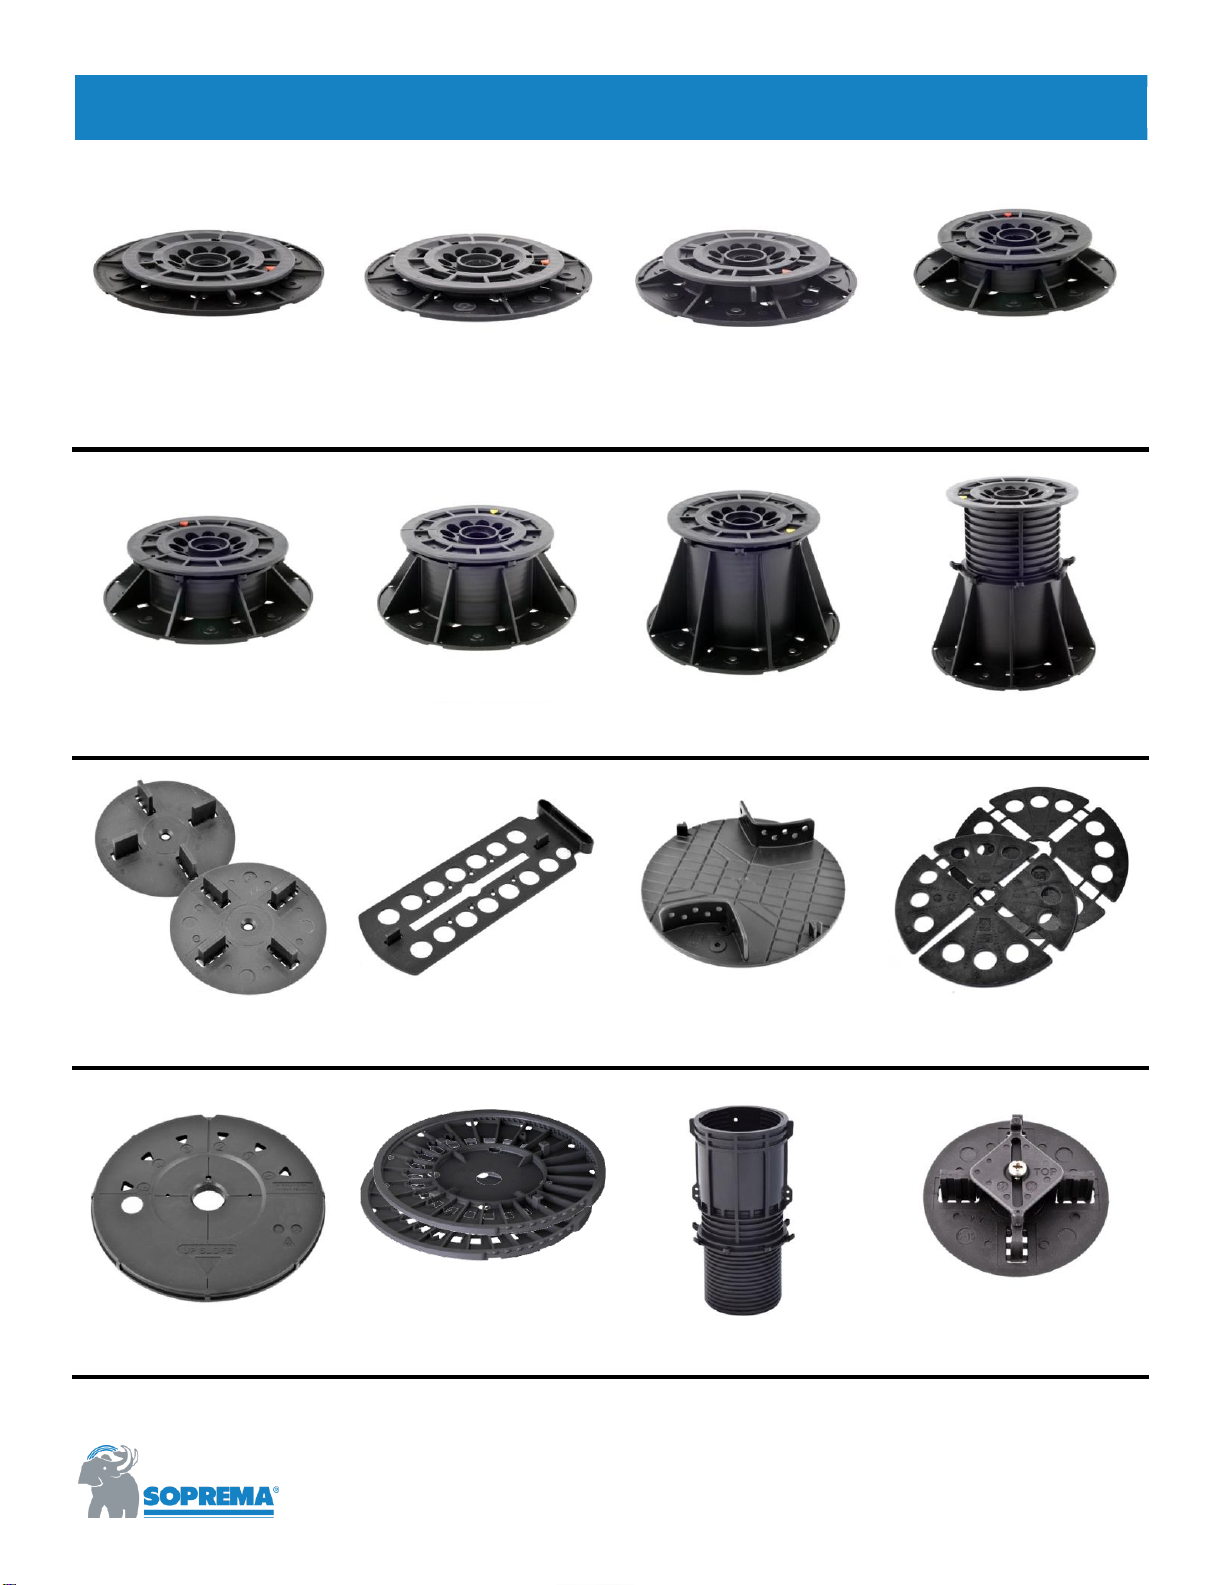
Appendix A: Overview of Products
CT1 UltraLow
CT2 UltraMid
CT3 UltraMax
CF-1
CF-2
CF-3
CF-4
CF-5
Spacer Tab (3mm or 4mm)
Wall Spacer
Bearer Holder
Shims (1mm & 2mm)
Top Slope Corrector
Bottom Slope Corrector Set
X-245E Extender
Deck tile Assembly

310 Quadral Drive | Wadsworth, OH 44281 | soprema.us | 800.356.3521 6
Ultra Series Base Extender
Turning Tool
Variable Angle Spacer Tabs
Universal Base Pad
Concealed Paver Retainer
Vertical Edge Clips
Joiner
Appendix B: Pedestal Sizing Chart
This manual suits for next models
12
Popular Jack manuals by other brands

Daytona
Daytona DS300LPG Owner's manual & safety instructions

Cattini
Cattini YAK 1610 Operating and maintenance manual

Clarke
Clarke Strong Arm CTJ3000GB Operation & maintenance instructions

Craftsman
Craftsman 50357 Operator's manual

Strongway
Strongway 46246 owner's manual

Cattini
Cattini YAK 222/N Operating and maintenance manual


