Sound Sculpture MidiUp User manual

MidiUp
OWNER’S MANUAL
Document OMMU0905

2
2 Year Limited Warranty
Sound Sculpture Musical Instrument Products (Sound Sculpture) warrants the MidiUp MIDI controller device to the
original purchaser to be free of defects in material and workmanship under normal use for a period of 2 year from the
date of purchase from an authorized Sound Sculpture dealer or directly from Sound Sculpture Musical Instrument
Products.
Sound Sculpture's liability under this warranty is limited to repairing or replacing defective materials that show
evidence of defect, and only if the product is returned for repair directly to Sound Sculpture or to the authorized Sound
Sculpture dealer from which the unit was purchased.
Sound Sculpture reserves the right to make changes in design or make additions or improvements on the product
without incurring any obligation to install the same on products previously manufactured.
Sound Sculpture shall not be liable for any consequential damage or loss of profits as a result of the use of this product
even if Sound Sculpture is advised of the possibility of such damages or loss. In no event will Sound Sculpture's
liability exceed the price paid for the product.
No other warranties are expressed or implied and Sound Sculpture neither assumes nor authorizes any person to assume
for it any obligation or liability in connection with the sale of this product. In no event shall Sound Sculpture or its
dealers be liable for special or consequential damages due to the use of this product. Some states do not allow the
exclusion or limitation of incidental or consequential damages, so the above exclusions or limitations may not apply to
you.
In Case of Difficulty
In the unlikely event that you experience problems with the MidiUp, please refer to the section in this manual
pertaining to the operation you are having difficulty with. Very often the difficulty is simply a result of improper setup
or programming and can be resolved by studying this manual.
If, after reading this manual, you are unable to resolve the problem email us at info@soundsculpture.com or call Sound
Sculpture at the number listed below during normal business hours. If we are unable to resolve your problem over the
phone and determine that the unit needs repair, you will be given a return authorization number and further procedures
for returning the unit. UNAUTHORIZED REPAIR OF THE MidiUp BY ANYONE OTHER THAN THE
FACTORY VOIDS THE WARRANTY. NO UNITS WILL BE ACCEPTED FOR REPAIR WITHOUT FIRST
CONTACTING THE FACTORY FOR A RETURN AUTHORIZATION NUMBER.
Precautions and safety notes
To reduce the risk of fire or electric shock, do not expose this unit to rain or operate this unit in a wet environment.
Use only the power module supplied with the unit. Use of another module will void the warranty.
If the unit becomes physically damaged due to dropping or for other reasons, it should be returned to the factory for
repair to avoid the risk of further damage to the unit or to attached units.
To avoid damage due to overheating this unit should not be exposed to, or operated in, direct sunlight for extended
periods of time.
To avoid damage due to lightning, this unit should be unplugged during an electrical storm.
Copyright by Sound Sculpture Musical Instrument Products
20380 Rae Road, Bend OR 97702 - USA
(541) 318-1877
This publication may not be reproduced by any means in whole or in part except for personal use without written
consent from
Sound Sculpture Musical Instrument Products.

3
INTRODUCTION ______________________________________________________ 4
FRONT AND REAR PANEL CONNECTIONS ______________________________ 4
ABOUT MIDI CONTROLLERS AND YOUR EFFECTS ______________________ 5
SETUP USING A VOLUME PEDAL ______________________________________ 6
SETUP USING A USER INSTALLED POT _________________________________ 6
USING MULTIPLE MIDIUP DEVICES ___________________________________ 7
AUTO CALIBRATION __________________________________________________ 8
USING THE MIDIUP WITHOUT A FOOT CONTROLLER ___________________ 8
USING THE MIDIUP WITH A MIDI FOOT CONTROLLER __________________ 8
INSTALLING A POT INSIDE THE GUITAR ______________________________ 10
MODIFYING A POT ALREADY IN THE GUITAR__________________________ 11
TESTING THE MODIFICATIONS_______________________________________ 11

4
INTRODUCTION
Congratulations on your purchase of the Sound Sculpture MidiUp. This professional MIDI controller
system gives you new flexibility in your ability to control any MIDI effect that responds to MIDI Control
Change commands. The MidiUp is simple to use, flexible and solves a variety of problems encountered by
electric musicians. With the MidiUp you can transmit MIDI Controller information in two ways:
1. By using a user installed pot inside the guitar or
2. By attaching a standard volume pedal.
The MidiUp can transmit a MIDI Controller Numbers in the range of 0-15 over any of the first 8 MIDI
channels. The number and channel to transmit are selected by sending a Program Change from any MIDI
foot controller to the MidiUp over it’s own channel.
The MidiUp is also a MIDI merger. This means any MIDI information being transmitted from an attached
foot controller will pass directly through the MidiUp with no interference. If the pedal happens to transmit
at the same time that the MidiUp is transmitting, the two data streams will be seamlessly merged before
passing the data on to your effects. No additional MIDI splitter is necessary.
Several MidiUps can be used together. By connecting the MIDI output of one MidiUp to the MIDI input
of the next, you can have as many controllers as you like. One can be connected to the guitar over the
stereo cord and the others are connected to volume pedals. Or if you chose all units can be connected to
volume pedals.
When used with a pot inside your guitar, modifications must be made inside your guitar that should be
simple enough for anyone who is handy with a soldering iron, or can be made at your favorite guitar repair
center. In addition you must use a stereo guitar cable from your guitar to the MidiUp. Full instructions for
modifications are included in this manual.
When used with a volume pedal no modification is necessary, simply hook a standard guitar cable from the
pedal output to the MidiUp input and you are ready to roll. In this application no cable is attached to the
input of the volume pedal. Instead your guitar just goes directly to the effects.
The MidiUps clever architecture adjusts itself automatically to any of the standard guitar pot or volume
pedals resistance values, typically 250K, 500K, and 1M ohms. With this ability to self-calibrate, you can
switch the MidiUp from guitar to guitar and always feel confident that the full range of the pedal or guitar
pot will transmit the full range of controller messages. The MidiUp automatically re-calibrates whenever
the instruement cable is unplugged from the guitar or from the volume pedal and reconnected.
FRONT AND REAR PANEL CONNECTIONS
MidiUp
TM
MIDI LO/HI PWR
Audio Input
Jack
Audio Output
Jack
MIDI Data
Indicator
Data Lo/Hi
Indicator
Po w e r
Indicator
MIDI IN MIDI OUT
POWER 9V
DC 200MA
CENTER POS
MIDI In Jack Midi Out Jack
DC Power Jack

5
Audio Input Jack: This is a stereo (Tip-Ring-Sleeve) jack that connects the MidiUp to the guitar using a
stereo cord. The tip of the jack (guitar audio) is connected internally to the tip of the output jack enabling
the signal to pass straight through the unit unhindered. The ring (which connects to the installed guitar pot
via the cable) is connected to the processing section of the MidiUp to convert the pot value to a MIDI Data
stream.
If a standard (mono) instrument cable is plugged into this jack and if the audio output jack is left connected,
the Tip of the cable is routed to the processing section instead. This is the standard configuration when
used with a volume pedal where the tip of the volume pedal jack is naturally connected to the pedal pot.
Audio Output Jack: This is a mono (Tip-Sleeve) jack that is connected to the audio input jack to pass the
guitar signal unhindered. If left disconnected then it rewires the input jack for use only with a volume
pedal.
MIDI LED: This LED blinks whenever the MidiUp is actually transmitting a MIDI data stream in
response to a the pot turning or the volume pedal moving. It also blinks whenever it sees a valid Program
Change Command coming from a connected MIDI foot controller. A valid PCC in this case is one that is
transmitted on the MidiUp’s own channel as set by the internal DIP switch.
HI/LO LED: This LED will light whenever the guitar pot or volume pedal reach either their lowest or
highest extreme. When this LED lights it indicates that either a 0 (lowest) or a 127 (highest) MIDI value
have been transmitted and is your assurance that the MidiUp is seeing the full sweep range of the pot. If
upon turning the pot to it’s extremes the LED does not come on either on one side or both, then this
indicates that the MidiUp has not been calibrated to the pot and calibration should be performed. (See
Calibration section)
PWR LED: When this LED is illuminated it simply means that DC power has been applied to the MidiUp
through the power jack on the back panel.
MIDI In Jack: This jack may be connected to a MIDI foot controller normally used to select presets on
MIDI capable devices. Normally you will connect the MidiUp between the foot controller and your first
MIDI effect. The MidiUp will pass whatever signal the midi foot controller sends so all effects can
respond to it accordingly and it will also repsond to any Program Change command intended for itself. The
MidiUp can be directed to transmit Controller information over selected channels and with selected
Controller numbers in response to the foot controller.
MIDI Out Jack: This Jack connects the MidiUp to the next effect device in line. It automatically
configures as a MIDI Thru jack unless the MidiUp is actually transmitting Controller data. If the MidiUp
receives data from the footswitch while it is currently transmitting, it will merge the data from the foot
controller insuring that no data is ever lost.
Power Jack: This jack connects to the supplied power module.
ABOUT MIDI CONTROLLERS AND YOUR EFFECTS
Multi Effects devices and other MIDI equipment equipment are usually capable having their parameters
changed smoothly and in real time in response to MIDI Control Change (MIDI Controller) messages. If
your MIDI gear can respond to these types of messages then the MidiUp can be used with this equipment.
The MIDI Control Change message itself is a 3 byte message containing the MIDI channel (limited to
channels 1-8 in the MidiUp) that the message transmits over, the Controller number which can be anything
from 0-127 (limited to 0-15 in the MidiUp) and the last byte is the Controller value (from 0-127). The
Controller number represents the parameter in the MIDI effect that is to change, and the value represents
the degree of change of that parameter. The MIDI device must also be set to the same number as the MIDI
channel in the message. For example, if you have a MIDI device set to channel 1, and it’s echo time is

6
assigned to MIDI Controller value 13, then you can change the echo time by transmitting a Controller 13
over channel 1. As the Value byte in the message varies, so does the echo time.
SETUP USING A VOLUME PEDAL
Using the MidiUp with a standard volume pedal is very simple. Just connect a standard guitar cable
between the volume pedal output and the MidiUp audio input. Nothing is connected to the input of the
volume pedal since the pedal is only used to control your effects, not to control the audio output of the
guitar. Also nothing is connected to the MidiUp audio out since the unit is not passing a signal. The
instrument itself is connected directly to your effects. This way, all parameters are controlled by the foot
pedal.
SETUP USING A USER INSTALLED POT
GL
GL
To A m p
MIDI Foot Pedal MidiUp
Ef fects Pr ocessor s
Guitar
MIDI Cable
Audio Cable
Vol u me Peda l
GL
GL
To A m p
MIDI Foot Pedal
MidiUp
Ef fects Pr ocessor s
Guitar with Pot Installed
MIDI Cable
A
udio Cable
7
The MidiUp can be controlled by a user installed pot in the guitar by connecting a stereo cable between the
modified guitar and the MidiUp. To install the pot in the guitar, the guitar should be modified by a
competent guitar technician
(or by you if you are handy with a soldering iron). The modification involves either installing an additional
pot or freeing up one of the pots (either a tone or volume control) inside the guitar, inserting a stereo jack in
place of the mono jack that is in your guitar, and wireing the pot to the extra pin on the jack. Most guitars
only require the removal and connection of a couple of wires to complete the operation. Notice that if you
use one of the tone controls as the pot, then of course you no longer will have any control over the tone of
the picup it is tied to, but instead the pot will control a much larger array of sound, including tone, by using
your multi-effect system, so you will probably not miss it. You can also use a volume control, but again, if
you use a volume control inside the guitar for this purpose, then you will not be able to control the volume
of that picup except through your effects. The other volume and tone controls in your guitar are not
affected.
If you choose to install a new pot instead of using one of the current pots in your guitar, you have the
advantage of retaining all of the volume and tone control operation as originally intended during times you
may not be using the MidiUp. The disadvantage of this method of course is that you need to drill an extra
hole into the pickguard or wood of the guitar to add the pot. Not a big deal, but possibly not something you
want to do to your favorite vintage.
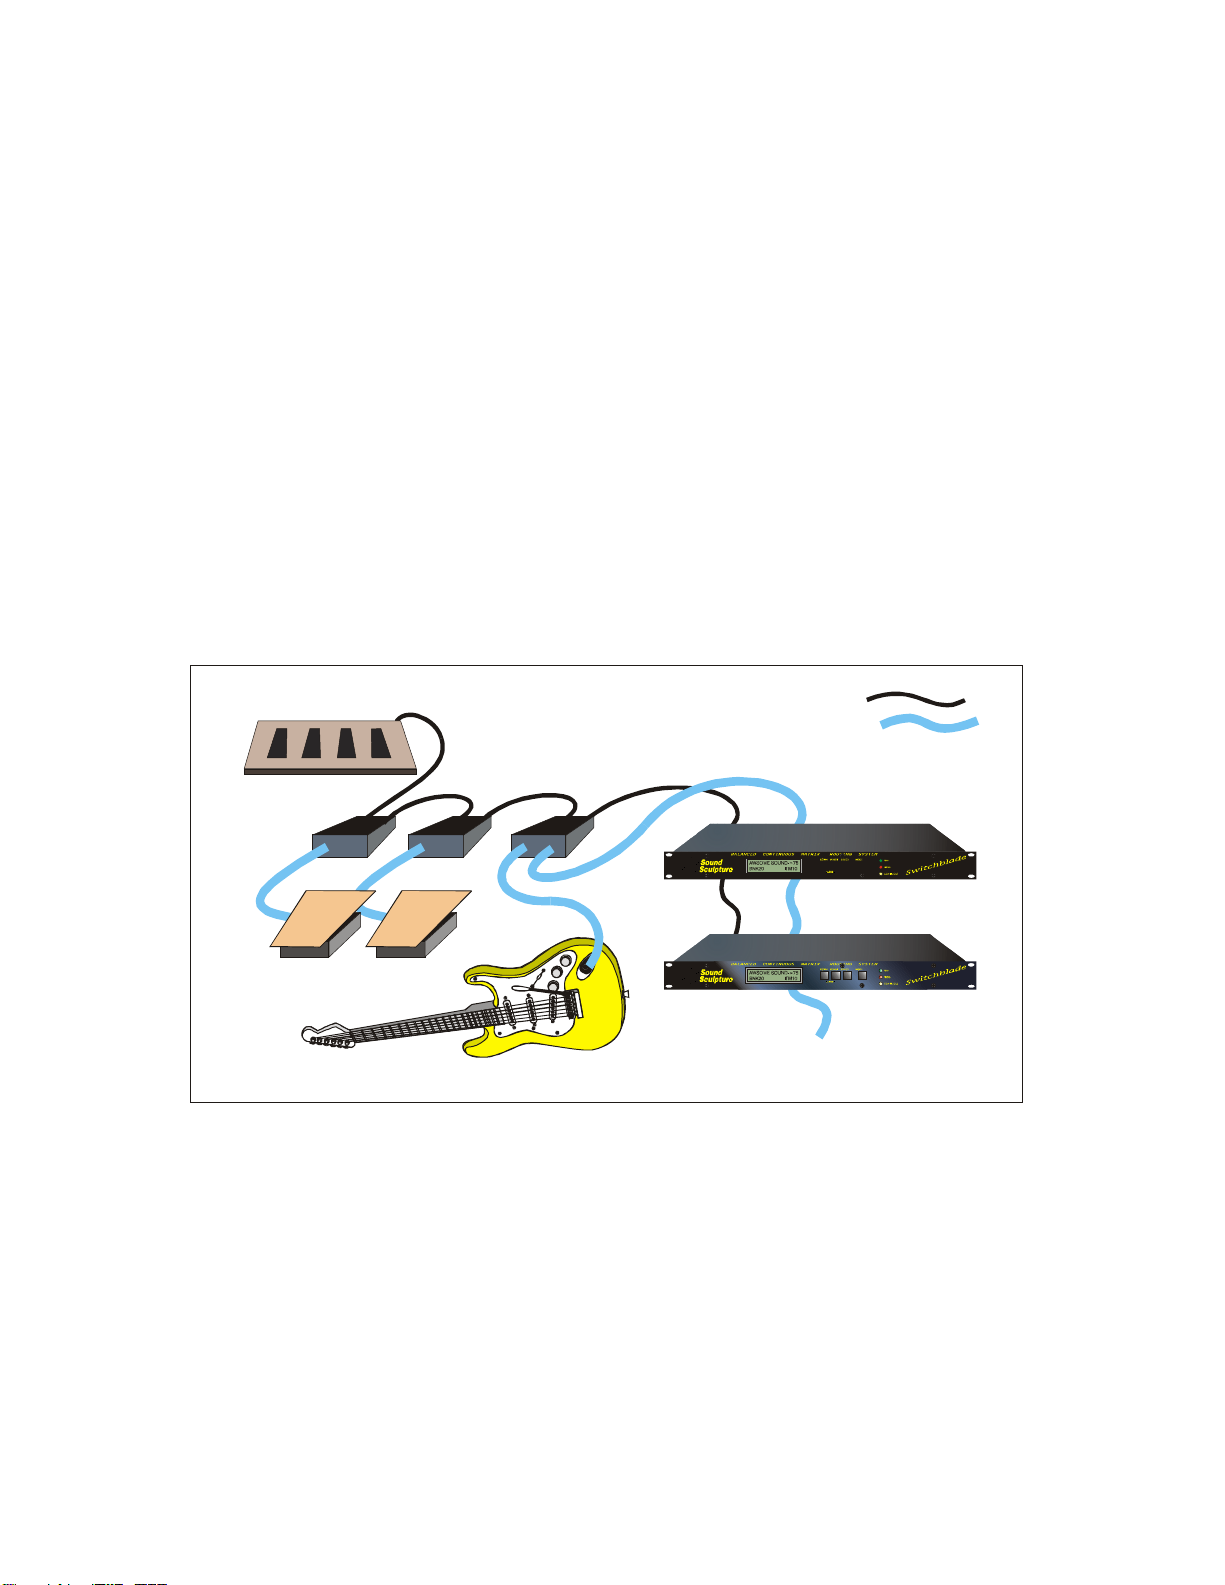
USING MULTIPLE MIDIUP DEVICES
There may be occasion when you need to have different volume pedals controlling different effects
parameters or different effects at the same time. By using several MidiUp units together you can expand to
have both a pot in your guitar and a volume pedal controlling different effects or parameters of the same
effect. Each additional Midiup can accomodate another volume pedal. You can only have one pot in your
guitar unless you make special cabling arrangements.
GL
To A m p
MIDI Foot Pedal
MidiUps
Effects Processors
Guitar with pot installed
MIDI Cable
A
udio Cable
Volume Pedals
GL

8
AUTO CALIBRATION
The MidiUp has the ability to automatically calibrate to any pot that’s used within the usual range of audio
pots (250K to 1M Ohm). This section decribes the auto calibration procedure.
When used with a guitar pot:
To calibrate the MidiUp to the guitar pot being used, be sure a mono cable is connected to the Audio
Output jack on the MidiUp and that the stereo cable is connected to between the MidiUp and the guitar.
Apply power to the MidiUp after these connections are made. After power is applied rotate the pot on the
guitar to it’s lowest and highest extremes. It does not matter which way the pot is turned first, just so long
as you get to both min and max positions. This completes the calibration.
You can test that the MidiUp is calibrated by rotating the pot a second time to it’s extreme postion and
watching the HI/LO LED on the panel of the MidiUp. The LED should come on when the pot is both near
it’s lowest position and near it’s highest position. There will be a small amount of rotation left over on both
sides of the pot which is normal.
If power is already applied to the MidiUp and you wish to recalibrate without having to remove power then
simply unplug the stereo cord from the guitar and plug it back in again. Rotate the pot as described above
after plugging the cord back in and the MidiUp will again calibrate. BE SURE TO UNPLUG THE CORD
AT THE GUITAR AND NOT AT THE MIDIUP OR CALIBRATION WILL NOT OCCUR. ALSO THE
MONO CORD MUST BE CONNECTED TO THE OUTPUT JACK AS WELL FOR CALIBRATION TO
OCCUR.
When used with a volume control:
To calibrate the MidiUp when used with a volume control, essencially the same procedure is followed as
with a guitar pot. Have everything connected up before applying power to the MidiUp. After power is
applied, move the volume pedal to both of it’s extreme positions. You can then check calibration is
complete by watching the HI/LO LED.
If power is already applied to the MidiUp and you wish to recalibrate without having to remove power then
simply unplug the mono cord from the volume pedal and plug it back in again. Move the pedal to it’s
extremes and the MidiUp will again calibrate. BE SURE TO UNPLUG THE CORD AT THE VOLUME
PEDAL AND NOT AT THE MIDIUP OR CALIBRATION WILL NOT OCCUR. ALSO THERE MUST
BE NO CORD CONNECTED TO THE OUTPUT OF THE MIDIUP FOR CALIBRATION WITH A
VOLUME PEDAL TO OCCUR. When used with a volume pedal a cord is never attached to the output of
the MidiUp since no audio is passes through the MidiUp.
USING THE MIDIUP WITHOUT A FOOT CONTROLLER
If you do not use a foot controller with your MIDI equipment then you must use the default setup in the
MidiUp. The default transmits Control Change 0 over channel 1. Therefore you must set the MIDI unit
that you are controlling with the MidiUp to channel 1 in order for it to respond to the MidiUp. In addition
you need to program the the unit to respond to Control Change number 0. Refer to the manual that came
with the gear for instructions on how to do this.
USING THE MIDIUP WITH A MIDI FOOT CONTROLLER
If you have a MIDI foot controller then you can use it to instruct the MidiUp to transmit other Control
Change Numbers and over other channels. To do this you will need to program your foot controller to
transmit a MIDI Program Change message to the MidiUp. The channel that the foot controller
transmits over must match the MidiUp channel. The channel in the MidiUp is set by a switch inside
the unit and is factory set to Channel 16.

9
This channel number is the MidiUp channel number and should not be confused with the channel that the
MidiUp will transmit over which will likely be different. Use the chart on the next page to determine what
Program Change number needs to be loaded into the foot controller for the desired result. Refer to the
Appendix for information on how to set the unit channel to a new value if required for special
circumstances.
In the chart, “Program” refers to the Program Change Number to program into your MIDI foot controller
and “CCN CH” refer to the resulting Control Change Number and Channel that the MidiUp will transmit
over once it receives the message. The Program numbers assume your MIDI devices refer to the range of
0-127. Some devices refer to the range of 1-128. If so then simply add 1 to the number in the program list
.
Program Ch CCN Program Ch CCN Program Ch CCN Program Ch CCN
01 0 32 3 0 64 5 0 96 7 0
11 1 33 3 1 65 5 1 97 7 1
21 2 34 3 2 66 5 2 98 7 2
31 3 35 3 3 67 5 3 99 7 3
41 4 36 3 4 68 5 4 100 7 4
51 5 37 3 5 69 5 5 101 7 5
61 6 38 3 6 70 5 6 102 7 6
71 7 39 3 7 71 5 7 103 7 7
81 8 40 3 8 72 5 8 104 7 8
91 9 41 3 9 73 5 9 105 7 9
10 1 10 42 3 10 74 5 10 106 7 10
11 1 11 43 3 11 75 5 11 107 7 11
12 1 12 44 3 12 76 5 12 108 7 12
13 1 13 45 3 13 77 5 13 109 7 13
14 1 14 46 3 14 78 5 14 110 7 14
15 1 15 47 3 15 79 5 15 111 7 15
16 2 0 48 4 0 80 6 0 112 8 0
17 2 1 49 4 1 81 6 1 113 8 1
18 2 2 50 4 2 82 6 2 114 8 2
19 2 3 51 4 3 83 6 3 115 8 3
20 2 4 52 4 4 84 6 4 116 8 4
21 2 5 53 4 5 85 6 5 117 8 5
22 2 6 54 4 6 86 6 6 118 8 6
23 2 7 55 4 7 87 6 7 119 8 7
24 2 8 56 4 8 88 6 8 120 8 8
25 2 9 57 4 9 89 6 9 121 8 9
26 2 10 58 4 10 90 6 10 122 8 10
27 2 11 59 4 11 91 6 11 123 8 11
28 2 12 60 4 12 92 6 12 124 8 12
29 2 13 61 4 13 93 6 13 125 8 13
30 2 14 62 4 14 94 6 14 126 8 14
31 2 15 63 4 15 95 6 15 127 8 15

10
INSTALLING A POT INSIDE THE GUITAR
This section descibes how to install a new pot inside of your guitar. The installation will generally follow
these steps and will be explained in detail.
1. Drill a hole into the pickguard or guitar body where the pot is to be located.
2. Disconnect the wires going to the stock audio jack and remove the jack
3. Install the stereo jack and reconnect the jack wires to the tip and sleeve of the new jack.
4. Add 2 wires from the new pot to the ring and ground of the jack.
5. Install the pot in the hole and close up the guitar.
Drilling a hole in the pickguard
If you have a Stratocaster style or similar guitar that has all of the pots mounted to the removable pickguard
then you will want to find a location on the pick guard where you can mount the pot. Keep in mind in
must be in an area where there is a recess in the body of the guitar so the pot will fit when the pickguard is
replaced.
Disconnect the jack wires and remove the jack
The jack will have the signal wire or wires attached to the tip of the jack and will also have one or more
ground wires attached to the sleeve of the jack. Remove both of these groups of wires and then remove the
jack.
Install the stereo jack and reconnect the wires
After installing the new stereo (tip-ring-sleeve) jack, replace the wires that were removed by conneting
them to the tip and ground lugs on the jack. This leaves the lug for the ring (the middle connector) still
unconnected.
Connect up the new pot
Attach a wire from the ring of the new jack to the center terminal of the pot. Attach a second wire from the
ground of the jack (or any place connected to the guitar ground) to the end terminal. Choose the end that is
to the right if you are looking at the shaft end of the pot and the terminals are pointing up. You may twist
these two wires together if it helps to keep the wiring neat.
This diagram shows the wiring inside a
factory wired guitar. All electronics including
the pickups, the switches, and the pot
eventually end up connected between the Tip
and the Sleeve of the audio jack.
Sleeve (ground)
Ti p
Sleeve (ground)
Ri n g
Ti p
Standard Guitar
Jack an d Wi r i ng
Wiring with Stereo
Jack and Extra Pot
Guitar Electronics
Guitar Electronics
Ext r a
Po t
This diagram shows how the guitar is wired
after the stereo jack and additional pot are
installed. The guitar electronics is still
connected between the Tip and the Sleeve as
before, and the pot is connected between the
Ring on the stereo jack and the Sleeve.

11
Close up the guitar
Install the pot into the pickguard if you haven’t already done so and close up the guitar
MODIFYING A POT ALREADY IN THE GUITAR
You may wish to use a pot already installed inside the guitar such as an unused volume or tone control as
the pot for the MidiUp to avoid having to install a new one. Most pots used in guitars are of the 250K to
1M ohm variety so will work with the MidiUp. It is highly recommended that unless you are familiar with
guitar electronics, that you leave this particular modification to your guitar repair shop.
Although guitar wiring varies greatly from guitar to guitar which makes it impossible to offer specific
instructions, generally speaking, the following rules will apply:
Bypassing the volume control
The volume control connects between the signal (from the pickups or selector switch) and ground and the
center tap goes to the output (or to the selector switch). Therefore to bypass the volume control, leave the
end that is connected to ground alone and remove the wires that are connected to the other two terminals
and connect them directly together. Leaving two empty lugs on the pot and no unconnected wire. Then
take a single wire and solder it between the center lug on the volume control and the ring (center connector
) on the stereo pot.
Bypassing the tone control
Bypassing a tone control usually just means disconnecting all of the wires from the pot and not connecting
the removed wires either to each other or to anything else. There is usually a capacitor connected to the pot
and this should be removed completely. Once the pot is disconnected from the circuit, then you can wire it
up in the same way as described in the last section for wiring up a new pot.
TESTING THE MODIFICATIONS
After closing up the guitar connect the guitar to the input of the MidiUp using a high quality stereo (TRS to
TRS) cable. Connect a regular mono instrument cable (TS to TS) from the output of the MidiUp to the
guitar amp. If you get sound from the guitar to the amp, you know that part of the connection is wired
correctly.
Now turn the pot for the MidiUp from one extreme position to the other and check that the HI/LO LED on
the front panel lights when the pot is at one extreme and then at the other. There will be a small amount of
rotation left over on either side of the pot after the LED lights. This is normal.
If these two checks work out, then you have successfully completed the job.
12
APPENDIX A: SETTING THE MIDIUP CHANNEL NUMBER
The MidiUp is factory set at channel 16. This channel will work fine for most applications. If you need to
change the channel number to a value other than this you will need to change the settings of the channel
switch inside the unit.
A situation that would require this is if you are using more than one MidiUp together in which case one
should be left at the factory setting, the next set to another channel such as channel 15 and so on.
To access the switch, remove the two screws on the front of the unit and slide the cover away from the
front panel to expose the circuit board. The switch is labled with the numbers 8 4 2 1 below the switch.
Refer to the following chart to set the values. Note 0 = switch off. 1 = switch on. In the chart “CHAN
represents the desired channel and “8 4 2 1" refers to the settings of the 4 switches.
CHAN 8 4 2 1 CHAN 8 4 2 1 CHAN 8 4 2 1 CHAN 8 4 2 1
1 0 0 0 0 5 0 1 0 0 9 1 0 0 0 13 1 1 0 0
2 0 0 0 1 6 0 1 0 1 10 1 0 0 1 14 1 1 0 1
3 0 0 1 0 7 0 1 1 0 11 1 0 1 0 15 1 1 1 0
4 0 0 1 1 8 0 1 1 1 12 1 0 1 1 16 1 1 1 1
Table of contents
Other Sound Sculpture Recording Equipment manuals


Popular Recording Equipment manuals by other brands

Sharper Image
Sharper Image 207717 user guide

MIR
MIR MiR100 Technical documentation
 Interface Device NI... quick start guide")
National Instruments
National Instruments Gigabit Ethernet (GigE) Interface Device NI... quick start guide

Philips
Philips TL720R/00T operating instructions

Kenwood
Kenwood TK-930 manual

LA Audio
LA Audio DPF3103 Operator's manual


