Sound Sculpture ABCadabra Mk II User manual

(and original ABCadabra)
OWNER’S MANUAL
Document OMABC1912
Mk II

1
2 Year Limited Warranty
Sound Sculpture Musical Instrument Products (Sound Sculpture) warrants the ABCadabra to the original purchaser to be free of defects in material
and workmanship under normal use for a period of 2 year from the date of purchase from an authorized Sound Sculpture dealer or directly from
Sound Sculpture Musical Instrument Products.
Sound Sculpture's liability under this warranty is limited to repairing or replacing defective materials that show evidence of defect, and only if the
product is returned for repair directly to Sound Sculpture or to the authorized Sound Sculpture dealer from which the unit was purchased.
Sound Sculpture reserves the right to make changes in design or make additions or improvements on the product without incurring any obligation to
install the same on products previously manufactured.
Sound Sculpture shall not be liable for any consequential damage or loss of profits as a result of the use of this product even if Sound Sculpture is
advised of the possibility of such damages or loss. In no event will Sound Sculpture's liability exceed the price paid for the product.
No other warranties are expressed or implied and Sound Sculpture neither assumes nor authorizes any person to assume for it any obligation or
liability in connection with the sale of this product. In no event shall Sound Sculpture or its dealers be liable for special or consequential damages
due to the use of this product. Some states do not allow the exclusion or limitation of incidental or consequential damages, so the above exclusions
or limitations may not apply to you.
In Case of Difficulty
In the unlikely event that you experience problems with the ABCadabra, please refer to the section in this manual pertaining to the operation you are
having difficulty with. Very often the difficulty is simply a result of improper setup or programming and can be resolved by studying this manual.
If, after reading this manual, you are unable to resolve the problem email us at [email protected] or call Sound Sculpture at the number
shown below during normal business hours. If we are unable to resolve your problem over the phone and determine that the unit needs repair, you
will be given a return authorization number and further procedures for returning the unit. UNAUTHORIZED REPAIR OF THE ABCadabra BY
ANYONE OTHER THAN THE FACTORY VOIDS THE WARRANTY. NO UNITS WILL BE ACCEPTED FOR REPAIR WITHOUT FIRST
CONTACTING THE FACTORY FOR A RETURN AUTHORIZATION NUMBER.
Precautions and safety notes
To reduce the risk of fire or electric shock, do not expose this unit to rain or operate this unit in a wet environment.
Use only the power module supplied with the unit unless you are qualified to use a substitute power supply. Use of another module or supply with
incompatible specifications will void the warranty if damage occurs.
If the unit becomes physically damaged due to dropping or for other reasons, it should be returned to the factory for repair to avoid the risk of further
damage to the unit or to attached units.
To avoid damage due to lightning, the power supply should be unplugged during an electrical storm.
Copyright by Sound Sculpture LLC
Bend, OR - USA
(541) 318-1877
This publication may not be reproduced by any means in whole or in part in any form or by any means including electronic except for personal use
without written consent from an officer of Sound Sculpture LLC.

2
Table of Contents
WHAT’S NEW WITH MK II.................................................................................................................................................................2
INTRODUCTION ...................................................................................................................................................................................2
PANEL FEATURES................................................................................................................................................................................3
SETUP COMMON TO ALL USES .......................................................................................................................................................3
SETTING THE ABCADABRA MIDI CHANNEL..............................................................................................................................................3
CONNECTING MIDI TO THE ABCADABRA..................................................................................................................................................3
CONNECTING POWER TO THE ABCADABRA ...............................................................................................................................................3
PROGRAMMING YOUR FOOT PEDAL TO OPERATE THE ABCADABRA ...........................................................................................................3
SETUPS UNIQUE TO YOUR USE .......................................................................................................................................................4
SETUP FOR SWITCHING BETWEEN TWO AMPLIFIERS ..................................................................................................................................4
Programs for toggling using only one foot switch .................................................................................................................................4
Programs where separate switches are used.........................................................................................................................................4
Programs for individual control over Amps ..........................................................................................................................................4
Programs for individual control using separate switches......................................................................................................................5
SETUP FOR EFFECT INSERT/BYPASS............................................................................................................................................................5
Commands for toggling insert/bypass using only one switch ................................................................................................................5
Programs for insert/bypass using separate switches .............................................................................................................................5
SETUP FOR ROUTING TWO INSTRUMENTS OR TWO EFFECTS TO A SINGLE AMP..........................................................................................6
To select an instrument or effect using a single switch..........................................................................................................................6
To select an instrument or effect using a two switches ..........................................................................................................................6
MK II FEATURES AND INFORMATION..........................................................................................................................................7
SPECIFICS ON THE MIDI IN AND MIDI OUT CONNECTIONS..................................................................................................7
PINS 6&7 ..................................................................................................................................................................................................7
FOR EFFECTS THAT DO NOT SUPPLY PHANTOM POWER .............................................................................................................................7
PINS 1&3 ..................................................................................................................................................................................................7
COMPLETE LISTINGS OF ALL AVAILABLE PROGRAMS AND CONTROLLERS. ..............................................................8
What’s New with Mk II
Please see “Mk II Features and Information” on page 8 to see the features and important information about the the Mk II version of
the ABCadabra.
Introduction
The ABCadabra A/B Box and Effect Insert is a versatile accessory for MIDI equipped electric musicians and offers 3 main uses.
•Route a single instrument signal to two amplifiers and switch among amplifiers under MIDI control.
•Route two signal processors to a single amplifier and switch between processors under MIDI control.
•Insert/Bypass a signal processor in the main signal path under MIDI control.
The ABCadabra is a relay based device, which is to say that the audio signals only go through relays for the greatest signal integrity.
The ABCadabra functions are controlled using either pre-assigned MIDI Program Change commands or Controller commands. For
example by repeatedly sending Program 0, the ABCadabra will alternately route your instrument signal to either of two amplifiers.
Additional Programs are used to toggle between 3 states (A/B/Both), to only turn on or turn off a function (as opposed to toggling), to
insert/bypass an effect and more. Or using Controller information, you can select A or B by transmitting controller data 0 or 127 from
an Instant Access Switch available on most foot controllers.
3
Panel Features
The back panel of the ABCadabra has a MIDI IN jack, a MIDI THRU jack, and power connector. The front panel has two mono (tip-
ring) ¼” jacks labeled “IN” and “A”, one stereo (tip-ring-sleeve) ¼” jack labeled “B/FX”, and 2 indicators. The “PWR” indicator
illuminates whenever power is applied to the unit. The “B/FX” indicator serves two purposes. It will blink rapidly for a moment
whenever the unit receives MIDI information that it can respond to. It then illuminates solid if either the “B” channel is active, or if a
signal is being sent to an effect device attached to the “B/FX” jack.
Setup common to all uses
Setting the ABCadabra MIDI Channel
The ABCadabra is factory set to MIDI channel 16. If this is an acceptable MIDI channel for your use than you do not need to do
anything more. If you wish to set the unit to respond to another MIDI channel, then you will need to change the switch setting inside
the unit.
To access the switch use a Philip’s head screwdriver to remove the 2 screws on the front panel. Slide the insides partially out by
pulling the front panel away from the case. Inside you will find a 4 position switch that can be used to set the channel. If the switch is
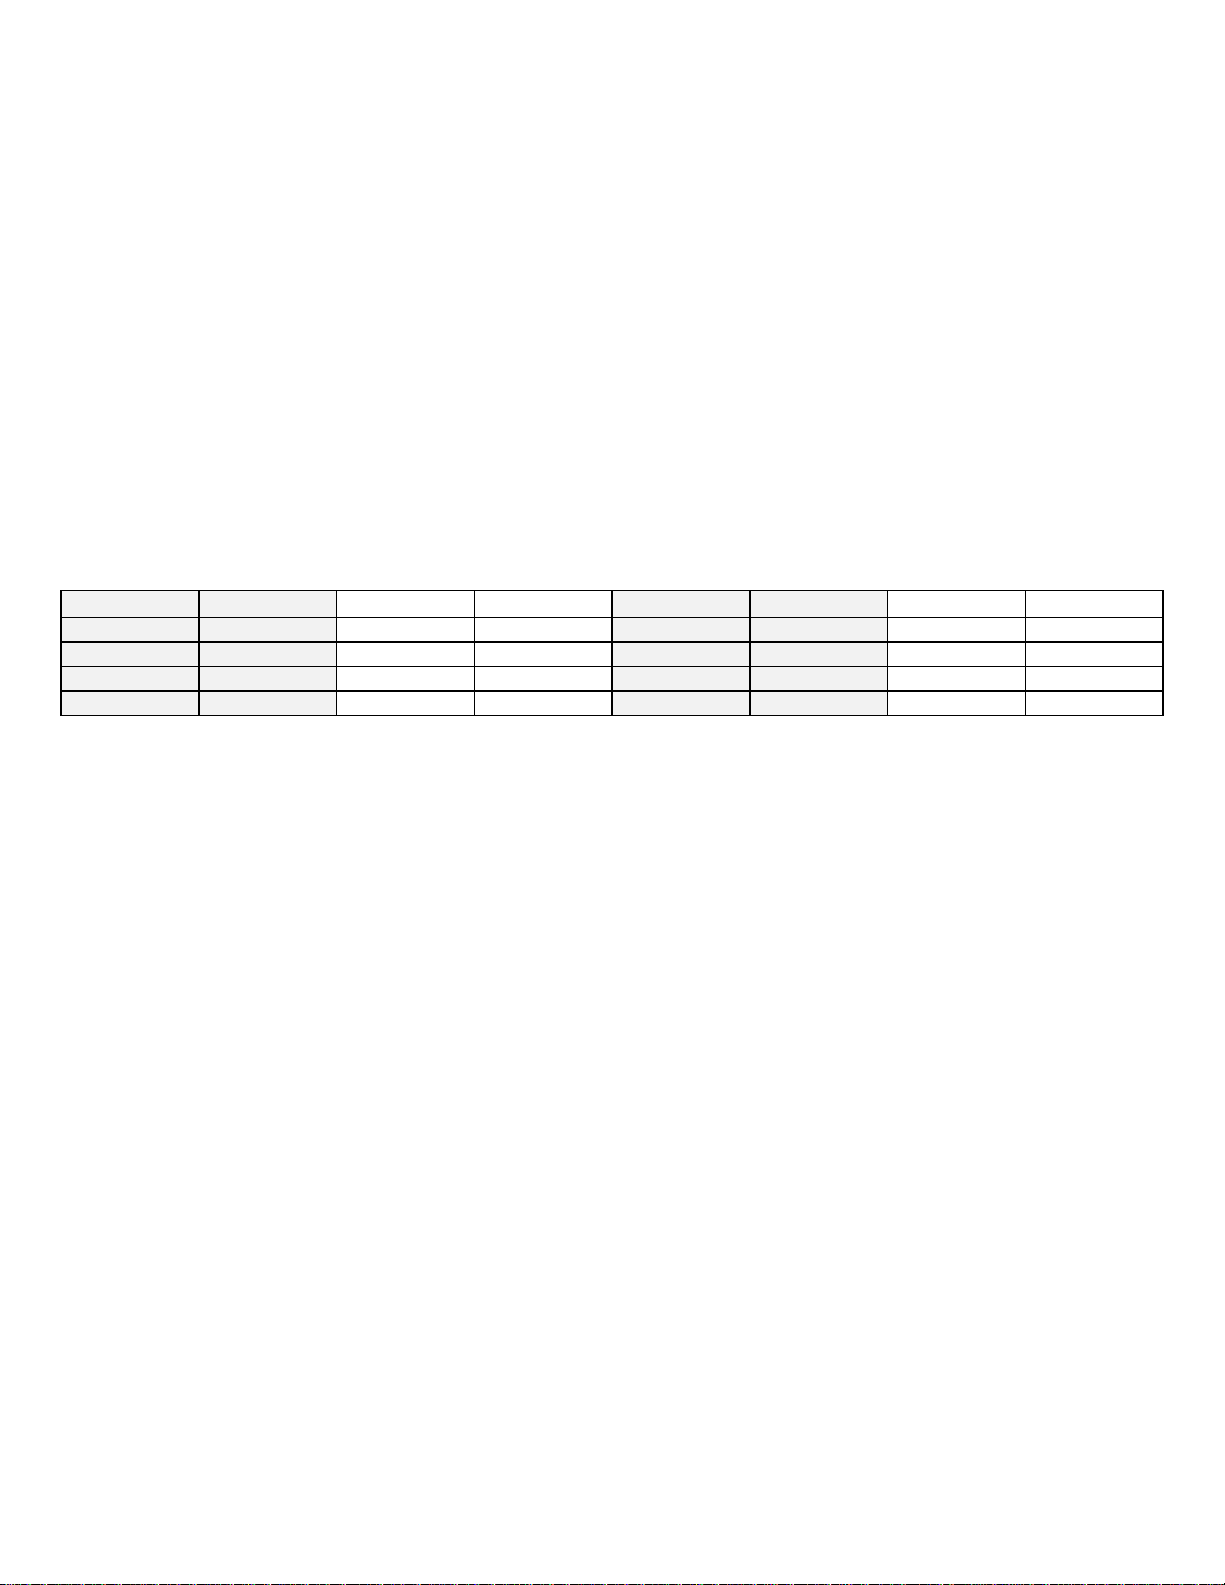
turned on (moved toward the center of the board) then this indicates a “1” otherwise it indicates a “0”. Use the following chart to
determine the switch setting for the channel you need.
CHANNEL
SWITCH
CHANNEL
SWITCH
CHANNEL
SWITCH
CHANNEL
SWITCH
1
0000
5
0100
9
1000
13
1100
2
0001
6
0101
10
1001
14
1101
3
0010
7
0110
11
1010
15
1110
4
0011
8
0111
12
1011
16
1111
After you have selected the MIDI channel slide the board back inside the case taking care that the board slides all the way in (you may
need to push the bottom of the plastic bezel on the rear panel downward a slight amount while pushing the board in so the board goes
all the way in). When the board is all the way in, attach the screws and lightly tighten.
Connecting MIDI to the ABCadabra
Connect a standard MIDI cable between your MIDI foot controller MIDI OUT jack and the ABCadabra MIDI IN jack. Connect an
additional cable between the MIDI THRU jack on the ABCadabra and the MIDI IN jack of the next MIDI device in your chain as you
normally would. The ABCadabra does not interfere with the MIDI signal and simply passes through all data seen on the MIDI IN
jack directly to the MIDI THRU jack. Power must be applied to the ABCadabra in order for MIDI data to pass through to the next
device.
Connecting Power to the ABCadabra
NOTE: THIS PARAGRAPH APPLIES TO THE ORIGINAL ABCADABRA. FOR POWER INFORMATION ON THE
MKII UNIT, PLEASE REFER TO PAGE 8 “Mk II Features and Information”.
Connect a 9VDC wall adapter to the power jack. You can use a wall style adapter or a power substitute but in either case the supply
must be 9V DC at 100ma using a 2.1mm connector with center pin positive. You can operate the unit safely with up to 12V DC
supplies without damage. Operation beyond this voltage may cause damage to the unit and void the warranty if damage occurs.
Programming your foot pedal to operate the ABCadabra
To control the ABCadabra, you will need to program your MIDI foot pedal to send out either Program Change commands or Control
Change commands when you press a switch on the pedal. Whether you use Program Change commands or Controller commands will
depend on the foot pedal that you use and what you are trying to achieve. Every operation in the ABCadabra has a pre-assigned
Program Change number and Controller number associated with it. There are a total of 16 Program Change commands and 5
Controller numbers that the unit will respond to, but in actual use you will only select a few of these to achieve the desired result.
If your foot pedal only transmits Program Change commands, then these commands are what you will use to control the ABCadabra.
You can have a single switch toggle the unit or separate switches to go to definite states. If your foot pedal has additional switches
that send out two value Controller commands, sometimes referred to as “Instant Access” switches, you may use these switches as well
to control the ABCadabra. Refer to the charts in the next sections to determine which Program Change commands or Controller
numbers to use for your setup.
4
Setups unique to your use
How you attach the audio cables, what type of cables you will need to use, and what MIDI commands to program into your foot
controller depend on your intended use of the ABCadabra.
If you intend to switch a single instrument between two amplifiers, then refer to “Setup for Switching Between Two Amplifiers.
If you intend to insert/bypass a signal processor in your main signal path under MIDI control then refer to “Setup for Effect
Insert/Bypass”.
If you intend to route either of two signal processors to a single amp or to the input of another signal processor, then refer to “Setup
for Routing Processors to a Single Amp”.
Setup for Switching Between Two Amplifiers
This setup is for routing a single instrument such as a guitar to two amplifiers. Under MIDI control you can direct the ABCadabra to
route the guitar to the first amp, the second amp, both amps, or neither amp (mute).
There are a total of 12 Program commands that can be used in this setup to give you the freedom to operate the unit that is most
convenient for you. One thing of note is that when an amplifier is muted, the input to that amp is shorted to ground to insure
complete silence from the muted amp.
For this setup, attach the instrument to the “IN” jack using a standard instrument cable. Attach the two amplifiers to the “A” and the
“B/FX” jacks also using standard instrument cables. Then program your foot pedal referring to the following sections.
Programs for toggling using only one foot switch
If you wish to use just a single switch on your foot controller to toggle between amps then program either of the two programs shown
in the chart to a single switch on your foot pedal or program an Instant Access switch with the Controller number shown in the chart.
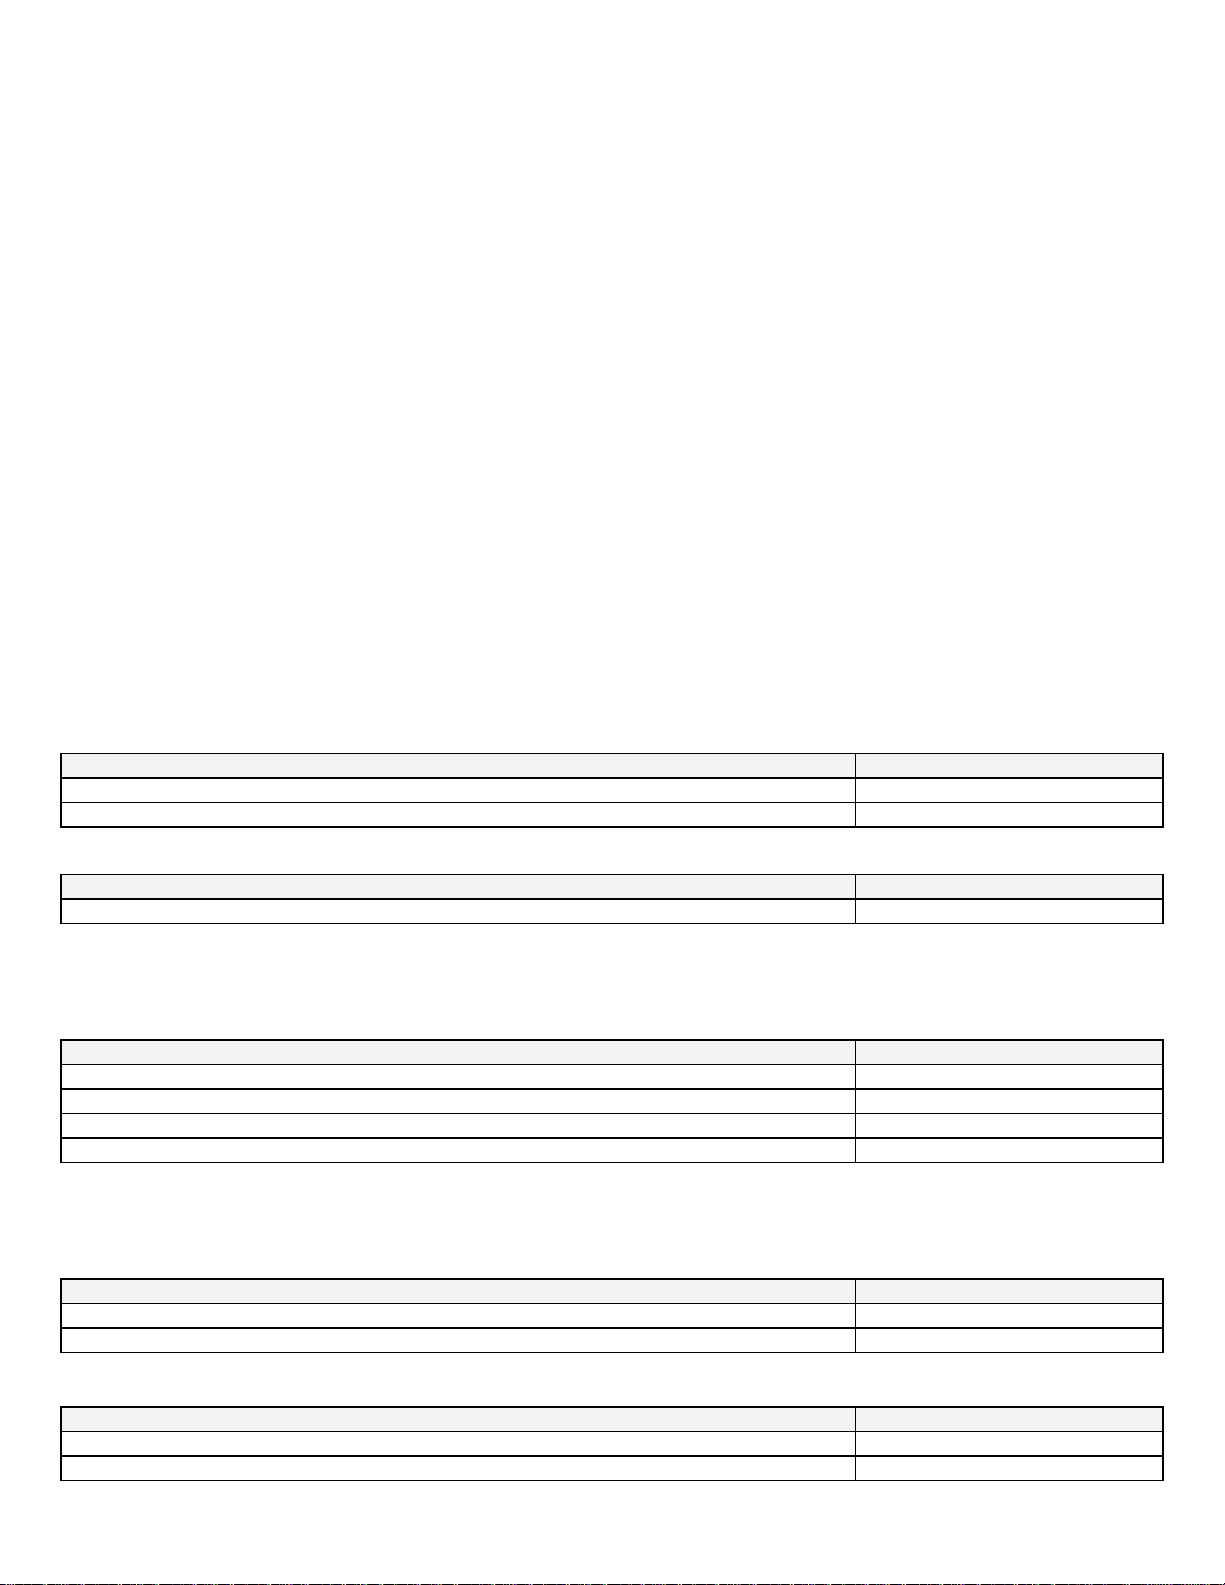
Function
Program (0-127 range)
Toggle between A or B only using a single switch (mute unused amp)
0
Three way toggle between A only, B only, and Both using a single switch
1
Function
Controller Number
Toggle between A or B only (0=A only 127=B only)
0
Programs where separate switches are used
If you wish to have separate switches on your foot pedal to switch between A, B, Both, or Mute, then you can do so by assigning
programs 4-7 to the 4 switches as shown in the chart.
Function
Program (0-127 range)
A only (mute B)
4
B only (mute A)
5
Both A and B
6
Mute both amps
7
Programs for individual control over Amps
If you wish to have 2 switches assigned such that each switch toggles an individual amp without affecting the state of the other amp
you can do so by using these commands.
Function
Program (0-127 range)
Toggle A on/mute without changing B
2
Toggle B on/mute without changing A
3
Function
Controller Number
Toggle A on/mute without changing B (0=A mute 127=A on)
1
Toggle B on/mute without changing A (0=B mute 127=B on)
2
5
Programs for individual control using separate switches
You can also control individual amps using separate switches for on and mute. This requires 4 switches on your foot pedal to be
programmed with separate commands.
Function
Program (0-127 range)
A on (no change to B)
8
A mute (no change to B)
9
B on (no change to A)
10
B mute (no change to A)
11
Setup for Effect Insert/Bypass
The ABCadabra can be used to insert an effect into your signal path under MIDI control. When the effect is bypassed, the instrument
signal completely bypasses the effect by removing the effect entirely from the signal path. In other words it is exactly the same as just
plugging your instrument directly into your amp. This is a real treat for purists that like to connect their guitar or other instrument
directly to their amp, but still require the option of going through an effect for certain situations.
In addition to completely disconnecting the effect (both input and output), you also have the option of disconnecting only the output to
the effect but leaving the input connected. This is useful in a situation where you want to “load up” an effect such as a delay without
actually hearing the delay until you switch over to the effect. Such a situation might be useful at the end of a song where you want to
kick in an echo after you stop playing just to hear echoes.
To use the ABCadabra as an effect insert/bypass the “B/FX” jack is used as both the send and return to the effect. In order to do this
you will need a special Y type cable that has a stereo (tip-ring-sleeve) plug on one end and two mono (tip-sleeve) plugs on the other
end. These cables are readily available from your local music dealer. Connect the stereo end into the “B/FX” jack on the ABCadabra,
then identify the mono jack that is attached to the tip of the stereo jack and insert it into the input of the effect. Attach the other mono
jack to the output of the effect.
Connect the instrument to the “IN” jack using a regular instrument cable and connect the amplifier to the “A” jack also using a regular
instrument cable. Then program your foot pedal with the programs shown in the charts.
Commands for toggling insert/bypass using only one switch
Use one or both of these Programs or Controllers assigned to one or two switches to toggle the insert/bypass function. Note that is
you intend to hear an echo from your effect, then you must press the switch assigned to “bleed” when turning off the effect, in order to
hear the effect when you turn it back on. But when turning it back on you can use either switch (depending if you are going to go into
another bleed).
Function
Program (0-127 range)
Toggle insert/bypass with no bleed to the effect
0
Toggle insert/bypass with signal always bleeding to the effect
12
Function
Controller number
Toggle insert/bypass with no bleed to the effect (0=bypass 127=insert)
0
Toggle insert/bypass with bleed to the effect (0=bypass 127=insert)
3
Programs for insert/bypass using separate switches
Use the programs shown here if you wish to have separate switches to bypass or insert the effect rather than toggling between the two.
Function
Program (0-127 range)
Bypass with no bleed to effect
4
Bypass with signal bleeding to effect
6
Insert effect
5

6
Setup for Routing Two Instruments or Two Effects to a Single Amp
With the ABCadabra you can select among two instruments or among two processors and route them to a single amp. When used in
this fashion the ABCadabra is used “backwards” where the “IN” jack is the output and the “A” and “B/FX” are the inputs to be
selected. The programs are different than the A/B amp functions in that the unselected jacks are not shorted to ground as they are
when muting amps. This is not relevant when selecting passive instruments but is important if selecting between active instruments or
between processors where it is not desirable to short the outputs of the devices to ground.
To select among two instruments or effects, plug the first instrument or effect output into “A” and the second instrument or effect
output into “B/FX” using standard instrument cables. Plug the amplifier into the “IN” jack also using a standard instrument cable. If
using two effects then you will need to drive the two inputs from the effects from a single instrument. You can use a common Y cord
(with mono plugs on all 3 sides) to connect your instrument to the inputs of the two signal processors. Program your foot pedal with
the appropriate programs from the charts.
To select an instrument or effect using a single switch
Use this program is you wish to select your instrument using just a single switch on your pedal
Function
Program (0-127 range)
Toggle between devices (doesn’t ground unused device)
13
Function
Controller number
Toggle between devices (doesn’t ground unused device) (0=A 127=B)
4
To select an instrument or effect using a two switches
Use these programs if you wish to select your instrument or effect using two switches on your foot pedal. This is preferred if you
always want to know which instrument or effect is selected when a switch is pressed. Program the first switch with the first program
and the second switch with the second program.
Function
Program (0-127 range)
Select the “A” device (doesn’t ground B side)
14
Select the “B” device (doesn’t ground A side)
15
Using two ABCadabras to select from 4 signal sources
NOTE: THIS IS ONLY AVAILABLE ON THE MKII.
When using two ABCadabras, you can select from up to 4 instruments or effects by plugging the 4 sources into the A & B inputs of
both units, then connecting a mono Y cord (mono on all 3 plugs) to the common jacks of the two units and plugging the third plug into
your amp. To select, first send the following command to the one unit you want to completely disconnect (removes A & B from going
to common) then select A or B on the other unit as indicated with programs 14 and 15 above. Each unit should be on its own MIDI
channel.
Function
Program (0-127 range)
Deselect both effects –allows special use when using two ABCadabras
16

7
Mk II Features and Information
This newer version of the ABCadabra has some important enhancements
•The MIDI connectors have been changed to 7 pins to accommodate devices carrying phantom power and bidirectional
communication. More on this below. You can also use the ABCadabra with standard 5 pin cables if you will not be using
phantom power.
•When phantom power is passed through the ABCadabra, it will absorb some of the power and power itself from this power
meaning you don’t have to connect a power supply to the power jack. The ABCadabra requires only 50 ma of current.
•In the event you need to supply phantom power to a MIDI foot controller, but the device you normally connect to doesn’t
have phantom power, you can plug the foot controller power supply into the ABCadabra and power your foot controller from
phantom power supplied to the ABCadabra. The ABCadabra in this case will get power from the phantom power supply on
the power jack
•The relays remember their last state when the unit is powered down, so in the event of an accidental power loss for example,
when power is re-applied, you can continue to perform without having to send out a refresher command.
•The ABCadabra can now be powered from almost any effect power supply AC or DC from 9V to 18V that can supply at
least 50ma.
Specifics on the MIDI IN and MIDI OUT Connections
Standard 5 pin MIDI IN jacks use pins 4 & 5 to receive MIDI information. 5 pin MIDI OUT jacks use pins 4 & 5 to transmit MIDI to
the next device In addition the center pin on the MIDI OUT jack is connected to the shield and is usually tied to system ground.
Pins 6 & 7
MIDI Foot Controllers have adopted a trick technique of passing power through the MIDI cable by using 2 additional pins available in
7 pin MIDI Cables. Pin 6 & 7 are these pins. The way this works is that the device that the foot controller is attached to has an
additional power jack that is simply connected to these 2 pins inside the unit. On the foot controller end these 2 pins are connected to
the power input of the foot controller. If you plug the foot controller power supply into the effect, it passes the power down the cable
into the foot controller and like magic, the foot controller now has power without the artist having to connect and additional cable to
the foot controller. A great time saver during setup.
In such a setup, you can connect the ABCadabra in between the effect supplying phantom power and the foot controller receiving this
power. If this is done, the ABCadabra will “steal” some phantom power from those pins to power itself, so the user doesn’t have to
add an additional supply to the ABCadabra. Another great time saver. NOTE: Do not connect a power supply to the power jack of
the ABCadabra in this scenario. Doing so will interrupt the power passing through the unit and instead attempt to supply power to the
foot controller itself which is not what you want to do.
For Effects That do not Supply Phantom Power
If you have a phantom powered foot controller, but the effect you are trying to control does not have a phantom power feature, you
can use the ABCadabra to help you out. To do this connect the foot controller to the MIDI IN on the ABCadabra using a 7 pin MIDI
cable, the connect the MIDI OUT on the ABCadabra to the standard effect using a standard 5 pin MIDI cable. Plug the power supply
that came with your foot controller to the power jack on the ABCadabra and it will connect that power to the pins that supply the foot
controller with power and you are set to go. The ABCadabra will also “steal” a little power from that power supply as well to power
itself.
Pins 1 & 3
There are two more unused pins in the standard MIDI implementation. Some manufacturers have taken advantage of these two pins
on their MIDI IN jack (which normally just received data from something like a foot controller) to send data back out to the foot
controller thus creating a bi-directional communication link between the effect and the foot controller. This is useful for example if
you want to update the foot controller with some display information coming from the effect.
In this scenario, you can connect the ABCadabra between the effect and the foot controller as described above as the ABCadabra
connects pin 1 and pin 3 on the MIDI IN jack directly to pin 1 and 3 of the MIDI Out jack so the bidirectional signal is not interrupted.
Again, if phantom power is also passing through the ABCadabra (on pins 6 and 7) then no power supply is needed for the ABCadabra

8
Complete listings of all available Programs and Controllers.
The following 6 charts shows all the available commands for the ABCadabra for the 3 uses referred in the text. Note that the Program
numbers refer to controllers that use the 0-127 range when programmed. If your controller uses the range 1-128 then just add 1 to the
value shown in the chart.
Listing for A/B amp use
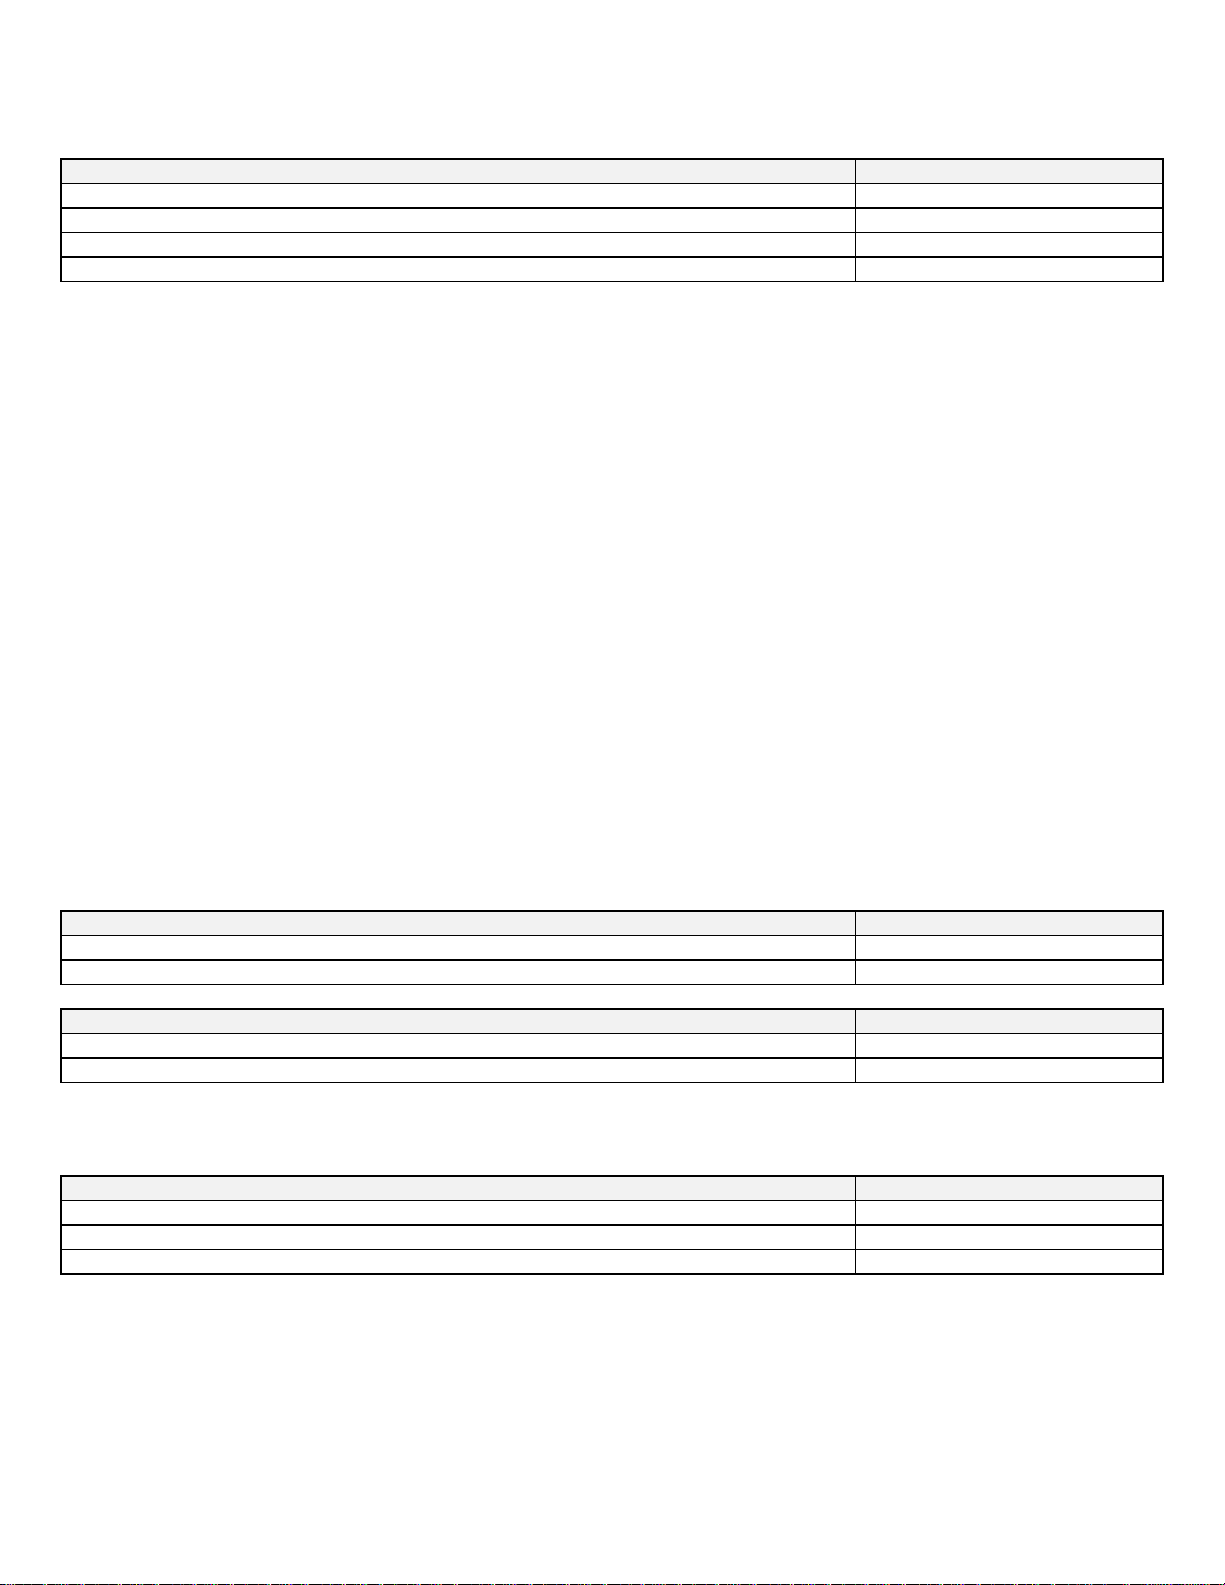
Function
Program (0-127 range)
Toggle between A or B only using a single switch (mute unused amp)
0
Three way toggle between A only, B only, and Both using a single switch
1
Toggle A on/mute without changing B
2
Toggle B on/mute without changing A
3
A only (mute B)
4
B only (mute A)
5
Both A and B
6
Mute both amps
7
A on (no change to B)
8
A mute (no change to B)
9
B on (no change to A)
10
B mute (no change to A)
11
Function
Controller Number
Toggle between A or B only (0=A only 127=B only)
0
Toggle A on/mute without changing B (0=A mute 127=A on)
1
Toggle B on/mute without changing A (0=B mute 127=B on)
2
Listing for Effect Loop Insert/Bypass
Function
Program (0-127 range)
Toggle insert/bypass with no bleed to effect
0
Toggle insert/bypass with signal always bleeding to the effect
12
Bypass effect with no bleed (complete bypass)
4
Bypass effect with bleed to effect
6
Insert effect
5
Function
Controller number
Toggle insert/bypass with no bleed to the effect (0=bypass 127=insert)
0
Toggle insert/bypass with bleed to the effect (0=bypass 127=insert)
3
Listing for Selecting Between Two Instruments or Effects
Function
Program (0-127 range)
Toggle between two instruments or effects (doesn’t ground unused instrument)
13
Select the “A” instrument or effect (doesn’t ground B side)
14
Select the “B” instrument or effect (doesn’t ground A side)
15
Deselect both effects –allows special use when using two ABCadabras ONLY ON MKII
16
Function
Controller number
Toggle between devices (doesn’t ground unused device) (0=A 127=B)
4

9
Table of contents
Other Sound Sculpture Recording Equipment manuals


