Soundaware DAM1 Instruction sheet
DAM1
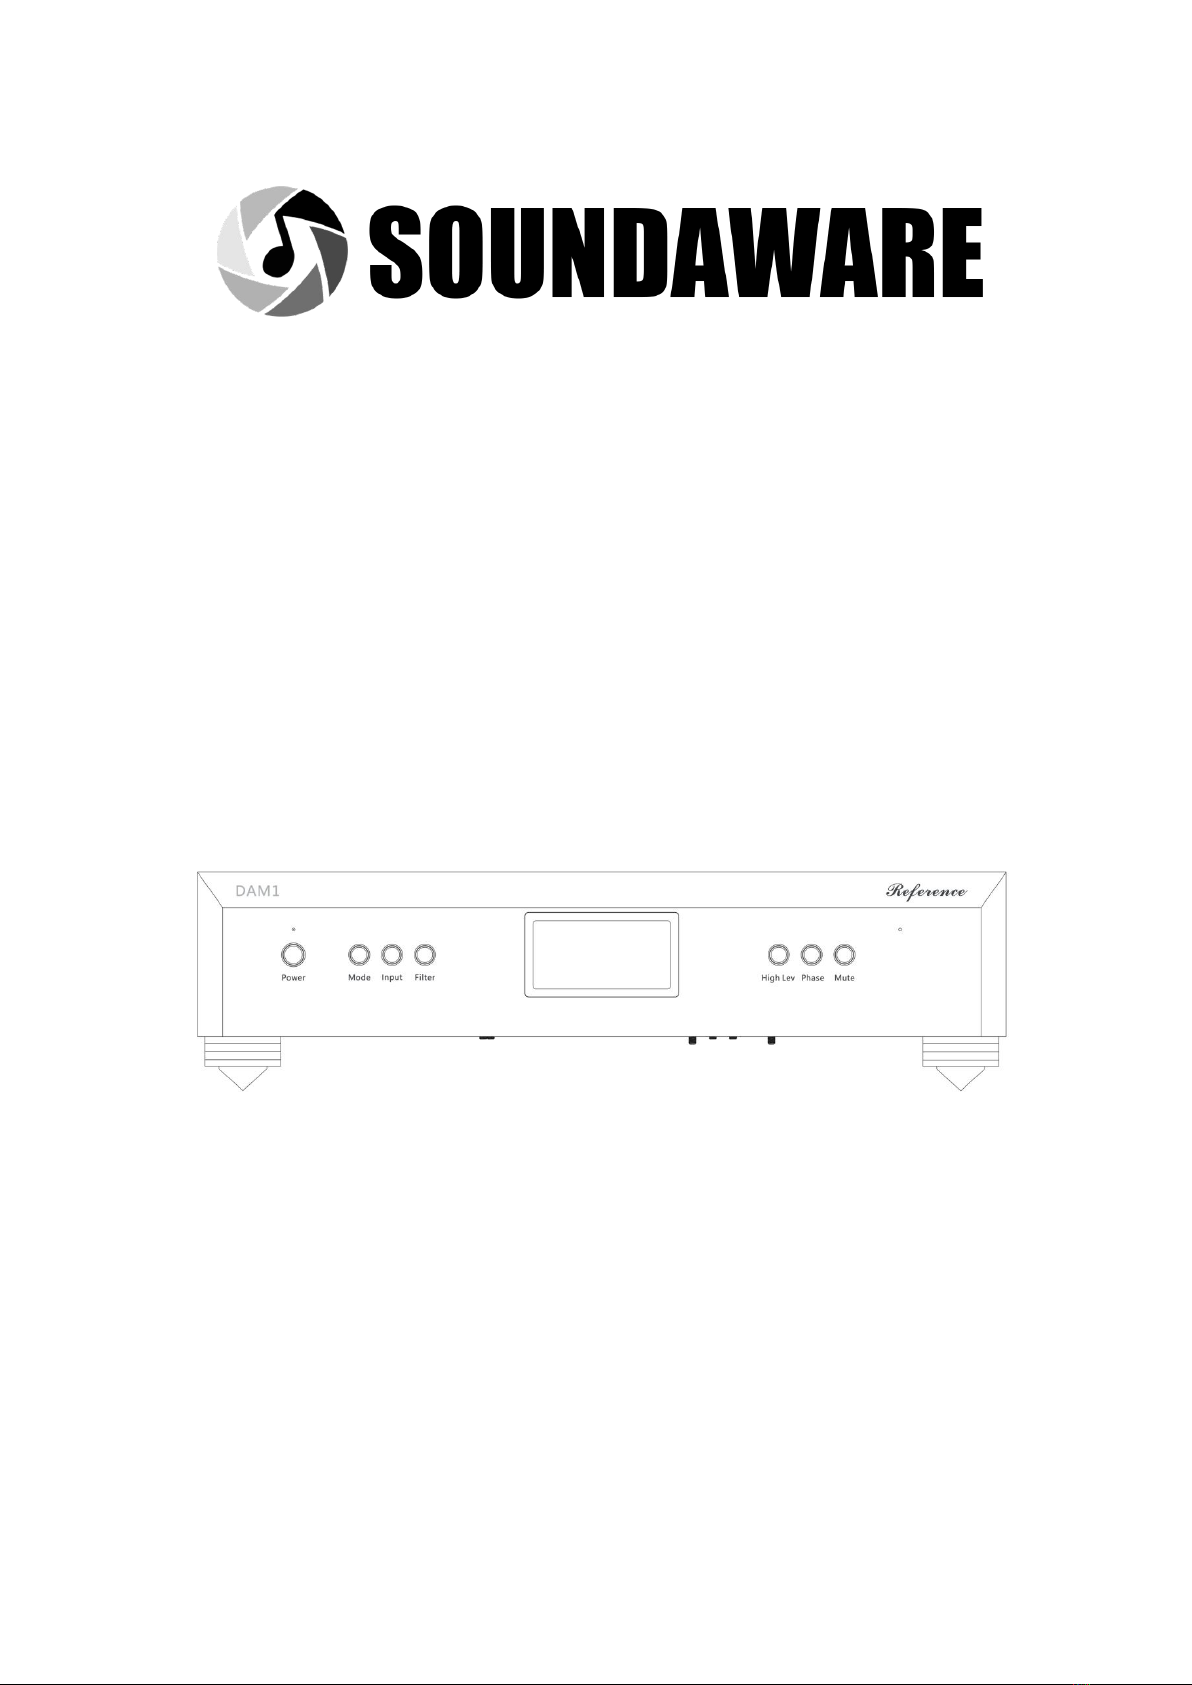
Soundaware Reference Level DAC
Product Instructions

1
Letter to Users
Dear valued DAM1 user:
Good day!
Thank you for using the DAM1, a reference-level DAC of Soundaware. DAM1 as a
pure decoder positioned at the reference level, how to properly match and burn-in is
the content that needs to be paid attention to next.
Before use, be sure to check whether the accessories of DAM1 are complete,
including HIFI DC cable, USB test cable, power test cable, manual, warranty card, etc.
Note that the test line is only used to test whether the function is normal, it will
seriously affect the sound quality, please use HIFI quality USB line and power line
instead.
In order to achieve the best sound quality, DAM1 needs to be burned in for a
certain period of time. In addition, after the cold machine is turned on, it needs
about 30 minutes of warm-up work. In particular, it is necessary to provide a load
under certain pressure for its power supply, so that it can achieve better looseness
and smoothness with a certain amount of heat. For the LPX power supply, you can
buy the 5525 loader of Soundaware for burn in, and for the LP1 customized version
power supply, you can buy the USB version of the loader for burn in. Just keep its
temperature slightly higher than the normal body temperature will do. Generally,
after three days and three nights of burn in using the load, intermittent trial listening
can be carried out until the sound basically does not change . As for the burn in of
DAM1, try to use the preferred connections as much as possible, and keep working
in ALL DSD or NOS mode, because it has a self-heating design inside, so no special
treatment is required. Also after three days and three nights, intermittent audition
can be carried out, and free aging can be done after one week.
DAM1 is very sensitive to shock absorbers, DC cables, power cables, XLR cables,
and USB cables. The HIFI DC cable provided by default pursues the sense of hearing
and fullness, so it is not the best solution in terms of analysis and dynamics. If you
have higher requirements for details, analysis and dynamics, you can use high-purity
silver or industry-renowned high-performance pure silver wires to make DC lines.
The line sequence can refer to the free line. There is no directionality. Pay special
attention, all four cores must be connected . When using USB, if the USB at the
output end is clean enough, whether the PA1 module is turned on or not can be
used as a means of tuning, but if it is connected to the USB port of a consumer
product, the PA1 module must be turned on.
The above is just a general method of operation. In fact, different systems,
different turntables, different wires, and different power sources will lead to

2
different effects of DAM1. However, both USB and power cables must use HIFI-level
cables, and at least basic shock-absorbing isolation for LPX aluminum alloy. If you
have the budget, you can use high-end cables and shock-absorbing accessories, the
effect is more outstanding. Appropriate adjustments can be made for the following
situations:
1. The original decoding can dive, but after DAM1 is added, the subwoofer is
not enough: You can use stainless steel spikes + stainless steel gaskets like DAM1 for
LPX. At the same time, you can replace the original HIFI DC cable with a HIFI-grade
pure silver cable for adjustment. Of course, it can also be adjusted from the power
line, XLR line, USB, AES and other lines to achieve the desired level.
2. After DAM1 is added, the sound is too thin or too thick: If it is too thick, you
can adjust the LPX power cable/XLR cable/USB/AES/coaxial cable, etc., or replace the
original HIFI DC cable with a HIFI level sterling silver wire. At the same time, method
1 can also reduce the thickness. If it is too thin, you can use a thick and warm power
cable/USB cable/AES/coaxial cable/XLR cable to adjust.
3. Pursue a specific style: DAM1 itself is mainly neutral. If you want a specific
preferred style, you can compare which mode you like under NOS or ALL DSD. At the
same time, more adjustments are made from the wire material or shock absorption
to achieve your own style preferences.
Of course, you must be familiar with and understand the basic settings and
functions of DAM1, such as different modes, different sound styles, and the high and
low output level settings can also obviously affect the sound quality, and the output
phase is often serious in many systems. Affects realism and soundstage. Therefore, it
is better to optimize it after using it correctly and aging to a certain extent.
At the same time, we also found that some wrong usage methods or individual
special circumstances will cause problems with the sound of DAM1. The following
are some problems found temporarily, please pay special attention:
1) DAM1, LPX or PA1 references cannot be superimposed on any items,
otherwise it will have a more obvious impact on dynamics and air feeling.
2) In the case of using the default HIFI DC cable, it may not be suitable for DAM1
with a cable with a muffled sound, because the sound itself has a certain thickness.
3) LPX and PA1 references must optimize the shock absorption, otherwise it will
affect the performance of DAM1. It is recommended to refer to the simple matching
scheme at the official audio show.
4) If the LPX and PA1 references have slight continuous heating when there is
no load or PA1 is no-load; There may even be situations where the analytical power
is not as good as the customized version of LP1, so special attention should be paid
to this.
5) If LPX and PA1 have not been heated to a certain extent, the density,
looseness and fluency are slightly worse.
6) The wrong phase selection may cause the sound of the system to deteriorate
significantly. By default, the P phase mode is sufficient. It is not necessary to select
the N phase if the record is reversed. At the same time, the output of high and low

3
levels is also very important. By default, H level is used. Only in some cases such as
connecting to a few amps on the desktop (especially portable 4.4 or 3.5mm input), L
level will be selected, otherwise it will be Affects the dynamics of the sound.
7) In rare cases, when the decoder works abnormally or freezes, please press
and hold the DAM1 power button to turn off the power and wait for more than 30
seconds, so that the internal large-capacity capacitor can be fully discharged, and
then turn it on again.
At the same time, in terms of function usage, some functions need to re-select
the mode or reboot to take effect. For example, DSD left and right channel switching
in HDMI IIS, etc.; and functions such as USB PA1 are turned on and off, sometimes
you need to restart DAM1 to take effect, otherwise the PA1 module will be turned
on and off directly when it is turned on, which will cause the USB to not be
recognized. At the same time, the sporadic display of garbled characters, display
errors, unable to turn on the screen or automatically turn off the screen is due to the
long display line and no communication verification. In the case of certain
interference in the environment or high static electricity during contact, it may cause
the display If there is a transmission error, generally you only need to restart DAM1
to return to normal.
If you encounter any problems during use, you can refer to this manual to find
the answers you need, or call: +65 8066 9960 for telephone support (telephone
support time: Monday to Saturday, SGT 9:00-18:00)
Finally, thank you again for choosing DAM1 decoder.
4
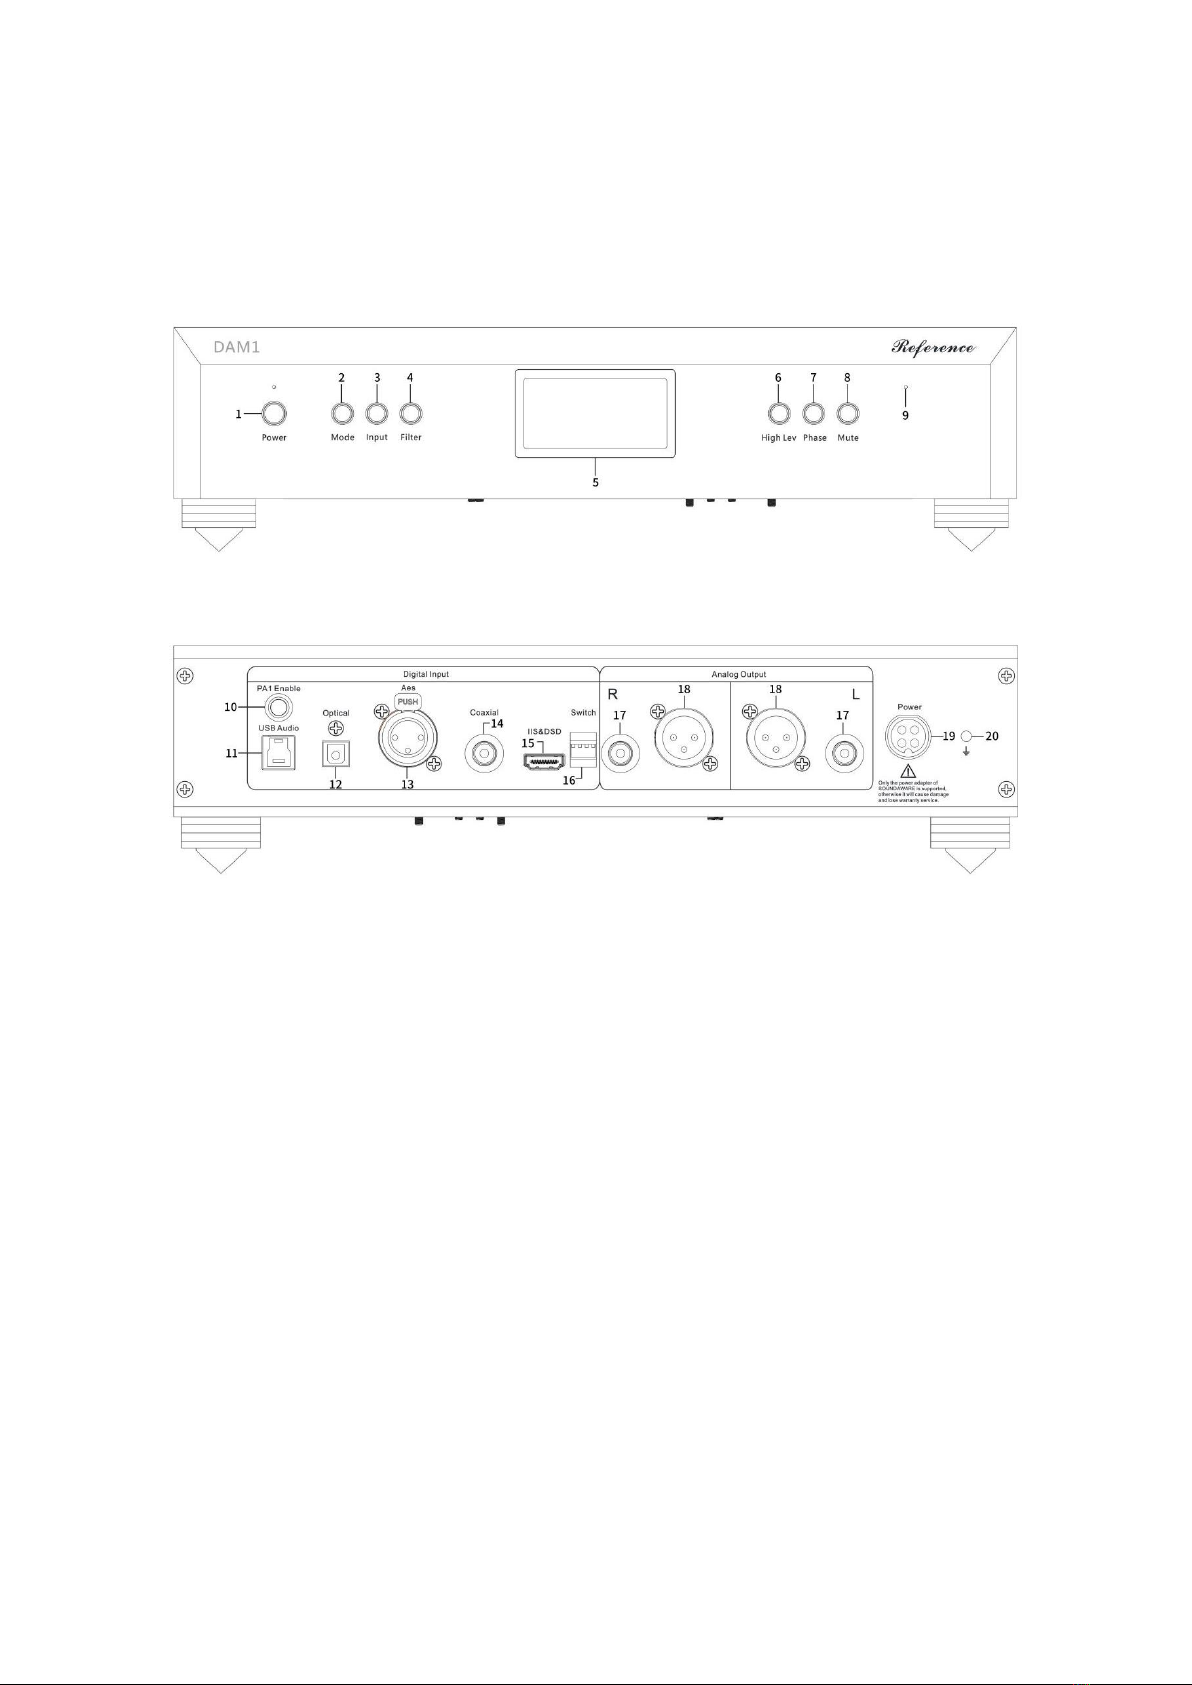
1. Interface and parameter description
Front:
Back:
1. Power button, when connected to the power supply, long press to turn on/off,
short press to turn off the screen. Note: When the screen is off, press any panel
button to turn on the screen.
2. Decoding mode selection, respectively 1) NOS 2) ALL DSD 3) Normal 4) SAW
mode
3. Input selection, can be selected according to the current audio source input:
coaxial AES/USB/optical fiber/IIS five kinds of input
4. Filter mode selection (only valid in Normal mode), there are four types: F1, F2,
F3, and F4
5. OLED display
6. RCA/XLR high and low gain switching
7. Positive and negative phase switch
8. Mute Button
9. Infrared receiver
10. Built-in PA1 module enable switch, when the green light is always on, it means
that the PA1 module inside DAM1 is in working state, and if it is not on, it means
that the PA1 module is not enabled. Note: After opening or closing, DAM1 must
be restarted to take effect, otherwise the device may not be recognized.
11. USB audio input interface, up to PCM 384KHz, DSD256
12. Optical fiber input interface, up to PCM 192KHz, DSD (DOP) 64
5
13. AES input interface, up to PCM 384KHz, DSD (DOP) 128 (note that the quality of
the line is higher when the bit rate is high)
14. Coaxial input interface, up to PCM 384KHz, DSD (DOP) 128 (note that the quality
of the line is higher when the bit rate is high)
15. HDMI IIS input interface, 16 kinds of line sequence adjustable, the highest
support PCM 384KHz, DSD256
16. IIS line sequence switch, a total of 1, 2, 3, 4 four groups
17. RCA analog output (L/R), ~1.7VRms/2VRms
18. XLR balanced analog output (L/R), ~3.4VRms/4VRms
19. 19.5V power input interface, can only be powered by PA1 reference version, LPX,
LP1 custom version and LP1 custom signature version
20. Independent ground interface
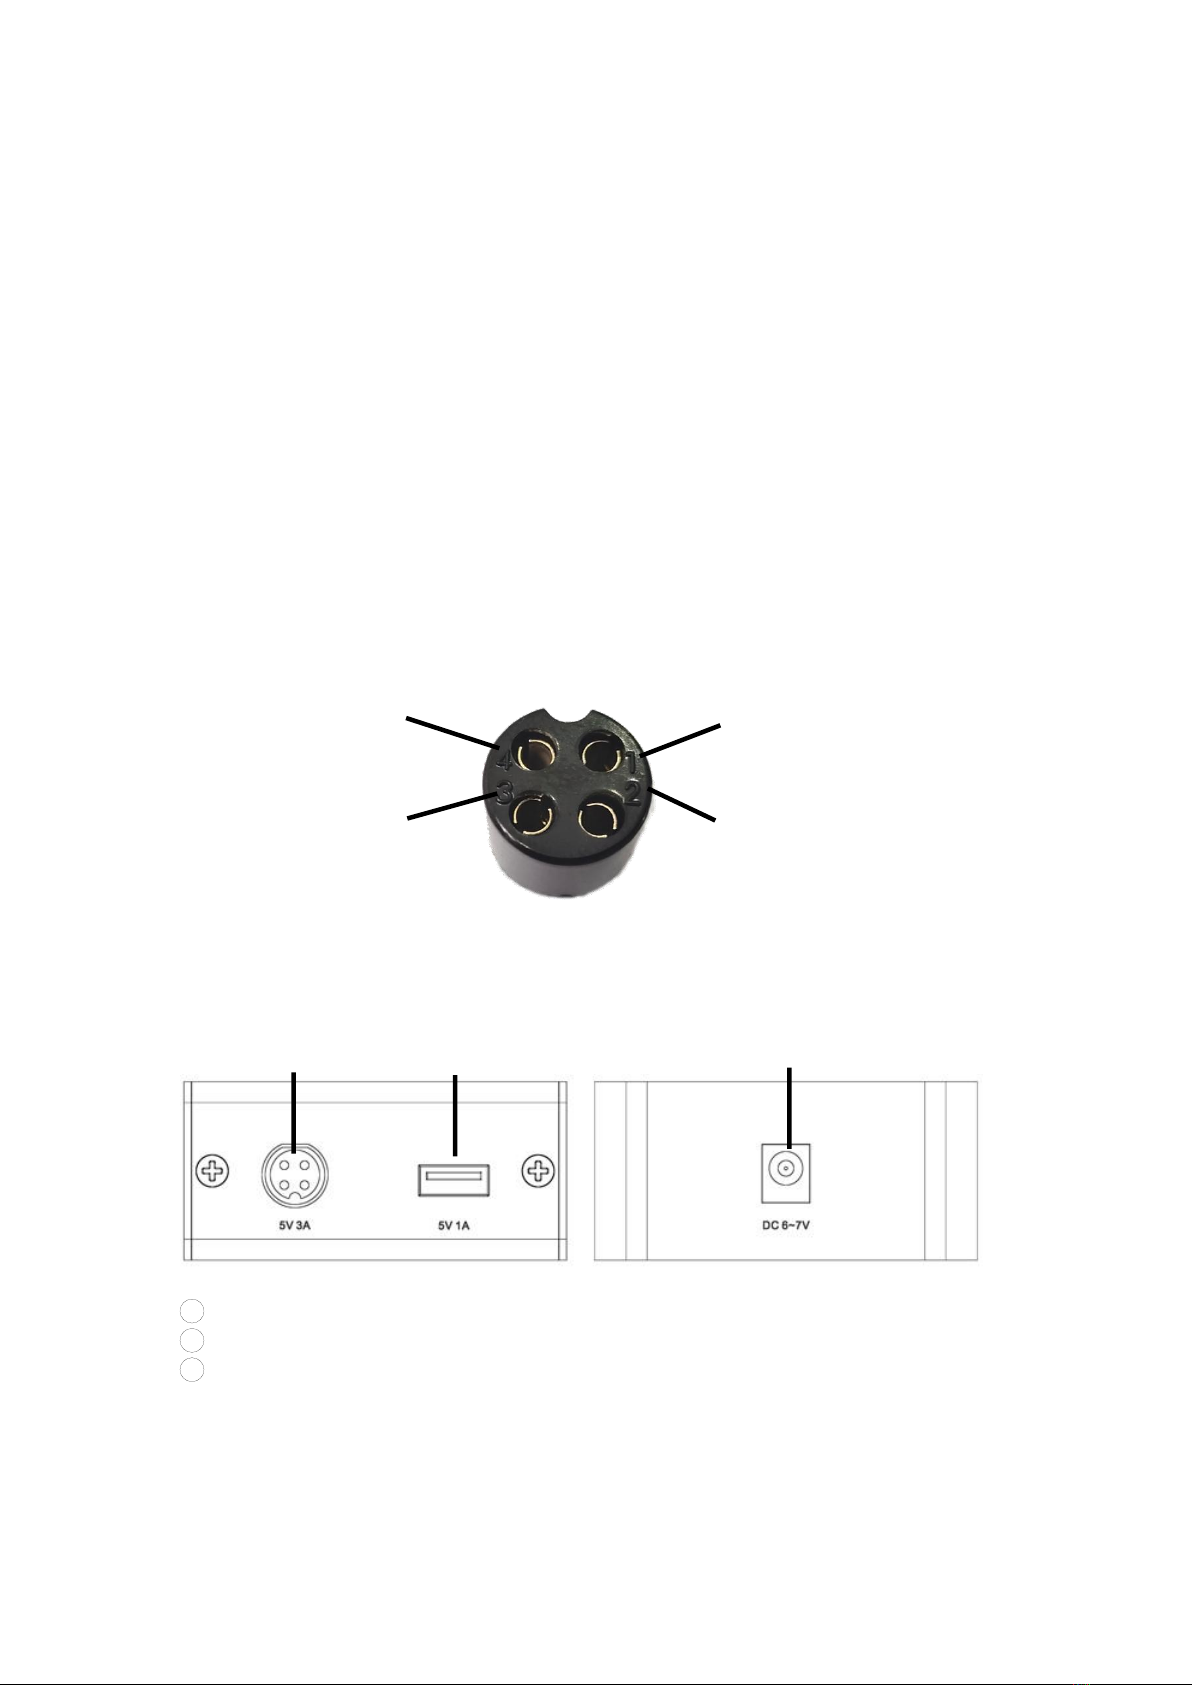
PS. If you need to customize the aviation DC line, you can mark it according to the
serial number of each interface of the four-core aircraft carrier, 1 and 2 are "-", and
3 and 4 are "+". As shown below:
LP1 Custom Edition/LP1 Signature Edition:
1Four-core aviation DC cable (integrated with the fuselage, not detachable)
2USB TYPE-A interface (only recommended for burn-in)
3DC power input interface
1:-
4:+
2:-
3:+
①
②
③

6
PA1 Reference Edition/LPX:
15V 5A (7.5A MAX) four-core aviation DC power output interface
25V 3A 2.5mm DC power output interface
3Independent ground wire interface
4Power switch
5Power cord and fuse interface
6Power Indicator
Remote control instructions:
⑤
④
③
②
①
⑥
1Screen switch, short press to
realize off/on screen. Note: When
the screen is off, press any other
button on the remote control to
not turn on the screen.
2Mute button
3Reserve volume + button
4Reserved volume - button
5Decoding mode selection,
respectively 1) NOS 2) ALL DSD 3)
NORMAL 4) SAW mode
6Input selection, according to
the current audio input, you can
choose five kinds of input:
coaxial/AES/USB/optical/IIS
7Filter mode selection (only
valid in Normal mode), there are
four types: F1, F2, F3, and F4
8RCA/XLR high and low level
switching
9Positive and negative phase
switch
10 Reserved button

7
Special Note: The default remote control comes with a built-in battery, which may be reversed
for power saving. If the remote control cannot be used, please open the battery holder and
install the battery.

8
2. Matters needing attention
Since moisture is the fatal enemy of the quality of electronic products, please do not
expose the machine to a humid environment for a long time, and do not place any
container with liquid on the machine, so as to avoid failure of electronic components
due to oxidation; at the same time, avoid overheating, dust and Vibration, these may
damage the device.
Do not use any power supply other than LP1 custom version, LP1 signature version,
LPX in PA1 reference version to connect DAM1, our warranty commitment does not
cover damage caused by overload due to unofficial power input.
Please keep the machine away from volatile substances. Do not allow it to come into
contact with organic materials such as rubber for a long time. These materials may
cause discoloration or damage to the surface of the unit. Please use a soft, clean
cloth to gently wipe the surface of the case, and avoid using organic chemical
reagents. For stubborn spots, wipe with a soft cloth dampened with a mild detergent,
then wipe with a dry cloth. Do not let water or other liquids splash into the machine
or the surface of the case, and do not drop small metal fragments into the machine.
Please try to avoid using the machine in an environment where there is no air
circulation or heat dissipation is inconvenient. Do not place the unit near stoves,
radiators or other heat sources. Do not expose the machine to a room exposed to
direct sunlight for a long time, a place with steam or oily smoke, dust or high
humidity, or near strongly magnetized objects. If the device works for a long time
and the temperature is high, please turn it off and cool it down Use it after a while.
When moving the machine, please make sure that all the cables of the machine are
unplugged, and do not drop the machine or subject it to strong impact. Do not place
heavy objects or any metal casings or devices that can be directly touched on the
machine, and ensure that the power ground wire has good contact, otherwise it is
easy to be interfered and the sound quality will deteriorate.
9
3. Instructions for use:
1. Start up:
1. LP1 customized version/LP1 signature version: interface ② is connected to the
original power adapter (it is strictly forbidden to use unofficial power adapters,
otherwise the consequences of machine damage or burning must be borne by
yourself), and when used in mainland China, the original power adapter should be
connected to the national grid. Electric voltage range voltage , interface ① is
connected to interface 19 of DAM1.
2. PA1 reference version/LPX: connect LPX (default 220V in mainland China) to a
voltage in line with the national grid mains voltage range , connect one end of the 4-
core DC cable to interface ①, and connect the other end to interface 19 of DAM1,
and open the PA1 reference version /LPX power switch. Wait for the power indicator
to light up and power on for 5-8 minutes.
After completing the above connection to the corresponding power supply, press
and hold the DAM1 power button and start working after the screen displays
normally. If the LPX or PA1 reference is not fully charged, forcing the power on will
result in failure to power on, or the screen will display abnormally!
2. Interface and setting instructions
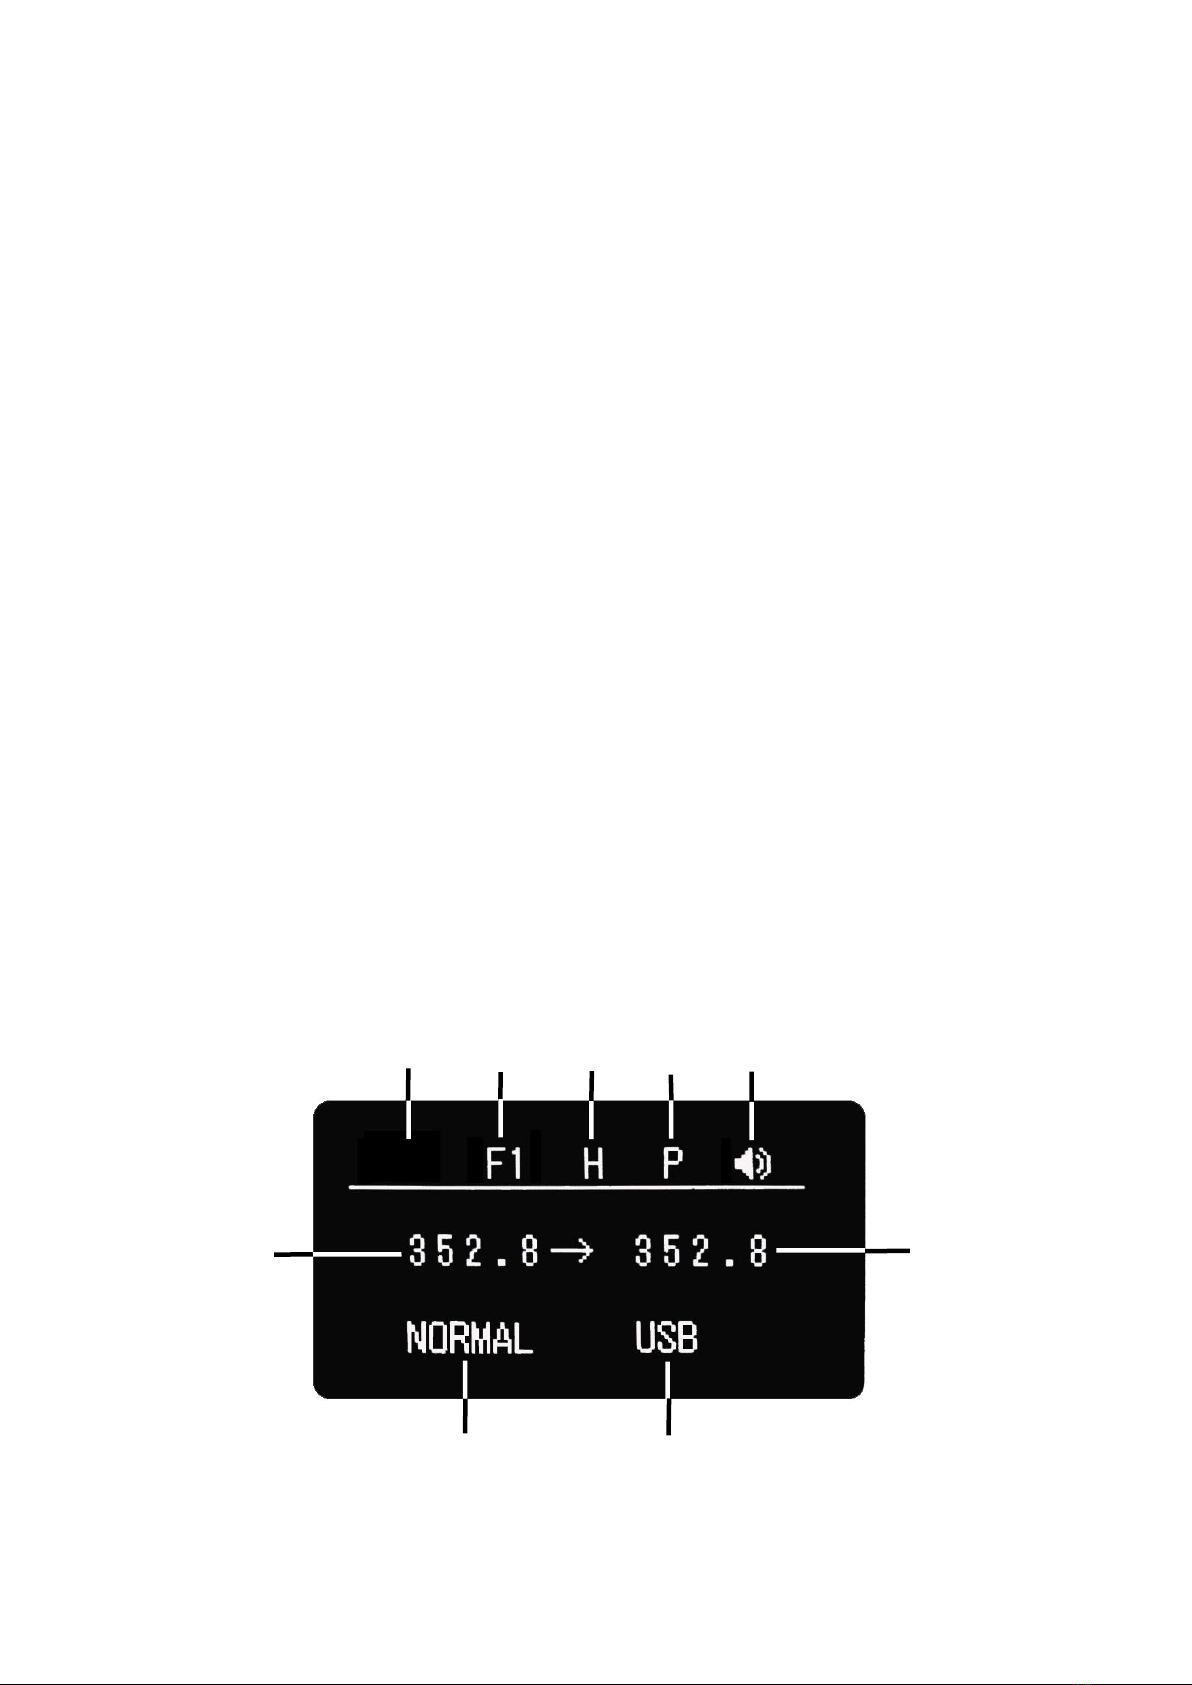
After starting up, the DAM1 menu is displayed as shown in the figure below:
①Reserved display area
④
③
②
⑤
①
⑦
⑥
⑧
⑨

10
②Displays the filter mode selection in NORMAL mode, there are four modes F1, F2,
F3, and F4 to choose from, and it is invalid in non-NORMAL mode
③Display the analog output gain mode, H is high level mode, L is low level mode
④ Positive and negative phase status display. P is forward, N is reverse
⑤ Display the current mute/non-mute state
⑥ Display the original sampling rate of the currently playing file
⑦Display the output sampling rate of Jinling DSP in different modes:
NOS mode: PCM 44.1KHz multiplier files are fixed up to 352.8KHz; PCM 48KHz
multiplier files are fixed up to 384KHz; DSD will be forced to PCM output.
ALL DSD mode: When playing PCM files, the frequency will be upscaled to DSD256,
but when playing DSD, the frequency will not be upscaled, and the original sampling
rate will be displayed.
NORMAL mode: Except for HDMI IIS, SPDIF (coaxial, optical fiber, AES), no
upscaling, displaying the original sampling rate, the upscaling input interface is just
Jinling DSP using local clock to optimize the input jitter problem.
SAW mode: Enjoy Sound intelligent mode, which will automatically select NOS or
ALL DSD mode for output according to the current playing file.
⑧Display the current playback mode, which is NOS, ALL DSD, NORMAL, SAW, a
total of four
⑨Display the current audio source input, there are five kinds of USB, AES, COAX
(coaxial), OPT (optical fiber), (HDMI) IIS
3. Connection and use
1According to the personal equipment interface and usage, connect the audio
output terminal to the corresponding input terminal of DAM1 through the coaxial
cable/optical cable/AES cable/USB cable/IIS cable.
Special Note:
1. When using a USB connection, if the front end is a PC with a non-AMC windows
system, you need to install the professional custom driver of DAM1. If it is an AMC
series, you only need to install the AMC driver. Only in this way can the native output
of the ASIO channel be used to obtain the best sound experience. In addition, if the
USB output port is a consumer product, it is strongly recommended to enable the
11
built-in PA1 module of DAM1 to obtain better sound performance. If the front USB
output itself is relatively clean, you can switch the tuning according to your own
preferences through this switch.
DAM1 professional custom driver can go to the driver download address through the
link below:
http://www.soundaware.net/filedownload/97309
AMC professional custom driver links are as follows:
http://www.soundaware.net/filedownload/80837
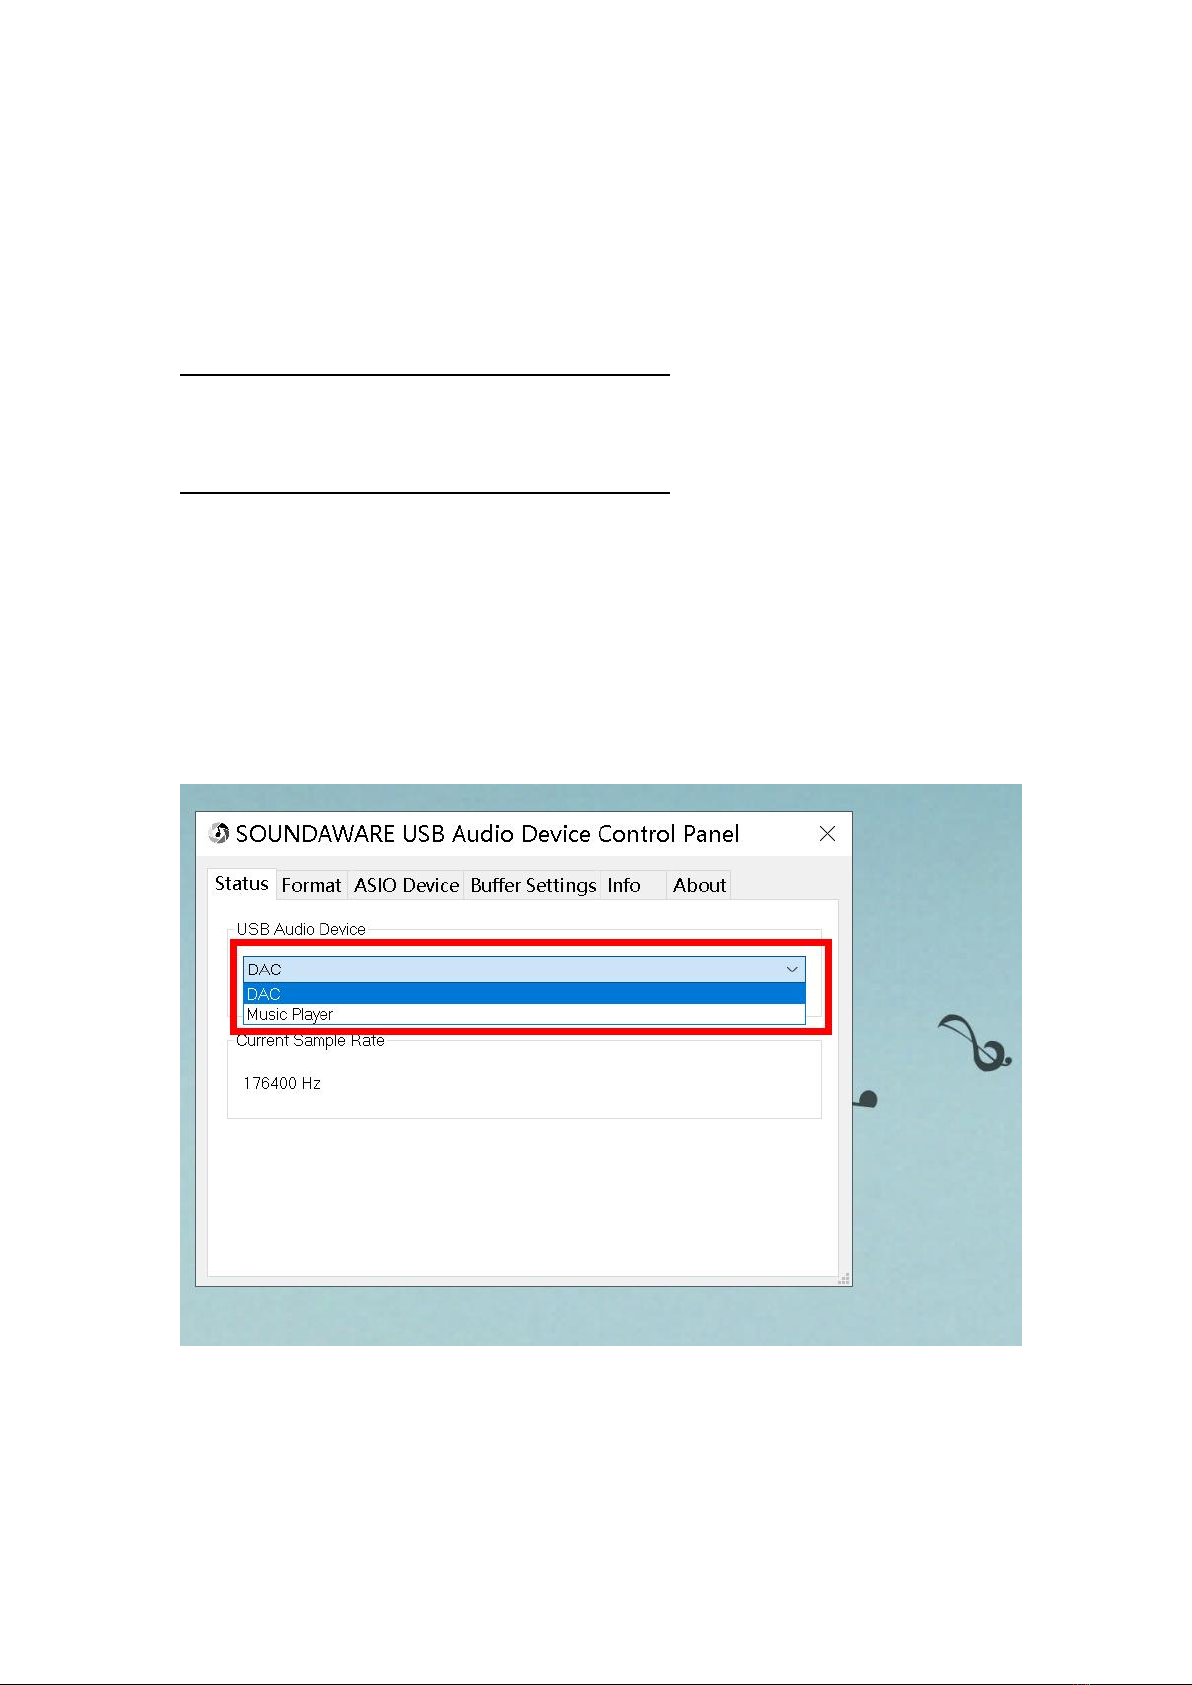
Special Note: It is not recommended to install the independent DAM1 driver for the
AMC product all-in-one. For turntable products that are only used with DAM1, it is
recommended to install only the DAM1 custom driver. If the AMC product is an all-
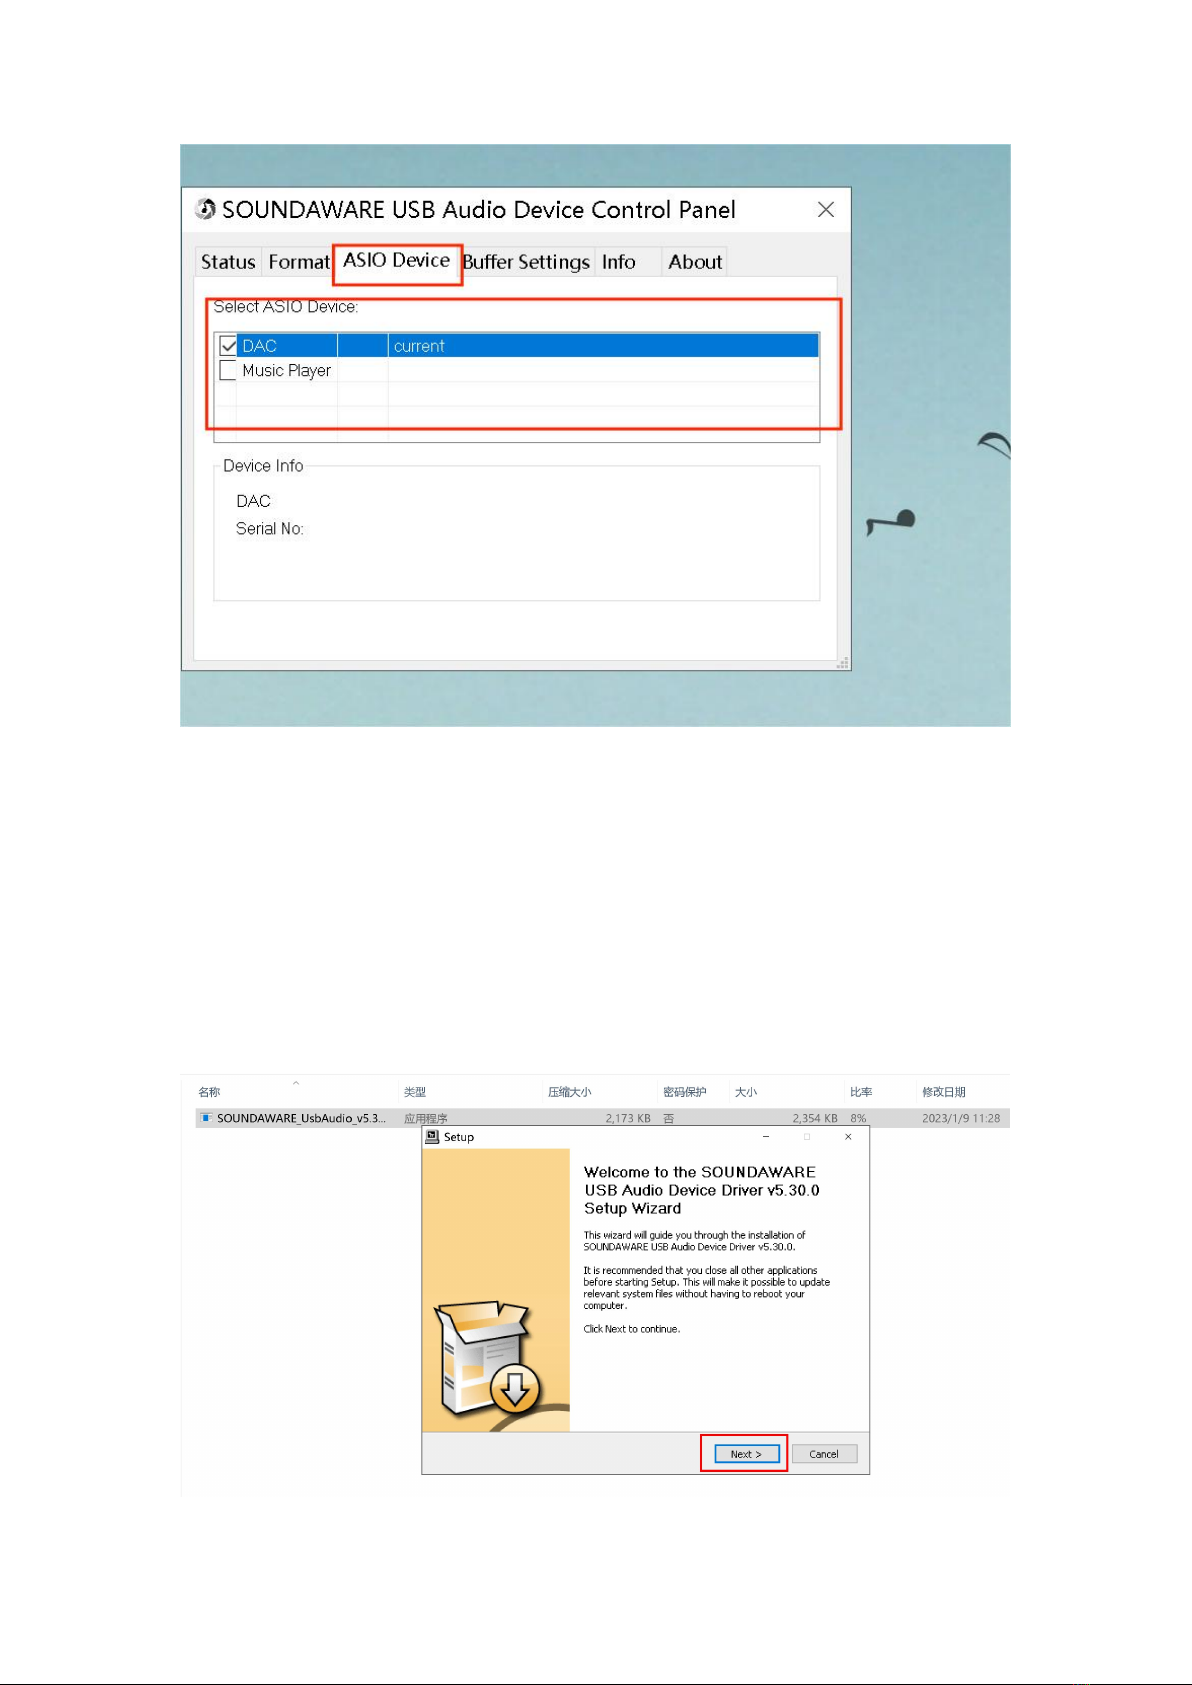
in-one machine or connected to multiple Soundaware decoder products at the same
time, you need to select the correct output device for ASIO output in the
Soundaware customized driver icon on the taskbar, and also need to tick the ASIO
Device position of the driver. Select the corresponding device, as shown in the figure
below:
12
Here we take AMC D1 as an example to introduce the driver installation and FOOBAR
(1.6.11) detailed setting steps.
Download DAM1 custom driver according to the link above and decompress it,
then connect the USB audio output port of D1 to the DAM1 USB audio input
port through the USB A→B cable, and install the driver on D1 according to the
prompt steps when DAM1 is powered on. After the driver is successfully
installed, the driver can be found in the status bar at the lower right corner of
the D1 interface, as shown in the figure below:
13
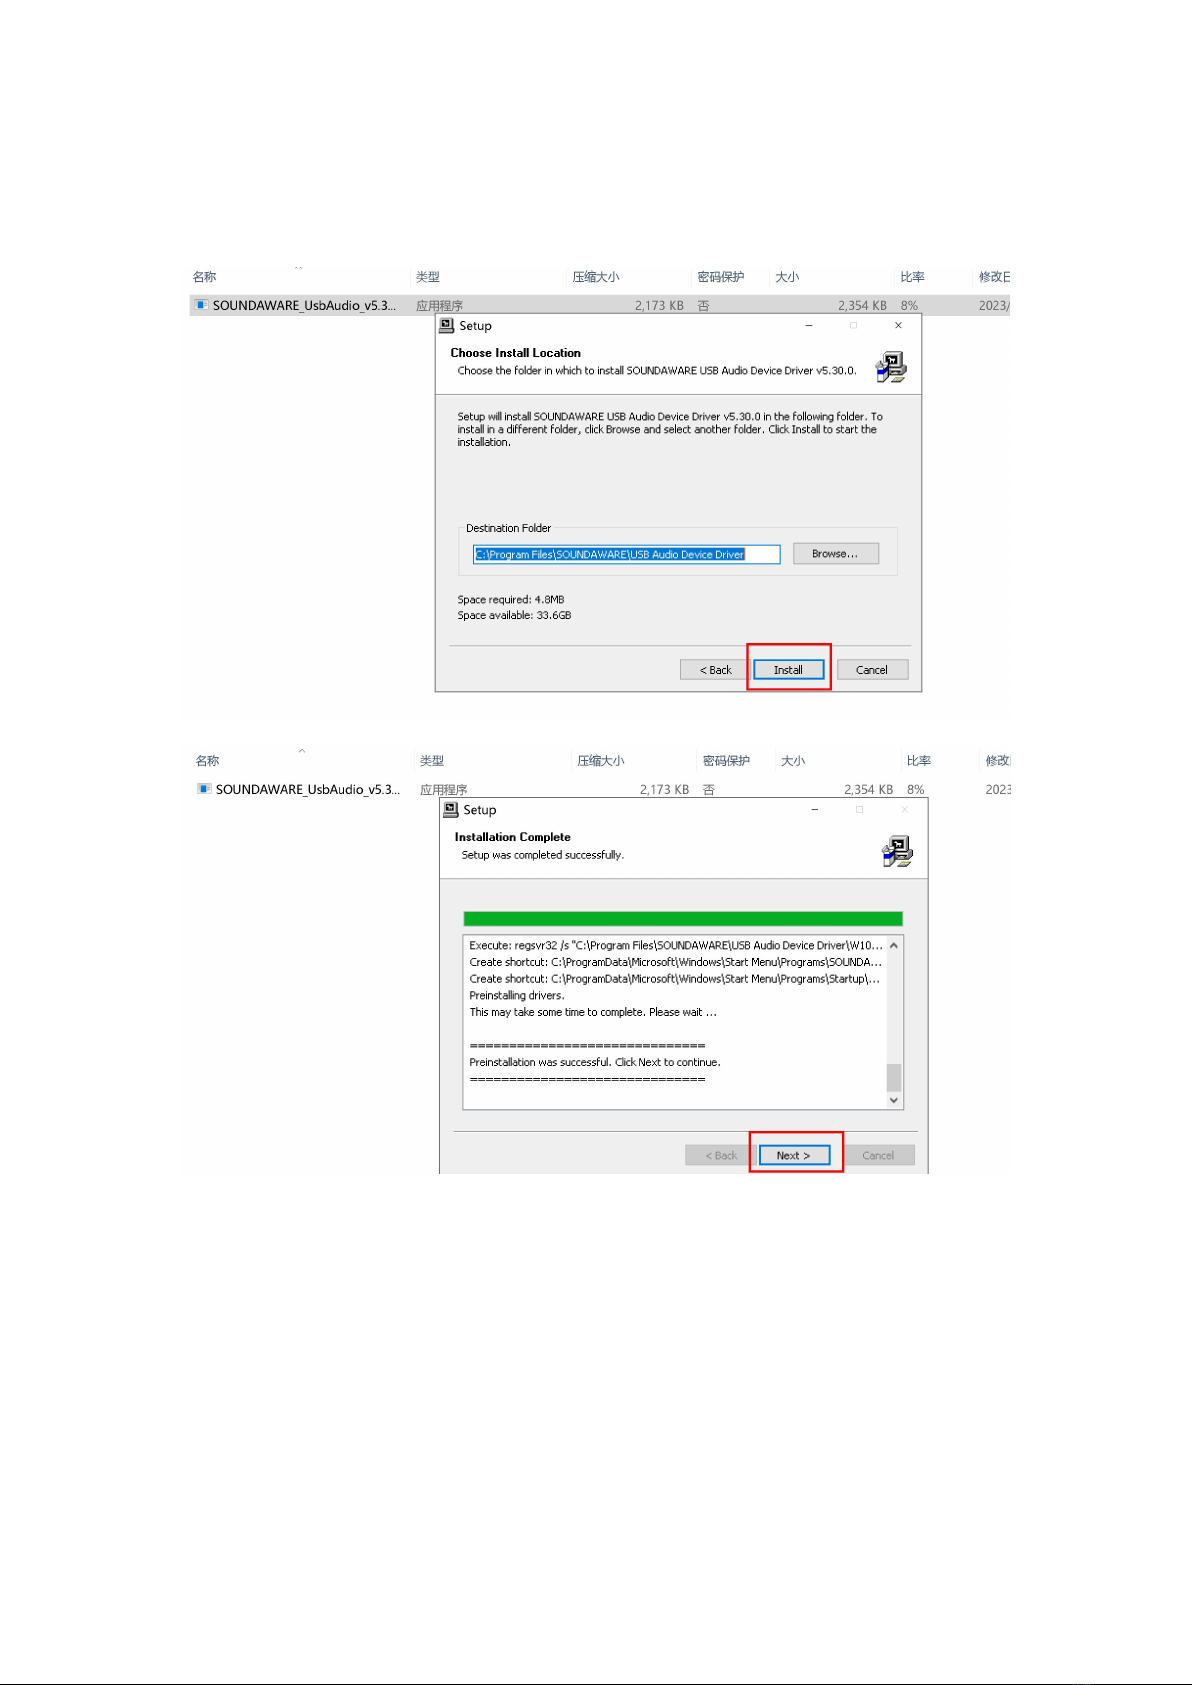
After selecting the directory to be installed, click the install option in the red
box to start the installation
After the installation is complete, click Next
14
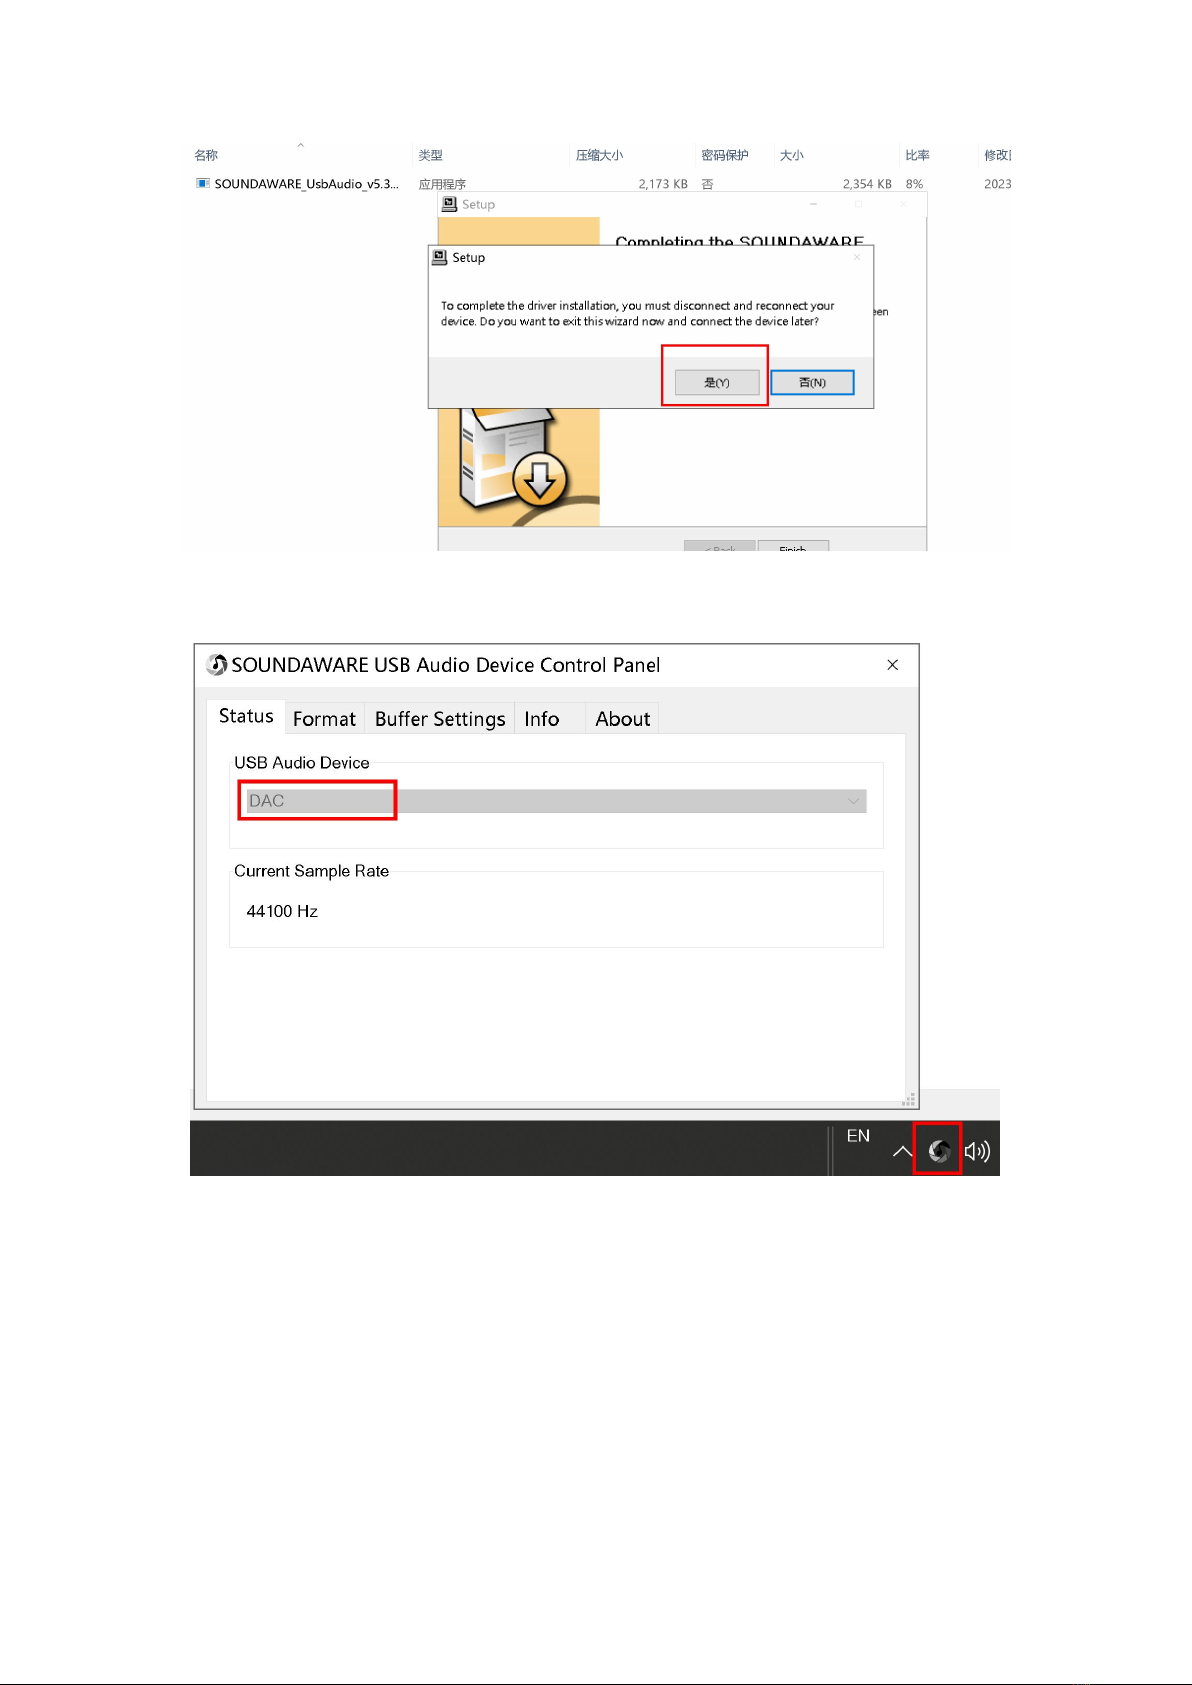
After clicking "Yes", unplug the DAM1 or the output USB cable and reconnect
it
Click the driver logo in the lower right corner, and the interface shown in the
above figure will pop up. When the DAM1 is connected, the USB device is
displayed as DAC
Open the main interface of FOOBAR, and then click "File" → "Parameter
Options" → "Output", as shown in the figure below:
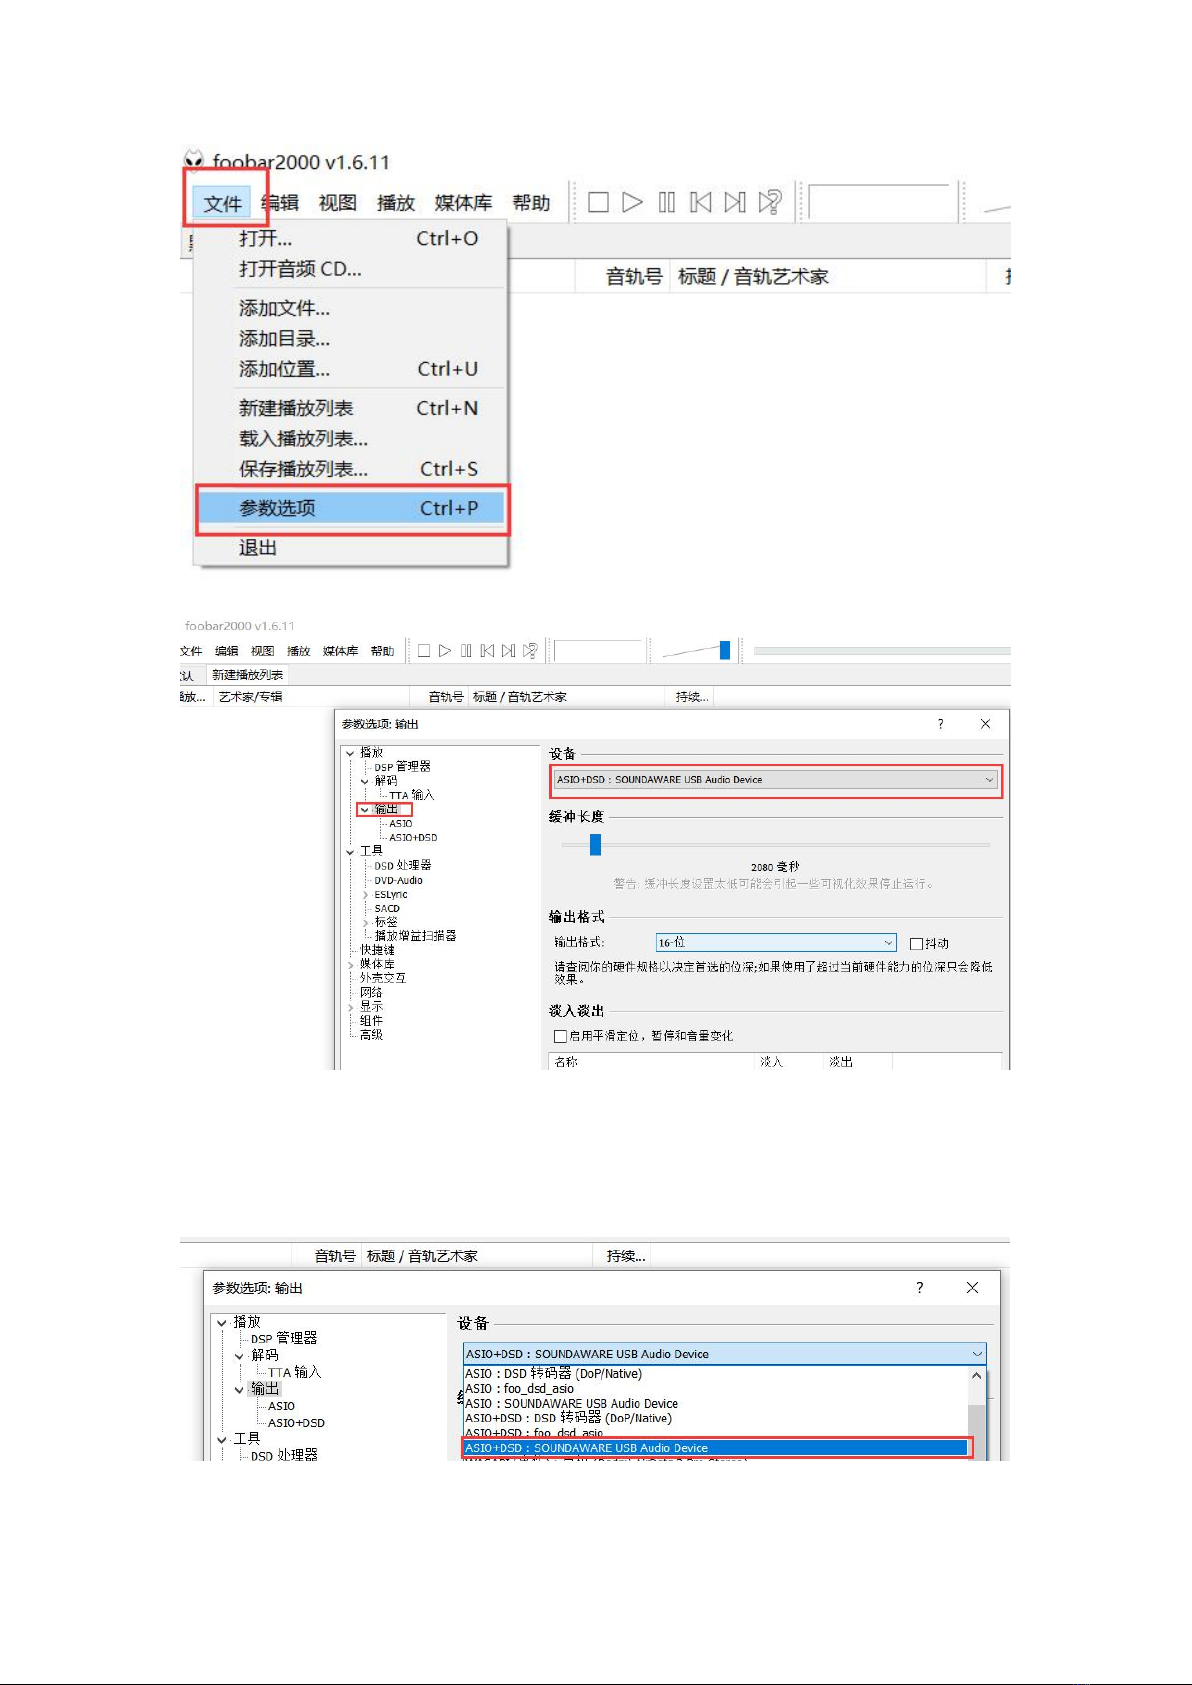
15
◆the output device named " ASIO+DSD: SOUNDAWARE USB Audio Device ". This
device is the custom driver installed by DAM1, and then click Apply. As shown
below:

16
◆Select SACD and confirm that the output mode is DSD. If it is currently PCM, it
will be converted to PCM output when FOOBAR plays DSD files. After the setting
is complete, click Apply. As shown below:
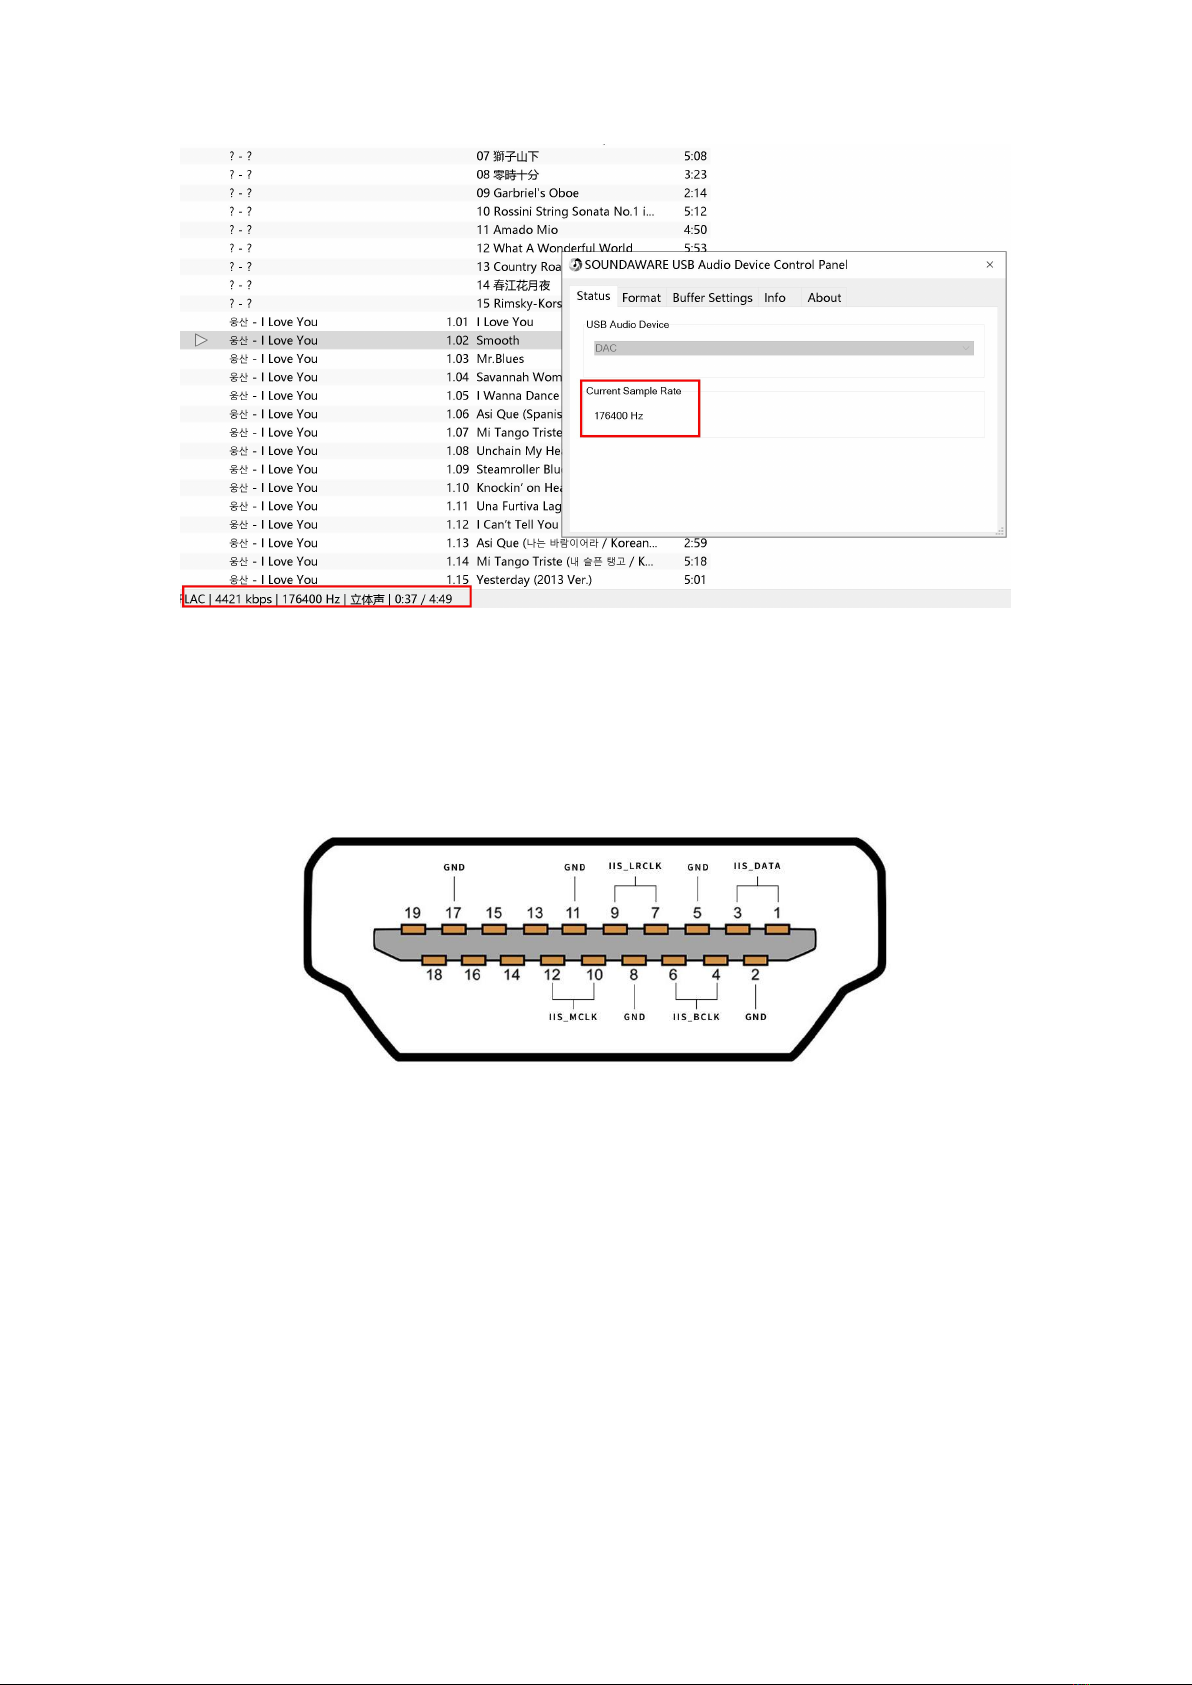
◆After completing the above settings, you can try to choose different sampling
rate files to play, and confirm that the current sampling rate displayed in the
lower right corner of FOOBAR is correct. At this time, open the driver in the
status bar at the lower right corner of the D1 interface, and the playback status
will also display the current output sampling rate, as shown in the figure below:
17
2. When using IIS connection, considering the line sequence matching problem
between the output terminal and the DAM1 input terminal, four sets of line
sequence adjustment switches are provided on DAM1. If the line sequence does not
match, etc., you can debug through the following steps:
The definition of DAM1 HDMI IIS interface is shown in the figure above, please
confirm the IIS_DATA (1, 3 pins), IIS_BCLK (4, 6 pins), IIS_LRCLK (7, 9 pins), IIS_MCLK
(10, 12 pins) of the output port before starting debugging. The group pins are
consistent with the pins of the front-end IIS output terminal, and then start the next
step of debugging. If the positions of any of the four groups of pins do not match,
you must adjust the IIS line pin wiring or customize the wire according to the line
sequence.
There are four IIS line sequence phase adjustment switches on DAM1, marked with
numbers 1, 2, 3, and 4 from left to right. Among them, 1 corresponds to IIS_DATA, 2
corresponds to IIS_BCLK, 3 corresponds to IIS_LRCLK, and 4 is the DSD left and right
channel adjustment switch. The above four sets of switches are all adjusted by
flipping up and down.
The debugging method is as follows:

18
◆In the case of ensuring that the above four sets of pin positions correspond,
connect the IIS cable, and select the input channel on DAM1 as HDMI (IIS), and
then select the PCM file to play (make sure the file bit rate is within the support
range of the corresponding input interface ), and confirm whether the sound can
be played normally. If there is obvious noise or abnormal sound, first adjust
switches 1 and 2 freely until the sound is normal.
◆After the adjustment in step 1, confirm whether the left and right sound
channels are correct. If the left and right sound channels are reversed, adjust
through switch 3.
◆After confirming that the PCM file is playing normally, select the DSD file to play
(make sure the file bit rate is within the support range of the corresponding
input interface). If the left and right channels are reversed during DSD file
playback, use switch 4 to adjust. Note: DSD left and right channel switching can
only take effect after switching the working mode of DAM1.
2According to the different input methods used, switch the input channel
through the DAM1 front panel button 3 or the remote control button 6.
3According to the current matching equipment, the analog output level can be
adjusted through the DAM1 front panel button 5 or the remote control button 8.
The RCA output high and low levels are 2VRms and 1.7VRms respectively, and the
XLR output high and low levels are 4VRms and 3.4VRms respectively. Generally,
high-level output is recommended, and low-level output is only used under a few
conditions.
4When there is a problem that the phase is reversed when paired with individual
devices, which affects the sound, you can switch between the positive and
negative phases through the DAM1 front panel button 6 or the remote control
button 9, but it is recommended that the reverse phase must be cautious, only
when the phase of the record is confirmed to be reversed . Otherwise, the sound
effect will be seriously affected.
5Under special circumstances, when it is necessary to keep the decoder
temporarily muted, the mute operation can be achieved through the DAM1 front
panel button 7 or the remote control button 2, and the sound can be restored by
pressing it again.

19
4. Function Description
The upscaling and processing logic in the four modes are different. The following are
the upscaling logic details of the 50 firmware (the final firmware may have fine-
tuning, the actual firmware shall prevail):
Decoding
mode + input
format
Coaxial
Optical
AES
HDMI
USB
Remark
ALL
NOS+PCM
FIFO+ASRC
(358.2khz/38
4khz)
FIFO+ASRC
(358.2khz/384
khz)
FIFO+ASRC
(358.2khz/38
4khz)
FIFO+ASRC
(358.2khz/38
4khz
SRC
(358.2khz/38
4khz)
5ps
technology
optimizes
SPDIF to IIS
ALL NOS+DSD
FIFO+ASRC
FIFO+ASRC
FIFO+ASRC
FIFO+ASRC
SRC
-170db SRC to
PCM, 5ps
technology to
optimize SPDIF
to IIS
ALL
DSD+PCM
FIFO+ASRC
DSD256
FIFO+ASRC
DSD256
FIFO+ASRC
DSD256
FIFO+ASRC
DSD256
SRC DSD256
-170db SRC to
DSD, 5ps
technology to
optimize SPDIF
to IIS
ALL DSD+DSD
original
frequency
original
frequency
original
frequency
original
frequency
original
frequency
1bit DSD
channel
NORMAL+PC
M
FIFO+ASRC
(358.2khz/38
4khz)
FIFO+ASRC
(358.2khz/384
khz)
FIFO+ASRC
(358.2khz/38
4khz)
FIFO+ASRC
(358.2khz/38
4khz
original
frequency
Using
traditional
sigma-delta
decoding, 5ps
technology to
optimize SPDIF
to IIS
NORMAL+DS
D
original
frequency
original
frequency
original
frequency
original
frequency
original
frequency
1bit DSD
channel
SAW (enjoy
sound)
+PCM
FIFO+ASRC
(358.2khz/38
4khz)
FIFO+ASRC
(358.2khz/384
khz)
FIFO+ASRC
(358.2khz/38
4khz)
FIFO+ASRC
(358.2khz/38
4khz
SRC
(358.2khz/38
4khz)
5ps
technology
optimizes
SPDIF to IIS
SAW (enjoy
sound)
+DSD
original
frequency
original
frequency
original
frequency
original
frequency
original
frequency
1bit DSD
channel
The reason for adopting FIFO+ASRC is to reduce the requirement of external clock
and adopt local high-performance main clock. The main difference between NOS and
NORMAL modes is that NOS is least affected by the DA filter and oversampling at low
code rates, and the transient distortion is significantly lower, thus making the sound
more coherent. And ALL DSD is converted to DSD by Jinling DSP for 1bit decoding,
and the sound style is different from NOS. The NORMAL mode is decoded through
the Sigma-delta method of the traditional flagship DA chip.
Table of contents
Popular Media Converter manuals by other brands


Patton electronics
Patton electronics 2085RC user manual

Microchip Technology
Microchip Technology TC1047A user guide

Stahl
Stahl 9721/13-11 Series operating instructions

KROHNE
KROHNE UFC 400 Supplementary instructions

Cobalt Digital Inc
Cobalt Digital Inc BIDI-2H2S product manual

Triax
Triax CCS 1000 S Assembly instructions