manuals.online logo
Brands
  1. Home
  2. •
  3. Brands
  4. •
  5. SOUNDMASTER
  6. •
  7. Clock Radio
  8. •
  9. SOUNDMASTER UR-2010 User manual

SOUNDMASTER UR-2010 User manual

UR - 2010
Bedienungsanleitung
Instruction manual
Mode d´emploi
WARNING: SHOCK HAZARD – DO NOT OPEN!!!
Key List
1. Mounting bracket 11. Battery Hatch
2. MODE 12.MEMORY / KEY LOCK
3. UP 13.MEM 5 /10
4. Alarm 1 / VOL + 14.MEM 4/9
5. TIMER/ALARM MODE/SDA MODE 15.POWER
6. FM antenna 16.Power Cord
7. Alarm 2 / VOL - 17.MEM 1/6
8. DOWN 18.MEM 2/7
9. MEMORY Review /AMS 19.MEM 3/8
10.LCD display
How to used
•As the unit is powered up, the date and clock are defaulted to Monday, 1st Jan
2007, 0:00 or 12:00AM.
•The two alarms are defaulted to 0:00 or 12:00AM, daily type but disabled.
•The radio is switched off.
•It then switches to auto-run mode.
Auto-run Mode (Radio OFF)
•Press <MODE> once to go to different mode sequentially.
•Auto-runMode SettheClock SettheDate
(with Clock display)
Dimmer ON/OFF Automatic update ON/OFF SettheSDA
•In radio mode, If RDS information is transmitted by the station, the station name
appears in place of the frequency; the frequency is displayed when there is no
RDS information had been received.
•Press <Alarm-1> to review/set the alarm-1.
•Press <Alarm-2> to review/set the alarm-2.
•Only when the radio is ON, press <M1/M6>, <M2/M7>, <M3/M8> and <M4/M9>,
<M5/10> to recall the preset memories.
•Only when the radio is ON, press <MEM>,<M1-M10>and then <MEM> again to
store the current station into memory.
•Only when the radio is ON, press <Vol. +> and <Vol. -> to adjust speaker
volume.
•When the radio is ON, press <M / SCAN> to preview those preset memory.
Press and hold for 2 seconds to activated the AMS (Automatic Memory Storage).
•At every minute boundary, the real time clock is compared with the alarm setting
if it has been enabled. For details, please refer to the section of ‘When alarm is
active’.
Set the clock (manually)
•Press <MODE> once when the unit stays in clock display mode.
•The clock goes flashing the LCD with day-flag cleared.
•The second keeps counting up once per second.
•Press <UP> to advance the clock by 1 minute.
•Press <DOWN> to move the clock back by 1 minute
•Press and hold <UP> or <DOWN> to set the clock in fast mode of 10 minutes per
step.
•Press <MODE> once to set the date.
•Press other key to start its corresponding function.
•When no key has been pressed for 10 seconds, the current setting is confirmed
and it switches to auto-run mode.
Set the date
•Press <MODE> once in clock setting mode.
•The current date goes flashing in the format of dd.mm.yyyy in the LCD.
•Press <UP> or <DOWN> to change the current setting by 1 day per step. Press
and hold <UP> or <DOWN> to change the setting in fast mode of 10 days per
step. The day flag will be updated automatically when the date has become
steady.
•Press <MODE> once to confirm the current setting and it switches to set the
SDA.
•Press other key to start its corresponding function.
•When no key has been pressed for 10 seconds, the current setting is confirmed
and it switches to auto-run mode automatically.
Set the SDA
•Press <MODE> once in date setting mode.
•The date & ‘SDA’ goes flashing alternative.
•Press <UP> or <DOWN> to set the Special Date.
•Press < SDA MODE > to ignore the year.
•Press <MODE> once to confirm the current setting and go to set the automatic
update ON/OFF.
•Press <M1-M5> to select the number of SDA
•Press other key to start its corresponding function.
•When no key has been pressed for 10 seconds, the current setting is confirmed
and it switches to auto-run mode automatically.
In case of ignore the year the SDA will be active ever year at same date
Switching automatic update ON/OFF
•Press <MODE> once in SDA setting mode.
•The display show ‘UPDATE’ press <UP> or <DOWN> to switch update ON or
OFF.
•The indicator “ ” disappears, the update function is switch OFF.
•The indicator “ ” flashes. The time will be updated the next RDS time signal is
received.
•Press <MODE> once to confirm the current setting and go to set the dimmer
ON/OFF.
•Press other key to start its corresponding function.
•When no key has been pressed for 10 seconds, the current setting is confirmed
and it switches to auto-run mode automatically.
Switching dimmer ON/OFF
•Press <MODE> once in the automatic update setting mode.
•The display show ‘DIM ON’ or ‘DIM OFF’.
•Press <UP> or <DOWN> to switch dimmer ON or OFF.
•Display show ‘DIM ON’ the display is illuminated for 10 seconds, when any key
had been pressed.
•Display show ‘DIM OFF’ the display is illuminated for all time.
•Press <MODE> once to confirm the current setting and it switches to auto-run
mode.
•Press other key to start its corresponding function.
•When no key has been pressed for 10 seconds, the current setting is confirmed
and it switches to auto-run mode automatically.
The Cooking Timer (Radio Off)
•Press <TIMER> to enter the timer mode.
•Press <M1> once, display shows ‘00:00 T1’ goes solid or the previous value of
the memory-1 goes solid in the LCD.
•Similar to <M1>, press <M2>, <M3>, <M4> or <M5> to select the desired preset
memory value.
•Press <UP> or <DOWN> to adjust the value (from 1 minute to 23hours and
59minute), press <TIMER> to start the cooking timer and the current value will
store in to memory automatically.
•Press < TIMER > again to pause the timer. To restart the timer press <TIMER>
again.
•Press and hold <TIMER> for 2 seconds to terminate the timer and leave, when
the timer is running.
•When the clock before 30 second reach to 00.00, the voice
“be…be…be…be…be” will be heard until 00.00
•When the clock reach to 00:00, the voice “be------” will be heard for 1 hour until
user terminate.
•Press the < TIMER > to terminate the timer and leave.
As the alarm becomes active, the cooking timer, if exists, is terminated immediately.
ALARM1 and ALARM2 setting
•Press <ALARM1> or <ALARM2> once, ‘ALARM1’ or ‘ALARM2’goes solid in the
alphanumeric section.
•The current setting of HH:MM and the type of alarm goes flashing by the
corresponding day-flags.
•Press <UP> to advance the setting by 1 minute.
•Press <DOWN> to move the setting back by 1 minute.
•Press and hold <UP> or <DOWN> to change the setting in fast mode of 10
minutes per step.
•Press <ALARM MODE> to change the type of alarm between daily, weekday,
weekend and daily independently, which are reflected by the 7 day-flags.
•Press and hold <ALARM MODE> to enter daily independently mode. Press
<ALARM MODE> again to select the day and it will reflect by the day-flags.
Press and hold <ALARM MODE> to leave the daily independently mode and
return select daily, weekday and weekend.
•Press same alarm key, which is <ALARM1> or <ALARM2>, once to select the
output format of the alarm
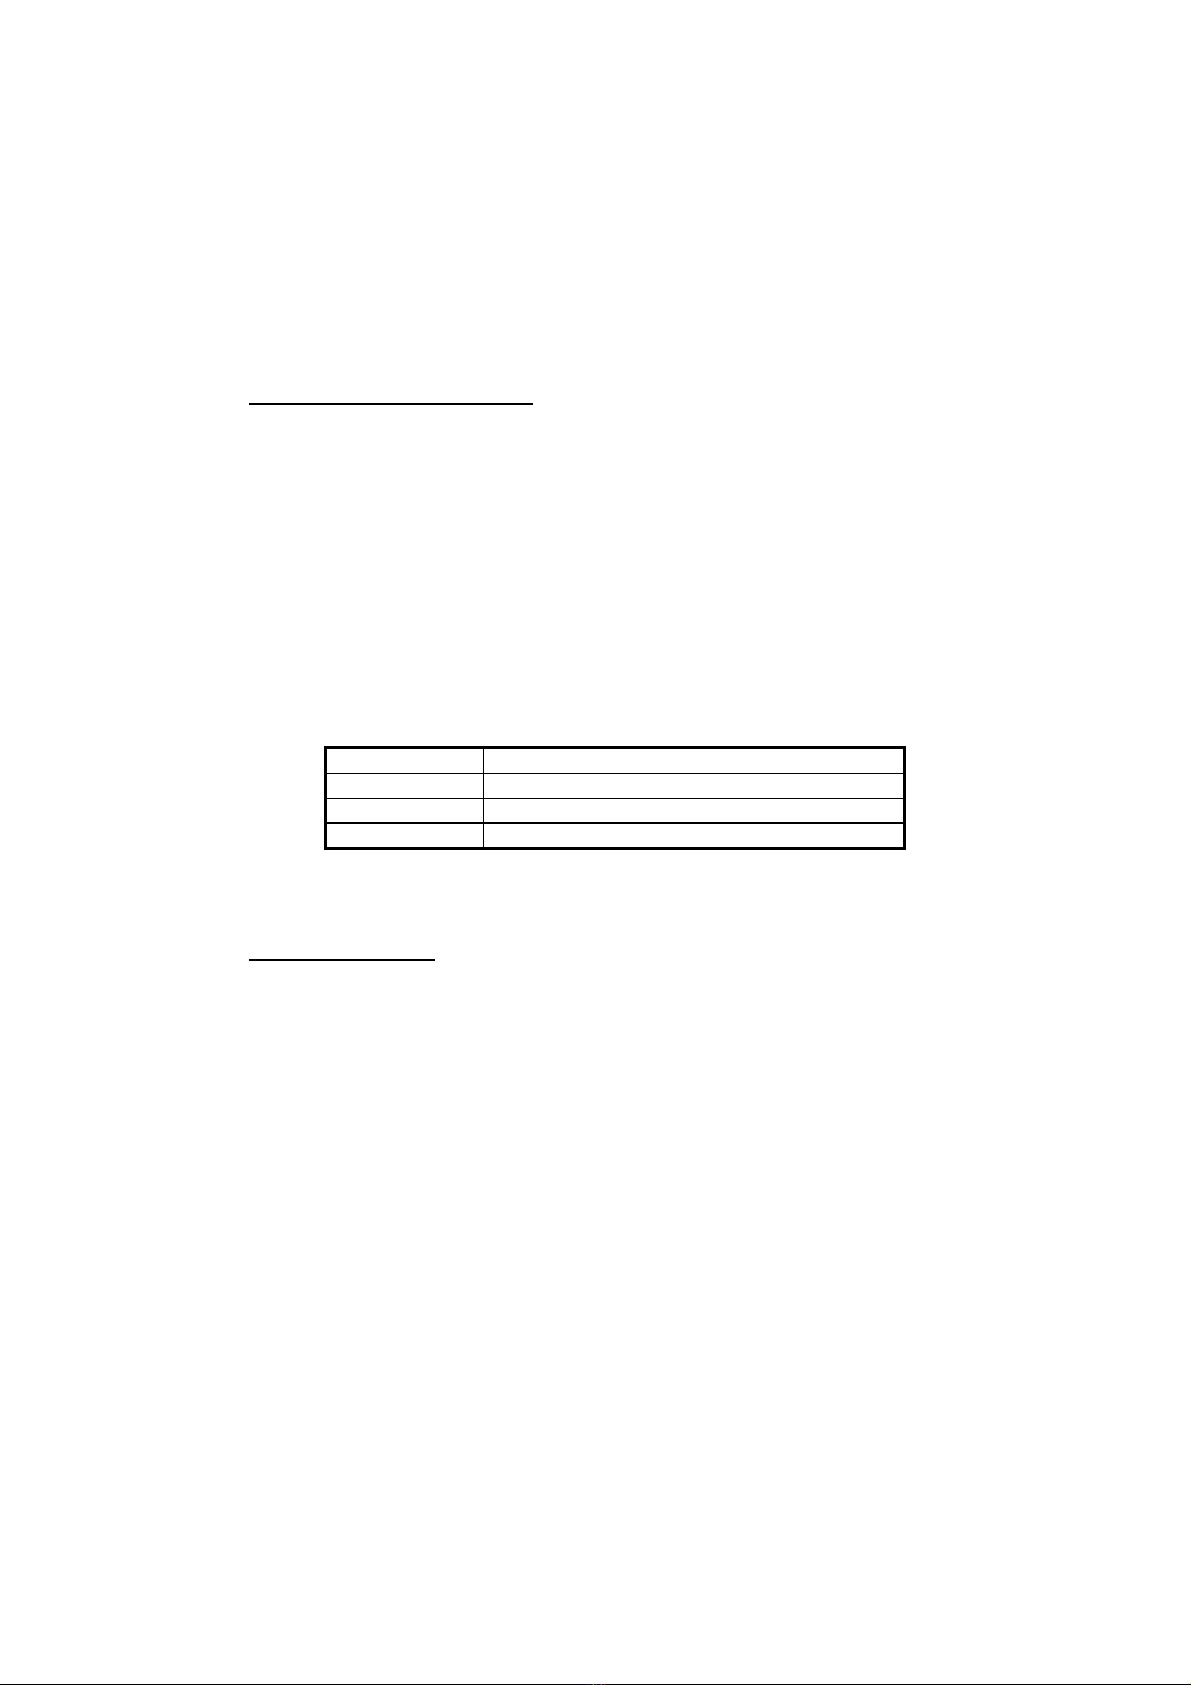
Output format LCD display
Beep sound ‘Bell’ symbol goes solid
Radio output ‘Radio’ symbol goes solid
Disable All the ‘Bell’ and ‘Radio’ are cleared
•Press other key to start its corresponding function.
•When no key has been pressed for 10 seconds, the system goes back to
auto-run mode.
When SDA is active
•When the date/month/(year) matches with the SDAwhich has been enable, alert
becomes active at 8:00AM.
•As the SDA active, Sound of beep toggles at the Speaker for 10 minutes, Muted
Radio even radio ON & The “SDA” goes flash on LCD display.
•The 10 minutes beep music per every hour until 23:00.
•Press any key to start its corresponding function and the SDA at the day will be
terminate.
When alarm is active
•When the real time clock matches with the alarm which has been enabled, alarm
becomes active.
•As the alarm becomes active, the Cooking timer, if exists, is terminated
immediately.
•If Beep sound alarm is selected,
1) Sound of beep toggles at the Speaker
2) Muted Radio even radio ON
3) The duration of alarm is 10 minutes
•If Radio alarm is selected,
1) RADIO ON
2) the duration of the alarm is 60 minutes
•To terminate the currently active alarm, press the corresponding key <ALARM1>
or <ALARM2>.
Radio reception
•Press <POWER> once, the station frequency or the station name show on LCD.
•If RDS information is transmitted by the station current set, “ ”
appears in the display and after short time the station name appears in place of
the frequency.
Recall radio preset memory
•There are 10 preset memory stations for the radio.
•When the radio is ON, press <M1/M6> once. ‘MEM’ goes solid; the frequency of
the memory-1 goes solid in the LCD. Press again <M1/M6> to select the preset
memory-6.
•Similar to <M1/M6>, press <M2/M7>, <M3/M8>, <M4/M9> or <M5/M10> to
select the desired preset memory station.
•When new preset memory key is pressed, MUTE is active. When keying the
preset memory has been released for 1 second, the selection of preset memory
is considered as valid and the radio will be tuned to that frequency immediately
with MUTE idle.
•At any time, press other key to start its corresponding function.
Store into memory
•To store the tuning frequency of radio station being received into any of the
preset memory, press <MEM> once. The ‘MEM’ goes flashing.
•Select the desired memory station by pressing the corresponding key until its
number goes solid above ‘MEM’.
•Press <MEM> again to confirm the process of storing. Then, ‘MEM’ goes solid.
•When ‘MEM’is flashing, pressing <UP>, <DOWN> or <M/ SCAN> will search up,
search down and memory scan with the ‘MEM’ cleared.
•Press other key to start its corresponding function.
Search Up/Down
•When the radio is ON, press <UP> once to change the receiving frequency up by
1 step (50kHz).
•Press <DOWN> once to change the receiving frequency down by 1 step
(50kHz).
•Press and hold <UP> to search the next radio station by moving the receiving
frequency up.
•Press and hold <DOWN> to search the next radio station by moving the
receiving frequency down.
Memory review
•When the radio is ON, press <M/SCAN> once to scan the 10 preset memory
stations.
•The review starts from the next memory station or MEM-1 if no memory station is
being selected.
•Review will stop at each station for 5 seconds.
•During review, press other key will start its corresponding function and the review
process will be terminated.
AMS Using
•Press and hold <M/SCAN> 2 seconds to active AMS mode. In this mode, the
radio will automatically store the station that had been scanned.
Electronic Volume Control
•Only when radio is on,
•Press <VOL +> once, to increase speaker volume by one step. Hold for
continually.
•Press <VOL -> once, to decrease speaker volume by one step. Hold for
continually.
Key-lock
•Press and hold the <MEM> for 2 seconds, key-lock has been switched ON, the
“KEY” goes solid.
Technical Data
UKW-FM Frequency 87,5 – 108MHz
Rated Voltage AC 230V 50Hz
Backup Battery 3V (2 x 1,5V UM-4/AAA)
Output 500mW
Temperature display 5°C – 40°C
Technische Änderungen und Druckfehler vorbehalten
Copyrights by Wörlein GmbH, 90556 Cadolzburg, Germany.
Vervielfälltigung oder Kopie dieser Anleitung nur mit ausdrücklicher Genehmigung durch Wörlein GmbH

Other manuals for UR-2010

1

Other SOUNDMASTER Clock Radio manuals

SOUNDMASTER UR270 User manual

SOUNDMASTER

SOUNDMASTER UR270 User manual

SOUNDMASTER UR200SI User manual

SOUNDMASTER

SOUNDMASTER UR200SI User manual

SOUNDMASTER Highline FC-1000 User manual

SOUNDMASTER

SOUNDMASTER Highline FC-1000 User manual

SOUNDMASTER ELiTEline UR8200 User manual

SOUNDMASTER

SOUNDMASTER ELiTEline UR8200 User manual

SOUNDMASTER UR600SW User manual

SOUNDMASTER

SOUNDMASTER UR600SW User manual

SOUNDMASTER BT-1308 User manual

SOUNDMASTER

SOUNDMASTER BT-1308 User manual

SOUNDMASTER DAB450 User manual

SOUNDMASTER

SOUNDMASTER DAB450 User manual

SOUNDMASTER URD480SW User manual

SOUNDMASTER

SOUNDMASTER URD480SW User manual

SOUNDMASTER UR800SW User manual

SOUNDMASTER

SOUNDMASTER UR800SW User manual

SOUNDMASTER UR8350WE User manual

SOUNDMASTER

SOUNDMASTER UR8350WE User manual

SOUNDMASTER BR80 User manual

SOUNDMASTER

SOUNDMASTER BR80 User manual

SOUNDMASTER NR 350 User manual

SOUNDMASTER

SOUNDMASTER NR 350 User manual

SOUNDMASTER UR800 User manual

SOUNDMASTER

SOUNDMASTER UR800 User manual

SOUNDMASTER FUR5005 User manual

SOUNDMASTER

SOUNDMASTER FUR5005 User manual

SOUNDMASTER UR155 User manual

SOUNDMASTER

SOUNDMASTER UR155 User manual

SOUNDMASTER FUR100 User manual

SOUNDMASTER

SOUNDMASTER FUR100 User manual

SOUNDMASTER UR-501 User manual

SOUNDMASTER

SOUNDMASTER UR-501 User manual

SOUNDMASTER Highline UR135 User manual

SOUNDMASTER

SOUNDMASTER Highline UR135 User manual

SOUNDMASTER FUR4005 User manual

SOUNDMASTER

SOUNDMASTER FUR4005 User manual

SOUNDMASTER Day Break iP 1040 User manual

SOUNDMASTER

SOUNDMASTER Day Break iP 1040 User manual

SOUNDMASTER Highline UR 922 User manual

SOUNDMASTER

SOUNDMASTER Highline UR 922 User manual

SOUNDMASTER URD860 User manual

SOUNDMASTER

SOUNDMASTER URD860 User manual

SOUNDMASTER URD810iPH User manual

SOUNDMASTER

SOUNDMASTER URD810iPH User manual

SOUNDMASTER Highline UR 8680 User manual

SOUNDMASTER

SOUNDMASTER Highline UR 8680 User manual

Popular Clock Radio manuals by other brands

Vitek VT-6610 SR Manual instruction

Vitek

Vitek VT-6610 SR Manual instruction

Denver Electronics TR-419 MK2 operating instructions

Denver Electronics

Denver Electronics TR-419 MK2 operating instructions

Panasonic RC-6088 operating instructions

Panasonic

Panasonic RC-6088 operating instructions

GPX CI150B user guide

GPX

GPX CI150B user guide

Philips AJ210 Specifications

Philips

Philips AJ210 Specifications

Sony Dream Machine ICF-C490 Specifications

Sony

Sony Dream Machine ICF-C490 Specifications

Dynex DX-CLTR01 Guía De Instalación Rápida

Dynex

Dynex DX-CLTR01 Guía De Instalación Rápida

Jensen JCR-228 user manual

Jensen

Jensen JCR-228 user manual

Sony DREAM MACHINE ICF-C793 Service manual

Sony

Sony DREAM MACHINE ICF-C793 Service manual

Roadstar CLR-2630 instruction manual

Roadstar

Roadstar CLR-2630 instruction manual

Sony Walkman ICF-C492 operating instructions

Sony

Sony Walkman ICF-C492 operating instructions

International Receiver Company IKR1360DABBTBLK instruction manual

International Receiver Company

International Receiver Company IKR1360DABBTBLK instruction manual

Hyundai RAC 860 instruction manual

Hyundai

Hyundai RAC 860 instruction manual

iHome iM30 quick start guide

iHome

iHome iM30 quick start guide

Sony DREAM MACHINE ICF-C318 operating instructions

Sony

Sony DREAM MACHINE ICF-C318 operating instructions

THOMSON CP280 user guide

THOMSON

THOMSON CP280 user guide

Roberts CR960 manual&nbsp;

Roberts

Roberts CR960 manual&nbsp;

Electrohome EAAC470 quick start guide

Electrohome

Electrohome EAAC470 quick start guide

manuals.online logo
manuals.online logoBrands
  • About & Mission
  • Contact us
  • Privacy Policy
  • Terms and Conditions

Copyright 2025 Manuals.Online. All Rights Reserved.