SOUNDMASTER HighLine UR 2150USB User manual

CAUTION
RISK OF ELECTRIC SHOCK
DO NOT OPEN
WARNING: SHOCK HAZARD - DO NOT OPEN
AVIS : RISQUE DE CHOC ÉLECTRONIQUE - NE PAS OUVRIR
WARNUNG : ELEKTROSCHOCK GEFAHR - NICHT ÖFFNEN
LASERSCHUTZKLASSE 1 PRODUKT
CLASS 1 LASER PRODUCT
APPAREIL A LASER DE CLASSE 1
Deutsch
English
Français
Nederlands
Español
UR 2150USB
UR 2150USB ib - Ger/Eng/Fre/Dutch/Spanish (0211-12315-37)
108B UR2150USB IB 37.indd 1 2010/5/4 10:45:04 AM

GB - 1
LOCATION OF CONTROLS AND INDICATORS
Front view
Bottom view
1. AUX IN, ON Button
2. Timer Indicator
3. Timer Start/Stop Button
4. Timer Adjust –/+ Buttons
5. CD Door
6. CD Tray Open / Close Button
7. USB Slot
8. Stop / Off Button
9. Play / Pause Button
10. AUX IN Jack
11. Remote Sensor
12.
Preset / Album : Up / Down Button ( / )
Radio : Radio Preset
MP3 : Album
13. Radio On / Band Button
14. LCD Display
15. Volume - / + Button
16. CD, ON Button
17. USB, ON Button
18. CD/USB : Skip/Search Previous
Radio : Tuning –
19. CD/USB : Skip/Search Next
Radio : Tuning +
20. Speakers
21. AC Power Cord
22. Battery Compartment Door
23. FM wire Antenna
108B UR2150USB IB 37.indd 1 2010/5/4 10:45:09 AM

GB - 2
Remote control
1. Volume - / + Button
2. CD/USB : Skip / Search Next Track
Radio : Tuning +
Time : Time +
3. CD/USB : Skip / Search Previous Track
Radio : Tuning –
Time : Time –
4. Preset / Album : Up / Down Button ( / )
Radio : Radio Preset
MP3 : Album
5. Radio / Band ON Button
6. AUX In ON Button
7. Mute Button
8. Clock Button
9. Play / Pause Button 13. CD ON Button
10.+10 Button 14. USB ON Button
11. Stop / Off Button 15. Magnetic Plate
12.Mode / Program Button 16. Battery Door
LOADING BATTERIES
1. Remove the battery compartment cover.
2. Insert 2 "AAA" size batteries (not included) as indicated by the polarity marking. (Placing
the battery in the wrong way will cause malfunction.)
3. Replace the battery compartment cover.
Note:
• The batteries (battery pack or batteries installed) shall not be exposed excessive heat
such as sunshine,re or the like.
•
Do not attempt to recharge, short-circuit, disassemble, heat or throw the batteries into a re.
• If you don not intent to use the remote for a long time, so you must remove the batteries
to prevent damage by leakage and corrosion.
• When the distance from which the remote conrol will work gets shorter than before, replace
all batteries with new ones. Do not mix old and new batteries.
• Do not mix alkaline, standard (carbon-zinc), or rechargeable (nickel cadmium).
• Do not try to recharge batteries not intended to be recharged; they can overheat and
ruptune. (Follow battery manufacturer's directions).
• Dispose of old batteries properly in accordance with local law.
OPERATION
Basic operation is same as main unit, except :
1. PRESET UP - recall radio preset station up within the selected band.
2. Mute - mute the audible sound from loud-speaker, LCD will show "MUTE", press this button
again to resume audible sound.
Use of Magnet
The magnet is attached on the back of the remote control. You can put the remote control
on an iron or steel surface such as on a refrigerator.
User should not attempt to operate the remote control while it is attached to iron/steel surface.
Note : Do not place the remote control near magnetic cards such as credit cards.
108B UR2150USB IB 37.indd 2 2010/5/4 10:45:10 AM

GB - 3
PREPARATION FOR USE
INSTALLING THE UNIT UNDER A CABINET
1. Mark the position of the 3 holes by using the supplied template. Use a drill to make the
holes.
2. When the cabinet door overhangs the shelf and obstructs the unit, you can adjust the
unit/shelf height.
3. Install the unit with the supplied mounting screws.
Caution:
Please read the following before installing the unit.
• Since the unit is heavy, be careful when installing the unit.
• To reduce the risk of re, do not place any heating or cooking appliance beneath this
unit.
• Install the unit so that its AC power cord can be connected directly to a wall outlet. Do
not use a converter or extension cord.
• Be sure that the AC power cord has no slack when using the unit. If the AC power cord
has some slack, wind it up to the cord hook until the cord has no slack.
• The unit has a built-in ferrite bar antenna for AM radio reception. Check the condition of
AM reception before xing in position.
• Install the unit as far as possible from a source of noise. (for example, refrigerator,
microwave oven, uorescent lamp, etc.)
• Use tools carefully while installing of the unit.
• To reduce the rish of re or electric shock, do not touch the AC power cord with wet
hands.
108B UR2150USB IB 37.indd 3 2010/5/4 10:45:12 AM

GB - 4
MAIN POWER SUPPLY
- Check that the power voltage as shown on the type plate (at the base of the set)
corresponds to your local power voltage. If it does not, consult your dealer or service
organization.
- Connect the power cord to the wall outlet, for AC power supply. As soon as you insert
the power plug into the wall outlet, the display time will ash and show . Please
see below how to set the correct time.
POWER FAILURE
If power failure occurs, the unit will switch off. As soon as the power supply returns,
will ash and display, indicating that you must reset the correct time.
BATTERY BACK-UP SYSTEM
2 "AA" size batteries (not included) can be inserted into
the battery compartment to, in the event of a power failure,
provide sufcient power to maintain the time. When AC
power is restored, the correct time will be restored and will
not require resetting.
• Neither the display nor the unit will operate until the unit
is connected to an AC outlet.
BATTERY WILL ONLY
RESTORE CLOCK SETTINGS WHEN AC POWER IS
RESTORED.
• Replace the battery once per year. The service of the battery depends on how often and
for how long the power supply fails. This varies from one region to another.
Note: Always check the time and reset if necessary after a power-failure.
CLOCK
Setting the current time at power off mode
1. Press and hold CLOCK button on the remote for a few
seconds.
A tone will sound and the hour digit will start to ash on the
display.
2. Press TUNE/TIME + or – button on the remote until the correct
hour.
3. Press CLOCK once. A tone will sound and the minute digit will ash.
4. Repeat step 2 to set the minutes.
After setting the minutes, press CLOCK. Two tones will be heard and normal operation
will begin.
To set the current time rapidly, hold down TUNE/TIME + or –.
108B UR2150USB IB 37.indd 4 2010/5/4 10:45:12 AM

GB - 5
CD PLAYER OPERATION
1. Press CD button once to turn on CD power, "CD" will light up on the LCD.
2. To open the CD tray, press OPEN/CLOSE button once.
- NOTE : Pressing the OPEN/CLOSE button at any time will automatically switch the unit
to the CD function and open the CD tray EXCEPT when the timer alarm is sounding.
3. Place a compact disc on the tray with label side facing upward.
4. To close the CD compartment, push OPEN/CLOSE button once.
- The CD player scans the contents of the CD and the total track number
will be displayed.
5. If no CD inside, LCD will show "no".
6. Press PLAY/PAUSE button to start playback from track
no. 1. The display will indicate the playback track number.
7. Adjust the sound level by pressing VOLUME + / – buttons
(Maximum volume is "20").
8. To pause playback, press PLAY/PAUSE button.
Press PLAY/PAUSE button again to resume playback.
9. Press STOP button to stop playback.
10. To switch off the CD power, press the STOP button again.
Note : CD playback will also stop when :
- The CD has reached the end.
- The CD door is open.
- The RADIO / USB or AUX IN button is pressed once.
USB PLAYER OPERATION
1. Press USB button once to turn on USB power, "USB" will light up on the LCD.
2. Connect the USB ash drive directly to the USB port on the front panel.
3. Press PLAY/PAUSE button in order to playback .mp3 les stored in the USB ash
drive. The display will indicate the playback track number.
4. To pause playback, press PLAY/PAUSE button. Press PLAY/PAUSE button
again to resume playback.
5. Press STOP button to stop playback.
6. To switch off the USB power, press the STOP button again.
PRESET / ALBUM ( / )
If you are playing a CD or USB with MP3 and the CD or USB has more than one album, press
to go to the next or previous album.
SKIP/SEARCH ( / /+10)
Selecting a different track during playback.
- You can jump to the next track by pressing button once. If you want to skip more
than one track, press button more than once until the display shows the desired track
number.
- If you want to repeat the current track from the beginning, press button once. If you
want to play one of the previous track, press button more than once until the display
shows the required track number.
- To skip forward 10 songs, press the +10 button.
108B UR2150USB IB 37.indd 5 2010/5/4 10:45:13 AM

GB - 6
Starting with a particular track
1. In the STOP mode, you can select a desired track using the or button.
2. Press PLAY/PAUSE button to start playback.
Searching for a passage within a track
You can search for a passage within a track. The CD/MP3 audio sound will be muted during
search track.
• Keep the or button pressed during playback, and release the button.
- Normal CD/MP3 playback will resume from this point.
MODE/PROGRAM
REPEAT 1
- During CD/MP3 playback, press MODE / PROGRAM button once. The REPEAT 1 indicator
will come on and the current track will play repeatedly.
REPEAT ALL
- During CD/MP3 playback, press MODE / PROGRAM button twice. The REPEAT ALL
indicator will come on and all tracks will play repeatedly.
RANDOM PLAY
- During CD/MP3 playback, press MODE / PROGRAM button three times. The RDM
indicator will ash and tracks will begin playing in random order.
PROGRAM
Programming track number at STOP mode.
You may store up to 20 tracks in the memory in any sequence.
You may store any track more than once.
1. Press the MODE / PROGRAM button, the PGM indicator ashes and is shown.
2. Press or to select the desired album and press or to select the desired
track.
3. When the desired track is displayed, press MODE / PROGRAM button to register. The
next program no. display will change to .
4. Repeat step 2 and 3 to program the order of more tracks up to 20 tracks can be programmed
into memory.
Program Play
Press PLAY/PAUSE
button, the PGM indicator will turn on and start to play the desired
tracks.
To clear programmed tracks
- Press STOP button before program play, or
- Press STOP button twice during program play, or
- Change to other function mode.
108B UR2150USB IB 37.indd 6 2010/5/4 10:45:14 AM

GB - 7
AUX IN OPERATION
Caution: Turn off power and unplug the power cord before connection.
Connect to other audio equipment, including video recorder to provide sound output
for other audio equipment.
Preparation
1. Connect these audio equipments "LINE OUTPUT" to "AUX IN" socket
of the unit through an audio cable (not included).
2. Press the AUX IN / ON button once to turn on power and into AUX
IN mode.
3. The AUX indicator will light up on the LCD.
4. Press VOLUME +/- button to increase or decrease sound level.
5. To turn the unit off after use, simply press the STOP/OFF button
once.
RADIO OPERATION
1. Press RADIO/BAND button once to turn on radio power, RADIO
will light up on the LCD.
2. Press RADIO/BAND button again to select radio band.
3. Press the TUNE/TIME button + or – momentarily (less than 0.5 sec.) to step up or down
the receiving frequency in order to select the desired station.
4. For auto tuning, keep pressing the TUNE/TIME button + or – (more than 0.5 sec.) until
the displayed frequency starts to change, then release the button. Tuning will stop
automatically when a station is received.
5. Adjust the sound level by pressing VOLUME +/– buttons.
6. To turn the unit off after use, simply press STOP/OFF button once.
NOTE: After radio frequency is displayed for about 10 seconds, the LCD will show the current
time. Pressing the RADIO/BAND button once will show radio frequency again.
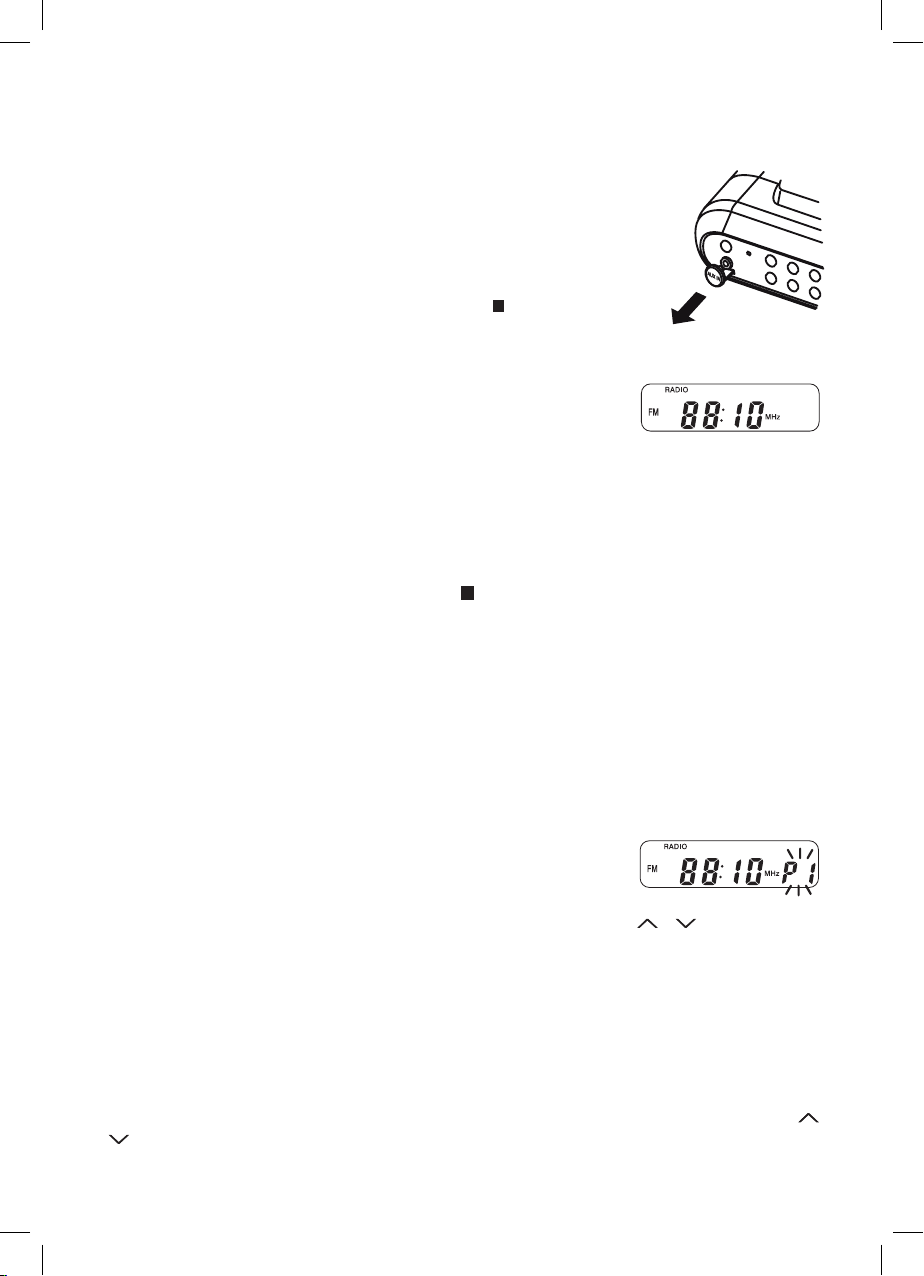
Improving the reception
• Extend the FM wire antenna which is located on the back of unit, and change its position
until the best FM reception is found.
• The unit has a built-in ferrite bar antenna for MW radio reception. Check the condition of
MW reception before xing this unit in position.
• Install the unit as far as possible from a source of noise. (for example : refrigerator,
microwave oven, uorescent lamp, etc.)
PRESET STATIONS
1. Press the RADIO/BAND button to the desired band.
2. When the desired station is tuned, press MODE / PROGRAM
button to enter saving mode.
3. The preset location will ash on the LCD, press PRESET/ALBUM / button to select
preset channel.
4. Press MODE / PROGRAM button again to save into memory. If it has previously set, the
former station is replaced.
5. Repeat step 1 ~ 4 to store more preset stations.
NOTE: The preset memory can store a maximum of 12 stations for FM band and 12 stations
for AM band.
RECALL A PRESET STATION
To recall any preset stations within the selected band, simply press the PRESET/ALBUM
/ buttons until the preset radio frequency appears on the display.
108B UR2150USB IB 37.indd 7 2010/5/4 10:45:15 AM

GB - 8
TIMER OPERATION (Count-down timer)
• TIMER SETTING
- Press TIMER ADJUST + or – to desired count-down time, the
maximum count-down time is 120 minutes, with a 1 minute
interval selection.
- Press the TIMER button once to start counting, the timer indicator will light up.
- When the timer has been set and is counting, the LCD will show the count-down, however,
current time, radio frequency and CD playing track can also be displayed by pressing:
1. CLOCK button once to show current time and CD playing track when unit is in CD
play mode.
2. CLOCK button once to show current time when unit is in radio on mode.
3. RADIO/BAND button once to show current radio frequency when unit is in radio on
mode.
4. CLOCK button once to show current time when unit is in stop/off mode.
• About 5 seconds later, LCD will resume to show timer count-down.
- To cancel timer operation, simply press TIMER button once, the timer indicator will turn
off.
- When desired time has elasped, refer to below section for details.
• Timer can be set and operated in OFF mode or CD PLAY / USB / RADIO ON / AUX IN
mode.
- In OFF mode:
When the desired time has elapsed, a beep sound will be heard and the timer indicator
will ash for about 60 minutes. This alert can be stopped at any time by pressing the
TIMER button once.
- In CD PLAY / USB / RADIO ON / AUX IN mode:
When the desired time has elapsed, a beep sound will be heard and the TIMER indicator
will ash for about 60 minutes. When the alarm sounds, the sound level of CD PLAY /
USB / RADIO or AUX IN will be lowered automatically. This alert can be stopped at any
time by pressing the TIMER button once. When the alert stops, the sound level of CD
PLAY / USB / RADIO or AUX IN will return to the original level.
108B UR2150USB IB 37.indd 8 2010/5/4 10:45:15 AM

GB - 9
SPECIFICATION
RADIO SECTION
Frequency Range FM : 87.5 – 108 MHz
AM : 522 – 1620 KHz
CD SECTION
Sampling Frequency 44.1 KHz
Frequency Response 80 Hz - 16 KHz
USB SECTION
Supported File Format .mp3
Supported File System FAT12, FAT16, FAT 32
Supported BIT Rate 32 Kbps ~ 320Kbps
POWER SOURCES
Mains Operation AC 230V ~ 50Hz
Clock Standby System DC 1.5V x 2 "AA" (not included)
Power Consumption 15W in AC operation
GENERAL
Speaker 2 x 76mm 4 ohms
Power Output 2W + 2W
Dimension Approx.330 (W) x 70 (H) x 260 (D) mm
Weight Approx. 2.2 kgs. w/o batteries
DESIGN AND SPECIFICATIONS ARE SUBJECT TO CHANGE WITHOUT NOTICE.
108B UR2150USB IB 37.indd 9 2010/5/4 10:45:15 AM
Other manuals for HighLine UR 2150USB
1
Table of contents
Other SOUNDMASTER Portable Stereo System manuals

SOUNDMASTER
SOUNDMASTER SCD1980 User manual

SOUNDMASTER
SOUNDMASTER RCD5000WS User manual

SOUNDMASTER
SOUNDMASTER SCD3750DS User manual

SOUNDMASTER
SOUNDMASTER UR 2080 User manual

SOUNDMASTER
SOUNDMASTER SCD6900 User manual

SOUNDMASTER
SOUNDMASTER SCD 6800MP3 User manual

SOUNDMASTER
SOUNDMASTER SCD4200 User manual

SOUNDMASTER
SOUNDMASTER SCD1990SW User manual

SOUNDMASTER
SOUNDMASTER SCD5100SW User manual

SOUNDMASTER
SOUNDMASTER SCD8100 User manual