southern science supply MicroSight 1.3MP User manual

www.southernsciencesupply.com
877.968.7522
USER MANUAL
MAC COMPUTERS
MicroSight 1.3MP & MicroSight 5MP
MICROSCOPE

2
TABLE OF CONTENTS
Overview……………………………………........ 3
Install the Software ……………………….......... 4
Start the Program………………………….......... 4
Focus the Microscope…………………….......... 5
Using Additional Focal Tips……………............ 5
Function Key List ………………………….......... 6
How to Take Photos .....................…...................7
How to Save Photos and Videos........................8
How to Create Time Lapse Video………...........9
Understanding the Preferences Window.........10
How to Compare Two Images.…………..........11
How to Use the Draw Tool………………..........12
How to Calibrate For Measurement.................13
Understanding the Measurement Window.....14
How to Measure an Angle..........…….....….......15
How to Measure an Ellipse................................16
How to Measure a Line.......……........................17
How to Measure a Triangle....……………….....18
How to Measure a Radius/Arc...........................19
Troubleshooting……………………………........20

3
The 10-200x digital MicroSight Microscope provides an adjustable magnication range
anywhere from 10-200x and comes in two megapixel options, the 1.3MP and the 5MP. The
5MP is considered high denition and will make a difference when printing, enlarging, and
cropping. All MicroSight microscopes are USB supported.
The built-in high-performance LEDs can illuminate an object without the need for any auxiliary
lighting. The light is dimmable should you be viewing something reective. By adjusting the
focus knob on the camera, the magnied image can be viewed, captured as a JPEG or BMP, or
recorded as a video directly from the computer screen.
These MicroSight microscopes can be used in a variety of situations. Education is probably the
most widely used application, however, they are often used in skin exams, scalp exams, circuit
boards, printing inspection, textile inspection, paper money and coins, stamps, jewelry
inspection, rock and mineral inspections, and so much more.
The software is always included with these microscopes and is designed for Mac and Windows.
MicroSight microscopes are also compatible with Chromebook as external cameras and can
be used with little iPEVO Visualizer, a free download from the Google store. All microscope
purchases include a full sight license.
The MicroSight microscope comes with:
Microscope with tip that focuses at 100/200x.
Additional microscope tips that focus at 15x, 30x, 50x (always included)
Plastic Stand
Software
5 Year Warranty
Attach the base
to the back
upright.
Push and lock
the stand.
A variety of sturdy metal stands are available through our website under the Accessories Tab.
OVERVIEW
HOW TO ASSEMBLE THE PLASTIC STAND
Insert a holder at the
bottom of the back
of the stand. Press
the holder, pull up
and down to adjust
the distance between
the microscope and
the object. Place the
microscope in the stand.

4
There are two ways to install the MicroViewer software for Mac or Windows. The disc is included
inside the box for both Mac and Windows. If you nd yourself with a computer that doesn’t have
a disc drive, an external drive may be used or the direct download is available from our website
at the bottom of the home page in the footer under Downloads tab.
INSTALL THE SOFTWARE
1. Install the MicroViewer program and restart the computer.
2. The serial number is located on the paper sleeve of the disc inside the box.
There is a Mac number and a Windows number. They are both case sensitive.
There are no letter Os, use zeros.
3. Serial numbers may be used more than one time.
4. After entering the serial number, press OK, not evaluate. The evaluate button is for a trial
period and will stop working after a given amount of time. If this happens, simply
reinstall again.
START THE PROGRAM
1. Plug the microscope into the USB port BEFORE opening the program.
2. Double click the MicroViewer software and the image above will show up and you will
see a live image.
3. Place the microscope on or above the object to be viewed.
4. You will be asked if you want to calibrate. Unless you are planning to measure something
during this use, just say okay and move on. You can read more about how to calibrate and
measure later in this user guide.
5
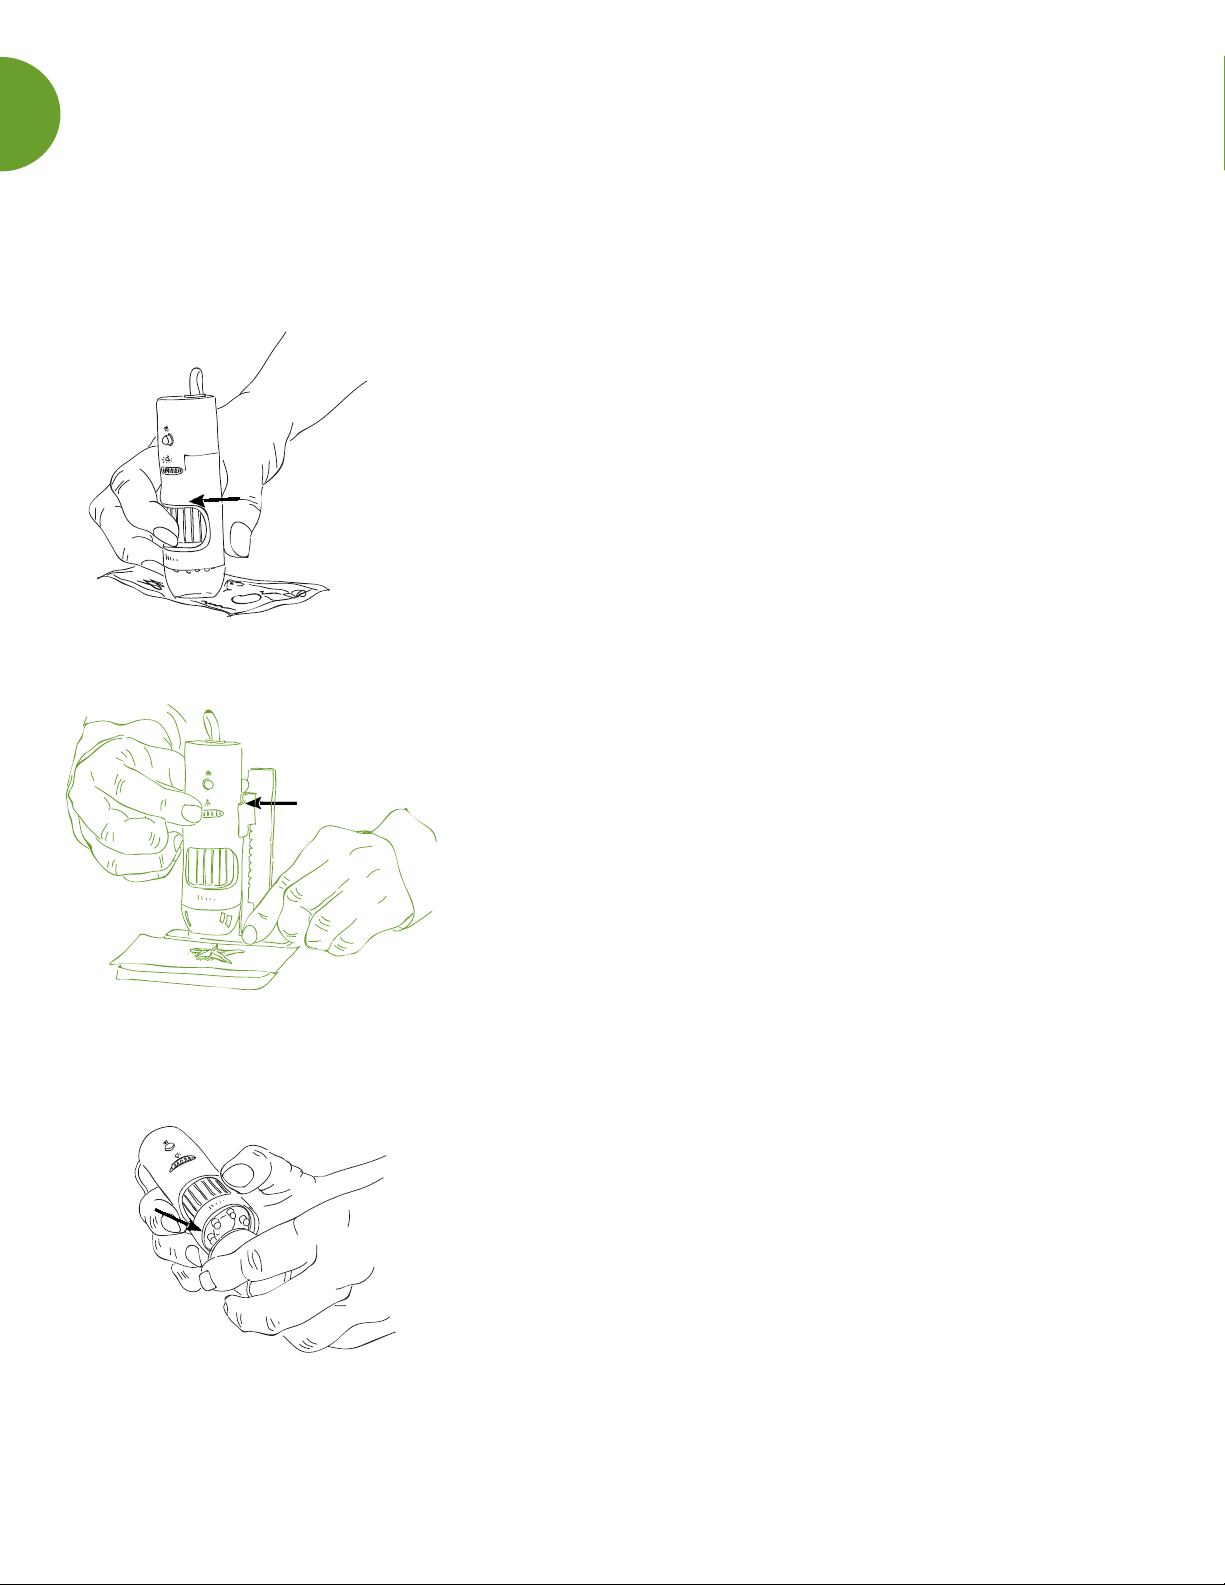
The MicroSight microscope is easy to use. The closer you put the microscope to the specimen
the bigger the image will appear. Don’t hesitate to touch the clear tip to the surface of what is
being viewed. It is calibrated at the tip and it helps you be steady when you are viewing a
specimen.
FOCUS THE MICROSCOPE
*CURVED LENS
The curved tip on your microscope has two focal points
when touching the surface of the specimen to the specimen
being viewed. Turn the focus wheel to the right and view
the specimen at 100x. Keep turning the wheel and the next
time if focuses the specimen will be magnied to 200x.
*MICROSCOPE ADJUSTABLE LIGHT
Adjust the light intensity by turning the thin wheel on the
microscope.
*ADDITIONAL FOCUS TIPS
All of the Southern Science Supply microscopes include
additional focus tips. They are pre-calibrated at the rim of
the tip to match the measurement on the magnication
sticker.
Remove the curved tip to the microscope by pulling or
popping it off and replace it with any of the additional focal
tips as desired. NOTE: The rst time the additional tips are
used, it may be necessary to adjust the LED lightbulbs
gently inward to allow the focus tip to be placed on the
microscope. Make certain the focus tip is seated rmly and
completely on the microscope before viewing.

6
You will see the function keys in a Tool Bar near the software
screen. This toolbar can be moved to anywhere on your screen.
FUNCTION KEY LIST
Below is a quick overview of the keys.
7
HOW TO TAKE PHOTOS
To take a picture, click on the Camera icon. The button on the microscope device is no
longer compatible on the latest Mac OS upgrades. We are working to x that. Any image
captured will show up as a thumbnail in the bottom section of the software screen.
If you don’t see the thumbnail images, simply click on the icon. Double click the picture
to open it in the microscope window. The image is now ready for editing.
*HOW TO VIEW AN IMAGE I HAVE ALREADY TAKEN
Make sure the MicroSight microscope is plugged into the USB port and the software is open.
Click on the icon. The photos File Browser will open.
Double click on the picture you want to preview, and it will appear in the microscope screen.
To preview a second picture, simply double click on the new image and it will appear in the
microscope screen.
To return to live viewing, click the Microscope icon.

8
HOW TO SAVE PHOTOS AND VIDEOS
Make sure the MicroSight microscope is plugged into the USB port and the software is open.
Begin by clicking on the Preference Tool icon in the function keys. The Preferences
screen will appear.
You will see where your videos and images are stored.
VIDEOS To change the location of where your videos are, click on the Video File Folder drop
down menu and select “Select Other Folder”. You can choose individual student folders, class
folders, subject folders etc. You can choose to save all videos to your desktop and then move
them into the appropriate folders or redirect the software to send them directly to a specic
folder each time you take a video.
IMAGES To change the location of where your images are, click on the Image File Folder drop
down menu and select “Select Other Folder”. You can choose individual student folders, class
folders, subject folders etc. You can choose to save all images to your desktop and then move
them into the appropriate folders or redirect the software to send your images directly to a
specic folder each time you take a video. Images may be saved as JPEG or PNG by selecting
the Image File Type drop down menu.
9
HOW TO CREATE TIME LAPSE VIDEO
Select the Time Lapse option, then click on the drop down menu to choose your setting.
To select the time-lapse ratio, you may nd this helpful. If you choose “5:1” only one second of
every 5 seconds will be recorded. If you choose “60:1” only one second of every 60 seconds
will be recorded, and so on.
WARNING: If you choose the time-lapse function, please make sure the recording time is
longer than the ratio time. EX: Choose “60:1”, the real recording time must be longer than 60
seconds. Exit the screen, to save settings.

10
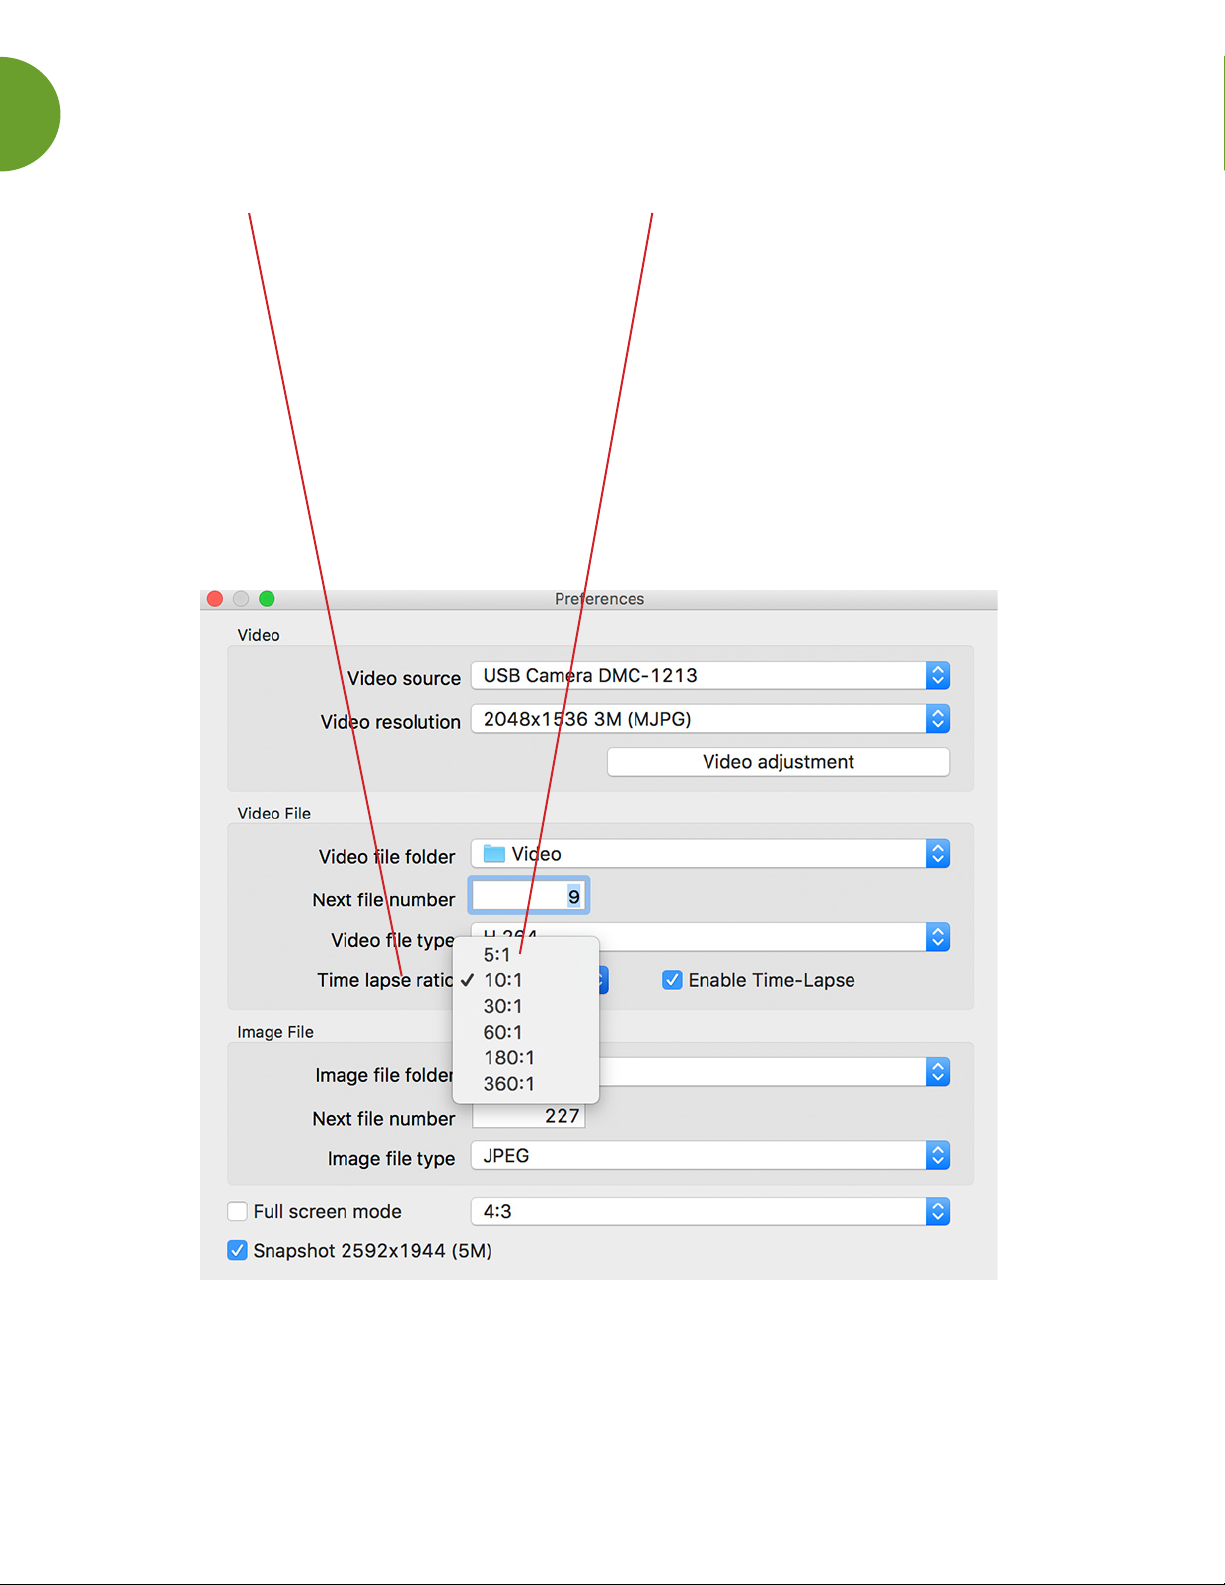
UNDERSTANDING THE PREFERENCES WINDOW
Video source allows a user
to choose or switch the image
source if there is more than
one microscope connected.
Video resolution supports different
resolutions:
1.3MP Microscope: 640x480/1280x1024
5MP: 640x480/1024x768/2048x1536
Note: The Snapshot and Record format
will change at the same time.
Video adjustment changes
the Video values for
Exposure time/Brightness/
Contrast/Saturation/
Sharpness.
Video le folder - Set up
the video saving location.
Next le number - Set up
the le name of the next
video.
Video le type - set up the
compression type of video.
Time lapse ratio - Enable
time lapse function by
selecting the ratio. See
in-depth ratio tips on p. 9
Image le folder - Set up
the picture saving location.
Next le number - Set up
the the le name of the next
picture.
Image le type - Set up
the compression type of
video.
Full Screen Mode - If the full screen mode box is
marked, MicroViewer will start on full-screen mode
automatically with Live Video Zone at 4:3 aspect ratio.
This mode is necessary for the measurement function.
FULL: The entire screen will display live video. The
aspect ratio may not be correct, so live images may
appear distorted.
ICON: The Screen will be lled with the MicroViewer
window, so all function buttons will be visible. In this
mode, the video image will be expanded and it is not
correct for the measurement function.
Snapshot 2592x1944 - (For Digital Microscope 5MP
ONLY) Mark the box and you can save the picture with
maximum resolution of 2592x1944 (5MP) when you click
the hardware snapshot button. NOTE: It will take 5-6
seconds to save a picture, do not move the microscope.

11
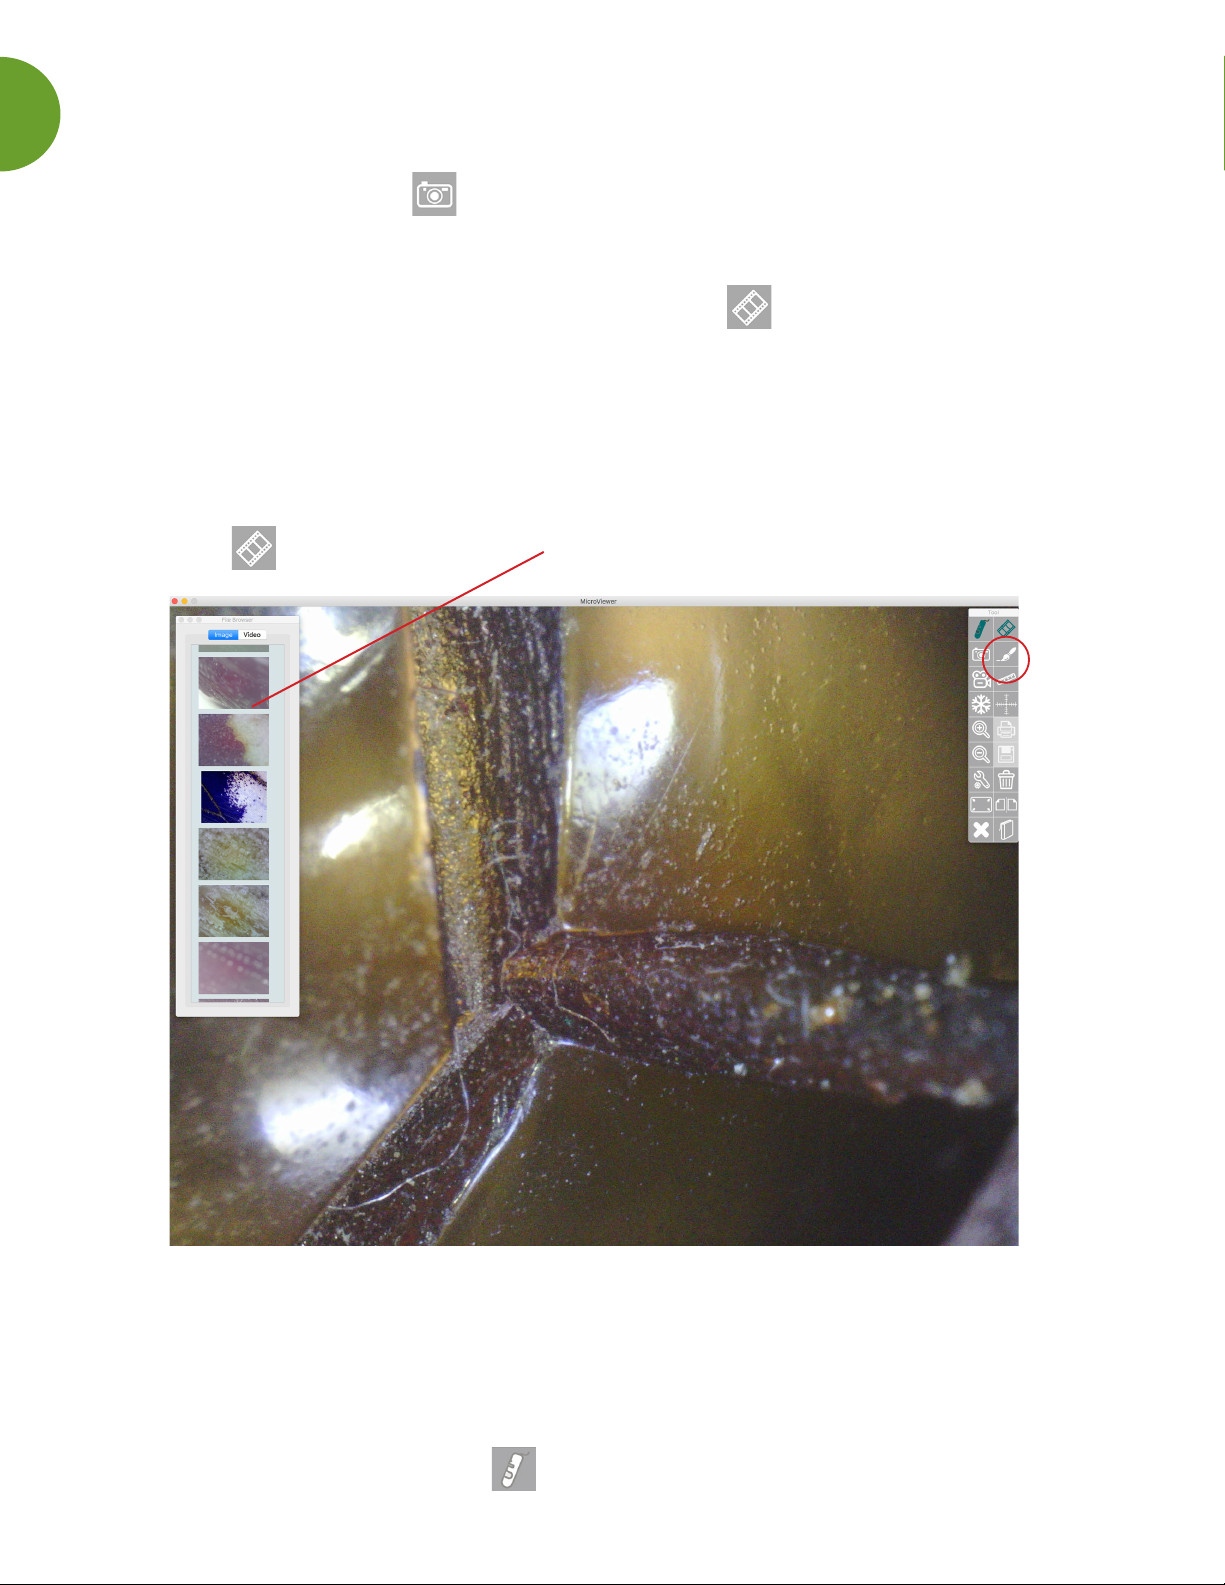
HOW TO COMPARE TWO IMAGES
Click on the Compare icon in the Tool Bar. You will see a wide black space appear on the
screen. Select the image you would like to view from the File Browser. The rst image you
select will appear on the left when you double click the image. Next click in the right side of
the compare screen (It’s still black) and then double click on the second image you want. It will
appear on the right.
You can choose to save by selecting the Save icon or print by selecting the Print icon.
You can plug two digital microscopes into the USB ports to compare images from two
microscopes or to compare two live images. This can be very interesting when you are
comparing a lower magnication on the 10-200x MicroSight microscope with a larger
magnication on the xed 500x MicroSight microscope. The scopes must be the same
megapixel model (both either 1.3MP or both 5MP).
NOTE: BOTH microscopes must be plugged onto the USB ports BEFORE the program is
opened for this live feature to work.
To return to normal viewing, click on the Microscope icon, or the Compare icon.
12
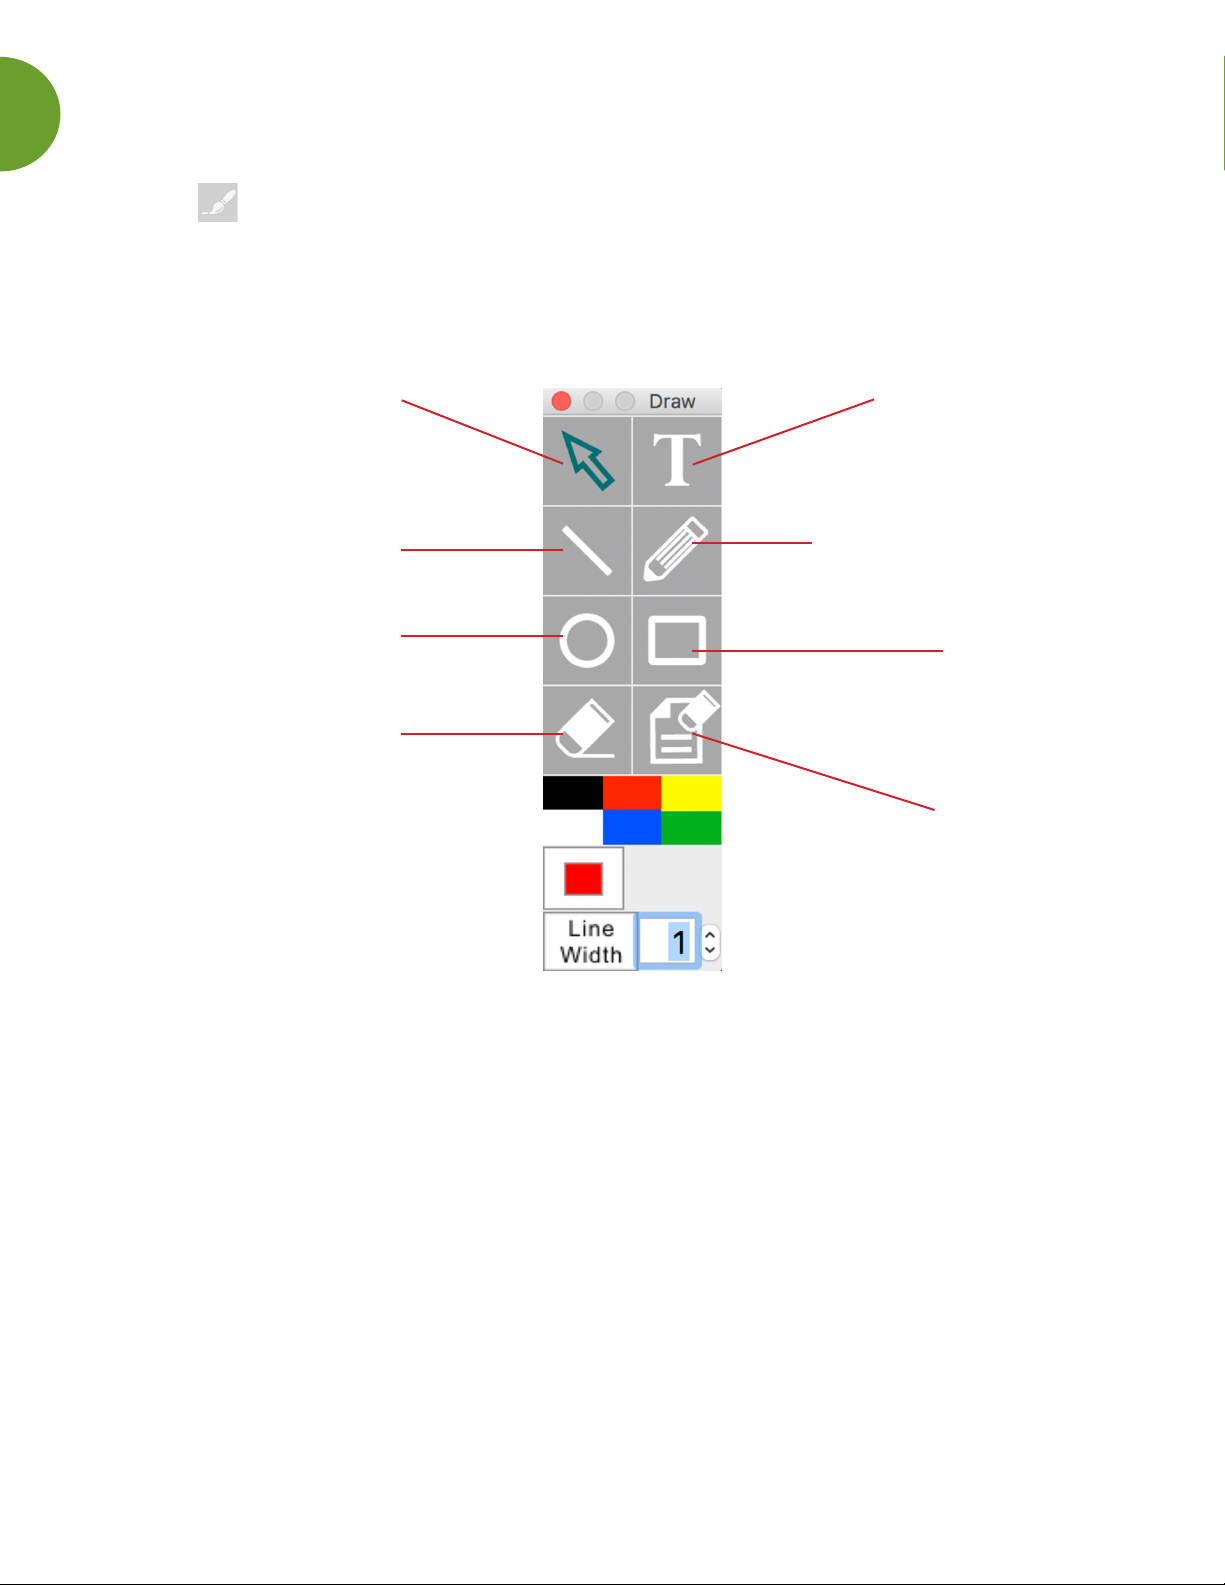
HOW TO USE THE DRAW TOOL
Click the Draw icon, and the following Tool Bar will apppear.
Cursor to move the window.
Draw lines. You can set up
the line width and color.
Draw circles. You can set
up the line width and color.
Draw circles. You can set
up the line width and color.
Input text. You can set up
the line width and color.
Free hand drawing or writing.
You can set up the line
width and color.
Draw rectangles.
You can set up the line
width and color.
Delete all drawing.
13
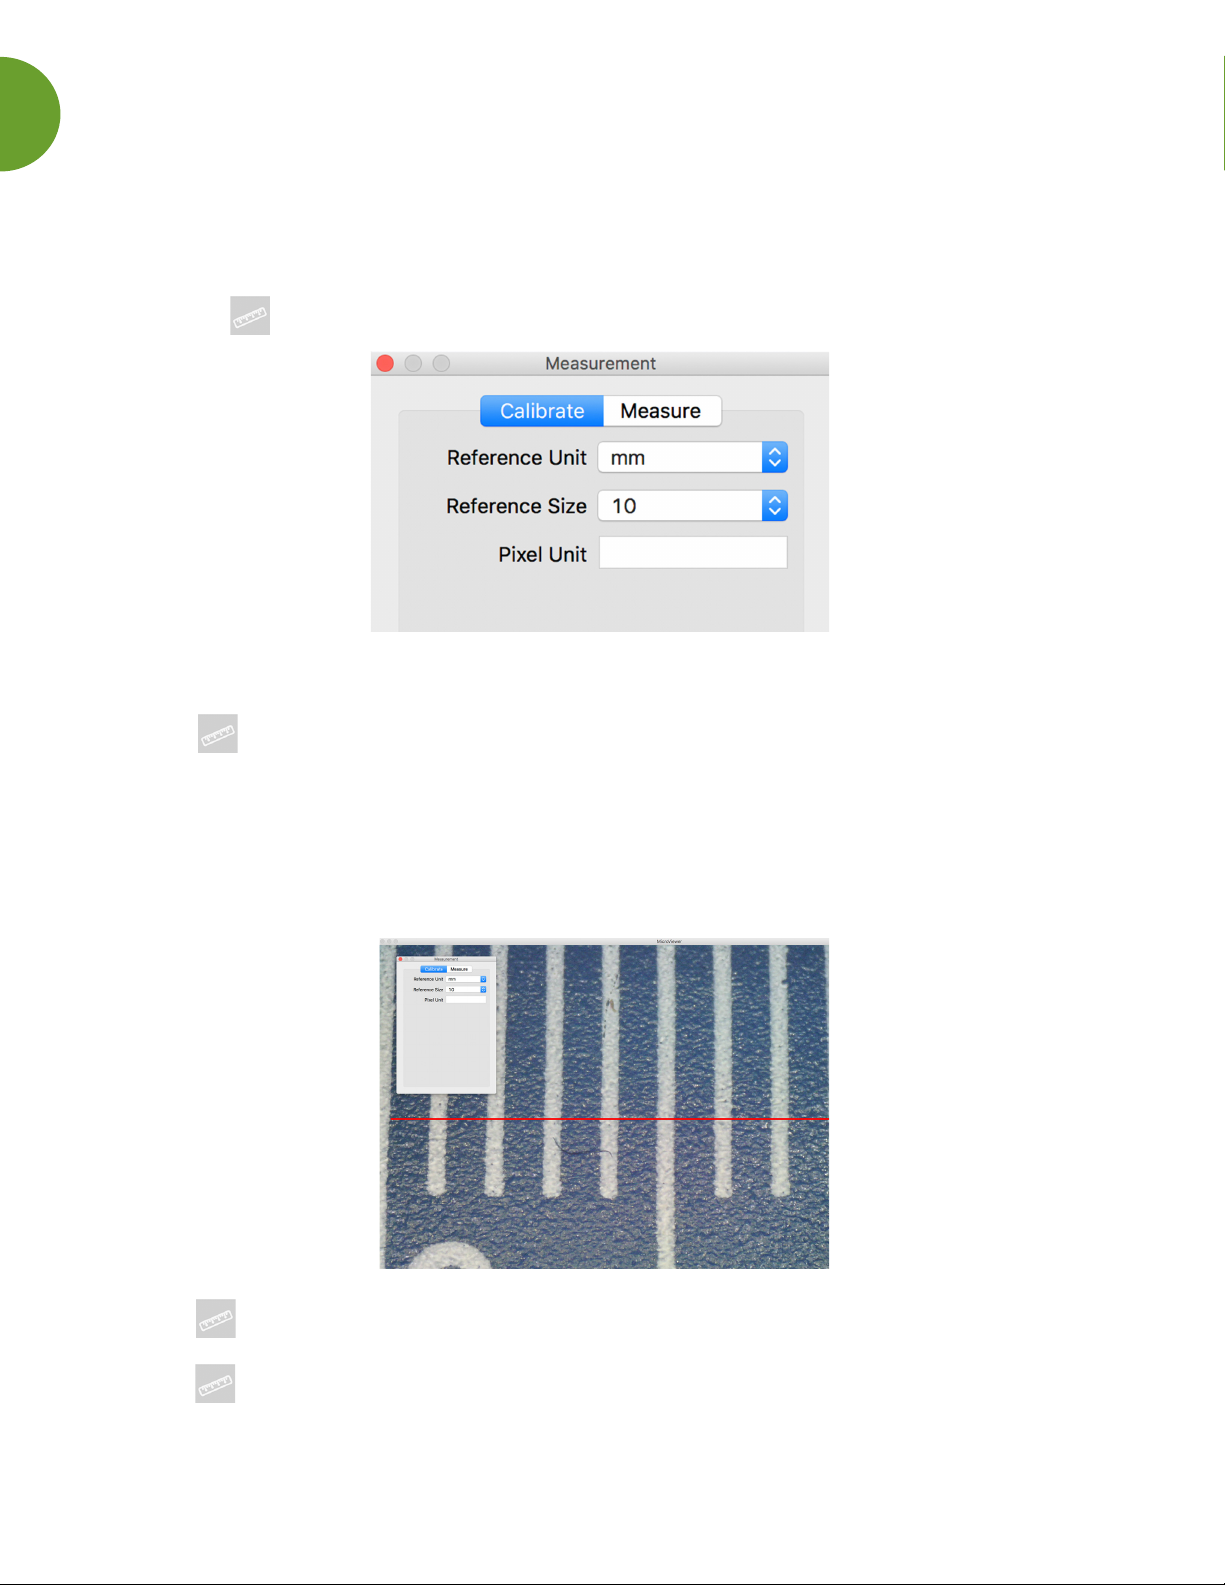
HOW TO CALIBRATE FOR MEASUREMENT
You must calibrate your microscope for accuracy before you can begin to measure.
Make sure the MicroSight microscope is plugged into the USB port and the software is open.
Click on the Measurement icon, this window will appear.
Place the camera down on any ruler and adjust the focus knob until the image is sharp.
Click the Measurement button, and the Measurement window will appear.
NOTE: You must calibrate again if you change the distance, magnication, or resolution. (Step 3)
Check Calibrate option and choose the Reference Unit and Reference Size, which is the
largest dimension visible on your snapshot. Ex: The largest dimension available between 3
centimeters and 4 centimeters is 10 millimeters. Therefore, choose the mm as the Reference
Unit and choose 10 as the Reference size.
Click the Measurement icon to go back. It’s time to begin measuring!
Double click the saved picture in the list bar or just place the microscope on a specimen and
click the Measurement button.
NOTE: This calibration must be done at the beginning of each microscope session before you
can measure accurately.
14
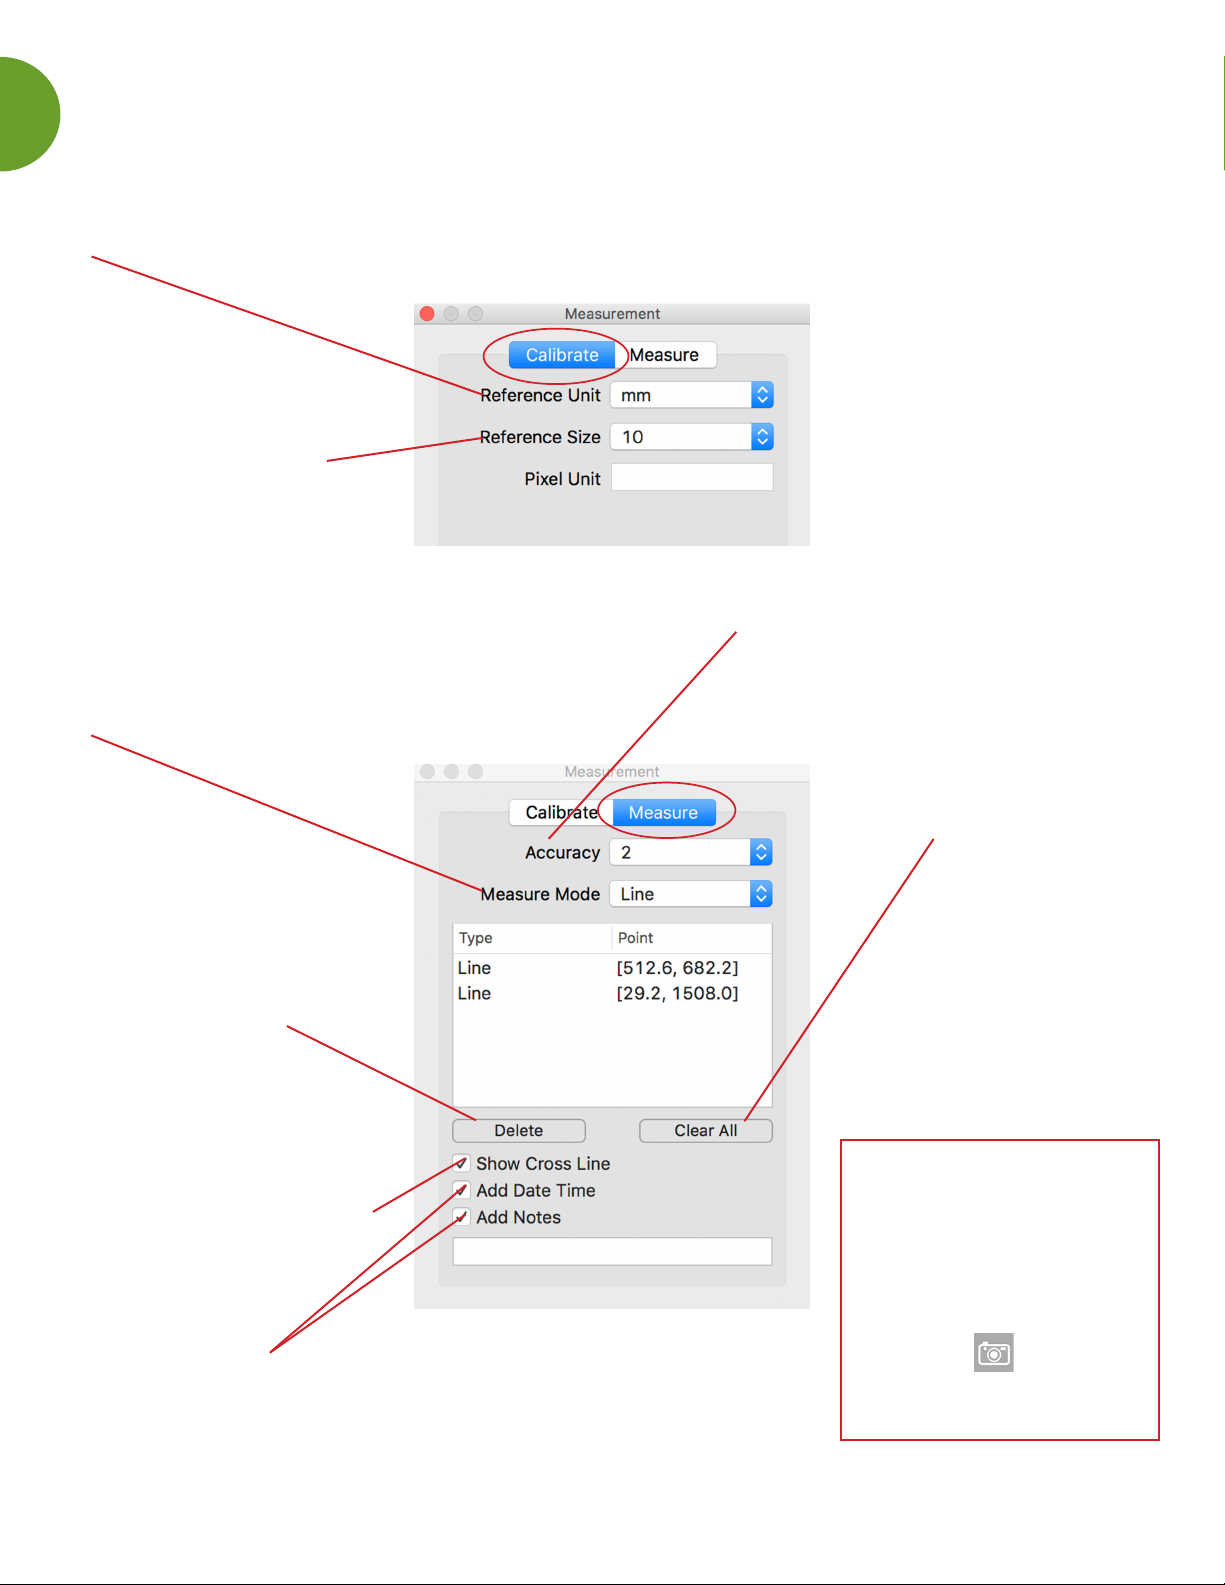
UNDERSTANDING THE MEASUREMENT WINDOW
Reference Unit - Select a unit for calibration and
measurement. Choose from three units: mm/inch/mil
Reference Size - Select
the reference size for
calibration.
Accuracy - The number is accurate up
to nine decimal points. measurement.
Choose from three units: mm/inch/mil
Measure Mode - Select a measurement
mode from the following options:
Angle/Circle/Ellipse/Line/
Rectangle/Triangle/3DotsRadius.
Delete - Click the
measurement data and
click the delete button to
delete the data.
Clear All - Delete all
measurement data.
Show Cross Line - Check
the Cross Line if you want
this function for accurate
measurement.
Add Date/Time/Notes - Add notes and
data times in the image.
IMPORTANT
After you take a
measurement, remember
to take a snapshot of
the image to save
the measurements.
Use the Camera
icon on the Tool Bar
to take the photo.

15
HOW TO MEASURE AN ANGLE
After calibrating you can begin measuring.
Follow the full calibration directions on page 13. Click the Measure button.
Select the Measure Mode drop down menu and choose Angle for the Measure Mode.
1. Hold the button of the mouse at the point A of the angle.
2. Drag to point B of the angle and release the button of the mouse.
3. Click the button on point C on the angle and the angle measurement will appear.
To return to the live screen, click on the Measure icon button in the Tool Bar.

16
HOW TO MEASURE AN ELLIPSE
After calibrating you can begin measuring.
Follow the full calibration directions on page 13. Click the Measure button.
Select the Measure Mode drop down menu and choose Ellipse for the Measure Mode.
1. Select the “Ellipse” option in the Measure Mode. Hold the button of the mouse at the
upper left of the object.
2. Drag to the lower right of the object.
3. Release the button of the mouse, and the ellipse measurement will appear.
The “D” means diameter and the “A” means area.
To return to the live screen, click on the Measure icon button in the Tool Bar.
17
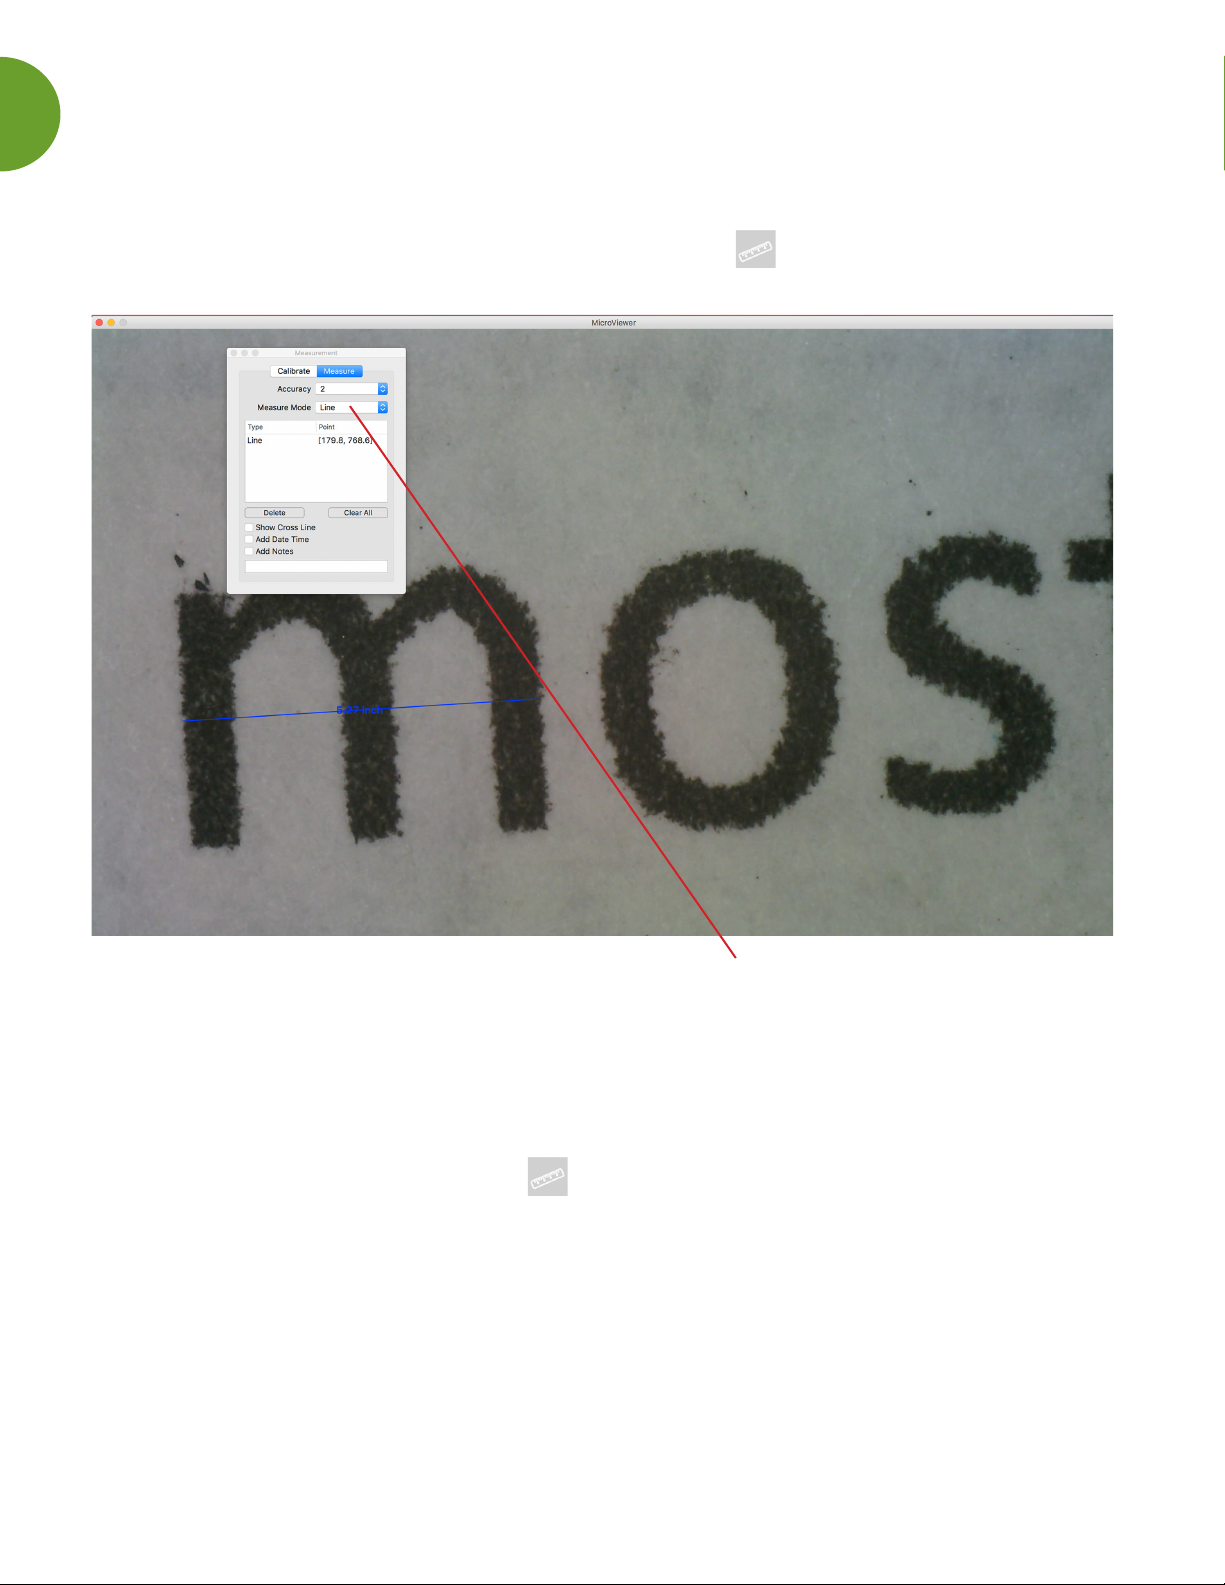
HOW TO MEASURE A LINE
After calibrating you can begin measuring.
Follow the full calibration directions on page 13. Click the Measure button.
Select the Measure Mode drop down menu and choose Line for the Measure Mode.
1. Hold the button of the mouse at the starting of the line. Drag to the nishing point
of the line.
2. Release the right button of the mouse, and the line measurement will appear.
The number represents the length.
To return to the live screen, click on the Measure icon button in the Tool Bar.

18
HOW TO MEASURE A TRIANGLE
After calibrating you can begin measuring.
Follow the full calibration directions on page 13. Click the Measure button.
Select the Measure Mode drop down menu and choose Triangle for the Measure Mode.
1. Hold the button of the mouse at the rst point of the object.
2. Drag to the second part and release.
3. Immediately hold the right button on the mouse again at the second point of the object,
then drag to the third point of the object.
To return to the live screen, click on the Measure icon button in the Tool Bar.

19
HOW TO MEASURE A RADIUS/ARC
After calibrating you can begin measuring.
Follow the full calibration directions on page 13. Click the Measure button.
Select the Measure Mode drop down menu and choose 3DorRadius for the Measure Mode.
1. Hold the button of the mouse at the rst point of the arc.
2. Drag to the second point and release.
3. Click the mouse button at the third point of the arc, and the arc measurement will appear.
The “R” means radius, “A” means area, and the “L” means arc.
To return to the live screen, click on the Measure icon button in the Tool Bar.

20
carol@southernsciencesupply.com
877.968.7522
(cell)210.887.0479
www.southernsciencesupply.com
TROUBLESHOOTING
QUESTIONS & ANSWERS
For technical questions, compatibility issues,
or other wonderings, please reach out to us.
We pride ourselves on supporting you 110%.
Other manuals for MicroSight 1.3MP
1
This manual suits for next models
1
Table of contents
Other southern science supply Microscope manuals


