Souvia SMF700 User manual
Owner’s Manual
SMF MILK FROTHER
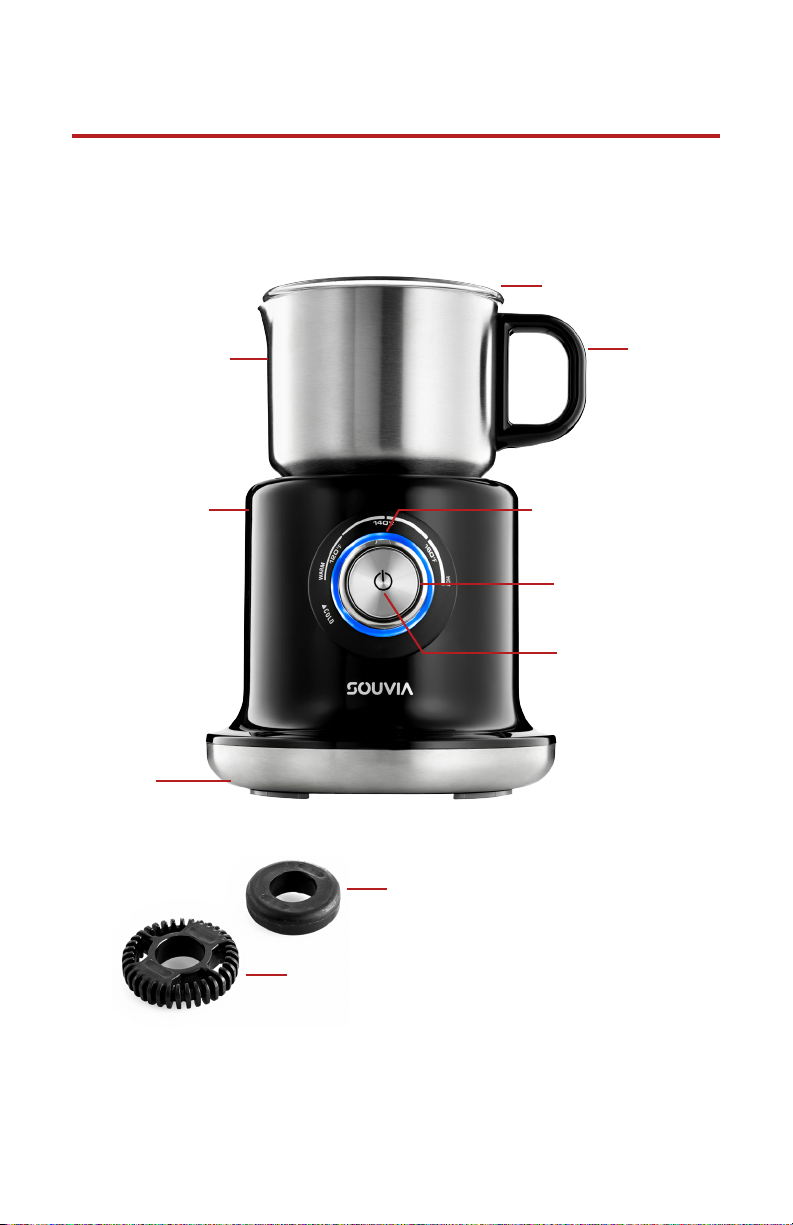
Smooth Stirring Head
(For Heating Milk)
Serrated Stirring Head
(For Frothing Milk)
Lid
SPECIFICATIONS
Model#: SMF700 Supply Voltage: 120V - 60Hz
Volume: 700 ml Power Consumption: 500W
Stainless Steel
Milk Container
Base
On/O Switch
Temperature
Control
Handle
FEATURES
pg 1
Main Indicator
Lamp
Power Cord
Storage

IMPORTANT SAFEGUARDS
This appliance is for HOUSEHOLD USE ONLY.
When using an electrical appliance, basic safety precautions should
always be taken, including the following:
1. READ ALL INSTRUCTIONS BEFORE USE.
2. Unplug from outlet when not in use and before cleaning. Allow unit to
cool before putting on or taking o parts, and before cleaning appliance.
3. The milk container heats up during operation. Do not touch hot
surfaces. Use handle.
4. To protect against re, electric shock and injury to persons, DO NOT
IMMERSE CORD, PLUG OR BASE UNIT in water or other liquids.
5. Close supervision is necessary when any appliance is used by or near
children.
6. Do not operate any appliance with a damaged cord or plug, or aer the
appliance has malfunctioned or has been damaged in any way. Return
appliance to the nearest authorized service facility for examination,
repair or adjustment.
7. The use of accessory attachments not recommended by Souvia may
result in re, electric shock or injury to persons.
8. Do not use outdoors.
9. Do not let power cord hang over edge of table or counter, or touch hot
surfaces.
10. Do not place on or near a hot gas or electric burner, or in a heated
oven.
11. Always put container on base, then plug cord into wall outlet. To
disconnect, press the ON/OFF button, then remove plug from wall
outlet.
12. This appliance is intended for heating up and frothing milk. Do not
put any other type of liquid or solid food in the container. Do not use
appliance for anything other than intended use.
13. Scalding may occur if the lid is opened during the heating cycle.
14. Do not use a cracked container or a container having a loose or
weakened handle.
SAVE THESE INSTRUCTIONS
pg 2

Short Cord Instructions
A short power supply cord is provided to reduce the hazards resulting
from entanglement or tripping over a longer cord. Longer detachable
power-supply cords or extension cords are available and may be used
if care is exercised in their use. If a longer detachable power-supply
extension cord is used:
1. The marked electrical rating of the cord set or extension cord should be
at least as great as the electrical rating of the appliance.
2. The cord should be arranged so that it will not drape over the counter
top or tabletop where it can be pulled on by children or tripped over
unintentionally.
3. If the appliance is of the grounded type, the extension cord should be
grounding type 3-wire cord.
Line Cord Safety Tips
1. Never pull or yank on cord or the appliance.
2. To insert plug, grasp it rmly and guide it into outlet.
3. To disconnect appliance, grasp plug and remove it from outlet.
4. Before each use, inspect the line cord for cuts and/or abrasion marks.
If any are found, this indicates that the appliance should be serviced
and the line cord replaced. Please return it to an authorized service
representative.
5. Never wrap the cord tightly around the appliance, as this could place
undue stress on the cord where it enters the appliance and cause it to
fray and break.
DO NOT OPERATE APPLIANCE IF THE LINE CORD SHOWS ANY
DAMAGE OR IF APPLIANCE WORKS INTERMITTENTLY OR STOPS
WORKING ENTIRELY.
This appliance must be grounded while in use. CAUTION: To ensure
continued protection against risk of electric shock, connect to properly
grounded outlets only.
IMPORTANT
During the rst few minutes of initial use, you may notice smoke and/or a
slight odor. This is normal and should quickly disappear. It will not recur
aer appliance has been used a few more times.
This appliance is not intended for use by persons (including children) with
reduced physical, sensory or mental capabilities, or lack of experience
and knowledge, unless they have been given supervision or instruction
concerning use of the appliance by a person responsible for their safety.
pg 3

OPERATING INSTRUCTIONS
READ ALL INSTRUCTIONS BEFORE USE
Before using for the rst time:
Prior to initial use, clean the unit by following the instructions in the
cleaning and care section of this manual.
We recommend the use of a long life milk (UHT) with a high protein
content. For best results, the milk should be taken from the refrigerator
immediately before frothing. Do not heat any liquid other than milk in
this appliance.
Choosing Stirring Head
To avoid uneven heating and burning of milk, Do not operate the milk
frother without a frothing disc inserted into the milk jug. Use only one
stirring head at a time.
HEATING: use the smooth stirring head.
FROTHING AND HEATING: To froth and heat milk at the same time;
use the serrated head.
COLD-FROTHING: Use serrated head
Fill Amounts
Always observe the minimum mark and ensure the container is lled
with at least 120 ml of milk.
FROTHING: ll the container to a maximum of 350 ml (lower max
mark).
HEATING: ll the container to a maximum of 700 ml (upper max mark).
Heating or Frothing Milk
1. Place the base on a rm, level surface.
2. Remove the lid from the milk container.
3. Place the appropriate head onto the mounting protrusion inside the
bottom of the container. NOTE: Do not operate the milk frother without
a frothing disc inserted into the milk jug - this can cause uneven heating
and burning of the milk.
pg 4

4. Put the required amount of milk into the container. Always use cold
milk and ll the milk jug between the MIN and MAX level markings.
Overlling the jug may cause spillage. Under lling the jug prevents the
frothing disc from working properly.
5. Place the lid on the container
6. Use the temperature control to set the desired temperature or to select
the cold-frothing function (COLD). The “COLD” setting will operate for
60 seconds before automatically stopping. If desired, you can re-select
the “COLD” setting. NOTE: If the temperature setting is changed during
operation, the milk frother will stop at the new temperature selection. If a
lower temperature is selected mid-cycle and the milk has already exceeded
the lower temperature selected, the milk frother will immediately stop.
7. Insert the plug into a proper outlet. a beep will sound and the main
indicator lamp will start to ash.
8. Press the ON/OFF button.
9. A double beep will sound, the indicator lamp remains on and the motor
cooling system starts up.
10. The stirring process begins. When the milk has reached the selected
temperature, the milk frother will automatically stop and beep twice.
Frothing functions take between 2 -7 minutes depending on the
amount of milk used. NOTE: Do not remove the milk jug from the power
base during operation. Doing so may disrupt the frothing disc and cause
grinding. Before removing the jug always stop operation of the unit by
pressing the START /STOP push-dial. Operation of the unit has stopped
once the button surround has stopped ashing.
11. The main indicator lamp ashes, and a number of beep signals will
sound.
12. You can now remove the milk container from the base. Use a suitable
spoon to take o the milk froth. NOTE: Aer 30 seconds of non-use, the
milk frother will enter standby mode. The button surround will cease to
illuminate. To reactivate the unit, turn or press the START/STOP push-dial.
13. The cooling system continues to run for a brief period. The main
indicator lamp stops ashing aer about three minutes.
14. The power cord can now be unplugged from the wall.
NOTE: if the appliance has not been disconnected from the outlet the ON/
OFF switch must be pressed twice to start a new operating cycle.
Aer a heating cycle, the appliance cannot start a new stirring and
heating cycle immediately. The unit must be allowed to cool down rst.
pg 5

pg 6
FUNCTION MILK AMOUNT
Cappuccino 350 ml
Latte 700 ml
Aer a cold-frothing cycle, a new stirring and heating cycle may be started
immediately.
Boil Dry, Overheating Protection - This unit is equipped with overheat-
ing protection. The unit will automatically shut o if the milk jug over-
heats. This is caused by insucient amount of milk in the milk jug or aer
too many consecutive uses. If this occurs, 3 alerts will sound. Unplug the
unit from the power outlet, wait approximately 5 minutes for the milk
frother to cool down. To speed up the cooling process, ll the milk jug
with cool water. Once adequately cooled, you will be able to reactive the
milk frother and recommence frothing
Tips
To achieve a thicker froth, go through a cold-frothing cycle rst,
followed by a hot-frothing cycle.
Making Hot Chocolate: The appliance is also suitable for preparing
hot chocolate. Proceed as described in the Heating or frothing section
of this manual. Fit the smooth stirring head into place and set the
temperature selector to 113˚F. As soon as the milk has been heated to
113˚F (as indicated by the corresponding beep signals), take off the lid
and add the required amount of cocoa powder. Set the temperature
selector to 149˚F and press the ON/OFF switch again. To prevent any
blockage or congestion, do not use grated chocolate or chocolate flakes
when making cocoa.
Making Coee: refer to the table below for milk amounts when
preparing milk for coee.

pg 7
CLEANING & MAINTENANCE
DO NOT IMMERSE UNIT IN WATER
Do not clean container with cleansers, steel wool pads,
or other abrasive material.
1. Unplug your unit and allow it to cool before cleaning.
2. To avoid the risk of electric shock, do not clean the base or the power
cord with water and do not immerse them.
3. The milk container, stirring heads and lid should be cleaned aer each
cycle of use with hot water and a little detergent, or in a dishwasher.
If necessary, the serrated stirring head may be cleaned with a suitable
brush.
4. Wipe the outside of the base with a so, damp cloth.
Never immerse base in water. Servicing should be
performed by an authorized service representative.
TROUBLESHOOTING
PROBLEM POSSIBLE CAUSE SOLUTION
Milk is not foaming Milk is warm or too
hot to foam.
• Use cold, fresh (or freshly
opened) milk.
• Do not re-foam already heated
milk.
• Try reducing the quantity of
milk in the milk jug.
• Try a dierent milk. Some milks
and milk brands produce more
froth than others. For example,
we have found that some soy
milks produce froth while others
do not. Experiment with dierent
milk options and frothing discs to
achieve the desired result.
• Adding dense ingredients like
thick syrups, heavy powders
and large akes can signicantly
reduce the amount of foam. This
is normal.

pg 8
PROBLEM POSSIBLE CAUSE SOLUTION
Milk is not heating • Ensure the milk jug is correctly
positioned onto the power base.
• Ensure that the milk frother
has been properly activated.
Frothing has started once the
milk frother beeps once and the
button surround slowly ashes. If
the milk frother does not do this,
re-push the START | STOP push-
dial once, rmly.
• Increase the temperature by
turning the START /STOP push-
dial to the right.
Frothing disc is not
moving or is dislodged
• Frothing disc is not
inserted correctly.
• Frothing disc
has dislodged during
operation.
• Ingredients have
been added too
quickly.
1. Stop operation.
2. Remove liquid from milk jug.
3. Ensure the frothing disc is
securely and correctly attached.
Once attached, turn the frothing
disc with your ngers, it should
turn freely. If it doesn’t, contact
Souvia Customer Service.
4. Rell milk jug with liquid.
5. Start frothing. Add ingredients
(if desired) slowly and in small
quantities aer the milk has
already started swirling.
3 Beeps sounding The milk frother may
be overheated.
1. Unplug the cord from the
power outlet.
2. Remove liquid from milk jug.
Rinse the milk jug and frothing
disc with cold water then dry
thoroughly.
3. Ensure the milk frother has not
been operated for 5 minutes. This
allows the internal components
to cool.
4. Ensure the frothing disc is
securely and correctly attached.
Once attached, turn the frothing
disc with your ngers, it should
turn freely. If it doesn’t, contact
Souvia Customer Service
5. Recommence frothing.
Humming noise This is normal. It is the
cooling fan preventing
the milk frother from
overheating.
During this time, you may still use
the milk frother unless the Boil
Dry Overheat Protection as been
activated (3 beeps will be heard).
Follow the instructions above.

PROBLEM POSSIBLE CAUSE SOLUTION
Burnt milk • Milk is not swirling
correctly.
• Milk jug has not been
cleaned properly and
milk residue from pre-
vious use is burning.
• Ensure the frothing disc is
securely and correctly attached.
Once attached, turn the frothing
disc with your ngers, it should
turn freely. If it doesn’t, contact
Souvia Customer Service.
• Ensure the milk jug is
thoroughly cleaned aer each
use and between consecutive
uses.
Ingredients are not
melting
• Ingredients have
been added before
milk has warmed up.
• Ingredients are too
large.
• Always allow the milk frother
to start for a few seconds before
using the measuring cap to grad-
ually add ingredients.
• Ensure ingredients are in small
pieces.
Milk is too cold or hot • Adjust the temperature to suit
your personal preference.
• Always ll the milk jug between
the MIN and MAX level markings.
Grinding noise • Frothing disc is not
inserted correctly.
• Frothing disc has
dislodged during operation.
• The milk jug has been
removed from the power
base during operation.
• Ensure the frothing disc is
securely and correctly attached.
Once attached, turn the frothing
disc with your ngers, it should
turn freely. If it doesn’t, contact
Souvia Customer Service.
• Removing the milk jug during
operation can dislodge the
frothing disc. Stop operation.
Reinsert the frothing disc
correctly before recommencing.
Emergency stop To stop operation at any time,
press the center of the START
/STOP push-dial. Operation
has stopped once the button
surround has stopped ashing.
pg 9

YEAR WARRANTY REGISTRATION
✂
SMF MILK FROTHER WARRANTY
NAME
STREET ADDRESS
PHONE
MODEL NO. DATE OF PURCHASE
CITY STATE ZIP
Please cut the top portion of this page and mail to Souvia at the following address
within 30 days of purchase.
51 Forest Rd. #316-113
Monroe NY, 10950 USA
Souvia warrants, subject to the conditions stated below, that from the date of purchase, this product will be free from mechan-
ical defects for a period of ONE (1) year. Souvia, at its option, will repair or replace this product found to be defective during the
warranty period. Should this product become defective by reason of improper workmanship or material defect during the specied
warranty period, Souvia will repair or replace the same eecting all necessary parts replacements for a period of one year from the
date of purchase. Transportation charges on parts, or products in whole, submitted for repair or replacement, under this warranty,
must be borne by the purchaser.
CONDITIONS: This warranty is valid for the original USA retail purchaser from the date of initial retail purchase and is not transfer-
able. Keep the original sales receipt. Proof of purchase is required to obtain warranty service or replacement. Dealers, service cen-
ters, or retail stores do not have the right to alter, modify or in any way, change the terms and conditions of this warranty. Warranty
registration is not necessary to obtain warranty on Souvia Products. Save your proof of purchase receipt.
ABOUT YOUR PRODUCT WARRANTY: warranty service does NOT apply if the product damage occurred because of misuse,
lack of routine maintenance, shipping, handling, warehousing or improper installation. Similarly, the warranty is void if the manu-
facturing date or the serial number on the product has been removed or the equipment has been altered or modied. During the
warranty period, the authorized service dealer, at its option, will repair or replace any part that, upon examination, is found to be
defective under normal use and service. Warranty does NOT cover peeling or scratches to the non-stick coating on the appliance.
NORMAL WEAR: This warranty does not cover normal wear of parts or damage resulting from any of the following: negligent
use or misuse of the product; improper voltage or current; use contrary to the operation instructions; deviation from instructions
regarding storage and transportation; repair or alteration by anyone other than Souvia or an authorized service center. Further,
the warranty does not cover Acts of God, such as re, ood, hurricanes and tornadoes. Souvia shall not be liable for any incidental
or consequential damages caused by the breach of any express or implied warranty. Except to the extent prohibited by applicable
law, any implied warranty of merchantability or tness for a particular purpose is limited in duration to the duration of the above
warranty. Some states, provinces or jurisdictions do not allow the exclusion or limitation of incidental of consequential damages or
limitations on how long an implied warranty lasts, so the above limitations or exclusion may not apply to you. This warranty gives
you specic legal rights, and you may also have other rights that vary from state to state or province to province.
HOW TO OBTAIN WARRANTY SERVICE: If your Souvia appliance should prove to be defective within the warranty period, we will
repair it, or if we think necessary, replace it. To obtain warranty service, simply call our Customer Service Representatives;
1-888-406-4110, or send an email to ask@souviacook.com
pg 10

Table of contents
Other Souvia Kitchen Appliance manuals


