Grain Maker 99 User manual
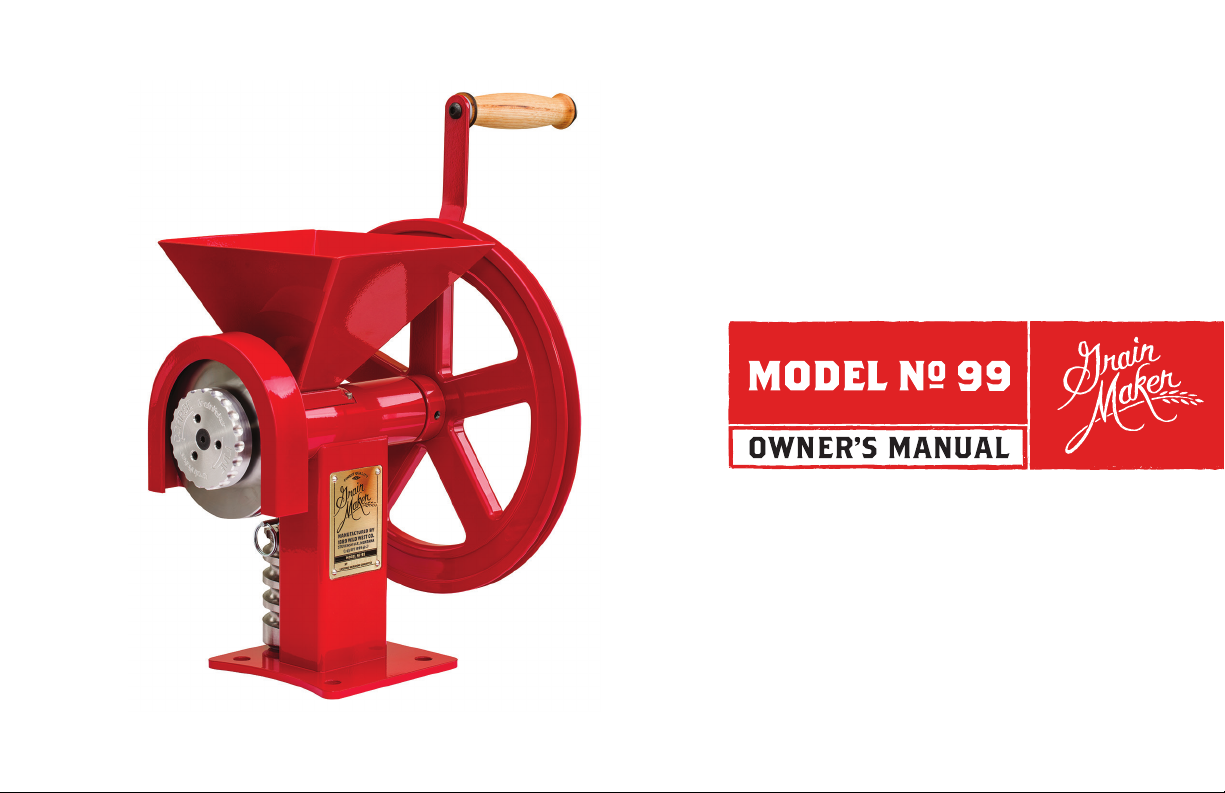

Your heirloom quality GrainMaker mill comes complete with
everything you need to start grinding. Just add quality grain,
seeds, legumes or nuts. Your mill can produce cracked grains
to ne our and creamy nut butter in just one pass.
Each mill has been tested before it leaves our shop. You may
notice some residual our in the mill from this testing. Your
GrainMaker mill was manufactured in a facility that contains
wheat and nuts.
This mill is intended for use with dry or oily grains, seeds,
legumes, nuts and similar food items. Your mill is not
intended for use with anything moist or wet.
It is imperative that you ll
out and return the Heirloom
Guarantee Card 90 days from
the date that your mill
was received. You may also
go online and register here:
grainmaker.com/registration
introduction
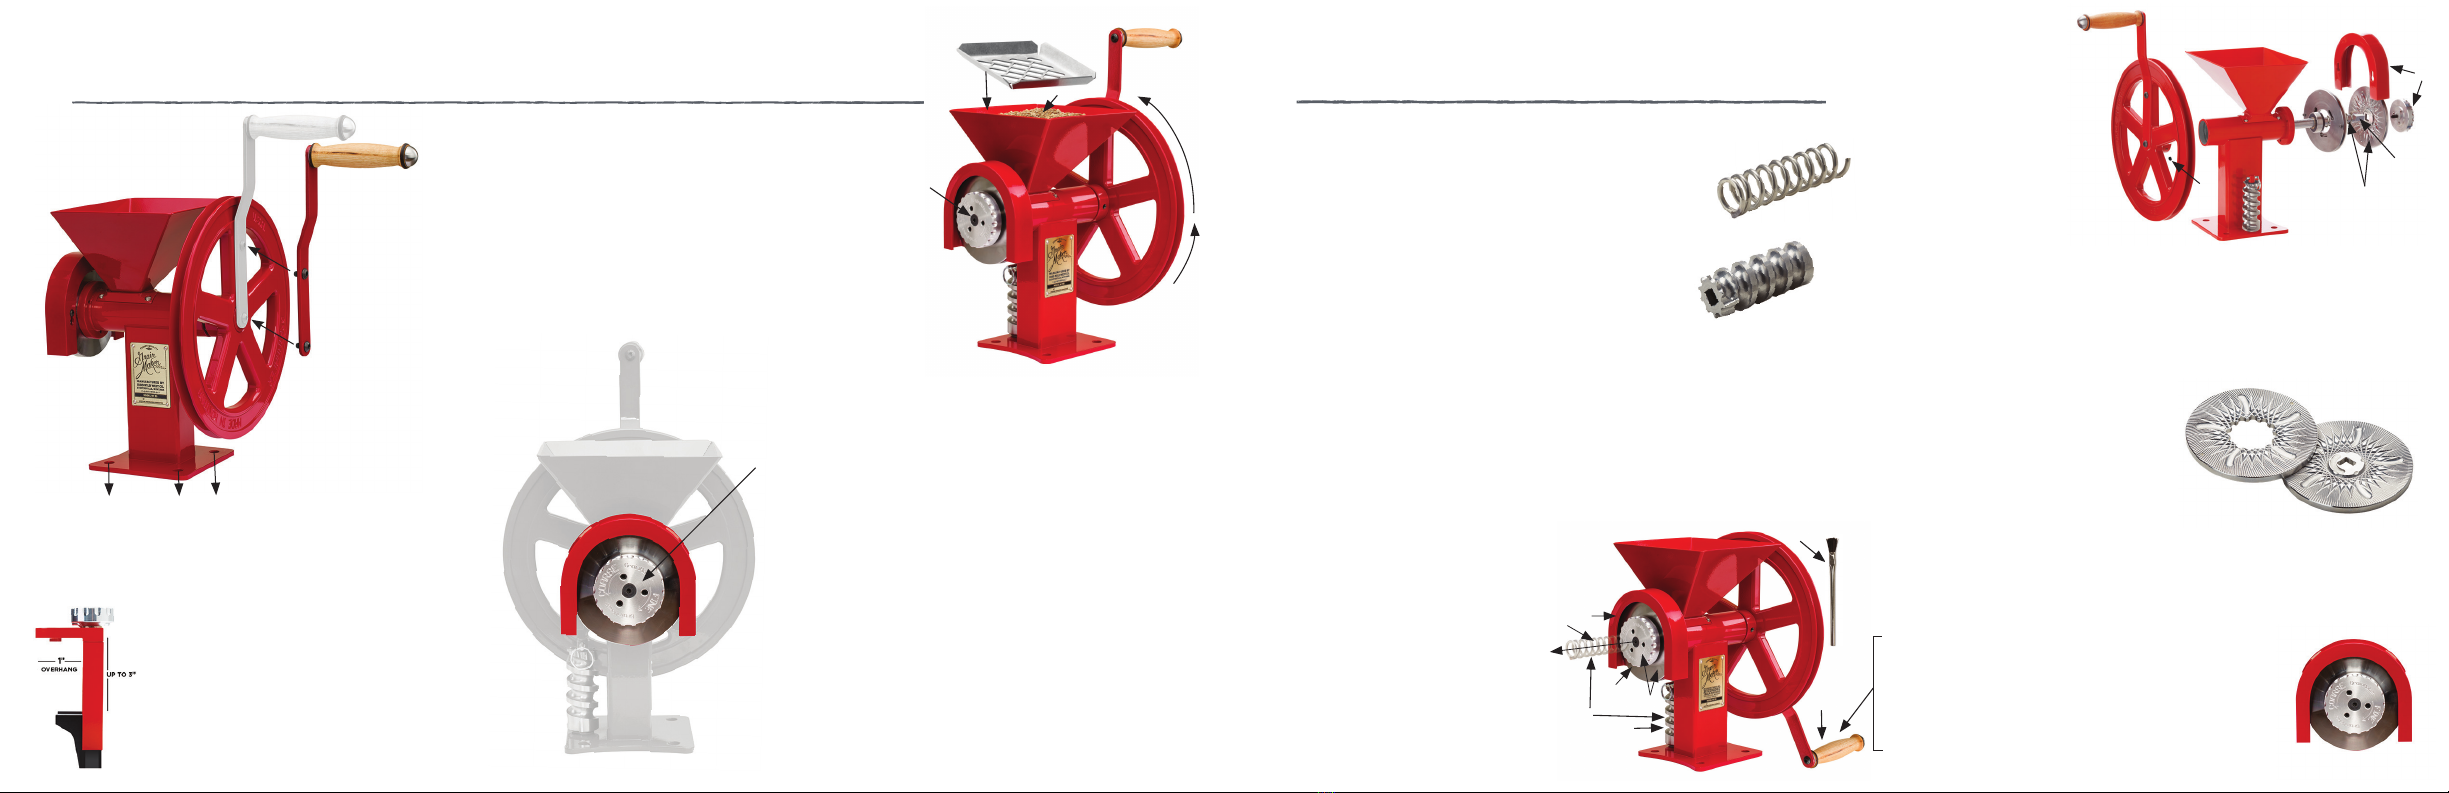
Coil auger Each mill is shipped with the coil auger already
inserted in the mill. This auger looks like a big spring and
is used to grind smaller grains. The coil auger must
be inserted with the at end rst - towards the mill.
GrainBreaker auger This auger is designed to break
larger media into smaller pieces while pushing it
into the grinding burrs for the nal grind. It must
be used for legumes, corn, coffee and nuts.
Changing the augers
A. Position the extension handle and grip to its lowest point.
B. Remove dust cover.
C. Hold the burrs together with one hand while turning the click
& lock adjustable knob counterclockwise with the other hand
until it is completely unscrewed.
D. Remove the front grinding burr. It is not necessary to remove
the stationary burr when changing the augers.
E. Pull the auger out.
F. Use the provided brush to sweep out
any remaining media left inside the tube.
G. Insert the desired auger and reverse
the steps above.
H. Store the other auger on the
storage post. The storage post
is shipped with blue protective
tape at the top to protect it
during shipping. You may
choose to remove it if desired.
setup
1. ATTACH THE EXTENSION HANDLE
A. Remove the bolts securing your
mill to the shipping board and
secure the handle using the large
Allen wrench. Place the rst bolt
furthest away from the wood
grip into the shaft.
B. Place the second bolt into
the tapped spoke of the
V-pulley ywheel.
3. BEGIN MILLING
A. Place the safety guard in the hopper.
B. Fill the hopper with grain.
C. Loosen the click and lock
adjustable knob as it has been
tightened for shipping.
D. Turn the extension handle clockwise.
4. FINE-TUNING
A. As the grain works into the burrs, tighten the
adjustable click & lock knob 1 to 2 clicks, then turn
the extension handle 3 to 4 times, test consistency
and repeat this process until you reach the
desired consistency.
B. Remember, making small adjustments of 1
to 2 clicks does change the consistency, but it
is necessary to turn the extension handle a couple
of times. Do not go by what is in your collection
container as this will have various consistencies
during this process. Do not overtighten. This will
not allow the media to ow as there needs to be
room between the grinding burrs to allow the
our to escape.
Note: When grinding grain into our, it is
normal to have more our accumulating on
one side of your container versus the other.
2. SECURE THE MILL
A. Bolt your mill down to your work surface
B. You may also use the GrainMaker clamp.
The mill must be secured.
mill details
CUSTOM MOUNTING CLAMP (sold separately)
This custom machined heavy-duty clamp
needs 1” overhang clearance with a thickness
of up to 3”. This clamp is not ideal for those
with rounded or waterfall edge counters.
a
b
c
d
a
b
ab
c
d
a
b
e
F
H
c
d
G
Shaft and Bearing
ASSEMBLY Removal
A. Remove pulley v-belt
ywheel by loosening
the set screw.
B. Remove dust cover and
adjustment knob.
C. Remove rotating front burr and auger.
D. Use a rubber mallet or block of wood placed on the end of
the shaft where the adjustment knob (B) was and tap. The shaft
and bearing assembly will come out on the opposite end where
the pulley v-belt ywheel was.
Note: To replace, do the reverse of the above steps.
GRINDING BURRS
A. Over-tightening the grinding burrs
will not allow media to ow.
B. If the grinding burrs are hot, you may
have the knob too tight. This is common especially
when using your own motor and running it too fast.
CLICK & LOCK ADJUSTMENT KNOB
A. Loosening the knob: Larger gap between burrs = coarser grind.
B. Tightening the knob: Less space between burrs = ner grind.
Note: When you loosen the knob, position the
extension handle and grip to its lowest point. If
you fail to do this, the handle and grip will lose
resistance and rotate quickly towards the base
of the mill. This could harm your ngers or hands.
Hopper Safety Guard
Set Screw
Feeding
Tube
12” V-Belt
Flywheel Pulley
Unstained
Hardwood Grip
Hub
Hopper
Dust Cover
Front Burr
Adjustable
Click & Lock
Knob
Stationary Burr
Grain Breaker Auger
Coil Auger
Shaft
Flange
Storage Post with Clip
4 Pre-drilled ½” Holes
(that use a 3/8” bolt)
Mill Body
Extension
Handle
Bearings
It is normal to nd residual grain left in the mill under the auger
area. The space around the auger allows the handle to rotate
and the grain to be pushed into the burrs.
To disassemble for cleaning:
If your mill is motorized, be sure to unplug from power supply.
1. Remove the dust cover.
2. Unscrew the click & lock adjustable knob, taking care to
hold the burrs together at the bottom with one hand while
unscrewing the knob.
3. Remove the front burr.
4. Remove the auger.
5. Use the provided long cleaning brush and sweep out all
residual grain. You may discard, or simply place it in your
mill or container to be used for your next grind.
6. If you need to remove the stationary burr, use the 1/8” Allen
wrench to loosen and remove the bolts holding the stationary
burr onto the ange.
HINT: For a thorough cleaning after grinding oily materials,
place a clean container under the burrs and run dry grain
through the mill to absorb some of the oily residue, then
disassemble and clean. You may wash the burrs by hand in
soapy water, but you must dry immediately. If you do notice
any rust on your burrs, simply run some wheat or dry grain
through the mill and discard the our.
cleaninG
It is important to clean and maintain your mill according to the
schedule below.
Depending on how often you use your mill, it is important
to follow the recommended monthly cleaning schedule.
RECOMMENDED CLEANING SCHEDULE:
- Average use (10 cups a month): Once a month
- Extra use (30-50 cups a month): Once a week
HINT: If you live in a humid area, you may wish to apply
some olive oil to your burrs and feeding tube between uses.
IMPORTANT! Do not immerse the mill in water. This WILL
damage the bearings and the mill.
cleaninG scHedule
Cleaning
Brush
Provided Large Allen Wrench
HINT: Use the large Allen wrench to
remove the mill from the wooden
shipping base. Then take the bolts
and fasten the handle to the ywheel.
Dust Cover
Bolts

Large Nuts & Legumes
1. It is necessary to use the GrainBreaker auger.
2. Break them into smaller pieces to allow them to fall more
easily into the auger.
3. Nuts need to be lightly toasted in a warm oven to process
nut butter.
4. When grinding nut butter, remove the dust cover.
5. Use a spatula to remove the nut butter that gathers around
the edges of the burrs.
Corn
1. It is necessary to use the GrainBreaker auger.
2. Remove the adjustment knob and front grinding burr and
coarsely crack.
3. The pieces will be large, and you may even notice some
kernels coming through whole.
4. Once you have run the corn through once, depending on
the consistency you desire, you may place the front burr on
with the GrainBreaker auger still in the mill and leave the
knob adjusted on the looser side. Then, place the cracked
corn back into the hopper, and begin grinding.
Oats
1. Toasting raw oats helps to remove any bitterness. This is
very easy to do and requires a short amount of time.
2. Place the oats on a baking sheet (about ¾ of an inch deep)
and bake for 25 minutes at 300 degrees.
3. Cool, then grind.
Speed and moisture
1. Speed and moisture are two main reasons the mill clogs up
when milling.
2. Soft grains like spelt and oats require slow milling.
3. It is important to know the moisture content in your grain as
too much can cause clogging as well. A moisture content of
9% or below is a good rule of thumb.
4. If using your own motor, the mill needs to run under 100 RPM.
Will it Mill it?
Our mills were designed to grind whole grains, coffee, nuts,
seeds and dry, dehydrated vegetables. Items such as mesquite
bean pods and sugars do not process well in our mill. If you
have any questions regarding other foods that you would like
to try in the mill, email us at sales@grainmaker.com.
GrindinG inFormation
Consistency
If the consistency of your grind is not to your liking, then
place the milled product back into the hopper and mill again.
Safety first
1. The mill must be bolted or clamped securely to a work
surface before using, and the hopper safety guard must
be in place.
2. Our shiny red mills and nely crafted accessories are
practically irresistible to children. Get in the habit of
leaving the handle in the upright position, so children
aren’t tempted to reach for it, and please, always
supervise children around the mill.
3. Consumer assumes all risk and responsibility when
operating the mill by hand, bicycle, electric power
or any alternative power method. As the designer
and manufacturer, we reserve the right to make
changes that improve our products. Models and
prices subject to change.

ELECTRIC GEAR MOTOR This gear motor was designed exclusively for GrainMaker mills. Easy conversion with no belts
needed, simply remove the ywheel and slide the motor directly onto the shaft.
BICYCLE KIT Want to make our faster, without electricity? Use pedal power! Our bicycle conversion kit and your geared
bicycle with 26” wheels is the answer.
DIY MOTORIZING KIT Designed for consumers with basic knowledge of mechanics and carpentry. It allows you to convert
your own 1 HP motor that runs around 1725 - 1800 RPM’s. The motor will require a minimum of 200 inch pounds of torque.
EXTENDED WOOD GRIP This grip is designed for customers
that choose to use two hands while turning the hand crank
on the ywheel. It is 10.5” wide compared to the 5”
grip that comes standard with all of our mills.
CUSTOM MOUNTING CLAMP This custom machined
heavy-duty clamp needs 1” overhang clearance
with a thickness of up to 3”. This clamp is not ideal
for those with rounded or waterfall edge counters.
Our accessories are designed and manufactured with the same attention to detail and craftsmanship as your hand-made mill. Photos shown without safety guarding for illustration purposes only.
available accessories
1889 Wild West Co. guarantees this GrainMaker mill to be free
from defects in materials and workmanship under normal
household use and conditions for a lifetime. This Lifetime
Heirloom Guarantee covers all parts including the burrs and
excluding the nish. This Heirloom Guarantee is void if the mill
is used commercially, or in any way other than recommended.
1889 Wild West Co. will repair, or at its discretion, replace
the mill or mill parts free of charge (less shipping), if in the
opinion of the company, it has been proven that the problem
is related to defective parts or an error in workmanship.
MONEY-BACK GUARANTEE: Your mill comes with a 30-day
money-back guarantee. Contact 1889 Wild West Co.
immediately to arrange return and full refund of purchase price
(less shipping), if you are not satised with your purchase. Mill
must be securely packaged and returned in new condition.
REGISTRATION: The Lifetime Heirloom Guarantee registration
card must be completed and mailed to 1889 Wild West Co.,
PO Box 130, Stevensville, MT 59870, within 90 days of receipt
of merchandise. This proof of purchase must be on le with the
company when requesting guarantee service. If you purchase a
mill without a Lifetime Heirloom Guarantee card, please contact
1889 Wild West Co.
SHIPPING DAMAGE: Damage due to shipping should be reported
immediately to 1889 Wild West Co. Limitations: The Lifetime
Heirloom Guarantee is void if the product is used for any other
purpose than that for which it is designed or intended. The
product must not be altered, repaired or serviced by anyone
other than 1889 Wild West Co. The product must not have been
subject to accident or damage in transit, or while in the owner’s
possession misused, abused or operated contrary to the
instructions contained in the instruction manual. This Lifetime
Heirloom Guarantee is valid in all countries. The consumer will
pay postage for repairs.
EXPRESSED OR IMPLIED WARRANTIES:
Except to the extent prohibited by law, no other warranties
whether expressed or implied, including warranty merchantability
and tness for a particular purpose, shall apply to this product.
Under no circumstances shall 1889 Wild West Co. be liable for
consequential damages sustained in connection with said
product. 1889 Wild West Co. neither assumes nor authorizes
any representative or other person to assume for it any obligation
or liability other than such as is expressly set forth. This Lifetime
Heirloom Guarantee covers only the GrainMaker and its specic
parts, not the food or other products processed in it.
PAYMENT AND SHIPPING INFORMATION:
Call 406-777-7096 or 1-855-777-7096 for shipping information.
Make checks payable to: GrainMaker PO Box 130
Stevensville, MT 59870
Heirloom Guarantee

PROUDLY MADE IN STEVENSVILLE, MONTANA
1889 Wild West Co.
PO Box 130
Stevensville, MT 59870
Phone: 406-777-7096
Toll-Free 1-855-777-7096
GrainMaker.com
sales@grainmaker.com
Table of contents
Other Grain Maker Kitchen Appliance manuals

Popular Kitchen Appliance manuals by other brands

Tayama
Tayama TYG-35AF instruction manual

AEG
AEG 43172V-MN user manual

REBER
REBER Professional 40 Use and maintenance

North American
North American BB12482G / TR-F-04-B-NCT-1 Assembly and operating instructions

Presto
Presto fountain popper instruction manual

Westmark
Westmark 1035 2260 operating instructions


