Sovereign AC6060SCGSS User manual

AC6060SCGSS - AC6060SCGW
GAS FREESTANDING
COOKER
USER’S MANUAL

Thank you for choosing this Cookworks appliance. It has been designed to give years of
trouble-free use, provided it is installed and maintained correctly.
Please read these instructions carefully before installing or using your
appliance. It is advisable to keep your purchase and installation receipts
with these instructions in a safe place for future reference. Included is
some important safety information in addition to guidelines and
recommendations which will enable you to take full advantage of all the
functions available.
This quality appliance has been tested and certified to meet all applicable
UK electrical and safety standards.
This appliance must be installed and connected in accordance with
current regulations by a qualified GAS ENGINEER.
After unpacking the appliance ensure that there is no visible damage. If
the appliance has been damaged during transit, do not use it.
Do not attempt to modify the appliance in any way. Do not keep
flammable materials near the appliance while it is operating. If you notice
any damage to the oven you should switch off the unit and contact the
Service Helpline.
Before using the cooker
Remove any packing and protective film and keep this away from
children. Wash the cooker thoroughly with clean warm soapy water.
The first time you use the cooker
Light the oven for approximately 30 minutes at a high temperature and
the grill for 10 minutes to burn off any residues from the manufacturing
Process.
Guarantee
This appliance is guaranteed for one year from date of purchase. Keep your purchase
receipt with these instructions.
To fulfil the conditions of the guarantee this appliance must have been correctly
Installed by a qualified person and operated in accordance with these instructions. The
appliance is intended for domestic uses only.
If the appliance fails to work properly during the first year period
contact the Helpline.
The appliance will be repaired (at the manufacturer ’s discretion)at no cost to you. If the
guarantee has elapsed, you will be given a quotation for any repairs or parts required.
This data and model number together with details of your sales receipt must be quoted
when contacting the Service Helpline. See the data plate inside the oven door aperture.
For Assistance or Service please contact the
Sovereign Service Helpline on 0870-607-7270

CONTENTS:
Section 1. COOKER COMPONENTS
Section 2. INSTALLATION
Section 3. USING THE HOTPLATE
Section 4. USING THE GRILL
Section 5. USING THE OVEN
Section 6. CLEANING AND MAINTENANCE
Section 7. SERVICE
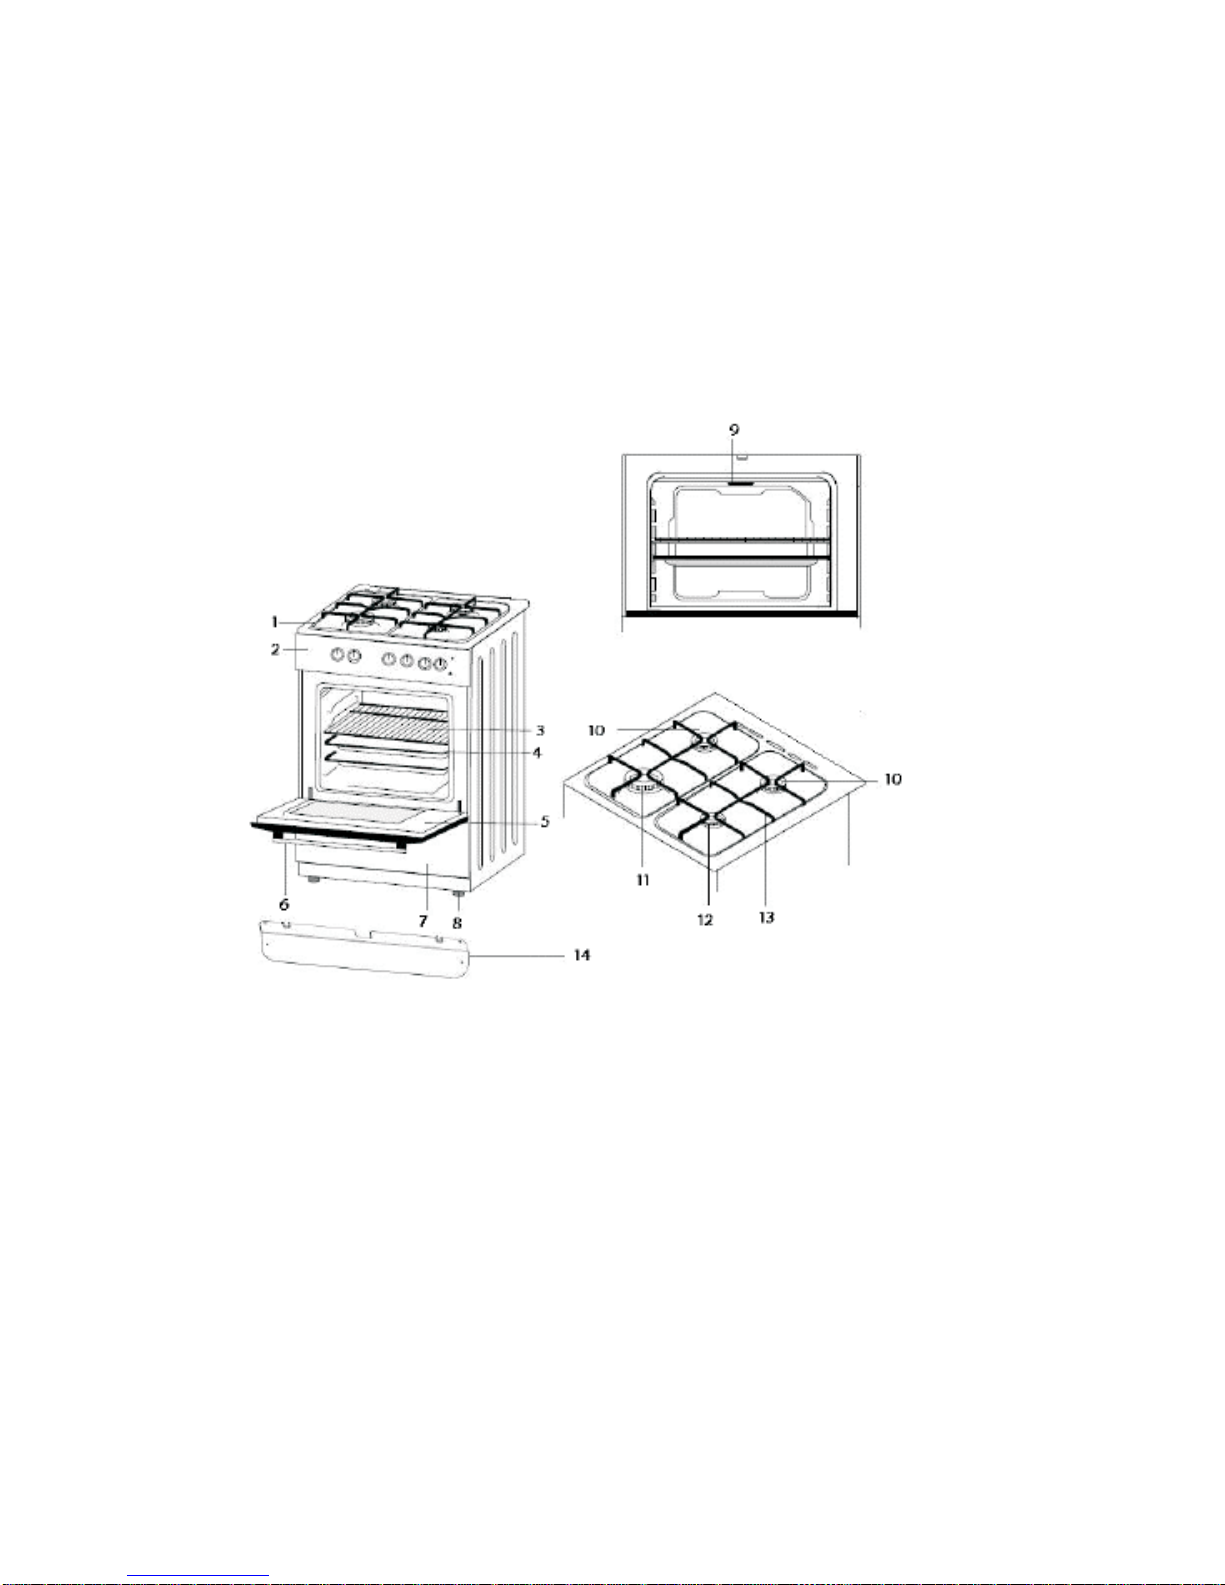
SECTION1: COOKER COMPONENTS
1-Hob
2-Control Panel
3-Wire Grid
4-Oven Tray
5-Oven Door
6-Door Handle
7-Storage Compartment
LIST OF PARTS:
8-Adjsutable Feet
9-Grill Burner
10-Semi-Rapid Burner
11-Rapid Burner
12-Auxillary Burner
13-Pan Support
14-Grill Heat Shield
SECTION 2: INSTALLATION
This appliance must be installed and connected in accordance with
current regulations by a qualified GAS ENGINEER.
2.1. INSTALLATION OF OVEN
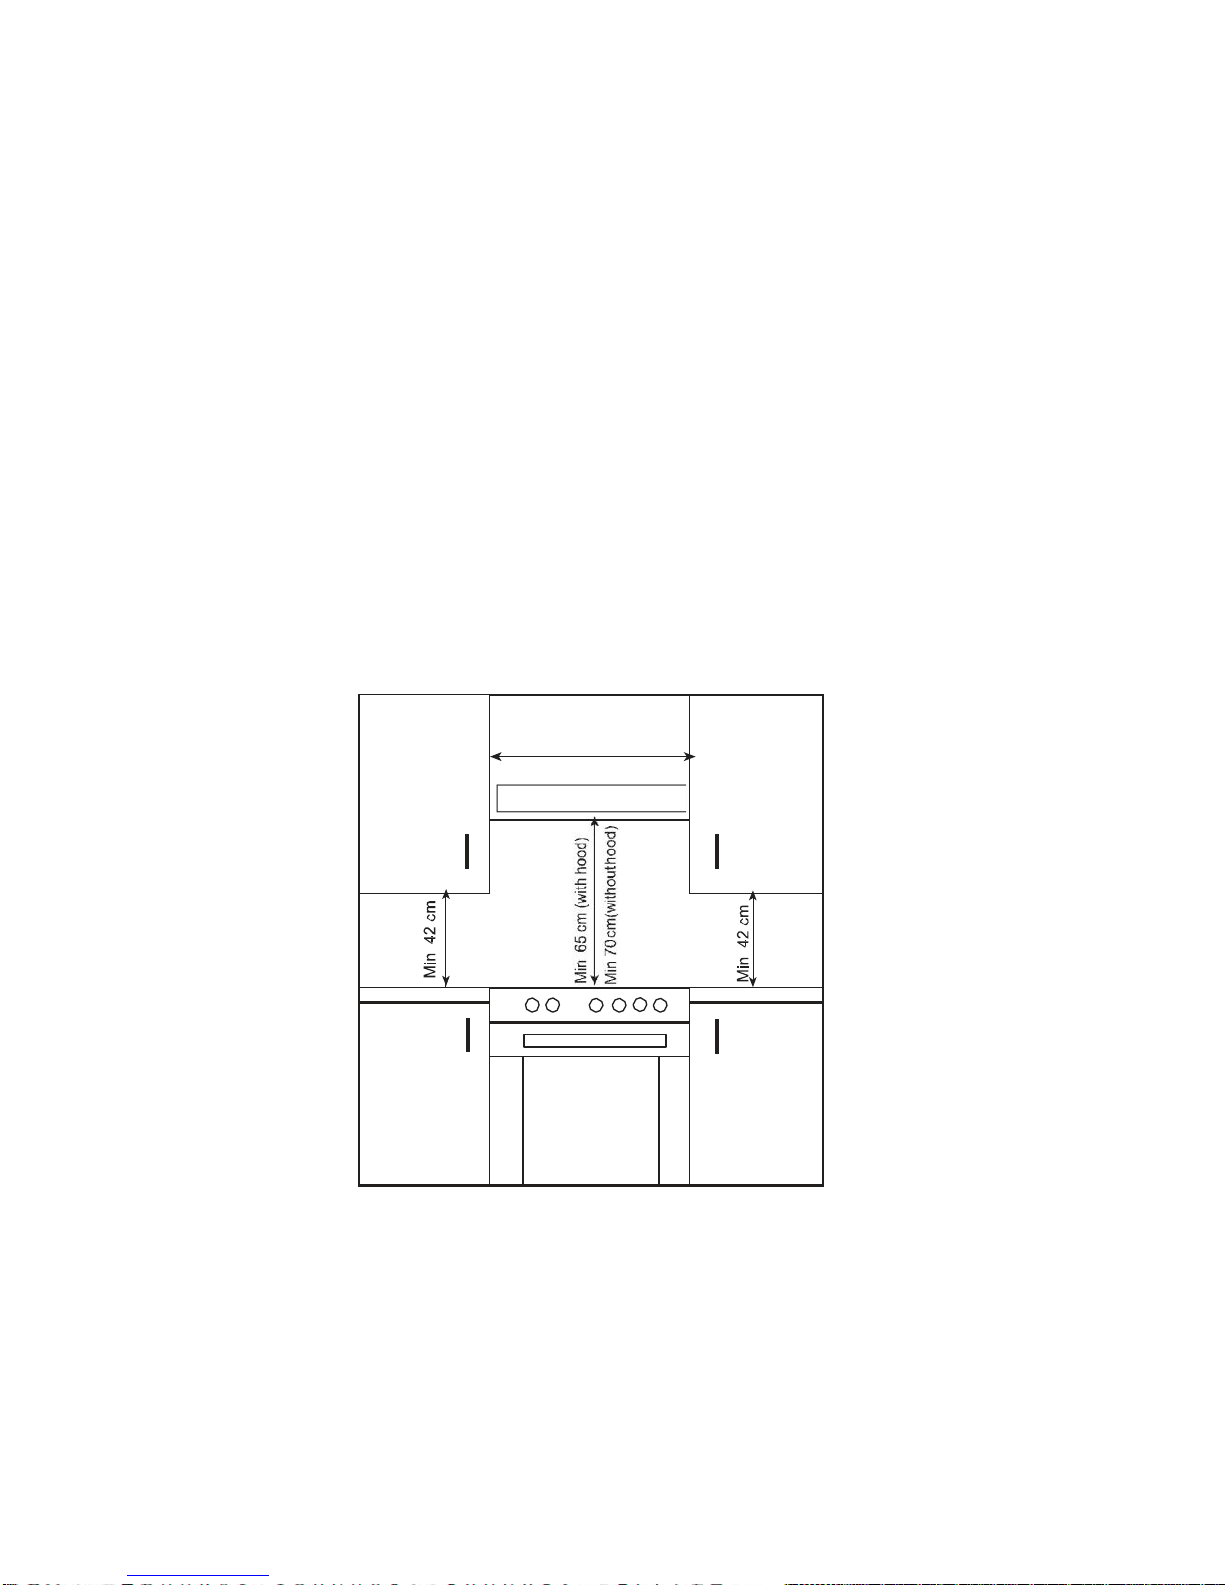
This appliance can be placed next to or in between built-in kitchen
furniture. However, the height of the built-in furniture must not exceed the
height of the cooker hotplate. The furniture adjacent to the oven must be
resistant to temperatures 50 °c higher than the room temperature. Ensure
that there is a minimum of 2cm clear space behind the cooker to allow for
air circulation.
You must allow a minimum height of 650mm between the cooker hotplate
a cooker hood fitted above it. You must not allow fitted wall cupboards to
overhang the area directly above the hotplate. See Figure 1. below.
M in. 60 cm.
C O O K E R H O O D
It is important that this cooker is installed in a room that has adequate
ventilation. You may need a suitable air-brick, cooker hood or extractor to
Your qualified Gas Engineer will advise you.
This appliance requires 2m3/h air per KW input whilst in operation.
The use of a gas cooking appliance results in the production of heat and moisture in
the room in which it is installed. Ensure that the kitchen is well ventilated: keep
natural ventilation open or install a mechanical ventilation device (mechanical
extractor hood) as detailed above.

Prolonged intensive use of the appliance may call for additional ventilation, for example
opening of a window or more effective ventilation, for example increasing the level of
mechanical/electrical ventilation where present.
Your qualified gas engineer will ensure a safe installation, however, if at
a later stage you think you have a gas leak, do not use the cooker, turn
off the gas supply at your meter and contact a Gas Engineer
immediately.
2.2. ADJUSTMENT OF FEET
Your cooker is fitted with 4 adjustable feet. Please ensure that the appliance is level and
secure before first use. You can increase the height by turning the feet clockwise, or vice
versa. You can increase the height of the cooker
2.3. ELECTRICAL CONNECTION
This appliance has been adjusted as appropriate for 220-240 Volts.
This appliance must be earthed.
Connect the appliance using the 13amp plug to an adjacent socket.
The connection cord supplied with the appliance is
equipped with a plug and 3Afuse.
Do not use an extension cable.
2.3. GAS CONNECTION
PLEASE NOTE:
THIS GASAPPLIANCE MUST BE INSTALLED BYA SUITABLY QUALIFIED
GAS ENGINEER. Your engineer will ensure that the appliance is installed
and tested in accordance with the UK standards.
The engineer will ensure that the gas connection is safe and fully tested
for leaks. He/she will also ensure that:
The gas pipe is not allowed to touch HOT surfaces.
The length of hose does not exceed 1.5m.
The hose does not touch sharp or moving objects, is not ruptured, over-
tightened, is not ruptured, over-tightened, over-stretched or damaged in any way.
The gas connection nut of this appliance is equipped with BSP ½” female thread.

SECTION 3: USING THE HOTPLATE
The graphics on each control knob clearly show which gas burner will be operated. Press
in the control knob and turn it to the maximum setting and light with a spark igniter or a
lighted taper. Once the burner is alight turn the control knob to the required setting.
Once you have finished using the burner, turn the control knob off – setting ‘0 ’. Never
use pans with concave or convex bottom surfaces.
SECTION 4: USING THE GRILL
The grill only has one heat setting, it creates heat at a constant rate. Press the oven
control knob and turn it clockwise to the grill setting and light the grill (situated in the top
of the oven)with a spark igniter or lighted taper. As the grill valve is equipped with a
Flame Failure Device (FFD),you should keep the knob pressed for 3-5 seconds. Once
you finished using the grill turn the control knob anti-clockwise back to the off position
–marked ‘0 ’.
Please note:
Whilst grilling, you must fit the Heat Deflector plate (supplied with your cooker) to ensure
that the control knobs do not get discoloured and/or damaged. Before you grill fit the
Heat Deflector to the underside of the fascia panel. The two slots in the panel align up
with the two screws/washers on the underside of the fascia panel. Carefully slide the
deflector in place above the screws/washers. If the screws are too tight, simply slacken
them off half a turn with a screwdriver.
Assembling Grill Heat Shield
G ril l h ea t s h iel d was h e rs SE E D E T A IL A D E TA IL A
Open the oven door and put the grill heat shield under the control panel using grill heat
shield washers as shown above.
Finally close the door up to it reaches to the grill heat shield
as shown above.

WARNING: The Heat Deflector will get hot whilst you are using the grill,
leave it to cool down before removing.
CAUTION:
ACCESSIBLE PARTS MAY BE HOT WHEN THE GRILL IS IN USE.
YOUNG CHILDREN SHOULD BE KEPT AWAY.
SECTION 5: USING THE OVEN
To light the gas oven, open the oven door, push in and turn the oven control knob
anti- clockwise to the minimum temperature setting and then hold a lighted taper or
spark igniter near the small hole towards the front- left corner of the oven base plate.
As the oven burner is equipped with a Flame Failure Device (FFD), you should keep
the knob pressed for 3-5 seconds. Once the oven burner is alight, turn the oven
control knob to the required temperature setting.
The heat settings are as follows:
Minimum. 145oC
Position 3. 190oC
Position 5. 220oC
Position 7. 250oC
Maximum. 290oC
If you use accessories other than trays or shelves supplied with this cooker, please
ensure that you only use baking/cooking trays and dishes that are oven proof.
Both the oven burner and the grill burner are equipped with a flame failure device
(FFD), regardless of the model you purchase.
For any gas burner, if the burner has not lit after 15 seconds, stop operating the
device, wait at least 1 minute before attempting a further ignition of the burner. In the
event of the burner flames being accidentally extinguished, turn off the burner control
and do not attempt to re-ignite the burner for at least one minute. For the oven /grill
compartment, open the oven door and wait for 90 seconds before re-ignition.
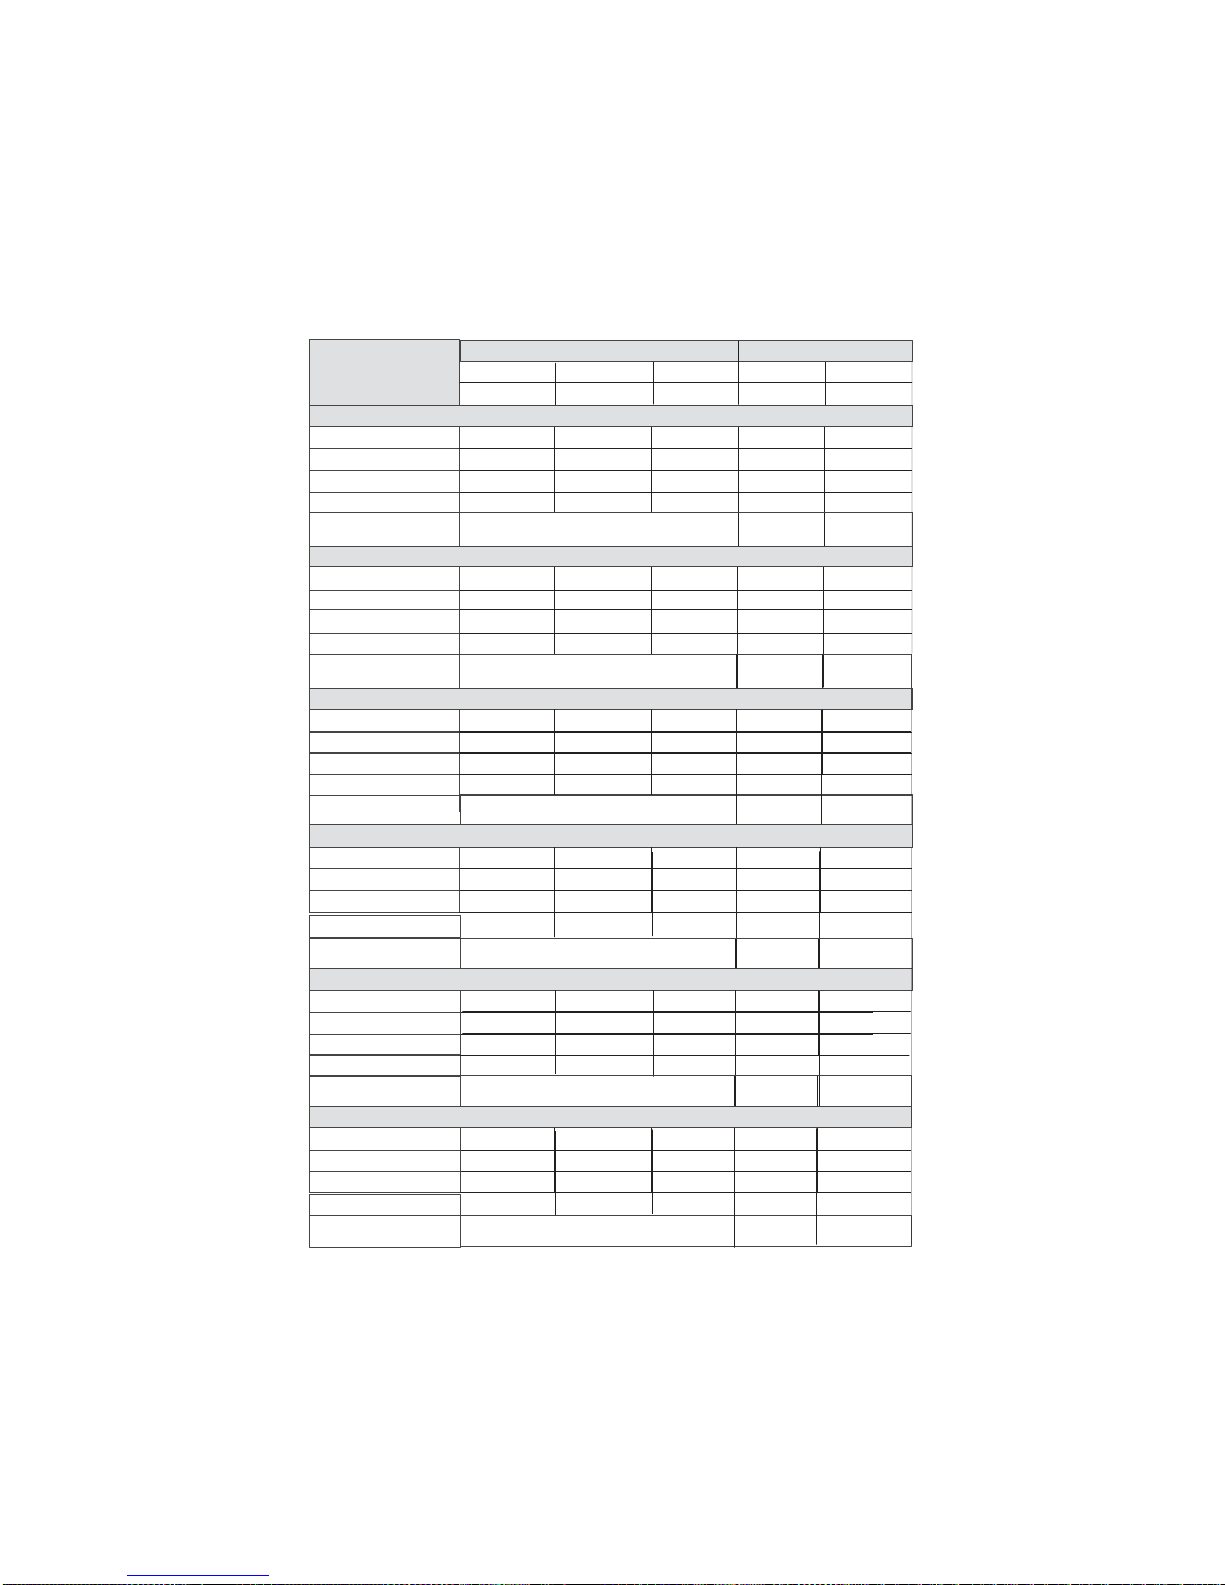
RAPID BURNER
Injector diam.(%mm)
85
85
75
115
125
Nominal Rating (kw)
3
3
3
3
3
Min. Rating (kw)
0.85
0.85
1.23
0.7
0.82
Consumption in 1h
218.13 gr/h
214.28 gr/h
218.13 gr/h
Consumption in 1h
(at 150C and 1013mbar press)
285.7 lt/h
332.2 lt/h
AUXILLARY BURNER
Injector diam.(%mm)
50
50
43
72
72
Nominal Rating (kw)
1
1
1
1
1
Min. Rating (kw)
0.4
0.4
0.5
0.3
0.3
Consumption in 1h
72.71 gr/h
71.42 gr/h
72.71 gr/h
Consumption in 1h
127.25 gr/h
125 gr/h
127.25gr/h
Consumption in 1h
166.66 lt/h
193.79 lt/h
Consumption in 1h
(at 150C and 1013mbar press)
361.9 lt/h
420.82
OVEN BURNER
Injector diam.(%mm)
76
76
68
120
120
Nominal Rating (kw)
2.8
2.8
2.8
2.8
2.8
Min. Rating (kw)
1.4
1.4
1.4
1.4
1.4
G30
28-30 mbar
LPG
G31
28-30/37 mbar G30
50 mbar
NG
G20
20 mbar G25
25 mbar
Consumption in 1h
(at 150C and 1013mbar press)
95.24 lt/h
110.74 lt/h
MEDIUM BURNER
Injector diam.(%mm)
65
65
58
97
94
Nominal Rating (kw)
1.75
1.75
1.75
1.75
1.75
Min. Rating (kw)
0.65
0.65
0.65
0.495
0.495
(at 150C and 1013mbar press)
WOK BURNER
Injector diam.(%mm)
98
98
77
135
148
Nominal Rating (kw)
3.8
3.8
3.8
3.8
3.8
Min. Rating (kw)
1.55
1.55
1.9
1.7
1.6
Consumption in 1h 276.3 gr/h 271.42 gr/h 276.3 gr/h
lt/h
Consumption in 1h 203.6 gr/h 200 gr/h 203.6 gr/h
Consumption in 1h
(at 150C and 1013mbar press)
266.7 lt/h
310.1 lt/h
GRILL BURNER
Injector diam.(%mm)
68
68
62
110
110
Nominal Rating (kw)
2.2
2.2
2.2
2.2
2.2
Min. Rating (kw)
--
--
--
--
--
Consumption in 1h
Consumption in 1h
(at 150C and 1013mbar press)
160 gr/h 157.14 gr/h 160 gr/h
209.5 lt/h 243.6 lt/h

SECTION 6: CLEANING AND MAINTENANCE
Always ensure that your cooker is completely cool and switched off at the electricity
supply before carrying out cleaning.
Always clean away food and liquid spills from the hotplate as soon as possible – do
not allow spills to harden off.
Exterior and interior areas of the cooker should be washed with warm soapy water
and/or mild cream detergents.
Use glass cleaner to clean the interior/exterior of the glass door.
NEVER USEABRASIVE DETERGENTS OR WIRE WOOL TO CLEAN AREAOF
YOUR COOKER.
SECTION 7: SERVICE
If you require further advice or assistance, please phone
our Service Helpline on 0870-607-7270

The symbol on the product or on its packaging indicates that this
product may not be treated as household waste. Instead it shall be
handed over to the applicable collection point for the recycling of
electrical and electronic equipment. By ensuring this product is
disposed of correctly, you will help prevent potential negative
consequences for the environment and human health, which could
otherwise be caused by inappropriate waste handling of this
product. For more detailed information about recycling of this
product, please contact your local city office, your household waste
disposal service or the shop where you purchased the product.
This manual suits for next models
1
Table of contents


