Sovereign M1Q-DD7-55BD User guide

450W JIGSAW
Item No. 594446
Model No. M1Q-DD7-55BD
HHGL Limited, MK9 1BA; HHGL (ROI) Limited, D02 X576 Mar 21
ORIGINAL INSTRUCTION MANUAL
Please read these instructions fully before starting assembly.
www.coreservice.co.uk
Technical Support & Parts
01904 727509
Mon-Fri 9am-5pm Sat-Sun 11am-4pm

2
CONTENTS
Contents 2
General safety warnings 3
Warning symbols 10
In the box 11
Operation 12
Maintenance and storage 16
Technical data 17
Recycling and disposal 19
UK plug 19
Getting help 20
Warranty 20

3
GENERAL SAFETY INFORMATION
WARNING! Read all safety warnings,
provided with this power tool.
Failure to follow all instructions listed below
injury.
Save all warnings and instructions for future
reference.
The term "power tool" in the warnings refers to your
mains-operated (corded) power tool or battery-
operated (cordless) power tool.
1) Work area safety
a. Keep work area clean and well lit. Cluttered or
dark areas invite accidents.
b. Do not operate power tools in explosive
atmospheres, such as in the presence of
flammable liquids, gases or dust. Power tools
create sparks which may ignite the dust or fumes.
c. Keep children and bystanders away while
operating a power tool. Distractions can cause
you to lose control.
2) Electrical safety
a. Power tool plugs must match the outlet. Never
modify the plug in any way. Do not use any
adaptor plugs with earthed (grounded) power

4
tools. Unmodified plugs and matching outlets will
reduce risk of electric shock.
b. Avoid body contact with earthed or grounded
surfaces, such as pipes, radiators, ranges and
refrigerators. There is an increased risk of electric
shock if your body is earthed or grounded.
c. Do not expose power tools to rain or wet
conditions. Water entering a power tool will
increase the risk of electric shock.
d. Do not abuse the cord. Never use the cord for
carrying, pulling or unplugging the power tool.
Keep cord away from heat, oil, sharp edges
or moving parts. Damaged or entangled cords
increase the risk of electric shock.
e. When operating a power tool outdoors, use an
extension cord suitable for outdoor use. Use of
a cord suitable for outdoor use reduces the risk of
electric shock.
f. If operating a power tool in a damp location
is unavoidable, use a residual current device
(RCD) protected supply. Use of an RCD reduces
the risk of electric shock.
3) Personal safety
a. Stay alert, watch what you are doing and
use common sense when operating a power
tool. Do not use a power tool while you are
tired or under the influence of drugs, alcohol

5
or medication. A moment of inattention while
operating power tools may result in serious
personal injury.
b. Use personal protective equipment. Always
wear eye protection. Protective equipment, such
as a dust mask, non-skid safety shoes, hard hat, or
hearing protection used for appropriate conditions
will reduce personal injuries.
c. Prevent unintentional starting. Ensure the
switch is in the 'off' position before connecting
to power source and/or battery pack, picking
up or carrying the tool. Carrying power tools
with your finger on the switch or energising power
tools that have the switch on invites accidents.
d. Remove any adjusting key or wrench before
turning the power tool on. A wrench or a key left
attached to a rotating part of the power tool may
result in personal injury.
e. Do not overreach. Keep proper footing and
balance at all times. This enables better control
of the power tool in unexpected situations.
f. Dress properly. Do not wear loose clothing or
jewellery. Keep your hair, clothing and gloves
away from moving parts. Loose clothes, jewellery
or long hair can be caught in moving parts.
g. If devices are provided for the connection of
dust extraction and collection facilities, ensure
these are connected and properly used. Use of
these devices can reduce dust-related hazards.

6
h. Do not let familiarity gained from frequent use
of tools allow you to become complacent and
ignore tool safety principles. A careless action
can cause severe injury within a fraction of a
second.
4) Power tool use and care
a. Do not force the power tool. Use the correct
power tool for your application. The correct
power tool will do the job better and safer at the
rate for which it was designed.
b. Do not use the power tool if the switch does
not turn it on and off. Any power tool that cannot
be controlled with the switch is dangerous and
must be repaired.
c. Disconnect the plug from the power source
and/or the battery pack from the power tool
before making any adjustments, changing
accessories, or storing power tools. Such
preventive safety measures reduce the risk of
starting the power tool accidentally.
d. Store idle power tools out of the reach of
children and do not allow persons unfamiliar
with the power tool or these instructions
to operate the power tool. Power tools are
dangerous in the hands of untrained users.
e. Maintain power tools. Check for misalignment
or binding of moving parts, breakage of parts
and any other condition that may affect the
power tools operation. If damaged, have the

7
power tool repaired before use. Many accidents
are caused by poorly maintained power tools.
f. Keep cutting tools sharp and clean. Properly
maintained cutting tools with sharp cutting edges
are less likely to bind and are easier to control.
g. Use the power tool, accessories and tool bits,
etc., in accordance with these instructions,
taking into account the working conditions and
the work to be performed. Use of the power tool
for operations different from those intended could
result in a hazardous situation.
h. Keep handles and gripping surfaces dry, clean
and free from oil and grease. Slippery handles
and gripping surfaces do not allow for safe
handling and control of the tool in unexpected
situations.
5) Service
a) Have your power tool serviced by a qualified
repair person using only identical replacement
parts. This will ensure that the safety of the power
tool is maintained.

8
ADDITIONAL SAFETY WARNINGS FOR JIGSAWS
a. Hold the power tool by insulated gripping
surfaces, when performing an operation where
the cutting accessory may contact hidden
wiring. Cutting accessory contacting a “live “wire
may make exposed metal parts of the power tool
“live” and could give the operator an electric shock.
b. Use clamps or another practical way to
secure and support the workpiece to a stable
platform. Holding the workpiece by hand or
against your body leaves it unstable and may lead
to loss of control.
c. Keep hands away from the sawing range. Do
not reach under the workpiece. Contact with the
saw blade can lead to injuries.
d. Apply the machine to the workpiece only
when switched on. Otherwise there is danger
of kickback when the cutting tool jams in the
workpiece.
e. When sawing, the base plate must always
face against the workpiece. The saw blade can
become wedged and lead to loss of control over
the machine.
f. When the cut is completed, switch off the
machine and then pull the saw blade out of the
cut only after it has come to a standstill. In this
manner, you can avoid kickback and can put down
the machine securely.

9
g. Use only undamaged saw blades that are in
perfect condition. Bent or dull saw blades can
break, negatively influence the cut, or lead to
kickback.
h. Do not brake the saw blade to a stop by
applying side pressure after switching off.
The saw blade can be damaged, break or cause
kickback.
i. Do not support the workpiece with your hand
or foot. Do not touch objects or the floor with the
saw running: Danger of kickback.
j. Use suitable detectors to determine if utility
lines are hidden in the work area or call the
local utility company for assistance. Contact
with electric lines can lead to fire and electric
shock. Damaging a gas line can lead to explosion.
Penetrating a water line cause property damage or
may cause an electric shock.
k. When working with the machine, always hold
it firmly and provide a secure stance.

10
WARNING SYMBOLS
Warning!
Read the instructions
Wear ear protection
Wear eye protection
Wear a dust mask
Class II tool
The product complies with the applicable European
directives, and an evaluation method of conformity
for these directives was done.
Recycle unwanted materials instead of disposing
of them as household waste. All tools, hoses
and packaging should be sorted, taken to the
local recycling centre and disposed of in an
environmentally safe way.
The product complies with the applicable UK
directives, and an evaluation method of conformity
for these directives was followed.

11
IN THE BOX
Description
1.
2.
3.
4.
5.
6.
7.
8.
9.
10.
11.
Accessories
11
12
OPERATION
NOTE: Before using the tool, read the
instruction book carefully.
Intended Use
The machine is intended for sawing wood, plastic, metal and
building materials while resting firmly on the workpiece. It is
suitable for straight and curved cuts with bevel angles to 45°.
The saw blade recommendations are to be observed.
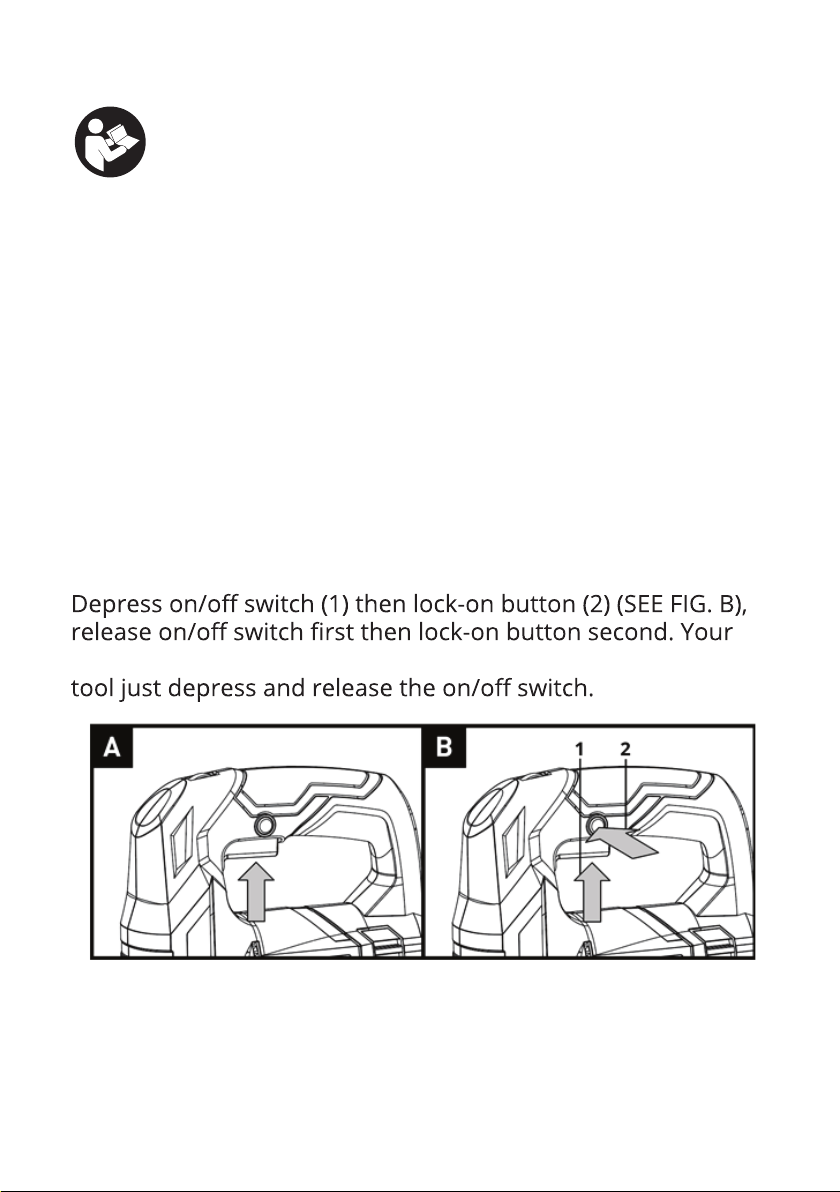
1. ON/OFF SWITCH
Depress to start, and release to stop your tool. (SEE FIG. A)
2. SWITCH LOCK-ON BUTTON
switch is now locked on for continuous use. To switch off your
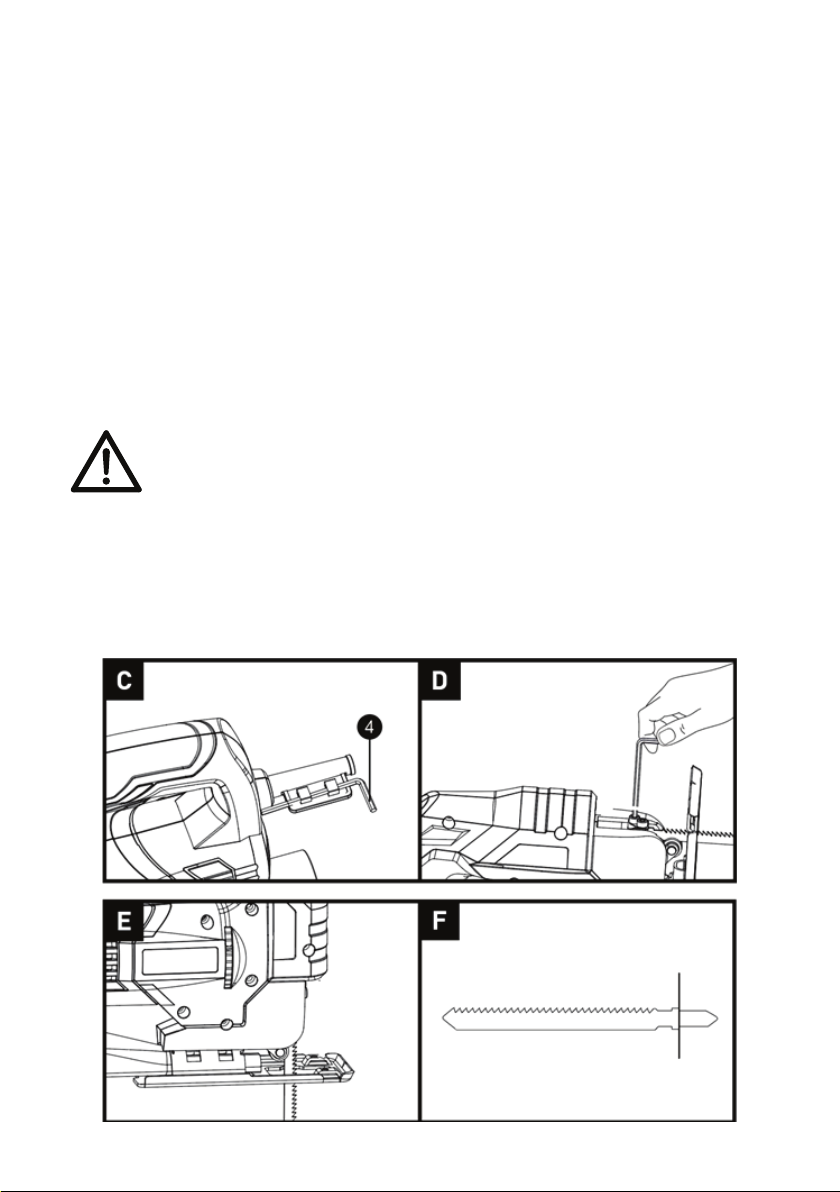
3. ALLEN KEY STORAGE
The Allen key is located at the power cable sheath (SEE FIG. C).
13
4. BLADE FITTING (SEE FIG. D)
NOTE: Remove the plug from the socket before carrying out
any adjustment, servicing or maintenance.
To fit the blade, firstly raise the finger protection and use the
Allen key provided to loosen the blade set screws on the blade
holder. The blade’s cutting edge should be facing forward.
Insert the blade’s mounting portion into the groove in the
blade holder until it touches the bottom of the holder. Then
firmly tighten the set screw, as shown in Fig. D.
NOTE: To fit the blade firmly, do not insert the blade over the
line (SEE FIG. F).
WARNING! Blade teeth are very sharp. For best
cutting results, ensure you use a blade suited to the
material and cut quality you need.
5. ROLLER GUIDE (SEE FIG. E)
Ensure the blade is located and runs smoothly in the groove
(SEE FIG. E).
14
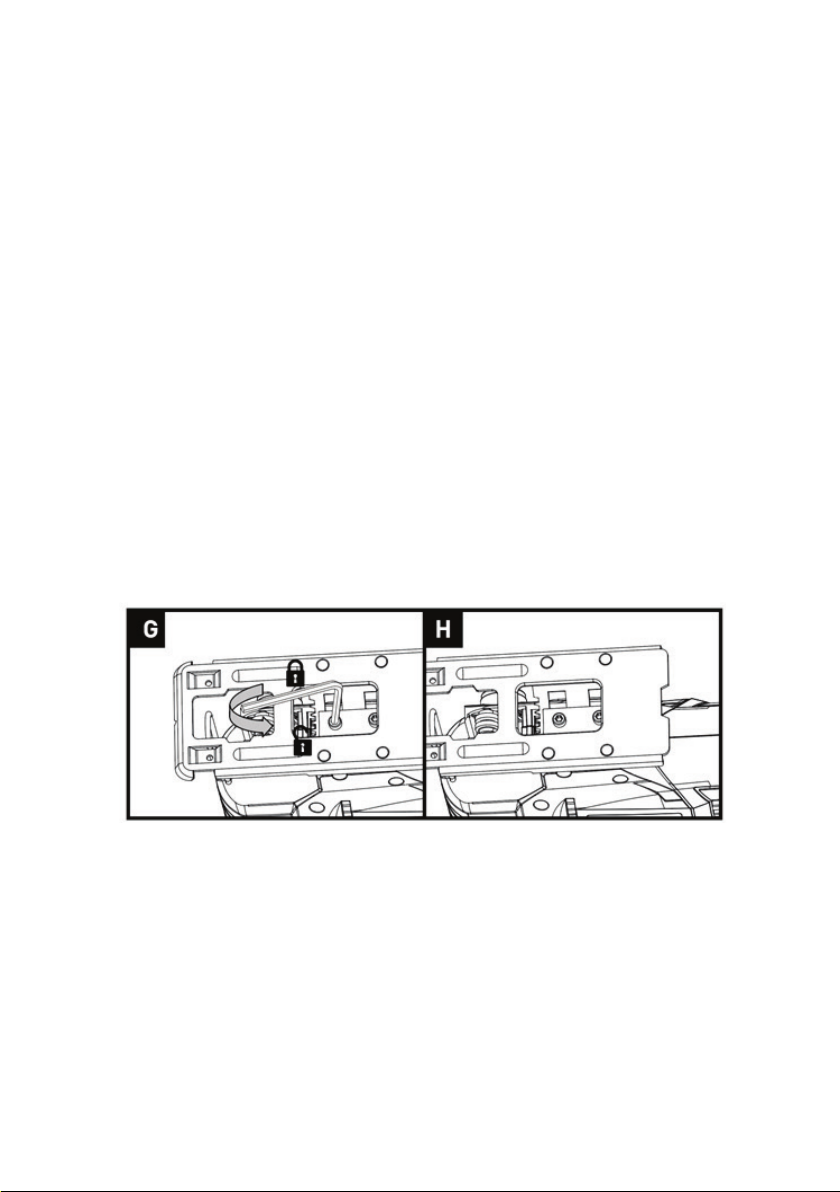
6. BASE PLATE ANGLE ADJUSTMENT
Adjusting the angle of the base plate enables bevel cutting.
The base plate must always be held firmly against the
materials being cut to reduce saw vibration, blade jumping or
blade breakage.
Use an Allen key (4). Loosen the bolts securing the base plate
(SEE FIG. G). For preset angles, rotate so the lines of the angle
on the base plate and angle plate (8) superposition at the
desired angle (0°, 15°, 30°, 45°) (SEE FIG. H). For other mitre
angles, rotate to your desired angle (use a protractor scale).
Following one of the above procedures, hold the base plate in
position and firmly tighten the bolts to clamp the base plate at
that angle. Finally, check the angle and ensure the base plate
is firmly clamped. The angle markings on the base plate are
accurate for most general purposes, but it is recommended
for accurate work to set the angle with a protractor and make
a test cut on other material.

15
7. DUST TUBE (SEE FIG. I)
Mount the dust tube (5) into the opening of the base plate
(6). Make sure that the plastic tip of the vacuum connection
engages into the corresponding opening on the housing (as
shown in the figure I).
8. METAL CUTTING
Use a finer tooth blade for ferrous metals, and a coarse tooth
blade for non-ferrous metals.
When cutting thin sheet metals, always clamp wood on both
sides of the sheet to reduce vibration or tearing of the sheet
metal. Both wood and sheet metal must be cut. Do not force
the cutting blade when cutting thin metal or sheet steel, as
they are harder materials and will take longer to cut. Excessive
blade force may reduce the life of the blade or damage
the motor. To reduce heat during metal cutting, add a little
lubricant along the cutting line.

16
MAINTENANCE AND STORAGE
IMPORTANT:
Make sure that the tool has been thoroughly cleaned
before storing it in a clean, dry and safe place, out of
the reach of children.
1. Switch the product 'OFF' and disconnect it from the power
supply before transporting it anywhere.
2. Always carry the product on its gripping surfaces.
3. Protect the product from any heavy impact or strong
vibrations which may occur during transportation in
vehicles.
4. Secure the product to prevent it from slipping or falling
over.

17
TECHNICAL DATA
Model M1Q-DD7-55BD
No-load speed
Max. cutting depth 55mm wood, 6mm metal
Protection class
Weight 1.7kg
Noise and vibration data
A weighted sound pressure (LpA) 90 dB(A), k=3dB(A)
A weighted sound power (LwA) 101 dB(A), k=3dB(A)
Vibrations ah,B
2 2
ahM
2 2
The sound intensity level for the operator may exceed 80
dB(A) and ear protection measures are necessary.
The declared vibration value has been measured in
accordance with a standard test method (according to EN
62841) and may be used for comparing one product with
another. The declared vibration value may also be used in a
preliminary assessment of exposure.
WARNING!
The vibration emission value during actual use of
the power tool can differ from the declared value
depending on the ways in which the tool is used and
dependant on the following examples and other
variations on how the tool is used:
How the tool is used and the materials being cut or
drilled.
The tool being in good condition and well maintained.
The use the correct accessory for the toolandensuring
it is sharp and in good condition.
The tightness of the grip on the handles and if any
anti-vibration accessories are used.
18
And the tool is being used as intended by its design
and these instructions.
This tool may cause hand-arm vibration syndrome
if its use is not adequately managed.
WARNING! To be accurate, an estimation of exposure
level in the actual conditions of use should also take
account of all parts of the operating cycle, such as
the times when the tool is switched off and when it is
running idle but not actually doing the job. This may
significantly reduce the exposure level over the total
working period.
Helping to minimise your vibration exposure risk.
Maintain this tool in accordance with these instructions
and keep well lubricated (where appropriate).
If the tool is to be used regularly then invest in anti-
vibration accessories.
Plan your work schedule to spread any high vibration
tool use across a number of days.

19
RECYCLING AND DISPOSAL
Waste electrical products should not be disposed with
household waste. Please recycle where facilities exist.
Check with your local authority or retailer for recycling
advices.
UK PLUG
instructions below.
IMPORTANT: The wires in the mains lead are coloured in
accordance with the following code: Blue–Neutral, Brown–Live
WARNING! Never connect live or neutral wires to the
BS1363/A plug and the correct rated fuse.
As the colours of the wire in the mains lead of this product
may not correspond with the coloured markings identifying
the terminals in your plug, proceed as follows: The blue wire
must be connected to the terminal marked N or coloured
black. The brown wire must be connected to the terminal
marked L or coloured red.
5

20
GETTING HELP
Our dedicated UK-based customer helpline is open 7 days a
week to assist you with assembly, parts queries and technical
are here to get you back enjoying your garden in no time.
For useful assembly, starting and maintenance videos, and
ordering spares, please visit www.coreservice.co.uk.
WARRANTY
This product is covered by a 1 year warranty.
The warranty covers any manufacturing defect in materials,
Any claim under this warranty must be made by going to your
nearest Homebase store, taking your proof of purchase with
you, and claims must be made within 12 months of the date
of purchase.
under the Consumer Rights Act 2015.
This warranty is given by HHGL Limited, MK9 1BA; HHGL (ROI)
Limited, D02 X576.
Please note: This warranty does not apply to products
misused or neglected and only covers domestic use. It does
not apply to commercial use of the product. In addition, the
warranty will be void for the following reasons: Any damage
resulting from product misuse or product neglect.
This manual suits for next models
1
Table of contents
Other Sovereign Power Tools manuals


