Space-Ray 600 User manual
®
INSTALLATION MANUAL
Electric Radiant Heat Panel
Model Panel
Please note:
Panel heaters are designed and manufactured for indoor use only and
should be used in conjuncon with energy saving controls to comply
with EU2015/118.

Content
1. Important 3
2. Introducon 4
3. Specicaon 4
3.1 Dimensions 4
4. Installaon 4
4.1 Mounng 4
4.1.1 Wall mounng 4
4.1.2 Ceiling mounted 5
4.1.3 Fied within a suspended/false ceiling 6
5. Operaon 7
5.1 Safety 7
6. Maintenance 7
6.1 Cleaning 7
7. Recycling Informaon 7

1. Important
When using Spaceray electric heaters, basic
precauons should always be followed to reduce the risk
of re, electric shock, and injury to persons, including the
following:
Read all instrucons before using this heater.
• Before using this appliance:
- Check that the voltage indicated on the type
plate corresponds to the mains supply voltage.
- Ensure that the heater has been securely
fastened in its nal mounng posion.
• Do not locate the heater immediately below a
socket outlet.
• This appliance can be used by children aged from
8 years and aboveand persons with reduced
physical, sensory or mental capabilies or lack
of experience and knowledge if they have been
given supervision or instrucon concerning use
of the appliance in a safe way and understand the
hazards involved. Children shall not play with the
appliance. Cleaning and user maintenance shall
not be made by children without supervision.
• Children of less than 3 years should be kept away
unless connually supervised.
• Children aged from 3 years and less than 8 years
shall only switch on/o the appliance provided
that it has been placed or installed in its intended
normal operang posion and they have been
given supervision or instrucon concerning use
of the appliance in a safe way and understand the
hazards involved. Children aged from 3 years and
less than 8 years shall not plug in, regulate and
clean the appliance or perform user maintenance.
• CAUTION Some parts of the product can become
very hot and cause burns. Parcular aenon has
been given where children and vulnerable people
are present.
• Disconnect pole switch from the hard wired circuit
during installaon, cleaning and always ensure
that the heater is cool.
• Do not use an extension cord with this product be-
cause the extension cord may overheat and cause
a risk of re.
• Keep the mains supply cord away from the body of
the heater which will get hot during use.
• Arrange the mains supply cord so it cannot be
tripped over or damaged.
• Do not cover or obstruct the heater while it is in
use.
• Do not place material or garmets on the heater, or
obstruct the air circulaon around the heater, for
instance by curtains or pushing furniture against
the heater when wall mounted, as this could cause
overheang and a re risk. The heater must be
visible to heat the space
• Do not install less than the minimum mounng
distance from the oor.
• WARNING: This heater should only be installed
indoors with a thermostat device to control the
room temperature and operated by users capable
of using the device. Do not use this heater in small
rooms when they are occupied by persons not
capable of leaving the room on their own, unless
constant supervision is provided.
• Note that due care and consideraon must
be taken when using this heater in series with
a thermal control, a program controller, a mer
or any other device that switches on the heat
automacally, since a re risk exists when the
heater is accidentally covered or displaced.
• This heater is for indoor use only - do not install
outdoors or near to a swimming pool. Never locate
the heater where it may fall into a bathtub or
other water container.
• IMPORTANT If the heater is installed in a room
containing a bath or shower, it must be posioned
so the heater or controller device cannot be
touched by a person using a bath or shower.
• This heater is not suitable for hazardous locaons.
• WARNING: The supply cord cannot be replaced.
If the cord is damaged the appliance should be
scrapped.
• CAUTION: All installaons must be in accordance
with the latest electrical safety regulaons. If in
any doubt, please consult a suitably qualied
electrician.
• NOTE: When hard wiring, a double pole switch
with a 3.0mm contact disconnecon should be
ed.
• WARNING: This appliance must be earthed and
connected to a supply that is earthed!
IMPORTANT:
SAVE THESE INSTRUCTIONS FOR FUTURE USE.
CAUTION!
CAUTION!
WARNING!
WARNING!
IMPORTANT!
CAUTION!
WARNING!
NOTE!
IMPORTANT!

The Panel range of heaters contain no serviceable parts
and are designed for indoor use only.
future reference.
3.1 Dimensions
All Panel models are ed with a mains supply cable,
therefore it is unnecessary to open the heater body to
carry out installaon of this product.
The wires in the mains cord are coloured in accordance
with the following:-
Blue - Neutral
Brown - Live
Green/Yellow - Earth
CAUTION: All installaons must be in accordance with
the latest electrical safety regulaons.
NOTE: When hard wiring, a large double pole switch with
a 3.0mm contact disconnecon should be ed.
NOTE: When installing the heater indoors it should be
connected to a suitable thermostat device.
NOTE: It using a RCD where applicable is recommended
The heater must be posioned with respect to the
minimum clearances shown in Fig. A and all cauons,
notes & warnings on pages 3 and 4 adhered to.
1. Idenfy where you wish to posion the heater and
whether it will be in a portrait or landscape orien-
taon then place the paper template on the wall
for the hole posions or see diagram over page.
2. Select the dimensions for the heater model you
are installing and using a pen, press through the
hole centres on the template to mark the wall.
Note, there is a 15mm drop from engagement
holes on the brackets to the top hanging edges so
allow for this.
3. Drill the mounng holes, insert wall anchors and
t the screws (not provided) and leave protruding
approx. 5mm for the heater to hang on. Note. the
slots on the back of the heater are 6mm wide so
select screws which have a head larger than 6mm
to ensure the heater remains capve and doesn’t
fall o the wall.
4. Locate the slots on the back of the panel heater
and hang in on all four screws with the cable exit-
ing the heater downwards.
Model 600 900 1200
kW 230V N & E 1Ph 50Hz
Power W325 520 700
Current A 1.4 2.3 3.0
IP24
Weight kg 3.1 4.9 5.3
Table 1 - Technical Spec
CAUTION
Always isolate the heater from the mains supply when
mounng or adjusng the heater posion.
A
B
C
D
E F
Rear View
38mm 27mm
Side View
Models A B C D E F
600 595 595 82 432 82 432
900 595 895 82 732 82 432
1200 595 1195 82 1032 82 432
CAUTION!
NOTE!
NOTE!
NOTE!
Table 2 - Dimensions

• The heat panels are suitable for ceiling mounng
with the oponal ceiling mounng brackets availa-
ble from Space-Ray. Note. it can also be hung from
chains or suspension wires (source separately).
• The heater must be posioned with respect to the
minimum clearances shown in Fig. D.
1. Idenfy where you wish to posion the heater and
place the paper template on the wall for the hole
posions of the ceiling mounng brackets or refer
to the dimensions over the page.
2. Select the dimensions for the heater model you
are installing and using a pen/pencil, press through
the hole centres on the template to mark the wall.
3. Drill the mounng holes, insert suitable wall
anchors and screws (not provided). Note. plaster-
board screws are not adequate! Refer to the speci-
caon table on page 4 for weights of the heaters.
4. Assembly the le and right ceiling mounng brack-
ets (hook proles to be outside of heater) to the
joining brace as shown Fig. E & F using the nuts
and washers provided.
5. Fit the ceiling mounng bracket assembly to the
ceiling in the mounng holes (Fig. G) and it is rec-
ommended addional xings are put in the sloed
secons into ceiling joists.
6. Take the heat panel and oer it up to the hooks
placing them through the body bracket slots and
sliding along unl it stops then gently lower to
ensure all four corners are capve.
7. Ensure the mains supply cord does not rest on the
heater.
Fig. A
Fig. B
Minimum
150mm
Minimum
150mm
Fig. C
CAUTION
Always isolate the heater from the mains supply when
mounng or adjusng the heater posion.
Fig. D
Minimum
150mm
Minimum
150mm
Fig. E

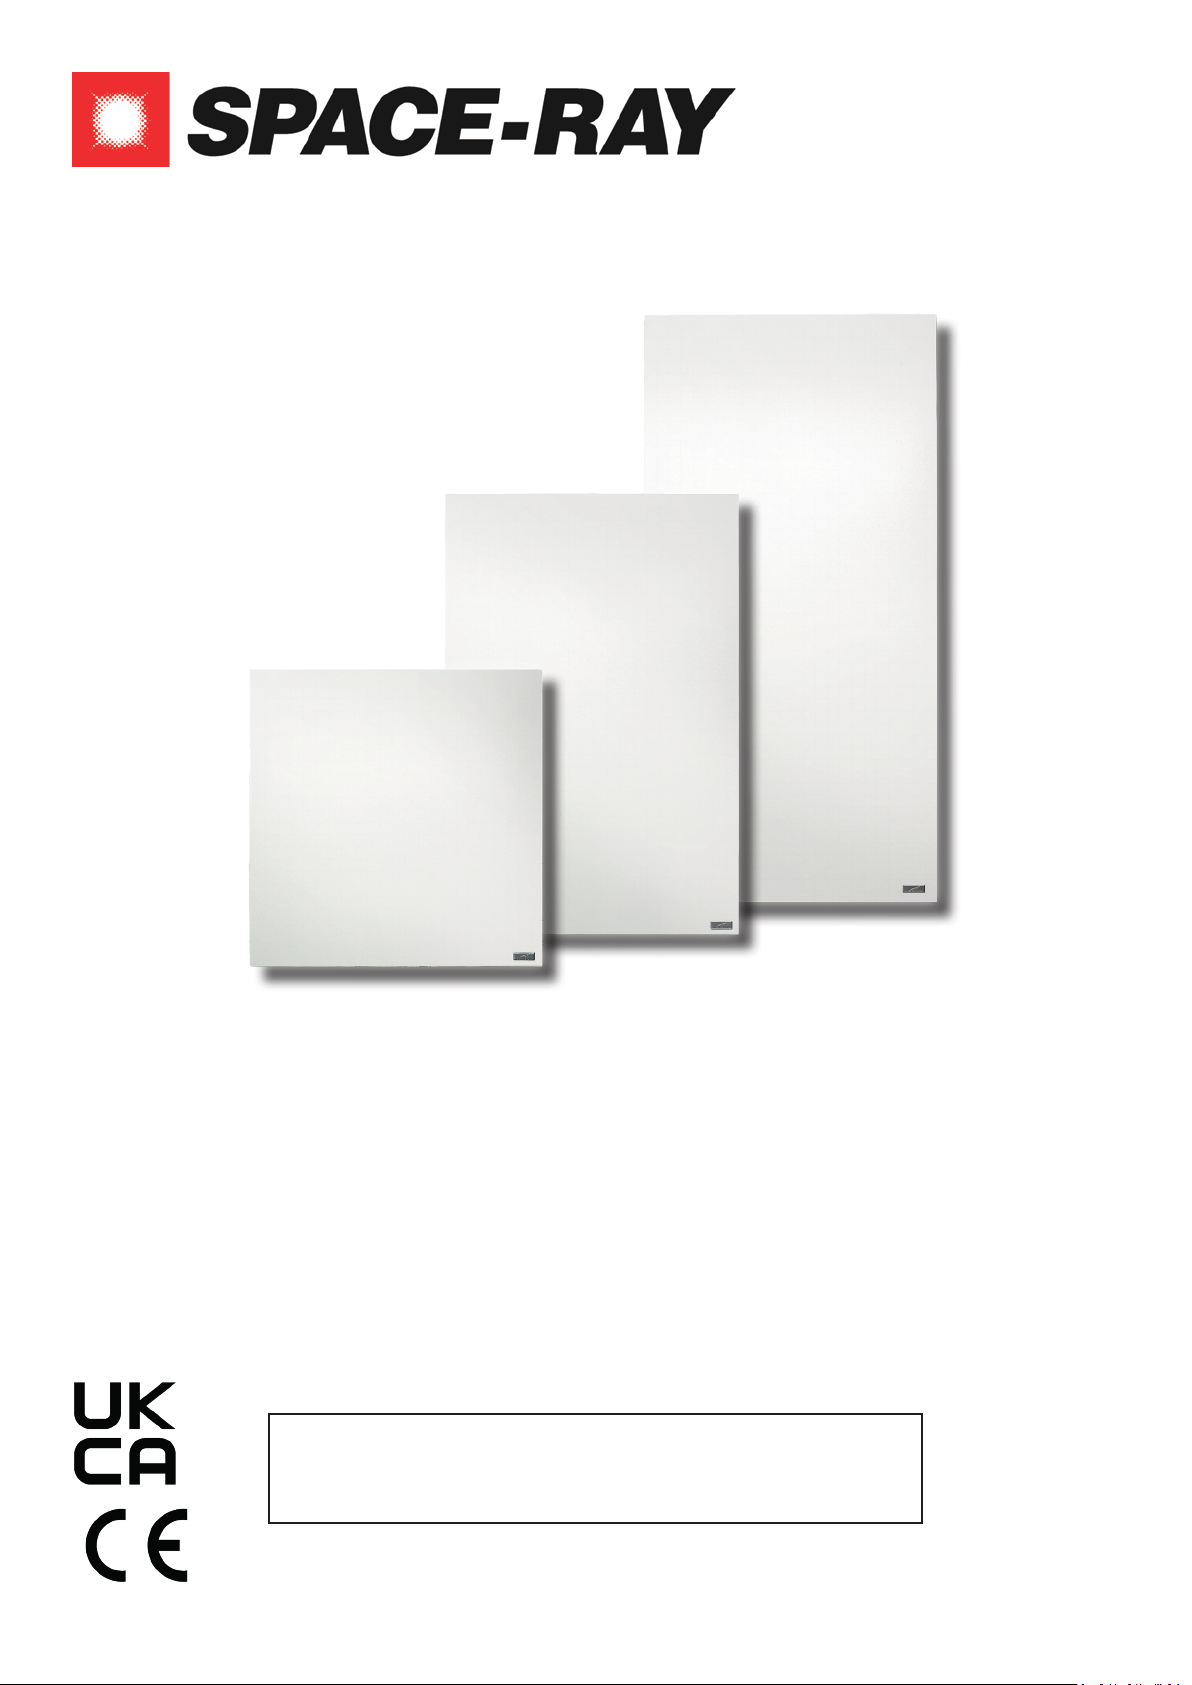
• The heat panels are suitable for mounng in false/
suspended ceilings as the dimensions are the
same as standard ceiling les.
• The heater must be posioned with respect to the
minimum clearances shown in Fig. D.
1. Ensure that the ceiling grid frame is suitablly sized
to accommodate the heater.
2. Check the ceiling grid frame to ensure there is no
damage and that it is at.
3. Ensure that the return edge (on which the heater
will sit) suciently covers all sides of the heater
panel when it lays within the frame see Fig. L.
4. Check that the ceiling frame has sucent supports
to accomodate the weight of the panel heater, es-
pecially if more than one heater is to be installed.
5. Ensure the heater is seated fully in the frame
without any gaps to maintain the re rang of the
ceiling.
6. Ensure the mains supply cord does not rest on the
heater.
Fig. F
Fig. J
Fig. J
Fig. K
Fig. G
Fig. H
Models A B C D
600 595 595 82 432
900 595 895 82 732
1200 595 1195 82 1032
Table 3 - Ceiling mount hole centres
CAUTION
Always isolate the heater from the mains supply when
mounng or adjusng the heater posion.
The heater should only be operated through an
electronic thermostat/control device that meets the
Ecodesign direcve requirements. Please contact Space-
Ray for further details.
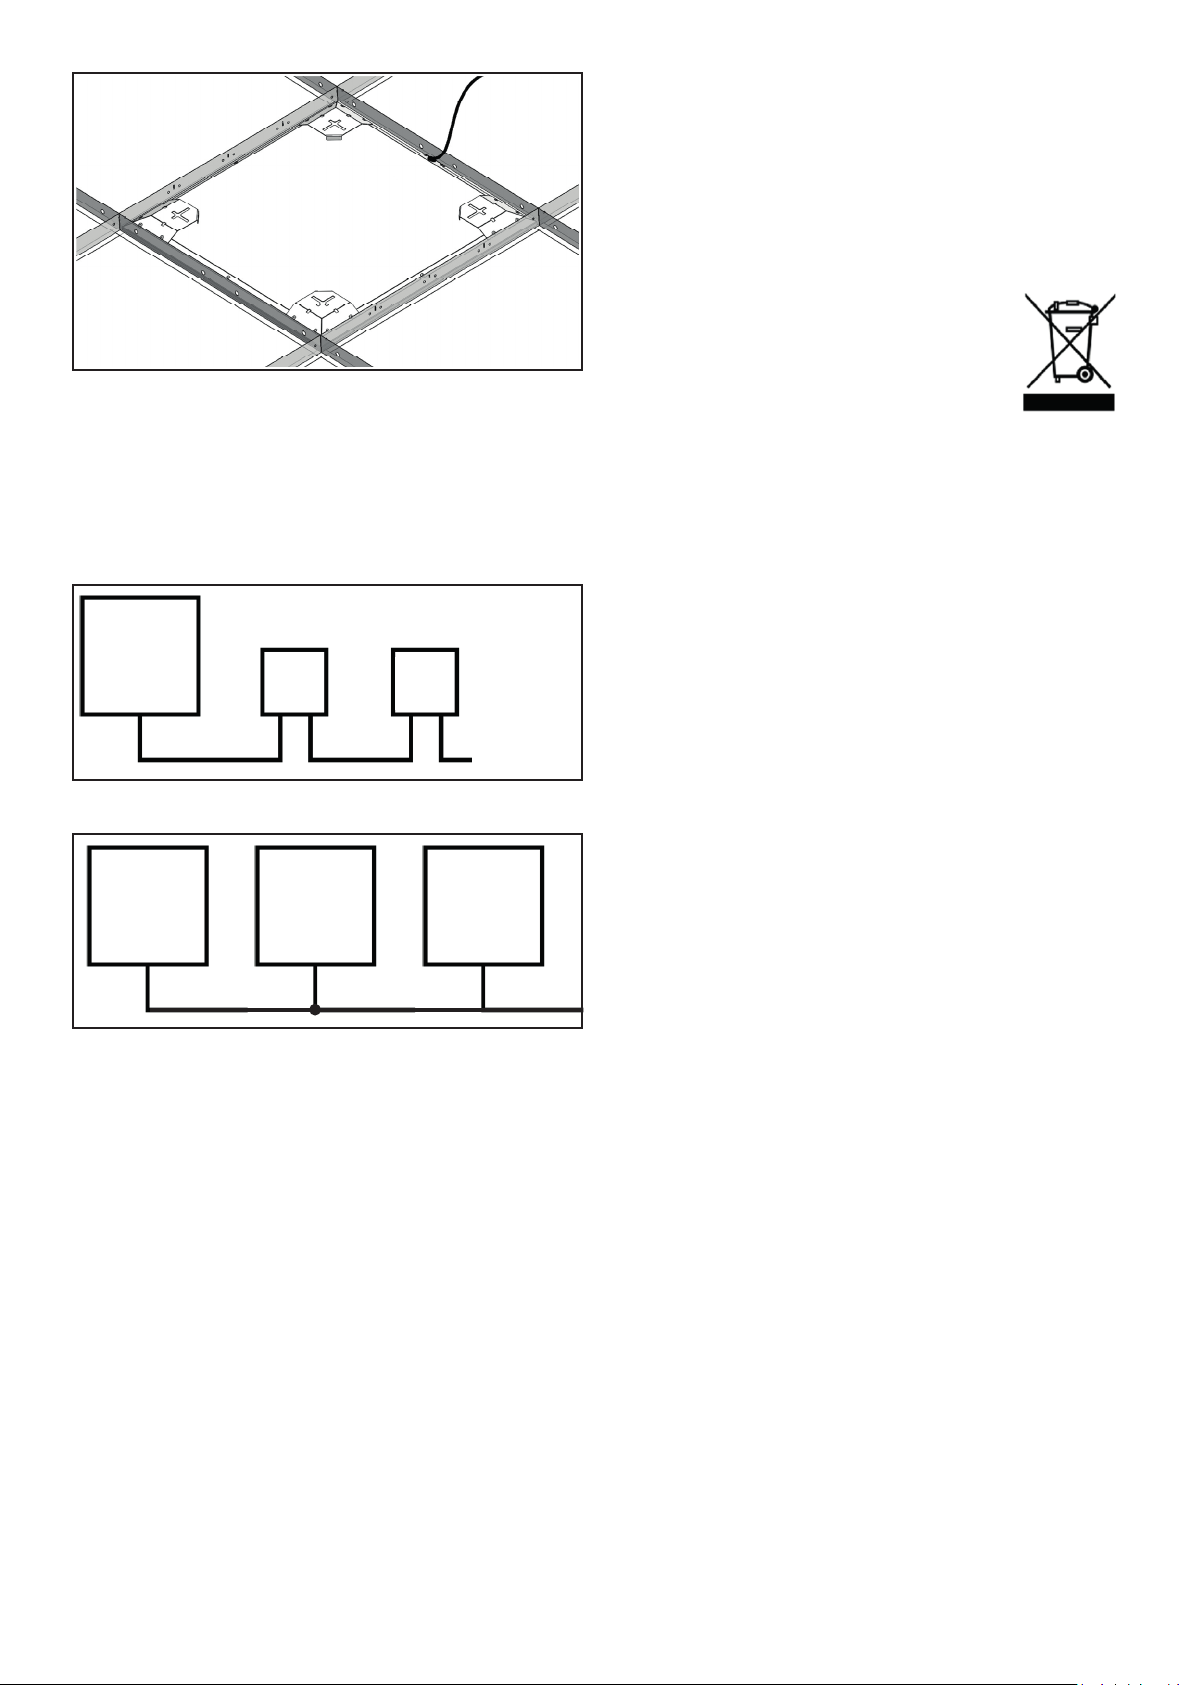
Fig. M illustrates how a heang panel should be wired. A
double pole switch/isolator must always be ed along
with a me and temperature control.
Where mulple heat panels are being used, each addi-
onal Panel is wired as shown in Fig. N. Care must be
taken to ensure that the total load of all heaters connect-
ed do not exceed the capability of the me and tempera-
ture controller as well as the double pole switch/isolator.
The heater is ed with a thermal cut-o switch which
will cut o the heater output if it exceeds its output limit
and switch it back on when it’s cooled to a sucient
level.
6. Maintenance
The Panel range of heaters contain no serviceable parts.
6.1 Cleaning
Before cleaning the heater disconnect/switch o from the
mains power supply and ensure the appliance is cool.
The heater should be wiped with a so damp cloth and
dried. Do not use abrasive cleaning products or polishes
as these can damage the nish of the heater.
The use of this symbol indicates that this
product may not be treated as household
waste. By ensuring this product is disposed
of correctly, you will help prevent potenal
negave consequences for the environment
and human health, which could otherwise
be caused by inappropriate waste handling of this
product.
For more detailed informaon about recycling of this
product, please contact your local council or your
household waste disposal service.
Fig. L
Radiant
Heat
Panel Control
Device
Double
Pole
Switch
240V Mains
Fig. M
Fig. N
Radiant
Heat
Panel
Radiant
Heat
Panel
Radiant
Heat
Panel

FACTORIES: IPSWICH, ENGLAND - CHARLOTTE, N.C, U.S.A
Gas Fired Products (UK) Ltd
Chapel Lane
Claydon
Ipswich
Suolk, IP6 0JL
Tel: +44(0)1473 830 551
Fax: +44(0)1473 832055
www.spaceray.co.uk
info@spaceray.co.uk
®
Panel Manual January 2023
This manual suits for next models
2
Table of contents
Other Space-Ray Electric Heater manuals


