TERMA MOA User manual

MOA
photo: chrome, straight cable
www.termaheat.pl page 1 of 3
20170913 WOŁOSIUK KACPER

Funcons and features:
Funconality
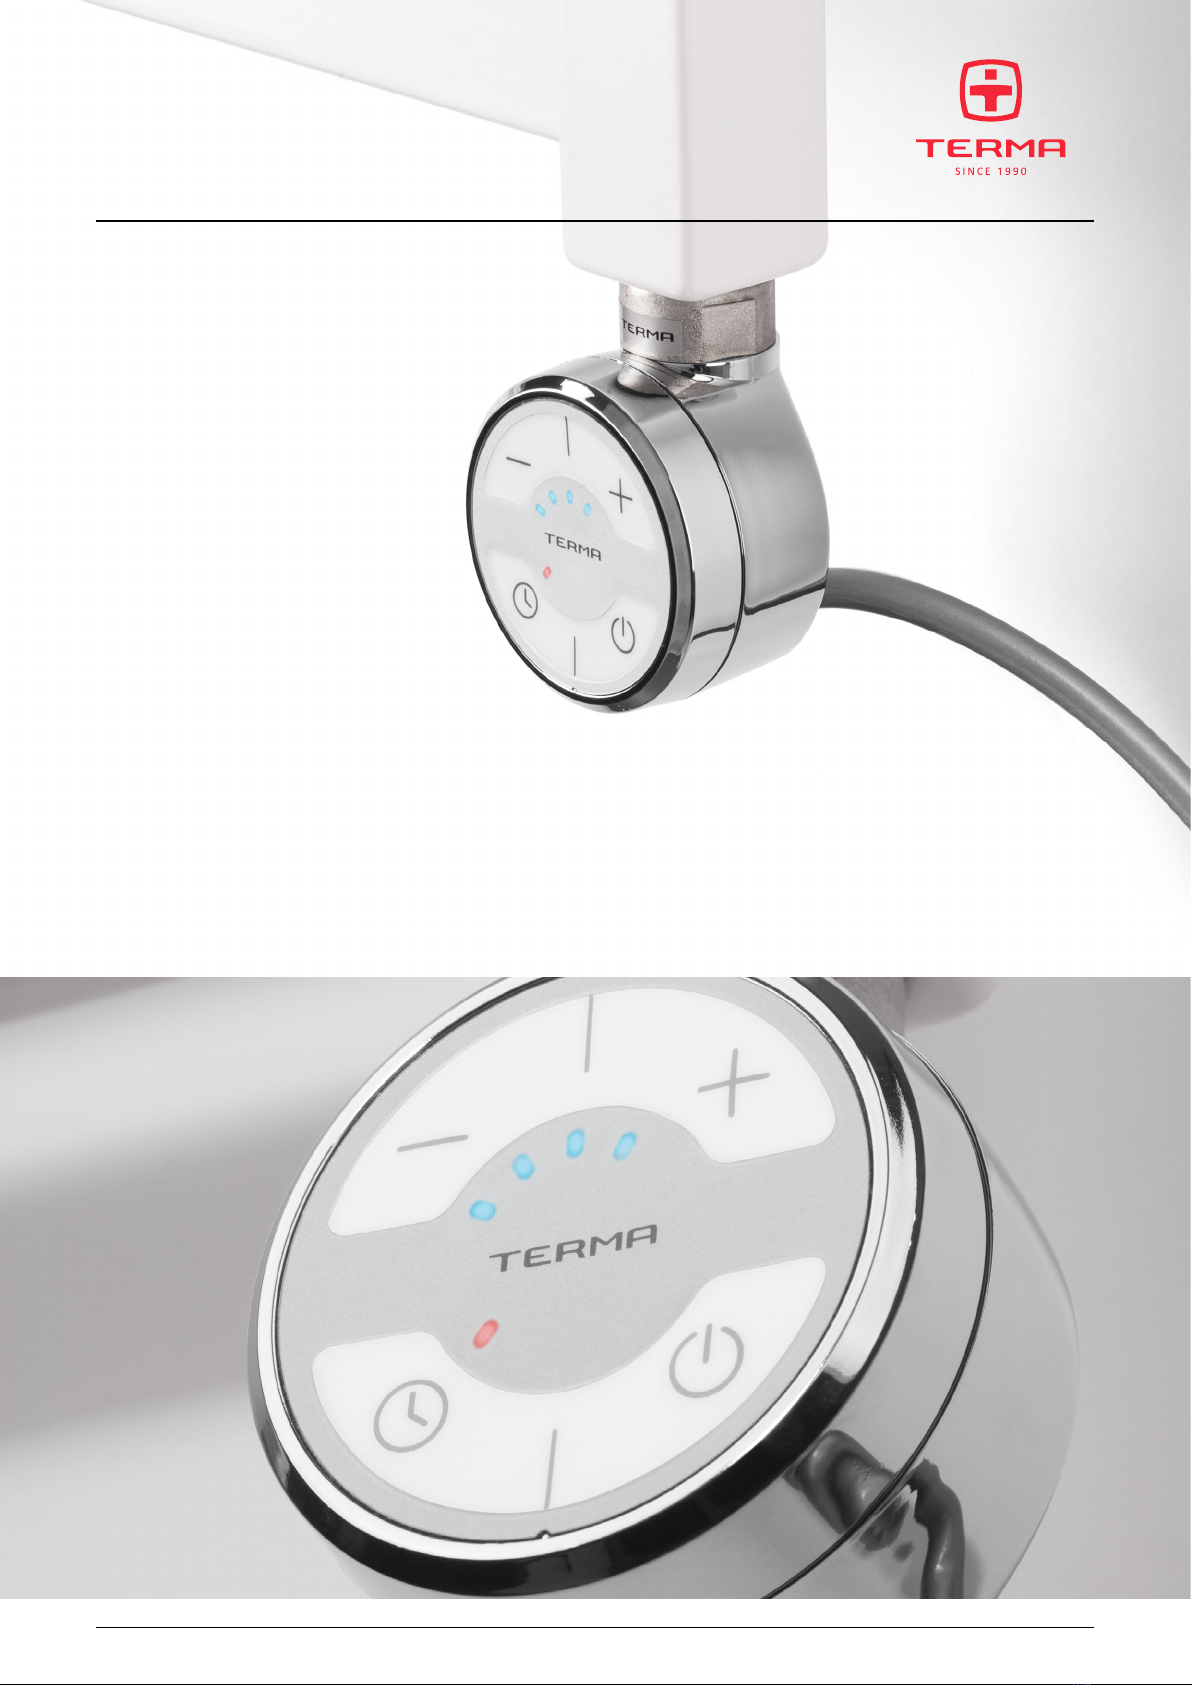
MOA oers 5 temperature sengs rang-
ing from 30°C to 60°C. It is equipped with
an electronic temperature sensor that
guarantees precise temperature control.
MOA displays the currently set tempera-
ture level and the status of the heang
cycle using illuminated diodes. The
heang element has a very low power
consumpon in a standby mode.
Dryer Funcon
This funcon allows the seng of
a higher heang power for two hours,
aer which the device returns to the
previous state.
Intelligent Building Systems
In the event of a power failure the MOA
remembers it’s previous sengs there-
fore making it suitable for connecon to
external mers and intelligent building
systems.
Safety
MOA is equipped with frost protecon
(ANTIFREEZE ). It also has double protec-
on against overheang of the radiator. It
displays warning indicators in case of mal-
funcon. It has an acve safety feature in
case of operaon in a dry radiator.
Design
MOA is supplied with a straight cable and
without a plug, it is also available with
a ‘cable masking’ as an oponal extra.
Colour
Available colours: white, silver, chrome
and black. Heang element can also be
oered in any RAL colour and Terma
special colours (including brass and gold)
subject to a minimum order of 100 pcs
per colour.
Specicaons:
Power supply: 230 V / 50 Hz
Device protecon class: Class I
Radiator connecon: G 1/2"
Ingress protecon [IP]: IPx5
MOA
Model Power
[W]
Packaging Colour Cable Type
WE MOA MOA 01 120 FFoil sleeve 916 White WStraight cable with plug
MAT MOA + T piece 02 200 TTube SMA Silver MStraight cable without plug with masking cover
03 300 CRO Chrome USpiral cable with plug
04 400 905 Black
06 600
08 800
10 1000
12 1200
Table conguraons:
Example of product code: WE MAT 04 T SMA W
Model code Packaging code
Element
power code
Colour or
nish code
Cable type and
plug code
design: Katarzyna Molicka and Michał Sowa
Code elements highlighted in blue
www.termaheat.pl page 2 of 3
20170913 WOŁOSIUK KACPER

66 L ± 5
G 1/2"
3955
48
(42 ÷ 77)
66 L ± 5
G 1/2"
3955
48
(42 ÷ 77)
Straight cable without plug with masking cover
Straight cable with plug
Spiral cable with plug
MOA
Power [W]
L [mm]
120
315
200
275
300
300
400
335
600
365
800
475
1000
565
1200
660
www.termaheat.pl page 3 of 3
20170913 WOŁOSIUK KACPER

PLEN DE FR ITCS SKRU
User Manual
Electric Heang Element
Návod na obsluhu — Topné těleso | Gebrauchsanweisung — Elektroheizpatrone |
Mode d’emploi — Kit résistance électrique | Manuale d'istruzioni — Elemento elerico
riscaldante | Instrukcja Obsługi — Grzałka elektryczna | Инструкция по применению
— Электронагреватель | Návod na obsluhu — Elektrické vykurovacie teleso
MEG · DRY · MOA ·
MOA IR · REG 2 · REG 3


3
EN
User Manual
Our products have been designed and manufactured in such a way to ensure
that all quality, functionality and aesthetic requirements are met. We would
like to congratulate you on the purchase of this great product and wish you
a pleasant experience with it.
Electric radiator
Guide to safe installation anduse.
1. Do not install the heater under an electrical socket point.
2. Your electric heater should be lled with a carefully measured amount of
liquid. In the case of loss of heating medium, or in any other case which
demands its supplementation, contact your supplier.
3. The device is not equipped with an external temperature controller *).
Do not use the device in a small room if unsupervised disabled or inca-
pacitated individuals are inside it. Only use the device if those individu-
als are under constant supervision.
*) Does not apply to selected models. Ask your supplier for details.

4User manual MEG, DRY, MOA, REG 2, REG 3
4. Electric heater is not a toy. Children under the age of 3 should not be al-
lowed within close proximity of the device without the supervision of an
adult.
Children aged 3 to 8 should only be allowed to operate the heater when
it has been properly installed and connected. The child must be under
adult supervision or have been trained to safely operate the device while
understanding the risks.
5. Note: Some parts of the radiator can be very hot and can cause burns. Pay
special attention to the presence of children or people with disabilities.
6. If the device is used as a clothes and towel dryer, ensure that the fabrics
drying on it have only been washed in water, avoiding contact with any
harsh chemicals.
7. To ensure the safety of very small children, install the electric dryer so
that the lowest tube is at least 600mm above the oor.
8. The device should only be installed by a qualied installer in accordance
with the applicable regulations regarding safety and all other regulations.
9. All installations to which the device is connected should comply with reg-
ulations applicable in the country of installation and use.
10. Extension leads or electric plug adapters should not be used in order to
supply power to the heater.

5
EN
11. While connecting the radiator to electric installation ensure that the cur-
cuit has a 30 mA residual-current circuit breaker and an appropriate over-
current circuit breaker. With the permanent installation (cable connec-
tion without plug) it is also mandatory to provide an omnipolar cut-o
switch with a minimum contact opening of 3 mm for disconnecting the
device on all poles.
12. The device version labelled PB can be installed in bathrooms in zone 1,
as dened by applicable law, subject to any additional regulations con-
cerning electrical installations in wet areas.
Other versions of the device can be installed in Zone 2 or beyond.
13. The device is recommended for use solely as described in the manual.
14. Ensure that the heater has been installed on a wall in accordance with
its installation manual.
15. Please forward this instruction manual to the end user.

6User manual MEG, DRY, MOA, REG 2, REG 3
Zone 1
Zone 2

7
EN
Electric Heating Element
Safety requirements — installation
1. Fitting and connection of the heating element should only be performed
by a qualied installer.
2. Connect the unit to a sound electrical installation (see the ratings on the
heater).
3. Switching on the heating element in the open air to test the device is per-
mitted for a maximum of 3seconds.
4. Never test a heating element that is already in- stalled. Do not turn the
heating element on in an empty radiator!
5. Ensure that the power cord does not touch the hot parts of the heating
element or radiator.
6. Before installing or removing the device, make sure it is disconnected
from the power source.
7. Do not open the device — any interference with internal components
will invalidate the warranty.
8. The heating element’s power output must not exceed the radiators pow-
er output for the parameters 75/65/20° C.

8User manual MEG, DRY, MOA, REG 2, REG 3
9. The pressure in the radiator should not exceed 10atm. Ensure that an
air cushion is preserved in electric radiators. In central heating systems,
leave one valve open to prevent pressure build up due to the thermal
expansion of the liquid.
10. The device is intended for home use only.
11. Fitting and Installation of the device must be carried out in accordance
with all local regulations for electrical safety, including installation within
permissible locations only. Observe bathroom electrical zone regulations.
Safety requirements — use
1. The heating element must be fully submerged in the heating liquid dur-
ing its operation.
2. Regularly check the device for damage to ensure it is safe to use.
3. If the power cord is damaged the device should not be used. Unplug the
device and contact the manufacturer or distributor.
4. Do not allow ooding into the heating element casing.
5. Do not use the heating element in heating systems where the water tem-
perature exceeds 82° C.

9
EN
6. The heating element and radiator can heat up to high temperatures. Please
be cautious — avoid direct contact with the hot parts of the equipment.
7. Do not open the heating element casing.
8. In the central heating system, always make sure that one valve of the ra-
diator remains open.
9. Ensure that minors aged 8 and above or those with a physical or mental
disability are supervised if operating the device.
10. The device is not a toy. Keep it out of the reach of children.
11. The device must be disconnected from the mains during cleaning and
maintenance.
12. Cleaning of the equipment by children under 8years of age is only per-
mitted under appropriate supervision.

10 User manual MEG, DRY, MOA, REG 2, REG 3
Intended use of device
The heang element is an electric device
intended solely for installaon in radiators
(standalone or connected to the central
heang system).
Heang element power output should be
matched with radiator output for parame-
ters of 75/65/20° C
Technical informaon
Model markings
(power cable type):
PB (Straight cable without plug) *
PW (Straight cable with plug)
SW (Spiral cable with plug)
Type of electrical connecon: Y: MEG, MOA, MOA IR, REG 3, DRY
Z: REG 2
Heat outputs available: 120, 200, 300, 400, 600, 800, 1000, 1200 [W]
Power supply: 230 V / 50 Hz
Insulaon class: Class I
Towel rail connecon thread: G 1/2"
Casing protecon class [IP]: IPx4: MEG
IPx5: REG 2, REG 3, MOA, MOA IR, DRY
Length of heang element: 120 200 300 400 600 800 1000 1200 [W]
315 275 300 335 365 475 565 660 [mm]
* Device intended to be connected permanently to the system

11
EN
Installaon or removal
Detailed informaon demonstrang the dif-
ferent ways of installing or removing a radi-
ator heang element is available from the
manufacturer or importer (see footnotes at
the end of the manual). Below we list some
basic requirements and principles which
must be followed to ensure long term, re-
liable operaon of the product.
150°
When installing the heang element hor-
izontally, the single tube (capillary) where
the temperature sensor is located, should
be posioned to be as close to the boom
of the radiator as possible.
Before installaon or rst use:
1. Read the chapter Safety requirements
— Installaon.
2. Fit the heang element using the cor-
rect spanner (size 22).
3. The heang element must be installed
at the boom of the radiator, perpen-
dicular to the radiator pipes, while pre-
serving space for the proper circulaon
of the heang medium.
4. Use a suitable heang medium for ll-
ing the electric radiator, i.e. (water, spe-
cial products based on water and glycol
for use in central heang systems, or oil
which complies with the requirements
of the manufacturer of the radiator and
heang element).
5. Check the distances between the indi-
vidual heang element tubes and bend
if necessary.
5 mm
2-3 mm
8% (20°C)

12 User manual MEG, DRY, MOA, REG 2, REG 3
6. Do not switch the heang element on if
it is not fully immersed in radiator heat-
ing medium.
7. Make sure an adequate air cushion is pre-
sent to protect against excessive pressure
build up within the heater (always leave
one of the radiator valves open).
8. When lling the radiator with hot liquid
insure that the liquid temperature does
not exceed 65° C.
9. Follow the subsequent guidelines when
connecng the electrical installaon:
a. Brown wire — live connecon to the
circuit (L).
b. Blue wire — connect to neutral (N)
c. Yellow & green wire — earth con-
necon (PE).
10. Before lling the radiator with heang me-
dium, ensure that the heang element is
ed properly and that it is water ght.
11. In central heang installaon radiator
must be ed with the valves enabling
disconnecon of the radiator from the
rest of the system.
12. The temperature of the heang agent
in the central heang system must not
exceed 82° C!
13. For detailed installaon hints — see the
last pages of this manual.
Notes prior to removal:
1. Before dismantling permanently, discon-
nect the heang element from the mains
and ensure that the radiator is not hot.
2. Be aware. A radiator lled with liquid can
be very heavy. When moving the radia-
tor, ensure that you take the necessary
safety precauons.
3. Before disassembly, close the appropri-
ate valves and drain the radiator com-
pletely to avoid causing any damage.
Product disposal
This product should not be disposed of as
general waste but should be brought to the
appropriate collecon point for re- cycling of
electric and electronic devices. This informa-
on is provided by the sign on the product,
user manual and packaging. Informaon on
the appropriate point for used devices can be
provided by your local authority, product dis-
tributor or the store from where the product
was purchased. Thank you for your eort to-
wards protecng the environment.

13
EN
Maintenance
• Before performing maintenance, always
unplug the unit from the mains system.
• Periodically check the uid level in the
radiator and ensure the heang element
is completely submerged.
• Clean the product with a dry or damp
cloth. If necessary, use a very small
amount of detergent, ensuring that it
contains no solvents or abrasives.

14 User manual MEG, DRY, MOA, REG 2, REG 3
MEG
Turning on the device will result in the heat-
ing of the radiator up to the set tempera-
ture. Aer reaching the set temperature the
device will turn o and on regularly in order
to maintain the set temperature.
The construcon of the device as well as
the physical characteriscs of the heang
agent inside the radiator inuence the way
in which the heat is distributed — the tem-
perature of the boom pipes on the radia-
tor (especially the two located at the very
boom of the radiator) may be lower than
the temperature of the remaining parts of
the radiator — this is normal.
Temperature increase
In order to increase the temperature of the
radiator, press once or several mes as
required; the right number of diodes will
start blinking. The last blinking diode indi-
cates the set temperature, whilst the last.
Temperature decrease
In order to decrease the temperature of the
radiator, press once or several mes as re-
quired; the right number of diodes will start
blinking. The last diode that which shines
constantly indicates the set temperature
whilst the last blinking diode indicates the
current temperature. The following diodes
will start fading on reaching subsequent
temperature levels.
An-freeze funcon
(an-freeze protecon)
When the device is o and the temperature
around temperature sensor drops down be-
low 6° C, the device will switch on automat-
ically. This is to prevent the heang agent
inside the radiator from freezing. Acvang
An-freeze mode is indicated by winking of
the middle diode.
temperature regulaon
turn on / o buon

15
EN
Problem solving
Problem Possible cause Soluon
The device is plugged in,
no diodes are on.
Problem with the
connecon.
Check the connecon of
the power wire, the plug
and the socket.
Heang element is not
heang, outside diodes
are winking alternately.
Temperature sensor has
been damaged.
Disconnect the device
completely, wait unl the
radiator cools down and
then re-connect it.
Overheang of device.
Check and conrm that
the heang element's out-
put does not exceed the
recommended output of
your radiator. Check and
reduce the water tem-
perature in the central
heang system-must not
exceed 82°. In electric-only
version check, if the radi-
ator is properly lled with
the heang agent.
Heang element is heang
despite turning it o with
the on/o buon.
Damaged Electronics.
Disconnect the device
completely, wait unl the
radiator cools down and
then re-connect it.
If the problem connues please contact Your local Distributor.

16 User manual MEG, DRY, MOA, REG 2, REG 3
DRY
Funcons
Heater DRY has 1 xed temperature set- ng
(default temperature of 48° C) and an ad-
vanced range of automac switch o func-
ons aer 1-5 hours. This makes the prod-
uct convenient and user-friendly — perfect
for drying clothing and towels. The default
heang temperature for the towel rail can
be set to any of the following values: 43, 48,
52, 55 or 60° C. A built-in temperature sen-
sor protects the towel rail from freezing in
situaons where the temperature falls be-
low 5-7° C. The LED diode next to the on/o
buon will ash recurrently, indicang that
the an-freeze protecon is acve.
Heater use
The heater is turned on by pressing the on/o
buon. The LED diode at the on/o buon
lights up when the heater is on and the regu-
lator maintains the set heang temperature.
Aenon: the heater control panel turns the
device on only when radiator temperature
is lower than the set temperature (default
temperature of 48° C). On reaching the re-
quired temperature, the heater will turn on
recurrently to maintain the set temperature
only. This funcon allows much lower en-
ergy consumpon than calculaons based
on the heaters nominal heat output might
indicate. In the upper le part of the con-
trol panel, there is a (TIMER) buon which
can be used to set the automatic switch
o me of the device. Every subsequent
pressing of the buons will light up diodes
on the heang me indicator and allow the
user to preset the “switch o” me of the
device to between 1 and 5 hours from the
current me.
After this time, the heater will turn off
automacally.
TIMER buon
TIMER indicaon
Indicaon of heater current
working state
On / o buon

17
EN
It is useful to know that:
• Longer pressing of the buon will au-
tomacally set the mer to 5 hours or,
turn o the TIMER funcon,
• The buon can also be used when the
heater is o. On pressing the buon, the
heater will automacally turn on and set
the TIMER to 1 hour,
• If you want to turn the TIMER o, press
the buon several mes or simply turn
the heater o and on,
• TIMER LED diodes will turn o one by
one, to display the correct, remaining
drying me.
The construcon of the heater as well as
physical characteriscs of various heang
liquids may cause an uneven heat distribu-
on inside the towel rail. As a result, boom
pipes of the towel rail may stay cool. Such
phenomenon is completely normal and is
not an indicaon of heater failure.
Modicaon of radiator heang
temperature
The default temperature of the heater is
48° C. The user can modify the heang tem-
perature by following these steps:
1. Disconnect the device from the electric-
ity supply (i.e. unplug the device).
2. Press and hold the on/o buon while
reconnecng the heater to the electric-
ity supply.
3. Release the buon.
4. One of 5 TIMER diodes will start ashing.
Select the required temperature value by
pressing the buon unl the correspond-
ing diode starts ashing. Temperature
values for each diode are shown in the
table below:
52°
55°
60°
48°
43°
5. Wait for 10 seconds or press the TIMER
buon in order to conrm your chosen
value.
Other manuals for MOA
4
Table of contents
Other TERMA Electric Heater manuals
Popular Electric Heater manuals by other brands

BizHomart
BizHomart W914-40F instruction manual

Harvia
Harvia V45E Instructions for installation and use

Olimpia splendid
Olimpia splendid Unico Air R410A Instructions for use and maintanence

evatronic
evatronic BK-102-1 manual

Harvia
Harvia Spirit HSPE604M Instructions for installation and use

Romus
Romus 93478 operating instructions

Aura
Aura CF40240 Installation, operation and maintenance manual

PHI VILLA
PHI VILLA AH-FP-30CHE instruction manual

TESY
TESY FinEco Cloud CN 06 Operation and storage manual

Colorado Tri-Flo
Colorado Tri-Flo ER10000W.01-230V owner's manual

Harvia
Harvia PC70XW Instructions for installation and use

Helo
Helo Cava series Installation and user instructions