Space-Ray SURA GSS20 User manual
®
INSTALLATION MANUAL
Electric High Intensity Halogen
Model Sura
IP55

1. The Heater
According to Thermodynamic Laws there are three types
of heat transfers: conducon, convecon and radiaon.
“Radiant Heaters” funcon using the radiant heat trans-
fer principle, they act like the sun by heang the objects
that they are exposed to. In other words, with radiant
heang the objects, people, etc. are heated directly by a
solid surface without heang up the air in between.
The air warms up aerwards, by the convecon heat
released from the people and objects.
It is possible to divide the radiant heaters in to two main
classes. These are “Low Intensity Heaters”, “High and
Medium Intensity Heaters”. SPACE-RAY SURA models
belong to the laer.
Each heater has a halogen electric lamp. The lament
of these lamps reaches up to 1200°C, a short me aer
switching on. Thus, a comfortable warm feeling occurs
just aer start up. These characteriscs of the heater
provide economical and eecve heang soluons for
applicaons that are very high and wide, have poor insu-
laon and outdoors. Addionally, they are clean, odor-
less, silent and environmental friendly.
SPACE-RAY™ SURA heaters can be used as general, local
or spot heang appliances.
All the equipment used in the producon of the heaters
are manufactured according to the EU direcves, having
the CE marking.
2. Product Components
The main product components are as follows:
A. Protecve wire guard
B. Quartz lamp holders and quartz lamp
C. Reector
D. Hard case and end caps
E. Connector Box
F. Wall hanger bracket c/w xing screws
G. Electric cable
Please read this informaon carefully before installing
and using this device, which is manufactured to use
for general, local and spot heang.
This device should not be used in the environments
where;
• There are ying or jumping animals
• Explosive or ammable goods are manufactured
or stored.
Do not touch the lamp(s) with bare hands. If you touch
the lamp(s) clean the ngerprints with a so and dry
cloth with the help of a volale Solvent such as alcohol.
Otherwise, these ngerprints will reduce the life of the
lamp(s) and/or cause failure.
Electrical connecons should be made by authorized
personnel according to these instrucons and the wiring
diagram show on page 4.
It is not necessary to de-assemble of any part of the
device to make the electrical connecon. The connecon
should only be made according to the instrucons and
schemacs given below.
Please have your electricity supply (capacity, earth,
protecon) checked carefully by authorized personnel
before installing it. The manufacturer is not responsible
any damage caused due to the installaon or usage of
this product other than described within this manual.
The below table shows the minimum height from oor
level for installed products:
The parts needed to install the product are provided
within the box given to you. Please follow the instruc-
ons given below:
Fix the hanger bracket to the place (wall, column or
beam) where you want to install the heater.
Use a spirit level to ensure the heater is installed straight.
Mark the locaon of the hanger xing holes on the
mounng surface, and drill the correct sized hole. Insert
the plasc wall plugs (suuplied) and x the hanger brack-
et in place using the screws supplied.
Please note, if xing to a non-brick or concrete surface
then please source and use the correct xings required
for the surface.
Contents Page
1. The heater 2
2. Product components 2
3. Instrucons for installaon & use 2
3.1 Important safety informaon 2
3.2 Installaon 2
3.3 Using the heater 3
4. Removing the heater. 3
Model Power Electrical
Supply Current Min height
Dimensions
GSS20 2kW 230V 8.25A 2.5m 430x166x95
Gss40 4kW 230V 17.4A 3.5m 830x166x95
Angle of the heater can be adjusted by loosening the
screws on the hanger bracket, selecng your preferred
angle and re-ghtening the screws.
Please make sure that the electrical connecon of the
heater is made according to the instrucons and wiring
details conaned within this document.
The operaon of the heater is made by switching on or
o the electrical supply when the heater is required/
not required. This can be via a convenonal three pin
plug ed into a wall socket, or hard wired into a fused
isolator. It is also possible to use a thermostat and/or a
dimmer as an opon. Please contact your local repre-
sentave or service agent for these items.
Do not install the heater directly under the wall plug/
isolator.
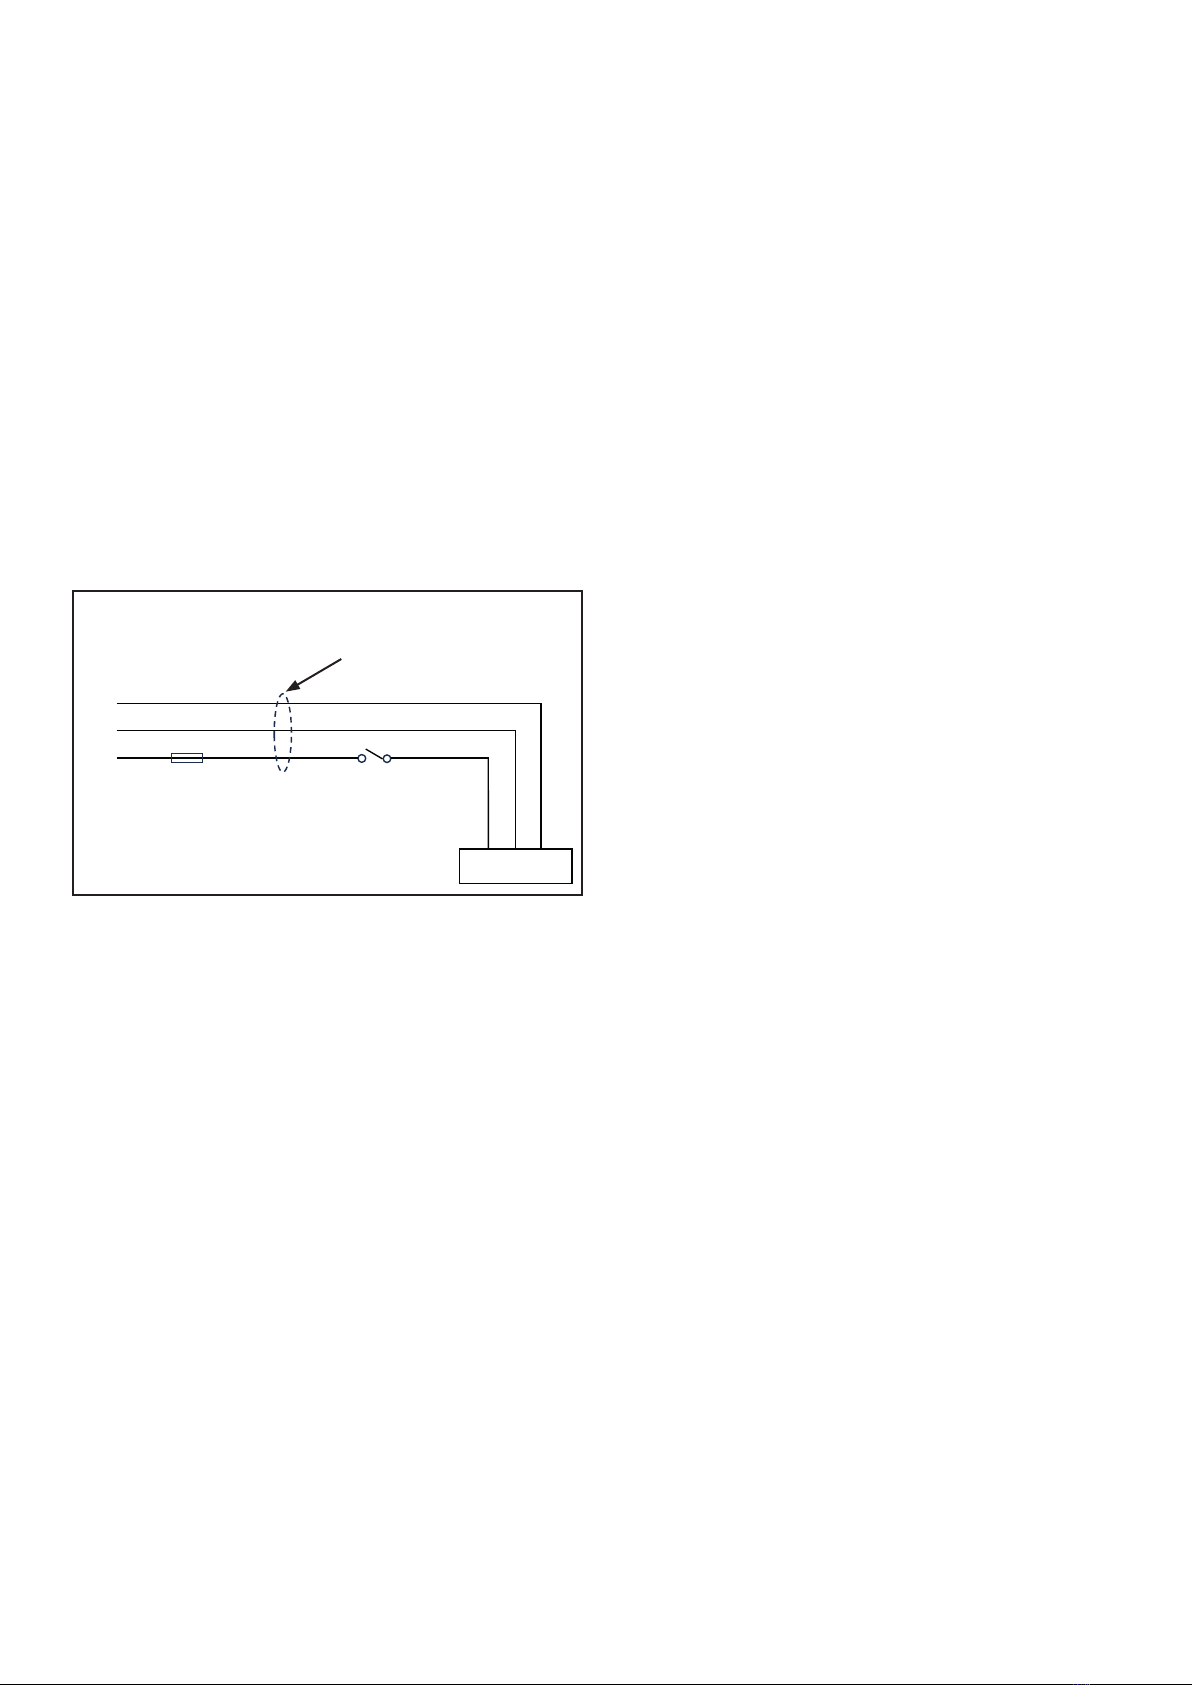
Wiring Diagram
3.3. Use
It is always necessary to make sure that the installaon
of the heater is properly made and the electricity current
provided is not below or above permissible the limits.
Products which are installed correctly should serve you
for a long me.
Please pay aenon to the following when using this
heater:-
• Please check if the heater is installed properly
according to the rules (descripons and warnings)
given in the instrucon manual.
• When using models supplied with a plug, just con-
nect the plug to a wall terminal with convenient
grounding.
• Turn on the on/o switch when using un-plugged
models.
• Disconnect the electric supply if the heater is not
used.
• Fluctuaons in the electric voltage will reduce the
lamp life. Please make sure that the uctuaons do
not occur.
• Each heater has a wire guard at the front to protect
the heang elements being touched by anything. Do
not operate the heater when the protecve guard is
not present.
• Do not insert anything into the heater and do not
touch the lamp.
• Stay 1.25 m away from the heater when it is on.
• Prolonged looking at the lamp during operaon may
result in damage to the eye. Therefore when the
heater is on, do not look at the lamp with bare eyes.
• Protect the heater against movement and vibraons
even when it is not operang.
• Do not put anything on the heater or cover it fully or
parally.
• Ensure that combusble items such as paper, ny-
lon curtains etc.. are at least 1.25 m away from the
heater.
• Ensure that children cannot reach the heater.
If the heater is not working:
• Do not try to x the heater.
• Disconnect the electric supply.
• Contact the nearest authorized agent for mainte-
nance.
The reectors are made out of highly polished aluminum.
They do not lose their reecvity easily, even due to dirt
and dust. Therefore, it is not necessary to clean them fre-
quently. However, if needed please follow the procedure
below to clean the reectors.
• Disconnect the electric supply to the heater.
• Remove the protecve guard.
• Clean the reector with a dry cloth.
• Do not touch the lamp with bare hands during
cleaning. Make sure that no stain occurs on the
lamp.
• If the lamp gets dirty clean the lamp with a so
cloth moisturized with alcohol.
• Install the protecve guard.
• Connect the heater to the electric supply.
4. Removing The Heater
To uninstall the heater, follow the procedure below:
• Ensure the heater is switched o and is not hot.
• If the heater does not have a plug, authorized per-
sonnel must remove the electric wiring according to
local codes.
• If the heater has plug connecon, simply disconnect
the heater from the wall socket.
• Hold the heater case (it is recommended that this is
done by another person) and loosen the screws at
the sides of the heater hanger bracket. Be careful
when removing the wall xing screws ensuring that
the heater is rmly grasped.
• Cover the heater with impact absorbing wrapping
before packing to protect the heater from any dam-
age.
L
N
E
230V 50Hz
Cable Size
GSS20 - 3 x 1.5mm2
GSS40 - 3 x 2.5mm2
GSS20 - 16A
GSS40 - 25A
Fuse
Heater

FACTORIES: IPSWICH, ENGLAND - CHARLOTTE, N.C, U.S.A
Gas Fired Products (UK) Ltd
Chapel Lane
Claydon
Ipswich
Suolk, IP6 0JL
Tel: +44(0)1473 830 551
Fax: +44(0)1473 832055
www.spaceray.co.uk
info@spaceray.co.uk
®
Sura Manual October 2023
This manual suits for next models
1
Other Space-Ray Electric Heater manuals


Popular Electric Heater manuals by other brands

Electric Radiators Direct
Electric Radiators Direct RC Wave Plus quick start guide

Pacetti
Pacetti BME operating & maintenance manual

Global Industrial
Global Industrial 246100 user manual

IKI-Kiuas
IKI-Kiuas Sahko 6 kW manual

CONVECTAIR
CONVECTAIR APERO Installation, operating instructions & warranty registration

Heatzilla
Heatzilla SYCLC90 user manual


Helo
Helo Fusion 60 Instructions for installation and use

Gasmate
Gasmate EH325 manual

SKF
SKF TIH 100m Instructions for use

Hunter
Hunter Illumi-Heat installation instructions

Bromic Heating
Bromic Heating Tungsten 2000W Installation, instruction and service manual

Harvia
Harvia Spirit Owner's/operator's manual