Space Scooter X580 User manual

Owner’s Manual
Model: X580
EN14619 Class A / ASTM F2264
Space Scooter Step by Step Manual
If you need additional assistance, please contact us by e-mail
WARNING: Adult assembling required.

Page 2
Index
Safety warnings....................................................................................... 3
Space Scooter 101®................................................................................. 6
Setup and unfolding................................................................................ 7
How to Unfold..................................................................................... 7
How to Fold®..................................................................................... 10
Folding for storage............................................................................ 10
How to ride ........................................................................................... 12
Ride as a traditional kick scooter ...................................................... 12
Ride as a Space Scooter®................................................................... 12
Check and adjust................................................................................... 14
Check collar clamp ............................................................................ 14
Check wheels and bearings............................................................... 14
Check quick release........................................................................... 14
Maintenance ......................................................................................... 16
Check flywheel and add ballbearingoil ............................................. 16
Space Scooter®F.A.Q. (frequently asked questions) ............................ 17
Issues with folding or unfolding........................................................ 17
The grip of the tray plank diminishes. .............................................. 17
The chain skips or runs next to the gears(flywheel)......................... 17
Noises, Sounds, etc.. ......................................................................... 17
Warranty ............................................................................................... 19
Copyright............................................................................................... 21
Produced by: ......................................................................................... 21

Page 3
Safety warnings
AN IMPORTANT MESSAGE TO PARENTS:
This manual contains important information. For your child’s safety,
it is your responsibility to review this information with your child
and make sure that your child understands all warnings, cautions,
instructions and safety topics. We recommend that you
periodically review and reinforce the information in this manual
with your child and properly maintain your child’s scooter to insure
their safety.
GENERAL WARNING:
LIKE ANY OTHER MOVING PRODUCT, USING A SCOOTER CAN BE A
DANGEROUS ACTIVITY AND MAY RESULT IN INJURY EVEN WHEN
USED WITH PROPER SAFETY PRECAUTIONS. USE AT YOUR OWN
RISK AND USE COMMON SENSE.
WARNING: DO NOT USE PARTS MANUFACTURED BY ANOTHER
COMPANY WITH YOUR SPACE SCOOTER®. Do not modify the
structure or parts of the scooter, which may cause risk of failure.
WARNING:
The air spring of the shock absorber is filled with high-pressure air.
Do not disassemble or destroy it, and never throw it into a fire as
that may cause the air spring to explode.

Page 4
Always wear a helmet when riding your scooter and keep
the chain strap securely buckled.
Always wear shoes.
Ride on smooth, paved surfaces away from motor vehicles.
Avoid sharp bumps, drainage grates, and sudden surface
changes.
Avoid streets and surfaces with water, sand, gravel, dirt,
leaves, and other debris. Wet weather impairs traction,
braking, and visibility.
Do not ride at night.
Brake may get hot from continuous use.
Be cautious of traveling downhill, as this may cause the
Space Scooter to go very fast.
Adults must assist children in the initial adjustment
procedures, which include unfolding the scooter, adjusting
the handlebars, steering to height, and folding the scooter
for storage.
Obey all local traffic, bike and scooter laws and regulations.
Watch out for pedestrians.
Do not exceed the 200Lbs (90Kg)weight limit on the scooter.
Do not allow children under age of eight (8) to use the
scooter. Children under age fourteen (14) should ride with
adult supervision at all times.
Although the child may meet the weight requirment to ride
the Space Scooter, a parent’s decision to allow his or her
child to ride this product should be based on the child’s
maturity, skill level and ability.
Always pay attention to surroundings to avoid sudden
braking and sudden turning which may cause the user fall
down, this may hurt the user or other people.
Always ensure that your child is wearing proper protective
equipment such as an approved safety helmet.

Page 5
A helmet may be legally required by local law or regulation in
your area. Your child should always wear shoes, never ride with
bare foot or in sandals, and keep shoelaces tied and out of the
way of the wheels.
ALWAYS USE COMMON SENSE, READ THE WARNING
INSTRUCTIONS TO DECREASE RISKS AND SERIOUS INJURY. USE
AT YOUR OWN RISK AND WITH APPROPRIATE AND SERIOUS
ATTENTION TO SAFE OPERATION. USE CAUTION.
WARNING: ALWAYS INSPECT SCOOTER PRIOR TO RIDING.
Properly inspecting and maintaining your Space Scooter® can
reduce the risk of injury. Always inspect your Space Scooter®
before riding and regularly maintain it.
WARNING: CHECK LOCAL LAWS REGARDING SCOOTER USE.
Check local laws and regulations regarding laws governing
helmet use and scooter operation in your area.
WARNING: THE SPACE SCOOTER® CANNOT DRIVE BACKWARDS
DUE TO ITS ANTI-ROLL BACK SYSTEM.
Page 6
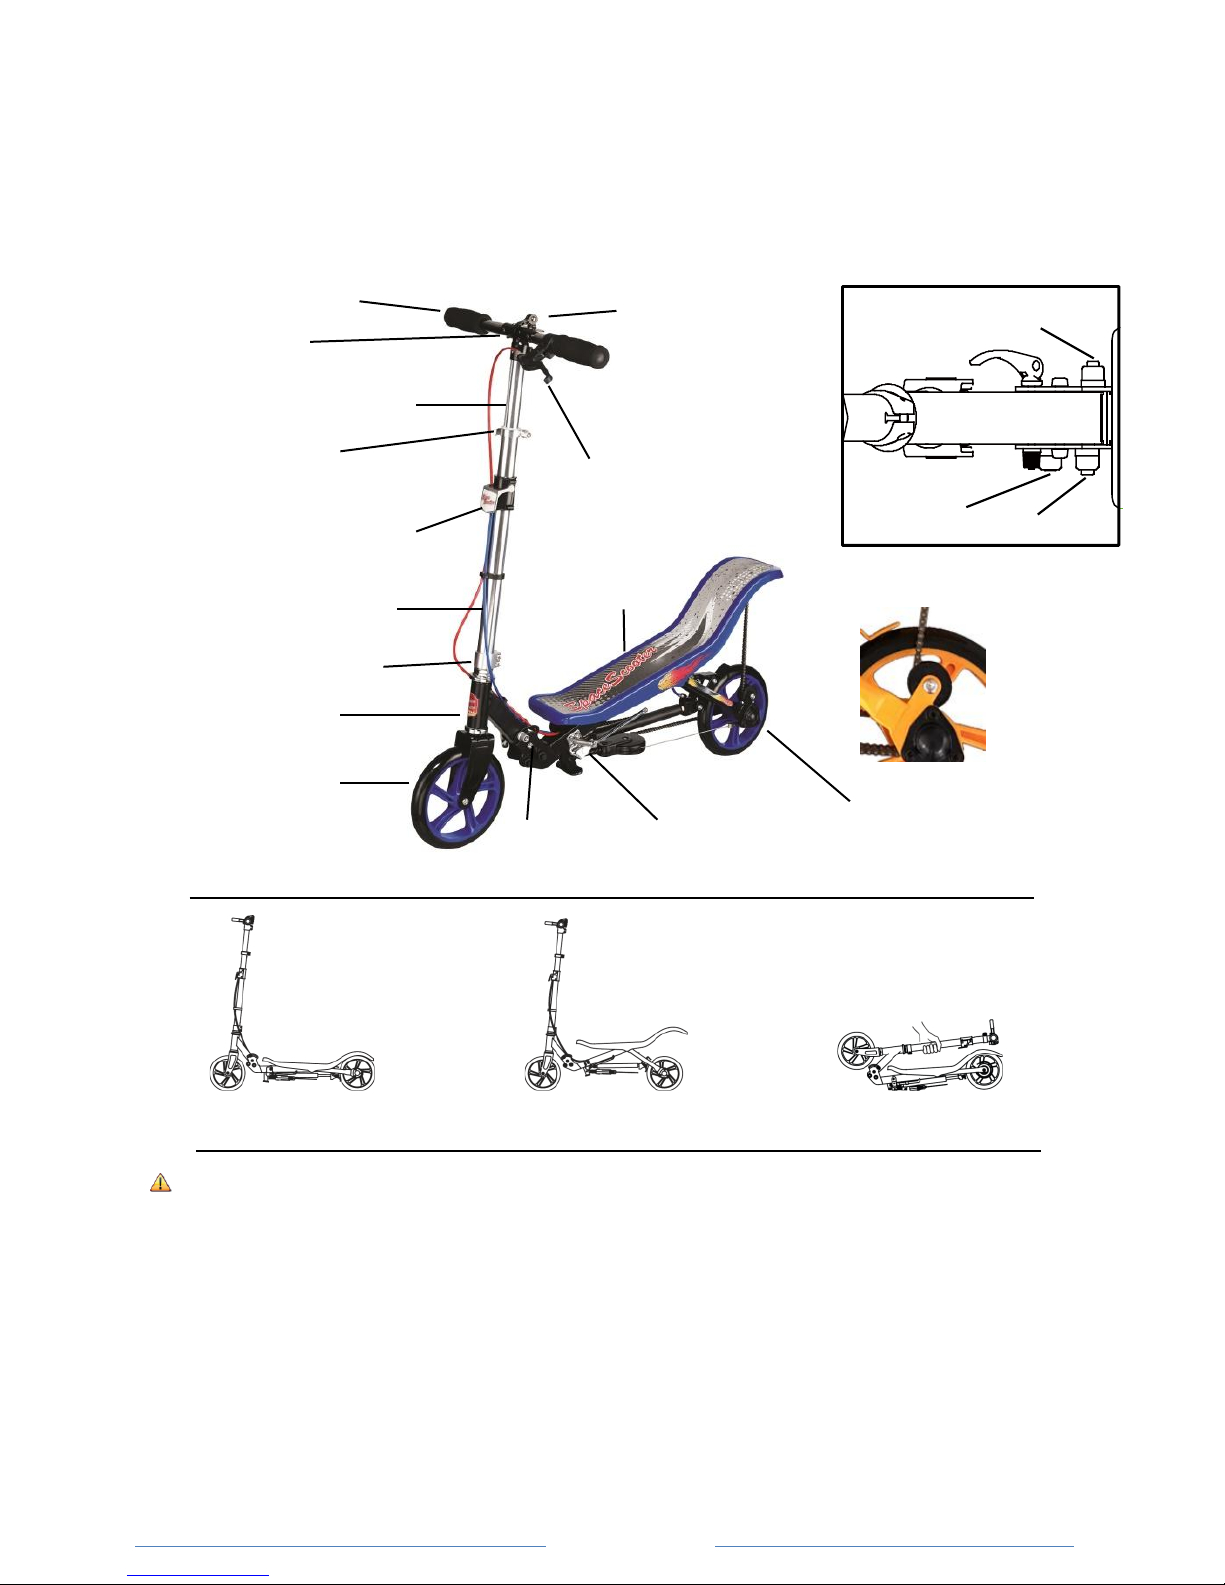
Know your Space Scooter®
Remove your Space Scooter from the box and inspect it for any dents,
chips, etc. before use.
Kicking
Riding
Folding
WARNING: DO NOT USE PARTS MANUFACTURED BY ANOTHER COMPANY. Your Space
Scooter® has been built to certain design specifcations. The original equipment supplied
at the time of sale was selected on the basis of its compatibility with the frame, fork and
all other parts. Certain aftermarket products may or may not be compatible.
Folder
C:Kicking
A:Folding
B:Riding
handlebar grip
handlebar
upper steering tube
steering tube
quick-release
frames folding trigger
lower steering tube
handlebar quick
release
brake handle
deck
rear wheel
kickstand
folder
steering tube clamp
front wheel
head tube

Page 7
Setup and unfolding
Tightening the brake handle.
Note: The brake handle has not been tightened before the product
was packed in the factory; the user should tighten the brake handle
screw before using the scooter. Adjust brake handle to a suitable
position and tighten it with the allen wrench.
Unfolding
1. Release the folding mechanism by opening the quick release clamp
on the right side of folding mechanism.
2. Push "Folding" unlock button (A) on the folding mechanism to
unlock and pull the vertical pole upwards until you hear a click.
Turn the steering pole slightly to confirm spring-load lock pin is
locked into the correct position.
3. Tightening the quick-release clamp at the right side of the folder to
lock the mechanism.

Page 8
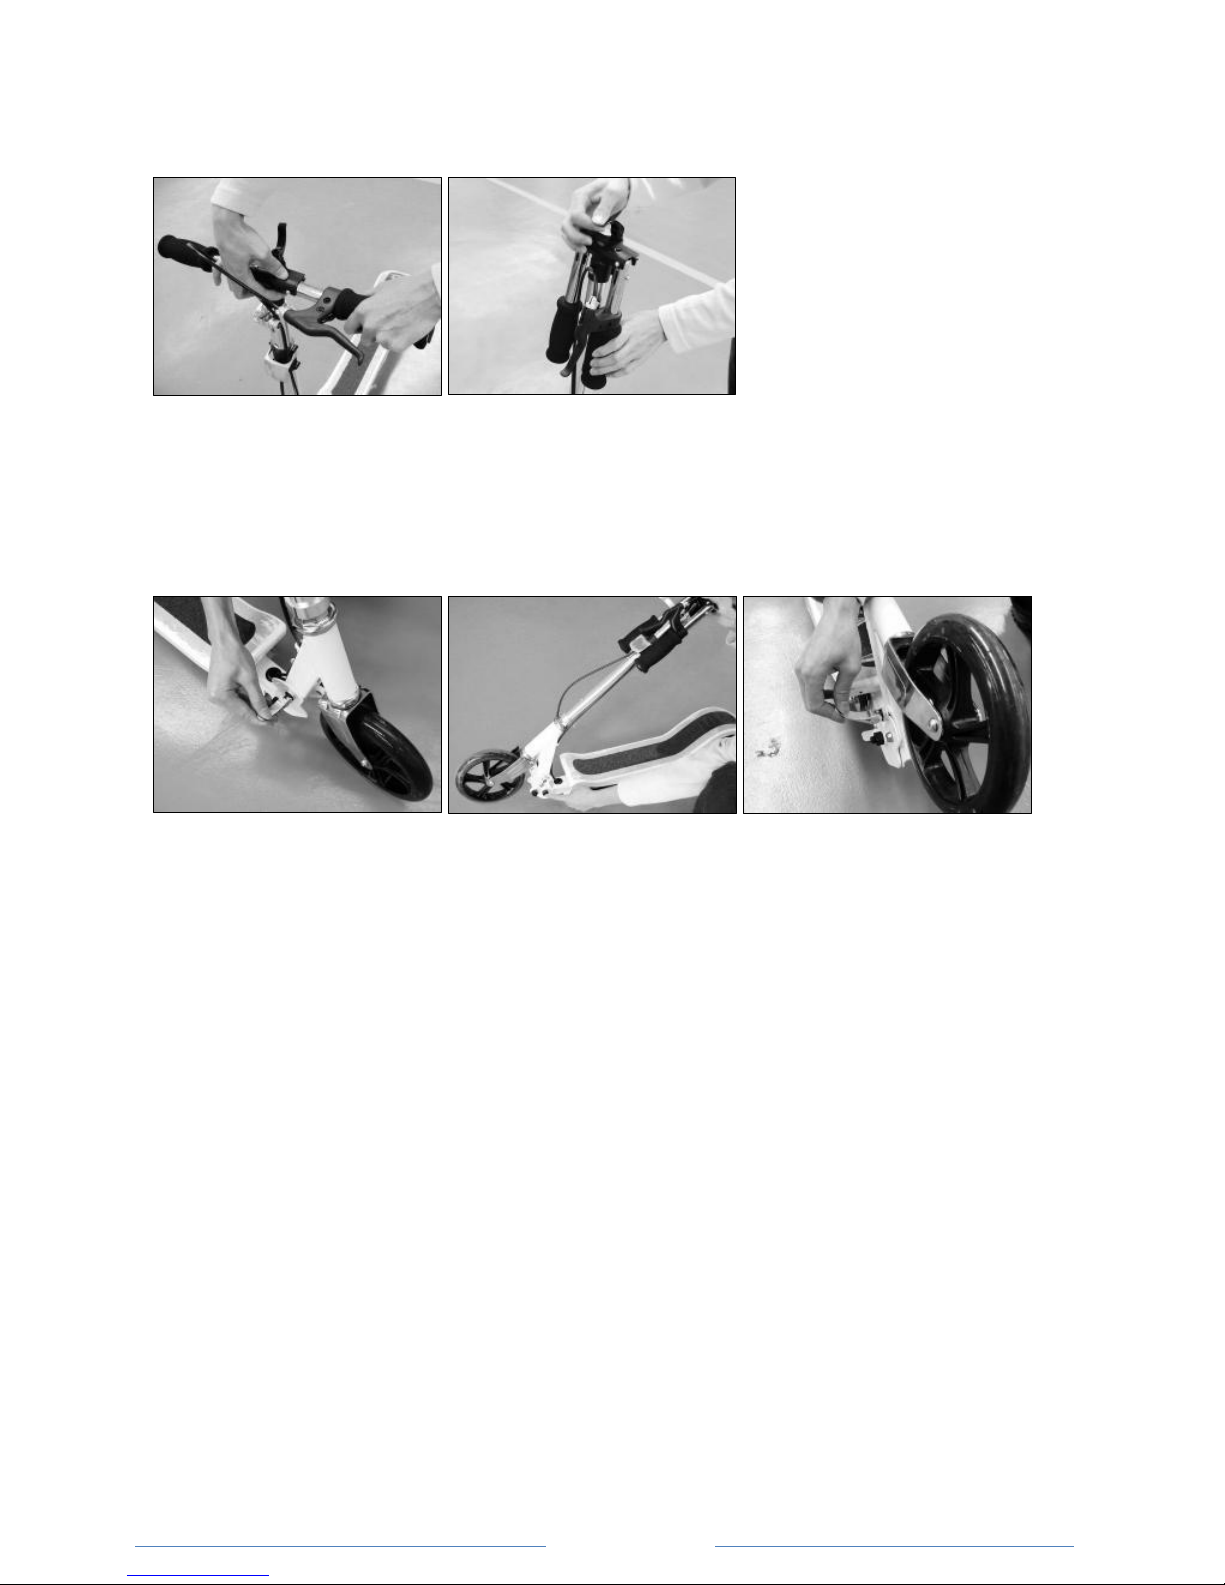
4. Open the quick-release clamp at top end of T-tube.
5. Insert and secure left and right handlebars by pressing the spring-
loaded buttons and inserting them into T-tube. Make certain BOTH
handlebars are properly locked into the T-bar by spring-loaded
buttons.
6. Close quick-release clamp to lock the handlebar. If needed, adjust
the nut at the lower end of the clamp to ensure a tighter fit.
7. To adjust the height of the handlebars: open the quick-release
clamp on the steering pole..
8. Press the spring-load button and raise or lower the T-bar to desired
position, and make sure that the spring-load button is locked into
the hole of the tube.
9. Re-secure the quick release clamp to lock it into place. If needed,
adjust the nut at the left end of the clamp to ensure a tighter fit.
WARNING: Failure to properly secure the quick-release lever may
cause the T-tube to telescope up or down while riding, which may
cause you to lose control and fall.
Page 9
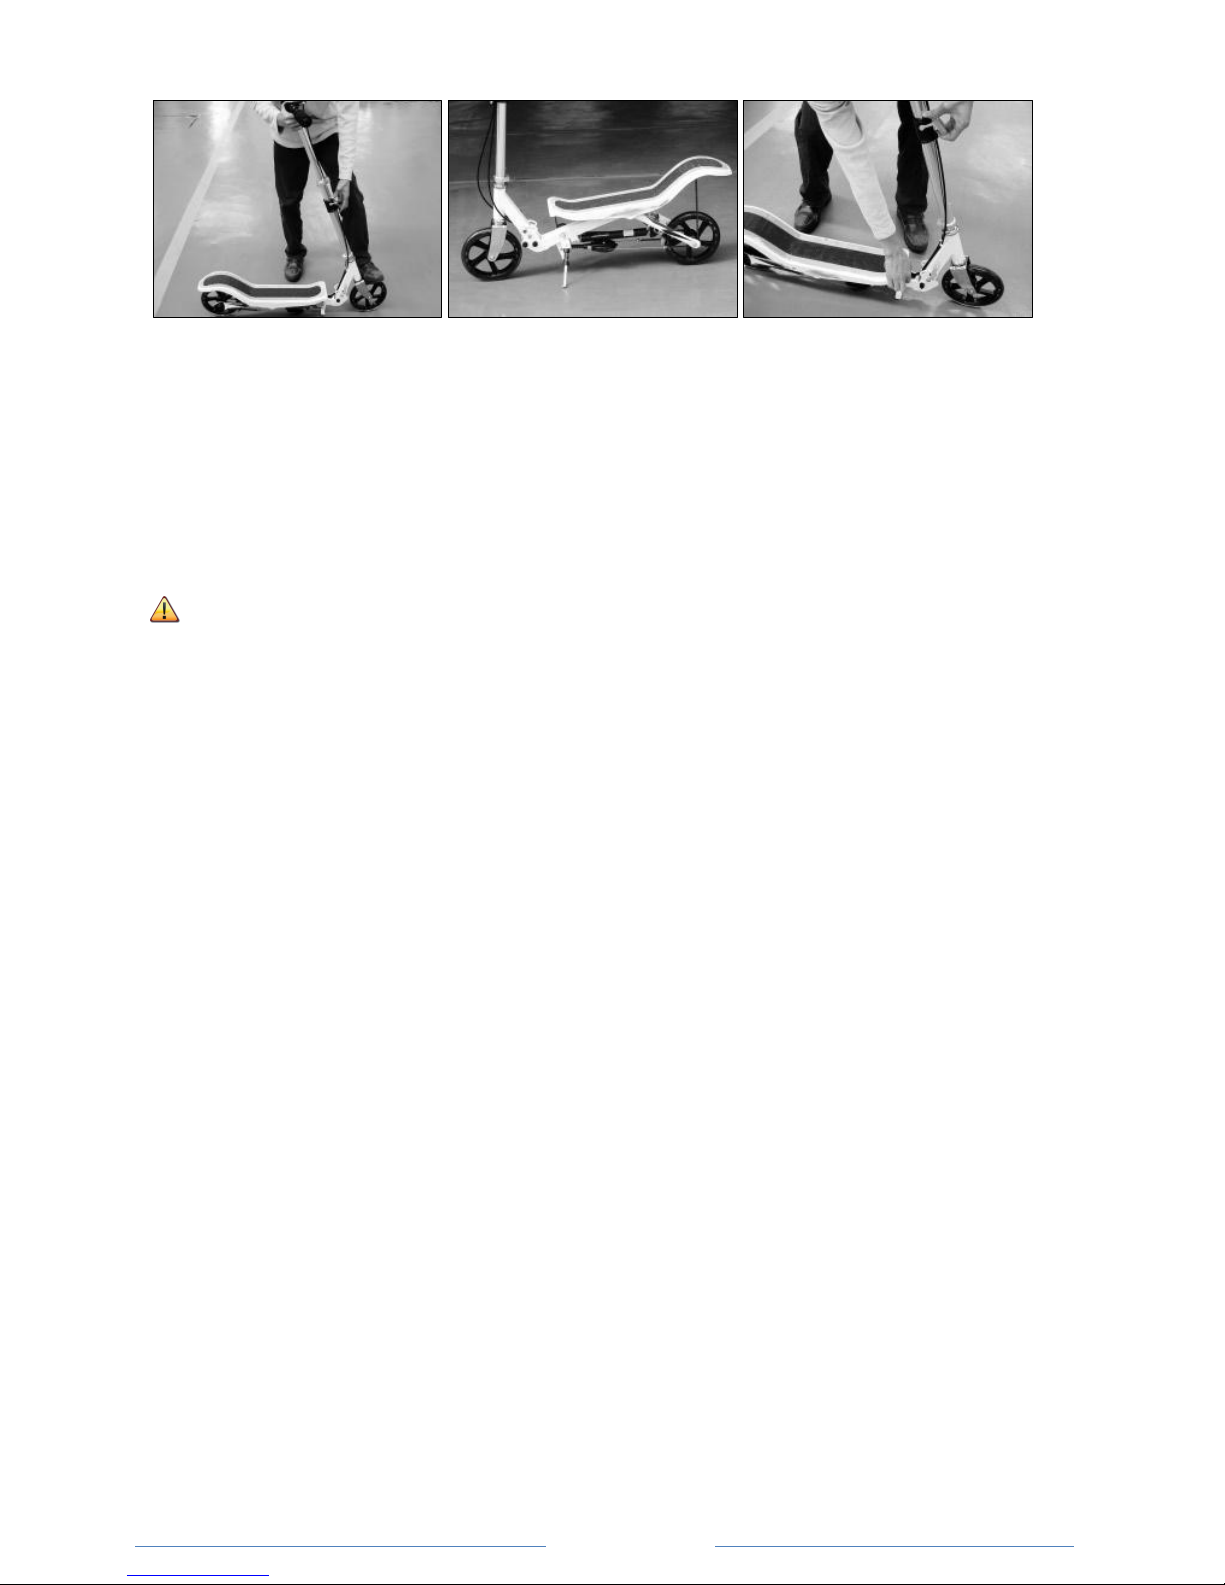
10. To unfold the deck, stop the front wheel by placing a foot on it.
11. Hold the steering pole with one hand and pull the folding lever
with the other hand. At the same time, pull the steering pole
slightly forward untill the rear wheel is lifted from the ground. The
deck will unfold slowly. Let the deck raise completely and let go of
the folding lever. The deck will be locked at this position.
If the deck does not unfold normally, the user can pull the front end
of the deck to help unfold it.

Page 10
Convert your Space Scooter®into a traditional kick
scooter.
1. Fold the deck:
(Make sure the deck is either horizontal or tilted up at the front.)
Hold the steering pole with one hand and then pull the folding
lever up with the other hand. At the same time, push down on the
deck with a foot in order to lower the deck. This might need some
weight.
2. Adjust the steering pole position: To adjust the steering pole to
"kick-scooter" mode, push the "Riding" unlock button (B) on the
folding mechanism to unlock the head tube and raise the steering
tube up more until it securely locked into "kick scooter" position.
Folding for storage
3. Folding the deck:
(Make sure the deck is either horizontal or tilted up at the front.)
Hold the steering pole with one hand, then pull the folding lever up
with the other hand. At the same time, push down on the deck
with a foot in order to lower the deck. This might need some
weight.
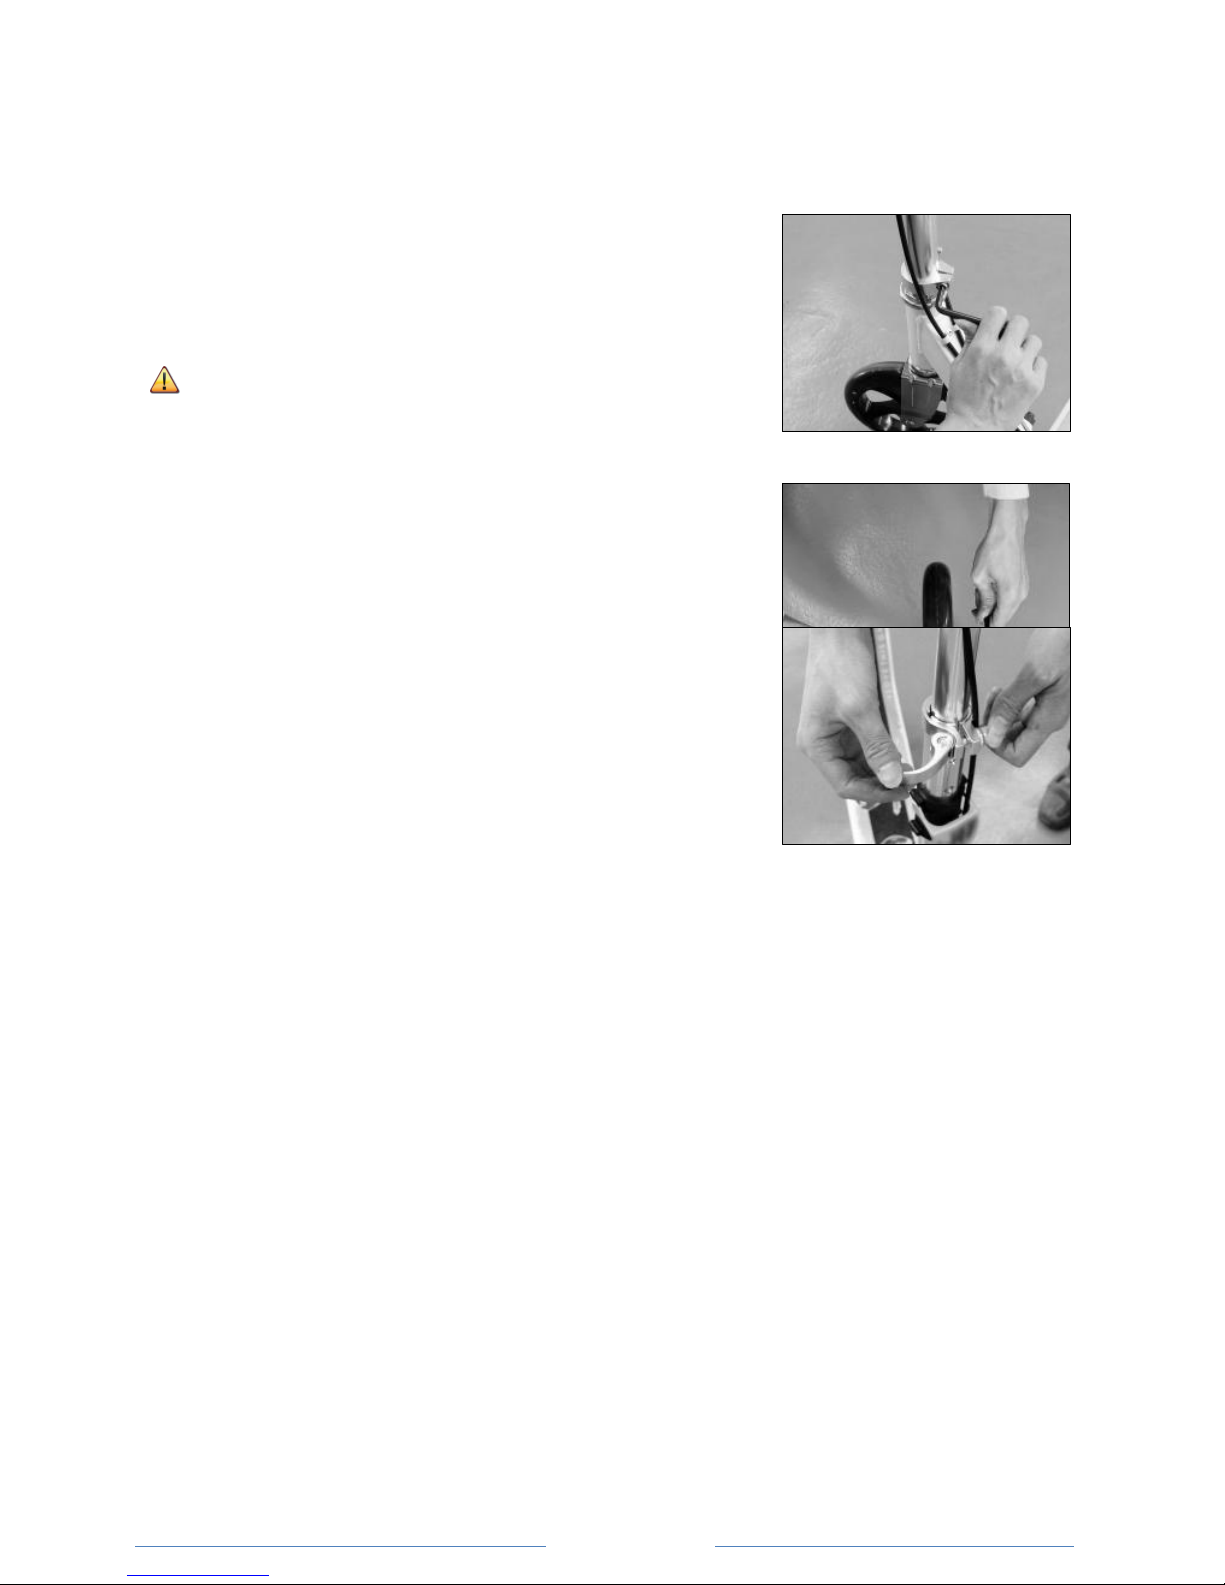
1. Folding the steering pole: Open the quick-release clamp for the
steering pole, then push the spring-loaded button on the side of
the steering pole and push down on the upper part of the steering
pole. The spring-loaded button will lock into place at the hole at
Page 11
the lower end of lower steering pole. Close the quick-release clamp.
2. Folding the handlebar: Open the quick-release lever on the top of
the T-tube, pull out the handlebar from the T-tube by pressing the
spring-loaded button on the handlebar. Fold down the handlebar
to the folding position.
3. Folding down the steering pole:
Open the quick-release lever on the right side of the folding
mechanism. Push the "Riding" unlock button (B) to unlock the
steering pole and press the steering pole down until securely
locked in the folded down position. Then tighten the quick release
lever at the right side of folder to lock the folding mechanism.

Page 12
How to ride
Riding As A Traditional Kick Scooter
Hold the handlebar with two hands. Place one
foot on the deck, then push forward with the
other foot by kicking the ground.
For enhanced cornering, lean slightly into the
direction of the turn. For controlled stops, apply
brake by grasping the brake handle slightly to
slow down the speed of the scooter. Do not grasp
the brake handle suddenly. We recommend that
you practice applying the brake at various speeds and in an open area
free from obstructions before riding your scooter around others.
Riding as a Space Scooter®
Hold the handlebar with two hands. Place one foot on the front end of
deck and kick the ground with the other to push the scooter forward.
Then stand on deck with both feet. Push the deck up and down in a
teeter-totter motion to propell forward.
For enhanced cornering, lean slightly into the direction of the turn. For
controlled stops, gently grasp the brake to slow down. Do not grasp
brake handle suddenly. We recommend that you practice applying the
brake at various speeds and in an open area free from obstructions
before riding your scooter around others.
(1)
(2)
(3)

Page 13
WARNING: Riding the scooter incorrectly may cause risk of falling
down.
Do not overstep the front end of deck.
Do not overstep the rear end of deck.
Do not attempt to ride down stairs.
Page 14
Check and Adjust
Check collar clamp
Using a 5 mm Allen wrench, check that the
collar clamp bolt is tightened securely as it
may have loosen during shipping.
WARNING: Failure to properly secure the
collar clamp may cause risk of injury or
death.
Check wheels and bearings
Periodically inspect the wheels for wear and tear, the axle
for proper tightness and bearings for side-to-side play and
loose parts.
Check quick release
Check all quick-releases before riding and
make sure that they are closed and tightened.
Adjust quick-release as follows:
1. Open handle of quick-release.
2. Adjust nut of quick release.
3. Close handle of quick release.
If it is not suitable, do it again.

Page 15
Adjust Brake Cable
Check the brake before riding:
1. Clench the brake handle, and the Space Scooter will not move
forward
2. Release the brake handle, and the Space Scooter will move
forward
3. Tiny adjustment: adjust the screw of brake handle to loosen or
tighten the brake cable.
Wide adjustment:
1. Loosen the brake cable nut.
2. Draw the brake cable to a suitable place.
3. Tighten the cable nut.
WARNING: Failure of brake may cause the scooter to go out of
control, causing risk of injury or death.
Page 16
Maintenance
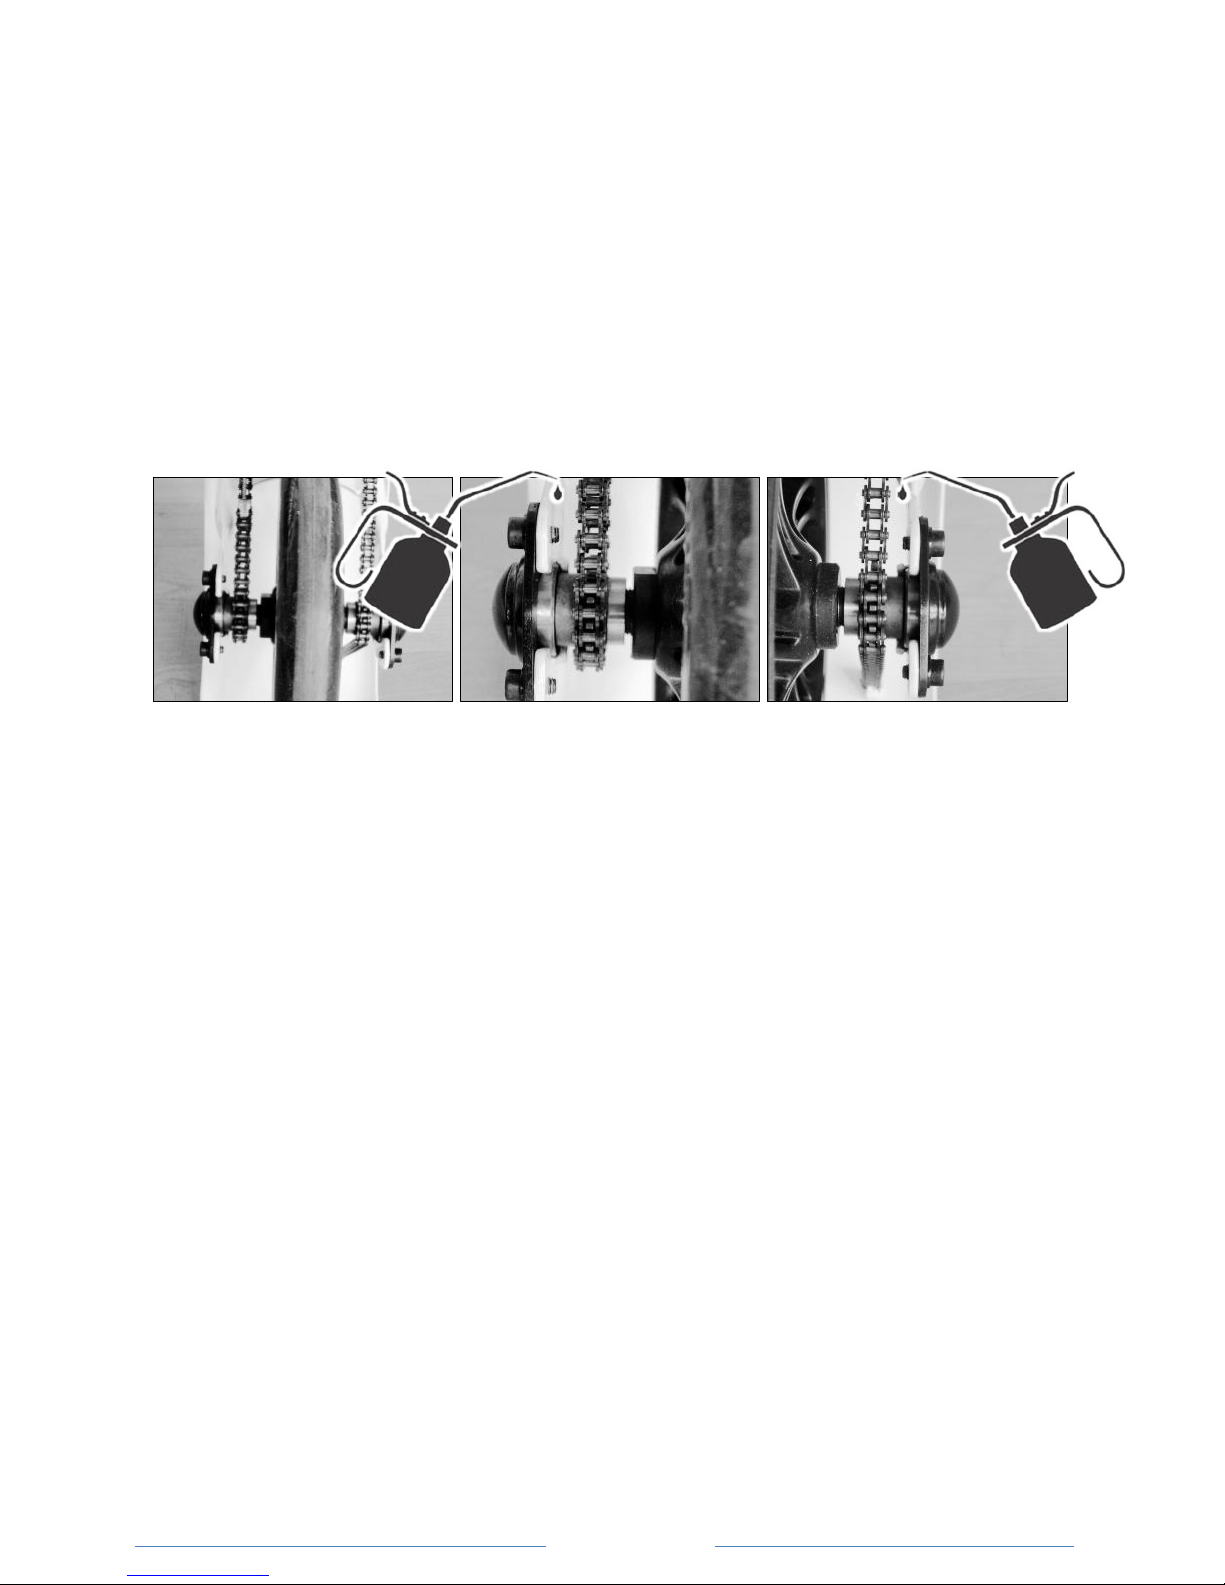
Check flywheel and add ball-bearing-oil
Checking the flywheel before riding. If you hear a noise, just apply
ballbearingoil to the gaps between the flywheels and bearing. We
recommend that you apply ballbearingoil every month to ensure a
smooth ride.

Page 17
Space Scooter®F.A.Q. (frequently asked questions)
The Space Scooter®does not unfold.
Inspect your Space Scooter® carefully. The rear brake maybe locking
the back wheel into place. If this is the case, simply loosen the nut with
a size 8 wrench to provide some slack, then refasten the nut.
The grip of the grip sticker on the deck diminishes
clear description of the problem. Or when not available contact us by e-mail
HOW TO: FOR REPLACING THE GRIP STICKER.
a) Remove the existing sticker. You can easily peel off the sticker with your nail. Gently
pull off the sticker.
b) Make sure the tray shelf is clean. (defatted)
c) Peel off the new sticker from its back-side. Make sure to start at the square end and
only peel the first few centimeters. (This is applied at the front side of the Space
Scooter®)
d) Place the square end of the sticker straight onto the tray plank. Pull the sticker's
back-side off bit by bit whilst rubbing the sticker onto the tray. Make sure to create
no air pockets while applying.
The chain skips or runs next to the gears(flywheel).
HOW TO: REPLACE THE CHAINSPRING.
a) Lift the chain from the gears (go to the workshop manual available on
www.spacescooter.eu to find additional information on how to do this)
b) Loosen the inbus that holds the spring on the front.
c) Loosen the inbus that holds the other side of the spring.
d) Insert the new spring in reverse order.
The Space Scooter®makes strange noises.
There could be a few reasons why your Space Scooter® is making noises. Below are a few
reasons why this could be happening, and how to fix it.
(a) Treat the chain with a dry lubrication, which can be purchased at any bike or
hardware store. We do not recommend using WD40 or a silicone spray, as this will

Page 18
attract dirt. However, If the chain becomes rusty, then clean it with WD40, dry it off
well and then lubricate it with the chain spray.
(b) Apply grease to the ball bearings. To do this, you need to disassemble the rear wheel.
Do not use WD40 as this will result in defects.
(c) Make sure that all parts of the Space Scooter® are fastened tight. The caps under the
tray shelf can get loose by vibrations. Although the Space Scooter® is put together
with the utmost care, we cannot avoid parts getting loose. To ensure screws will stay
tight, you can use a product such as Loctite.
Be sure you have read the instruction manual carefully and understand how the Space
Scooter® works. If the problem you’re still experiencing still exists, please contact the helpdesk
All rights reserved.

Page 19
Warranty
Space Scooter® Limited 12-month warranty
SpaceScooter Inc. (“Space Scooter”) warrants to the original end-user
purchaser that this product will be free from defects in materials and
workmanship under the normal and intended use for a period of 12
months from the date of retail purchase (the “Warranty Period”). This
warranty is extended only to the original end-user purchaser of a new
product that is not sold “as-is”.
This Limited Warranty does not cover normal wear and tear, or any
damage, failure or loss caused by improper assembly, maintenance,
use, or storage.
This Limited Warranty will be void if the product is ever:
Used in a manner other than for recreation.
Modified in any way.
Rented.
Repaired with parts other than from Space Scooter®.
Space Scooter or the manufacturer is not liable for incidental or
consequential loss or damage due directly or indirectly to the use of
this product.
In case of a defect, or questions about this warranty, please contact
Space Scooter in one of the following manners:
By telephone: (888) 677 6701
By mail: 1954 N 30th Rd, Hollywood, FL 33021
You might be asked to provide a description, pictures or a video of the
problem you encounter in order to evaluate the situation and suggest
a solution if a repair is not needed.

Page 20
If your product needs to be repaired under warranty, you will be
supplied with instructions on how to send the product to us without
incurring shipping costs. You will be asked to include a description of
the problem, the reference number given and a copy of your purchase
invoice.
Space Scooter reserves the right at all times, at its sole opinion and
discretion, to repair your product, replace your product with a new
and comparable product of at least equivalent or greater retail value,
or to refund to you the purchase price of this product.
This warranty gives you specific legal rights, and you may also have
other rights which vary from state to state.
Only valid in the U.S.A.
Table of contents
Other Space Scooter Scooter manuals


