manuals.online logo
Brands
  1. Home
  2. •
  3. Brands
  4. •
  5. Space Seating
  6. •
  7. Indoor Furnishing
  8. •
  9. Space Seating 529-3R2N1F2 User manual

Space Seating 529-3R2N1F2 User manual

© Office Star Products Cctobre 2013
529-3R2N1F2 / 529-E3R2N1F2 / 529-R22N1F2
EXECUTIVE R2 SPACEGRID BACK CHAIR
OPERATING INSTRUCTIONS
529-3R2N1F2 / 529-E3R2N1F2 / 529-R22N1F2
FAUTEUIL DE DIRECTION À DOSSIER
EN R2 SPACEGRID
INSTRUCTIONS DE MONTAGE
529-E3R2N1F2 & 529-R22N1F2
(not shown)
LIMITED WARRANTY
SPACE®chairs are warranted* from the date of purchase against failure due to material and workmanship as follows:
• Lifetime on component parts including pneumatic cylinder, control mechanism, base and casters.
• 3 Years on upholstery fabric and foam against wear and deterioration.
• Leather is not warranted against routine scratching and scuffing, as leather is subject to minor blemishes in use.
*All warranties are limited to the original purchaser for normal commercial usage defined as a standard forty hour work week by persons weighing 250 lbs. or
less. This warranty will not cover labor, freight or damage from misuse, abuse, negligence, alteration, accident, vandalism, rusting, acts of nature or any other
event beyond the control of Office Star Products. The warranty does not cover cosmetic damage that may result from normal use. Liability for incidental or
consequential damages is excluded. The user assumes all risk of injury resulting from use of this product. When usage is more than 40 hours per week, a five
year warranty on all parts applies. Fabric is warranted for one year. This warranty gives you specific legal rights, and you may also have other rights which vary
from state to state.
To make a warranty claim, contact Parts Department via e-mail parts@officestar.net, by Fax 1-909-930-5629, or toll free parts
number 1-800-950-7262, Monday through Friday 8:00 a.m. - 5:00 p.m. Pacific Time. Provide model number and description of the
problem and obtain confirmation number. At it’s option Office Star Products will:
(a) Supply compatible components of current manufacture.
(b) Repair the customer’s component.
It is the customer’s responsibility to prepay freight on any components returned to the factory. Return freight on components
covered by warranty will be paid by Office Star Products.
WARNING
1. Use this product only one person at a time.
2. Do not use this chair unless all bolts screws and
knobs are securely tightened.
3. Check that all bolts screws and knobs are tight
every three months or as needed.
4. Do not overturn back tilt knob when decreasing
tension.
5. Dispose of packing material properly. Do not use
plastic cover as head covering. It may cause
suffocation.
6. Do not use chair as a stepladder.
7. Use this chair for its intended purpose only.
8. Use mild detergent only for cleaning.
FEATURES
• PNEUMATIC SEAT HEIGHT ADJUSTMENT
To raise seat remove pressure from seat and pull lever (1)
up. To lower seat height sit on chair and pull lever (1) up.
NOTE: It is normal for chair to slightly lower under body
weight.
• 2-TO-1 SYNCHRO TILT ADJUSTMENT
For individual comfort, this chair has been equipped with
an adjustment knob that will allow the user to change the
tension of the tilting feature.Turn knob (2) clockwise to increase
tension and counter-clockwise to decrease or ease the
tension. To lock return chair to the upright position and push
lever (1) in.To unlock pull lever (1) out.
NOTE: Be careful not to loosen back tilt adjustment knob
completely.
• ADJUSTABLE ARMS
- Height Adjustment: Push button (3) in to allow arms to
move up or down freely, release button (3) once the
desired height is reached.
- Flip Arm: To flip arms up, simply pull up on arm.
To lower arm, simply pull down on arm.
3
12
ÉTAPE 1 ÉTAPE 2 ÉTAPE 3
ÉTAPE 4 ÉTAPE 5
1
2
7R
8
13
910
5
7L
X5
3
4
13
11
12
6
X3
13
X3
X3
X3
X3
8
9
5
4
X4
1
PIÈCE QTÉ
1. Base .....................1
2. Roulettes ..................5
3. Vérin pneumatique ............1
4. Plaque du siège ..............1
5. Coussin Du Siège .............1
6. Dossier ....................1
7. Bras (7L et 7R) ...............2
8. Rondelles plates ..............6
9. Vis pour les bras ..............6
10. Vis pour le plaque du siège ......4
11. Vis pour le support du dossier ....3
12. Support du dossier (préinstallé) ...1
13. Clé Allen (non montrée) ........1
Enlever toutes les pièces du carton, les organiser selon les numéros de pièce indiqués sur la liste et vérifier les
quantités des pièces.
ÉTAPE 1 Insérer cinq Roulettes (2) dans la Base (1), les pousser très fort jusqu’à ce que vous entendiez ou sentiez la
Roulette (2) s’enclencher.
ÉTAPE 2 Fixez les Bras (7L et 7R) au Coussin du siège (5) avec trois Rondelles plates (8) et trois Vis pour les bras (9) pour chaque bras.
SERREZ TOUTES LES VIS COMME IL FAUT AVEC LA CLÉ ALLEN (13).
ÉTAPE 3 Fixez la Plaque du siège (4) au Coussin du siège (5) avec la flèche qui se dirige vers l’avant de la chaise en utilisant quatre Vis pour
la plaque du siège (10). SERREZ TOUTES LES VIS COMME IL FAUT AVEC LA CLÉ ALLEN (13).
ÉTAPE 4 Fixez le Support du dossier (12) à l’arrière de la Plaque du siège (4) avec trois Vis pour le support du dossier (11).
SERREZ TOUTES LES VIS COMME IL FAUT AVEC LA CLÉ ALLEN (13).
ÉTAPE 5 Introduisez le Cylindre pneumatique (3) à la Base (1) et placez le siège assemblé sur le Cylindre pneumatique (3).
Mettez de la pression vers le bas.
ATTENTION: AVANT D’UTILISER LE FAUTEUIL, S’ASSURER D’AVOIR
RESSERRÉ COMPLÈTEMENT TOUTES LES VIS.
© Office Star Products October 2013
AVERTISSEMENT
1. Seule une personne à la fois peut utiliser ce produit.
2. Ne pas utiliser ce fauteuil à moins que toutes les vis et tous les
boulons et boutons soient resserrés.
3. Vér ifier à tous les trois mois ou au besoin que toutes les vis et
tous les boulons et boutons sont resserrés.
4. Ne pas trop tourner le bouton d’inclinaison du dossier lors de la
diminution de la tension.
5. Éliminer les matér iaux de conditionnement d’une manière
convenable. Ne pas utiliser la couverture en plastique pour
couvrir la tête à cause du risque d’étouffement.
6. Ne pas utiliser le fauteuil comme un escabeau.
7. Ce fauteuil ne doit ser vir qu’à l’usage pour lequel il a été conçu.
8. N’utiliser qu’un détergent liquide doux pour le nettoyage.
GARANTIE LIMITÉE
Les fauteuils SPACE ®sont garantis* à compter de la date d’achat contre les défaillances entraînées par des vices de matériaux et de fabrication comme suit:
• Garantie à vie sur les pièces, dont le mécanisme de commande, le vérin pneumatique, la base et les roulettes.
• Garantie de 3 an sur le tissu d’ameublement et la mousse contre l’usure et la détérioration.
• Nous ne pouvons pas mériter le cuir contre le grattement de routine et érafler, comme tout cuir est sujet aux défauts mineurs dans l’usage.
Pour faire une réclamation de garantie, contacter le service des pièces. Fournir le numéro de modèle et une description du problème. À sa discrétion, Office
Star Products:
(a) fournira des pièces compatibles de produits courants
(b) réparera la pièce du client. Le client doit payer d’avance les frais de transport de toute pièce retournée à l’usine. Les frais de transport de retour pour des
pièces encore sous garantie seront payés par Office Star Product.
*Toutes les garanties sont limitées à l’acheteur original et à l’usage commercial normal défini comme l’usage pendant une semaine de travail standard
de quarante heures par des personnes pesant 250 lb ou moins. Cette garantie ne couvre pas la main d’oeuvre, le transport ou les dégâts entraînés par la
mauvaise utilisation, la négligence, la modification, les accidents, le vandalisme, la rouille, les catastrophes naturelles ou tout autre événement indépendant
de la volonté d’Office Star Products. La garantie ne couvre pas des dégâts superficiels qui pourraient se produire au cours de l’utilisation normale. La
responsabilité de dommages indirects ou accessoires est exclue. L’utilisateur accepte tout risque de blessure résultant de l’utilisation de ce produit. Si l’usage
dépasse 40 heures par semaine, une garantie de cinq ans sur toutes les pièces est applicable. Le tissu et la mousse sont garantis pendant un an.
Cette garantie vous accorde des droits spécifiques reconnus par la loi, et vous pouvez avoir d’autres droits qui varient d’un état et
d’une province à l’autre.
Nos normes de qualité sont par mi les plus élevées de l’industrie. De temps en temps, malgré nos efforts, il arrive que des pièces
soient endommagées ou manquantes. Notre département de pièces fera tout son possible pour régler le problème promptement.
Contactez-nous par courriel à parts@officestar.net, par télécopie à 1-909-930-5629 ou à notre numéro sans frais pour le service des
pièces à 1-800-950-7262, du lundi au vendredi de 8 h à 17 h, heure du Pacifique.
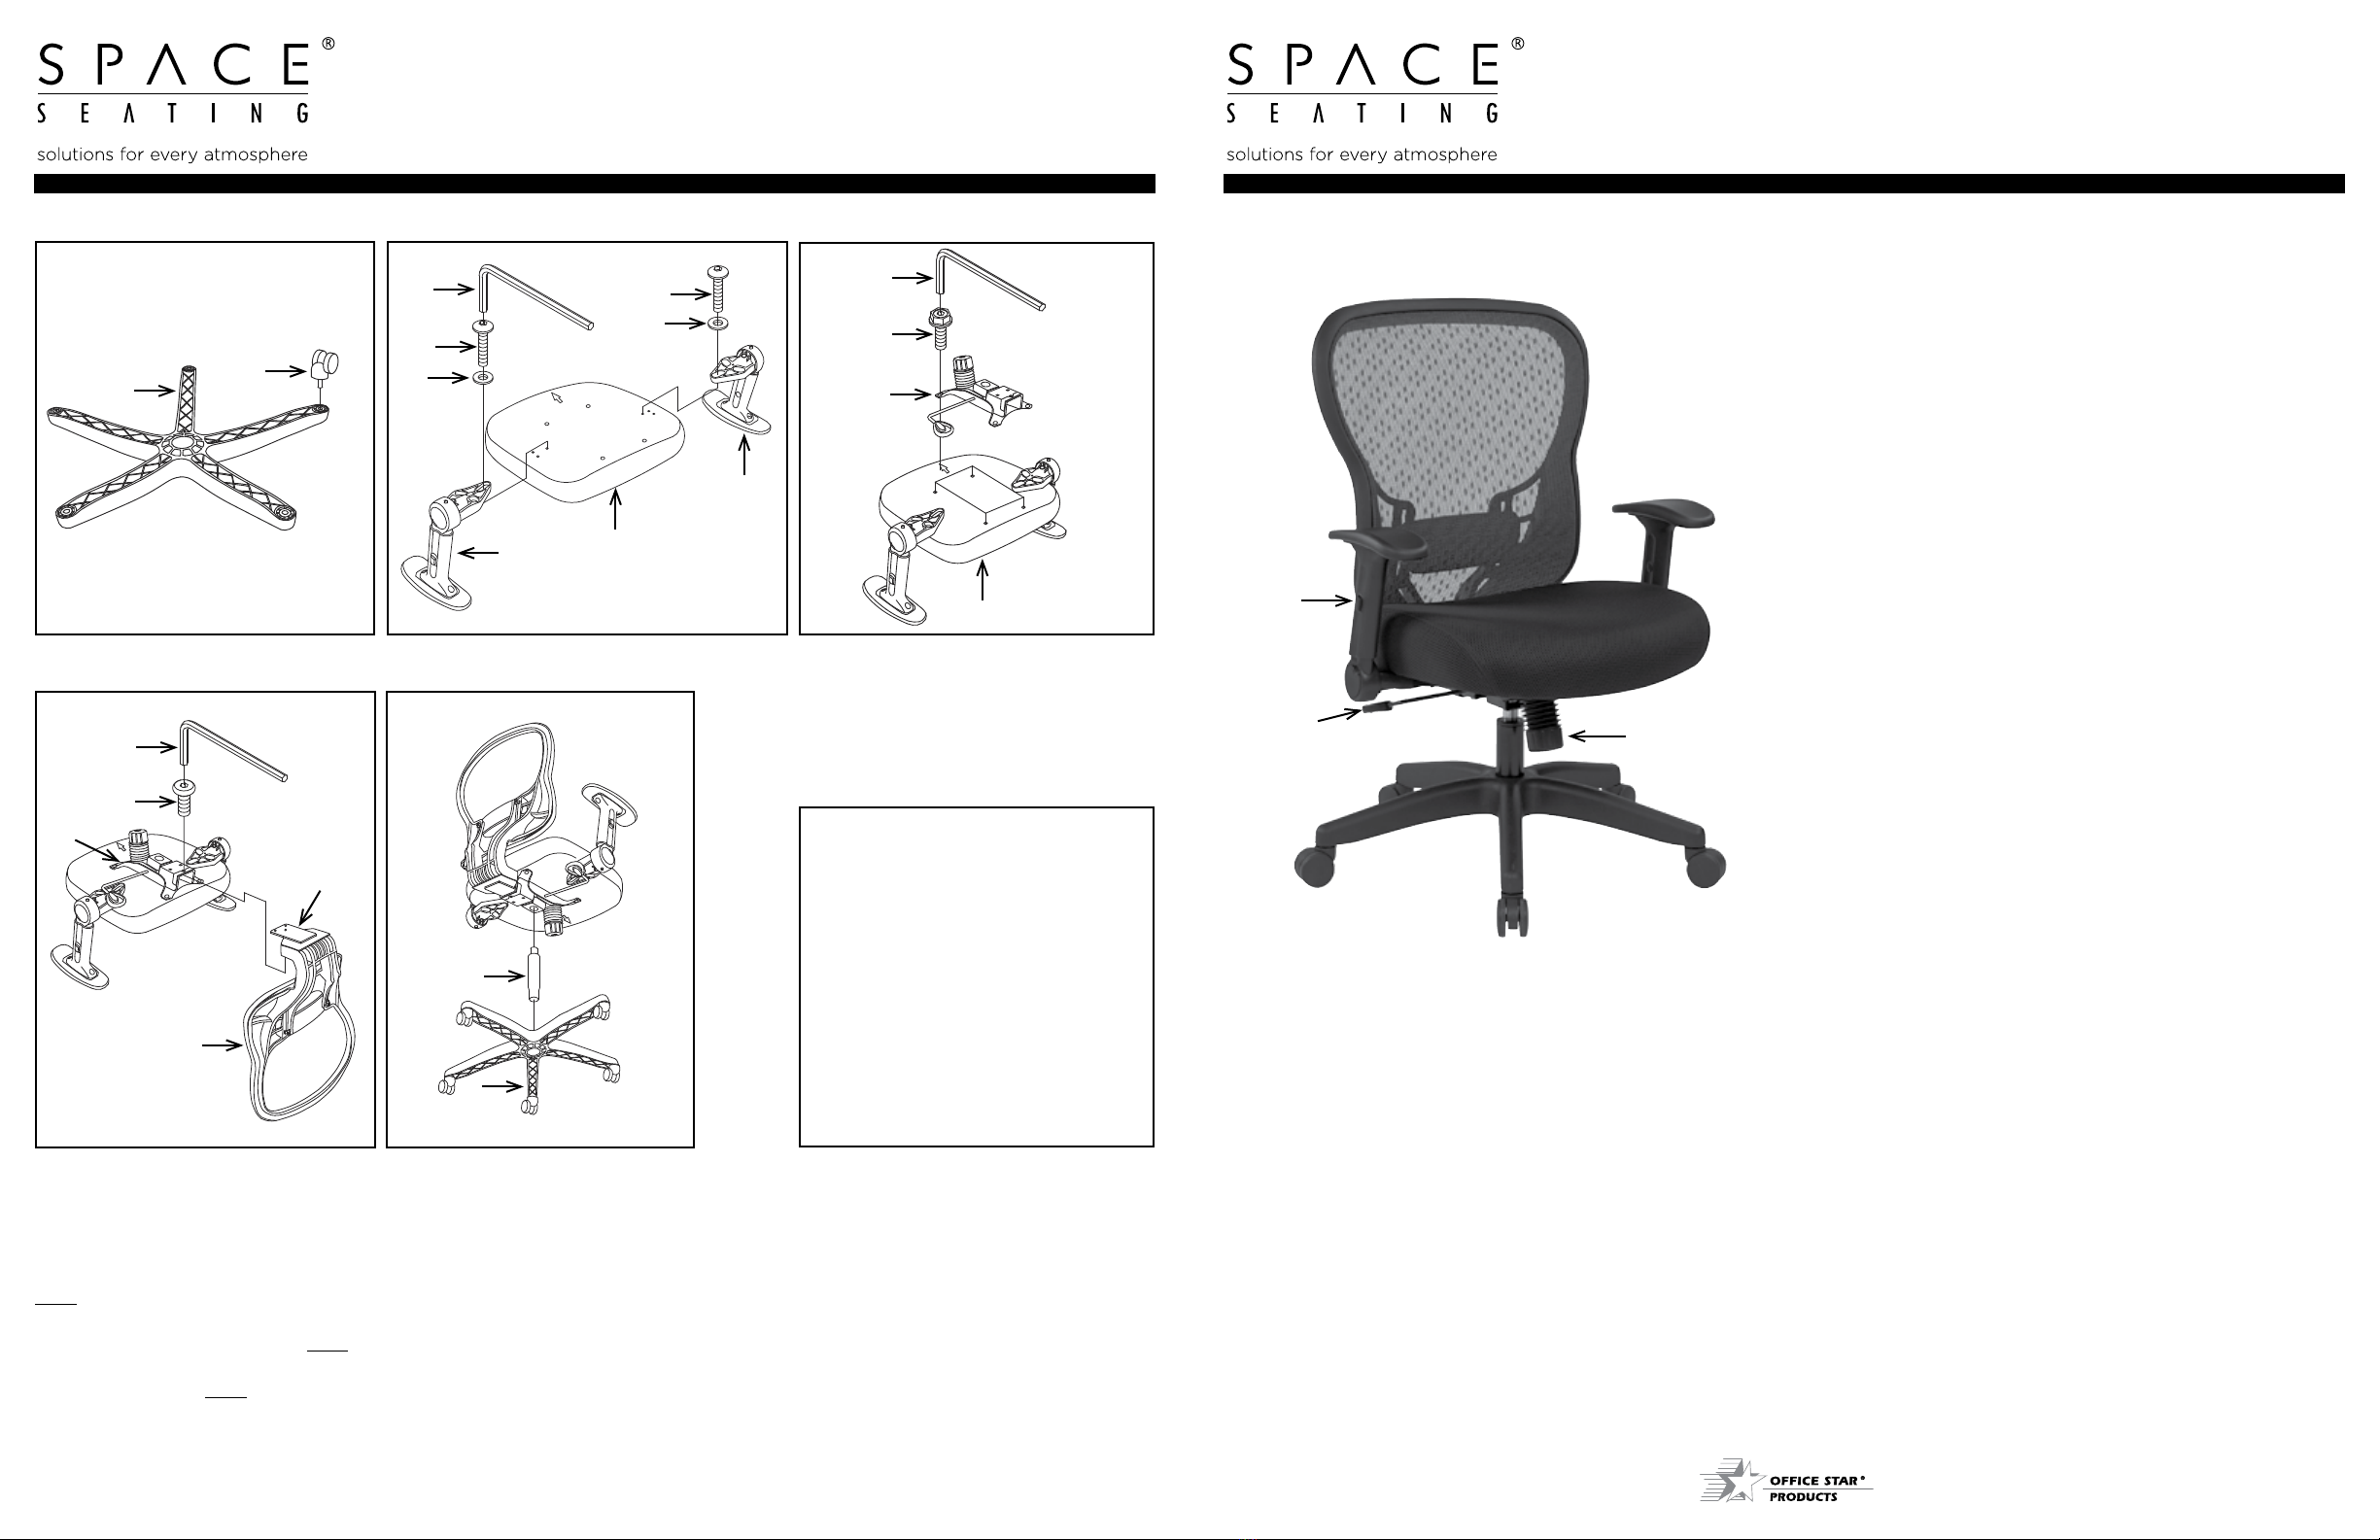
CARACTÉRISTIQUES
• RÉGLAGE DE LA HAUTEUR DU SIÈGE PNEUMATIQUE
Pour élever le siège, enlever toute pression du siège et lever le
levier (1). Pour baisser le siège, s’asseoir sur le fauteuil et lever
le levier (1).
NOTE: C’est normal que le fauteuil descend un peu lorsqu’on
s’assied.
• RÉGLAGE D’INCLINAISON SYNCHRO 2 À 1 ET DE
TENSION D’INCLINAISON
Pour assurer le confort des personnes, ce fauteuil est équipé
d’un réglage qui offre à l’utilisateur la possibilité de modifier la
tension de l’inclinaison. Tournez le bouton (2) vers la droite pour
augmenter la tension et vers la gauche pour réduire ou atténuer
cette tension. Pour verrouiller le fauteuil, remettez-le en position
verticale et poussez le levier (1). Pour le déverrouiller, tirez le
levier (1).
NOTE: Prendre garde à ne pas complètement desserrer le bouton de
réglage de l’inclinaison du dossier.
• BRAS RÉGLABLES
- Réglage de la hauteur: Appuyer sur le bouton (3) pour per-
mettre aux bras de monter et de descendre librement. Lâcher le
bouton (3) à la hauteur désirée.
- Bras flip: Pour inverser les bras, il suffit de tirer sur le bras.
Pour abaisser le bras, il suffit de tirer vers le bas sur le bras.
529-E3R2N1F2 & 529-R22N1F2
(non montré)
3
12
529-3R2N1F2 / 529-E3R2N1F2 / 529-R22N1F2
EXECUTIVE R2 SPACEGRID BACK CHAIR
ASSEMBLY INSTRUCTIONS
STEP 1 STEP 2 STEP 3
STEP 4 STEP 5
PART QTY
1. Base ..........................1
2. Casters ........................5
3. Pneumatic Cylinder ..............1
4. Seat Plate ......................1
5. Seat Cushion ...................1
6. Back Assembly ..................1
7. Arms (7L & 7R)..................2
8. Flat Washers....................6
9. Arm Screws ....................6
10. Seat Plate Screws ..............4
11. Back Support Screws............3
12. Back Support (Pre-Installed) ......1
13. Allen Wrench ..................1
Remove all parts from carton, separate by part numbers indicated on parts list, and verify part quantities.
STEP 1 Insert five Casters (2) into Base (1), push hard until you feel or hear the Caster (2) snap into place.
STEP 2 Attach Arms (7L & 7R) to Seat Cushion (5) using three Flat Washers (8) and three Arm Screws (9) for each arm. FULLY TIGHTEN
ALL SCREWS USING ALLEN WRENCH (13).
STEP 3 Attach Seat Plate (4) to Seat Cushion (5) with arrow pointing towards the front of the chair, secure Seat Plate (4) using four Seat Plate
Screws (10). FULLY TIGHTEN ALL SCREWS USING ALLEN WRENCH (13).
STEP 4 Attach Back Support (12) to rear of Seat Plate (4) using three Back Support Screws (11),
FULLY TIGHTEN ALL SCREWS USING ALLEN WRENCH (13).
STEP 5 Insert Pneumatic Cylinder (3) into Base (1), place the assembled seat on top of Pneumatic Cylinder (3) and apply downward pressure.
ATTENTION: MAKE SURE ALL SCREWS ARE FULLY TIGHTENED BEFORE USING CHAIR.
1
2
7R
8
13
910
5
7L
X5
3
4
13
11
12
6
X3
13
X3
X3
X3
X3
8
9
5
4
X4
1
529-3R2N1F2 / 529-E3R2N1F2 / 529-R22N1F2
FAUTEUIL DE DIRECTION À DOSSIER
EN R2 SPACEGRID
MODE D’EMPLOI

This manual suits for next models

2

Other Space Seating Indoor Furnishing manuals

Space Seating Air Grid 5500SL User manual

Space Seating

Space Seating Air Grid 5500SL User manual

Space Seating 15-37A720D User manual

Space Seating

Space Seating 15-37A720D User manual

Space Seating 818-41G9C18P User manual

Space Seating

Space Seating 818-41G9C18P User manual

Space Seating 5500 User manual

Space Seating

Space Seating 5500 User manual

Space Seating 15-37A720D User manual

Space Seating

Space Seating 15-37A720D User manual

Space Seating 13-37P500D User manual

Space Seating

Space Seating 13-37P500D User manual

Space Seating 317-E36C61F6 User manual

Space Seating

Space Seating 317-E36C61F6 User manual

Space Seating 829-R2C728P User manual

Space Seating

Space Seating 829-R2C728P User manual

Space Seating 215-E3T17C1A8 User manual

Space Seating

Space Seating 215-E3T17C1A8 User manual

Space Seating 525-3G3N11 User manual

Space Seating

Space Seating 525-3G3N11 User manual

Space Seating 32-E3371F3 User manual

Space Seating

Space Seating 32-E3371F3 User manual

Space Seating 9370-55NC17U User manual

Space Seating

Space Seating 9370-55NC17U User manual

Space Seating Air Grid 213-37N2F3D User manual

Space Seating

Space Seating Air Grid 213-37N2F3D User manual

Space Seating 867A Series User manual

Space Seating

Space Seating 867A Series User manual

Space Seating R2 SpaceGrid 529-M3R2N6F2 User manual

Space Seating

Space Seating R2 SpaceGrid 529-M3R2N6F2 User manual

Space Seating 818A-11P9C1C3 User manual

Space Seating

Space Seating 818A-11P9C1C3 User manual

Space Seating 75-37A773 User manual

Space Seating

Space Seating 75-37A773 User manual

Space Seating 3680 User manual

Space Seating

Space Seating 3680 User manual

Space Seating Air Grid213-38N1F3 User manual

Space Seating

Space Seating Air Grid213-38N1F3 User manual

Space Seating 317-ME3R2C6KF6 User manual

Space Seating

Space Seating 317-ME3R2C6KF6 User manual

Space Seating 5500V User manual

Space Seating

Space Seating 5500V User manual

Space Seating SYNCHRO KNEE TILT CHAIR 25004 User manual

Space Seating

Space Seating SYNCHRO KNEE TILT CHAIR 25004 User manual

Space Seating SpaceGrid 529-3R2V30 User manual

Space Seating

Space Seating SpaceGrid 529-3R2V30 User manual

Space Seating 13-37N9WA User manual

Space Seating

Space Seating 13-37N9WA User manual

Popular Indoor Furnishing manuals by other brands

fantastic furniture Cove manual

fantastic furniture

fantastic furniture Cove manual

Argos 609/0131 Assembly instructions

Argos

Argos 609/0131 Assembly instructions

Deltaco Gaming DC220 user manual

Deltaco Gaming

Deltaco Gaming DC220 user manual

bbf CH1308BLF-03 Assembly instructions

bbf

bbf CH1308BLF-03 Assembly instructions

Balt BLT-90294 Assembly instructions

Balt

Balt BLT-90294 Assembly instructions

Julian Bowen Limited CAM501 Assembly instructions

Julian Bowen Limited

Julian Bowen Limited CAM501 Assembly instructions

Novogratz 4012810COMNUK Assembly instructions

Novogratz

Novogratz 4012810COMNUK Assembly instructions

Rauch Tarragona M1826 Assembly instructions

Rauch

Rauch Tarragona M1826 Assembly instructions

DHP Junior Loft Bed Instruction booklet

DHP

DHP Junior Loft Bed Instruction booklet

Furniture of America CM3018PT Assembly instructions

Furniture of America

Furniture of America CM3018PT Assembly instructions

Diphano METRIS quick guide

Diphano

Diphano METRIS quick guide

Interior Solutions DC420V operating instructions

Interior Solutions

Interior Solutions DC420V operating instructions

CALICO DESIGNS ADELAIDE 52002 Assembly instructions

CALICO DESIGNS

CALICO DESIGNS ADELAIDE 52002 Assembly instructions

MARCKERIC ESTEFANIA 16441 Assembly instructions

MARCKERIC

MARCKERIC ESTEFANIA 16441 Assembly instructions

John Thomas T-3248XBT Assembly instructions

John Thomas

John Thomas T-3248XBT Assembly instructions

Next ANDERSON 843556 Assembly instructions

Next

Next ANDERSON 843556 Assembly instructions

MasterCraft MO-40 instruction manual

MasterCraft

MasterCraft MO-40 instruction manual

Safavieh Furniture KCH 1401 manual

Safavieh Furniture

Safavieh Furniture KCH 1401 manual

manuals.online logo
manuals.online logoBrands
  • About & Mission
  • Contact us
  • Privacy Policy
  • Terms and Conditions

Copyright 2025 Manuals.Online. All Rights Reserved.