SpaceCamper VanKid User manual

Travel cot VanKid
for VW T6.1, T6, T5, T4
The baby cot for the driver’s cab
for children from 0 months to approx. 4 years
Assembly instructions

We have:
• Metal frame in silver for the canopy, consisting of:
2 curved rods and 4 straight rods
• Metal frame in black for the lower part, consisting of:
2 curved rods
2 rods with adjustable lengths
4 more poles
• Folding mattress with tent poles
• Fabric for the lower part
• Mesh fabric for the canopy
Please note: The new VanKid only has a side marking on the metal
frame. The pictures show the old model with two stickers.
This is how the VW van becomes a family camper
Let’s begin
3
2
Step 1: The metal frames
Put the individual parts of the metal frames together. The black
frame is for the lower part, the silver one for the canopy.
For the black metal frame, two "normal" Rods and an adjustable rod
are needed. When used in the T4, the adjustment levers can be
used to adjust the required length.
The arrangement of the normal rods does not matter, the rods with
adjustable level for the length must be attached to the wider cur-
ved shape. For the silver metal frame, two normal rods are needed
per side. The order does not matter.
Step 2: Preparing the lying surface
The lying surface of the bed (the lower part) will be hung in the dri-
ver's cabin with the metal frame. First the underside should be re-
inforced with the help of tent poles

To do this, put the rst tent pole together and attach to one of the
long sides through all the black tabs up to the last closed tab.
5
4
In order to attach the tent pole on the opposite side, open the tab.
Place the rod in the open tab and then close it by using the Velcro.
Step 3: Attaching the lying surface to the metal frame
The lying surface will later rest on the front seats. Put the fabric and
the black metal frame together. The easiest way is to set up the
bed in the correct position, meaning the narrow side to the right
where the steering wheel of the van is. The fabric is attached to
both long sides of the metal frame with zippers.
Step 4: Attaching the canopy
to the the metal frame
Attach the canopy onto the sil-
ver metal frame with the zipper.
Important: The Velcro fasteners
for the handles must be positio-
ned on the short sides and the
Velcro strip on the lower part
must run along the inside.
Then attach the second tent pole on the other side through all the
tabs and fasten it as described above.
7
6
Step 5: Placing the lower part in the van
The steering wheel should be pla-
ced in the starting position enab-
ling enough space for the bed.
Push the metal frame with the
lower part through the open win-
dows into the driver's cabin. The
frame is then lying on the window
ttings and has a straight, stable position. Now place the folding
mattress inside and the lying surface is ready.
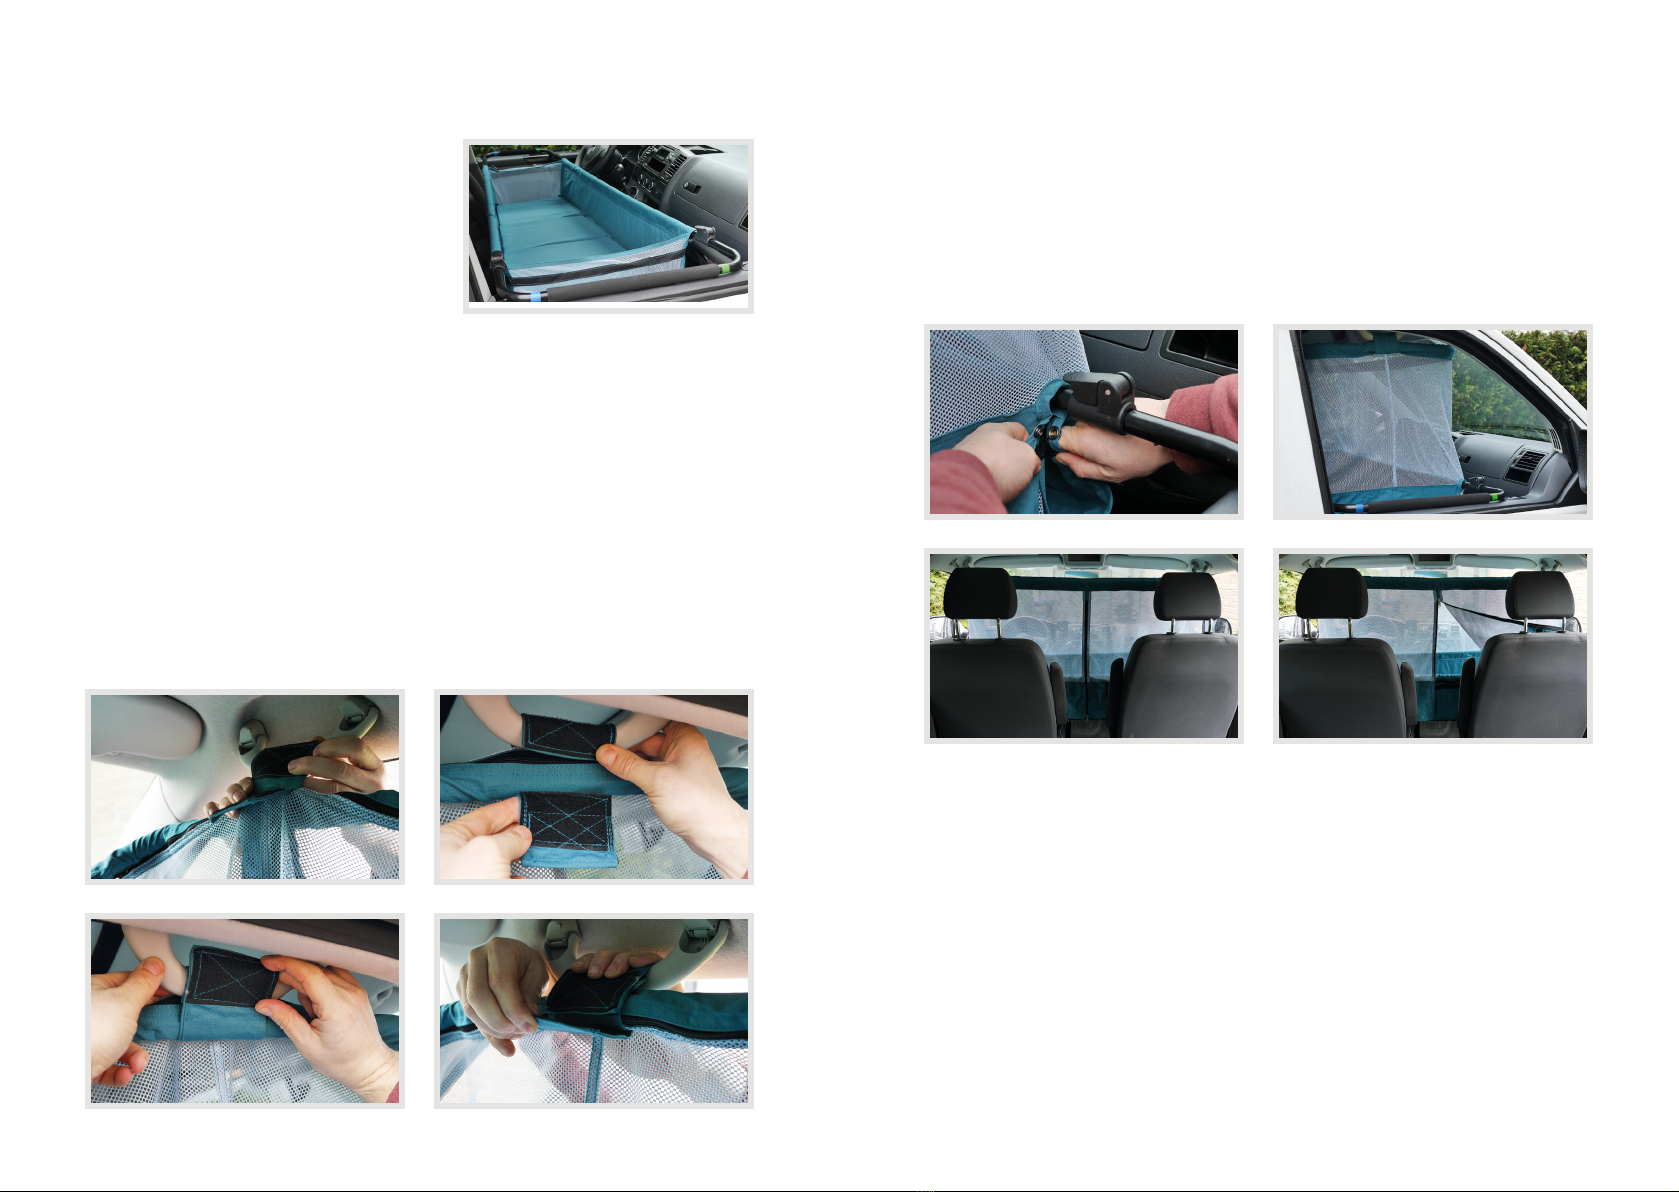
Step 6: Attaching the canopy to the handles
The canopy is held in place by loops with double-sided Velcro fas-
teners on the handles. They are similar to the sturdy leash attach-
ment that surfers use to secure their board to their leg. Push the
one-sided Velcro „without bottom“ through the handle. The dou-
ble-sided Velcro is attached from the outside. Then attch the Vel-
cro "without top" from the inside back to the double-sided one.
Step 7: Connecting the canopy to the lower part
The canopy is attached to the lower part via Velcro fasteners as
well as press studs. Please make sure that the Velcro is even and
smooth all round. Thus the bedroom is completed in a way that the
child does not climb out, fall or can reach outwards. The bed can
be opened and closed via a zipper between the front seats.
Lower part: 25 cm high, lying surface 115 cm long, 40–55 cm wide
(narrows towards the steering wheel)
Top part: from bottom of the bed to the suspension approx. 80 cm
Frame length: variably adjustable to 167–187 cm
Packing size: 60 x 30 x 18 cm
All information in the instructions is provided without guarantee for its correct-
ness. Under no circumstances will liability be assumed for damages resulting
from the use of the information retrieved. The legal liability is based on restrictions
of the company's assets.
Specications:

Wiesenweg 59
52072 Aachen
www.spacecamper-shop.de
Tel.: +49 2407 5548676
E-Mail: service@spacecamper-shop.de
ATTENTION
• Please set up the baby cot only as described in these in-
structions. Changes to individual elements or the build can
lead to serious injuries.
• If you leave your baby unattended in the crib, make sure
that the top of the bed (the canopy) is rmly attached to
the lower part and the zipper at the entrance is securely lo-
cked between the front seats of the van.
• Never place the baby cot near an open re or strong heat
source.
• Do not use the baby cot if individual parts are broken, torn,
damaged or missing. Only use original spare parts from the
manufacturer.
• Do not leave items in the baby cot or near the bed, that
could be used to climb out or that pose risk of suocation
and strangulation such as cords, thick pillows etc.
• Always use the baby cot together with the mattress sup-
plied and never use another mattress. Also, never put more
than one mattress in the baby bed. Babies can suocate if
gaps form in the bed due to mattresses and pads that are
too small or too thick.
Table of contents
Popular Automobile Accessories manuals by other brands


ULTIMATE SPEED
ULTIMATE SPEED 279746 Assembly and Safety Advice

SSV Works
SSV Works DF-F65 manual

ULTIMATE SPEED
ULTIMATE SPEED CARBON Assembly and Safety Advice

Witter
Witter F174 Fitting instructions

WeatherTech
WeatherTech No-Drill installation instructions

TAUBENREUTHER
TAUBENREUTHER 1-336050 Installation instruction