Spacelabs 91518 User manual

Multigas Analyzer
91518
Service Manual
070-1328-00 Rev. E

©2008 Spacelabs Medical, Inc.
All rights reserved. Contents of this publication may not be reproduced in any form without the written permission of
Spacelabs Medical. Products of Spacelabs Medical are covered by U.S. and foreign patents and/or pending patents.
Printed in U.S.A. Specifications and price change privileges are reserved.
Spacelabs Medical considers itself responsible for the effects on safety, reliability and performance of the equipment
only if:
• assembly operations, re-adjustments, modifications or repairs are carried out by persons authorized by
Spacelabs Medical, and
• the electrical installation of the relevant room complies with the requirements of the standard in force, and
• the equipment is used in accordance with the operations manual.
Spacelabs Medical will make available, on request, such circuit diagrams, component part lists, descriptions,
calibration instructions or other information which will assist appropriately qualified technical personnel to repair those
parts of the equipment which are classified by Spacelabs Medical as field repairable.
Spacelabs Medical is committed to providing comprehensive customer support beginning with your initial inquiry
through purchase, training, and service for the life of your Spacelabs Medical equipment.
CORPORATE OFFICES
U.S.A.
Spacelabs Medical, Inc.
5150 220th Ave SE
Issaquah, WA 98029
Telephone: 425-657-7200
Telephone: 800-522-7025
Fax: 425-657-7212
Authorized EC Representative UNITED KINGDOM
Spacelabs Healthcare, Ltd.
Beech House, Chiltern Court
Asheridge Road, Chesham
Buckinghamshire HP5 2PX
Telephone: 44 (0) 1494 784422
Fax: 44 (0) 1494 794414
BirthNet, Clinical Browser, Data Shuttle, Flexport, Intesys, Mermaid, MOM, Multiview, PCIS, PCMS, PrintMaster,
Quicknet, Sensorwatch, TRU-CAP, TRU-CUFF, TruLink, Ultralite, Ultraview, Ultraview Care Network, Ultraview Clinical
Messenger, Ultraview Digital Telemetry, Ultraview SL, Uni-Pouch, UCW, Varitrend and WinDNA are trademarks of
Spacelabs Medical, Inc.
Other brands and product names are trademarks of their respective owners.
Caution:
US Federal law restricts the devices documented herein to sale by, or on the order of, a
physician.
Before use, carefully read the instructions, including all warnings and cautions.
Rx Only
!

90518 Multigas Analyzer Service Manual i
Contents Page
Table of Contents
Introduction
Overview. . . . . . . . . . . . . . . . . . . . . . . . . . . . . . . . . . . . . . . . . . . . . . . . . . . . . . . . . . . . . . . . . . . . . . . . . . . . . . . . . 1-1
Compatibility . . . . . . . . . . . . . . . . . . . . . . . . . . . . . . . . . . . . . . . . . . . . . . . . . . . . . . . . . . . . . . . . . . . . . . . . . . . . . . 1-2
Dimensions. . . . . . . . . . . . . . . . . . . . . . . . . . . . . . . . . . . . . . . . . . . . . . . . . . . . . . . . . . . . . . . . . . . . . . . . . . . . . . . 1-2
Environmental Requirements . . . . . . . . . . . . . . . . . . . . . . . . . . . . . . . . . . . . . . . . . . . . . . . . . . . . . . . . . . . . . . . . . 1-3
Controls and Connectors . . . . . . . . . . . . . . . . . . . . . . . . . . . . . . . . . . . . . . . . . . . . . . . . . . . . . . . . . . . . . . . . . . . . 1-4
Setup
Unpacking. . . . . . . . . . . . . . . . . . . . . . . . . . . . . . . . . . . . . . . . . . . . . . . . . . . . . . . . . . . . . . . . . . . . . . . . . . . . . . . . 2-1
Safety Checks . . . . . . . . . . . . . . . . . . . . . . . . . . . . . . . . . . . . . . . . . . . . . . . . . . . . . . . . . . . . . . . . . . . . . . . . . . . . 2-1
Multigas Setup . . . . . . . . . . . . . . . . . . . . . . . . . . . . . . . . . . . . . . . . . . . . . . . . . . . . . . . . . . . . . . . . . . . . . . . . . . . . 2-2
Power Up Verification . . . . . . . . . . . . . . . . . . . . . . . . . . . . . . . . . . . . . . . . . . . . . . . . . . . . . . . . . . . . . . . . . . . . . . 2-14
Theory
Overview. . . . . . . . . . . . . . . . . . . . . . . . . . . . . . . . . . . . . . . . . . . . . . . . . . . . . . . . . . . . . . . . . . . . . . . . . . . . . . . . . 3-1
Interface PCBA. . . . . . . . . . . . . . . . . . . . . . . . . . . . . . . . . . . . . . . . . . . . . . . . . . . . . . . . . . . . . . . . . . . . . . . . . . . . 3-3
Gas Analyzer Unit. . . . . . . . . . . . . . . . . . . . . . . . . . . . . . . . . . . . . . . . . . . . . . . . . . . . . . . . . . . . . . . . . . . . . . . . . . 3-4
Maintenance
Overview. . . . . . . . . . . . . . . . . . . . . . . . . . . . . . . . . . . . . . . . . . . . . . . . . . . . . . . . . . . . . . . . . . . . . . . . . . . . . . . . . 4-1
Preventive Maintenance . . . . . . . . . . . . . . . . . . . . . . . . . . . . . . . . . . . . . . . . . . . . . . . . . . . . . . . . . . . . . . . . . . . . . 4-2
Corrective Maintenance . . . . . . . . . . . . . . . . . . . . . . . . . . . . . . . . . . . . . . . . . . . . . . . . . . . . . . . . . . . . . . . . . . . . 4-16
Disassembly and FRU Replacement . . . . . . . . . . . . . . . . . . . . . . . . . . . . . . . . . . . . . . . . . . . . . . . . . . . . . . . . . . 4-24
Troubleshooting
Tools and Equipment . . . . . . . . . . . . . . . . . . . . . . . . . . . . . . . . . . . . . . . . . . . . . . . . . . . . . . . . . . . . . . . . . . . . . . . 5-1
Problem Solving . . . . . . . . . . . . . . . . . . . . . . . . . . . . . . . . . . . . . . . . . . . . . . . . . . . . . . . . . . . . . . . . . . . . . . . . . . . 5-1
Parts
Field Replaceable Parts . . . . . . . . . . . . . . . . . . . . . . . . . . . . . . . . . . . . . . . . . . . . . . . . . . . . . . . . . . . . . . . . . . . . . 6-1
Drawings. . . . . . . . . . . . . . . . . . . . . . . . . . . . . . . . . . . . . . . . . . . . . . . . . . . . . . . . . . . . . . . . . . . . . . . . . . . . . . . . . 6-5
Appendix A — Electromagnetic Compatibility
Electromagnetic Emissions. . . . . . . . . . . . . . . . . . . . . . . . . . . . . . . . . . . . . . . . . . . . . . . . . . . . . . . . . . . . . . . . . . . A-1
Frequency Separation Distances . . . . . . . . . . . . . . . . . . . . . . . . . . . . . . . . . . . . . . . . . . . . . . . . . . . . . . . . . . . . . . A-3
Appendix B — Symbols


91518 Multigas Analyzer Service Manual 1-1
Contents
Introduction
Overview. . . . . . . . . . . . . . . . . . . . . . . . . . . . . . . . . . . . . . . . . . . . . . . . . . . . . . . . . . . . . . . . . . . . . . . . . . . . . . .1
Dimensions . . . . . . . . . . . . . . . . . . . . . . . . . . . . . . . . . . . . . . . . . . . . . . . . . . . . . . . . . . . . . . . . . . . . . . . . . . . . .2
Environmental Requirements . . . . . . . . . . . . . . . . . . . . . . . . . . . . . . . . . . . . . . . . . . . . . . . . . . . . . . . . . . . . . . .3
Controls and Connectors . . . . . . . . . . . . . . . . . . . . . . . . . . . . . . . . . . . . . . . . . . . . . . . . . . . . . . . . . . . . . . . . . .4
Overview
The 91518 is a multigas analyzer used primarily in an operating room environment to measure the CO2
produced by a patient and the O2, N2O, and anesthetic agents being administered. The anesthetic agents that
are monitored are halothane, isoflurane, enflurane, sevoflurane, and desflurane.
The 91518 Multigas Analyzer interfaces to a Spacelabs Healthcare monitor through an SDLC connection. The
Spacelabs Healthcare monitor provides the numeric display for gas concentrations, a respiratory rate, and a
capnograph waveform for CO2.
Multigas Analyzer
Figure 1-1: 91518 Multigas Analyzer
Spacelabs Healthcare products are designed and manufactured under good manufacturing practices and in
compliance with all applicable regulatory requirements. To ensure proper operation in accordance with these
guidelines, this product must be maintained by trained technicians using Spacelabs Healthcare authorized
replacement parts.

Introduction
91518 Multigas Analyzer Service Manual 1-2
Compatibility
The 91518 Multigas Analyzer is designed for use with Ultraview SL, Ultraview, and UCW®monitors.
Ultraview SL™
• Ultraview SL2400 (91369), SL2600 (91370), SL2700 (91387-27), SL2800 (91387-28)
Ultraview®
• UCW (90385)*, Ultraview 1700 (90387)*, Ultraview 1500 (90363), Ultraview 1600 (90364), Ultraview 1050
(90369), Ultraview 1030 (90367)
* Some UCW (S/N below 385-3xxxxx) and Ultraview monitors (S/N below 387-1xxxxx) do not support all
waveforms and display options, such as colors.
Dimensions
Height 17.15 cm (6.75 inches) (enclosure: 14.605 cm [5.75 inches]); feet: 1.27 cm
(0.5 inches)
Width 15.24 cm (6 inches)
Depth 28.45 cm (11.2 inches) (enclosure: 21.59 cm [8.5 inches]); gas module protrudes
from front 4.572 cm (1.8 inches); handle in back of enclosure protrudes 2.286 cm
(0.9 inches)
Weight 3.714 kg (8.19 lbs)
91518 Multigas Analyzer Service Manual 1-3
Introduction
Environmental Requirements
Table 1 lists the environmental requirements, including temperature, for operating and storing the 91518
Multigas Analyzer.
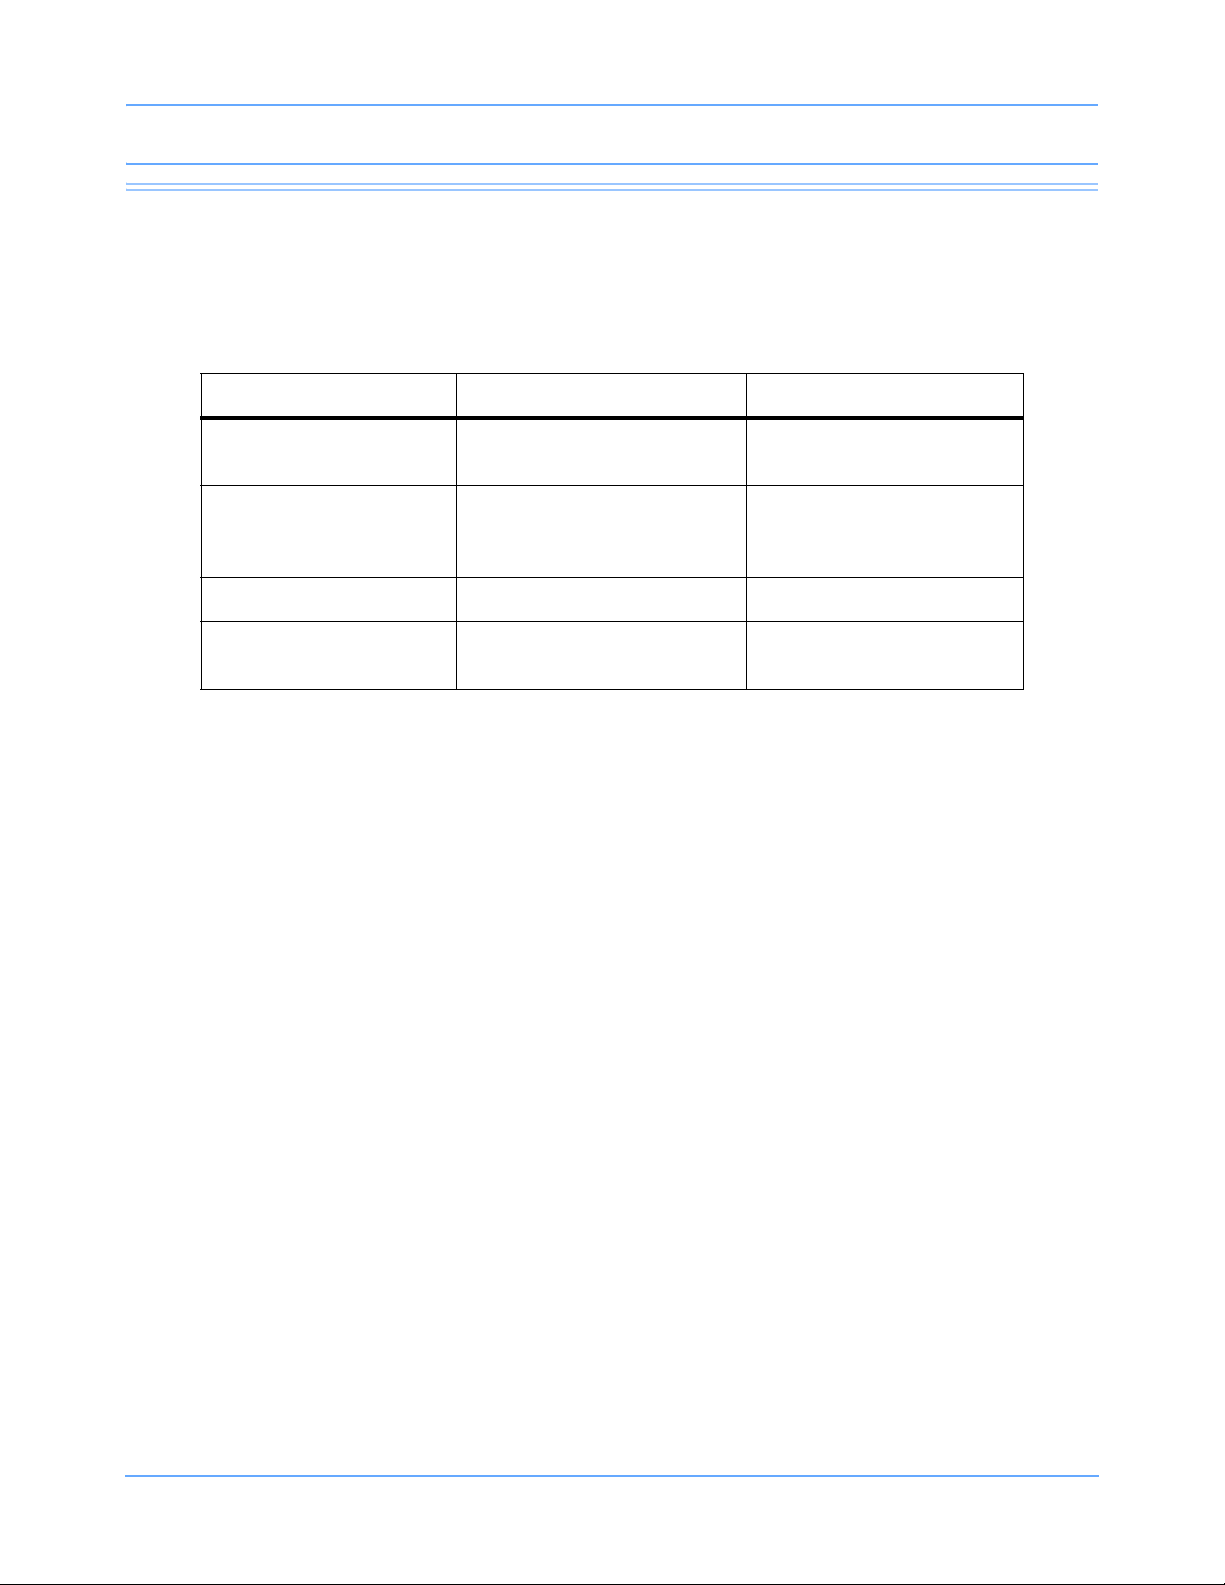
Table 1: Environmental Requirements
Operating Storage
Temperature 18° to 28° C (64.4° to 82.4° F),
±5° C of calibration -25° to 70° C (-13° to 158° F)
Humidity
20 to 80% (non-condensing)
relative humidity (RH), ±20%
RH of calibration
10 to 95% (non-condensing)
Altitude N/A 12,192 m (40,000 feet)
Atmospheric Pressure 500 to 800 mmHg, ±50mmHg
of calibration N/A

Introduction
91518 Multigas Analyzer Service Manual 1-4
Controls and Connectors
The blue power ON/OFF switch is located on the front of the analyzer.
All other multigas analyzer functions are controlled using the touch keys on Spacelabs Healthcare monitors.
Front View
Figure 1-2: Front view of the 91518 Multigas Analyzer
Gas sampling line inlet connector
Replaceable D-fend water trap
Reference gas port (no connection)
Power ON/OFF switch
Gas outlet port
Fan and filter

91518 Multigas Analyzer Service Manual 1-5
Introduction
Rear View
Figure 1-3: Rear of 91518 Multigas Analyzer
9 pin SDLC connector (J2)
RS-232 connector (J1)
SDLC terminator
Equipotential ground terminal
26-pin SDLC connector (J3)
Power connection


91518 Multigas Analyzer Service Manual 2-1
Contents
Setup
Unpacking. . . . . . . . . . . . . . . . . . . . . . . . . . . . . . . . . . . . . . . . . . . . . . . . . . . . . . . . . . . . . . . . . . . . . . . . . . . . . .1
Safety Checks. . . . . . . . . . . . . . . . . . . . . . . . . . . . . . . . . . . . . . . . . . . . . . . . . . . . . . . . . . . . . . . . . . . . . . . . . . .1
Multigas Setup . . . . . . . . . . . . . . . . . . . . . . . . . . . . . . . . . . . . . . . . . . . . . . . . . . . . . . . . . . . . . . . . . . . . . . . . . .2
Power Up Verification . . . . . . . . . . . . . . . . . . . . . . . . . . . . . . . . . . . . . . . . . . . . . . . . . . . . . . . . . . . . . . . . . . . .14
Unpacking
Before unpacking the 91518 Multigas Analyzer, inspect its shipping container for visible damage. Unpack and
remove the multigas analyzer from its container. Check the multigas analyzer's exterior for signs of physical
damage. Be sure to check the SDLC connectors (refer to Figure 1-3 on page 1-5) on the back of the multigas
analyzer for bent pins. If any damage is apparent, notify the carrier and Spacelabs Healthcare immediately.
Please follow your hospital’s procedure regarding the disposal or recycling of packaging waste.
Equipment Inventory
The following items are included with the 91518 Multigas Analyzer:
• Gas sampling input line
Safety Checks
Physical Inspection
Visually inspect the unit to verify that it is physically sound (no loose hardware, no damaged fittings, clean fan
filter, etc.).
Table 1: Summary of Standards for Medical Monitoring Equipment
International Mains to
Chassis Leakage
U.S. (120 V) Mains to
Chassis Leakage Mains Resistance
100 μA - normal condition, ground
attached (AC connector to chassis)
300 μA - normal condition, ground
attached (AC connector to chassis) 500 milliohms*
500 μA - single fault condition, open
ground or reverse polarity
300 μA - single fault condition, open
ground or reverse polarity 200 milliohms*
* Measured from the AC Power cord third wire ground to the most distant ground attachment

Setup
91518 Multigas Analyzer Service Manual 2-2
Multigas Setup
Sampling Lines
The sampling lines used with a 91518 Multigas Analyzer must be constructed of a material that will not absorb
anesthetic agents and cause erroneous readings. The correct sample lines are available from Spacelabs
Healthcare. Refer to Parts on page 6-1.
Power Supply
The 91518 can be powered from the J3 SDLC connector from the patient monitor or module housing, or it can
be powered from an external power supply, P/N 119-0479-xx.
SDLC Bus Termination
The SDLC bus must be properly terminated for correct operation. Termination of the SDLC bus is
accomplished by means of terminator switches on the rear of the monitor and the multigas analyzer, or by a
terminator plug P/N 012-0507-02, when connected to a portable monitor.
Figure 2-1: Terminator switch settings
90367/69, 91369, 91370 Monitor Installations
To install the 91518 with 90367/69, 91369, 91370 monitors:
1 Verify that AC power is connected as required by local standards. An external power supply
(P/N 119-0480-00 or 119-0251-00) is required for use with the 91518 Multigas Analyzer.
2 Ensure that the monitor and multigas analyzer are powered OFF.
3 Assemble the required cables and terminators for your system configuration (refer to Figure 2-2 for part
numbers).
4 Connect the P1 connector of the tee cable (P/N 012-0175-01) to the SDLC jack (J2) on the 91518 rear panel
(refer to Figure 1-3 on page 1-5 for rear panel information).
Note:
An extension cable (6-foot SDLC extension cable [P/N 012-0619-00] or 3-foot SDLC extension cable
[P/N 012-0242-00]) can be connected to the tee cable to extend the distance of the 91518 from the monitor
(refer to Figure 2-3 on page 2-3).
5 Connect the SDLC terminator to the P2 connector of the tee cable.
6 Connect the SDLC cable to the monitor.
7 Set the SDLC switch on the 91518 Multigas Analyzer to terminated ( ).
Non-terminated Terminated

91518 Multigas Analyzer Service Manual 2-3
Setup
Figure 2-2: 91518 connections to 90367/69, 91369, 91370 monitors
Figure 2-3: 91518 connections to 90367/69, 91369, 91370 monitors, using extension cable
jack (J2)
P/N 012-0175-01 SDLC
terminator
P/N 012-0507-02
SDLC
SDLC
....
.....
tee cable
91518
90367/69/91369/91370
monitor
jack
AC power
source
Power supply
P/N 119-0480-00
jack (J2)
P/N 012-0175-01 SDLC
terminator
P/N 012-0507-02
SDLC
SDLC
....
.....
tee cable
91518
90367/69/91369/91370
monitor
jack
AC power
source
Power supply
P/N 119-0480-00
extension cable
P/N 012-0619-00
or 012-0242-00

Setup
91518 Multigas Analyzer Service Manual 2-4
90367/69, 91369, 91370 Monitor Installations with Flexport
To install the 91518 with 90367/69, 91369, 91370 monitors:
1 Verify that AC power is connected as required by local standards. An external power supply
(P/N 119-0480-00 or 119-0251-00) is required for use with the 91518 Multigas Analyzer.
2 Ensure that the monitor and multigas analyzer are powered OFF.
3 Assemble the required cables and terminators or your system configuration (refer to Figure 2-4 for part
numbers).
4 Connect the P1 connector of the tee cable (P/N 012-0175-01) to the SDLC jack (J2) on the 91518 rear panel
(refer to Figure 1-3 on page 1-5 for rear panel information).
Note:
An extension cable (6-foot SDLC extension cable [P/N 012-0619-00] or 3-foot SDLC extension cable
[P/N 012-0242-00]) can be connected to the tee cable to extend the distance of the 91518 from the monitor
(refer to Figure 2-5 on page 2-5).
5 Connect P3 of the Flexport tee cable (P/N 012-0152-00) to P2 of the tee cable (P/N 012-0175-01).
6 Connect P1 of the Flexport cable to the monitor.
7 Set the SDLC switch on the 91518 Multigas Analyzer to terminated ( ).
Note:
If using more than one Flexport, Spacelabs Healthcare recommends the use of the Flexport Holder
(P/N 650-0201-00).
Figure 2-4: 91518 connections to 90367/69, 91369, 91370 monitors, with Flexport
jack (J2)
P/N 012-0175-01
SDLC
terminator
P/N 012-0507-02
SDLC
SDLC
....
.....
tee cable
91518
90367/69/91369/91370
monitor
jack
AC power
source
Power supply
P/N 119-0480-00
P/N 012-0152-00
tee cable
To peripheral device
Flexport interface

91518 Multigas Analyzer Service Manual 2-5
Setup
Figure 2-5: 91518 connections to 90367/69, 91369, 91370 monitors,
using Flexport and extension cable
jack (J2)
P/N 012-0175-01
SDLC
terminator
P/N 012-0507-02
SDLC
SDLC
....
.....
tee cable
91518
90367/69/91369/91370
monitor
jack
AC power
source
Power supply
P/N 119-0480-00
P/N 012-0152-00
tee cable
To peripheral device
Flexport interface
extension cable
P/N 012-0619-00
or 012-0242-00

Setup
91518 Multigas Analyzer Service Manual 2-6
91387 Monitor Installation
To install the 91518 with the 91387 monitor:
1 Verify that the AC power is connected as required by local standards. The 91518 Multigas Analyzer will not
require the use of an external power supply.
2 Ensure that the monitor and multigas analyzer are powered OFF.
3 Assemble the required cables for your system configuration (refer to Figure 2-6 for part numbers).
4 Connect the SDLC cable (P/N 012-0601-xx) to the SDLC jack (J3) on the 91518 rear panel (refer to
Figure 1-3 on page 1-5 for rear panel information) and to the SDLC (J9) of the monitor.
5 Set the SDLC switch on the 91387 monitor to unterminated ( ).
6 Set the SDLC switch on the 91518 Multigas Analyzer to terminated ( ).
Figure 2-6: 91518 connections to 91387 monitor, using power from monitor
91387 Monitor Installation with Flexport
To install the 91518 with the 91387 monitor:
1 Verify that the AC power is connected as required by local standards. The 91518 Multigas Analyzer will not
require the use of an external power supply.
2 Ensure that the monitor and multigas analyzer are powered OFF.
3 Assemble the required cables for your system configuration (refer to Figure 2-7 for part numbers).
4 Connect the SDLC cable (P/N 012-0601-xx) to the SDLC jack (J3) on the 91518 rear panel (refer to
Figure 1-3 on page 1-5 for rear panel information) and to the SDLC (J9) of the monitor.
5 Set the SDLC switch on the 91387 monitor to unterminated ( ).
P/N 012-0601-xx
SDLC
jack (J3)
cable
91387
SDLC
jack (J9)
91518

91518 Multigas Analyzer Service Manual 2-7
Setup
6 Set the SDLC switch on the 91518 Multigas Analyzer to unterminated ( ).
7 Connect the Flexport cable (012-0152-00) to J2 of the multigas analyzer.
Note:
If using more than one Flexport, Spacelabs Healthcare recommends the use of the Flexport Holder
(P/N 650-0201-00).
Figure 2-7: 91518 connections to 91387 monitor, with Flexport
P/N 012-0601-xx
SDLC
jack (J3)
cable
91387
SDLC
jack (J9)
91518
P/N 012-0152-00
cable
Flexport
To peripheral
device
interface
SDLC
jack (J2)
SDLC terminator
P/N 012-0507-02

Setup
91518 Multigas Analyzer Service Manual 2-8
90364, 90491, 90499, and 90387 Module Housing or Monitor Installations
To install the 91518 with 90364, 90491, 90499, and 90387 module housings or monitors:
1 Verify that the AC power is connected as required by local standards. The 91518 Multigas Analyzer will not
require the use of an external power supply.
2 Ensure that the monitor or module housing and multigas analyzer are powered OFF.
3 Assemble the required cables for your system configuration (refer to Figure 2-8 for part numbers).
4 Connect the SDLC cable (P/N 012-0601-xx) to the SDLC jack (J3) on the 91518 rear panel (refer to
Figure 1-3 on page 1-5 for rear panel information) and to the SDLC (J2) of the monitor or module housing.
5 Set the SDLC switch on the 90364/90491/90499/90387 to unterminated ( ).
6 Set the SDLC switch on the 91518 Multigas Analyzer to terminated ( ).
Figure 2-8: 91518 connections to 90364, 90491, 90499, and 90387 monitors or housings
J2
J3
P/N 012-0601-xx
SDLC
jack (J3)
cable
90364/90491/
90499/90387
91518

91518 Multigas Analyzer Service Manual 2-9
Setup
90364, 90491, 90499, and 90387 Module Housing or Monitor Installations
with Flexport
To install the 91518 with 90364, 90491, 90499, and 90387 module housings or monitors:
1 Verify that the and AC power is connected as required by local standards. The 91518 Multigas Analyzer will
not require the use of an external power supply.
2 Ensure that the monitor or module housing and multigas analyzer are powered OFF.
3 Assemble the required cables for your system configuration (refer to Figure 2-9 for part numbers).
4 Connect the SDLC cable (P/N 012-0601-xx) to the SDLC jack (J3) on the 91518 rear panel (refer to
Figure 1-3 on page 1-5 for rear panel information) and to the SDLC (J2) of the monitor or module housing.
5 Set the SDLC switch on the 90364/90491/90499/90387 to unterminated ( ).
6 Set the SDLC switch on the 91518 Multigas Analyzer to unterminated ( ).
7 Connect the Flexport cable (012-0152-00) to J2 of the multigas analyzer.
Note:
If using more than one Flexport, Spacelabs Healthcare recommends the use of the Flexport Holder
(P/N 650-0201-00).
Figure 2-9: 91518 connections to 90364, 90491, 90499, and 90387 monitors or housings,
with Flexport
J2
J3
P/N 012-0601-xx
SDLC
jack (J3)
cable
90364/90491/
90499/90387
91518
SDLC
jack (J2)
To peripheral
Flexport
SDLC terminator P/N 012-0507-02
interface
P/N 012-0152-00
cable
device

Setup
91518 Multigas Analyzer Service Manual 2-10
90485 Remote Module Housing Installation
1 Verify that AC power is connected as required by local standards. An external power supply
(P/N 119-0480-00 or 119-0251-00) is required for use with the 91518 Multigas Analyzer.
2 Ensure that the module housing and multigas analyzer are powered OFF.
3 Assemble the required cables for your system configuration (refer to Figure 2-10 for part numbers).
4 Connect the P1 connector of the tee cable (P/N 012-0175-01) to the SDLC jack (J2) on the 91518 rear panel
(refer to Figure 1-3 on page 1-5 for rear panel information).
5 Connect P2 of the tee cable (P/N 012-0175-01) to the remote module housing.
6 Set the SDLC switch on the 90485 remote module housing to unterminated ( ).
7 Set the SDLC switch on the 91518 Multigas Analyzer to terminated ( ).
Figure 2-10: 91518 connections to a remote module housing
J6
90485 Remote
P/N 012-0175-01 SDLC
terminator
P/N 012-0507-02
SDLC
jack (J2)
91518
SDLC termination
switch
Module Housing
tee cable
AC power
Power supply
P/N 119-0480-00
Table of contents
Other Spacelabs Measuring Instrument manuals


Popular Measuring Instrument manuals by other brands

Teledyne Analytical Instruments
Teledyne Analytical Instruments 3020 P operating instructions

TSI Instruments
TSI Instruments HM675 Quick start guides

BMS
BMS EASY-CHECK FN Operational manual

OPHIR
OPHIR vega user manual

AMALGAMATED INSTRUMENT
AMALGAMATED INSTRUMENT RM4-FX Operation and instruction manual

Atal
Atal AT-VLX-A1-R1-RS user manual


