OPHIR vega User manual

LASER POWER/ENERGY METER
USER MANUAL
VEGA
VEGA
OPHIR OPTRONICS
VEGA
www.ophiropt.com/photonics
100x200mm

1
Table of Contents
Chapter 1. Introduction: How to Use This Manual 4
Chapter 2. Qruick Reference ..............................5
2.1 Getting Started..............................................................5
2.2 Functions with no Sensor Connected .......................6
2.3 Thermal Sensors...........................................................9
2.4 Photodiode Sensors...................................................14
2.5 Pyroelectric Sensors .................................................16
Chapter 3. The Vega Display Unit......................21
3.1 General Description ................................................... 21
3.2 Smart Connectors ......................................................22
3.3 Soft Keys......................................................................22
3.4 Power Up and Shut Down.........................................24
3.5 Vega Functions, which are Independent of
Sensor Type...................................................................25
3.6 Hardware Functions ..................................................28
3.7 GUI and Keypad Settings ..........................................32
Chapter 4. Operation with Thermopile Absorber
Sensors.........................................................36
4.1 Thermopile Absorber Sensors..................................36
4.2 Selecting Settings from the Vega Screen...............37
4.3 Startup and Configuration of Defaults ....................38
4.4 Power Measurement .................................................40
4.5 Energy Measurement.................................................49
4.6 Advanced Display Screens.......................................54

2
Chapter 5. Operation with Photodiode Type Sensors59
5.1 Photodiode Sensors...................................................59
5.2 Setting up the PD300 to display the user's
chosen wavelengths ....................................................60
5.3 Startup Defaults..........................................................61
5.4 Selecting Settings from the Vega Screen...............62
Chapter 6. Operation with Pyroelectric Sensors .68
6.1 Pyroelectric & Photodiode Energy Sensors...........68
6.2 Selecting Settings from the Vega Screen...............69
6.3 Startup and Configuration of Defaults ....................73
6.4 Energy, Power or Exposure Measurement.............75
6.5 Measuring Repeating Pulses of High Energy.........81
6.6 Energy Log...................................................................81
6.7 Pyro Scope Adapter...................................................83
6.8 PE-DIF Diffuser Sensors............................................84
Chapter 7. BeamTrack Features .......................85
7.1 Track Screen...............................................................85
7.2 Menu Screen...............................................................86
7.3 Stability Screen ..........................................................86
7.4 Statistics Screen ........................................................87
7.5 Optimizing Measurements ........................................87
Chapter 8. Circuit Description ..........................89

3
Chapter 9. Calibration, Maintenance and
Troubleshooting .............................................91
9.1 Calibration of Thermopile or RP Sensors................91
9.2 Calibration of Photodiode type Sensors .................96
9.3 Calibration of Pyroelectric type Sensors ................98
9.4 Error Messages ........................................................ 101
9.5 Troubleshooting........................................................ 102
9.6 Maintenance............................................................. 104
Chapter 10. Vega Specifications .....................105
10.1 System/Meter Specifications ...............................105
10.2 Sensor Specifications............................................ 106

4
Chapter 1.
Introduction: How to Use This Manual
The Ophir Vega is a microprocessor-based Laser
Power/Energy Meter providing a broad range of
measurements, displays, and data handling options. It
operates with thermopile, pyroelectric and photodiode
sensors, and uses smart connector technology. Just
connecting the sensor configures and calibrates the
instrument.
This manual tells you what you need to know to make full
use of the Vega for all your laser measurement needs. It
includes a "Quick Reference", (Chapter 2) to allow you to
perform basic measurements immediately, without
reading the whole manual.
The main measurement sections, Chapters 4, 5 and 6
include a general description and a section detailing
operating options.

5
Chapter 2.
Quick Reference
2.1 Getting Started
The Vega is equipped with "soft keys." That is, the
functions of the keys change as indicated by the legend
above each key. (See Figure 2.2).
To connect sensor to the Vega Display
Insert the 15 pin D type connector of the measuring
sensor cable into the socket marked "Head Input" on the
rear panel of the Vega display. (See Figure 2.1)
Vega Rear Panel View
Figure 2.1
12VDC AN OUT HEAD INPUT USB/RS232 OUTPUT

6
2.2 Functions with no Sensor Connected
2.2.1. Turning on and off.
To switch the Vega on:
Briefly press the on/off switch. (Figure 2.2). The unit will
switch on, and the display will appear.
Note:
To work with a sensor, the sensor must be plugged in
before the unit is switched on.
Figure 2.2

7
To toggle the state of the backlights on and off:
The backlight for the Vega’s LCD can be configured to
toggle between full and partial illumination. Similarly, the
keypad lighting can be configured to toggle between on
and off. This toggling will be performed by briefly pressing
the on/off switch after the Vega has been switched on.
To switch the Vega off:
Press the on/off switch and hold it for about 3 seconds
until the display blanks.
If you wish to save the current Vega configuration, use
the "Configure" function. (See section 2.2.2).
Display Options
To zero instrument:
1. Disconnect the sensor, turn off then on again. "Head
Disconnected" will be displayed. displayed. skj
2. Make sure instrument is not in an electrically noisy
environment and is undisturbed.
3. Press zero and then start.
To set the Display Modes:
1. Disconnect the sensor and switch off then on again.
"Head Disconnected" will appear.
2. Select “Display Mode” and enter. Choose the
desired mode and press save. The Vega will now be
in this display mode for all sensors.
3. Select “Date” and press the enter button. Using the
navigation keys set to the correct date. Press Save.
4. Select “Time” and enter. Using the navigation keys,
set to the correct time. Press Save.
5. For adjusting RS232 baud rate and Analog Output
voltage see sections 3.5.2 and 3.5.3.
2.2.2.

8
Adjusting GUI and Keypad Settings:
1. Disconnect the sensor, turn off then on again. "Head
Disconnected" will be displayed.
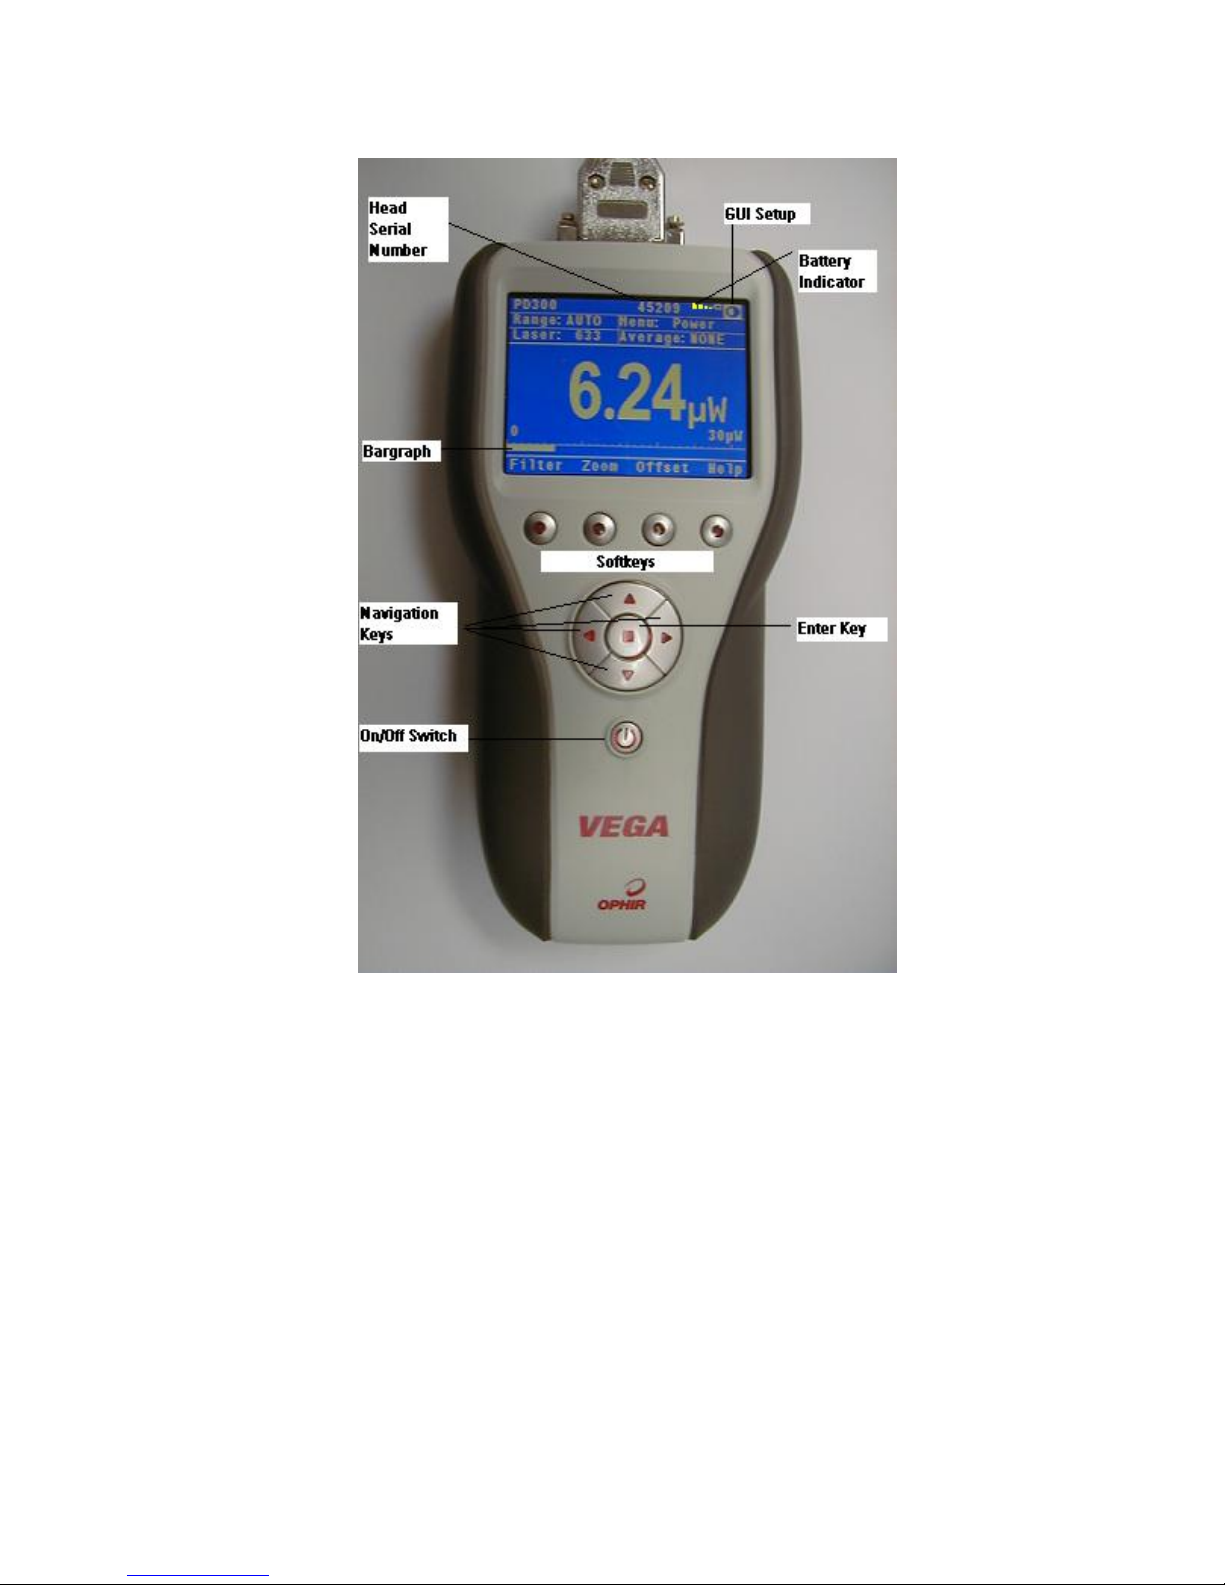
2. With the navigation keys go to the icon and
press the Enter key. Settings that can be adjusted
are, LCD Lighting, Keypad Lighting, Color Scheme,
and Bargraph Style (and parameters).
3. Select the setting to adjust with the up/down
navigation keys and press Enter.
4. Select the value desired with the up/down
navigation keys and press Enter.
5. Repeat until all settings are adjusted. Press “Exit”
when finished.
Language Options:
Vega has two language options, English and Japanese. In
order to switch from English to Japanese:
1. "Language" is found either in "Head Disconnected"
screen (without a sensor connected) or in
"Instrument" screen (with sensor connected).
2. With the navigation keys go to "Language".
3. Press the Enter key and with the navigation keys
choose "Japanese" (written in Japanese letters).
4. Press the Enter key when finished.
5. Press the secont soft key from the right and Japanese
will now be saved as your startup language.
Warning:
In the event that you mistakably saved the Japanese
language as the Vega startup language, the way to
switch back to English is:
a. Disconnect the sensor from the Vega.
b. Turn the Vega off and on again. You will reach the
instrument setup screen (titled “head disconnected”
in Japanese).
c. Press the down navigation key 4 times.
d. Press the Enter. This will open a window to select
the instrument language.
e. Select "English" and press the Enter key.
f. Press the “save” soft key and English will now be
saved as your startup language.

9
2.2.3. Updating the firmware of the Vega.
1. Download the latest firmware version of the Vega
from the Ophir website: www.ophiropt.com/photonics
and copy to your target directory.
2. Turn on the Vega.
3. Connect the USB communication cable to the Vega
and the PC.
4. Using the StarLab software press "select device".
5. Select Vega. The device name will be highlighted in
blue.
6. Select "upgrade Vega".
7. Browse and select the file N2AXXX.BIN, where XXX is
the latest firmware version of the Vega.
8. Press "start".
9. The status will show "programming" for several
minutes.
10. The status will show a green V sign and state
"finished".
11. Press "Done".
2.3 Thermal Sensors
2.3.1. Use of Vega with thermal type sensors.
Most Thermopile sensors have somewhat different
absorption at different wavelengths. In order to
compensate for this, each sensor has been calibrated by
laser at several wavelengths. When you choose the
correct laser wavelength, the correction factor for that
wavelength is automatically introduced. Note that the
laser wavelength correction in use is displayed in the
upper left corner of the display.
Thermopile sensors with the LP1 absorber have large
variation of absorption at different wavelengths.
Therefore a continuous spectral curve is stored in the
sensor, enabling the user to choose the desired
wavelength from the range specified in the specification
sheet and the correction factor for that wavelength is
automatically introduced

10
To set type of laser being used:
With sensors with fixed wavelengths:
1. While the Vega is off, plug in the sensor then switch it
on again.
2. Press the navigation keys until "Laser" is highlighted.
Press the Enter key and select the appropriate laser
wavelength.
3. If you want to save this new wavelength as the
startup default, press "Save". To use this wavelength
for this session only, press the Enter key.
With continuous spectral curve:
1. While the Vega is off, plug in the sensor. Switch
on the Vega.
2. From the main measurement screen, press "Laser"
to select the correct laser wavelength. If you
want to save this new wavelength as the startup
default, press “Save” before exiting. If the
wavelength you want is not among the
wavelengths in the six wavelengths listed and you
want to change or add a wavelength, see step 3.
3. Changing Chosen Wavelengths:
3.1. From the power measurement screen select
“Laser” and enter. Move to the wavelength you
wish to change or add. Press the right navigation
key.
3.2. Using the up/down navigation keys to change
each number and the right/left navigation keys to
move to the next number, key in the desired
wavelength. Press the Enter key to exit. If you
wish to save this new wavelength as one of the 6
favorite wavelengths, press “Save”.
Note: Saving the new wavelength in the Modify screen
will not set this wavelength as the default startup
wavelength. To do so, you must follow the instructions in
Step 2 above.

11
To select a range for power measurement:
1. Select "Range" with the navigation keys. Press the
Enter key.
2. Select the appropriate manual range or AUTO to
select autoranging.
3. To save this new range as the startup default, press
"Save". Otherwise, press the Enter key to return to the
main measurement screen.
To choose power or energy measurement:
1. To go from the main power measurement screen to
the energy measurement screen, press the lower left
soft key "Energy".
2. To go from the energy measurement screen to power
measurement, press “Power”.
2.3.2. Setting and Saving the Startup Configuration
1. Turn on the Vega with the sensor connected, select
“Menu” and enter. Select “Configure” and enter.
2. With the navigation keys select “Startup mode”.
Press the Enter key and select “Power” or “Energy”
as the startup mode. Press the Enter key again to
exit. If you want this mode to be permanent, press
“Save”after pressing enter.
3. Select “Display Mode”. Press the Enter key and
select the type of screen you wish to start up with.
Press Save to set this as the default display mode. If
you do not want to save this as the startup mode but
only change for now, press the Enter key. (This
choice is saved in the instrument and not the sensor
so the Vega will start up from the screen selected
for all sensors).
4. Select “Power Range”. Press the Enter key and
choose the manual power range you wish to be the
default or choose auto range.
5. Select “Average” to select what period you wish to
average power over or select the default, "NONE".
See section 4.4.2.4 for details.

12
6. Select “Energy Range” and choose the default
energy range.
7. Select “Threshold” if you wish to change the energy
threshold. See section 4.5.3 for details.
8. Select “Laser” and select the laser type you wish to
be the default.
9. Press "Save" to save all present settings then "Exit" to
get back to the main measurement screen.
Further details on configuration in section 4.3.
2.3.3. Power or Single Shot Energy Measurement
Warning:
Do not exceed maximum sensor limits for power,
energy, power density and energy density as listed in
Table 5. and Table 6.
in Chapter 10. Otherwise, there
is a risk of damaging the absorber.
To simulate an analog needle display on the Vega:
1. Select “Menu” and enter. Select “Needle” and enter.
The display will now show a simulated analog needle
type display.
2. Press “Expand” to get a full screen display of the
needle. Minimum and Maximum readings will also be
tracked
To use the Vega to measure Laser power:
1. Verify that the display shows “Menu: Power” in the
upper right hand side of the display.
2. If the display shows "Menu: Energy" and units of J, (or
mJ etc) then press "Power" to switch to the power
measurement mode.
To expand the bargraph scale ±5x about the present
reading:
1. Press the "Zoom” button.
2. Press the "Zoom” button again to return to the
ordinary bargraph. See Section 4.4.2.1 for full details.

13
To subtract background and set current reading to zero:
1. From the main power measurement screen press
"Offset".
2. Press "Offset" again to cancel. See Section 4.4.2.2 for
full details.
To use the Vega to fine-tune Laser power:
1. From the main power measurement screen select
“Menu” and enter. Select “Tune" and enter.
2. Set the percentage range of the power scale to be
displayed by repeatedly pressing the ±50% key.
3. Now select the horizontal sweep time you desire by
selecting “Graph” and choosing the time scale.
4. You may now use the screen to tune the laser power.
See Section 4.4.2.3.
for full details.
5. Press “Power” to exit to the main measurement
screen.
To use the Vega to measure Laser energy:
1. Verify that the display shows "Energy" in the upper
right hand side of the display.
2. If the display shows "Power" and units of W (or mW
etc) then press "Energy" to switch to the energy
measurement mode.
3. Energy measurement is performed in manual ranges
only. Select "Range" and hit the Enter key. Use the
navigation keys to select the proper range. To save
this range as the default startup, press “Save”. The
correct range to select is the lowest one that is larger
than the expected pulse energy to be measured. Note
that the range will be displayed in the lower right
corner of the main display.
4. When the Vega screen flashes "READY," on and off,
fire the laser. See Section 4.5 for full details.
To save configuration:
1. To save configuration, follow directions in Section
2.2.2 above.

14
2.4 Photodiode Sensors
2.4.1. Selecting Wavelengths
1. While the Vega is off, plug in the sensor then switch it
on again.
2. From the main measurement screen, press "Laser" to
select the correct laser wavelength. If you want to
save this new wavelength as the startup default,
press “Save” before exiting. If the wavelength you
want is not among the wavelengths in the six
wavelengths list and want to change or add a
wavelength, see section 2.4.2 below.
3. Follow the directions on configuration in section 2.4.4
below.
2.4.2. Changing Chosen Wavelengths
1. From the power measurement screen select “Laser”
and enter. Move to the wavelength you wish to
change or add. Press the right navigation key.
2. Using the up/down navigation keys to change each
number and the right/left navigation keys to move to
the next number, key in the desired wavelength. Press
the Enter key to exit. To save this new wavelength as
one of the 6 favorite wavelengths, press “Save”.
Note: Saving the new wavelength in the Modify screen
will not set this wavelength as the default startup
wavelength. To do so, you must follow the instructions in
Section 2.4.1 above.
2.4.3. To choose manual or automatic ranging or dBm in
power measurement
Select "Range" and enter. Using the navigation keys,
select the appropriate manual range, autorange, or
dBm (logarithmic scale).

15
2.4.4. Setting the Startup Configuration
1. Select menu and press enter. Select “Configure”
and enter.
2. Select “Filter” and enter. Choose filter in or out to be
the default. If you only want to change for now, exit
without saving.
3. Select “Display Mode”. Press the Enter key and
select the type of screen you wish to start up with.
Press Save to set this as the default display mode. If
you do not want to save this as the startup mode but
only change for now, press the Enter key. (This
choice is saved in the instrument and not the sensor
so the Vega will start up from the screen selected
for all sensors).
4. Select “Power Range” and choose the manual
power range you wish to be the default or choose
autorange or dBm.
5. Select “Average:” and set the average over period
over or leave the default “NONE”.
6. Select “Laser” to choose the startup laser
wavelength. See Section 2.4.2 above for details.
7. Press “Save” to save these settings as the default
startup. When finished, press “Exit”. For further
details on configuration see Section
5.3
.
2.4.5. Power Measurement
Warning:
Do not exceed maximum sensor limits for power,
energy, power density and energy density as listed in
Table 5. and Table 6.
in Chapter 10. Otherwise, there
is a risk of damaging the absorber.
To expand the bargraph scale ±5x about the present
reading:
1. Press the "Zoom” button.
2. Press the "Zoom” button again to return to the
ordinary bargraph.
To subtract background and set current reading to zero:

16
1. From the main power measurement screen press
"Offset".
2. Press "Offset" again to cancel. See Section 5.4.5 for
full details.
To use the Vega to fine-tune Laser power:
1. From the main power measurement screen select
“Menu” and enter. Select “Tune" and enter.
2. Set the percentage range of the power scale to be
displayed by repeatedly pressing the ±50% key.
3. Now select the horizontal sweep time you desire by
selecting “Graph” and choosing the time scale.
4. You may now use the screen to tune the laser power.
See Section 4.4.2.3.
for full details.
5. Press “Power” to exit to the main measurement
screen.
2.5 Pyroelectric Sensors
2.5.1. Zeroing Instrument against Sensor
For the most accurate calibration, you must zero the
pyroelectric sensor against the Vega it is being used
with. Proceed as follows: Make sure the sensor is in a
quiet environment and not subject to pulsed
radiation. Plug sensor into Vega and turn on. Press
“Menu”, select “Zero” and enter. Press “Start”.
When “ZEROING COMPLETED” appears, press
“Save”. Press “Exit” and then choose the screen
from the menu that you wish to use. After you have
done zeroing, you do not have to do it again when
used with the same type of meter. If you have zeroed
it against a different type of meter, then a different
value has been saved and when used with a Vega
again you should zero it again.

17
2.5.2. Changing Chosen Wavelengths (metallic type
only)
1. Select "Laser" and enter.
2. Select the wavelength you wish to use and enter. If
you wish to save this wavelength as the startup
default, press “Save”before exiting.
3. If you wish to modify one of the wavelengths, select
the wavelength and press the right navigation key.
4. Using the up/down navigation keys to change the
numbers and the right/left navigation keys to move to
the next number, modify to the desired.
5. When finished, press “Save” and exit. To apply these
changes to this session only, exit without pressing
“Save”.
2.5.3. To set type of laser being used
From main measurement screen, select "Laser" and
enter. Choose the desired laser type or wavelength. If
you want this one to be the startup wavelength, press
“Save”before exiting.
2.5.4. Setting Startup Configuration
1. Turn on the Vega with the sensor connected, select
“Menu” and enter. Select “Configure”.
2. With the navigation keys select “Startup Mode”,
press the Enter key and select “Power” or “Energy”
as the startup mode. Press Enter again to exit. If you
want this mode to be permanent, press Save after
pressing the Enter key.
3. Select “Display Mode”. Press the Enter key and
select the type of screen you wish to start up with.
Press Save to set this as the default display mode. If
you do not want to save this as the startup mode but
only change for now, press the Enter key. (This
choice is saved in the instrument and not the sensor
so the Vega will start up from the screen selected
for all sensors).
4. Select “Energy Range” and press the Enter key.
Choose the energy range you wish to be the default.

18
5. Select “Average” to select the average over period
or select the default, "NONE".
6. If this sensor has a diffuser sensor, set Diffuser to IN
or OUT.
7. Now select “Max Pulse Len” and choose the
shortest pulse length setting longer than your laser’s
pulse length. Warning: Incorrect readings will result
if pulse length is not set up correctly.
8. Select “Laser” and select the laser type you wish to
be the default.
9. Press "Save" to save all present settings then "Exit" to
get back to the main measurement screen.
Note:
Some sensors have only the one pulse length setting
for all pulse lengths. In that case N/A appears. For
further details on configuration see Sections 6.2 and
6.3.
2.5.5. Energy or Average Power Measurement
Warning:
Do not exceed maximum sensor limits for power,
energy, power density and energy density as listed in
Table 5. and Table 6.
in Chapter 10. Otherwise, there
is a risk of damaging the absorber.
With the pyroelectric sensor, you have been supplied a
test slide with the same coating as on your pyroelectric
detector. You can also obtain this slide from your dealer.
You should use this slide to test the damage threshold
with your laser pulses. If the slide shows damage,
then either enlarge your beam or lower the laser energy
until damage is no longer seen.
Note:
High sensitivity pyroelectric sensors (PE-9, PE-10) are
very sensitive to vibration, and therefore might read a
false trigger when operating in an acoustically non-
stable environment. Set the threshold to a high
enough value that false triggering does not occur.
Ophir also offers a shock absorbing mounting post

19
(P/N 7Z08268) that helps reduce vibration on the
sensor.
2.5.5.1. To choose Energy or Average Power Measurement
1. To go from the main energy measurement screen to
power measurement, press "Power".
2. To go from the main power measurement screen to
energy measurement, press "Energy".
2.5.5.2. To use the Vega to measure Laser Energy and
Frequency
1. In measurement mode, verify that the units are mJ, µJ
etc. and “Energy” is displayed in the upper right
corner. If not, press the “Energy” key.
2. Select "Range" and press the Enter key. Use the
navigation keys to select the proper energy range.
The correct range is the lowest one that is larger than
the pulse energy measured. Press "Save" if you want
that range to be the startup default. Press "Exit".
3. If the sensor triggers from ambient vibration or noise
without a laser signal raise the threshold level as
follows: Select “Threshold”, enter then using the
up/down buttons, raise the threshold until the false
triggering stops. If the sensor does not read the
pulses at all on the lowest range, try to lower the
threshold to minimum.
Warning:
While measuring pulsing lasers, erroneous energy
reading will result if energy range is not set up
correctly. See Section 6.4 for details
.
2.5.5.3. To measure Total Energy Exposure.
1. From the energy measurement screen select “Menu”,
enter and select “Exposure”.
2. Select the method of measurement with “Mode”,
“Timeout” and “Pulses” then press “Start”. Press
“Start” again. The Vega will start summing laser
energy exposure. To stop exposure measurement
before the chosen period, press” Stop”.
Table of contents
Other OPHIR Measuring Instrument manuals