SPALDING 8406SP User manual

13/21ID# M8406044
© COPYRIGHT 2012 by SPALDING
Universal Mounting Bracket
Owners Manual
This manual, accompanied by sales receipt, should be saved and kept on hand as a
convenient reference, as it contains important information about your model.
Adult Assembly Required.
READ AND UNDERSTAND
OPERATOR’S MANUAL
BEFORE USING THIS UNIT.
FAILURE TO FOLLOW
OPERATING INSTRUCTIONS
COULD RESULT IN INJURY
OR DAMAGE TO PROPERTY.
WARNING!
Write Model Number
From Box Here:
Toll-Free Customer Service Number for U.S.: 1-800-558-5234
For Canada: 1-800-284-8339
For Europe: + 353 51 379777 (Sweden: 009 555 85234)
For Australia: 1300 367 582
Internet Address: www.spalding.com www.spalding.com.au
REQUIRED TOOLS
AND MATERIALS:
AND/OR
OPTIONAL TOOLS
AND MATERIALS:
1/2”
7/16” 9/16”
• Two (2) Capable
Adults
• Tape Measure
• Safety Glasses
• Step Ladder - 8ft.
(2.4 m)
• (2 each) Wrenches and/or Socket
Wrenches and Sockets (Deep-
Well Sockets are Recommended).
• Extension is Recommended.
•Large and Small Adjustable
Wrenches
1/2”
7/16” 9/16”

2
Inscrivez ici le numéro de modèle qui apparaît sur la boîte :
Die Modellnummer vom Verpackungskarton hier eintragen:
Escriba aquí el número de modelo que se encuentra en la caja:
Universalanbaustütze
Gebrauchsanleitung
Soporte de Montaje Universal
Manual del propietario
AVERTISSEMENT !
WARNUNG!
¡ADVERTENCIA!
ASSUREZ-VOUS D’AVOIR LU ET COMPRIS
LE MANUEL D’UTILISATION AVANT
D’UTILISER CET APPAREIL.
LE NON-RESPECT DES INSTRUCTIONS
D’UTILISATION PEUT ENTRAÎNER DES
BLESSURES OU DES DOMMAGES MATÉRIELS.
DAS BENUTZERHANDBUCH VOR
GEBRAUCH DIESES PRODUKTS
SORGFÄLTIG DURCHLESEN UND
VERSTEHEN.
EIN MISSACHTEN DIESER
BETRIEBSANLEITUNG KANN
VERLETZUNGEN ODER SACHSCHÄDEN
ZUR FOLGE HABEN.
LEA Y ENTIENDA EL MANUAL DEL
OPERADOR ANTES DE USAR ESTA
UNIDAD.
EL INCUMPLIMIENTO DE ESTAS
INSTRUCCIONES PODRÍA OCASIONAR
LESIONES O DAÑOS MATERIALES.
Support de montage universel
Manuel d’utilisation
Numéro vert du Service clientèle - États-Unis : 1-800-558-5234, Canada : 1-800-284-8339,
Europe : + 353 51 379777 (Suède : 009 555 85234), Australie : 1300 367 582
Adresse Internet : www.spalding.com www.spalding.com.au
Gebührenfreie Telefonnummer für die USA: 1-800-558-5234, für Kanada: 1-800-284-8339,
für Europa: + 353 51 379777 (Schweden: 009 555 85234), für Australien: 1300 367 582
Internet-Adresse: www.spalding.com www.spalding.com.au
Teléfono gratuito del Servicio al Cliente en EE.UU.: 1-800-558-5234,
Canadá: 1-800-284-8339, Europa: + 353 51 379777 (Suecia: 009 555 85234), Australia: 1300 367 582
Dirección en Internet: www.spalding.com www.spalding.com.au
Ce manuel, accompagné du justificatif d’achat, devra être conservé pour
référence ultérieure, dans la mesure où il contient des informations
importantes sur votre modèle.
Diese Anleitung sollte zusammen mit dem Kaufbeleg griffbereit
aufbewahrt werden, da sie wichtige Informationen über Ihr Modell enthält.
Debe conservar este manual junto con el recibo de la compra y tenerlo
disponible como conveniente referencia, ya que contiene información
importante sobre su modelo.
Assemblage exclusivement réservé à un adulte.
Montage nur durch Erwachsene.
El montaje debe realizarse por una persona adulta.

3
Questions or Missing Parts?
Call TOLL-FREE Customer Service
number listed on the front page!
STOP!
STOP!
DON'T go back to the store!
Questions or Missing Parts?
Call TOLL-FREE Customer Service
number listed on the front page!
STOP!
STOP!
DON'T go back to the store!
SAFETY INSTRUCTIONS
FAILURE TO FOLLOW THESE SAFETY INSTRUCTIONS MAY RESULT IN SERIOUS INJURY OR
PROPERTY DAMAGE AND WILL VOID WARRANTY.
Owner must ensure that all players know and follow these rules for safe operation of the system.
To ensure safety, do not attempt to assemble this system without following the instructions carefully.
Check entire box and inside all packing material for parts and/or additional instruction material. Before
beginning assembly, read the instructions and identify parts using the hardware identifier and parts list in
this document. Proper and complete assembly, use, and supervision are essential for proper operation
and to reduce the risk of accident or injury. A high probability of serious injury exists if this system is not
installed, maintained, and operated properly.
Most injuries are caused by misuse and/or not following instructions.
Use caution when using this system.
• If using a ladder during assembly, use extreme caution.
• Two (2) capable adults are recommended for this operation.
• Climate, corrosion, or misuse could result in system failure.
• Minimum operational height is 6’ 6” (1.98 m) to the bottom of backboard.
• This equipment is intended for home recreational use only and NOT
excessive competitive play.
• The life of your basketball pole depends on many conditions. The climate,
placement of the pole, location of the pole, exposure to corrosives such as
pesticides, herbicides, or salts are all important.
• If technical assistance is required, contact Customer Service.
OUTILS ET VISSERIE NÉCESSAIRES :
ERFORDERLICHE WERKZEUGE UND MATERIALIEN:
HERRAMIENTAS Y MATERIALES REQUERIDOS:
• Deux (2) adultes aptes
• Zwei (2) kompetente
Erwachsene
• Dos (2) adultos capaces
• Ruban à mesurer
• Maßband
• Cinta métrica
• Lunettes de sécurité
• Schutzbrille
• Gafas protectoras
• Escabeau de 8 pi (2,4 m)
• Stufenleiter - 8 Fuß (2,4 m)
• Escalera de 8 pies (2,4 m)
• Clés ajustables petites et grandes
• Große und kleine verstellbare Schraubenschlüssel
• Llaves ajustables, una pequeña y otra grande.
OUTILS ET VISSERIE FACULTATIFS :
OPTIONALE WERKZEUGE UND MATERIALIEN:
HERRAMIENTAS Y MATERIALES OPCIONALES:
ET/OU
UND/ODER
Y/O
1/2”
7/16” 9/16”
• (2 chacun) Clés et/ou clés à douille et douilles (des clés à douille
profonde sont recommandées).
• (jeweils 2) Schraubenschlüssel und/oder Steckschlüssel und
Steckschlüsseleinsätze (tiefe Steckschlüsseleinsätze werden empfohlen).
• (2 de cada una) Llaves y/o llaves de vaso y manerales
(se recomiendan manerales profundos).
• Une rallonge est recommandée.
• Es wird eine Verlängerung empfohlen.
• Se recomienda utilizar la extensión.
1/2”
7/16” 9/16”
4
SICHERHEITSHINWEISE
EIN MISSACHTEN DIESER SICHERHEITSHINWEISE KANN ZU SCHWEREN VERLETZUNGEN
UND/ODER SACHSCHÄDEN FÜHREN UND DIE GARANTIE UNWIRSKAM MACHEN.
Der Eigentümer muss sicherstellen, dass alle Spieler diese Regeln für einen sicheren Betrieb des Systems kennen und befolgen.
Aus Sicherheitsgründen darf dieses System nur unter sorgfältiger Beachtung der Anleitung zusammengebaut werden.
Überprüfen Sie die gesamte Verpackung und das gesamte Verpackungsmaterial auf Teile und/oder zusätzliches
Anleitungsmaterial. Lesen Sie vor Beginn der Montage die Anleitung und identifizieren Sie die Teile anhand der
Hardware-Kennung und der Teileliste in diesem Dokument. Eine ordnungsgemäße und vollständige Montage,
Verwendung und Aufsicht ist für den richtigen Betrieb und zur Reduzierung des Unfall- oder Verletzungsrisikos absolut
erforderlich. Bei einer unsachgemäßen Installation und Wartung und bei einem falschen Betrieb dieses Systems
besteht ein hohes Risiko schwerer Verletzungen.
• Bei Gebrauch einer Leiter während des Zusammenbaus extrem vorsichtig vorgehen.
• Diese Arbeit sollte von zwei (2) kompetenten Erwachsenen ausgeführt werden.
• Klimatische Bedingungen, Korrosion oder Fehlgebrauch kann zu Systemversagen führen.
• Die Mindestspielhöhe beträgt 6’ 6” (1,98 m) bis zum unteren Rand der Korbwand.
• Diese Vorrichtung ist nur für den Freizeitgebrauch zu Hause, NICHT aber für ein übermäßig
wettkampfbetontes Spiel vorgesehen.
• Die Nutzungsdauer Ihrer Basketballstange hängt von zahlreichen äußeren Umständen ab.
Klimabedingungen, Platzierung und Aufstellort der Stange, Einwirkung korrodierender Substanzen
wie Ungeziefer- und Pflanzenvernichtungsmittel oder Salz - all das sind wichtige Faktoren.
• Technische Unterstützung kann vom Kundendienst angefordert werden.
Die meisten Verletzungen werden durch einen Fehlgebrauch bzw. ein Missachten der
Anleitungen verursacht. Bei der Verwendung dieses Geräts vorsichtig vorgehen.
INSTRUCCIONES DE SEGURIDAD
EL INCUMPLIMIENTO DE ESTAS INSTRUCCIONES DE SEGURIDAD PUEDE OCASIONAR
LESIONES GRAVES, DAÑOS MATERIALES Y ANULARÁ LA GARANTÍA.
El propietario debe asegurarse de que todos los jugadores conozcan y sigan estas reglas para un funcionamiento seguro del sistema.
Por su seguridad, no intente montar este sistema sin seguir cuidadosamente las instrucciones. Revise toda la caja
y el interior de todo el material de embalaje para verificar si hay piezas y/o cualquier material de instrucciones
adicional. Antes de comenzar el montaje, lea las instrucciones e identifique las piezas utilizando el identificador
de los herrajes y la lista de piezas en este documento. Es esencial el montaje completo, el uso y la supervisión
adecuados para el funcionamiento correcto del sistema y para reducir el riesgo de accidentes o lesiones. Existe
una alta probabilidad de sufrir lesiones graves si este sistema no se instala, mantiene y funciona adecuadamente.
• Si utiliza una escalera durante el montaje, extreme la precaución.
• Se recomienda que dos (2) adultos capaces realicen esta operación.
• El clima, la corrosión y el mal uso podrían provocar fallos en el sistema.
• La altura mínima de funcionamiento es de 6 pies y 6 pulgadas (1,98 m) hasta la parte inferior del
tablero.
• Este equipo está diseñado únicamente para uso recreativo en el hogar y NO para juego competitivo
excesivo.
• La vida útil de su poste de baloncesto depende de muchas condiciones. El clima, la colocación
del poste, la ubicación del poste, la exposición a sustancias corrosivas tales como pesticidas,
herbicidas o sales son factores importantes.
• Si requiere asistencia técnica, póngase en contacto con el Servicio al Cliente.
La mayoría de las lesiones están causadas por el uso inadecuado y/o por el incumplimiento de las instrucciones.
Tenga cuidado cuando use esta unidad.
CONSIGNES DE SÉCURITÉ
SUIVEZ CES CONSIGNES DE SÉCURITÉ SOUS PEINE DE PROVOQUER DES BLESSURES
GRAVES, DES DÉGÂTS MATÉRIELS ET L’ANNULATION DE LA GARANTIE.
Le propriétaire doit s’assurer que tous les joueurs connaissent et suivent ces règles d’utilisation sûre du système.
Par mesure de sécurité, n’essayez pas de monter ce système sans suivre scrupuleusement les instructions.
Examinez toute la boîte et l’intérieur de tous les emballages pour les pièces et/ou instructions supplémentaires.
Avant de commencer le montage, lisez les instructions et identifiez les pièces en utilisant l’identifiant de la visserie
et des pièces énumérées dans ce document. Un montage, une utilisation et une supervision corrects et complets
sont indispensables à un bon fonctionnement et à la réduction des risques d’accident ou de blessure. Des blessures
graves sont très probables si le système n’est pas installé, entretenu et utilisé correctement.
• Si vous utilisez une échelle en cours de montage, soyez extrêmement prudent.
• Il est recommandé de s’y prendre à deux (2) adultes pour réaliser cette opération.
• Les conditions climatiques, la corrosion ou une mauvaise utilisation risquent de provoquer la
panne du système.
• La hauteur minimale d’utilisation est de 6’ 6” (1,98 m) jusqu’à la base du panneau.
• Ce matériel est réservé à un but récréatif à domicile et NON PAS à un jeu extrêmement compétitif.
• La durée de vie de votre poteau de basket-ball dépend de bien des facteurs. Le climat, la position
du poteau, son emplacement, son exposition à des agents corrosifs tels que des pesticides, des
herbicides ou des sels sont tous des facteurs importants.
• Pour toute assistance technique, contactez le service clientèle.
La plupart des blessures sont causées par une mauvaise utilisation et/ou le non-
respect des instructions. Soyez prudent lorsque vous utilisez ce système.
Des questions ou des
pièces manquantes?
Appelez le numéro du service clientèle
(NUMÉRO GRATUIT) qui figure en première page!
STOP!
STOP!
Des questions ou des
pièces manquantes?
Appelez le numéro du service clientèle
(NUMÉRO GRATUIT) qui figure en première page!
STOP!
STOP!
NE RETOURNEZ PAS au magasin!
NE RETOURNEZ PAS au magasin!
Fragen oder fehlende Teile?
Rufen Sie die GEBÜHRENFREIE
Servicetelefonnummer auf der Vorderseite an!
HAL
HAL
T!
T!
Fragen oder fehlende Teile?
Rufen Sie die GEBÜHRENFREIE
Servicetelefonnummer auf der Vorderseite an!
Gehen Sie NICHT zum Laden zurück!
Gehen Sie NICHT zum Laden zurück!
HAL
HAL
T!
T!
¿Tiene preguntas o le faltan piezas?
STOP!
STOP!
¿Tiene preguntas o le faltan piezas?
¡Llame al número de Atención al Cliente
GRATUITO que figura en la primera página!
¡NO regrese a la tienda!
¡NO regrese a la tienda!
STOP!
STOP!
¡Llame al número de Atención al Cliente
GRATUITO que figura en la primera página!

5
NOTICE TO ASSEMBLERS
Adult Assembly Required. Dispose of ALL packaging materials promptly. As with all products,
periodically inspect for loose small parts.
Assembled unit MUST be filled with sand or water at ALL times.
ALL basketball systems, including those used for DISPLAYS, MUST be assembled and installed
according to instructions. Failure to follow instructions could result in SERIOUS INJURY. It is NOT
acceptable to devise a makeshift support system.
AVIS AUX PERSONNES CHARGÉES DU MONTAGE
Assemblage exclusivement réservé à un adulte. Jetez TOUT le matériel d’emballage dans les plus
brefs délais. Comme pour tous les produits, inspectez périodiquement le serrage des
pièces de petite taille.
Une fois assemblé, l’ensemble DOIT être rempli de sable ou d’eau à TOUT MOMENT.
TOUS les systèmes de basket-ball, y compris ceux utilisés en EXPOSITION, DOIVENT être assemblés et
installés conformément aux instructions. Suivez ces instructions sous peine d’encourir des BLESSURES
GRAVES. Il n’est PAS acceptable de concevoir un système de support improvisé.
HINWEIS FÜR DIE PERSONEN, DIE DEN ZUSAMMENBAU DURCHFÜHREN
Zusammenbau nur durch Erwachsene. ALLE Verpackungsmaterialien sofort wegwerfen. Wie alle
Produkte muss auch dieses regelmäßig auf lose Kleinteile inspiziert werden.
Die zusammengebaute Einheit MUSS STETS mit Sand oder Wasser gefüllt sein.
ALLE Basketballsysteme, einschließlich der zu AUSSTELLZWECKEN benutzten Systeme, MÜSSEN
gemäß den Anleitungen zusammengebaut und aufgestellt werden. Ein Missachten dieser Anleitungen
kann SCHWERE VERLETZUNGEN zur Folge haben. Zum Beschweren darf NICHT zu irgendwelchen
Notbehelfsmaßnahmen gegriffen werden.
AVISO PARA LAS PERSONAS QUE REALIZAN EL MONTAJE
Es necesario que el montaje sea realizado por adultos. Deseche inmediatamente TODOS los materiales
de embalaje. Al igual que con cualquier producto, inspeccione periódicamente para verificar que todas
las piezas pequeñas estén firmemente apretadas.
La unidad montada DEBE estar llena de arena o agua en TODO momento.
TODOS los sistemas de baloncesto, incluidos aquellos utilizados para EXHIBICIÓN, DEBEN montarse
e instalarse según las instrucciones. El incumplimiento de las instrucciones podría ocasionar
LESIONES GRAVES. NO es aceptable emplear un sistema de apoyo improvisado.

6
Légende Quantité No de réf. Description
1 6 900099
Cornière courte, noire
2 1 900814
Cornière longue, noire
3 2 900815
Montant, long
4 6 200580
Équerre
5 2 204102
Boulon en U, 3/8-16 x 4-1/4
6 4 203309
Rondelle plate, 0,406 de D.I. x
1,0 de D.E.
7 4 203017
Ecrou hex, 3/8-16
8 10201107
Vis à tête, hex, 1/4-20 x 1/2
9 12 203326
Rondelle d’arrêt, 1/4
10 12 203228
Ecrou hex, 1/4-20
11 1 900104
Montant, court
12 4 203103
Vis de carrosserie, 5/16-18 x 1,9
13 4 203100
Ecrou à bride hex, 5/16-18
* Vous pourriez avoir des pièces en trop avec ce modèle.
Nr Anz. Teilenummer Beschreibung
1 6 900099 Kurzer Winkel, schwarz
2 1 900814 Langer Winkel, schwarz
3 2 900815 Langer Strebe
4 6 200580 Winkelstütze
5 2 204102 U-Bolzen, 3/8-16 x 4-1/4
6 4 203309 Flache Unterlegscheibe, 0,406 I.D.
x 1,0 O.D.
7 4 203017 6-Kant-Mutter, 3/8-16
8 10201107 Kopfschraube, 6-Kant, 1/4-20 x 1/2
9 12 203326 Sicherungsscheibe, 1/4
10 12 203228 6-Kant-Mutter, 1/4-20
11 1 900104 Kurzer Strebe
12 4 203103 Schlosschraube, 5/16-18 x 1,9
13 4 203100 6-Kant-Flanschmutter, 5/16-18
* Diesem Modell können zusätzliche Teile beigepackt sein.
LISTE DES PIÈCES (VOIR L’IDENTIFICATION DES PIÈCES)
TEILELISTE (SIEHE BEFESTIGUNGSTEILESCHLÜSSEL)
Item Qty. Part No. Description
1 6 900099 Short Angle, Black
2 1 900814 Long Angle, Black
3 2 900815 Strap, Long
4 6 200580 Angle Bracket
5 2 204102 U-bolt, 3/8-16 x 4-1/4
6 4 203309 Flat Washer, .406 I.D. x 1.0 O.D.
7 4 203017 Hex Nut, 3/8-16
8 10201107 Capscrew, Hex Head, 1/4-20 x 1/2
9 12 203326 Lock Washer, 1/4
10 12 203228 Hex Nut, 1/4-20
11 1 900104 Short Strap
12 4 203103 Carriage Bolt, 5/16-18 x 1.9
13 4 203100 Hex Flange Nut, 5/16-18
* You may have extra parts with this model.
PARTS LIST (SEE HARDWARE IDENTIFIER)
Item Qty. Part No. Description
14 4 240017 Bolt, Hex Head, 1/4-20 x 2.25
15 4 209143 Spacer, Steel, .26ID x .50OD
x .94 Long
Légende Quantité No de réf. Description
14 4 240017 Vis à tête hex, 1/4-20
x 2,25
15 4 209143 Espaceur, acier, 0,26
de D.I. x 0,50 de D.E.
x 0,94 de long
Nr Anz. Teilenummer Beschreibung
14 4 240017
15 4 209143
16 2 203071 Capscrew, Hex Head,
1/4-20x1.5
16 2 203071 Vis à tête, hex,
1/4-20 x 1.5
16 2 203071
Schraube, Sechskantkopf, 1/4-20
x 2,25
Distantstück, Stahl, 0,26 ID x 0,50
OD x 0,94 lang
Kopfschraube, 6-Kant,1/4-20x1.5

7
Artículo Cant. Pieza N.º Descripción
1 6 900099
Ángulo Corto, Negro
2 1 900814
Ángulo Largo, Negro
3 2 900815
Braza, Larga
4 6 200580
Soporte del ángulo
5 2 204102
Perno en U, 3/8-16 x 4-1/4
6 4 203309
Arandela Plana, 0,406 d. int. x 1,0 d. ext.
7 4 203017
Tuerca Hexagonal, 3/8-16
8 10201107
Tornillo de Cabeza Hexagonal, 1/4-20 x 1/2
9 12 203326
Arandela de Seguridad, 1/4
10 12 203228
Tuerca Hexagonal, 1/4-20
11 1 900104
Braza, Corta
12 4 203103
Perno de Carruaje, 5/16-18 x 1,9
13 4 203100
Tuerca de Brida Hexagonal, 5/16-18
* Puede que haya piezas adicionales en este modelo.
#6 (4)
#9 (12)
#13 (4)
203100
NUT, HEX FLANGE, 5/16-18
#10 (12)
203228HexHeadNut1/4
LISTA DE PIEZAS (VÉASE EL IDENTIFICADOR DE HERRAJE)
#12 (4)
HARDWARE IDENTIFIER (BOLTS, NUTS & WASHERS)
IDENTIFICATION DES PIÈCES (BOULONS, ÉCROUS ET RONDELLES)
BEFESTIGUNGSTEILESCHLÜSSEL (BOLZEN, MUTTERN UND UNTERLEGSCHEIBEN)
IDENTIFICADOR DE HERRAJE (PERNOS, TUERCAS Y ARANDELAS)
#7 (4)
#14 (4) #15 (4)
Artículo Cant. Pieza N.º Descripción
14 4 240017 Perno, Cabeza Hexagonal,
1/4-20 x 2,25
15 4 209143 Espaciador, Acero, 0,26 d. int. x
0,50 d. ext. x 0,94 Largo
16 2 203071 Tornillo de Cabeza
Hexagonal, 1/4-20 x 1.5
#8 (10)
#16 (2)

8
FAN OR RECTANGULAR MOLDED PLASTIC BOARD:
MOUNTING CHOICE SECTION PAGES
POLE A 9–12
WALL A 9–11, 13
ROOF B 9-11, 14-15
STEEL FRAMED ACRYLIC TO A:
MOUNTING CHOICE SECTION PAGES
POLE C 16–18
WALL C 16–17, 19
ROOF D 20–21
PANNEAU EN PLASTIQUE MOULÉ EN ÉVENTAIL OU RECTANGULAIRE :
CHOIX D’INSTALLATION SECTION PAGES
POTEAU A 9–12
MUR A 9–11, 13
TOIT B 9-11, 14-15
ACRYLIQUE À CADRE EN ACIER SUR :
CHOIX D’INSTALLATION SECTION PAGES
POTEAU C 16–18
MUR C 16–17, 19
TOIT D 20–21
FÄCHERFÖRMIGE ODER RECHTECKIGE KORBWAND AUS KUNSTHARZPRESSSTOFF:
MONTAGEOPTIONEN ABSCHNITT SEITE
STANGE A 9–12
WAND A 9–11, 13
DACH B 9-11, 14-15
AKRYLKORBWAND MIT STAHLRAHMEN:
MONTAGEOPTIONEN ABSCHNITT SEITE
STANGE C 16–18
WAND C 16–17, 19
DACH D 20–21
TABLERO DE PLÁSTICO MOLDEADO RECTANGULAR O EN ABANICO:
TIPO DE MONTAJE SECCIÓN PÁGINAS
POSTE A 9–12
PARED A 9–11, 13
TEJADO B 9-11, 14-15
TABLERO DE ACRÍLICO CON MARCO DE ACERO:
TIPO DE MONTAJE SECCIÓN PÁGINAS
POSTE C 16–18
PARED C 16–17, 19
TEJADO D 20–21
CAUTION:
THISBACKBOARDANDGOALARENOTDESIGNEDTO
SUPPORTAPLAYERHANGINGFROMTHEGOALOR NET.
FAILURETOOBSERVETHISCAUTIONMAYCAUSE
BODILYINJURYAND/ORPROPERTYDAMAGE.
CAUTION:
THISBACKBOARDANDGOALARENOTDESIGNEDTO
SUPPORTAPLAYERHANGINGFROMTHEGOALOR NET.
FAILURETOOBSERVETHISCAUTIONMAYCAUSE
BODILYINJURYAND/ORPROPERTYDAMAGE.
CAUTION:
THISBACKBOARDANDGOALARENOTDESIGNEDTO
SUPPORTAPLAYERHANGINGFROMTHEGOALOR NET.
FAILURETOOBSERVETHISCAUTIONMAYCAUSE
BODILYINJURYAND/ORPROPERTYDAMAGE.
CAUTION:
THISBACKBOARDANDGOALARENOTDESIGNEDTO
SUPPORTAPLAYERHANGINGFROMTHEGOALOR NET.
FAILURETOOBSERVETHISCAUTIONMAYCAUSE
BODILYINJURYAND/ORPROPERTYDAMAGE.

9
TOOLS REQUIRED FOR THIS SECTION
OUTILS REQUIS POUR CETTE SECTION
FÜR DIESEN BAUABSCHNITT BENÖTIGTES WERKZEUG
HERRAMIENTAS REQUERIDAS PARA ESTA SECCIÓN
SECTION A / SECTION A / BAUABSCHNITT A / SECCIÓN A
ASSEMBLING A FAN OR RECTANGULAR MOLDED PLASTIC BACKBOARD TO THE BRACKET TO
ATTACH TO A POLE OR WALL
MONTAGE D’UN PANNEAU EN PLASTIQUE MOULÉ EN ÉVENTAIL OU RECTANGULAIRE SUR LE SUPPORT
POUR FIXATION SUR UN POTEAU OU UN MUR
MONTAGE DER FÄCHERFÖRMIGEN ODER RECHTECKIGEN KORBWAND AUS KUNSTHARZPRESSSTOFF MIT DER
HALTERUNG ZUR BEFESTIGUNG AN EINER STANGE ODER WAND
MONTAJE DE UN TABLERO DE PLÁSTICO MOLDEADO RECTANGULAR O EN FORMA DE ABANICO EN EL
SOPORTE PARA SU INSTALACIÓN EN UN POSTE O EN UNA PARED
CAUTION:
THISBACKBOARDANDGOALARENOTDESIGNEDTO
SUPPORTAPLAYERHANGINGFROMTHEGOALOR NET.
FAILURETOOBSERVETHISCAUTIONMAYCAUSE
BODILYINJURYAND/ORPROPERTYDAMAGE.
9/16”
1/2”
• (2) 1/2” and (2) 9/16” Wrenches
• (2) clés 1/2” et (2) clés 9/16”
• (2) 1/2 und (2) 9/16-Zoll-Schraubenschlüssel
• (2) Llaves de 1/2”, y (2) de 9/16”
• (2) Socket Wrenches and Sockets
• (2) clés à douille et douilles
• (2) Steckschlüssel und Einsätze
• (2) Llaves de vaso y manerales
AND/OR
ET/OU
UND/ODER
Y/O

10
Assemble short angles (1) to long angle (2) using bolts (8), washers (9), and nuts (10) as shown.
Montez les cornières courtes (1) sur la cornière longue (2) à l’aide des boulons (8), des rondelles (9) et
des écrous (10), comme indiqué.
Die kurzen Winkelprofile (1) mit den Schrauben (8), Unterlegscheiben (9) und Muttern (10) wie abgebildet
am langen Winkelprofil (2) befestigen.
Monte los ángulos cortos (1) en el
ángulo largo (2) con pernos (8),
arandelas (9) y tuercas (10), como se
muestra.
POLE OR WALL MOUNT FOR FAN OR RECTANGULAR MOLDED PLASTIC BACKBOARDS
SUPPORT POUR POTEAU OU MUR POUR PANNEAUX EN PLASTIQUE MOULÉ EN ÉVENTAIL OU RECTANGULAIRES
STANGEN- ODER WANDMONTAGE DER FÄCHERFÖRMIGEN BZW. RECHTECKIGEN KORBWAND AUS KUNSTHARZPRESSSTOFF
MONTAJE DE TABLEROS MOLDEADOS DE PLÁSTICO RECTANGULARES O EN ABANICO EN UN POSTE O EN UNA PARED
Assemble three short angles (1) together using bolts (8), washers (9), and nuts (10) as shown.
Montez ensemble trois cornières courtes (1) à l’aide des boulons (8), des rondelles (9) et des écrous (10),
comme indiqué.
Drei kurze Winkelprofile (1) mit Schrauben (8), Unterlegscheiben
(9) und Muttern (10) wie abgebildet zusammenbauen.
Monte tres ángulos cortos (1) entre sí usando pernos (8),
arandelas (9) y tuercas (10), como se muestra.
10
2
1
9
8
1
#8
201107 hex head bolt 1/4 x 1/2
#9 #10
203228HexHeadNut1/4
IMPORTANT!
IMPORTANT !
WICHTIG!
¡IMPORTANTE!
ONLY FINGER TIGHTEN HARDWARE UNTIL
BRACKET IS COMPLETELY ASSEMBLED.
SERREZ LES ÉCROUS ET LES BOULONS À
LA MAIN JUSQU’À CE QUE LE SUPPORT SOIT
COMPLÈTEMENT ASSEMBLÉ.
DIE BEFESTIGUNGSTEILE NUR HANDFEST
ANZIEHEN, BIS DIE HALTERUNG VOLLSTÄNDIG
MONTIERT IST.
SOLO APRIETE EL HERRAJE CON LOS DEDOS
HASTA QUE EL SOPORTE ESTÉ COMPLETAMENTE
MONTADO.
1.
2.
#8
201107 hex head bolt 1/4 x 1/2
#9 #10
203228HexHeadNut1/4
1
10
9
8
1
1

11
Assemble two bracket assemblies with brace (3)
using bolts (8), washers (9), and nuts (10).
Montez deux supports sur l’entretoise (3) à
l’aide des boulons (8), des rondelles (9) et
des écrous (10).
Zwei Halterungsbaugruppen
mitie Strebe (3), Schrauben (8),
Unterlegscheiben (9) und Muttern (10)
zusammenfügen.
Monte dos conjuntos de soportes con
un refuerzo (3) usando pernos (8),
arandelas (9) y tuercas (10).
Install angle brackets (4) using bolts (8), washers (9), and nuts (10)
as shown. Keep finger tight until board is attached. Then fully tighten
ALL hardware.
Installez les équerres (4) à l’aide des boulons (8), des rondelles (9)
et des écrous (10), comme indiqué. Serrez simplement à la
main jusqu’à fixation du panneau. Ensuite,
serrez à fond TOUTE la visserie.
Die Winkelhalterungen (4) mit Schrauben (8),
Unterlegscheiben (9) und Muttern (10) wie
abgebildet montieren. Bis zur Befestigung
der Korbwand nur handfest anziehen.
Anschließend ALLE Befestigungsteile fest
anziehen.
Instale los soportes angulares (4) con
pernos (8), arandelas (9) y tuercas (10) como
se muestra. Apriételos solo con los dedos
hasta que el tablero esté instalado. Luego
apriete completamente TODO el herraje.
#8
201107 hex head bolt 1/4 x 1/2
#9 #10
203228HexHeadNut1/4
#8
201107 hex head bolt 1/4 x 1/2
#9 #10
203228HexHeadNut1/4
3.
4.
8
4
3
8
910
8
9
9
10
10
IMPORTANT!
IMPORTANT !
WICHTIG!
¡IMPORTANTE!
FULLY TIGHTEN ALL NUTS AND BOLTS AFTER
THIS ASSEMBLY.
SERREZ À FOND TOUS LES ÉCROUS ET
BOULONS APRÈS LE MONTAGE.
ALLE MUTTERN UND SCHRAUBEN NACH
DIESEM ZUSAMMENBAU FEST ANZIEHEN.
APRIETE COMPLETAMENTE TODAS LAS
TUERCAS Y PERNOS DESPUÉS DEL MONTAJE.
8
9
4
10
8
9
10
4
3
12
POLE MOUNT / FIXATION SUR POTEAU / STANGENMONTAGE / MONTAJE EN EL POSTE
#6
#13
203100
NUT, HEX FLANGE, 5/16-18
#7
#12
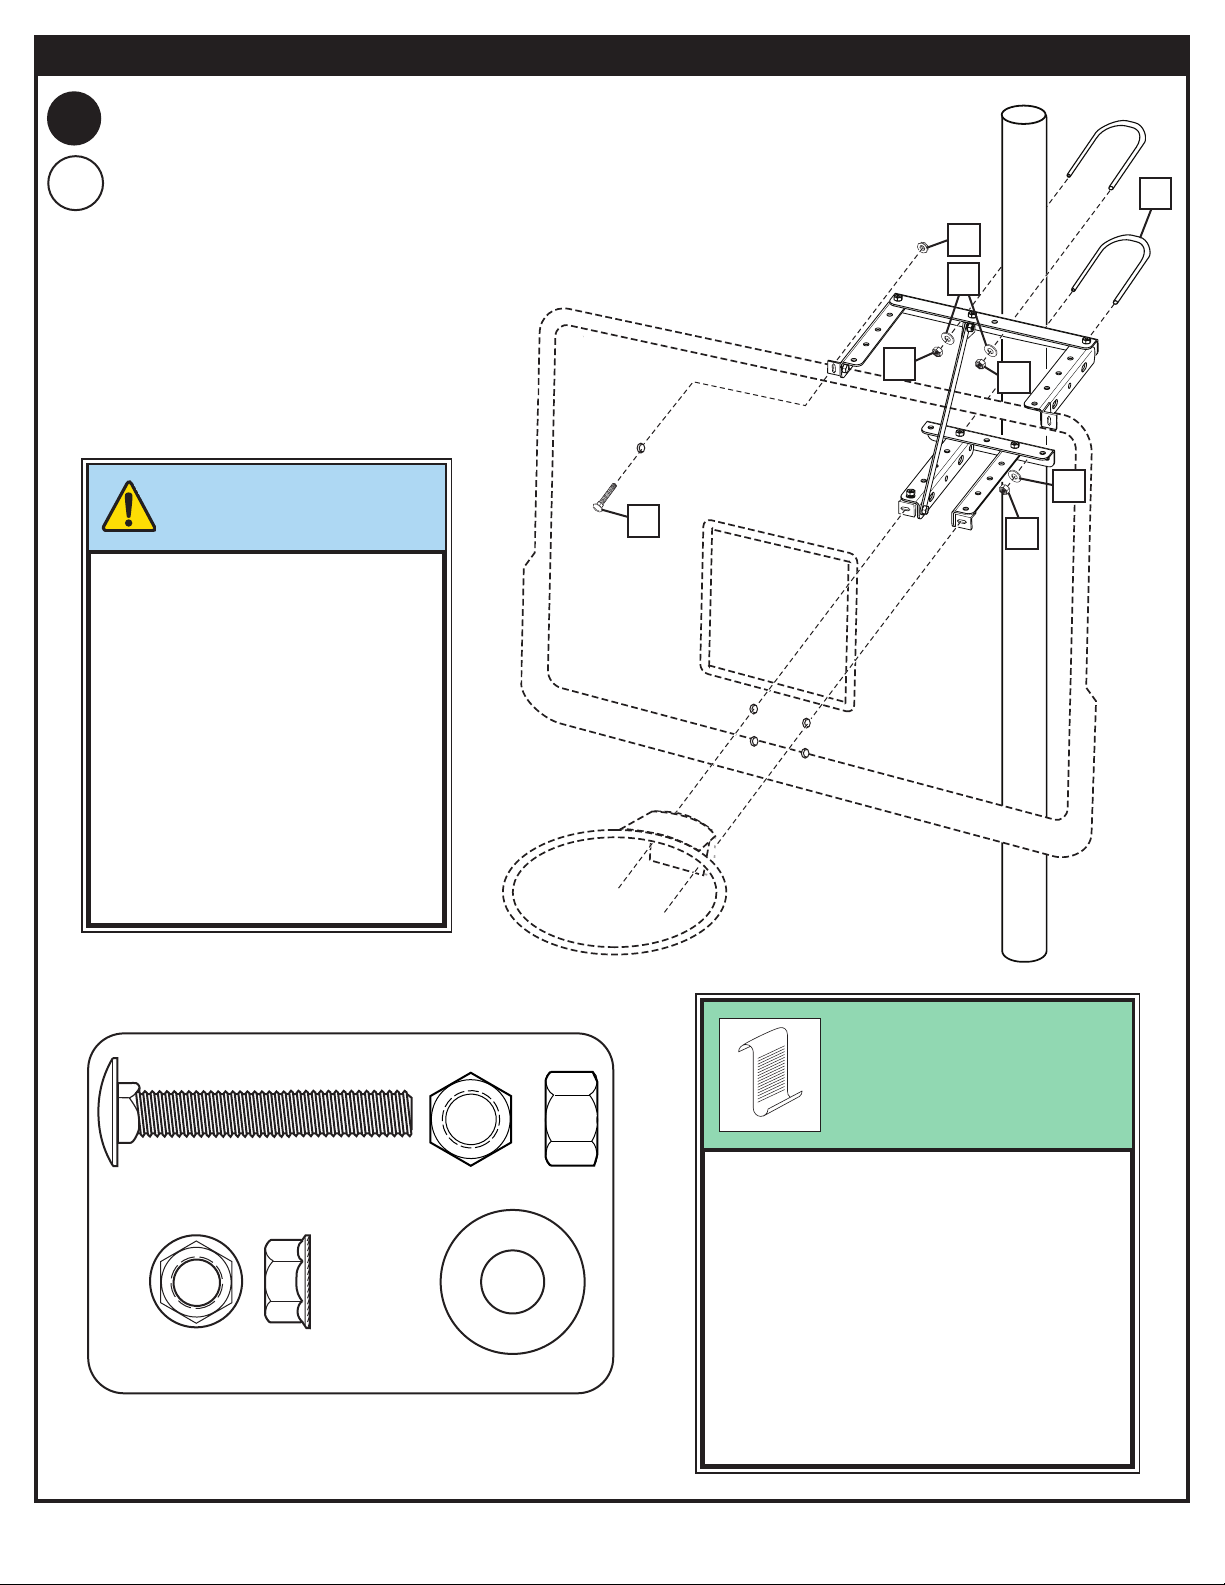
IMPORTANT!
IMPORTANT !
WICHTIG!
¡IMPORTANTE!
Hardware supplied is designed for a 3 1/2”
diameter pole. Consumers must provide
necessary hardware for poles of other sizes.
La visserie fournie a été conçue pour un
poteau de 3 1/2” de diamètre. Les utilisateurs
doivent fournir la visserie nécessaire pour les
poteaux d’autres dimensions.
Die beiliegenden Befestigungsteile sind für
eine Stange mit einem Durchmesser von
3 1/2” ausgelegt. Zur Montage an einer
Stange mit anderem Durchmesser müssen
die erforderlichen Befestigungsteile vom
Käufer bereitgestellt werden.
El herraje proporcionado está diseñado para
un poste de 3 1/2” de diámetro. Los usuarios
deben conseguir el herraje necesario para
postes de otro tamaño.
Assemble U-Bolts to brackets loosely. Tighten when desired goal height is reached. Official
goal height is 10 feet (3.05m).
Assemblez les boulons en U et les équerres, sans serrer. Serrez lorsque vous avez atteint
la hauteur de panier désirée. La hauteur officielle de est de 10 pieds (3,05 m).
Die Bügelschrauben lose an den Halterungen anbringen. Erst festziehen, wenn die
gewünschte Korbhöhe erreicht ist. Der Korbrand wird den offiziellen Regeln gemäß
in einer Höhe von 10 Fuß (3,05 m) angebracht.
Monte holgadamente los pernos en U en
los soportes. Apriételos cuando se logre
la altura deseada de la canasta. La altura
oficial de la canasta según es de
10 pies (3,05 m).
A
5.
For spring loaded rim assembly, refer to
instructions included with rim hardware.
Pour un anneau à ressort, reportez-vous
aux instructions fournies avec la visserie
de l’anneau.
Bei einer federbelasteten Korbmontage ist
die den Befestigungsteilen des Korbrands
beiliegende Anleitung zu beachten.
Para el montaje del aro con resorte,
consulte las instrucciones que se incluyen
con el herraje del aro.
NOTE:
REMARQUE :
HINWEIS:
NOTA:
13
77
7
6
12
5
6
13
WALL MOUNT / FIXATION SUR MUR / WANDMONTAGE / MONTAJE EN LA PARED
Assemble U-Bolts to brackets loosely. Tighten
when desired goal height is reached. Official
goal height is 10 feet (3.05m).
Assemblez les boulons en U et les équerres,
sans serrer. Serrez lorsque vous avez atteint la
hauteur de panier désirée. La hauteur officielle de
est de 10 pieds (3,05 m).
Die Bügelschrauben lose an den Halterungen
anbringen. Erst festziehen, wenn die gewünschte
Korbhöhe erreicht ist. Der Korbrand wird gemäß
den offiziellen Regeln in einer Höhe von
10 Fuß (3,05 m) angebracht.
Monte holgadamente los pernos en U en
los soportes. Apriételos cuando se logre la
altura deseada de la canasta. La altura
oficial de la canasta según es de 10
pies (3,05 m).
B
5.
#13
203100
NUT, HEX FLANGE, 5/16-18
#12
13
12
IMPORTANT!
IMPORTANT !
WICHTIG!
¡IMPORTANTE!
FULLY TIGHTEN ALL NUTS AND BOLTS AFTER
THIS ASSEMBLY.
SERREZ À FOND TOUS LES ÉCROUS ET
BOULONS APRÈS LE MONTAGE.
ALLE MUTTERN UND SCHRAUBEN NACH
DIESEM ZUSAMMENBAU FEST ANZIEHEN.
APRIETE COMPLETAMENTE TODAS LAS
TUERCAS Y PERNOS DESPUÉS DEL MONTAJE.
Hardware for mounting the brackets
to the wall is not included.
La visserie de fixation des équerres
sur le mur n’est pas fournie.
Die Befestigungsteile zur Anbringung
der Halterungen an der Wand sind
nicht im Lieferumfang enthalten.
No se incluye herraje para montar los
soportes en la pared.
NOTE:
REMARQUE :
HINWEIS:
NOTA:
For spring loaded rim assembly,
refer to instructions included
with rim hardware.
Pour un anneau à ressort,
reportez-vous aux instructions
fournies avec la visserie de
l’anneau.
Bei einer federbelasteten
Korbmontage ist die den
Befestigungsteilen des
Korbrands beiliegende Anleitung
zu beachten.
Para el montaje del aro
con resorte, consulte las
instrucciones que se incluyen
con el herraje del aro.
NOTE:
REMARQUE :
HINWEIS:
NOTA:

14
SECTION B: ASSEMBLING THE BRACKET TO ATTACH TO A ROOF
SECTION B : ASSEMBLAGE DU SUPPORT POUR FIXATION SUR TOIT
ABSCHNITT B: MONTAGE DER HALTERUNG ZUR BEFESTIGUNG AN EINEM DACH
SECCIÓN B: MONTAJE DEL SOPORTE PARA SU INSTALACIÓN EN EL TEJADO
TOOLS REQUIRED FOR THIS SECTION
OUTILS REQUIS POUR CETTE SECTION
FÜR DIESEN BAUABSCHNITT BENÖTIGTES WERKZEUG
HERRAMIENTAS REQUERIDAS PARA ESTA SECCIÓN
1/2”
• (2) 1/2” Wrenches
• (2) clés 1/2”
• (2) 1/2 Zoll-Schraubenschlüssel
• (2) Llaves de 1/2”
• (2) Socket Wrenches and Sockets
• (2) clés à douille et douilles
• (2) Steckschlüssel und Einsätze
• (2) Llaves de vaso y manerales

15
1.
4
13
12
13
ROOF MOUNT / FIXATION SUR TOIT
DACHMONTAGE / MONTAJE EN EL TEJADO
6
8
9
10
4
Top View / Vue de dessus / Ansicht von oben / Vista desde arriba
8
10
8
9
10
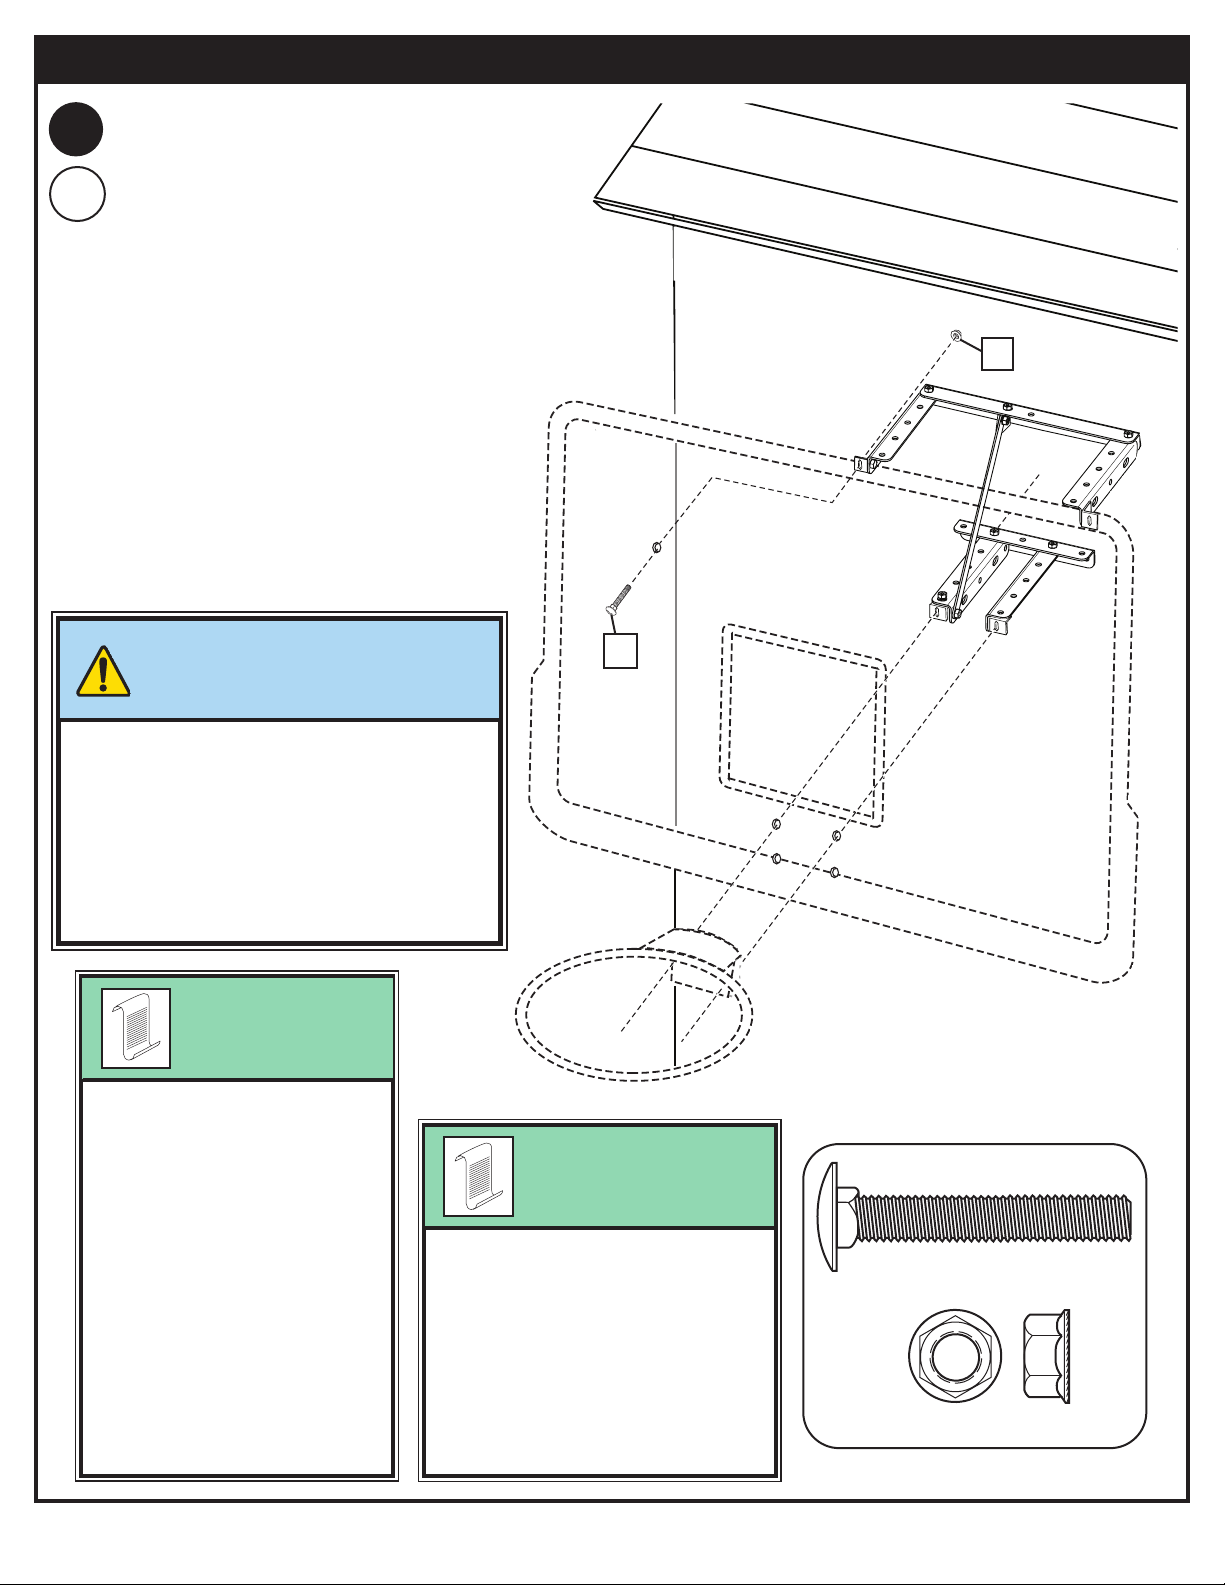
Mount to roof as shown.
Fixez au toit comme indiqué.
Wie abgebildet am Dach montieren.
Móntelo en el tejado tal y como se muestra.
Hardware for mounting the brackets to the roof is not included.
La visserie de fixation des équerres sur le toit n’est pas fournie.
Die Befestigungsteile zur Anbringung der Halterungen am Dach
sind nicht im Lieferumfang enthalten.
No se incluye herraje para montar los soportes en el tejado.
NOTE: / REMARQUE :
HINWEIS: / NOTA:
IMPORTANT!
IMPORTANT !
WICHTIG!
¡IMPORTANTE!
FULLY TIGHTEN ALL NUTS AND BOLTS
AFTER THIS ASSEMBLY.
SERREZ À FOND TOUS LES ÉCROUS ET
BOULONS APRÈS LE MONTAGE.
ALLE MUTTERN UND SCHRAUBEN NACH
DIESEM ZUSAMMENBAU FEST ANZIEHEN.
APRIETE COMPLETAMENTE TODAS LAS
TUERCAS Y PERNOS DESPUÉS DEL
MONTAJE.
4
8
10 9
#8
201107 hex head bolt 1/4 x 1/2
#10
203228HexHeadNut1/4
#9
#13
203100
NUT, HEX FLANGE, 5/16-18
#12
#6
NOTE:
REMARQUE :
HINWEIS:
NOTA:
Rim mounting nuts and bolts supplied
with rim hardware. DO NOT use
washers (6) here on spring return style
rims.
Les écrous et les boulons de fixation de
l’anneau sont fournis avec la visserie de
l’anneau. N’UTILISEZ PAS de
rondelles (6) sur les anneaux à ressort.
Korbrand-Befestigungsmuttern
und -schrauben sind in den
Befestigungsteilen des Korbrands
enthalten. An Federkorbrändern KEINE
Unterlegscheiben (6) benutzen.
Las tuercas y los pernos para el montaje
del aro se suministran con el herraje del
aro. NO use arandelas (6) aquí en los
aros de estilo de retorno por resorte.
16
SECTION C: ASSEMBLING A STEEL FRAMED ACRYLIC BACKBOARD TO THE BRACKET TO ATTACH TO A POLE
OR WALL.
SECTION C : MONTAGE D’UN PANNEAU EN ACRYLIQUE À CADRE EN ACIER SUR LE SUPPORT POUR FIXATION
SUR UN POTEAU OU UN MUR.
ABSCHNITT C: MONTAGE DER AKRYLKORBWAND MIT STAHLRAHMEN MIT DER HALTERUNG ZUR BEFESTIGUNG
AN EINER STANGE ODER WAND.
SECCIÓN C: MONTAJE DE UN TABLERO DE ACRÍLICO CON MARCO DE ACERO EN EL SOPORTE PARA SU
INSTALACIÓN EN UN POSTE O EN UNA PARED.
TOOLS REQUIRED FOR THIS SECTION
OUTILS REQUIS POUR CETTE SECTION
FÜR DIESEN BAUABSCHNITT BENÖTIGTES WERKZEUG
HERRAMIENTAS REQUERIDAS PARA ESTA SECCIÓN
1/2”
• (2) 1/2” Wrenches
• (2) clés 1/2”
• (2) 1/2 Zoll-Schraubenschlüssel
• (2) Llaves de 1/2”
• (2) Socket Wrenches and Sockets
• (2) clés à douille et douilles
• (2) Steckschlüssel und Einsätze
• (2) Llaves de vaso y manerales
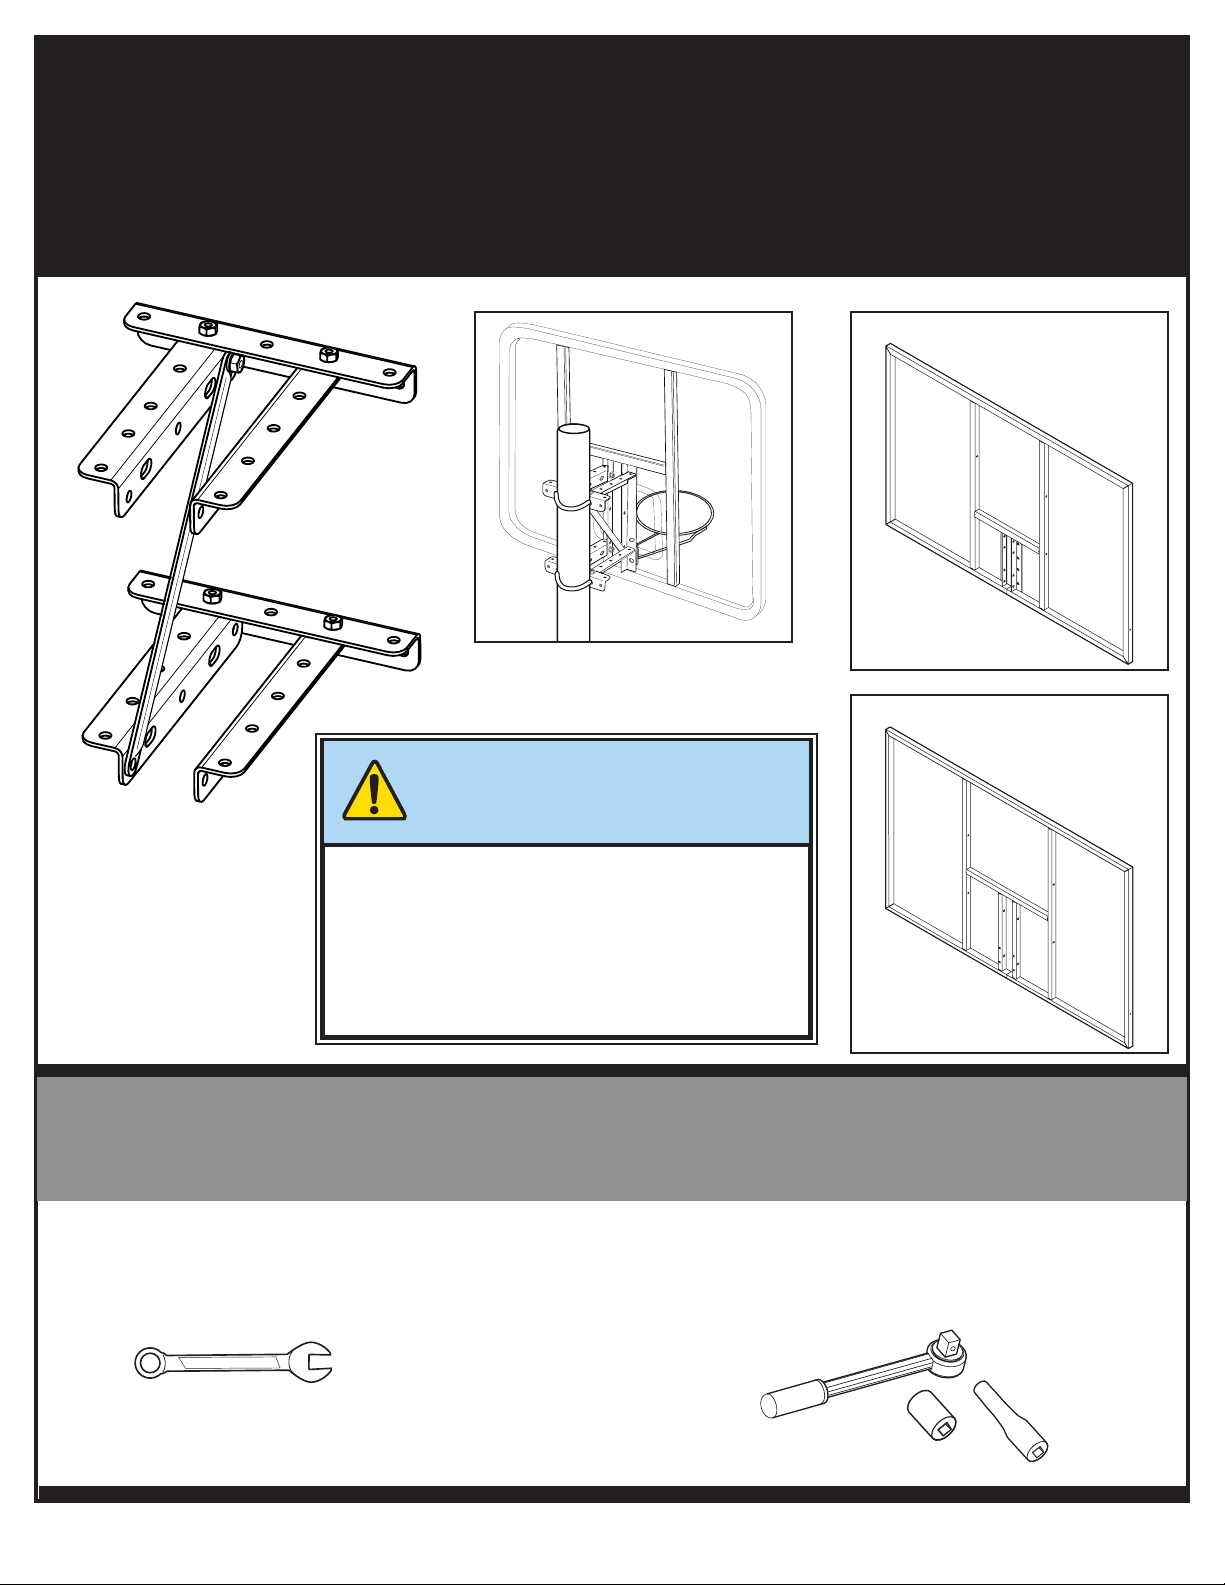
IMPORTANT!
IMPORTANT !
WICHTIG!
¡IMPORTANTE!
ONLY FINGER TIGHTEN HARDWARE UNTIL BRACKET IS
COMPLETELY ASSEMBLED.
SERREZ LES ÉCROUS ET LES BOULONS À LA MAIN JUSQU’À
CE QUE LE SUPPORT SOIT COMPLÈTEMENT ASSEMBLÉ.
DIE BEFESTIGUNGSTEILE NUR HANDFEST ANZIEHEN, BIS DIE
HALTERUNG VOLLSTÄNDIG MONTIERT IST.
SOLO APRIETE EL HERRAJE CON LOS DEDOS HASTA QUE EL
SOPORTE ESTÉ COMPLETAMENTE MONTADO.
Board Style B
Panneau Style B
Korbwandtyp B
Tablero tipo B
Board Style A
Panneau Style A
Korbwandtyp A
Tablero tipo A

17
POLE OR WALL MOUNT FOR STEEL FRAMED ACRYLIC BACKBOARDS
SUPPORT POUR POTEAU OU MUR POUR PANNEAUX EN ACRYLIQUE À CADRE EN ACIER
STANGEN- ODER WAND- MONTAGE DER AKRYLKORBWAND MIT STAHLRAHMEN
MONTAJE DE TABLEROS DE ACRÍLICO CON MARCO DE ACERO EN UN POSTE O EN UNA PARED
11
8
910
Attach brace to one bracket assembly using brace (11) and bolt
(8), washer (9), and nut (10).
Attachez une entretoise à un support à l’aide d’une entretoise (11)
et d’un boulon (8), d’une rondelle (9) et d’un écrou (10).
Die Strebe (11) mit Schraube (8), Unterlegscheibe (9) und
Mutter (10) an einer Halterungsbaugruppe befestigen.
Instale el refuerzo a un conjunto de soportes usando el
refuerzo (11), el perno (8), la arandela (9) y la tuerca (10).
3.
ASSEMBLE COMPONENTS when attaching board.
ASSEMBLEZ LES COMPOSANTS lors de la fixation du panneau.
KOMPONENTEN beim Anbringen der Korbwand
ZUSAMMENFÜGEN.
ENSAMBLE LAS PARTES cuando monte el tablero.
NOTE:
REMARQUE :
HINWEIS:
NOTA:
1. Assemble three angle brackets (1) together as shown.
Assemblez trois équerres (1) comme illustré.
Drei Winkelhalterungen (1) wie abgebildet zusammenbauen.
Monte tres soportes angulares (1) entres sí como se muestra.
#8
201107 hex head bolt 1/4 x 1/2
#9
1
8
9
10
1
1
203228HexHeadNut1/4
#10
A
2. Assemble a second set of three angle brackets (1) together as
shown.
Assemblez un second jeu de trois équerres (1) comme illustré.
Einen zweiten Satz von drei Winkelhalterungen (1) wie
abgebildet zusammenbauen.
Monte un segundo conjunto de tres soportes angulares (1)
entre sí como se muestra.
1
8
9
10
1
1
A
A
BOARD STYLE A ANGLE BRACKET ASSEMBLY INSTRUCTIONS
INSTRUCTIONS D’ASSEMBLAGE DES ÉQUERRES POUR PANNEAU DE STYLE A
KORBWANDTYP A: MONTAGEANLEITUNG FÜR WINKELHALTERUNG
INSTRUCCIONES PARA EL MONTAJE DEL SOPORTE DE ÁNGULO DEL TABLERO TIPO A

18
POLE OR WALL MOUNT FOR STEEL FRAMED ACRYLIC BACKBOARDS
SUPPORT POUR POTEAU OU MUR POUR PANNEAUX EN ACRYLIQUE À CADRE EN ACIER
STANGEN- ODER WAND- MONTAGE DER AKRYLKORBWAND MIT STAHLRAHMEN
MONTAJE DE TABLEROS DE ACRÍLICO CON MARCO DE ACERO EN UN POSTE O EN UNA PARED
BOARD STYLE B ANGLE BRACKET ASSEMBLY INSTRUCTIONS
INSTRUCTIONS D’ASSEMBLAGE DES ÉQUERRES POUR PANNEAU DE STYLE B
KORBWANDTYP B: MONTAGEANLEITUNG FÜR WINKELHALTERUNG
INSTRUCCIONES PARA EL MONTAJE DEL SOPORTE DE ÁNGULO DEL TABLERO TIPO B
11
8
910
Attach brace to one bracket assembly using brace (11) and bolt
(8), washer (9), and nut (10).
Attachez une entretoise à un support à l’aide d’une entretoise
(11) et d’un boulon (8), d’une rondelle (9) et d’un écrou (10).
Die Strebe (11) mit Schraube (8), Unterlegscheibe (9) und
Mutter (10) an einer Halterungsbaugruppe befestigen.
Instale el refuerzo a un conjunto de soportes usando el
refuerzo (11), el perno (8), la arandela (9) y la tuerca (10).
3.
ASSEMBLE COMPONENTS when attaching board.
ASSEMBLEZ LES COMPOSANTS lors de la fixation du panneau.
KOMPONENTEN beim Anbringen der Korbwand
ZUSAMMENFÜGEN.
ENSAMBLE LAS PARTES cuando monte el tablero.
NOTE:
REMARQUE :
HINWEIS:
NOTA:
1. Assemble three angle brackets (1) together as shown.
Assemblez trois équerres (1) comme illustré.
Drei Winkelhalterungen (1) wie abgebildet zusammenbauen.
Monte tres soportes angulares (1) entres sí como se muestra.
#8
201107 hex head bolt 1/4 x 1/2
#9
1
8
9
10
11
203228HexHeadNut1/4
#10
A
2. Assemble a second set of three angle brackets (1) together as
shown.
Assemblez un second jeu de trois équerres (1) comme illustré.
Einen zweiten Satz von drei Winkelhalterungen (1) wie
abgebildet zusammenbauen.
Monte un segundo conjunto de tres soportes angulares (1)
entre sí como se muestra.
A
A
1
8
9
10
11

19
8
8
10
10 9
POLE MOUNT / FIXATION SUR POTEAU / STANGENMONTAGE / MONTAJE EN EL POSTE
9
FRONT VIEW
VUE DE FACE
VORDERSEITE
VISTA FRONTAL
8
10
4.
A
IMPORTANT!
IMPORTANT !
WICHTIG!
¡IMPORTANTE!
Hardware supplied is designed for a 3 1/2” diameter pole. Consumers must provide
necessary hardware for poles of other sizes.
La visserie fournie a été conçue pour un poteau de 3 1/2” de diamètre. Les utilisateurs
doivent fournir la visserie nécessaire pour les poteaux d’autres dimensions.
Die beiliegenden Befestigungsteile sind für eine Stange mit einem Durchmesser von
3 1/2” ausgelegt. Zur Montage an einer Stange mit anderem Durchmesser müssen
die erforderlichen Befestigungsteile vom Käufer bereitgestellt werden.
El herraje proporcionado está diseñado para un poste de 3 1/2” de diámetro. Los
usuarios deben conseguir el herraje necesario para postes de otro tamaño.
#8
201107 hex head bolt 1/4 x 1/2
#9
203228HexHeadNut1/4
#10
BOARD STYLE A POLE MOUNT ASSEMBLY INSTRUCTIONS
INSTRUCTIONS D’ASSEMBLAGE DE FIXATION SUR POTEAU POUR PANNEAU DE STYLE A
KORBWANDTYP A: ANLEITUNG FÜR STANGENMONTAGE
INSTRUCCIONES PARA EL MONTAJE DEL POSTE DEL TABLERO TIPO A
Assemble U-Bolts to brackets loosely. Tighten when desired goal height is reached. Official goal height is
10 feet (3.05m).
Assemblez les boulons en U et les équerres, sans serrer. Serrez lorsque vous avez atteint la hauteur de
panier désirée. La hauteur officielle de est de 10 pieds (3,05 m).
Die Bügelschrauben lose an den Halterungen anbringen. Erst festziehen, wenn die gewünschte Korbhöhe
erreicht ist. Der Korbrand wird den offiziellen Regeln gemäß in einer Höhe von 10 Fuß (3,05 m) angebracht.
Monte holgadamente los pernos en U en los soportes. Apriételos cuando se logre la altura deseada de la
canasta. La altura oficial de la canasta según es de 10 pies (3,05 m).

20
14
14
15
10
9
POLE MOUNT / FIXATION SUR POTEAU / STANGENMONTAGE / MONTAJE EN EL POSTE
Assemble U-Bolts to brackets loosely. Tighten when desired goal height is reached. Official goal height
is 10 feet (3.05m).
Assemblez les boulons en U et les équerres, sans serrer. Serrez lorsque vous avez atteint la hauteur de
panier désirée. La hauteur officielle de est de 10 pieds (3,05 m).
Die Bügelschrauben lose an den Halterungen anbringen. Erst festziehen, wenn die gewünschte Korbhöhe
erreicht ist. Der Korbrand wird den offiziellen Regeln gemäß in einer Höhe von 10 Fuß (3,05 m) angebracht.
Monte holgadamente los pernos en U en los soportes. Apriételos cuando se logre la altura deseada de la
canasta. La altura oficial de la canasta según es de 10 pies (3,05 m).
4.
B
IMPORTANT!
IMPORTANT !
WICHTIG!
¡IMPORTANTE!
Hardware supplied is designed for a 3 1/2” diameter pole. Consumers must provide
necessary hardware for poles of other sizes.
La visserie fournie a été conçue pour un poteau de 3 1/2” de diamètre. Les utilisateurs
doivent fournir la visserie nécessaire pour les poteaux d’autres dimensions.
Die beiliegenden Befestigungsteile sind für eine Stange mit einem Durchmesser von
3 1/2” ausgelegt. Zur Montage an einer Stange mit anderem Durchmesser müssen
die erforderlichen Befestigungsteile vom Käufer bereitgestellt werden.
El herraje proporcionado está diseñado para un poste de 3 1/2” de diámetro. Los
usuarios deben conseguir el herraje necesario para postes de otro tamaño.
#9
203228HexHeadNut1/4
#10
14
#14 (4)
#15
BOARD STYLE B POLE MOUNT ASSEMBLY INSTRUCTIONS
INSTRUCTIONS D’ASSEMBLAGE DE FIXATION SUR POTEAU POUR PANNEAU DE STYLE B
KORBWANDTYP B: ANLEITUNG FÜR STANGENMONTAGE
INSTRUCCIONES PARA EL MONTAJE DEL POSTE DEL TABLERO TIPO B
Other manuals for 8406SP
1
Table of contents
Other SPALDING TV Mount manuals


