SPD PRO TOTAL FIT User manual
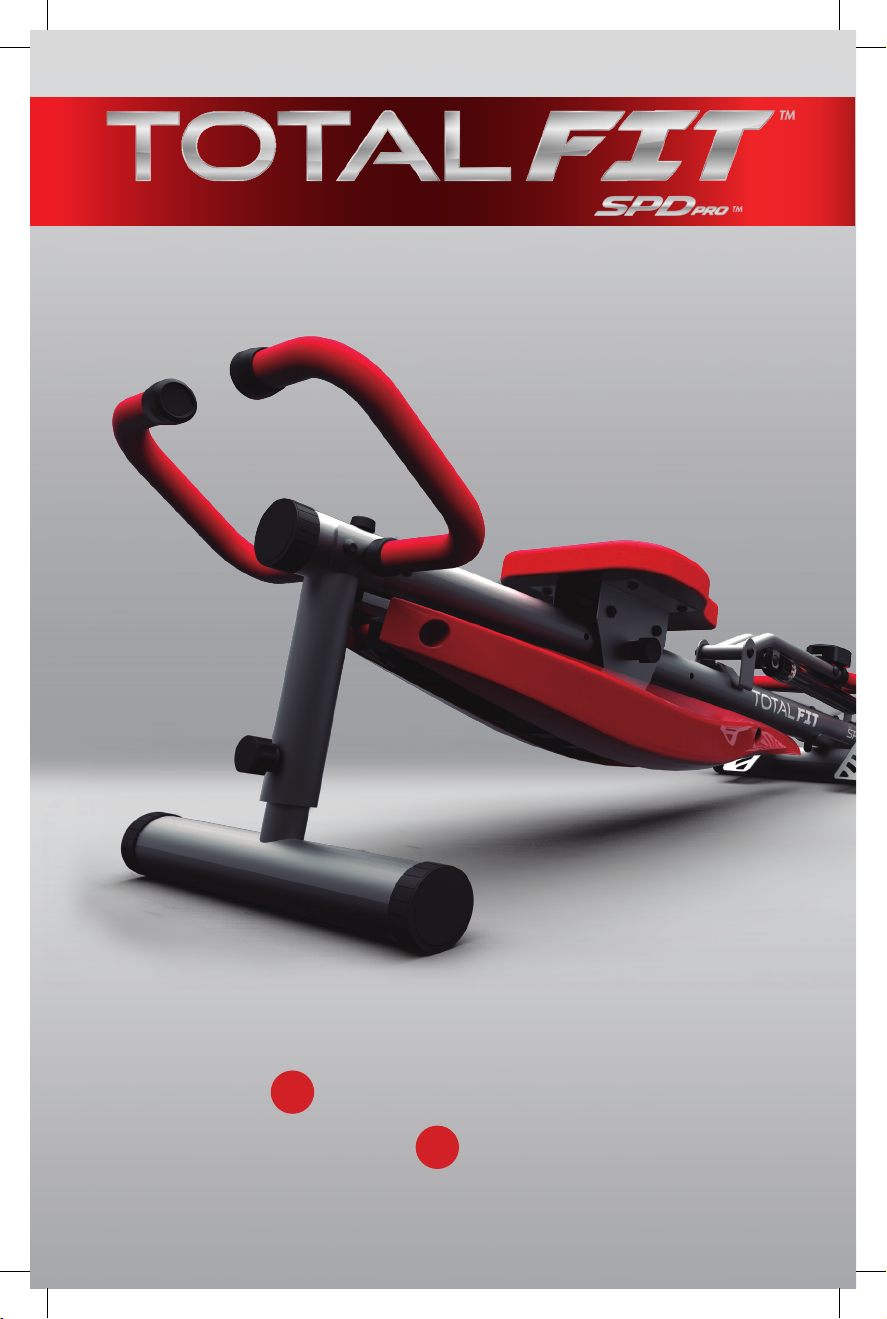
USER MANUAL
MANUAL DE INSTRUCCIONES
IMPORTANT: Read the entire manual carefully before using the equipment
IMPORTANTE: Lea atentamente este manual antes de usar el equipo
EN
ES

IMPORTANT SAFETY INFORMATION
Please keep this manual for future reference.
1. It is important that you read the entire manual before assembling and using the
equipment. A safe and efcient use of this equipment is ensured only when the
equipment has been completely assembled, maintained and used correctly. You are
responsible for ensuring that all users are informed of the warnings and necessary
precautions.
2. It is important to consult a physician before starting any training program in case
you should have any medical condition that could put your health at risk.
3. Pay attention to your body. If you make incorrect exercise or perform at a too
high intensity, you will increase the risk of injury. Stop immediately if you start
experiencing any of the following symptoms: pain, chest pain, irregular heat beat,
extreme shortness of breath, dizziness or nausea. If you experience any of these
symptoms, consult a physician before continuing with any training programme.
4. Keep children and pets away from the equipment. The equipment is designed for
adult use only.
5. Use the equipment on a solid, level surface and place something to protect the
oor. For your safety, always ensure there is at least half a meter of space around
the equipment.
6. Before using the equipment make sure all of the nuts and screws are securely
tightened.
7. The security level of the equipment can be maintained only if it is checked regularly
for damage and wear.
8. Always use the equipment as indicated in this manual. If you nd any defective
components during assembly or equipment maintenance, or if you hear any unusual
noise during use, stop immediately. Do not use the equipment until you have solved
the problem.
9. Always wear appropriate clothing when exercising. Avoid loose clothing that could
become caught in the equipment or clothing that could restrict movement. Make
sure you start slowly. Grip the handle rmly and do not lift up from the seat when
exercising.
10. The equipment is intended for domestic use and is suitable for users weighing 330
pounds / 150 kgs or less.
11. Be careful when lifting or moving the equipment so as to not injure your back.
Always use proper lifting techniques and / or ask for help.
EN

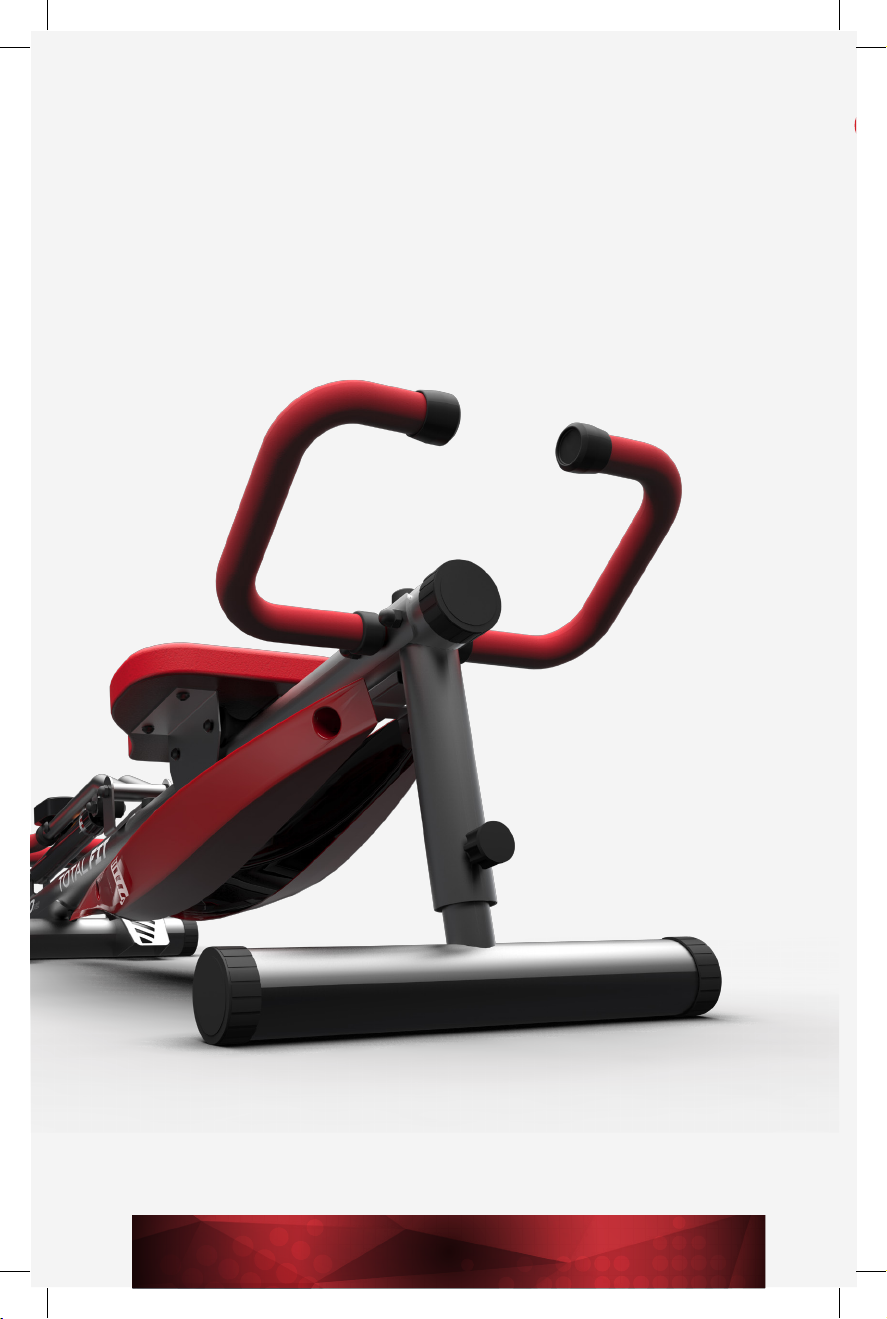
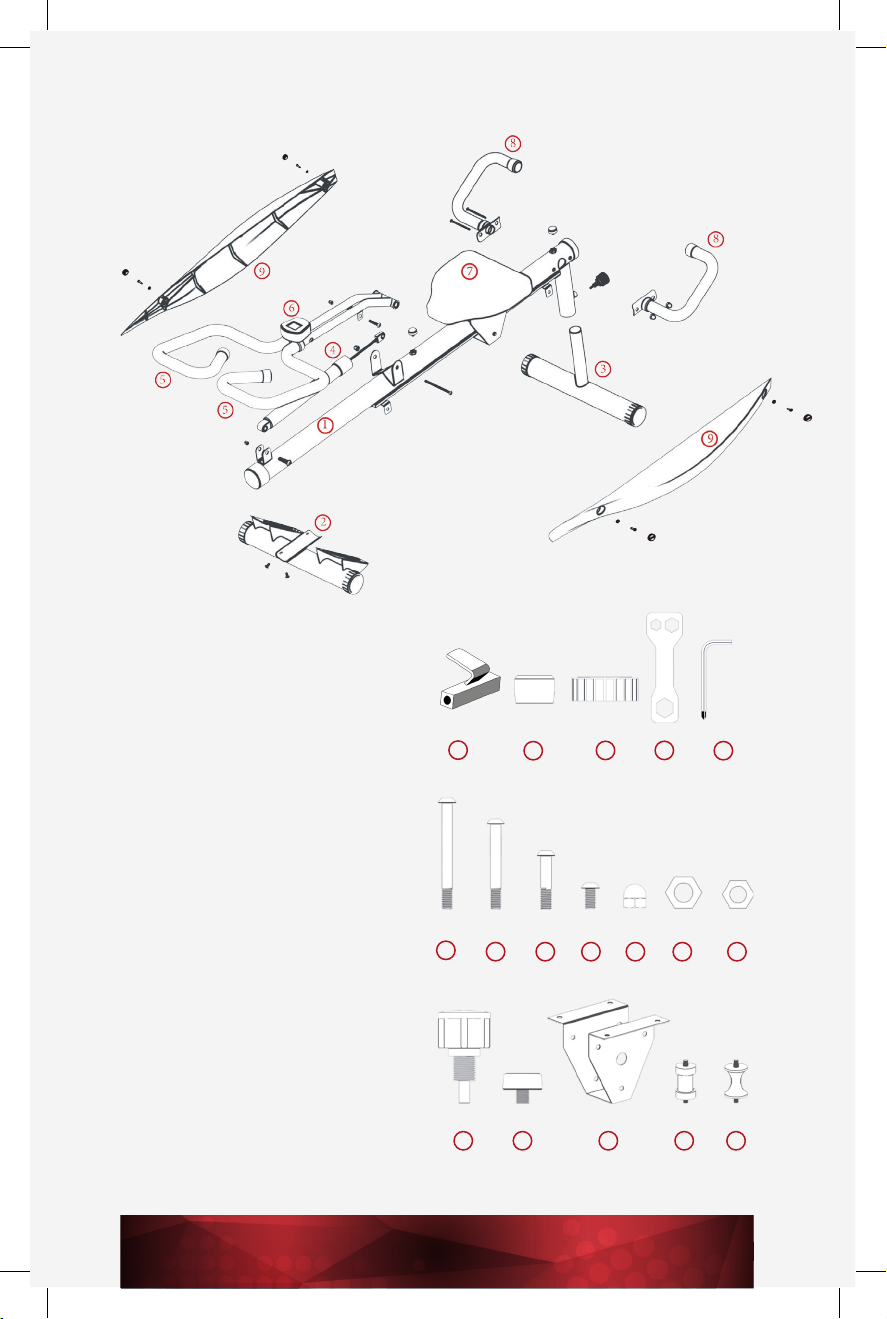
COMPONENTS:
1.- Main support
2.- Front frame
3.- Back frame
4.- Piston
5.- Main handles (x2)
6.- Digital monitor
7.- S e a t
8.- Back handles (x2)
9.- Casings (x2)
10.- Digital Monitor Support
11.- Small caps (x4)
12.- Large caps (x6)
13.- Wrench for nuts
14.- Allen wrench
15.- Screw A
16.- Screw B
17.- Screw C
18.- Screw D
19.- Nut No. 1
20.- Nut No. 2
21.- Nut No. 3
22.- Adjustment knob (x2)
23.- Safety stopper (x2)
24.- Seat mount
25.- Pulley A
26.- Pulley B
26
19
14
20 21
25
18
13
24
17
12
23
16
11
22
15
10
ASSEMBLY INSTRUCTIONS
Unpack the components, check with the components list that none are missing, and
throw away all plastic, cardboard and polystyrene protective packaging from the
equipment. NOTE: Some components may be hidden in the polystyrene.
Steps 1, 3 and 7 will come already assembled for your convenience.
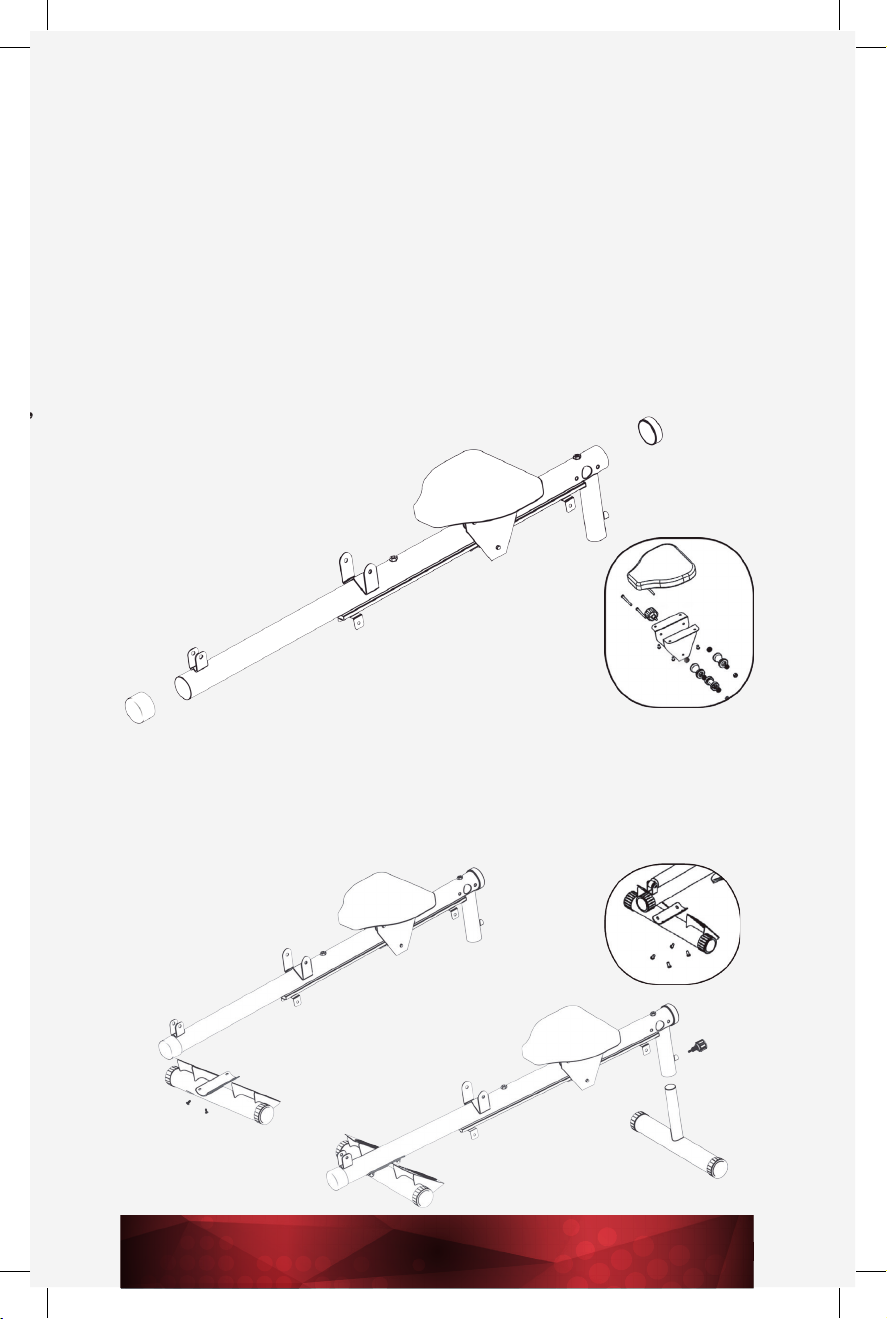
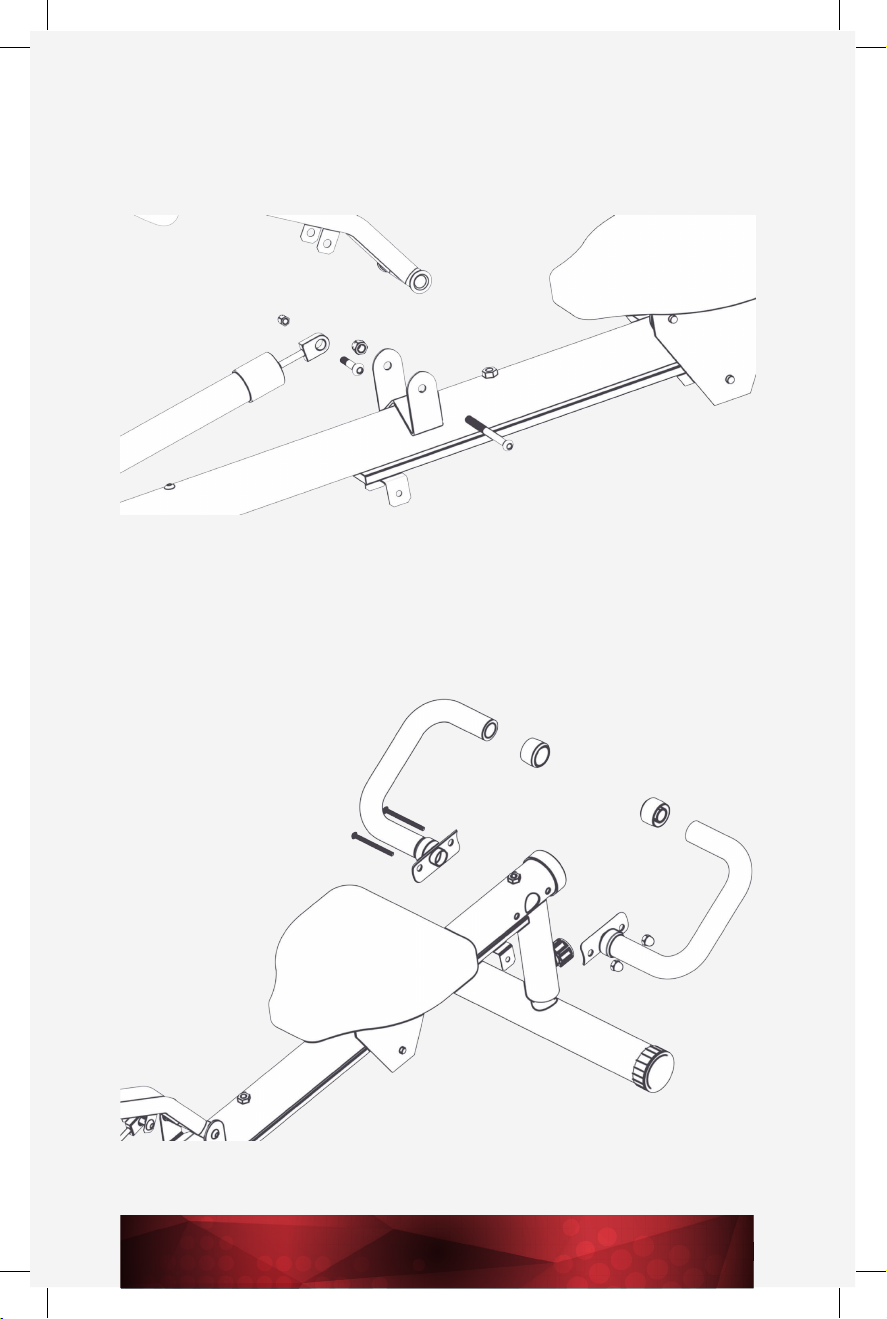
STEP 1
Place the large caps (x2) (component 12) on the main support (component 1).
Assemble the seat (component 7) using components 24, 25, 26 and screws B
(component 16), as seen in the image. After you have done this, for your safety,
immobilise the seat with the adjustment knob (component 22).
STEP 2
Assemble the front frame (component 2) and screw it to the main support using
screws D (component 18). Assemble the back frame (component 3) and secure it with
the adjustment knob (component 22).
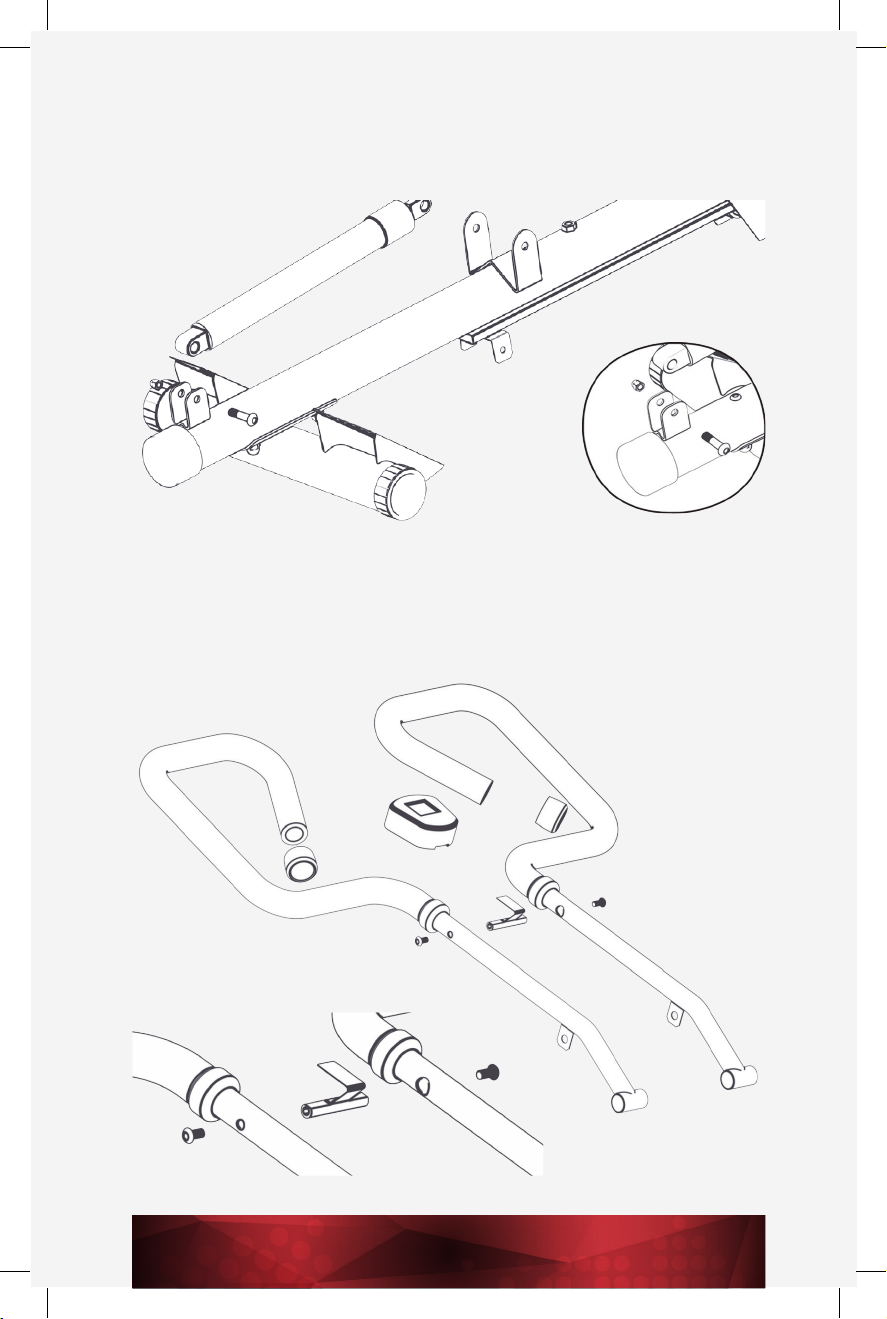
STEP 3
Screw the piston (component 4) to the main support using screw C (component
17). Make sure the piston is correctly placed as shown in the image.
STEP 4
To assemble the main handles, take component 5 (x2) and attach the digital monitor
support (component 10) using screws D (component 18) as shown in the image.
Attach the digital monitor (component 6) to the support.
STEP 5
Once the handles are secure, screw them to the main support using screw A
(component 15). Next, screw the top part of the piston to the handles with screw C
(component 17).
STEP 6
Assemble the back handles (component 8) (x2) and screw them to the main support
using screw B (component 16) (x2), as shown in the diagram.
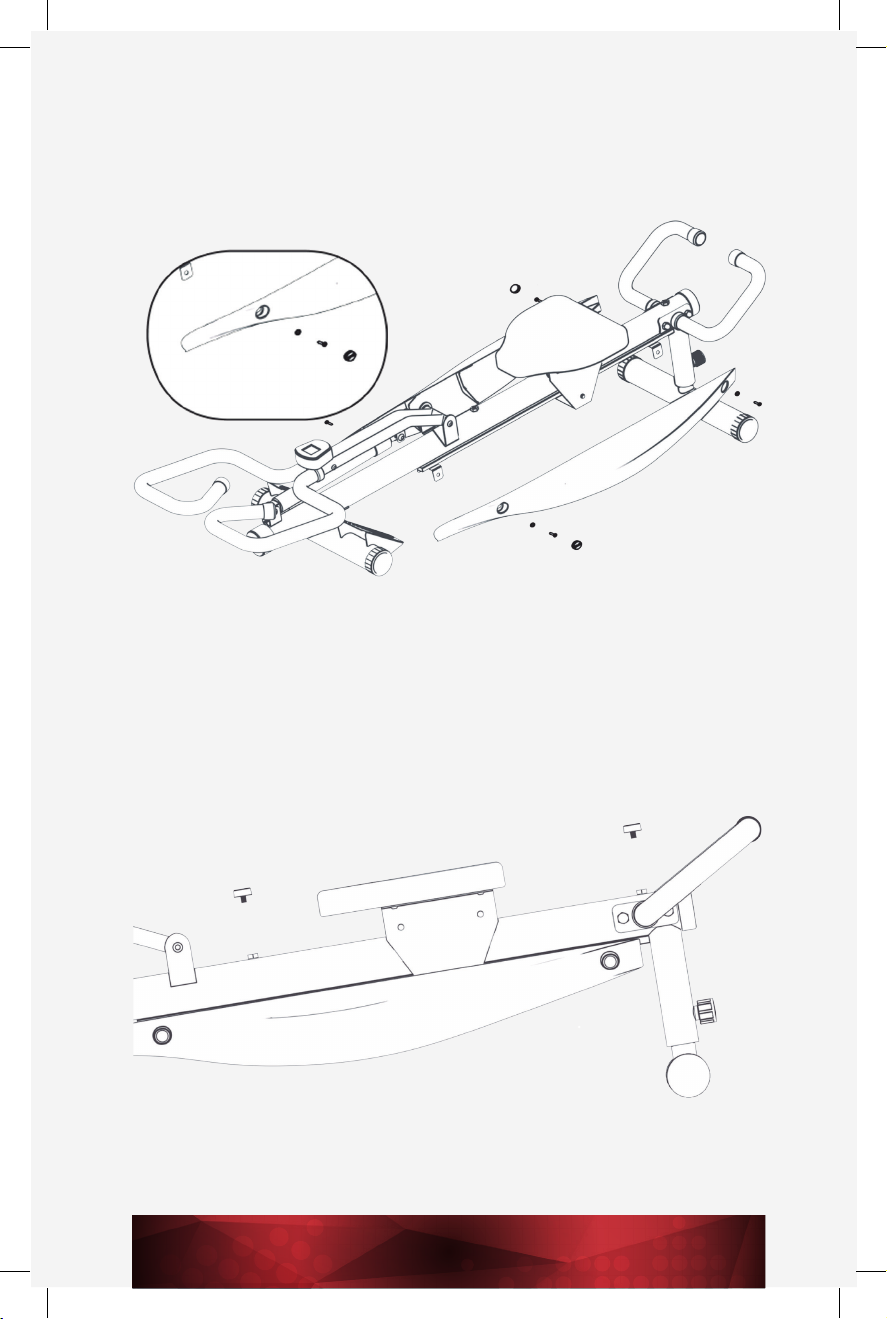
STEP 7
Assemble the casings (component 9) (x2) on the main support using screw
D (component 18).
STEP 8
Lastly, place the stoppers (component 23) and the small caps (component 11) (x4)
onto the handles, as shown in the image.

USE OF THE ADJUSTMENT KNOB
SEAT
If you would like to slide the seat, the adjustment knob must be placed in the LOCK
position (red colour). To do so, pull the knob and turn it until the LOCK position is
on top.
If you would like to x the seat to the main support, place the knob in the
UNLOCK position (green colour).
To do so, pull the knob and turn it until the UNLOCK position is on top.
Without releasing the adjustment knob, slide the seat through the main support
until place it in the desired hole.
Release the adjustment knob so that the bolt will be inserted in the hole and the
seat will be xed.
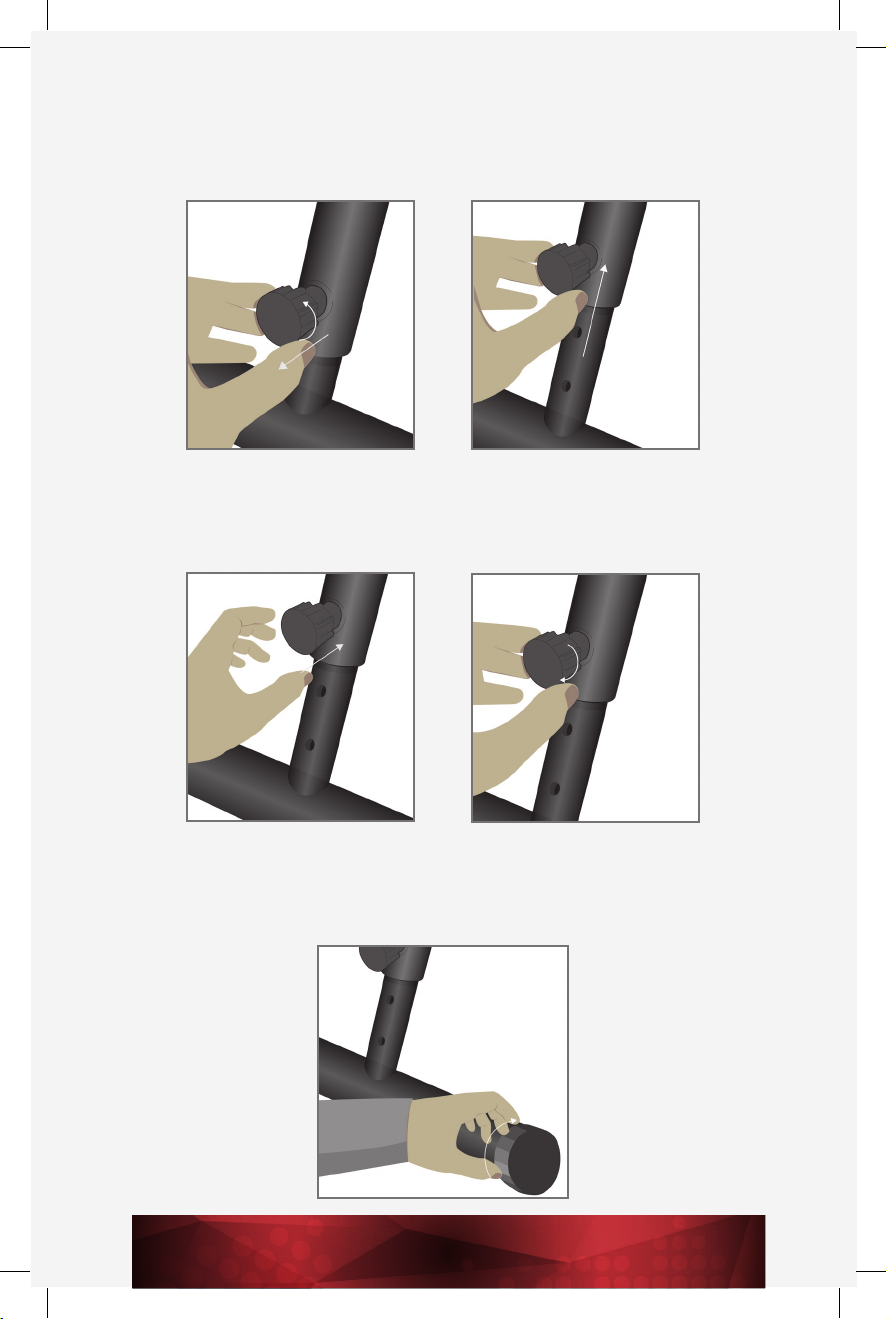
BACK FRAME
Total Fit allows you to regulate its height and inclination. Turn the adjustment knob
counter-clockwise, pull it and place the device at the desired height.
Release the adjustment knob so that the bolt is inserted in the hole and turn it once
again clockwise for complete attachment.
TIP: To assure Total Fit’s optimal stability, turn the caps with leveled included at
the back frame.
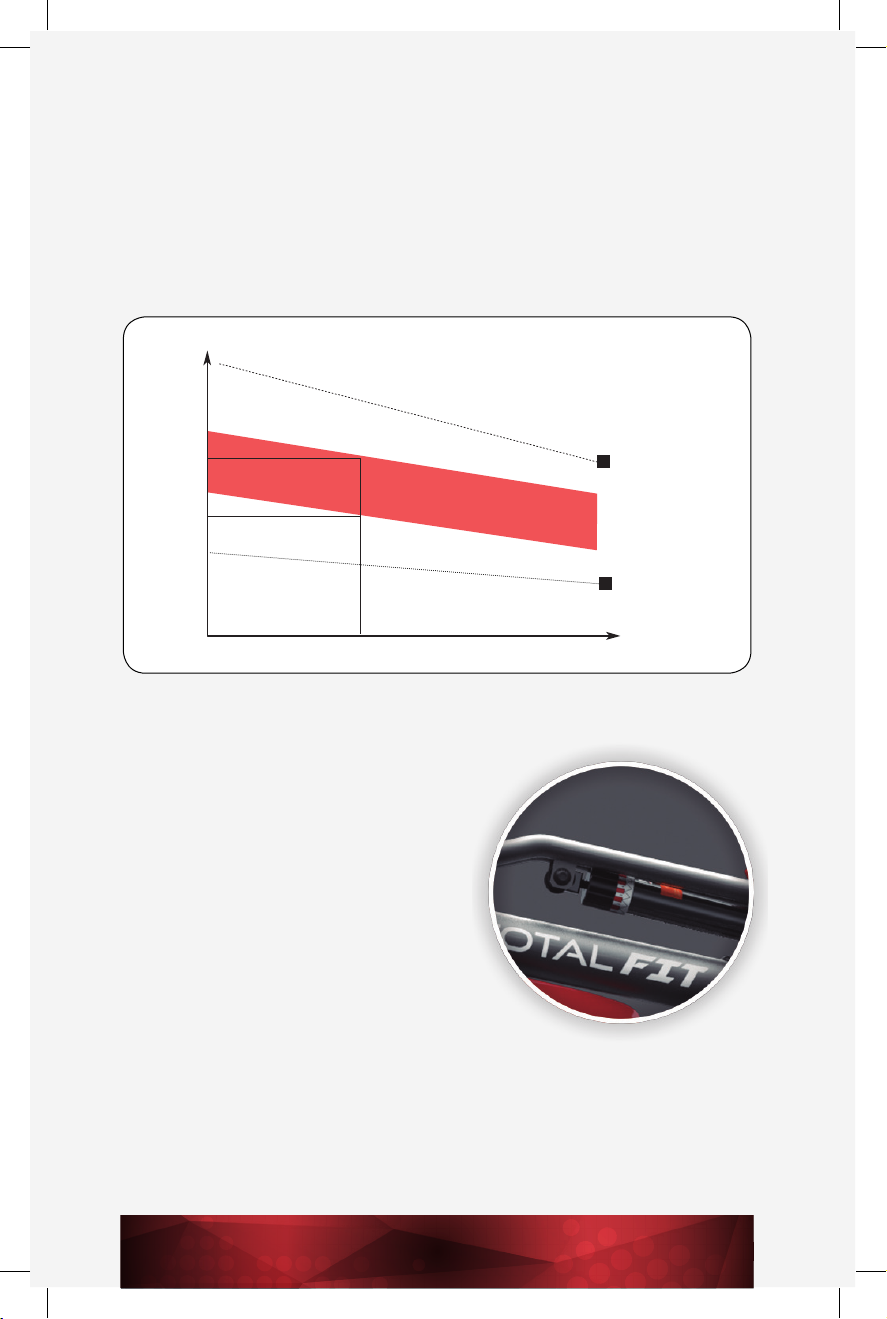
EXERCISE PHASE
This is the stage where you will be physically exerting yourself. After regular use, your
leg muscles will become more exible. It is very important to keep a steady pace.
Your pace should be enough to increase your heart rate to your Target Zone, which
you can nd with the following chart:
Total Fit includes a hydraulic piston with
12 levels of resistance for comprehensive
training and optimized effort. This will allow
you to increase your calorie consumption and
improve your cardiovascular system, as well
as maximize your power, strength, muscle
mass, and physical resistance.
12 LEVELS OF RESISTANCE
FOR COMPREHENSIVE TRAINING
IMPORTANT:
THE HYDRAULIC PISTON MAY BECOME HOT AFTER USE. DO NOT TOUCH
OR GRASP CYLINDER UNTIL A FEW MINUTES AS IT MAY CAUSE INJURY.
200
180
160
140
120
100
80
HEART RATE
MAXIMUM
85%
70%
COOL DOW N
AGE
20 25 30 35 40 45 50 55 60 65 70 75
TARGET ZONE

TRAINING PROGRAM
TOTAL FIT will help you improve your general physical condition as well as your
muscle tone. You can also lose weight if you combine exercise with a low-calorie diet.
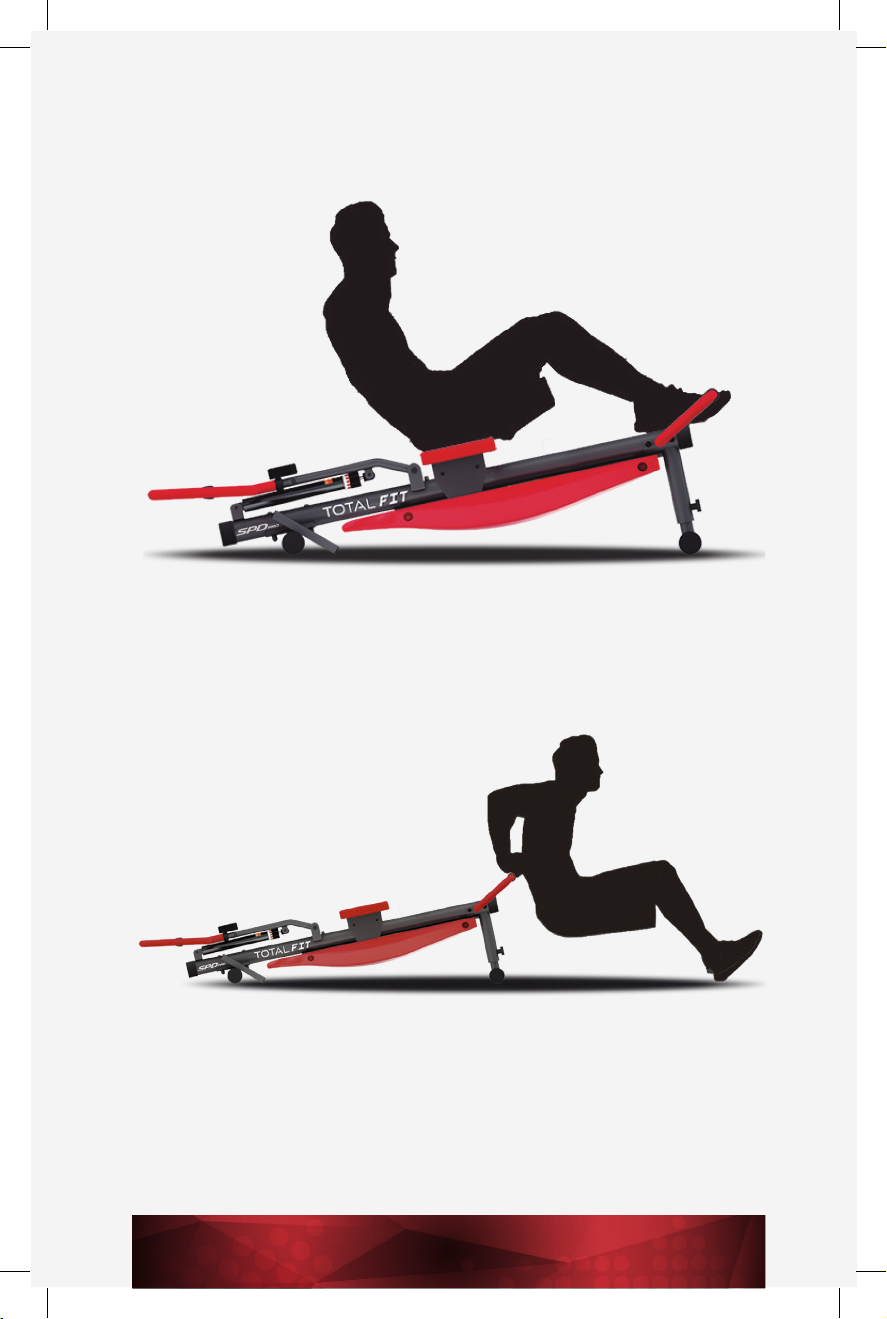
ROWING
Sit in front of the handles, grab them with both hands and pull them towards your
chest. At the same time, straighten your legs and keep your back straight until you
complete the motion.
You can vary the exercise by using different grips to work different muscle groups.

PUSH-UPS
Grab the back handles with both hands while you place your feet on the pedals, as
shown in the image. Lower yourself slowly, bending your arms until you reach your
chest level. Return slowly to your initial position to complete the motion.
You can vary the exercise by gripping the handles differently. This way you can work
different muscle groups.
AB CURLS
Place your knees on the seat and place both hands on the back handles. Slide the
seat up and down to complete the exercise.
SIT-UPS
Adjust the seat stopper to lock it into place, sit down and place your feet on the back
handles, as shown in the image. Do an abdominal crunch.
ARM DIPS
Place yourself as shown in the image, resting your hands on the back handles. Using
only your arms, lift yourself until your arms are almost completely straight and then
lower your chest to your hands to complete the motion.
You decide on the intensity of your workout. Try different combinations and enjoy the
benets of using TOTAL FIT.
COMPLETE AND SPECIALISED TRAINING
TO SCULPT YOUR BODY

DIFFERENT TYPES OF GRIPS
There are different types of grips that will target different muscle groups and will help
you improve your training.
Below you will see a diagram of the different types of grips for the main handlebars
and for the back handlebars:
MAIN HANDLEBARS
BACK HANDLEBARS
BICEPS & LAPS
AB CURLS
AB CURLS
BACK & TRICEPSBACK & TRICEPS
PUSH UPS
CORE & ARMS
ARM DIPS ARM DIPS
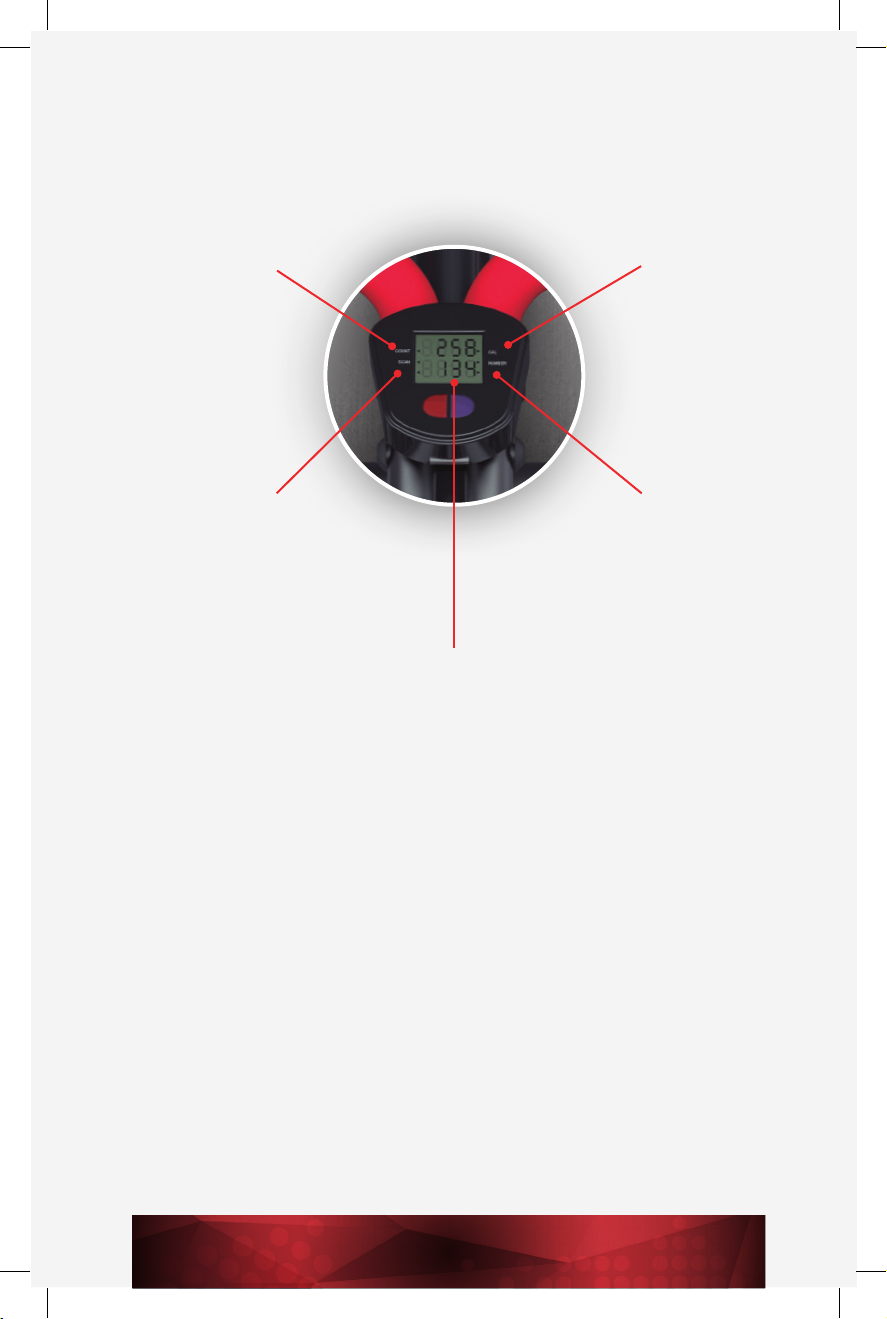
HOW IT WORKS
1 ON: The monitor turns on when you press the red button or when you start
exercising. Press the red button repeatedly until you see the function you want to
display on the screen, or select SCAN mode so that the functions appear on the
screen continuously.
2 OFF: The screen will turn off automatically if Total Fit is not used for 4 minutes.
3 RESET: To reset all counters to 0, hold down the red button for four seconds.
BATTERY INSTALLATION
The device requires an AA battery. To change the battery, open the lid on the back,
remove the empty battery and insert the new battery.
EXERCISE PHASE
This is the stage where you will be physically exerting yourself. After regular use, your
leg muscles will become more exible. It is very important to keep a steady pace.
Your pace should be enough to increase your heart rate to your Target Zone, which
you can nd with the following chart:
COUNT Function
(number of
repetitions):
This function counts
the number of
repetitions you
complete each time
you use Total Fit.
SCAN Function:
If you select the SCAN
option, the COUNT, TIME,
CAL and NUMBERS/MIN
functions appear on the screen
(changing every 5 seconds).
NUMBERS / MIN Function
(number of repetitions per
minute): This function counts
the number of repetitions per
minute you complete during your
training session with Total Fit.
CAL Function
(calories):
This function
counts the number
of calories you
burn when you
use Total Fit.
TIME Function (time):
This function allows
you to time your
training sessions
with Total Fit. The
timer stops if you
stop rowing and
starts again when
you continue.

LIMITED WARRANTY
Distributed by:
MDR US, INC.
Suffern, NY 10901
MDR US, INC. warrants that under normal usage conditions, the product is
free from defects in material and workmanship for 1 (one) year. If your product
stops operating to your satisfaction, we’ll gladly repair it or replace it for free
(excluding shipping and processing charges). This warranty is effective from the
date of original purchase. Rights and privileges may vary from state to state. THIS
WARRANTY IS VALID ONLY FOR THE ORIGINAL OWNER OF THIS PRODUCT
AND IS NOT TRANSFERABLE.
For warranty service, simply contact our customer service department via email @:
spdcustomercare1@gmail.com or via our phone number: (845) 533-0106.
MDR US, INC. warrants that the product is free of defects in materials and
workmanship for 1 (one) year from the date of purchase. This warranty is valid
only in accordance with the conditions set forth below:
1. Normal wear and tear are not covered by this warranty. This warranty applies
to consumer use only, and is void when the product is used in a commercial or
institutional setting.
2. This warranty extends only to the original consumer purchaser and is not
transferable. In addition, proof of purchase must be demonstrated. This warranty
is void if the product has been subject to accident, misuse, abuse, improper
maintenance or repair, or unauthorized modication.
3. This limited warranty is the only written or express warranty given by MDR
US, INC. Any implied warranties on the product (including but not limited to
any implied warranties of merchantability or tness for a particular purpose) are
limited in duration to the duration of this warranty. Some states do not allow
limitations on how long an implied warranty lasts, so the above limitation may not
apply to you.
4. Repair or replacement of the product (or, if repair or replacement is not feasible,
a refund of the purchase price) is the exclusive remedy of the consumer under this
warranty. MDR US, INC. shall not be liable for any incidental or consequential
damages for breach of this warranty or any implied warranty on this product.
Some states do not allow the exclusion or limitation of incidental or consequential
damages, so the above limitation or exclusion may not apply to you.
5. This warranty gives you specic legal rights, and you may also have other
rights which vary from state to state.
DISPOSAL OF MATERIALS
A symbol of a crossed-out wheeled bin means you should nd out about and
follow local regulations about disposing of this kind of product. Do not dispose
of this product as you would other household waste. Dispose of this device in
accordance with the corresponding local regulations. Electrical and electronic
devices contain hazardous substances that can have harmful effects on the
environment and/or human health and should be recycled properly.

ES INFORMACIÓN IMPORTANTE DE SEGURIDAD
Por favor, guarde este manual para futuras referencias.
1. Es importante que lea el manual por completo antes de ensamblar y utilizar el
equipo. El uso eciente y seguro del aparato solo puede lograrse si el equipo se
ensambla por completo, se mantiene y se usa adecuadamente. Usted es responsable
de asegurar que todos los usuarios estén informados de las advertencias y
precauciones necesarias.
2. Antes de empezar cualquier programa de ejercicio, consulte a su médico para
determinar si sufre de algún problema físico que pueda poner en riesgo su salud.
3. Escuche sus señales corporales. Realizar ejercicio de forma incorrecta o excesiva
puede dañar su salud. Deje de entrenar si se presenta alguno de los siguientes
síntomas: dolor, dolor en el pecho, ritmo cardiaco irregular, falta de aire extremo,
mareos o náuseas. Si experimenta alguna de estas condiciones debe consultar a su
médico antes de continuar con cualquier programa de ejercicio.
4. Mantener a los niños y a las mascotas alejadas del equipo. El equipo está diseñado
para ser usado únicamente por adultos.
5. Utilice el equipo sobre una supercie sólida y nivelada y con una protección sobre
el suelo. Para su seguridad el equipo debe colocarse con un espacio alrededor de
por lo menos 0.5 metros.
6. Antes de usar el equipo, verique que todas las tuercas y tornillos están atornillados
rmemente.
7. El nivel de seguridad del equipo solo puede mantenerse si se examina regularmente
para evitar daños y/o desgastes.
8. Siempre utilice el equipo como se indica en este manual. Si encuentra algún
componente defectuoso durante el ensamblaje o en la vericación del equipo, o si
escuchara algún ruido inusual durante su uso, suspenda su uso de inmediato. No
utilice el equipo hasta solucionar el problema.
9. Utilice ropa adecuada al utilizar el equipo. Evite ropa holgada que pueda
atascarse en el equipo o que pueda restringir o evitar el movimiento. Por favor, utilice
el equipo lentamente al principio. Sostenga el manillar con fuerza y no se levante del
asiento cuando realice ejercicio.
10. El equipo está indicado para uso doméstico y puede soportar un peso máximo
de 150 kgs / 330 libras.
11. Se debe tener cuidado cuando se levante o mueva el equipo para no lesionar su
espalda. Siempre utilice técnicas de carga adecuadas y / o pida ayuda.
PIEZAS:
1.- Soporte principal
2.- Base delantera
3.- Base trasera
4.- Pistón
5.- Manillar principal (x2)
6.- Monitor digital
7.- Asiento
8.- Manillar posterior (2x)
9.- Carcasas (2x)
10.- Soporte Monitor Digital
11.- Tapones pequeños (4x)
12.- Tapones grandes (6x)
13.- Multi llave para tuercas
14.- Llave Allen
15.- Tornillo A
16.- Tornillo B
17.- Tornillo C
18.- Tornillo D
19.- Tuerca Nº1
20.- Tuerca Nº2
21.- Tuerca Nº3
22.- Rueda de ajuste (x2)
23.- Topes de seguridad (x2)
24.- Soporte asiento
25.- Rodillo A
26.- Rodillo B
26
14
25
13
24
12
23
11
22
10
19 20 21
18
17
16
15

INSTRUCCIONES DE montaje
Desembale el equipo, revise con la lista de piezas que no falta ninguna y retire
todos los plásticos, cartones y poliespan de protección de todo el aparato.
NOTA: Algunas piezas pueden quedar escondidas en el poliespan.
Los pasos 1, 3 y 7 vendrán montados de fábrica para su mayor comodidad.
PASO 1
Coloque los tapones grandes (x2) (pieza 12) en el soporte principal (pieza 1).
Ensamble el asiento (pieza 7) utilizando las piezas 24, 25, 26 y los tornillos B
(pieza 16), tal como muestra la imagen. Al terminar y por seguridad, inmovilice el
asiento del equipo con la rueda de ajuste (pieza 22).
PASO 2
Prosiga a montar la base delantera (pieza 2) y atorníllela al soporte principal
utilizando los tornillos D (pieza 18). Continúe montando la base trasera (pieza 3) y
fíjela con la rueda de ajuste (pieza 22).
Table of contents
Languages:
Popular Fitness Equipment manuals by other brands


Cascade Health and Fitness
Cascade Health and Fitness Raptor 702022 instruction manual

Stairmaster
Stairmaster Gauntlet owner's manual

SPALDING
SPALDING M6620241 owner's manual

Coopers of Stortford
Coopers of Stortford HM-001 instructions

Gyrotonic
Gyrotonic TRANSFORMER 1500 owner's manual

Perfect
Perfect Multi-Gym Elite user guide


