Vasa SwimErg User manual


SwimErg
PART 1 - Assembly .................................................. 2
Parts List and Parts Descriptions ................................ 2
Assembly Instructions ............................................ 3-9
Power Meter Installation......................................10-11
Post-Assembly Safety Checklist ................................ 12
PART 2 – Using the SwimErg................................. 13
Safety Review.....................................................14-16
Resistance Settings ............................................17-18
Using the Vasa Power Meter ................................19-30
Power Meter Summary of Functions ......................... 31
PART 3 – Maintenance & Troubleshooting............ 32
Maintenance Instructions.....................................33-37
Troubleshooting ..................................................38-39
Guarantee & Warranty Information.......................40-41
USER’S MANUAL
RECORD ORDER
INFORMATION
Before you begin, write down your
Invoice Number and Date below.
This will allow Vasa Customer
Service to assist you in the future.
Please record:
INVOICE NUMBER:
____________
DATE OF INVOICE:
____________
If you have any questions at
this point with the assembly,
please contact us.
US customers and
International customers,
please call us at:
1 (802) 872-7101
E-Mail: info@vasatrainer.com
VASA, INC.
1 ALLEN MARTIN DRIVE
ESSEX JUNCTION, VERMONT USA 05452
TEL: 802.872.7101
EMAIL: [email protected]
WEB: www.vasatrainer.com

2August 2022
Vasa SwimErg User’s Manual
PART 1 - Assembly
PART NAME
1. Front Assembly
2. Monorail
3. Bench
4. Seat Carriage
5. Stretch Cord
6. Rear Stanchion
7. Power Meter
8. Damper Door
9. Wheel Bracket Assembly
(Swim paddles, exercise handles not shown)
V A S A
➊
➋
➎
➌
➏
➐
➑
➒
VASA SWIMERG - PARTS LIST
PART 1 - ASSEMBLY
1.1 - VASA SWIMERG - PARTS DESCRIPTIONS
BOX 1 CONTENTS (36x16x9 inches / 91x40x22 cm)
PART NAME PART # QUANTITY LOCATION
REAR STANCHION ASSEMBLY VE-2 1 BOX 1
STANDARD BENCH (or XL Bench) 4P (XL UPGR) 1 BOX 1 (XL IN BOX 4)
SEAT CARRIAGE ASSEMBLY 3-VT-SCA 1 BOX 1
WHEEL BRACKET ASSEMBLY VE-1-WBC 1 INNER BOX
STRETCH CORD 9SC-DLX 1 INNER BOX
EXERCISE HANDLES 8M-WHD 1 pair INNER BOX
POWER PADDLES PWR PPAD 1 pair INNER BOX
INSTRUCTION MANUAL IM-ERGO-V2 1 INNER BOX
HARDWARE BAG (see below) 1 bag INNER BOX
button head screw - 2 1/2” 11P 2
hex jam nut 18PS 2
hex cap screw - 1” (yellow zinc) 14SC 4
lock washer 14A-P 4
atwasher 19P 4
hex key allen wrench - 3/16” 12A-PS 1
hex key allen wrench - 5/32” 12B-PS 1
wrench - 7/16” 14B-PS 1
screwdriver VE-1-SDR 1
monorail reinforcement angle VT-MRA 2
BOX 2 CONTENTS (89x3x3 inches / 226x7x7 cm)
MONORAIL MONO-ERG 1 BOX 2
BOX 3 CONTENTS (35x29x18 inches / 88x73x45 cm)
FRONT SWIMERG ASSEMBLY ERGO-FE 1 BOX 3
POWER METER
(+ mounting bracket & batteries)
VM-1-PM2-BLE 1 INNER BOX
SAVE
ALL
PACKAGING
Box & inner packaging
for Box #3
➍

V A S A
Choice of World Champions
R
R
V A S A
METERS
SPM
/100M
WATTS
Shift
Setup Review Display
3
Vasa SwimErg User’s Manual
August 2022
REAR
STANCHION
STANDARD
BENCH
XL BENCH
IN BOX #4
SEAT CARRIAGE
WHEEL BRACKET
ASSEMBLY
STRETCH CORD
POWER PADDLES EXERCISE HANDLES
MONORAIL (16AL-E)
2 1/2” button
head screw (2)
hex jam nut (2)
1” hex cap screw (4)
lock washer (4)
at washer (4)
3/16” hex key allen
wrench (1)
5/32” hex key allen
wrench (1)
7/16” wrench (1)
HARDWARE BAG INCLUDES:
POWER METER
FRONT END
ASSEMBLY
BOX #1
BOX #3
BOX #2
PART 1 - Assembly
SAVE
ALL
PACKAGING
Box & inner packaging
for Box #3
1.2 - ASSEMBLING YOUR VASA SWIMERG
SWIM ERG ASSEMBLY VIDEO
View under the FAQ tab on this page:
https://vasatrainer.com/product/swim-SwimErg-swimming-machine/
UnpackandassembleyournewVasaSwimErginthespecicorderoutlinedbelow(unpackandassemble
the parts from Box 1 and Box 2 as instructed, then you will unpack and attach the front assembly from
Box3).Thisspecicorderistoavoidanydamagetothefrontassembly.
STEP 1: UNPACK BOX 1 AND BOX 2 (DO NOT UNPACK BOX 3 YET)
1.1.UnpackBox1andBox2andlaythecontentsoutontheoor.

4August 2022
Vasa SwimErg User’s Manual
NOTE:NOTE: be sure the U-bolt on your seat carriage is positioned
on the same end as the narrow end of your bench.
UNDERSIDE OF
BENCH
U-BOLT SEAT CARRIAGE
tighten with 7/16” wrench
1” hex cap screw
(brass colored)
lock washer
at washer
CAUTION: DO NOT OVER TIGHTENCAUTION: DO NOT OVER TIGHTEN
NARROW END
(FRONT)
WIDE END
(BACK)
U-BOLT
UNDER SIDE OF
BENCH
SEAT CARRIAGE
insert hex cap screws
with washers through
the middle hole of each
corner bracket
Figure A
Figure B
DO NOT USE
FRONT HOLES
PART 1 - Assembly
STEP 2: ASSEMBLE PADDED BENCH TO SEAT CARRIAGE
2.1. Laythepaddedbenchontheoorsothesidewiththefourorsixholes(withthreadedmetalnuts
inside the bench) is facing up. If you have six holes, you will mount the seat carriage to the four holes
closer to the rear of the bench. The remaining two front holes will not be used.
2.2. Position the seat carriage so that the metal bracket with the drilled holes is face down on the bench
(Figure A). Line up the middle holes of the bracket with the holes in the padded bench. NOTE:
Tapered
benches will be wider on one end than the other. Position the seat carriage so that the U-bolt on the
seat carriage is at the narrower end of the bench.
2.3.Putonelockwasherontoeachoffour1”hexcapscrews(brasscolored).Thenputoneat
washer onto each of the four 1” screws.
2.4. Thread one screw with both washers through the middle hole on the corner brackets of the seat
carriage (Figure B) and into the holes in the padded bench. Tighten the screws with the 7/16” wrench
until the lock washer and the bolt are snug. DO NOT OVER TIGHTEN.

5
Vasa SwimErg User’s Manual
August 2022
STEP 3: PADDED BENCH ASSEMBLY ONTO MONORAIL
3.1. Laythebenchassembly(withtheseatcarriageup)ontheoornexttothemonorail.
3.2. Keep the monorail level with the decals upside down.(See Figure C) Slowly and carefully feed the monorail
betweentherstsetofrollers(FigureA).
3.3. Carefully guide the monorail through to the second set of rollers (Figure B), continuing to keep it level.
DO NOT FORCE through to prevent damage to the rollers.
3.4. After installing the rail through the seat carriage, it should look like Figure C.
NOTE:Youmayndthattheseatcarriageseems“tight”onthemonorailandrollswithsomeresistance.
This is normal, since the rollers need to conform to the monorail. You’ll need to do about 25 - 100 repetitions
on your Vasa SwimErg before the rollers wear and conform to the monorail and roll smoothly. As the
rollers wear, they’ll leave some residue on the monorail which needs to be wiped off regularly. Any dust
or residue accumulation on the monorail will inhibit optimal functioning of the rollers. See maintenance
section of this manual for instructions on how to clean your monorail.
KEEP MONORAIL LEVEL
& DO NOT FORCE carefully & slowly feed the monorail
through 2nd set of rollers
Figure A
Figure C
Figure B
INFO
DECAL
keep at
front
REAR FRONT
PART 1 - Assembly

6August 2022
Vasa SwimErg User’s Manual
MONORAIL REINFORCEMENT ANGLES FOR VASA SWIMERG
There are two metal 90° angles called Monorail Reinforcement Angles (MRA)
in your hardware bag and they provide additional protection for the aluminum
monorail when tightening the Set Screw on the Front and Rear Stanchions sleeves.
However, they are only recommended and not required. The purpose is to add an
extra layer of protection to the monorail, more specifically in the Rear Stanchion as
there is more movement on that end with the seat carriage sliding up and down.
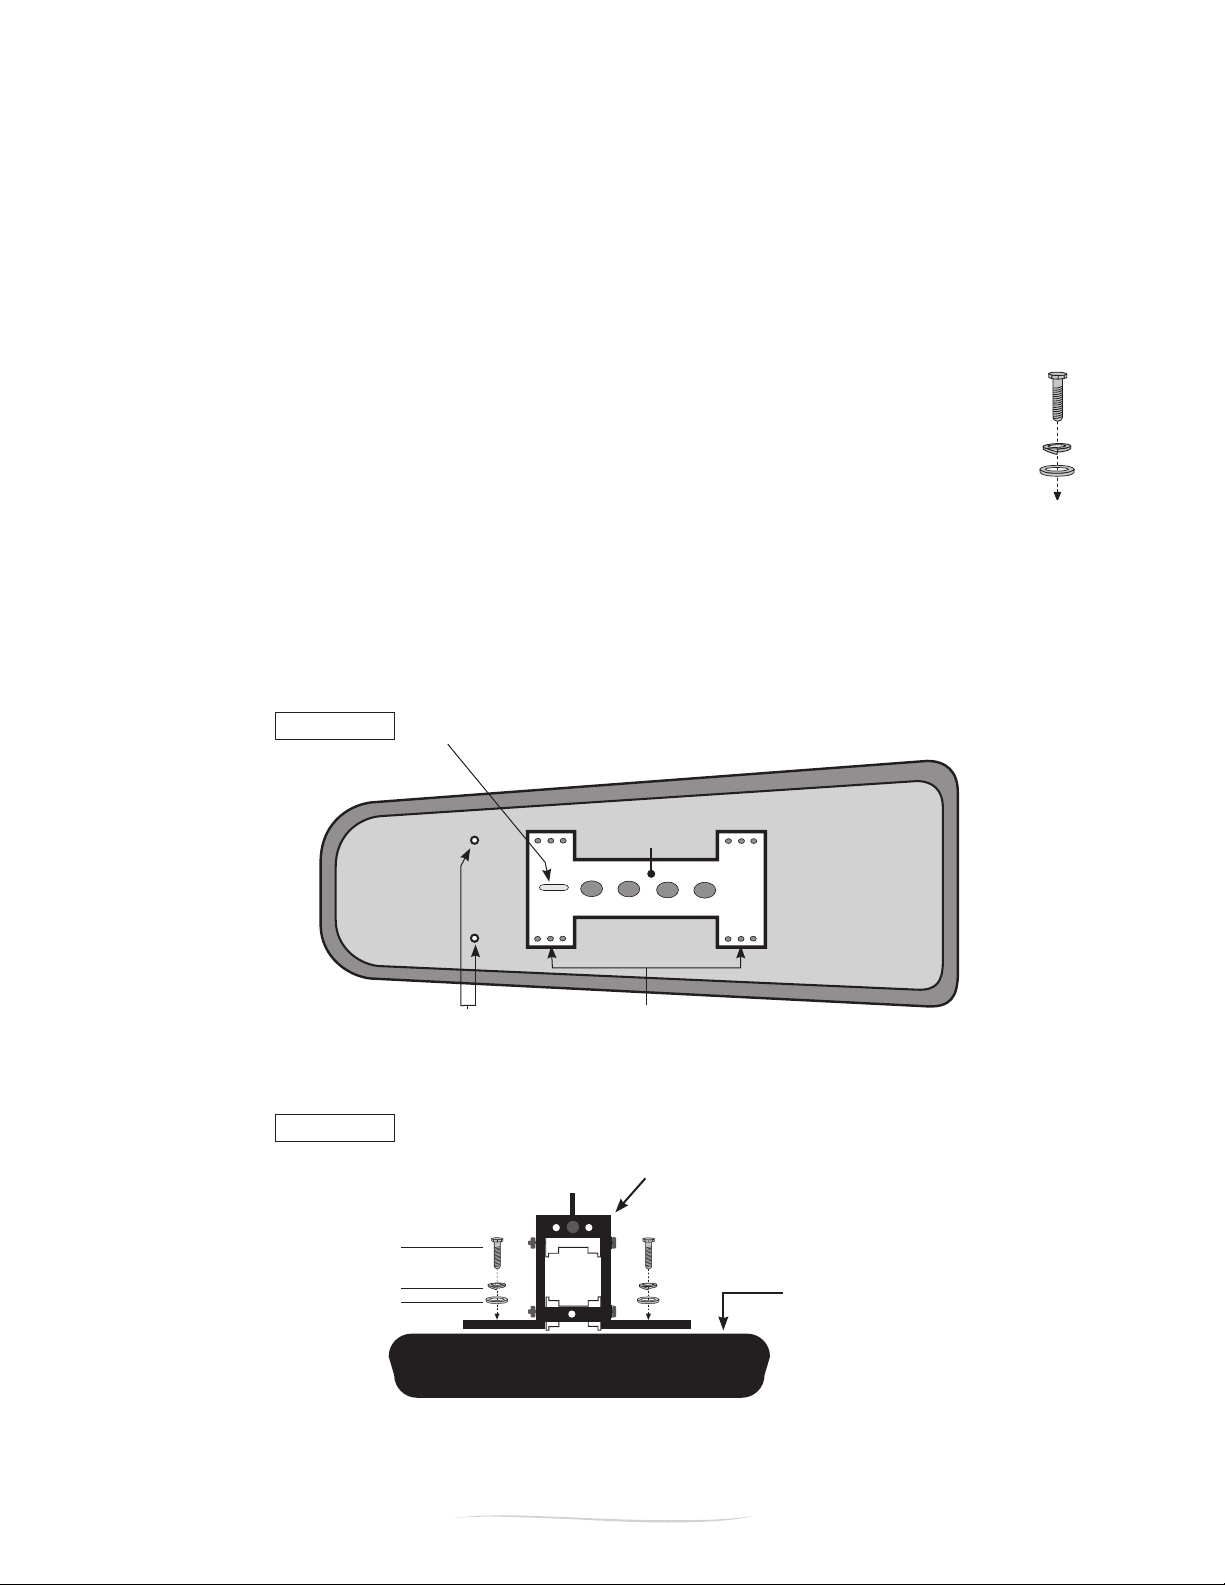
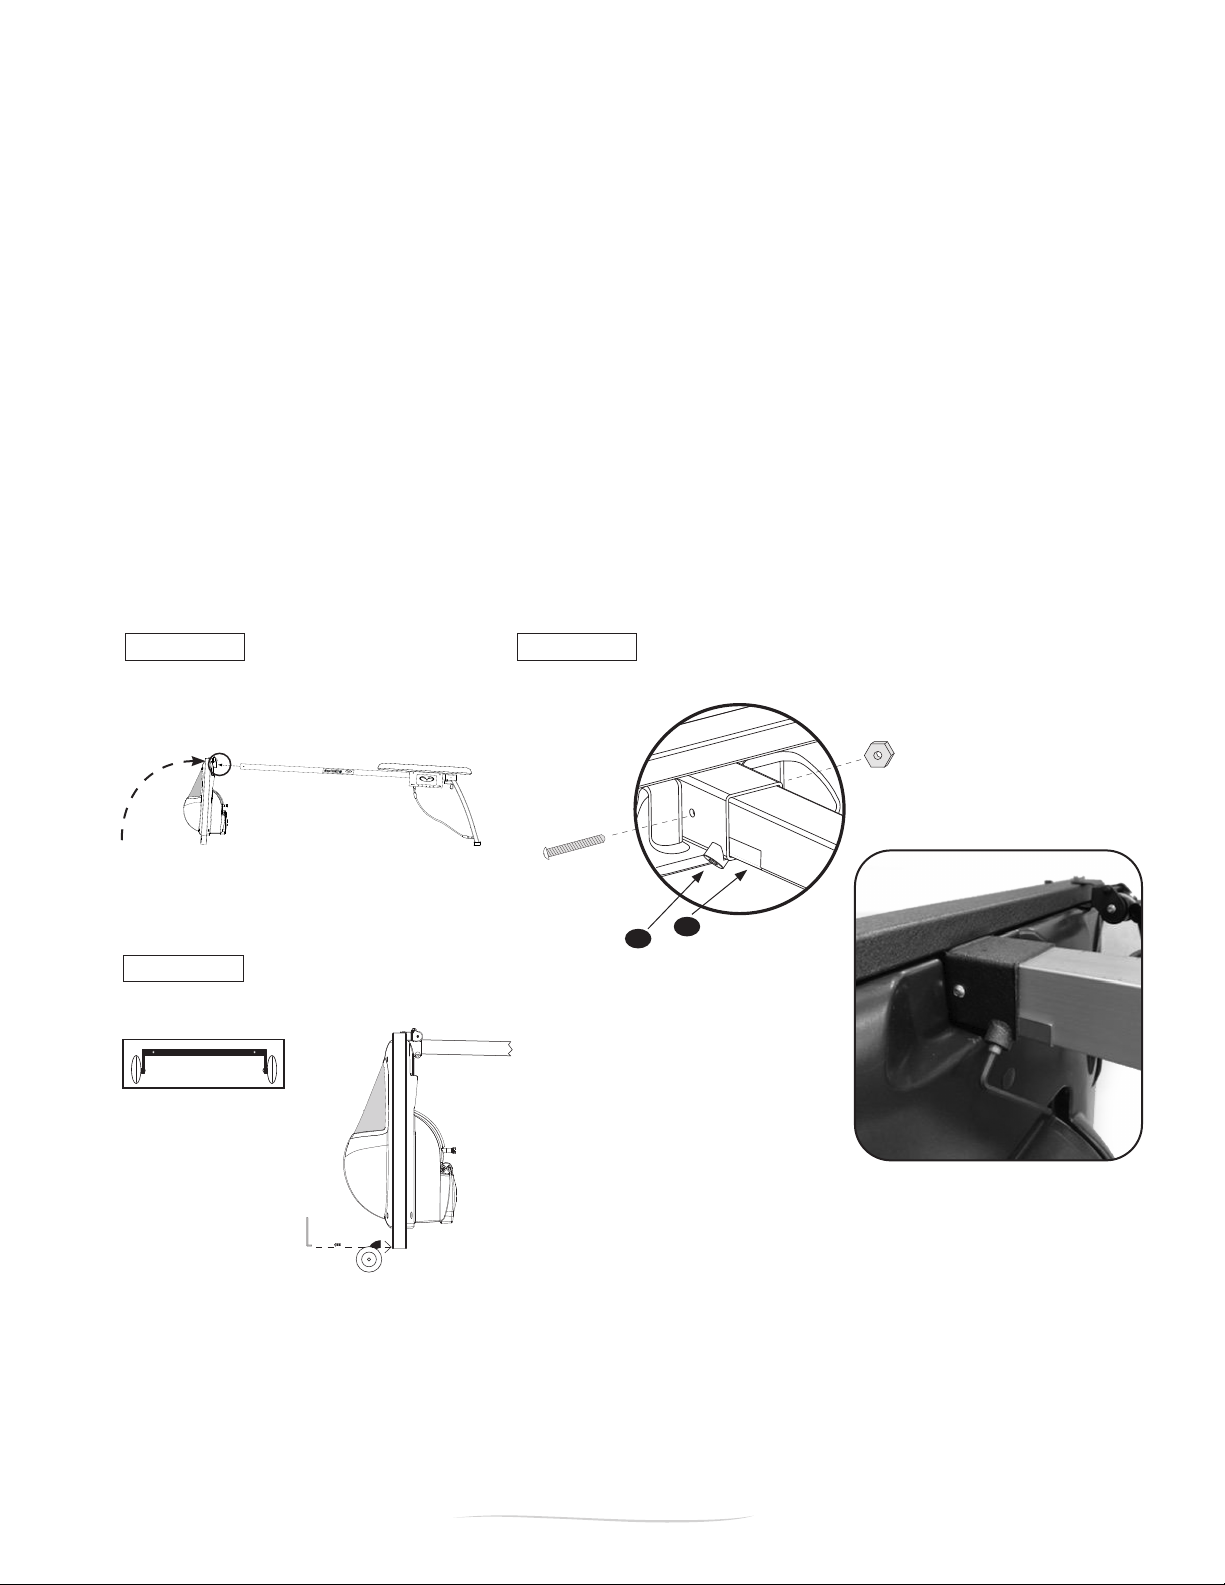
STEP 4: MONORAIL INTO THE REAR STANCHION ASSEMBLY
4.1. Loosen the socket set screw on the corner of the rear stanchion head (Figure A)
using the 3/16” hex key Allen wrench.
4.2. Hold the rear stanchion assembly upside down and slide the bracket over the rear section of the
monorail (Figure B).
4.3 Align the holes and insert a 2 1/2” button head screw through bracket and monorail. Thread the hex jam
nut on the end of bolt. Tighten to secure with a 5/32” Allen wrench and 7/16” wrench (Figure C).
4.4 1. After installing the monorail into the Rear Stanchion assembly in Step 4.2, Figure B), slide one
MRA in between the Monorail and the Rear Stanchion sleeve as shown in the photo:
2. Then tighten the Set Screw using the 3/16” hex Allen key wrench.
4.5 Tighten the socket set screw against monorail using the 3/16” hex key Allen wrench. This will secure
the monorail to the inside of the sleeve so that it won’t loosen or rattle while in use (Figure C).
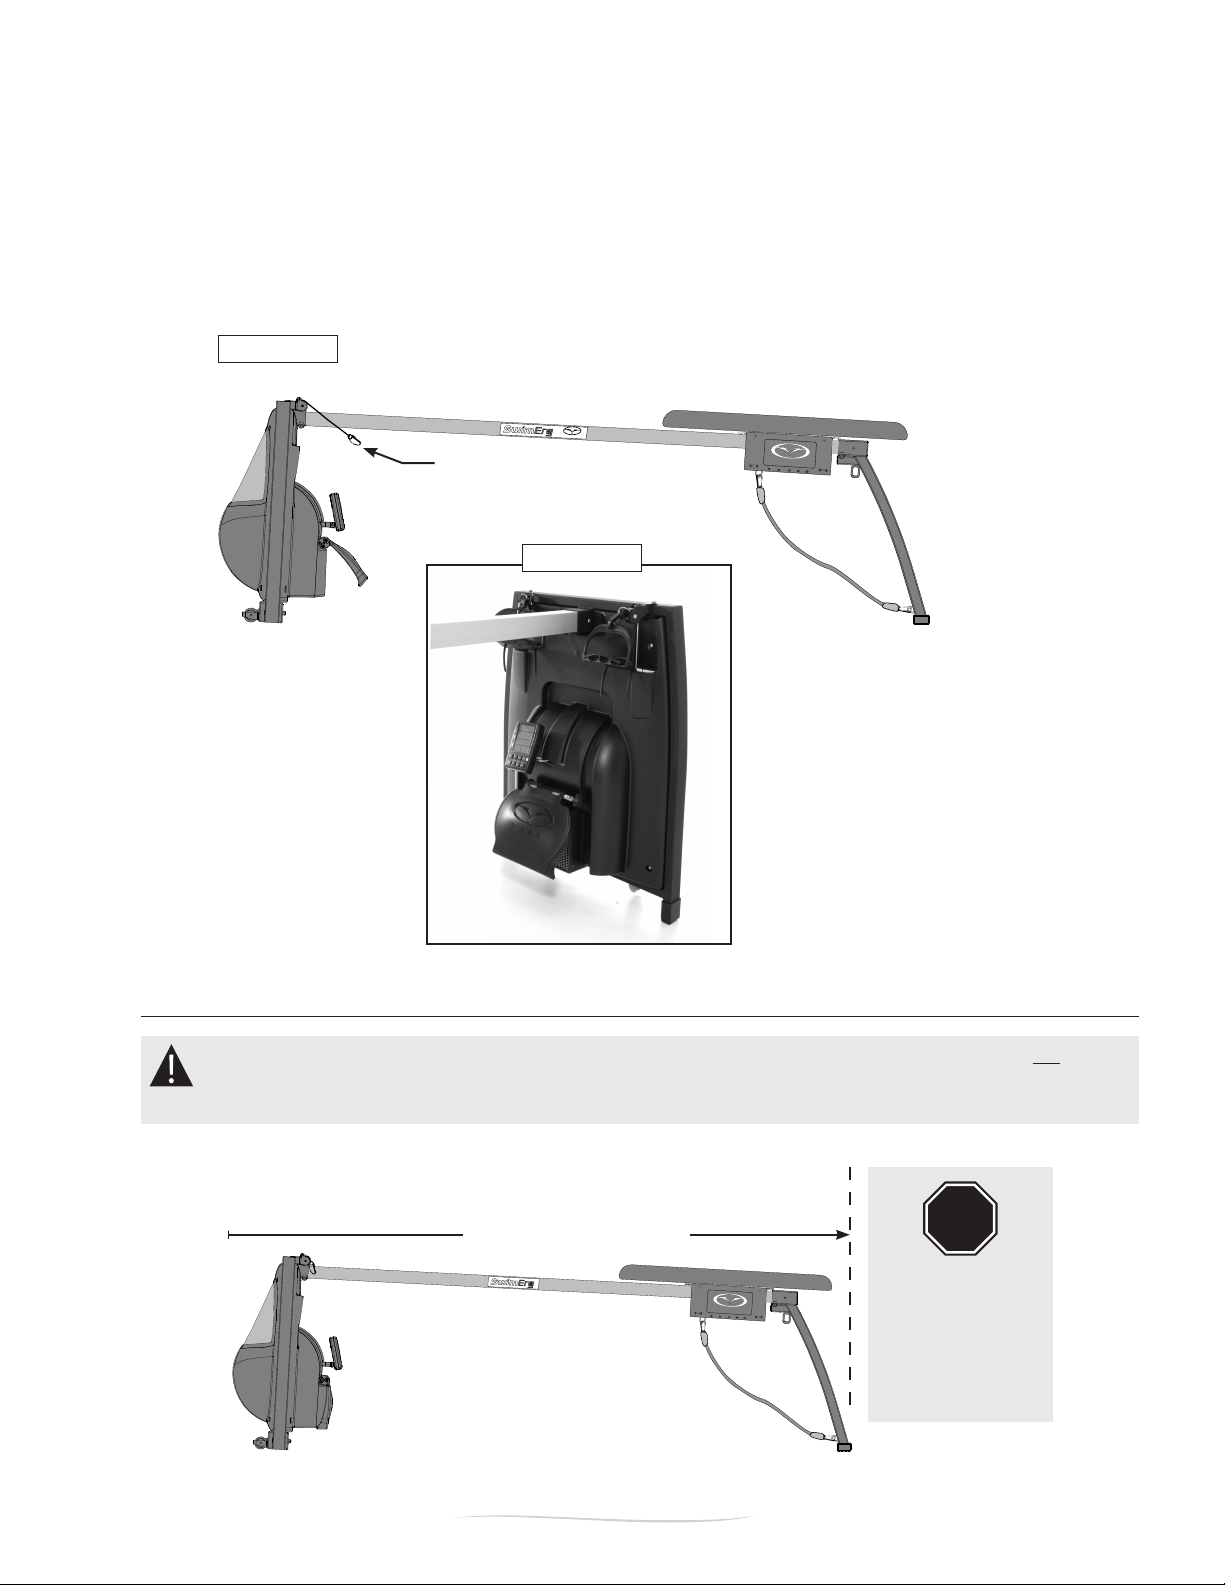
4.6AfxthestretchcordtotherearstanchionbasebarandtheU-boltontheseatcarriage(FigureD).
U-BOLT
slide the bracket on to the REAR of the monorail.
NOTE: The U-bolt is closer to front
loosen the socket set screw
REAR FRONT
REAR STANCHION
ASSEMBLY
Figure A Figure B
attach cord
Figure C Figure D
1. insert and tighten 2 1/2” button head
screw and hex jam nut.
2. insert MRA angle braket
3. tighten socket set screw with 3/16” hex
key wrench
attach the stretch cord to the seat carriage U-bolt and
the rear stanchion base bar
➋
➊
➌
PART 1 - Assembly

BOX #3
SIDE 1
down
1. lay box on SIDE 1 3. pull out (with bag)2. open bottom of box
bottom
of box
7
Vasa SwimErg User’s Manual
August 2022
slide out
Figure CFigure A
➊➋
Figure B
➌
PART 1 - Assembly
STEP 5: UNPACKING FRONT END ASSEMBLY (BOX #3)
5.1.Laythefrontendboxdownon“SIDE1”(FigureA).
5.2 Open bottom end of box (Figure B). DO NOT OPEN TOP OF BOX. Remove the
cardboard insert & set aside. Leave the bag on the assembly.
5.3. Slide the assembly & bag out of the box (Figure C). Remove the smaller inner box
(containing the Power Meter) and set aside until Step 9.
5.3. Save all packaging and store in a dry place for 90 days of possible.
SAVE
ALL
PACKAGING
Box & inner
packaging
CAUTION: DO NOT STAND THE FRONT ASSEMBLY UPRIGHT UNTIL DIRECTED. It will
not stand securely by itself. Hold securely until it is attached to the monorail in STEP 6.

8August 2022
Vasa SwimErg User’s Manual
V A S A
V A S A
MONORAIL
hex jam nut
➌
insert and tighten
2 1/2” button
head screw and
hex jam nut
tighten socket set
screw with 3/16”
hex key wrench
1. lift front end upright
2. slide monorail into front stanchion sleeve
3. install 2 1/2” bolt with locking nut
4. secure set screw
Figure A Figure B
1/2” screw
(x2)
5. attach wheel bracket
Figure C
➊
➋
➎
➍
a
4
4
bInsert MRA Bracket
(Tighten the set screw in the Front
Frame stanchion head against the
MRA bracket and monorail)
PART 1 - Assembly
STEP 6: ATTACH FRONT END ASSEMBLY TO MONORAIL & ADD WHEEL BRACKET
6.1. Insert the monorail into front end assembly sleeve (Figure A). Align the holes. Be sure to have a
secure hold on the frame so it does not fall over.
NOTE: You may need to loosen the socket set screw on the corner of the front SwimErg assembly
(Figure B) using the 3/16” hex key allen wrench.
6.2. Insert one 2 1/2” button head screw through the sleeve and the monorail (Figure B). Thread and tighten
one hex jam nut with 5/32” allen wrench and 7/16” wrench.
6.3. Insert MRA bracket into sleeve. Then tighten the socket set screw against monorail using the 3/16” allen
wrench. This will secure the monorail to the inside of the sleeve so that it won’t loosen or rattle while in use
(Figure B). IMPORTANT: IF THE MONORAIL REINFORCEMENT ANGLE (MRA) DOES NOT FIT INTO
THE FRONT FRAME, DO NOT FORCE IT OR INSTALL IT. IT IS NOT A REQUIRED COMPONENT OF
THE SWIMERG.
6.4. Install the Wheel Bracket Assembly (located in Box #1) on the bottom of the front of frame (Figure C).
Use two 1/2” button head screws and 5/32” allen wrench to attach.
1-3. POST ASSEMBLY SAFETY CHECKLIST

CAUTION: The drive cord is designed to extend out up to 8’ (2.4M) from the front cover. Do not pull
beyond the end of the rear stanchion.
CAUTION:
DO NOT PULL
DRIVE CORDS
PAST END
OF REAR
STANCHION
STOP
8’ (2.4M) MAX LENGTH
V A S A
V A S A
9
Vasa SwimErg User’s Manual
August 2022
Figure B
DRIVE CORD
CLIP
Figure A
PART 1 - Assembly
STEP 7: ATTACHING PADDLES OR HANDLES TO DRIVE CORD
7.1. Choose which attachment you would like to use for your workout: swim paddles, exercise handles,
or other optional attachment.
7.2. Take the drive cord clip (Figure A) on each end of the drive cords, and snap desired attachment into
the connection loop/ring (Figure B).
NOTE: MAXIMUM TRAVEL OF DRIVE CORD
V A S A

10 August 2022
Vasa SwimErg User’s Manual
PORT
PORT
ANT +
Connect the RED cable to “R”
port. Connect the other cable to
“L” port.
Figure C
Figure A
Cables extending through cable
channel ABOVE damper door.
PORT
PORT
ANT +
Use R and L ports.
Figure B
CONNECTION
PORTS
RED
STRIP
(Side angle of mounting bracket)
PORT
PORT
ANT +
PART 1 - Assembly
STEP 8: INSTALLING BATTERIES IN THE POWER METER
CAUTION: The Power Meter is a sensitive unit. Please handle with care at all times.
8.1. Locate the Power Meter in the small box packed inside BOX 3. (Front End Assembly)
8.2.Insertthetwo“AA”batteries(included)intothebatterycompartmentonthebacksideofthePower
Meter.
IMPORTANT: REMOVE THE BATTERIES if the Vasa SwimErg will be idle for 3 months or more.
STEP 9: ATTACHING THE CABLES TO THE POWER METER
9.1. Locate the two cables extending from rear cover (Figure A).
9.2 Locate the two connection ports on the back of the Power Meter: R and L (Figure B).
9.3. Connect the cable with the Red Tape into the R port and the remaining unmarked cable into the
L port (Figure C).
IMPORTANT: Always turn the Power Meter OFF after you connect the cables to reset.

11
Vasa SwimErg User’s Manual
August 2022
B
A
PART 1 - Assembly
STEP 10: POWER METER - INSTALLING & ADJUSTING
NOTE: The Power Meter may automatically turn ON when the cables are connected. Before
beginning your workout, turn the monitor OFF and wait two seconds. Push the ON button to power
back on and begin your workout.
10.1. Install the plastic washer onto the threads of the mounting knob.
10.2. Thread the mounting knob through the metal bracket on the Power Meter (A) and the metal
bracket on the Erg cover (B).
10.3. Pivot the Power Meter to the desired angle (back/forward) and tighten the knob clockwise.

V A S A
V A S A
V A S A
12 August 2022
Vasa SwimErg User’s Manual
➋
➍
after installing MRA,
tighten socket set screw
➎
U-bolt is
towards front
narrow end of bench is towards front
➏
➐
stretch cord attached
➑
cables are attached correctly to
“R” & “L” labeled ports.
➒
➊
button head screw and nut are
assembled on stanchion head
and monorail
➌
button head
screw and nut
are assembled
on stanchion
head and
monorail
power meter is mounted
after installing MRA,
tighten socket set screw
13
10
wheel bracket
monitor angle is adjusted
PART 1 - Assembly
1-3. POST ASSEMBLY SAFETY CHECKLIST
Please review the steps below to assure that your Vasa SwimErg is assembled correctly and ready for safe
use (check if complete).
FRONT
1. ____ Button head screw and nut are assembled on front stanchion head and monorail.
2. ____ Socket set screw on front stanchion head is tightened against the MRA bracket and monorail.
REAR (CHECK IF COMPLETE)
3. ____ Button head screw and nut are assembled on rear stanchion head and monorail.
4. ____ Socket set screw on rear stanchion head is tightened against the MRA bracket and monorail.
BENCH / SEAT CARRIAGE (CHECK IF COMPLETE)
5. ____ U-bolt on the seat carriage is towards the front assembly.
6. ____ Narrower end of the bench is towards the front assembly.
7. ____ Stretch cord is attached between rear stanchion and U-bolt on underside of seat carriage.
POWER METER
8. ____ Power Meter installed on the mounting bracket.
9.____Connectioncablesareattachedcorrectlyto“R”and“L”labeledportsonthePowerMeter.
10. ____ Power Meter is adjusted for best viewing angle.

CAUTION:
DO NOT PULL
DRIVE CORDS
PAST END
OF REAR
STANCHION
STOP
8’ (2.4M) MAX LENGTH
V A S A
13
Vasa SwimErg User’s Manual
August 2022
Place hands in handles
or paddles.
Pull handles/paddles to
engage drive cord and place
hands on front edge of bench.
Lie on bench and keep
one foot on oor to your
adjust position on bench.
Bring foot o oor and
bring hands into start
position.
➋ ➍➊ ➌
IMPORTANT SAFETY PRECAUTION: To avoid damage to the SwimErg, DO NOT release the swim
paddles or exercise handles when the drive cords are engaged and extended. Always hold the paddles
or handles while returning them toward the pulleys on the top bar of the SwimErg frame.
CAUTION: The drive cord is designed to extend out up to 8’ (2.4M) from the front cover. Do not pull beyond
the end of the rear stanchion.
PART 2 - Using the SwimErg
PART 2 – USING THE VASA SWIMERG
The following sections contain guidelines and tips for using your Vasa SwimErg, the power meter, and
adjusting the resistance.
2.1. SAFE OPERATION - GETTING SAFELY ON AND OFF
Getting safely on and off the Vasa SwimErg is an important part of your program. Please follow the guide-
lines below.
SWIM POSITION - Lying prone on the bench using swim paddles or exercise handles
1) Place your hands in the handles or paddles, then pull handles/paddles to engage the drive cord.
2) Walk towards bench, placing your hands at the top of bench.
3)Lieonthebenchsothatyourchestisevenwiththefrontofthebench,keeponefootonooruntil
you are positioned comfortably.
4)Bringyourfootofftheoor,thenbringhandsintostartposition.

14 August 2022
Vasa SwimErg User’s Manual
Straddle bench, steady
bench with knuckles as you
kneel. Bring hands into
position.
Straddle bench, then sit on
bench. Bring hands into
position.
SITTING
FACING FORWARD
Straddle bench, then sit on
bench. Bring hands into
position.
Pull drive cord, then
straddle bench, attach drive
cord to ankle straps, then
sit on bench.
KNEELING
FACING FORWARD
SITTING
FACING BACKWARD
USING ANKLE STRAPS
FACING BACKWARD
PART 2 - Using the SwimErg
CAUTION: Do not suddenly release the paddles or
handles while using the SwimErg. They could strike the
power meter or front assembly and cause damage or
injury. Always gently return the handles or paddles to the
ready position on the front assembly.
CAUTION: Do not pull the drive cord past the end of the SwimErg. This could result in damage to
the SwimErg.
GETTING SAFELY ON AND OFF - CONTINUED
OTHER POSITIONS - using handles or ankle straps

CAUTION:
DO NOT PULL DRIVE
CORDS PAST END OF
REAR STANCHION
STOP
V A S A
V A S A
15
Vasa SwimErg User’s Manual
August 2022
IMPORTANT: Do not release the paddles or handles while using the SwimErg. They could strike the
monitor or front assembly and cause damage or injury. Always return the handles or paddles slowly
to the ready position on the front assembly.
Do not operate
with plastic
covers removed
Do not release handles or paddles while
using the SwimErg. They could strike and
damage the monitor.
Do not force the monitor when adjusting it
side to side or up and down. If necessary,
loosen the clamp a bit before adjusting.
Keep hands, clothing
and loose hair free
of moving seat, drive
cord and ywheel.
Keep eyes and hands clear of air outlet.
Do not put anything through the holes of the
perforation in the air inlet and air outlet.
Be sure to loosen the knob before adjusting
the damper door setting. Tighten knob after.
DAMPER DOOR
MONITOR
AIR
OUTLET
AIR INLET
DRIVE CORD &
DRIVE CORD CLIP
PART 2 - Using the SwimErg
SAFETY REMINDERS
It’s very important to use common sense and adhere to these safety guidelines in order to avoid injury to
yourself or damage to your Vasa SwimErg. The next few pages review several areas of safety.
Thefollowingisa“pre-ight”safetycheckyoushoulddobeforeusingyourVasaSwimErg:
• DO NOT LET GO OF THE HANDLES, SWIM PADDLES OR PADDLE SHAFT while the drive cords are
extended - they could hit and damage your monitor which is NOT covered under warranty. Always
return the handles or paddles slowly to the ready position on the front assembly.
• Follow instructions on the previous page for safely getting on and off the Vasa SwimErg.
• Always instruct bystanders, especially children, to keep totally clear while SwimErg is in use, especially
ofthemovingseatcarriage,drivecordsandywheel.Avoidwearinglooseorslipperyclothing.Always
tie up long hair so it’s clear of moving parts on the machine.
• Keep eyes and hands clear of the air outlet below the damper door. To avoid blowing dust into your
eyes, do not operate in a dusty area.
• Do not operate if the plastic covers on the front assembly are removed.
•DonotpullthedrivecordspasttheendoftheVasaSwimErg.Ifthedrivecordsbecomesdifcultto
pull (like the cord is stuck), do not continue to pull as this may damage your SwimErg.
•PerformpropermaintenanceonyourVasaSwimErgasrecommendedin“Part5-Maintenance&
Troubleshooting”.

16 August 2022
Vasa SwimErg User’s Manual
PART 2 - Using the SwimErg
SUPERVISING CHILDREN
Supervise children at all times while they are using the Vasa SwimErg. Please review the Safety
Reminders and Getting On and Off Safely in this section with all children who will use the Vasa
SwimErg. In particular, we recommend the following:
1. Children should train with or be instructed by a parent or coach whenever possible. This
will help reduce the chance of injury. It also can be more motivating and fun.
2. Instruct users, especially children, to HOLD ONTO THE HANDLES SWIM PADDLES, while using the
Vasa SwimErg to protect the Power Meter from being damaged. Hold the handles, swim paddles
until the workout is complete. Return the handles/paddles/shaft slowly to the ready position on
the front assembly (see page 22).
3. Instruct all bystanders to stay clear of the SwimErg while in use, especially of the moving
seat carriage, drive cords and stretch cords. Avoid wearing loose clothing and always tie
up long hair.
4. Keep eyes and hands clear of the air outlet below the damper door. To avoid blowing
dust into the air or into the electronics, do not operate in a dusty area.
5. Do not pull the drive cords past the end of the Vasa SwimErg. If the drive cords stops
pulling, do not continue to pull as this will damage your SwimErg.
SECURING YOUR VASA SWIMERG IN A PUBLIC SETTING
If your Vasa SwimErg is left in a public area, you may wish to secure or vandal-proof it to avoid
unauthorized use. We recommend the following:
1. Remove swim paddles or handles from Drive Cord Clips and remove stretch cords. Store these
and any other accessories in a secure place.
2. You may wish to unplugandremovethePowerMeterforsafekeeping.See“Part1-Step8”
and follow instructions in reverse order to detach.
3. Use a cable and lock between the D-ring on the rear stanchion head and the U-bolt on the under-
sideoftheseatcarriage.Thiswilllockthebenchinaxedposition.
4. Store the Vasa SwimErg in a dry, secure room or closet. Avoid storing it in a humid, chlorine or
salt-air environment.
MEDICAL CLEARANCE - See your Doctor before beginning any exercise program.
CAUTION: Before exercising with the Vasa SwimErg or any other form of exercise, please check
withyourphysicianrst.Thisisespeciallyimportantifyouareoverweight,ifyouhavebeen
inactive for awhile, if you have injuries, or if you have any history of heart disease in your family. If
youareover35,it’sagoodideatoperformanexercisestresstestwithaqualiedphysicianbefore
you begin training. Training with the Vasa SwimErg can be vigorous and demanding. We suggest
that you be in good health to achieve the best results.

17
Vasa SwimErg User’s Manual
August 2022
1
7
M
O
R
E
R
E
S
I
S
T
A
N
C
E
DAMPER DOOR
Figure A
SETTING #1
(door closed)
Lowest/Easiest
SETTING #7
(door open)
Highest/Hardest
Damper door
setting number
Lock door = turn clockwise
Unlock door = turn counter-clockwise
SETTING #
1
KNOB:
Lock/Unlock
1
Figure B
PART 2 - Using the SwimErg
2.2. SETTING THE RESISTANCE
TheywheelandthedamperdoorworkinconcerttoaffecttheresistanceyouwillfeelusingtheVasa
SwimErg. The stetch cords are used to restrict the distance the bench travels on the monorail, and are
not intended as resistance cords.
FLYWHEEL
Theairowresistanceoftheywheelsimulatestheresistanceofwater-theharderyoupull,themore
resistance you feel.
DAMPER DOOR
Youcanadjusttheairowresistancebychangingthe
opening of the damper door on the front of your Vasa
SwimErg.Thelowestsetting“1”(doorfullyclosed)provides
theleastresistanceandsetting“7”(doorfullyopen)
provides the most resistance. Setting #1 is similar to going
WITH the current and Setting #7 is similar to going AGAINST
a strong current.
To adjust the damper door / change resistance level:
1. Unlock knob - turn counter-clockwise
2. Lift/Lower door (Settings: 1=easiest / 7=hardest)
3. Lock knob - turn clockwise

Figure A
18 August 2022
Vasa SwimErg User’s Manual
WEBBING STRAPS
Available at most hardware stores.
PART 2 - Using the SwimErg
DAMPER DOOR SETTINGS RELATING TO POWER AND FORCE OUTPUT
At high settings (5, 6, 7) it feels like swimming against a current. At low settings (1 & 2) it feels more like
swimming with a current. So if you select a setting of 1, you will have to move your arms faster than your
normal speed in still water to generate the same power (faster stroke rate). If you select a setting of 7,
you will have to move your arms slower than your normal speed in still water to generate the same power
(slower stroke rate).
Mathematically, this is expressed by the equation Power = Force x Velocity. The fan resistance determines
the force (a higher setting is a higher force) and the hand speed is the velocity. So the same power can be
achieved with either a high resistance setting combined with a low hand speed or a low resistance setting
combined with a high hand speed. As you would expect, there will be a setting where an individual can
producethemaximumpowerduetophysiologicalandbiomechanicalefciency,andthissettingwilllikely
be different depending on the individual’s body and training. The monitor calculates power by sampling the
force and hand speed many times per second throughout the stroke. Therefore it calculates power produced
& distance swam precisely regardless of the damper door setting. This allows users to choose a damper door
setting according to personal preference.
It is important to remember that the damper door setting is subjective, depending on body type, conditioning
level, and stroke technique. We think that most distance swimmers excel at the low to mid range damper
settings (either 2, 3 or 4).
Suggestion: once per week for one month do a 500 meter or a 1000 meter time trial at race pace & race
stroke rate. On week one, set the damper door at 2, for week 2, set it at 3 and so on. You’ll discover the
damper door setting that allows you to perform your best for that distance. Measure your heart rate, watts,
andtime.Monitoringthesewillhelpyouarriveatthemostefcientstrokerate,techniqueandheartrateto
sustain the power and pace you need to improve.
STRETCH CORD
The stretch cord is designed to prevent the seat from rolling too far forward. The user
should be able to complete a full range of motion without contacting the front unit.
NOTE:Allowingthebenchtorollfreelycanprovideauseful“treadmill”affect,wherebythe
user will notice a drop in average power because the bench will roll backwards.
ANCHOR BENCH TO PREVENT MOVEMENT
If you prefer to keep the bench from rolling on the monorail, you can use a webbing strap to anchor to rear
stanchion (Figure A).
Webbing straps with cam buckle are available at most hardware stores or at vasatrainer.com.

Shift
Setup Review Display
METERS
SPM
/100M
WATTS
Shift
Setup Review Display
METERS
SPM
/100M
WATTS
ELAPSED TIME
ACCUMULATED
DISTANCE
PACE
/ 100M(SWIM)
/ 500M*(KAYAK/SUP)
STROKE POWER
ON/OFF
button
STROKES PER
MINUTE
Shift
Setup Review Display
METERS
SPM
K
/100M
WATTS
48:40
8000
3:00
30 95
19
Vasa SwimErg User’s Manual
August 2022
Figure A
Figure C
Figure B
KAYAK/SUP Display
shows “K” here
Swim Display
is blank here
PART 2 - Using the SwimErg
2.3. POWER METER - GENERAL OPERATION
The Power Meter (PM) gives you the opportunity to get instant feedback on your performance. Having
reliable information on your performance will allow you to:
• monitor progress
• create repeatable performance testing & training
• set up workouts based on time & distance
• perform intervals or distance training
• simulate races
• analyze imbalance (right and left power)
Specicsonhowthepowermetercalculatesdatacanbefoundattheendofthissection.
INITIALIZE THE POWER METER
Each time after you install the connection cables, you must:
• power OFF (by pushing the ON/OFF button)
• wait two seconds
• power ON
This process will allow for the PM to communicate accurately with the SwimErg. If you see irregular
readings, repeat the initialize steps above.
VIEWING OPTIONS: SWIM VS. KAYAK/SUP
There is a SWIM VIEW (default) and KAYAK/SUP VIEW on the Power Meter
that provides relative data based on the sport.
The upper left corner of the top screen denotes the view:
Swim View = no display/blank (Figure B)
KAYAK/SUPView=“K”displayed(FigureC)
To change between views:
Step 1: Begin with the power meter OFF.
Step 2: Hold SHIFT and then press ON/OFF. Release buttons and wait
forLCDtestsequencetonish.
Step 3: Hold SHIFT and then press ON/OFF so it will display a series of
numbers. Release buttons.
Step 4: Hold the SHIFT and press SETUP button. Release buttons. The display will turn
off.
Step 5: Turn ON for the new view.
The Power Meter will remain in the selected view (Swim or KAYAK/SUP) for all future
workouts until you change it back. Repeat the sequence above if you want to change to
the other view.
*PACING NOTE: In the KAYAK/SUP View, the Power Meter will calculate PACE/500M. Swim View is always
displayed in PACE/100M.
Other manuals for SwimErg
1
Table of contents
Other Vasa Fitness Equipment manuals