Special Tomato 66 Series User manual

Model# Series
66XXXXXX
UM-RSS-07-19LIT
User Manual

Please read these warnings before using your
Recliner Support System.
WARNING: AVOID SERIOUS INJURY FROM FALLING OR SLIDING OUT. ALWAYS USE THE RECLINER SUPPORT
SYSTEM 5-POINT HARNESS. NEVER LEAVE OCCUPANT UNATTENDED.
IMPORTANT: READ THESE INSTRUCTIONS CAREFULLY BEFORE USE AND KEEP THEM FOR FUTURE
REFERENCE. THE OCCUPANT’S SAFETY IS YOUR RESPONSIBILITY.
GENERAL INFORMATION & SAFETY
• Follow all instructions carefully. Incorrect use can
cause damage to Recliner Support System.
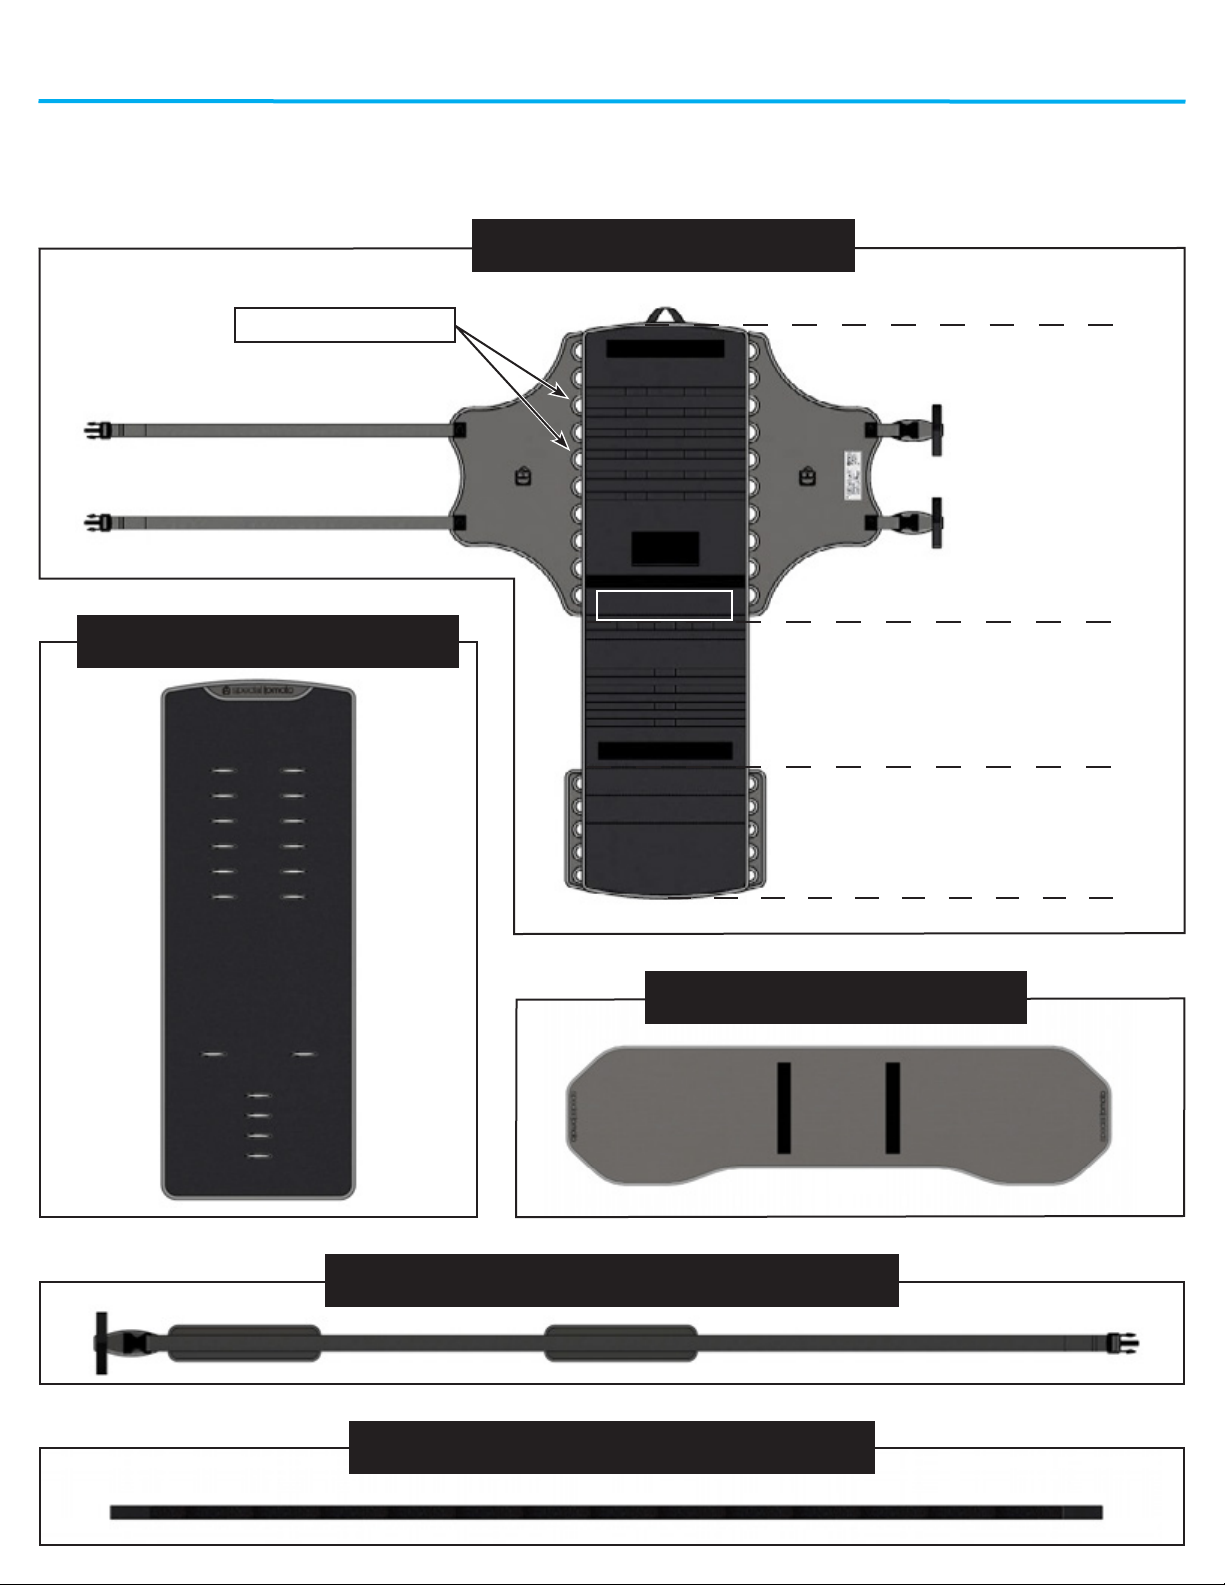
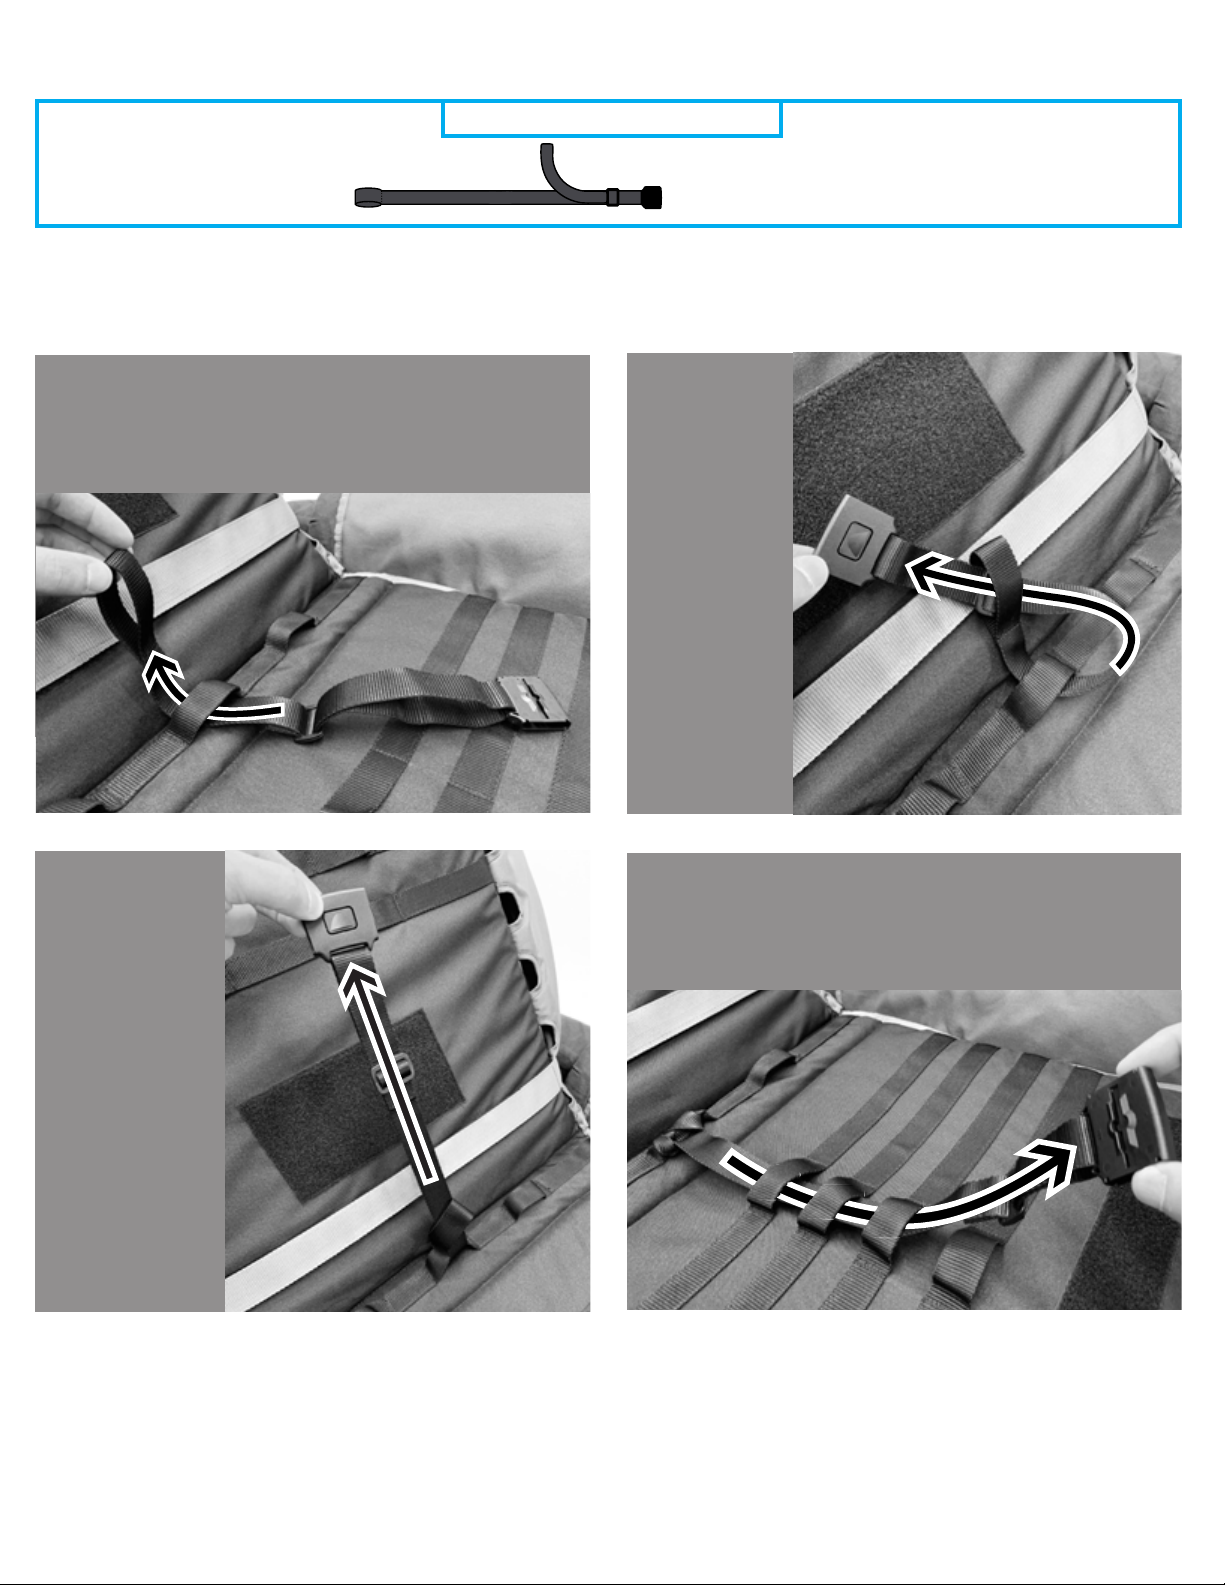
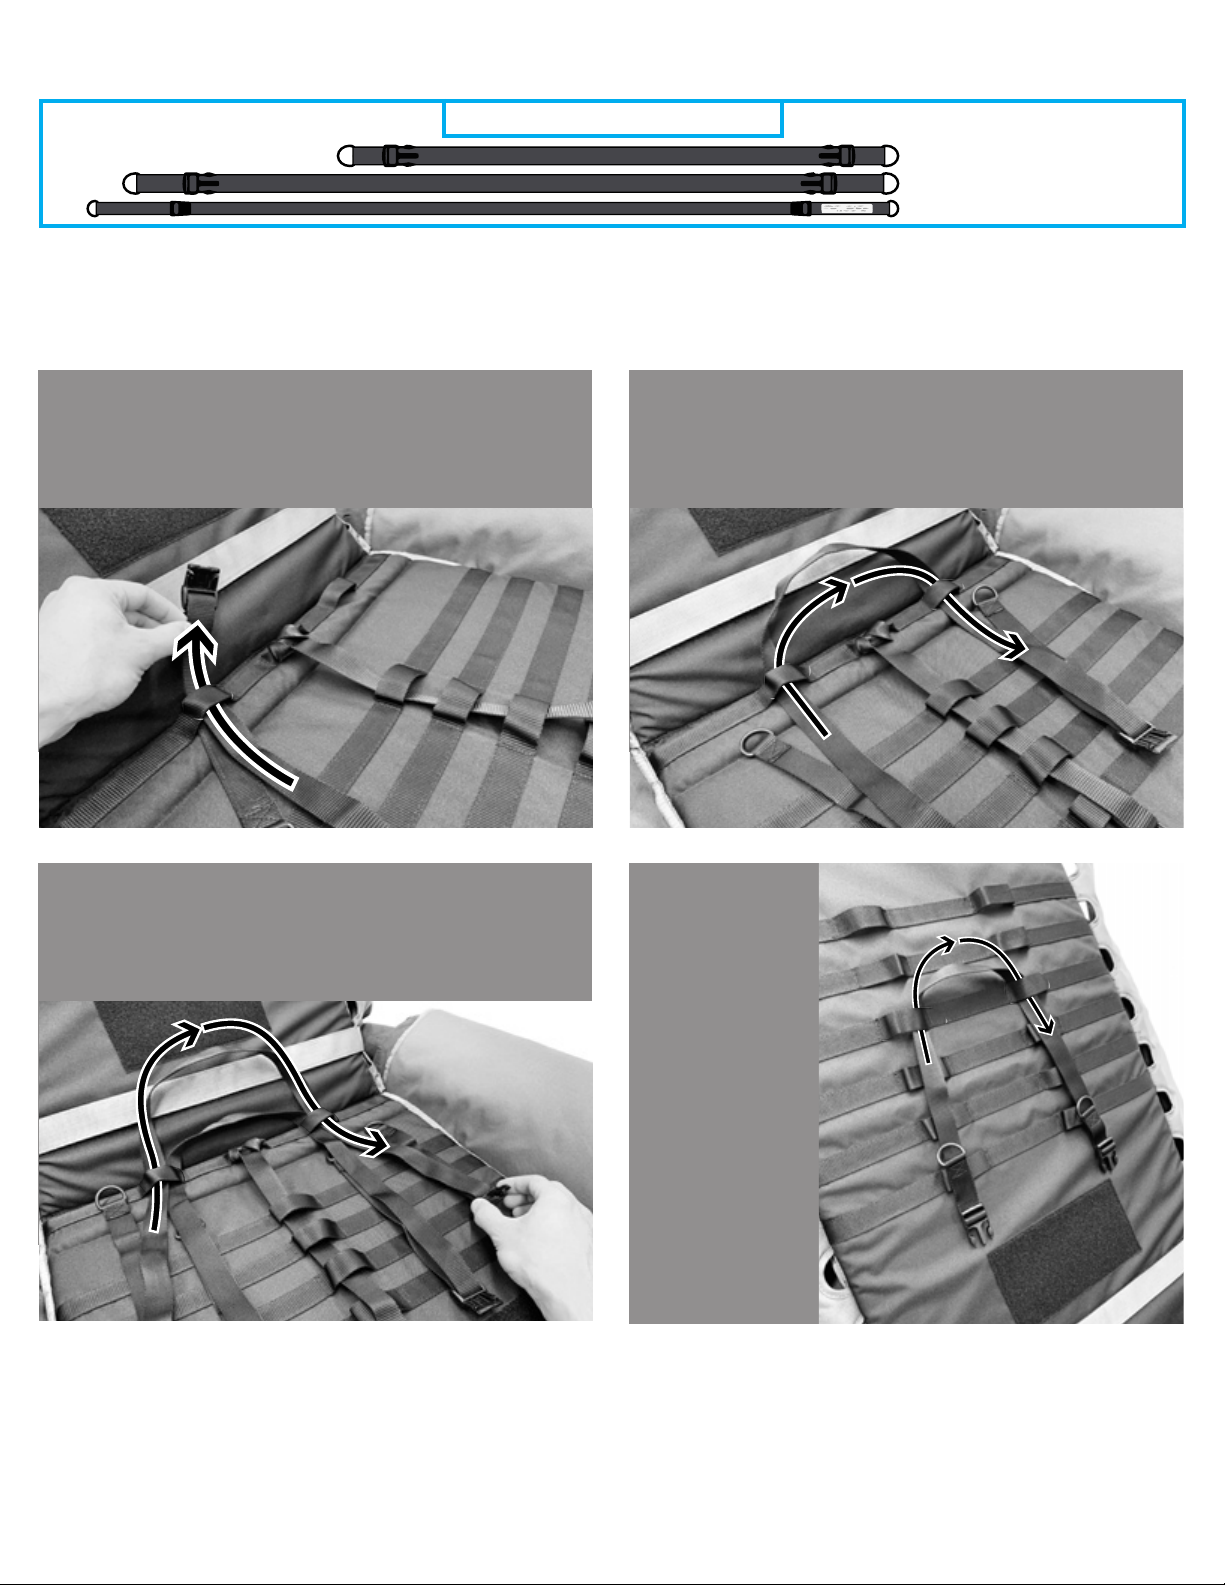
•IMPORTANT: The 5-Point Positioning Harness
must be correctly installed and adjusted before
using the Recliner Support System. See Page
18 for instructions.
• Occupant should always be properly secured with
the included 5-Point Harness whenever using the
Recliner Support System.
• Never leave occupant unattended.
• Never allow occupant to stand on any part of the
Recliner Support System.
• Never leave the Recliner Support System exposed to
direct sunlight or close to heat sources, e.g. a radiator
or open ame.
CARE AND CLEANING
•Before each use, ensure that all product straps are in
good working order and show no signs of fraying.
CLEANING
•The Recliner Support System may be cleaned using
a damp cloth with mild detergent. Always air-dry the
Recliner Support System before use or storage.
•In order to machine-wash the Recliner Support Sys-
tem, refer to Page 20 for detailed washing instruc-
tions.
•Store Recliner Support System in a cool, dry location.
Never fold or store the Recliner Support System if the
product is not completely dry.
The manufacturer reserves the right to make design changes to any of its products as part of its continuous design
improvement program.

3
Table of Contents
Recliner Support System
Components ...............................................................................4–5
Optional Cushions ..........................................................................6
Assembly
Recliner Drape & Base Fabric ....................................................7–8
5-Point Positioning Harness .....................................................9–10
Fabric Liner Pad ...........................................................................11
Optional:Soft-Touch Hip-Flex Seat Liner Cushion ........................12
Optional:Soft-Touch Back Liner Cushion ......................................13
Shoulder, Waist, Crotch, & Chest Pads ........................................14
Headrest .......................................................................................15
Calf Cushions ...............................................................................16
Legrest..........................................................................................17
5-Point Positioning Harness Adjustment ............................18
Folding for Storage.....................................................................19
Washing Instructions...........................................................20–21
Warranty & Contact Information.............................................22

4
ComponentsRecliner Support System
Your Recliner Support System should include the following (not to scale):
Seat Bight Securement Strap
Legrest Securement Strap
Backrest
Section
Seat
Section
Legrest
Section
Recliner Drape
Fabric Liner Pad
Base Fabric
Seat Bight
Strap Guide Holes

5
Headrest Cushion
Headrest Straps
Headrest
Calf Cushions
Calf Cushion
Attachment Straps
Calf Cushions
Waist Strap
Lower Chest Strap
Shoulder Strap
Shoulder Pads (x2)
Waist Pads (x2)
Crotch Strap Crotch Pad
Chest Pad
5-Point Harness
ComponentsRecliner Support System
Headrest
Support Pads

6
*Depth of Back Cushions are 1” thick at the
narrowest point and 4” thick at the widest point.
Optional Cushions
Recliner Support System
Optional: Soft-Touch Hip-Flex Seat and Back Liners
®

7
What you’ll need for this page:
Recliner Drape & Base Fabric
Assembly
Recliner Drape Base Fabric
Seat Bight Securement Strap
1. Place
Recliner
Chair in
fully-reclined
position
and center
Recliner
Drape across
Recliner
Chair seat
and arms.
Ensure back edge of
Recliner Drape is
ush with rear edge
of the Recliner
Chair armrests.
4. Move
Recliner
Chair
into fully
upright
position.
2. Place Base
Fabric
over Recliner
Drape. Be
sure to align
Velcro strips
on bottom
of the Base
Fabric with
matching
Velcro strips
on top of
Recliner
Drape.
3. Attach
Seat Bight
Securement
Strap to the
Base Fabric
Velcro patch
as shown
here.
Seat Bight
Velcro patch

8
Recliner Drape & Base FabricAssembly
Your
Recliner
Support
System
should
now look
like this:
5. Buckle
Base Fabric
Securement
straps and
Seat Bight
Securement
Strap around
back of
Recliner
Chair.
Tip: Coil excess
strapping and secure
with Velcro provided.
Always place Securement Strap Pads along the edges of the Recliner Chair, as
shown here. This protects the Recliner Chair surface material from potential wear.

9
What you’ll need for this page:
5-Point Positioning Harness
Assembly
Crotch Strap
7. Pass
Crotch
Strap buckle
through loop-
end.
6. Feed loop-end of Crotch Strap through
center Harness Loop located at the back of the
Base Fabric Seat Section. Note: Installation
may be easier if Recliner Chair is fully reclined.
8. Pull
Crotch
Strap buckle
upwards to
tighten knot.
9. Feed Crotch Strap buckle through center
sizing loops in Base Fabric Seat Surface.
Choose appropriate end-loop that best ts the
occupant.
Note: Both a Small and Large 5-Point Harness are included with the Recliner Support System. Choose the
harness size that best ts the occupant.

10
What you’ll need for this page:
5-Point Positioning HarnessAssembly
Waist Strap
Shoulder Strap
Lower Chest Strap
10. Feed Waist Strap through side Harness
Loop located adjacent to the center Harness
Loop.
11. Continue feeding Waist Strap through the
Harness Loop on the opposite side of the Base
Fabric Seat Section as shown here.
12. Feed the Lower Chest Strap through the
same Harness Loops as the Waist Strap.
13. Feed the
Shoulder
Strap through
the Backrest
Section
Harness Loops
as shown.
Choose
Harness Loops
slightly above
the occupant’s
expected
shoulder
height.

11
What you’ll need for this page:
Fabric Liner PadAssembly
Fabric Liner Pad
15. Align Velcro at the top of the Fabric Liner
Pad with Velcro at the top of the Base Fabric
Backrest Section.
17. Align Velcro at the bottom of Fabric Liner
Pad with the Velcro at the edge of the Base
Fabric Seat Section.
16. Feed ends
of Shoulder
Strap, Waist
Strap, Lower
Chest Strap,
and Crotch
Strap through
corresponding
slits in Fabric
Liner Pad.
14.
Ensure
Recliner
Chair is in
the fully-
reclined
position.
If using optional Soft-Touch Cushions, proceed to Page 12.
If using Recliner Support System without Soft-Touch Cushions, skip to Page 14.
®
®

12
What you’ll need for this page:
If you are not installing the optional Hip-Flex Seat and Back Liners, skip to Page 14.
Hip-Flex Seat Liner Cushion
SL1: Ensure that your
Hip-Flex Seat Liner
Attachment Strap is at
least 52” long in order
to be compatible with
the Recliner Support
System.
SL4: Feed Hip-Flex
Seat Liner Attachment
Strap behind Base
Fabric Backrest Section
and through the lowest
Strap Guide Hole on the
opposite side. Buckle and
tighten.
SL2: Feed Crotch Strap and Waist Straps
through the respective cutouts in the Hip-Flex
Seat Liner Cushion.
SL3: Thread Hip-Flex Seat Liner Attachment
Strap through the lowest Base Fabric Strap
Guide Hole shown here.
Note: Position the Hip-Flex
Seat Liner Attachment Strap
buckle as shown here. Do not
let the plastic buckle contact the
Recliner Chair fabric to prevent
possible scratches.
Optional:Soft-Touch®Hip-Flex Seat Liner Cushion
Hip-Flex Seat Liner Attachment Strap

13
What you’ll need for this page:
Optional:Soft-Touch®Back Liner Cushion
Back Liner Cushion Back Liner Attachment Strap
BL1: Ensure that
your Back Liner
Attachment Strap is at
least 52” long in order
to be compatible with
the Recliner Support
System.
BL2: Choose a Base Fabric Strap Guide Hole
at the appropriate height for the occupant, and
feed the Back Liner Attachment Strap through
Strap Guide Hole as shown here.
BL3: Pass the Back Liner Attachment Strap
behind the Base Fabric Backrest Section
and through the opposite Strap Guide Hole as
shown here. Clip buckle together.
Note: Once
installed,
ensure that
plastic buckles
do not lie
directly against
Recliner Chair
surface to
avoid potential
scratches.
Note: 5-Point
Harness and
Pads shown
fully-installed
here. Refer to
steps 18-20
for detailed
Harness Pad
installation
instructions.

14
What you’ll need for this page:
Shoulder, Waist, Crotch, & Chest PadsAssembly
Shoulder Pads (x2) Waist Pads (x2) Crotch Pad Chest Pad
19. Install
Waist Pads
and Crotch
Pad as
shown.
18. Slide
Shoulder
Pads onto
Shoulder
Straps.
20. Buckle
Chest Pad
to Shoulder
Strap and
Lower Chest
Strap.
Shoulder
Strap
Chest
Pad
Lower Chest
Strap

15
What you’ll need for this page:
Headrest
Assembly
21. If desired, assemble
Headrest Support Pads
to Headrest Cushion to
adjust depth of Headrest
Cushion.
Note: Top or bottom
Headrest Support Pad
can be removed for
an extended or exed
Headrest position.
22. Feed Headrest
Attachment Straps
through Strap Guide
Holes that best t the
occupant. Pass Headrest
Attachment Straps
behind Base Fabric
Backrest Section.
Headrest Attachment Straps Headrest Support Pads
23. Thread
the Headrest
Attachment
Straps
through the
Strap Guide
Holes on
opposite
side of Base
Fabric.
Clip both
buckles next
to Headrest
Cushion as
shown here.
Headrest Cushion
Note: Once installed, ensure
that plastic buckles do not lie
directly against Recliner Chair
surface to avoid potential
scratches.

16
What you’ll need for this page:
Calf CushionsAssembly
Calf Cushion Attachment StrapsCalf Cushions
24. Feed Calf Cushion Attachment Straps
through Strap Guide Holes in Base Fabric
Legrest Section that best t the occupant.
25. Lift Base Fabric Legrest Section and wrap
Calf Cushion Attachment Straps around Base
Fabric Legrest Section and through opposite
Strap Guide Holes as shown here.
26. Clip buckles next to Calf Cushions as
shown here.
Note: Once installed, ensure
that plastic buckles do not lie
directly against Recliner Chair
surface to avoid potential
scratches.

17
What you’ll need for this page:
Legrest
Assembly
Legrest Securement Strap
27. Lift Base Fabric Legrest Section. 28. Feed end of Legrest Securement Strap
through plastic ring on underside of Legrest
Section. Then, press Legrest Securement
Strap Velcro surfaces together as shown.
29. Lower the Legrest Section and wrap Legrest
Securement Strap under Recliner Chair footrest.
Feed the Legrest Securement Strap through the
opposite plastic ring as shown.
30. Pull Legrest Securement Strap tight,
then press the Velcro end of the Legrest
Securement Strap to itself as shown.

18
5-Point Positioning Harness Adjustment
Use this guide to t the harness to the occupant in order to optimize comfort and safety.
Always use shoulder pads to prevent plastic
buckles and strapping from contacting the
occupant's neck and face.
To ensure proper placement of the chest harness,
make sure the chest strap lies in the middle of the
occupant's chest (armpit level).
The pelvic harness has a
cam lock which prevents the
waist strap from loosening to
maintain proper positioning
of the pelvis.
The pelvic harness has a single quick-release button
that unlocks both sides of the pelvic harness for
quick and easy access to the occupant. The quick-re-
lease button requires that you push directly in the
center of the buckle to release both waist straps at
the same time. This is a safety mechanism in case
the occupant attempts to release the buckle on their
own.
Adjust the length of the crotch strap to allow the
pelvic belt to lie across the occupant’s pelvis. This will
prevent the pelvic belt from lying across the lower
abdomen.
Note: To adjust waist strap length, first push up on
webbing to release the cam lock.

19
Folding for Storage
1. Release the four
Securement Straps
that wrap around the
Recliner Chair. Fold
Recliner Drape over
Seat Section then
place Seat Bight
Securement Strap
on top of Recliner
Drape as shown.
Fold in Base Fabric
Wings.
3. Thread the Legrest
Securement Strap
through the top plastic
ring of the Legrest
Section as shown, and
then back through the
Legrest and Backrest
Strap Guide Holes.
Lastly, press the
Legrest Securement
Strap Velcro to itself.
2. Fold the Legrest
and Seat Section
up to the Backrest
Section. Next,
thread the Legrest
Securement Strap
through the top Strap
Guide Holes of the
Legrest and Backrest
(white circles). Next,
thread the Legrest
Securement Strap
through the top Strap
Guide Holes on
opposite side (black
circles).

20
Washing Instructions
1. Remove
all Harness
Pads.
3. Remove
5-Point
Harness from
Base Fabric.
2. Remove
Fabric Liner
Pad.
4. Clip all
5-Point
Harness
buckles
together
as shown
here. Place
5-Point
Harness and
Harness
Pads into
mesh laundry
bag before
washing.
To prepare Recliner Support System for machine washing, please follow these steps:
Table of contents
Other Special Tomato Medical Equipment manuals