Specialty Saw Clean-Cuts HYDM140 User manual

INSTRUCTION MANUAL
HYDM140

Table of Contents
Introduction ........................ 3
Old Method....................... 3
New Clean-Cuts Method .. 3
Operation ........................... 4
Operation Procedure........ 4
Changing the Blade............ 5
Vacuum Port....................... 6
Maintenance....................... 6
Benets .............................. 7
Hose Cutting Blades .......... 7
CAUTION
Use extreme caution. Please read all instructions before
starting machine. Follow all safety guidelines, do not remove
safety guards. Unplug machine prior to servicing.
GLOVES
Proper hand protection should be worn at all times when
working with sharp cutting tools.
SAFETY EYE WEAR
Proper eye protection should be worn at all times when work-
ing with high RPM cutting blades.
INSTRUCTION MANUAL
Clean-Cuts HYDM140 Hydraulic Hose Saw
2
A
ED
B
C
New Improved Clean-Cuts Method
With the Clean-Cuts hydraulic hose
saws the hose is positioned across
two pins (A) and moved into the
blade (C) by a feed foot (B) using
extendable handle (D) and adjust-
able pivot point (E) for cutting larger
industrial hose. The feed motion
causes the hose to stretch at the
point of contact with the blade,
allowing it to separate as it is cut
(see image at below). This separa-
tion allows the hose to pass clear of
the saw blade with NO friction, NO
heating and NO DEBRIS! A vacuum
hose (not shown) is attached to a
vacuum port to remove any tiny amount of debris or smoke during cutting.
NO DEBRIS
1/8” Clean-Cuts Blade
Pin A
Pin A
Hose separates
as blade slices,
no kerf required.
H
y
d
r
a
u
l
i
c
H
o
s
e
|
|
|
|
|
|
|
|
|
|
|
H
y
d
r
a
u
l
i
c
H
o
s
e
|
|
|
|
|
|
|
Introduction
Clean-Cuts hydraulic hose cutting system is break-through technology using a
toothed blade, cutting with the backs of each tooth, so the blade does not take a kerf.
The saw bends the hose into the blade spreading the cut edges to avoid burning and
smoking.
Old Method
The normal sawing method of lowering an abrasive
saw blade onto the hose causes the hose to com-
press and deform. As the blade cuts the compressed
hose expands against the blade causing friction,
heating and burning and much of the debris from the
kerf of the blade is deposited into your hose.
DEBRIS INSIDE
YOUR HOSE!
1/8” Abrasive
Wheel
Hydraulic Hose
Hydraulic Hos
Hydraulic Ho
3

OPERATION
This saw is a rugged and dependable tool when used and maintained properly. Many
of these saws have been in daily service for years and are still in good working order.
As with any tool, good operating procedure is important for tool life and operator
safety.
Operating Procedure
1. Set pin placement for the size hose you are cutting using the following guide:
*This guide only “suggests” the best possible pin placement, as there are vari-
ables such as new or used hose, brands of hose, braided or spiral wire rein-
forcement (4 or 6 wire multi-spiral). As an operator you will learn the best pin
placement for the hose you are cutting. Remember that the cut hose should be
square and clean.
2. Start the saw and let the motor come up to full speed. This is most important with
theDCsawsastheytakeamomentto“rampup”.Cuttingbeforethey’reatfull
speed can cause very high amperage draw and shorten the life of the motor.
3. Pushthehoseintothesawwithsteady,evenpressure.Letthebladedoits’jobby
cutting the hose not ripping it. This becomes more important as the hose size be-
comes larger, especially with the 6 wire multi-spiral hose. If there is a lot of smoke
and sparks you may be forcing the hose too fast or the blade may be excessively
dull.
After the hose is cut, be careful as the blade spins down to a stop.
A coasting blade is still dangerous!
4. Examine the hose. Look at the squareness and how clean the cut is. A good cut
goes a long way toward making a strong hose assembly.
4
Hose Size Pin Location*
-4 (1/4”) 1
-6 (3/8”) 2
-8 (1/2”) 2
-12 (3/4”) 3
-16 (1”) 3-4
-20 (1 1/4”) 4-5
-24 (1 1/2”) 5-6
-32 (2”) 7
1
1
2
2
3
3
4
45
5
6
6
7
7

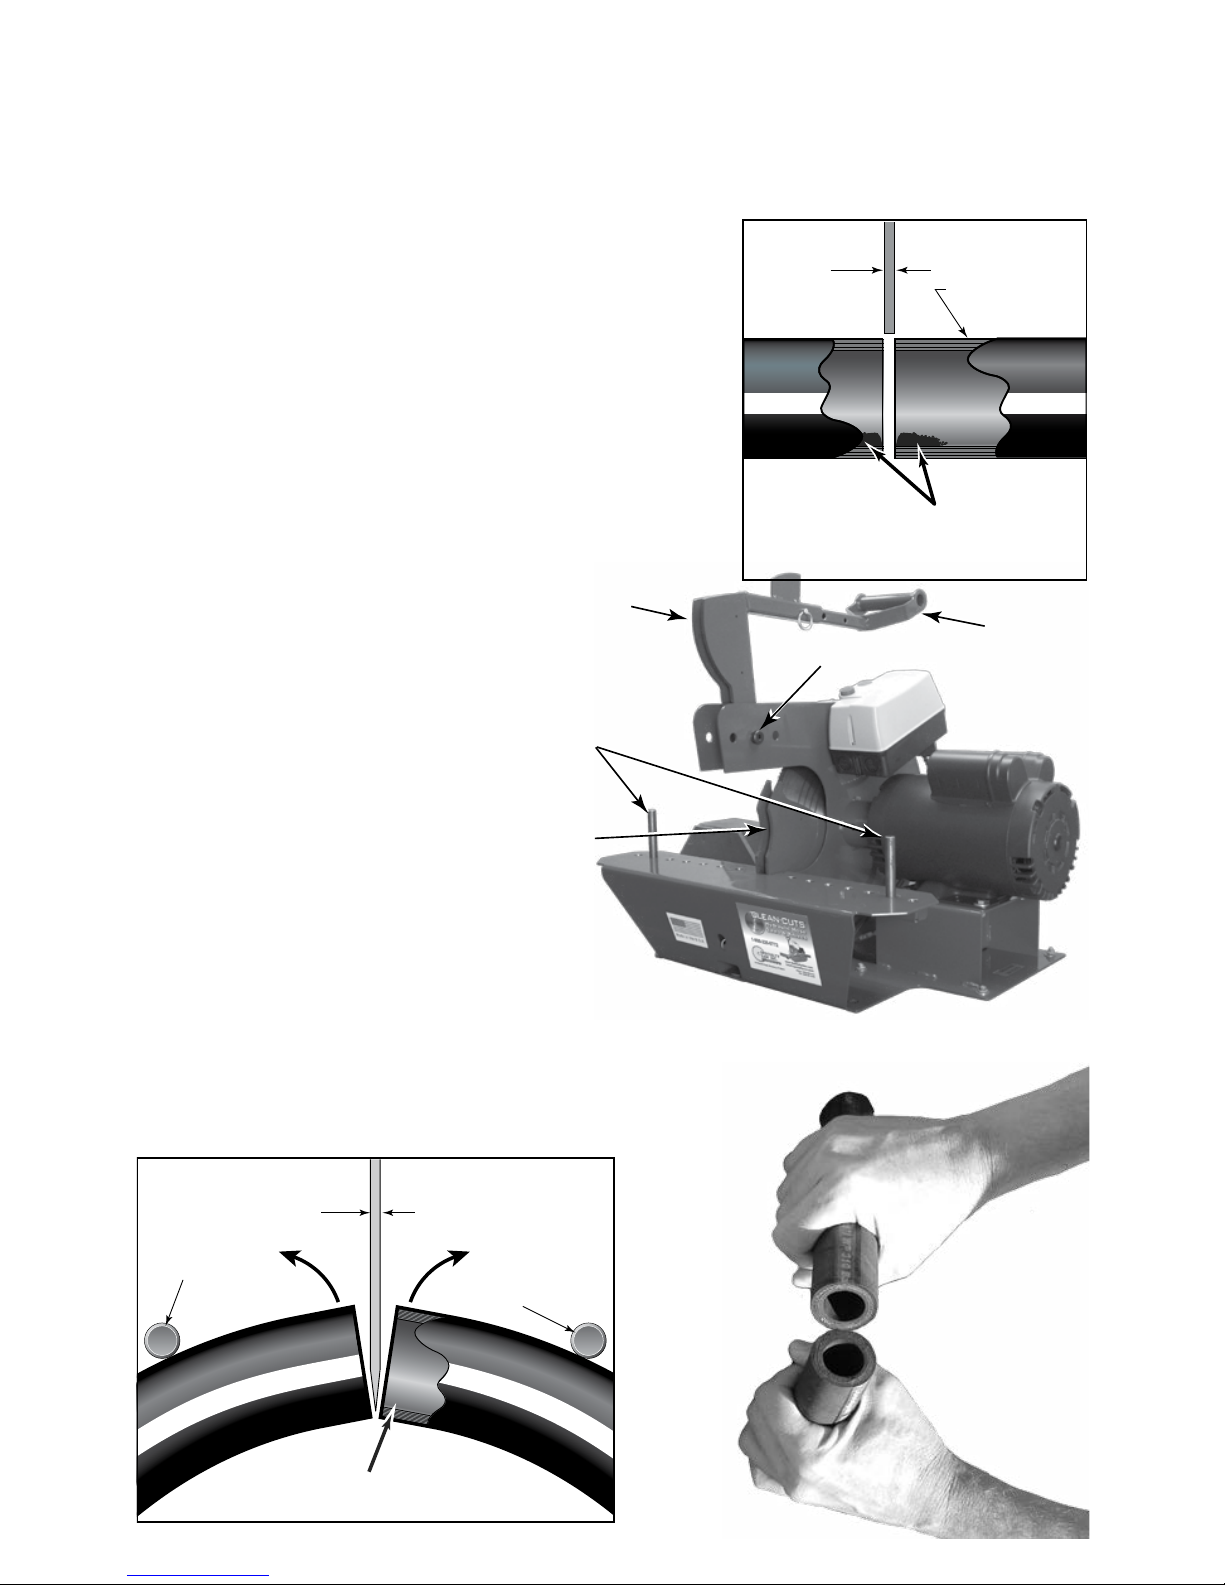
Changing the Blade
1. Disconnect Power Plug & logout tagout.
2. Remove hex nuts (right) holding blade
cover and remove cover.
3. Place1⁄4rod/pinthrougharborshaftto
lock saw blade arbor shaft and drive pin
at12o’clock(belowleft).Thiswilllockthe
arbor while the bolt is removed. Please
note that the bolt (below right) to remove
the blade is left hand threaded. To remove
it, turn counter-clockwise.
4. Remove old blade and put new one on over the drive pin (below left) and arbor
shaft. Be sure to follow the blade rotation arrow (below right).
5
5. Placedclampingangethroughdrive
pin and bolt blade onto the shaft.
Tighten bolt to 20-25 foot/lbs. Do not
over-tighten.Thenremove1⁄4rod/pin
which locks shaft.
6. Replace blade cover and tighten hex
bolts.
R
O
T
A
T
I
O
N
Table of contents
Other Specialty Saw Saw manuals


