Speedaire 437J36A Instructions for use

Operating Instructions & Parts Manual EN
General Duty
Hose Reel
Models 437J36A, 437J37A

PLEASE READ AND SAVE
THESE INSTRUCTIONS.
READ CAREFULLY
BEFORE ATTEMPTING
TO ASSEMBLE, INSTALL,
OPERATE OR MAINTAIN THE
PRODUCT DESCRIBED.
PROTECT YOURSELF AND
OTHERS BY OBSERVING ALL
SAFETY INFORMATION. FAILURE
TO COMPLY WITH INSTRUCTIONS
COULD RESULT IN PERSONAL
INJURY AND/OR PROPERTY
DAMAGE! RETAIN INSTRUCTIONS
FOR FUTURE REFERENCE.
PLEASE REFER TO BACK COVER
FOR INFORMATION REGARDING
SPEEDAIRE`S WARRANTY AND OTHER
IMPORTANT INFORMATION.
Model #:
Serial #:
Purch. Date #:
Printed in Korea
Version 0 12/2017
©2013 Dayton Electric Manufacturing Co.
All Rights Reserved

1
BEFORE YOU BEGIN
Tools Needed:
UNPACKING
Contents:
Inspect:
● Adjustable Wrench for installation
● Screwdriver
●
Speedaire
®
Hose Reel (1)
●
Operating Instructions and Parts Manual (1)
●
After unpacking the reel, carefully inspect for any damage that may
have occurred during transit. Check for loose, missing, or damaged
parts. Shipping damage claims must be filed with the carrier.
●
See General Safety Instructions on page 2, and Cautions and Warnings as shown
GETTING STARTED SAFETY /
SPECIFICATIONS OPERATION
ASSEMBLY /
INSTALLATION TROUBLESHOOTING MAINTENANCE /
REPAIR
PLEASE READ AND SAVE
THESE INSTRUCTIONS.
READ CAREFULLY
BEFORE ATTEMPTING
TO ASSEMBLE, INSTALL,
OPERATE OR MAINTAIN THE
PRODUCT DESCRIBED.
PROTECT YOURSELF AND
OTHERS BY OBSERVING ALL
SAFETY INFORMATION. FAILURE
TO COMPLY WITH INSTRUCTIONS
COULD RESULT IN PERSONAL
INJURY AND/OR PROPERTY
DAMAGE! RETAIN INSTRUCTIONS
FOR FUTURE REFERENCE.
PLEASE REFER TO BACK COVER
FOR INFORMATION REGARDING
SPEEDAIRE`S WARRANTY AND OTHER
IMPORTANT INFORMATION.
Model #:
Serial #:
Purch. Date #:
Printed in Korea
Version 0 12/2017
©2013 Dayton Electric Manufacturing Co.
All Rights Reserved
2
GENERAL SAFETY INSTRUCTIONS
Read the following precautions and instructions before you begin assembly or use.
Regarding the pressure of inlet, do not exceed the maximum pressure of the reel.
Use a flexible hose for connecting the inlet and do not use rigid plumbing.
Make sure the line pressure does not exceed the rated operating pressure of the
hose reel, refer to the specifications.
Exposure of the skin directly to pressurized air or fluid could result in severe
bodily injury.
Before carrying out any maintenance, turn off and disconnect the supply line to the
reel and carefully release the hose line pressure.
GETTING STARTED
SAFETY /
SPECIFICATIONS
OPERATION ASSEMBLY /
INSTALLATION
TROUBLESHOOTING
MAINTENANCE /
REPAIR

3
A (inch)
B (inch)
C (inch)
D (inch)
E (inch)
F (inch)
G (inch)
15-3/4
5-29/32
13-25/32
12-39/64
2-23/64
4-21/64
15/32
21-21/32
11-13/16
13-25/32
12-39/64
2-23/64
10-15/64
15/32
Maximum Operating
Pressure (PSI)
Hose I.D
(inch)
Hose Length
(ft)
Weight
(lbs)
Hose Outlet
16 18
NPT Male (inch)
Reel Outlet
NPT Female (inch)
Maximum Operating
Temperatures(°F)
Reel Inlet
NPT Female (inch)
SPECIFICATIONS
Figure 1
437J37A
437J36A
300
0
/
/
/
Applications
Housing Material
Housing Colour
Air, Water
STEEL
Green
Air, Water
STEEL
Green
GETTING STARTED SAFETY /
SPECIFICATIONS OPERATION
ASSEMBLY /
INSTALLATION TROUBLESHOOTING MAINTENANCE /
REPAIR
2
GENERAL SAFETY INSTRUCTIONS
Read the following precautions and instructions before you begin assembly or use.
Regarding the pressure of inlet, do not exceed the maximum pressure of the reel.
Use a flexible hose for connecting the inlet and do not use rigid plumbing.
Make sure the line pressure does not exceed the rated operating pressure of the
hose reel, refer to the specifications.
Exposure of the skin directly to pressurized air or fluid could result in severe
bodily injury.
Before carrying out any maintenance, turn off and disconnect the supply line to the
reel and carefully release the hose line pressure.
GETTING STARTED
SAFETY /
SPECIFICATIONS
OPERATION ASSEMBLY /
INSTALLATION
TROUBLESHOOTING
MAINTENANCE /
REPAIR
4
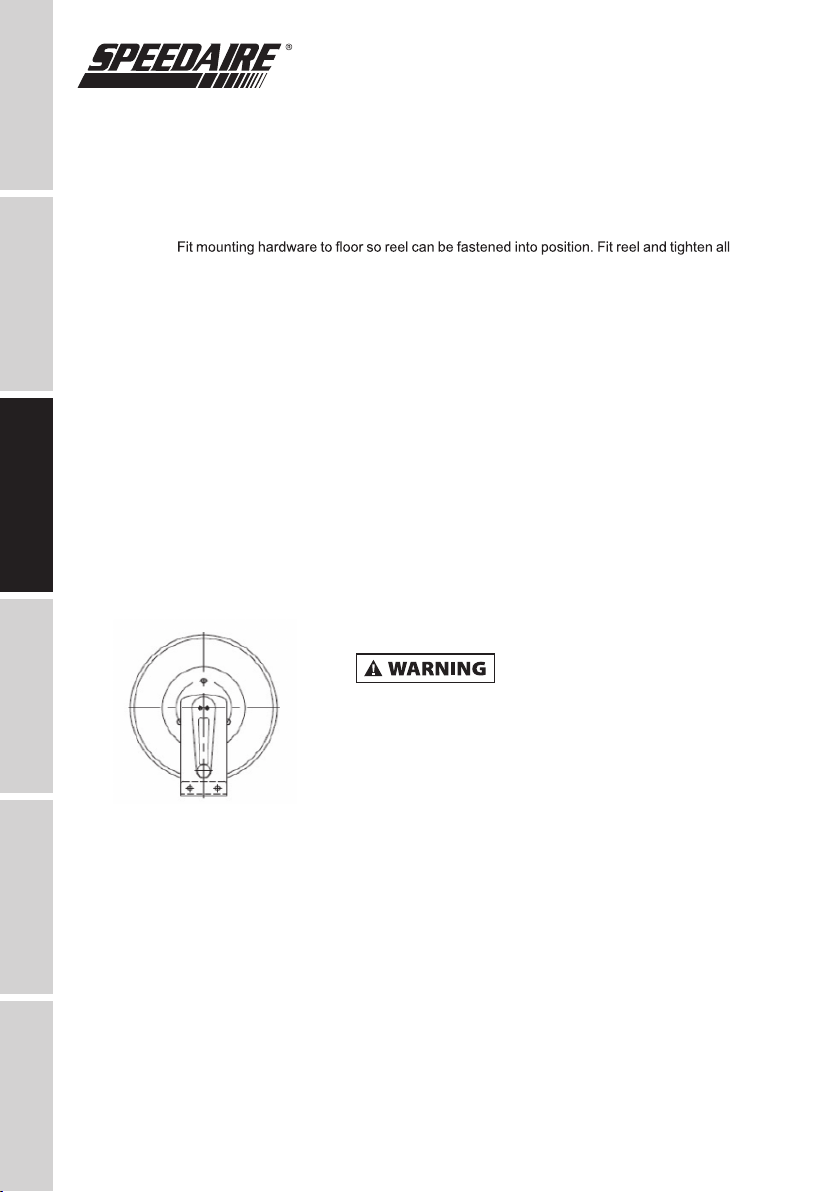
ASSEMBLY INSTALLATIONS
1 Unpack and inspect reel for any damage. Turn the reel by hand to check whether the reel is
operating smoothly or not.
Typical mounting position
2
hardware securely.
3
Apply thread sealant to inlet hose and connect to the swivel joint on reel
4
Reel are supplied with plastic crank handle to prevent damage on the move, the handle is
packaged folded. When using the handle, please unfold it.
When the reel is mounted to the floor it should
be mounted correctly.
Floor Mounting
If the hose is taken out when the reel is not
mounted correctly, the reel can fall down and become damaged.
Figure 2
GETTING STARTED
SAFETY /
SPECIFICATIONS
OPERATION ASSEMBLY /
INSTALLATION
TROUBLESHOOTING
MAINTENANCE /
REPAIR
5
TROUBLESHOOTING GUIDE
Symptom
Air Leakage 1. Worn inlet hose
2. Worn O-Ring
3. Coupler problem
1. Tighten hose clamp or replace the hose
2. Replace O-Ring
3. Tighten coupler or replace
1. 1.
..
fully fit on drum of reel
.
.
. /cable
meets the maximum outside
.
Caution
1. 1.
.
GETTING STARTED SAFETY /
SPECIFICATIONS OPERATION
ASSEMBLY /
INSTALLATION TROUBLESHOOTING MAINTENANCE /
REPAIR
4
ASSEMBLY INSTALLATIONS
1 Unpack and inspect reel for any damage. Turn the reel by hand to check whether the reel is
operating smoothly or not.
Typical mounting position
2
hardware securely.
3
Apply thread sealant to inlet hose and connect to the swivel joint on reel
4
Reel are supplied with plastic crank handle to prevent damage on the move, the handle is
packaged folded. When using the handle, please unfold it.
When the reel is mounted to the floor it should
be mounted correctly.
Floor Mounting
If the hose is taken out when the reel is not
mounted correctly, the reel can fall down and become damaged.
Figure 2
GETTING STARTED
SAFETY /
SPECIFICATIONS
OPERATION ASSEMBLY /
INSTALLATION
TROUBLESHOOTING
MAINTENANCE /
REPAIR
6
MAINTENANCE AND INSPECTION INSTRUCTION
Any repairs or replacements must be done by a
qualified person or authorized service center only.
An inspection should be conducted periodically.
Also the maintenance record should be updated
periodically. When a problem occurs, it should be
repaired after the pressure has been released.
Leakage Inspection
Regarding the media (fluid) which is used for the hose reel, checking for leaks should be
done periodically.
After taking out the hose, fully apply the soapy water on the connected point.
(Such as housing or shaft).
If the connected point is bubbling up, the user should suspect phenomenon of leakage.
●When a leak occurs, the sealing of the housing or shaft should be replaced.
●When a leak occurs because of hose damage, the hose should be replaced.
●Remove the hose from the swivel.
●Remove the snap ring with dedicated pliers.
●Remove the swivel by pulling it towards user.
●Attach the new swivel to the reel.
●Attach the snap ring to the new swivel with the dedicated pliers.
●Connect the input hose to the new swivel.
Swivel Seal Replacement
GETTING STARTED
SAFETY /
SPECIFICATIONS
OPERATION ASSEMBLY /
INSTALLATION
TROUBLESHOOTING
MAINTENANCE /
REPAIR
7
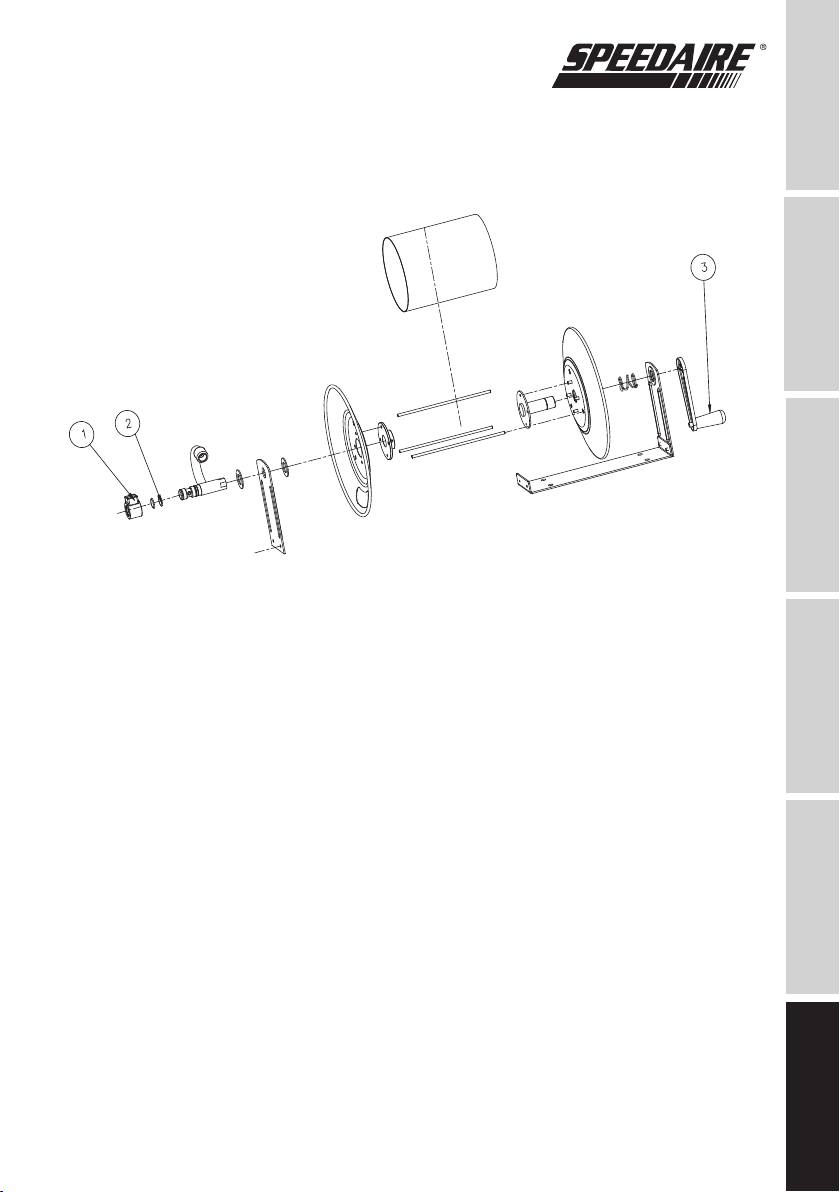
REPAIR PARTS ILLUSTRATION FOR 437J36A, 437J37A
For Repair Parts, call 1-800-323-0620
24 hours a day - 365 days a year
Please provide following information:
-Model number
-Serial number (if any)
-Part description and number as shown in parts list
GETTING STARTED SAFETY /
SPECIFICATIONS OPERATION
ASSEMBLY /
INSTALLATION TROUBLESHOOTING MAINTENANCE /
REPAIR
6
MAINTENANCE AND INSPECTION INSTRUCTION
Any repairs or replacements must be done by a
qualified person or authorized service center only.
An inspection should be conducted periodically.
Also the maintenance record should be updated
periodically. When a problem occurs, it should be
repaired after the pressure has been released.
Leakage Inspection
Regarding the media (fluid) which is used for the hose reel, checking for leaks should be
done periodically.
After taking out the hose, fully apply the soapy water on the connected point.
(Such as housing or shaft).
If the connected point is bubbling up, the user should suspect phenomenon of leakage.
●When a leak occurs, the sealing of the housing or shaft should be replaced.
●When a leak occurs because of hose damage, the hose should be replaced.
●Remove the hose from the swivel.
●Remove the snap ring with dedicated pliers.
●Remove the swivel by pulling it towards user.
●Attach the new swivel to the reel.
●Attach the snap ring to the new swivel with the dedicated pliers.
●Connect the input hose to the new swivel.
Swivel Seal Replacement
GETTING STARTED
SAFETY /
SPECIFICATIONS
OPERATION ASSEMBLY /
INSTALLATION
TROUBLESHOOTING
MAINTENANCE /
REPAIR

8
REPAIR PARTS LIST FOR 437J36A, 437J37A
Reference
Number Description Part Number Qty.
(PC/Unit) Remarks
11
2
3
SWIVEL
SEALING (O-Ring NITRILE)
1
Product Number
HANDLE ASS'Y
454Z33
454Z03
454Z24
437J36A
437J37A
437J36A
437J37A
437J36A
437J37A
GETTING STARTED
SAFETY /
SPECIFICATIONS
OPERATION ASSEMBLY /
INSTALLATION
TROUBLESHOOTING
MAINTENANCE /
REPAIR

9
NOTES.
GETTING STARTED SAFETY /
SPECIFICATIONS OPERATION
ASSEMBLY /
INSTALLATION TROUBLESHOOTING MAINTENANCE /
REPAIR
8
REPAIR PARTS LIST FOR 437J36A, 437J37A
Reference
Number Description Part Number Qty.
(PC/Unit) Remarks
11
2
3
SWIVEL
SEALING (O-Ring NITRILE)
1
Product Number
HANDLE ASS'Y
454Z33
454Z03
454Z24
437J36A
437J37A
437J36A
437J37A
437J36A
437J37A
GETTING STARTED
SAFETY /
SPECIFICATIONS
OPERATION ASSEMBLY /
INSTALLATION
TROUBLESHOOTING
MAINTENANCE /
REPAIR

SPEEDAIRE ONE-YEAR LIMITED WARRANTY
SPEEDAIRE ONE-YEAR LIMITED WARRANTY.
All Speedair
@
product models covered in this manual are warranted by Dayton Electric Mfg. Co.
(“Dayton”) to the original user against defects in workmanship or materials under normal use for one year after date of purchase. If the Speedair Product
is part of a set, only the portion that is defective is subject to this warranty. Any product or part which is determined to be defective in material or
workmanship and returned to an authorized service location, as Dayton or Dayton’s designee designates, shipping costs prepaid, will be, as the exclusive
remedy, repaired or replaced with a new or reconditioned product or part of equal utility or a full refund given, at Dayton’s or Dayton’s designee’s option,
at no charge. For limited warranty claim procedures, see “Warranty Service” below. This warranty is void if there is evidence of misuse, mis-repair,
mis-installation, abuse or alteration. This warranty does not cover normal wear and tear of Speedair Products or portions of them, or products or portions
of them which are consumable in normal use. This limited warranty gives purchasers specific legal rights, and you may also have other rights which vary
from jurisdiction to jurisdiction.
WARRANTY DISCLAIMERS AND LIMITATIONS OF LIABILITY RELATING TO ALL CUSTOMERS FOR ALL PRODUCTS
LIMITATION OF LIABILITY. TO THE EXTENT ALLOWABLE UNDER APPLICABLE LAW, DAYTON’S LIABILITY FOR CONSEQUENTIAL AND INCIDENTAL
DAMAGES IS EXPRESSLY DISCLAIMED. DAYTON’S LIABILITY IN ALL EVENTS IS LIMITED TO AND SHALL NOT EXCEED THE PURCHASE PRICE
PAID.
WARRANTY DISCLAIMER.
A DILIGENT EFFORT HAS BEEN MADE TO PROVIDE PRODUCT INFORMATION AND ILLUSTRATE THE SPEEDAIRE
PRODUCTS IN THIS LITERATURE ACCURATELY; HOWEVER, SUCH INFORMATION AND ILLUSTRATIONS ARE FOR THE SOLE PURPOSE OF
IDENTIFICATION, AND DO NOT EXPRESS OR IMPLY A WARRANTY THAT THE SPEEDAIRE PRODUCTS ARE MERCHANTABLE, OR FIT FOR A
PARTICULAR PURPOSE, OR THAT THE SPEEDAIRE PRODUCTS WILL NECESSARILY CONFORM TO THE ILLUSTRATIONS OR DESCRIPTIONS.EX-
CEPT AS PROVIDED BELOW, NO WARRANTY OR AFFIRMATION OF FACT, EXPRESSED OR IMPLIED, OTHER THAN AS STATED IN THE “LIMITED
WARRANTY” ABOVE IS MADE OR AUTHORIZED BY DAYTON.
PRODUCT SUITABILITY.
MANY JURISDICTIONS HAVE CODES AND REGULATIONS GOVERNING SALES, CONSTRUCTION, INSTALLATION,
ANDI OR USE OF PRODUCTS FOR CERTAIN PURPOSES, WHICH MAY VARY FROM THOSE IN NEIGHBORING AREAS. WHILE ATTEMPTS ARE
MADE TO ASSURE THAT SPEEDAIRE PRODUCTS COMPLY WITH SUCH CODES, DAYTON CANNOT GUARANTEE COMPLIANCE, AND CANNOT BE
RESPONSIBLE FOR HOW THE PRODUCT IS INSTALLED OR USED. BEFORE PURCHASE AND USE OF A PRODUCT, REVIEW THE SAFETYI
SPECIFICATIONS, AND ALL APPLICABLE NATIONAL AND LOCAL CODES AND REGULATIONS, AND BE SURE THAT THE SPEEDAIRE PRODUCT,
INSTALLATION, AND USE WILL COMPLY WITH THEM.
CONSUMERS ONLY.
CERTAIN ASPECTS OF DISCLAIMERS ARE NOT APPLICABLE TO CONSUMER PRODUCTS SOLD TO CONSUMERS; (A)
SOME JURISDICTIONS DO NOT ALLOW THE EXCLUSION OR LIMITATION OF INCIDENTAL OR CONSEQUENTIAL DAMAGES, SO THE ABOVE
LIMITATION OR EXCLUSION MAY NOT APPLY TO YOU; (B) ALSO, SOME JURISDICTIONS DO NOT ALLOW A LIMITATION ON HOW LONG AN
IMPLIED WARRANTY LASTS, SO THE ABOVE LIMITATION MAY NOT APPLY TO YOU; AND (C) BY LAW, DURING THE PERIOD OF THIS LIMITED
WARRANTY, ANY IMPLIED WARRANTIES OF MERCHANTABILITY OR FITNESS FOR A PARTICULAR PURPOSE APPLICABLE TO CONSUMER
PRODUCTS PURCHASED BY CONSUMERS, MAY NOT BE EXCLUDED OR OTHERWISE DISCLAIMED.
THIS LIMITED WARRANTY ONLY APPLIES TO SPEEDAIRE PRODUCTS PURCHASED BY UNITED STATES PURCHASERS FOR DELIVERY IN THE
UNITED STATES.
WARRANTY SERVICE
To obtain warranty service if you purchased the covered product directly from W.W. Grainger, Inc. (“Grainger”), (i) write or call or visit the local Grainger
branch from which the product was purchased or another Grainger branch near you (see www.grainger.com for a listing of Grainger branches); or (ii) contact
Grainger by going to www.grainger.com and clicking on the “Contact Us” link at the top of the page, then clicking on the “Email us” link; or (iii) call Customer
Care (toll free) at 1-888-361-8649. To obtain warranty service if you purchased the covered product from another distributor or retailer, (i) go to
www.grainger.com for Warranty Service; (ii) write or call or visit a Grainger branch near you; or (iii) call Customer Care (toll free) at 1-888-361-8649. In any
case, you will need to provide, to the extent available, the purchase date, the original invoice number, the stock number, a description of the defect, and
anything else specified in this Speedaire One-Year Limited Warranty. You may be required to send the product in for inspection at your cost. You can follow
up on the progress of inspections and corrections in the same ways.Title and risk of loss pass to buyer on delivery to common carrier, so if product was
damaged in transit to you, file claim with carrier, not the retailer, Grainger or Dayton. For warranty information for purchasers andIor delivery outside the
United States, please contact:
Dayton Electric Mfg. Co.,
100 Grainger Parkway, Lake Forest, IL 60045 U.S.A. or
call +1-888-361-8649

Manual de instrucciones operativas y de las piezas ES
Carrete de
manguera de
función general
Modelos 437J36A, 437J37A
SPEEDAIRE ONE-YEAR LIMITED WARRANTY
SPEEDAIRE ONE-YEAR LIMITED WARRANTY.
All Speedair
@
product models covered in this manual are warranted by Dayton Electric Mfg. Co.
(“Dayton”) to the original user against defects in workmanship or materials under normal use for one year after date of purchase. If the Speedair Product
is part of a set, only the portion that is defective is subject to this warranty. Any product or part which is determined to be defective in material or
workmanship and returned to an authorized service location, as Dayton or Dayton’s designee designates, shipping costs prepaid, will be, as the exclusive
remedy, repaired or replaced with a new or reconditioned product or part of equal utility or a full refund given, at Dayton’s or Dayton’s designee’s option,
at no charge. For limited warranty claim procedures, see “Warranty Service” below. This warranty is void if there is evidence of misuse, mis-repair,
mis-installation, abuse or alteration. This warranty does not cover normal wear and tear of Speedair Products or portions of them, or products or portions
of them which are consumable in normal use. This limited warranty gives purchasers specific legal rights, and you may also have other rights which vary
from jurisdiction to jurisdiction.
WARRANTY DISCLAIMERS AND LIMITATIONS OF LIABILITY RELATING TO ALL CUSTOMERS FOR ALL PRODUCTS
LIMITATION OF LIABILITY. TO THE EXTENT ALLOWABLE UNDER APPLICABLE LAW, DAYTON’S LIABILITY FOR CONSEQUENTIAL AND INCIDENTAL
DAMAGES IS EXPRESSLY DISCLAIMED. DAYTON’S LIABILITY IN ALL EVENTS IS LIMITED TO AND SHALL NOT EXCEED THE PURCHASE PRICE
PAID.
WARRANTY DISCLAIMER.
A DILIGENT EFFORT HAS BEEN MADE TO PROVIDE PRODUCT INFORMATION AND ILLUSTRATE THE SPEEDAIRE
PRODUCTS IN THIS LITERATURE ACCURATELY; HOWEVER, SUCH INFORMATION AND ILLUSTRATIONS ARE FOR THE SOLE PURPOSE OF
IDENTIFICATION, AND DO NOT EXPRESS OR IMPLY A WARRANTY THAT THE SPEEDAIRE PRODUCTS ARE MERCHANTABLE, OR FIT FOR A
PARTICULAR PURPOSE, OR THAT THE SPEEDAIRE PRODUCTS WILL NECESSARILY CONFORM TO THE ILLUSTRATIONS OR DESCRIPTIONS.EX-
CEPT AS PROVIDED BELOW, NO WARRANTY OR AFFIRMATION OF FACT, EXPRESSED OR IMPLIED, OTHER THAN AS STATED IN THE “LIMITED
WARRANTY” ABOVE IS MADE OR AUTHORIZED BY DAYTON.
PRODUCT SUITABILITY.
MANY JURISDICTIONS HAVE CODES AND REGULATIONS GOVERNING SALES, CONSTRUCTION, INSTALLATION,
ANDI OR USE OF PRODUCTS FOR CERTAIN PURPOSES, WHICH MAY VARY FROM THOSE IN NEIGHBORING AREAS. WHILE ATTEMPTS ARE
MADE TO ASSURE THAT SPEEDAIRE PRODUCTS COMPLY WITH SUCH CODES, DAYTON CANNOT GUARANTEE COMPLIANCE, AND CANNOT BE
RESPONSIBLE FOR HOW THE PRODUCT IS INSTALLED OR USED. BEFORE PURCHASE AND USE OF A PRODUCT, REVIEW THE SAFETYI
SPECIFICATIONS, AND ALL APPLICABLE NATIONAL AND LOCAL CODES AND REGULATIONS, AND BE SURE THAT THE SPEEDAIRE PRODUCT,
INSTALLATION, AND USE WILL COMPLY WITH THEM.
CONSUMERS ONLY.
CERTAIN ASPECTS OF DISCLAIMERS ARE NOT APPLICABLE TO CONSUMER PRODUCTS SOLD TO CONSUMERS; (A)
SOME JURISDICTIONS DO NOT ALLOW THE EXCLUSION OR LIMITATION OF INCIDENTAL OR CONSEQUENTIAL DAMAGES, SO THE ABOVE
LIMITATION OR EXCLUSION MAY NOT APPLY TO YOU; (B) ALSO, SOME JURISDICTIONS DO NOT ALLOW A LIMITATION ON HOW LONG AN
IMPLIED WARRANTY LASTS, SO THE ABOVE LIMITATION MAY NOT APPLY TO YOU; AND (C) BY LAW, DURING THE PERIOD OF THIS LIMITED
WARRANTY, ANY IMPLIED WARRANTIES OF MERCHANTABILITY OR FITNESS FOR A PARTICULAR PURPOSE APPLICABLE TO CONSUMER
PRODUCTS PURCHASED BY CONSUMERS, MAY NOT BE EXCLUDED OR OTHERWISE DISCLAIMED.
THIS LIMITED WARRANTY ONLY APPLIES TO SPEEDAIRE PRODUCTS PURCHASED BY UNITED STATES PURCHASERS FOR DELIVERY IN THE
UNITED STATES.
WARRANTY SERVICE
To obtain warranty service if you purchased the covered product directly from W.W. Grainger, Inc. (“Grainger”), (i) write or call or visit the local Grainger
branch from which the product was purchased or another Grainger branch near you (see www.grainger.com for a listing of Grainger branches); or (ii) contact
Grainger by going to www.grainger.com and clicking on the “Contact Us” link at the top of the page, then clicking on the “Email us” link; or (iii) call Customer
Care (toll free) at 1-888-361-8649. To obtain warranty service if you purchased the covered product from another distributor or retailer, (i) go to
www.grainger.com for Warranty Service; (ii) write or call or visit a Grainger branch near you; or (iii) call Customer Care (toll free) at 1-888-361-8649. In any
case, you will need to provide, to the extent available, the purchase date, the original invoice number, the stock number, a description of the defect, and
anything else specified in this Speedaire One-Year Limited Warranty. You may be required to send the product in for inspection at your cost. You can follow
up on the progress of inspections and corrections in the same ways.Title and risk of loss pass to buyer on delivery to common carrier, so if product was
damaged in transit to you, file claim with carrier, not the retailer, Grainger or Dayton. For warranty information for purchasers andIor delivery outside the
United States, please contact:
Dayton Electric Mfg. Co.,
100 Grainger Parkway, Lake Forest, IL 60045 U.S.A. or
call +1-888-361-8649
# de modelo:
# de serie:
# de fecha de compra:
Impreso en Corea
Versión 0 12 /2017
© 2013 Dayton Electric Manufacturing Co.
Todos los derechos reservados
POR FAVOR, LEA Y GUARDE
ESTAS INSTRUCCIONES.
LEA CON ATENCIÓN
ANTES DE INTENTAR
ENSAMBLAR, INSTALAR,
OPERAR O MANTENER EL
PRODUCTO DESCRIPTO.
PROTÉJASE Y PROTEJA A
OTROS AL CUMPLIR CON TODA LA
INFORMACIÓN DE SEGURIDAD.
¡EL INCUMPLIMIENTO DE LAS INSTRUCCIONES
PODRÍA OCASIONAR LESIONES PERSONALES Y /
O DAÑO A LA PROPIEDAD!
GUARDE LAS INSTRUCCIONES
PARA FUTURA REFERENCIA.
POR FAVOR, CONSULTE
LA CONTRATAPA PARA
OBTENER INFORMACIÓN ACERCA DE
LA GARANTÍA DE SPEEDAIRE Y
OTRA INFORMACIÓN
IMPORTANTE.
1
ANTES DE COMENZAR
Herramientas necesarias :
DESEMPAQUE
Contenidos :
Inspeccione :
●Después de desembalar el carril, inspeccione cuidadosamente para detectar cualquier daño
que pueda haber ocurrido durante el tránsito.
Verifique si hay piezas sueltas, faltantes o dañadas. Las reclamaciones de daños de envío se
deben presentar al transportista.
● Llave inglesa ajustable para la instalación
● Destornillador
● Carrete de manguera Speedaire
®
(1)
● Manual de instrucciones operativas y de piezas (1)
●
Consulte las Instrucciones de seguridad generales en la página 2 y las precauciones y
advertencias que se muestran.
CÓMO COMENZAR SEGURIDAD /
ESPECIFICACIONES FUNCIONAMIENTO
MONTAJE /
INSTALACIÓN
SOLUCIÓN DE
PROBLEMAS
MANTENIMIENTO /
REPARACIÓN
# de modelo:
# de serie:
# de fecha de compra:
Impreso en Corea
Versión 0 12 /2017
© 2013 Dayton Electric Manufacturing Co.
Todos los derechos reservados
POR FAVOR, LEA Y GUARDE
ESTAS INSTRUCCIONES.
LEA CON ATENCIÓN
ANTES DE INTENTAR
ENSAMBLAR, INSTALAR,
OPERAR O MANTENER EL
PRODUCTO DESCRIPTO.
PROTÉJASE Y PROTEJA A
OTROS AL CUMPLIR CON TODA LA
INFORMACIÓN DE SEGURIDAD.
¡EL INCUMPLIMIENTO DE LAS INSTRUCCIONES
PODRÍA OCASIONAR LESIONES PERSONALES Y /
O DAÑO A LA PROPIEDAD!
GUARDE LAS INSTRUCCIONES
PARA FUTURA REFERENCIA.
POR FAVOR, CONSULTE
LA CONTRATAPA PARA
OBTENER INFORMACIÓN ACERCA DE
LA GARANTÍA DE SPEEDAIRE Y
OTRA INFORMACIÓN
IMPORTANTE.

2
INSTRUCCIONES GENERALES DE SEGURIDAD
Lea las siguientes precauciones e instrucciones antes de comenzar a ensamblar o usar.
PRECAUCIÓN
PRECAUCIÓN
PRECAUCIÓN
PRECAUCIÓN
PRECAUCIÓN
En lo que se refiere a la presión de entrada, no exceda la presión máxima
del carrete.
Use una manguera flexible para conectar la entrada y no use plomería
rígida.
Asegúrese de que la presión de la línea no exceda la presión de
operación nominal del carrete de la manguera, consulte las especifica-
ciones.
La exposición de la piel directamente al aire o al fluido presurizado
podría ocasionar lesiones corporales graves.
Antes de realizar cualquier tarea de mantenimiento, apague y
desconecte la línea de suministro al carrete y libere con cuidado la
presión de la línea de la manguera.
CÓMO COMENZAR
SEGURIDAD /
ESPECIFICACIONES
FUNCIONAMIENTO MONTAJE /
INSTALACIÓN
SOLUCIÓN DE
PROBLEMAS
MANTENIMIENTO /
REPARACIÓN

3
A (pulgada)
B (pulgada)
C (pulgada)
D (pulgada)
E (pulgada)
F (pulgada)
G(pulgada)
15-3/4
5-29/32
13-25/32
12-39/64
2-23/64
4-21/64
15/32
21-21/32
11-13/16
13-25/32
12-39/64
2-23/64
10-15/64
15/32
Máxima presión de
funcionamiento (PSI)
ID de la Manguera
(pulgada)
Longitud de la manguera
(pies)
Peso
(libras)
Fin del carrete
NPT Macho (pulgada)
16 18
Salida del carrete
NPT Hembra (pulgada)
Máximas temperaturas de
funcionamiento (°F)
Entrada del carrete
NPT hembra (pulgada)
ESPECIFICACIONES
Figura 1
437J37A
437J36A
300
0
/
/
/
Aplicaciones
Material de la carcasa
Color de la carcasa
Aire, agua
ACERO
Verde
Aire, agua
ACERO
Verde
CÓMO COMENZAR SEGURIDAD /
ESPECIFICACIONES FUNCIONAMIENTO
MONTAJE /
INSTALACIÓN
SOLUCIÓN DE
PROBLEMAS
MANTENIMIENTO /
REPARACIÓN
2
INSTRUCCIONES GENERALES DE SEGURIDAD
Lea las siguientes precauciones e instrucciones antes de comenzar a ensamblar o usar.
PRECAUCIÓN
PRECAUCIÓN
PRECAUCIÓN
PRECAUCIÓN
PRECAUCIÓN
En lo que se refiere a la presión de entrada, no exceda la presión máxima
del carrete.
Use una manguera flexible para conectar la entrada y no use plomería
rígida.
Asegúrese de que la presión de la línea no exceda la presión de
operación nominal del carrete de la manguera, consulte las especifica-
ciones.
La exposición de la piel directamente al aire o al fluido presurizado
podría ocasionar lesiones corporales graves.
Antes de realizar cualquier tarea de mantenimiento, apague y
desconecte la línea de suministro al carrete y libere con cuidado la
presión de la línea de la manguera.
CÓMO COMENZAR
SEGURIDAD /
ESPECIFICACIONES
FUNCIONAMIENTO MONTAJE /
INSTALACIÓN
SOLUCIÓN DE
PROBLEMAS
MANTENIMIENTO /
REPARACIÓN

4
MONTAJE INSTALACIONES
Típica posición de montaje
Montaje en el suelo
Figura 2
ADVERTENCIA
1 Desempaque e inspeccione el carrete para verificar que no haya ningún daño.
Gire el carrete a mano para verificar si el carrete funciona o no funciona correctamente.
2 Coloque las herramientas de montaje en el piso para que el carrete pueda sujetarse a su
posición. Ajuste el carrete y ajuste todas las herramientas de forma segura.
3 El carrete se suministra con manivela de plástico para evitar daños en movimiento,
la manivela está embalada plegada. Cuando use la manivela, por favor despliéguela.
4 Aplique sellador de roscas en la manguera de entrada y conéctelo a la junta giratoria del
carrete
Cuando el carrete está montado en el suelo,
se debe montar correctamente.
Si se saca la manguera cuando el carrete no está montado correctamente,
el carrete se puede caer y se puede dañar.
CÓMO COMENZAR
SEGURIDAD /
ESPECIFICACIONES
FUNCIONAMIENTO MONTAJE /
INSTALACIÓN
SOLUCIÓN DE
PROBLEMAS
MANTENIMIENTO /
REPARACIÓN
5
GUÍA PARA RESOLVER PROBLEMAS
Síntoma Causa (s) posible (s) Acción correctiva
Fuga de aire 1. Manguera de entrada
desgastada
2. Junta tórica desgastada
3. Problema del acoplador
1. Ajuste la abrazadera de la manguera o
reemplace la manguera
2. Reemplace la junta tórica
3. Ajuste o reemplace el acoplador
Fugas de fluido del
pivote
1. Las juntas giratorias están
dañadas o desgastadas.
1. Reemplace los sellos giratorios.
Consulte el “reemplazo del sello giratorio”
Advertencia : ¡asegúrese de que la fuga no esté
en la conexión de la manguera!
El conjunto giratorio
no se mueve
libremente o se
bloquea
1. Se ha apretado
demasiado la conexión de la
manguera de entrada
2. La manguera de entrada
no es flexible y causa fuerza
lateral en el pivote.
1. Retire y examine el montaje giratorio para
ver si hay daños. Reemplace si es necesario.
Ajuste debidamente la manguera de entrada.
Ajuste a mano la conexión, más 1/2 giro con
la llave inglesa.
La manguera / cable
no encajará
completamente en el
tambor del carrete
1. La manguera / cable es más
larga que la especificada.
2. El diámetro exterior de la
manguera es más grande
que la especificación.
3. La manguera / cable no se
colocó manualmente sobre
el carrete y se levantaba de
manera uniforme sobre el
tambor.
1. Corte la manguera / cable para cumplir con la
capacidad especificada de los carretes
2. Reemplace la manguera / cable con una
manguera que cumpla con los requisitos
máximos de diámetro exterior especificados.
3. Coloque manualmente la manguera / cable en
el tambor para envolver de manera uniforme
como lo haría en el carrete.
CÓMO COMENZAR SEGURIDAD /
ESPECIFICACIONES FUNCIONAMIENTO
MONTAJE /
INSTALACIÓN
SOLUCIÓN DE
PROBLEMAS
MANTENIMIENTO /
REPARACIÓN
4
MONTAJE INSTALACIONES
Típica posición de montaje
Montaje en el suelo
Figura 2
ADVERTENCIA
1 Desempaque e inspeccione el carrete para verificar que no haya ningún daño.
Gire el carrete a mano para verificar si el carrete funciona o no funciona correctamente.
2 Coloque las herramientas de montaje en el piso para que el carrete pueda sujetarse a su
posición. Ajuste el carrete y ajuste todas las herramientas de forma segura.
3 El carrete se suministra con manivela de plástico para evitar daños en movimiento,
la manivela está embalada plegada. Cuando use la manivela, por favor despliéguela.
4 Aplique sellador de roscas en la manguera de entrada y conéctelo a la junta giratoria del
carrete
Cuando el carrete está montado en el suelo,
se debe montar correctamente.
Si se saca la manguera cuando el carrete no está montado correctamente,
el carrete se puede caer y se puede dañar.
CÓMO COMENZAR
SEGURIDAD /
ESPECIFICACIONES
FUNCIONAMIENTO MONTAJE /
INSTALACIÓN
SOLUCIÓN DE
PROBLEMAS
MANTENIMIENTO /
REPARACIÓN
6
INSTRUCCIONES DE MANTENIMIENTO E INSPECCIÓN
Inspección de fugas
●Retire el carrete del pivote.
●Retire el anillo de plástico con las pinzas específicas.
●Retire el pivote tirando hacia el usuario.
●Ajuste el Nuevo pivote al carrete.
●Ajuste el anillo de plástico al nuevo pivote con las pinzas específicas.
●Conecte la entrada de la manguera al nuevo pivote.
Reemplazo del sellado del pivote
ADVERTENCIA
ADVERTENCIA
Cualquier reparación o reemplazo las debe realizar solamente una persona
calificada o un centro de servicio autorizado.
Se debe realizar una inspección de manera periódica. Asimismo,
se debe actualizar de manera periódica el registro de mantenimiento.
Cuando ocurre un problema, se debe reparar después de liberar la presión.
En lo que respecta al medio (fluido) que se utiliza para el carrete de la manguera, se debe realizar una
verificación de fugas de manera periódica.
Después de sacar la manguera, aplique completamente el agua jabonosa en el punto conectado.
(Como armazón o eje).
Si el punto conectado hace burbujas, el usuario debe sospechar un fenómeno de fuga.
● Cuando ocurre una fuga, se debe reemplazar el sellado de la carcasa o del eje.
● Cuando se produce una fuga debido a daños en la manguera, se debe reemplazar la manguera.
CÓMO COMENZAR
SEGURIDAD /
ESPECIFICACIONES
FUNCIONAMIENTO MONTAJE /
INSTALACIÓN
SOLUCIÓN DE
PROBLEMAS
MANTENIMIENTO /
REPARACIÓN
This manual suits for next models
1
Table of contents
Languages:
Other Speedaire Tools manuals


