SPEX 8200 Planetary Mill User manual

Operating Manual
1
1300-87075-1A
8200 Planetary Mill
High-Energy Planetary Ball Mill

Operating Manual
2
1300-87075-1A
Copyright © 2022 by Spex
All rights reserved. No part of the work may be reproduced or transmitted in any form or by any means, elec-
tronic or mechanical; including photocopying and recording, except as may be expressly permitted by the 1976
Copyright Act or in writing from the publisher. Requests for permission should be addressed in writing to Spex,
65 Liberty Street, Metuchen, NJ 08840.

Operating Manual
3
1300-87075-1A
Contents
1.0 Introduction..............................................................................................................................................5
1.1 Disclaimer..................................................................................................................................................................5
2.0 Specifications .........................................................................................................................................6
3.0 Unpacking ...............................................................................................................................................7
4.0 Setting Up................................................................................................................................................8
4.1 Electrical Connection.............................................................................................................................................8
4.2 Standard Safety Features ...................................................................................................................................8
4.3 CE Safety Features ...............................................................................................................................................8
4.4 General Safety .......................................................................................................................................................9
5.0 Touch Screen Display ...........................................................................................................................9
5.1 Logo Screen.............................................................................................................................................................9
5.2 Control Panel...........................................................................................................................................................9
5.3 Changing Settings ............................................................................................................................................... 11
5.4 Saved Protocols ................................................................................................................................................... 11
6.0 Loading the Grinding Jar.................................................................................................................... 13
7.0 Locking the Grinding Jar in the Clamp ............................................................................................ 14
8.0 Balancing the Jar ................................................................................................................................. 14
8.1 Adjusting the counterweight ............................................................................................................................. 14
9.0 Operation............................................................................................................................................... 16
9.1 Mixing and Grinding............................................................................................................................................. 16
9.2 Operating the Door ............................................................................................................................................ 17
9.3 Running the Planetary Mill ................................................................................................................................ 17
9.4 Emptying and Cleaning the Grinding Jar...................................................................................................... 18
9.5 Safety Recommendations................................................................................................................................. 19
10.0 System Settings.................................................................................................................................20
10.1 Run History ..........................................................................................................................................................20
11.0 Maintenance......................................................................................................................................... 21
11.1 Technical Support ................................................................................................................................................ 21
12.0 Error Messages................................................................................................................................... 21
12.1 Door Error ............................................................................................................................................................. 21
12.2 Motor Rate Error................................................................................................................................................22
12.3 Motor Home Error............................................................................................................................................. 22
12.4 Latch Error .......................................................................................................................................................... 22

Operating Manual
4
1300-87075-1A
13.0 Troubleshooting................................................................................................................................. 23
14.0 Warranty .............................................................................................................................................. 24
14.1 Product Specifications...................................................................................................................................... 24
14.2 To Arrange a Return Shipment...................................................................................................................... 24
15.0 Instrument Disposal.......................................................................................................................... 24
16.0 Contact Us .......................................................................................................................................... 25

Operating Manual
5
1300-87075-1A
1.0 Introduction
The Spex 8200 Planetary Mill grinds samples with a mechanical motion rotating the jar in one direction while
the platform, planetary wheel (often referred to as the sun wheel) is rotated in the opposite direction. The
mechanical milling is performed at a 2:1 ratio causing the jar to rotate twice for every single rotation of the sun
wheel. As the jar is moved, the relative centrifugal force is transferred to the grinding balls causing them to move
in a circular motion, into each other and against the jar wall, grinding the sample. Generally, the grinding jar and
grinding balls are made from the same material.
The 8200 Planetary Mill is used for pulverizing rocks, minerals, sand, cement, slag, ceramics, glass, and other
brittle to hard samples.
Functionally described as a high-shearing or a high-energy ball mill, the 8200 Planetary Mill is capable of rapidly
rotating a jar in a circular motion several hundred times a minute. This multipurpose mill is capable of rapidly
reducing hard and brittle samples to analytical fineness, blending powders or making emulsions.
The 8200 Planetary Mill also features a touch screen display, sleek modern design, forced-air cooling, a safety
interlock, and a choice of hardened steel or stainless steel grinding jars and media, which are purchased
separately.
The jar, containing the sample and grinding media, is secured in the clamp and moved energetically in a circular
motion. The circular motion is combined with the rotating movement of the sun wheel, so that the jar appears
to be resembling a planetary movement as it moves. During each rotation of the jar, the balls impact the sample
and the walls of the jar, both milling and mixing the sample. Because of the amplitude and velocity of the clamp’s
movement, each ball develops high centrifugal forces, enough to pulverize the toughest rocks, minerals and
ceramics.
1.1 Disclaimer
While many materials can be safely ground and/or mixed in the 8200 Planetary Mill, some materials pose
hazards and are not appropriate for use with the Planetary Mill. Reactive materials can generate heat and
pressure and are not suitable for use in a closed vessel such as the Planetary Mill jar. Spex is available to oer
guidance to our customers. However, users are responsible for knowledge and understanding of the potential
hazards of the material with which they are working.
Grinding jars do not provide an airtight seal. Purging a jar with an inert gas prior to grinding will not ensure
exclusion of oxygen.

Operating Manual
6
1300-87075-1A
2.0 Specifications
Type of Mill Planetary ball mill, high-energy ball mill
Grinding Containers Canister type jar with multiple balls
Display Touch screen
Grinding Mechanism Grinding balls of hardened steel or stainless steel
Capacity One 500 mL jar or one 250 mL jar
Clamp Speed Adjustable range: 300 to 600 rpm
Clamp and Sun Wheel Motion Circular. Clamp and sun wheel rotate in opposite directions at a 2:1 ratio
Electrical Specifications CE approved. 115 V/230 V, 50/60 Hz
Power Cord 115 V/60 Hz model: 3-prong grounded plug supplied
230 V/50 Hz model: 2-prong European plug supplied
Circuit Breaker Same as ON/OFF switch
Safety Features Door locks while running. Interlock prevents mill from running if door is not
closed. Manual door release latch on top of the unit.
Run Timer Maximum 99 hours (1 cycle), maximum 20 hours (2 – 5 cycles)
Motor
1 ⁄ HP
Maximum speed: 3500 rpm
Maximum power: 220 V
Environment
For indoor use only at a maximum altitude of 6,600 ft (2000 m). Operate at
ambient conditions between 40 ºF (5 ºC) and 104 ºF (40 ºC), with maximum
relative humidity 80% below 88 ºF (31 ºC) decreasing linearly to 50% at
104 ºF (40 ºC). Main supply voltage fluctuations up to 10% of nominal voltage
(115 or 230 volts AC RMS). Pollution degree 1: none or only dry, conductive
pollution occurs.
Weight 250 lb (113 kg) (empty without jar)
Dimensions 21 in x 22 in x 15 in (54 cm x 56 cm x 38 cm)
Operating Manual
7
1300-87075-1A
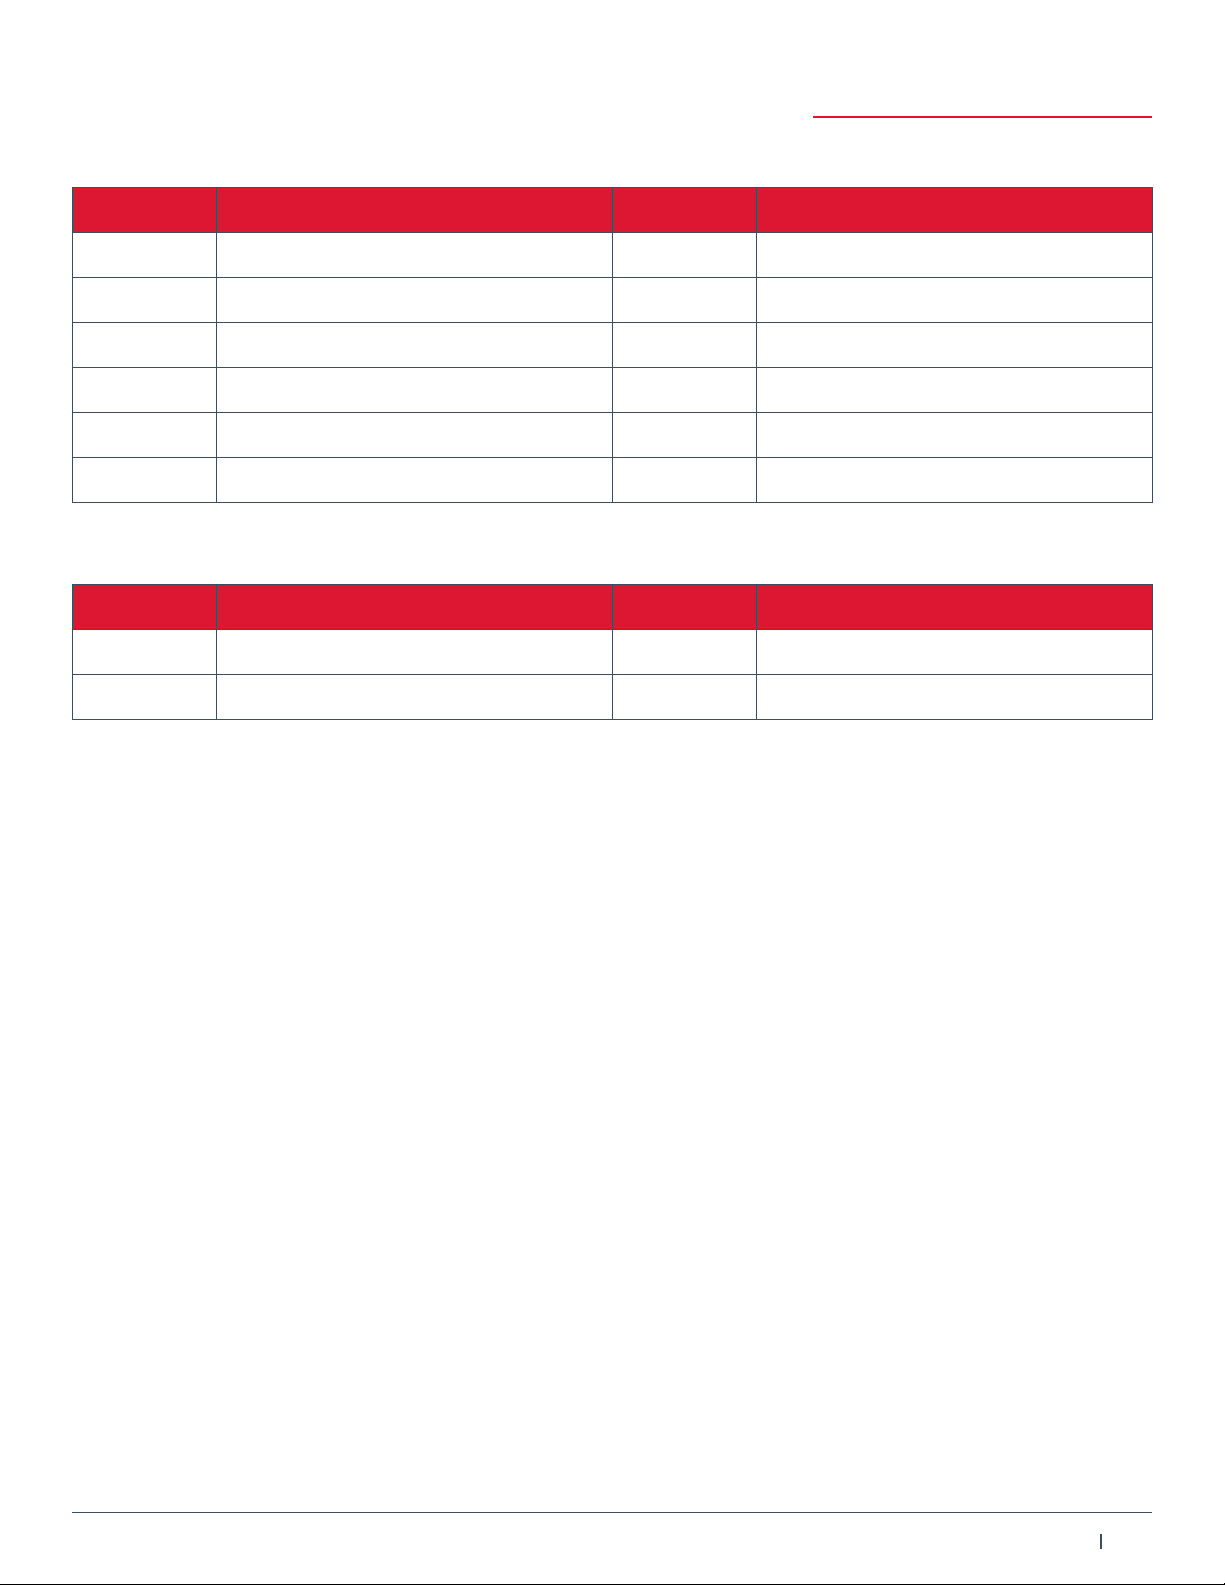
Table 1. Grinding Jars and Grinding Balls Available
Part # Description Part # Description
8211 Hardened Steel Grinding Jar, 250 mL 8227B-30 Stainless Steel Grinding Balls, 30 mm
8221 Hardened Steel Grinding Jar, 500 mL 8227B-40 Stainless Steel Grinding Balls, 40 mm
8217 Stainless Steel Grinding Jar, 250 mL 8221B-10 Hardened Steel Grinding Balls, 10 mm
8227 Stainless Steel Grinding Jar, 500 mL 8221B-20 Hardened Steel Grinding Balls, 20 mm
8227B-10 Stainless Steel Grinding Balls, 10 mm 8221B-30 Hardened Steel Grinding Balls, 30 mm
8227B-20 Stainless Steel Grinding Balls, 20 mm 8221B-40 Hardened Steel Grinding Balls, 40 mm
Table 2. Jar Sieves and Jar O-Rings
Part # Description Part # Description
8240 Jar Sieve for 250 mL Jar 8211S O-Ring for 250 mL Jar
8245 Jar Sieve for 500 mL Jar 8221S O-Ring for 500 mL Jar
3.0 Unpacking
At the factory, the Planetary Mill is adjusted and tested for proper operation, and carefully packaged for
shipping, Upon receipt, carefully inspect the exterior of the packing crate. If there is any visible damage, notify
Spex and file a claim with the carrier immediately.
To unpack the Planetary Mill, loosen and remove the eight wing nuts on the lower edge of the crate (two on
each side) and lift the crate sleeve o the base (this is a 2-person job). Remove loose items from the crate.
Remove any protective plastic cover from the mill. Remove the four hexagonal shipping feet from the bottom of
the crate, unscrewing the hex head screw using a 9/16 in wrench.
CAUTION: The Planetary Mill weights about 250 pounds (113 kg). Be sure to have a mechanical hoist or lifting
equipment on hand when moving the unit.
Follow a logical sequence of steps as you inspect the unit (Figures 1 and 2). For example:
1. Inspect the outside of the cabinet for any visible damage.
2. Inspect the electrical input module and on/o switch for any visible damage.
3. Ensure that the door mechanism is working properly (Section 9.2).
4. Open the door and inspect the interior of the Planetary Mill.
5. Check that the clamp has not been damaged.
6. Inspect the accessory pack. Compare with the packing list.
If everything seems to be in proper order, store the crate and packaging materials in case there is a need to
return the unit for service or repair.
Operating Manual
8
1300-87075-1A
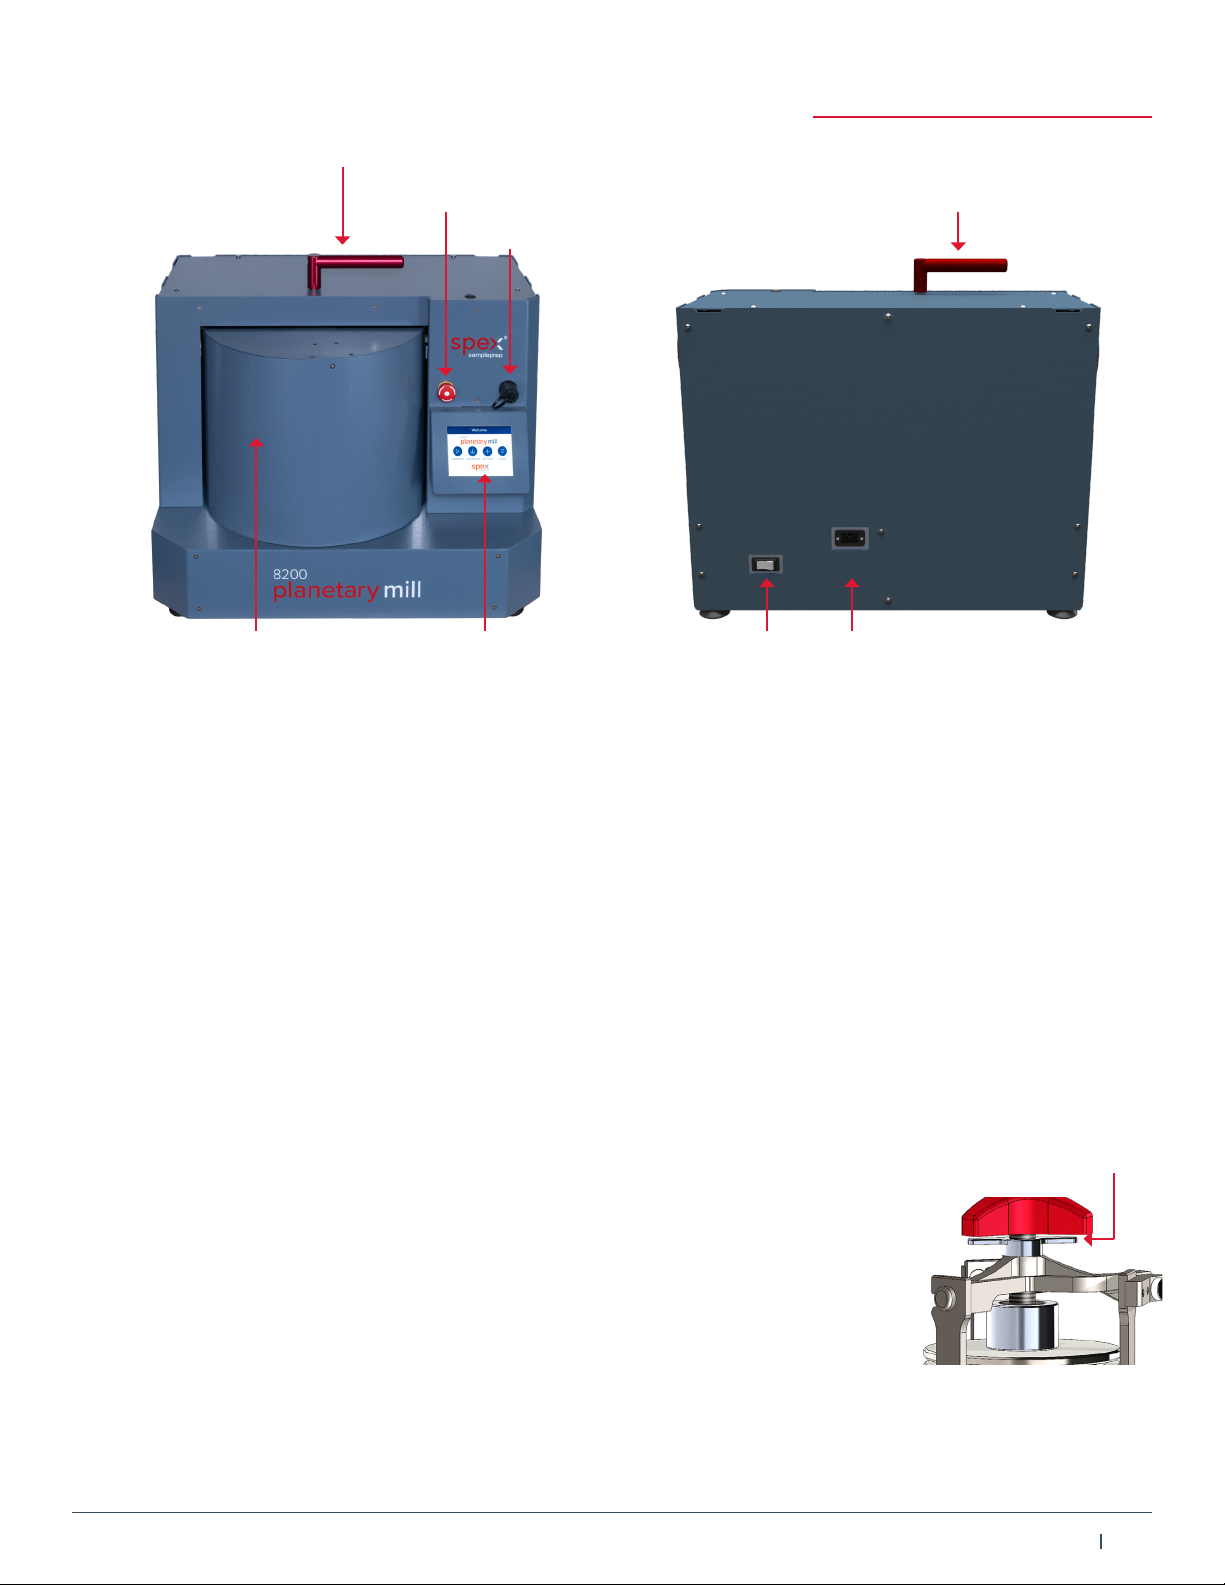
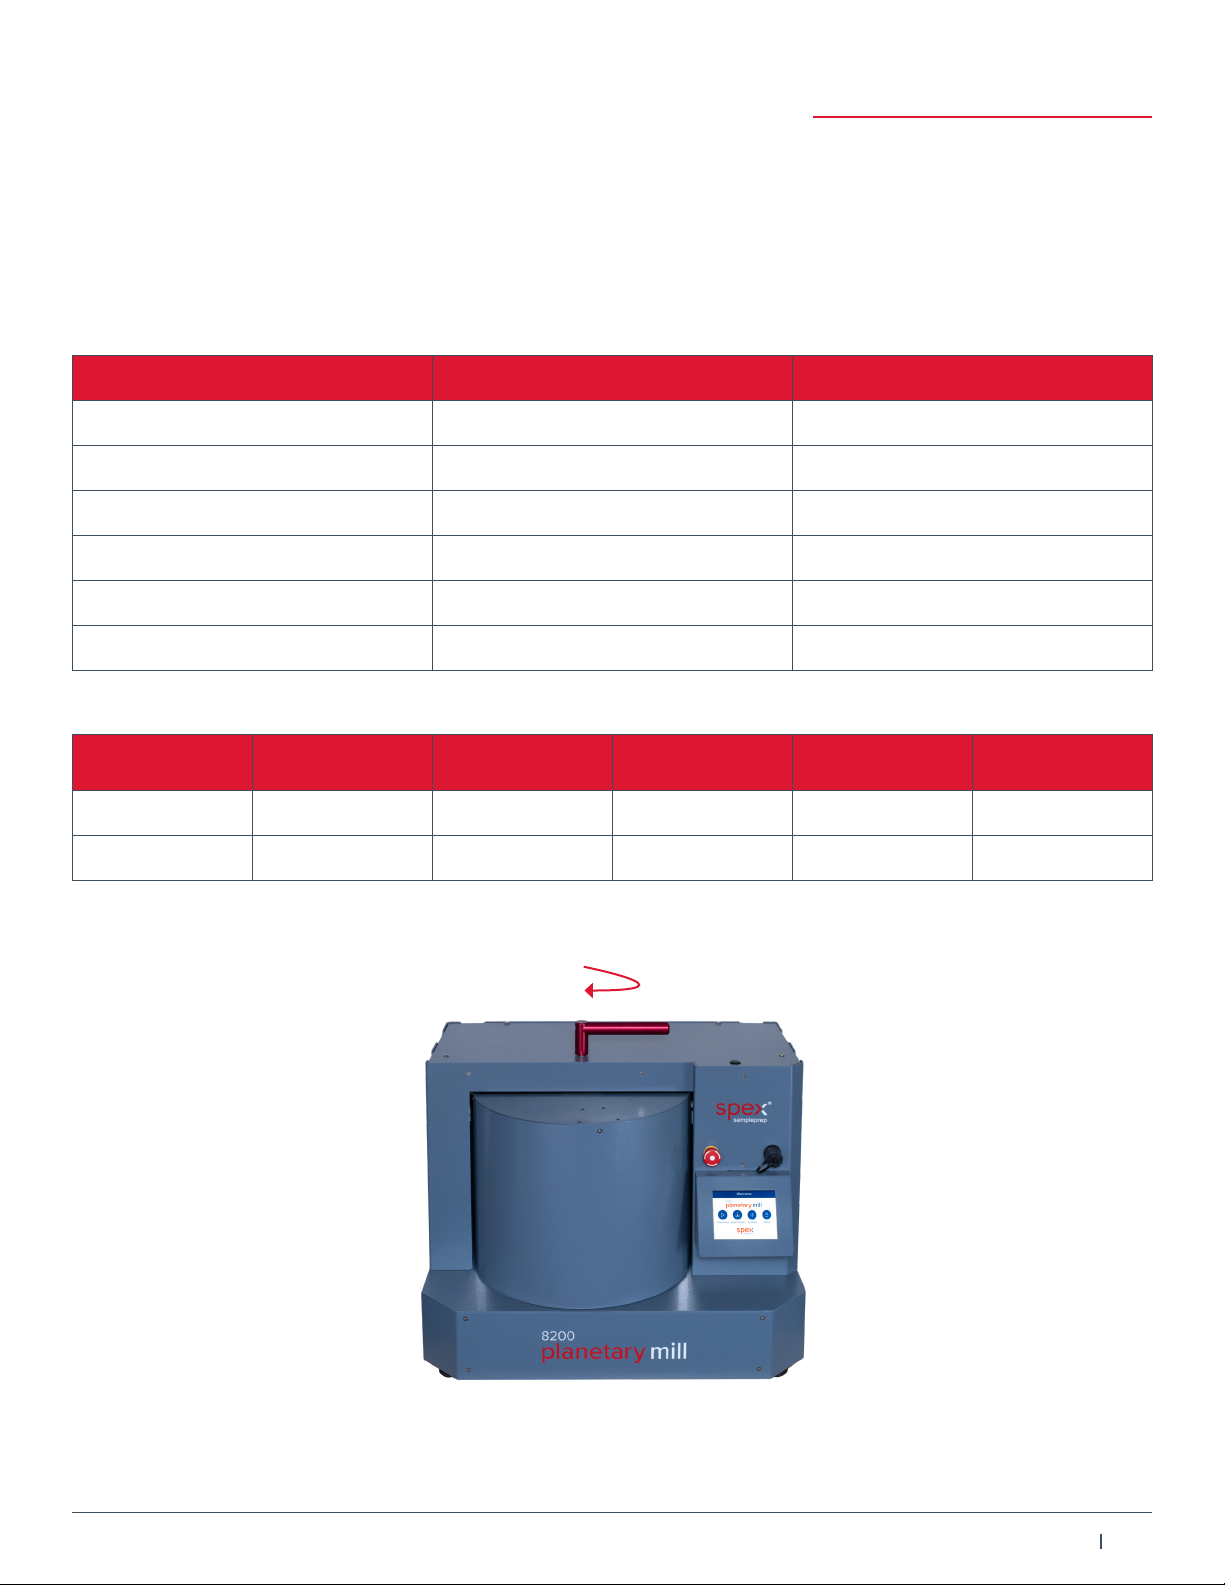
Figure 1. Planetary Mill (front view) Figure 2. Planetary Mill (back view)
Door Handle
Door Handle
Emergency Stop
USB
Control Panel On/O
Switch
Electrical
Inlet
Door (closed)
4.0 Setting Up
The 8200 Planetary Mill weighs 250 lb (113 kg). The door rotates to open and close from left to right with the
handle atop the mill. The electrical input module/power cord receptacle is located on the rear of the Planetary
Mill cabinet towards the bottom (Figure 2). The power on/o button is on the rear next to the electrical inlet. The
manual door release latch is located on the top of the unit at the top right. The touch screen control panel is
axed to the front side of the unit. Above the display of the control panel is an emergency stop button (in red)
and a USB port (black screw-o knob) to export run history or upgrade system software (Figure 1).
4.1 Electrical Connection
The on/o switch (controlling power to the motor and timer), is located at the back of the unit. To turn on the
power, press down-left the bar ( | ) side of the switch. Before plugging in the mill, set the power to o by pressing
down right the circle (O) side of the on/o switch, then plug the power cord into the mill’s power inlet. Plug the
mill into a standard 3-prong grounded electrical outlet; the AC input module and the on/o switch (which also
serves as a circuit breaker) are on the back of the cabinet.
4.2 Standard Safety Features
Clamp Locking Tab: The clamp is opened and closed by a knob on the end of
its threaded shaft. Whenever the clamp is closed on a jar, lock the clamp by first
tightening the locking tab clockwise against the clamp Y-bar (the locking tab is on
the shaft between the knob and the clamp Y-crossbar). When opening the clamp, first
loosen the locking tab.
4.3 CE Safety Features
CE directives require that electricity to the motor and timer be interrupted whenever the door is open, and that
the clamp must stop completely before the door can open.
Safety Interlock: Cuts o power to the motor when the door is open. DO NOT disconnect or damage this switch.
Locking Tab
Operating Manual
9
1300-87075-1A
Time-Delay Rotary Latch: Keeps the door closed while the mill is running, and for 5 seconds after the end of the
run. The Time Delay Rotary Latch, on the right side panel, is powered by an internal motor to engage the latch
actuator in the door. When the mill is started, the Time Delay Rotary Latch locks the door immediately and there
is a delay before the motor starts. When the timer reaches zero at the end of a run, the motor stops, the timer
displays RUN COMPLETE, and the latch stays locked for 5 seconds. At the end of 5 seconds, the latch unlocks
and the timer resets.
NOTE: Never try to force open the door before the Time Delay Rotary Latch unlocks.
4.4 General Safety
CAUTION: Every eort has been made to ensure the 8200 Planetary Mill operates at a moderate
noise level. The intensity of noise is directly impacted by the type if grinding jar, number of balls, size
of balls and sample hardness. Ear protection is recommended.
5.0 Touch Screen Display
The 8200 Planetary Mill is programmed and operated through a series of touch screen displays. Transition
between screens, and all programming and operating commands, are done by touching the screen with a
fingertip or stylus. Do not use a sharp point as this can damage or deface the screen.
5.1 Logo Screen
When the power is switched ON at the front of the mill, “Please Wait” appears during start-up as the software
loads. Then the Spex logo is displayed and a brief animated representation of the Planetary Mill logo. After the
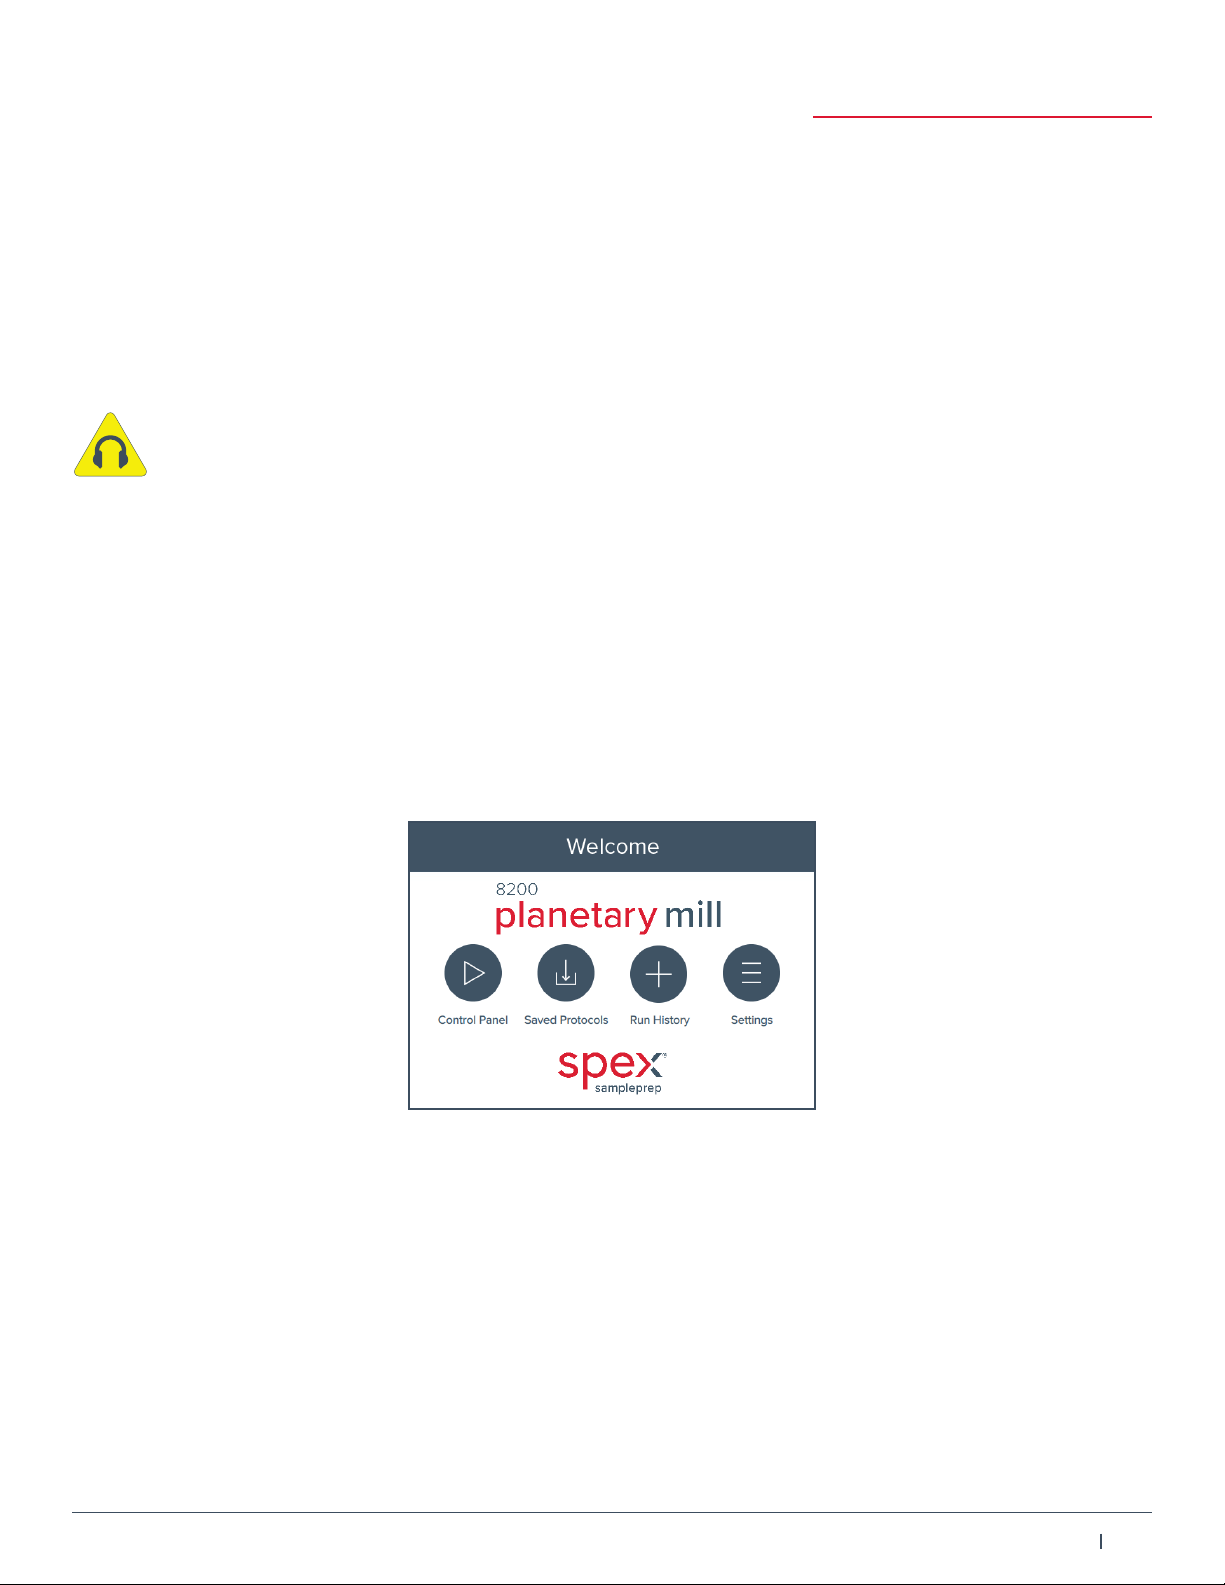
animation has finished, the screen will switch to the Home screen (Figure 3). From the Home screen, the Control
Panel, Run History and Settings can be accessed by touching the buttons displayed.
Figure 3. Home Screen
5.2 Control Panel
The Control Panel displays the programmed run parameters, and the Date and Time at the bottom right of the
screen (Figure 4). Changes to the run settings are made from this screen.
To recall stored run protocols, touch the Store/Recall button located at the bottom right of the screen (see
section 5.4 for more information on Saved Protocols).
The Home screen icon can be found on all screens (e.g. Control Panel) positioned at the top right of the screen.
Touching the Home icon allows the user to return to the Home screen.
Operating Manual
10
1300-87075-1A
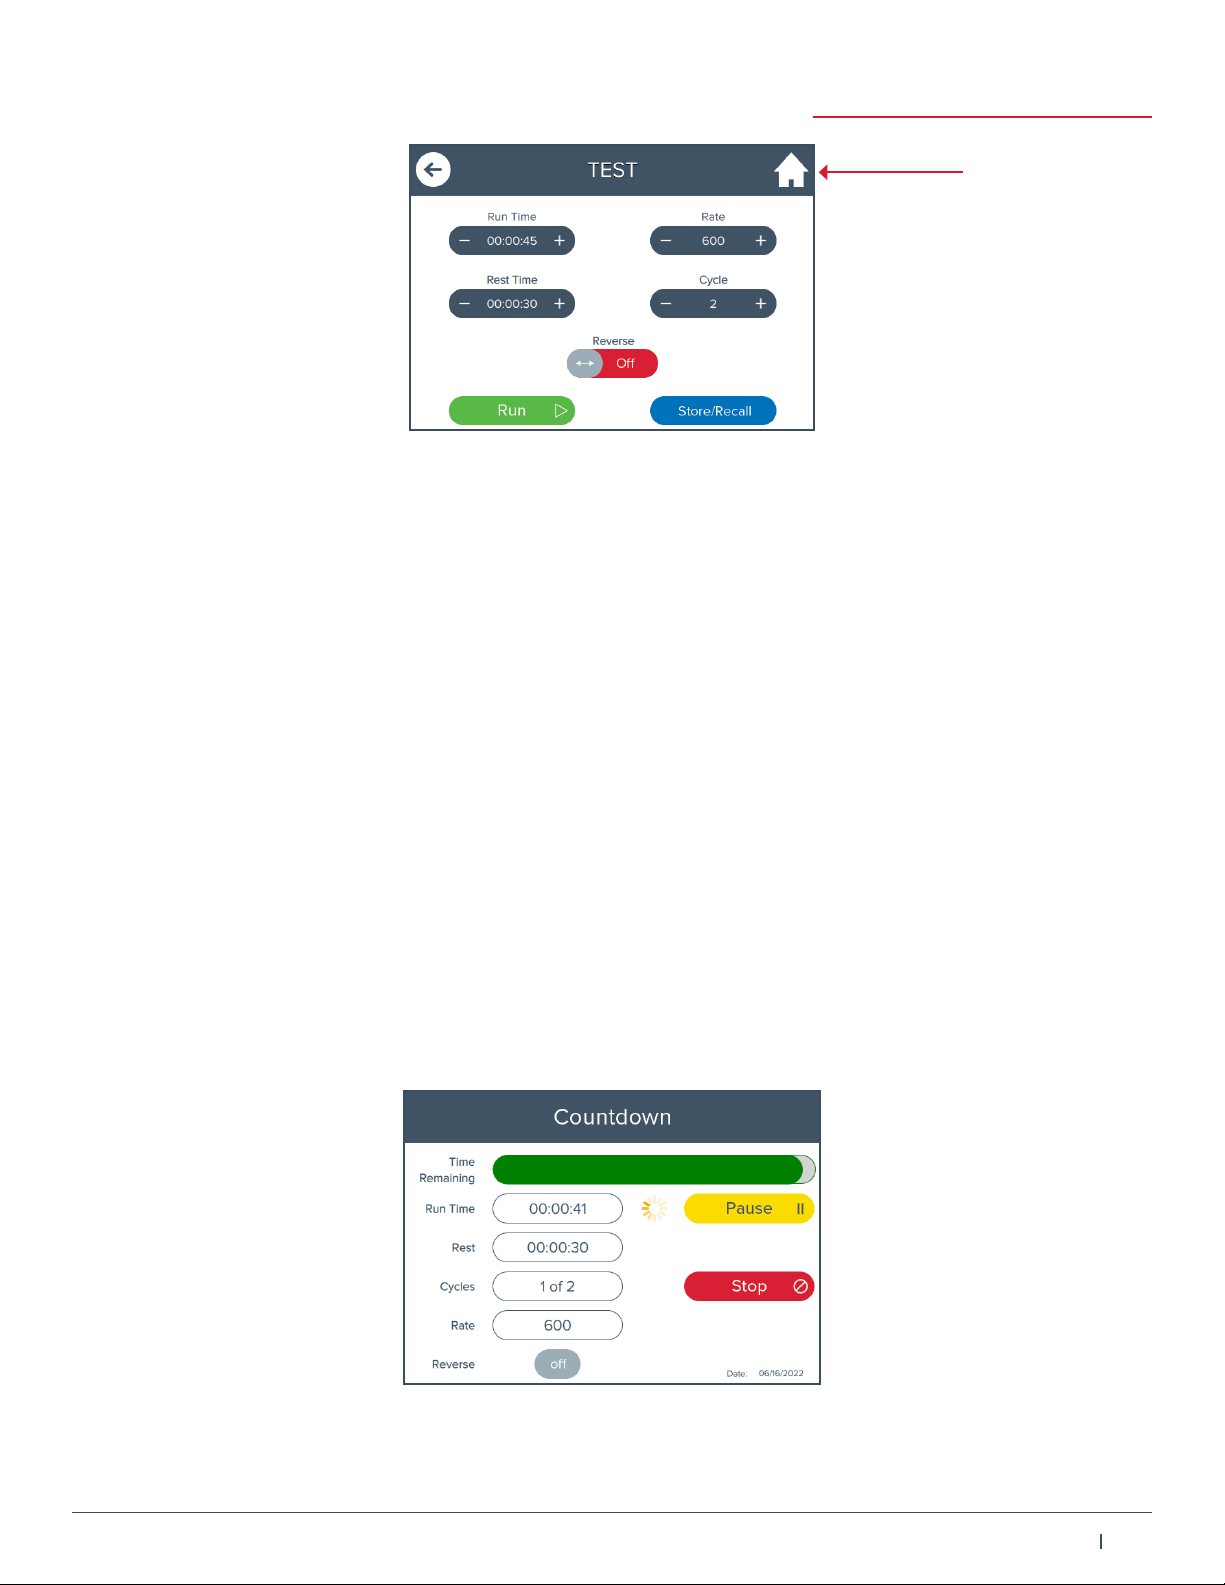
Figure 4. Control Panel
The following sequence of events will occur from the current settings in Figure 4. Note: Reverse directional
motion is o. Turning on the reverse motion (and running for 2 or more cycles) will reverse the planetary wheel
(opposite direction), causing the jar to rotate in the opposite direction. Reversing the motion can improve the
eciency of the grind, allowing the balls to scrape the wall of the jar to remove caked material.
1. Cycle 1 – unit runs for 2 minutes at a rate of 600 rpm.
2. Rest time – the unit is inactive for 30 seconds allowing the sample to dissipate the frictional heat from the
grinding balls.
3. Cycle 2 – unit runs for another 2 minutes at a rate of 600 rpm. Note: If reverse was on (active), the
planetary wheel would reverse every other cycle.
4. The run protocol is complete after Cycle 2.
In the Control Panel, to change the settings of a selected field such as, Run Time, Cycles, Rest Time, and Speed,
press the (+) or (–) buttons on the Control Panel screen. The (–) buttons decrease the number displayed on and
the (+) buttons increase the number displayed.
5.2.1 Starting a Programmed Run
To run the program displayed on the Control Panel screen, touch the Run button. The Planetary Mill can be
stopped, paused and restarted in the middle of a grinding program from the button selections on the right of the
screen.
Figure 5. Run Screen
Home Icon

Operating Manual
11
1300-87075-1A
During the Run Time stage, the Time counts down the time for the preprogrammed run in 1 second increments.
To pause program, touch the Pause button. To continue the program, touch the Resume button (appears when
paused). To abort the program, touch the Stop button. To start a new program, touch the Run button.
5.2.2 Stopping or Pausing a Run
To stop a program, touch the Stop button on the Run screen (Figure 5), the button will dim or turn a muted red
and the program will end. If the Run button is touched after the program has stopped, then the entire program
will start over.
To pause during a grinding program, touch the Pause button. Note: The Pause button will have a dimmed or
muted yellow appearance for a few seconds after the Run button is touched which indicates it is inactive.
After 5 seconds it will turn a brighter yellow indicating it is active. The run will hold the settings at that
moment (elapsed time, cycle, etc.). At this point, the door to the sample area can be opened. To resume the
program, close door and touch the Resume button. This will restart the program at the point at which it was
paused. Alternatively, pressing Stop will end the program.
5.3 Changing Settings
To change parameters (run time, rest time, cycles, and rate), touch the plus (+) or minus (–) buttons on the
Control Panel screen (Figure 4). Touching the plus increases the parameter, while touching the minus decreases
the parameter. Tap or hold the plus or minus buttons until the desired number is reached. The changes will
appear in the area between the arrows (Figure 4). The maximum run time is 99 hours for 1 cycle. If running 2–10
cycles, the maximum run time per cycle is 10 hours. The minimum rest is 15 seconds per cycle for 2–10 cycles. To
run a program with the new settings, touch the Run button.
Note: If the run parameters are changed to a protocol and not saved then (MOD) will appear to the right of the
protocol name at the top center of the screen.
5.4 Saved Protocols
The Saved Protocols screen is shown in Figure 7. Up to 20 protocols can be saved for simple and fast recall,
increasing productivity, and reducing operator error.
A saved program retains the settings for number of cycles, run time, rest time between cycles, and rate. Be sure
to adjust the rate to the desired setting after recalling a stored program.
Figure 7. Saved Protocols Screen
The Default protocol recalls the last programmed run setting that was not saved. The Default protocol can be
changed without saving the new settings, as described in section 5.4. At the top left on the Saved Protocols
screen is the back arrow button. Touching the back arrow button returns the user to the previous screen.
Operating Manual
12
1300-87075-1A
5.4.1 Recalling a Protocol
To recall a stored program, touch the Store/Recall button on the Control Panel screen (Figure 4). In the Saved
Protocols screen, select the protocol to highlight the box. Then touch Select to send protocol to the Control
Panel screen.
5.4.2 Storing a New Protocol
To store a new program, touch the Store/Recall button on the Control Panel screen (Figure 4). In the Saved
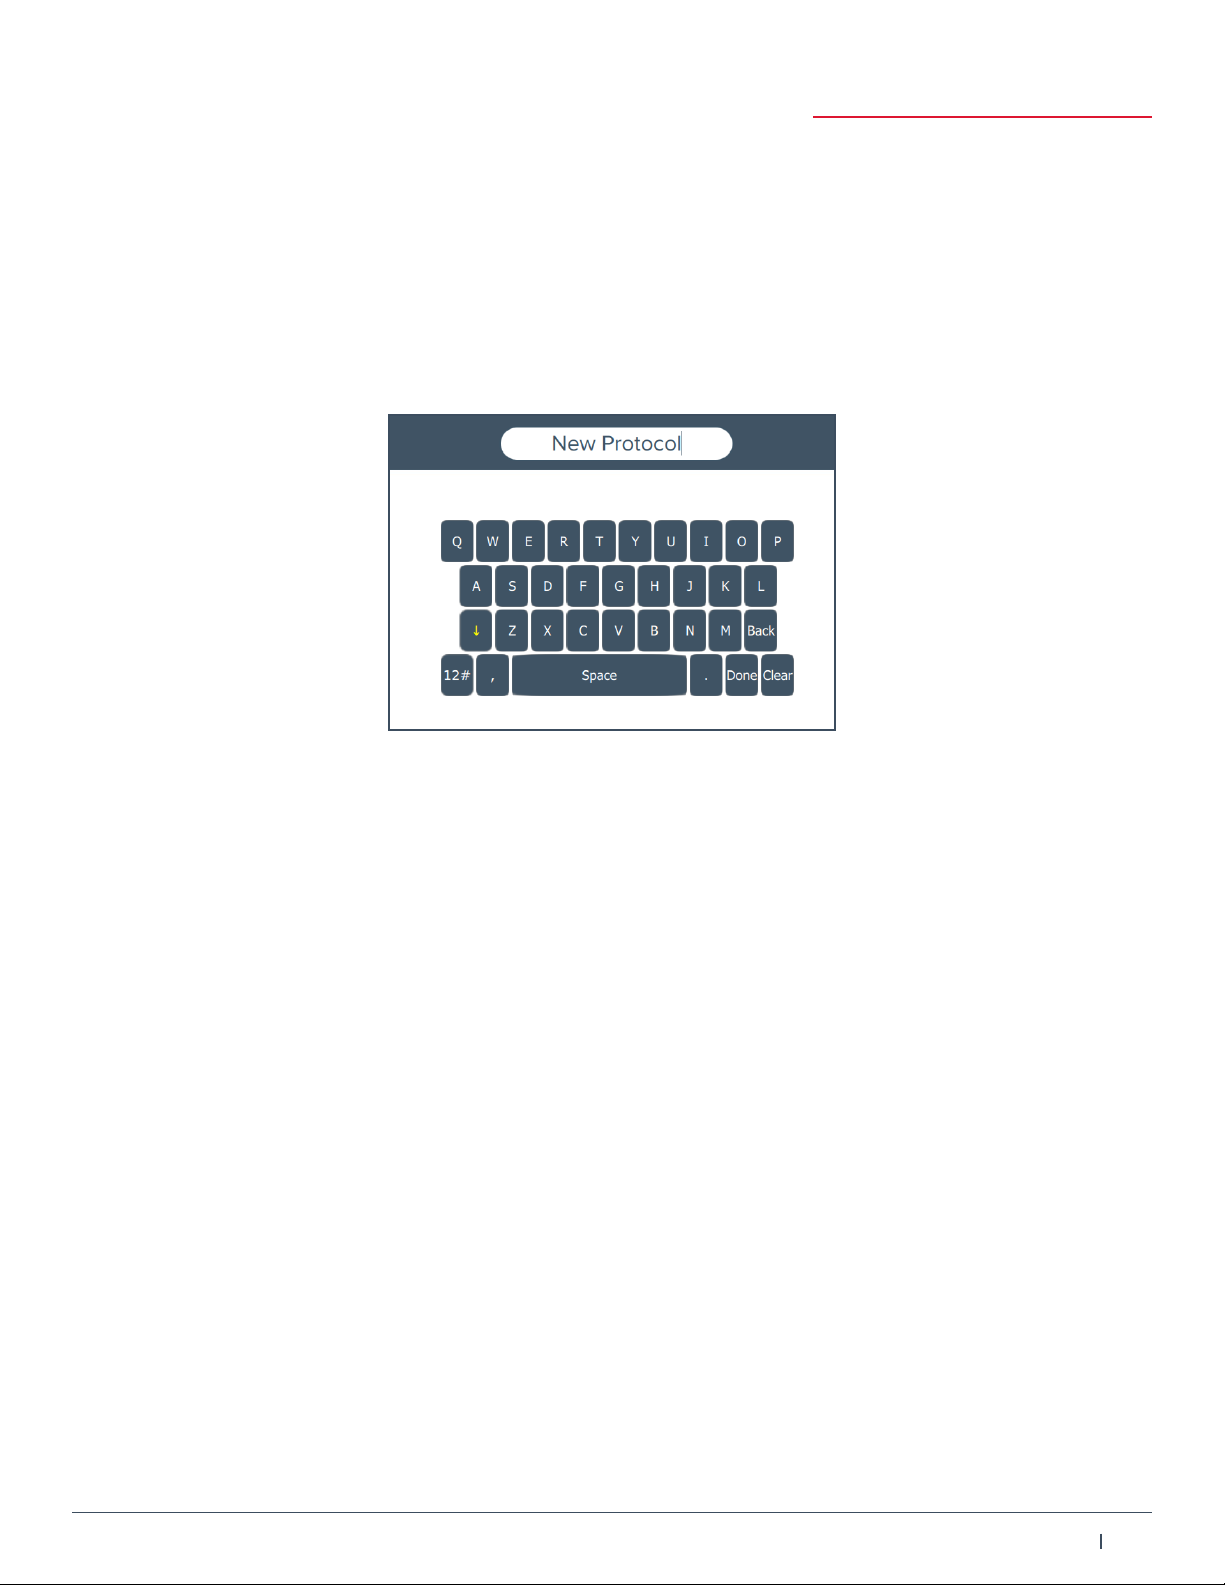
Protocols screen, touch the Add button as shown in Figure 7. This will bring up the Keyboard screen, a simplified
version of the standard keyboard for a computer.
Figure 8. Keyboard Screen
The Clear key deletes whatever has been entered in the label box. Touching the Done key enters the label
shown in the box.
Touch the Save button to save the label shown in the box. The label will appear as the name of the program on
the Saved Protocols screen (Figure 7).
The Cancel key does not change anything on the screen, but returns the display to the Saved Protocols screen.
To run the newly saved protocol, touch the protocol to highlight the box. Then touch Select to send the protocol
to the Control Panel screen. Review the parameters and touch the Run button to initiate the protocol.
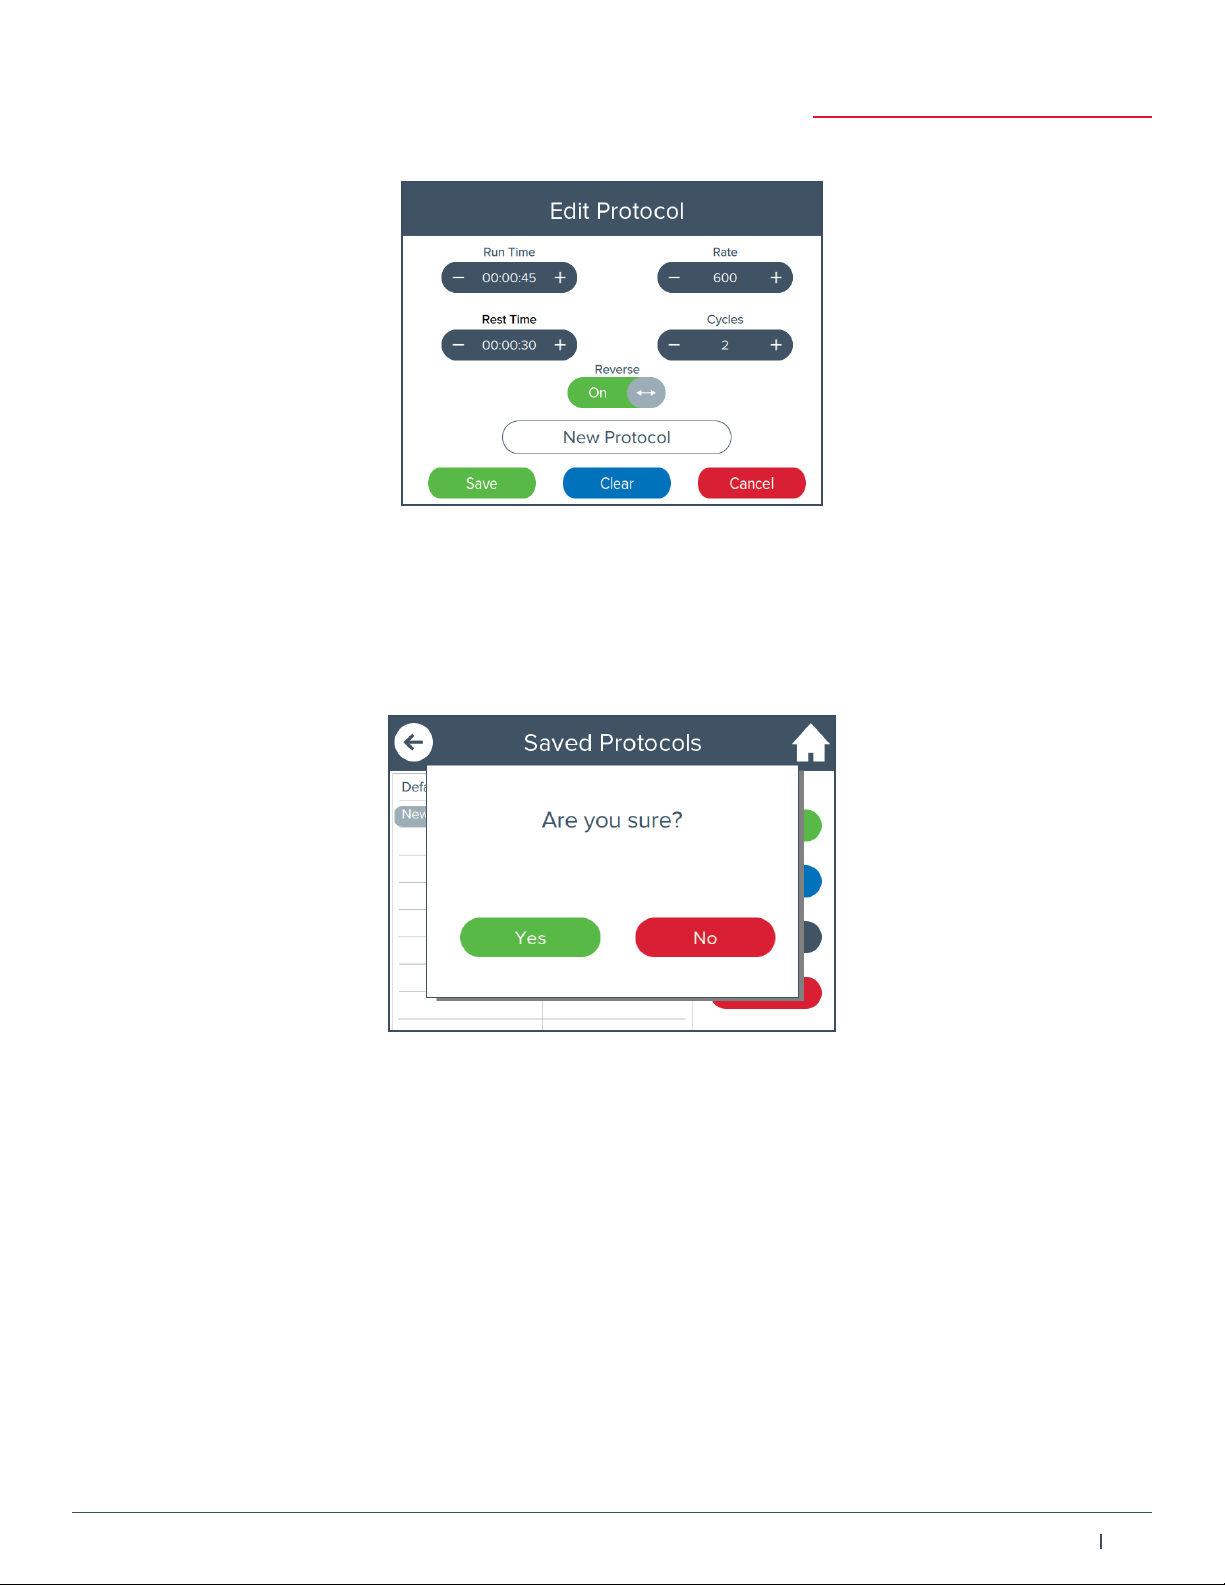
5.4.3 Edit a Protocol
To edit a saved protocol, touch the protocol name to highlight the box on the Saved Protocol screen (Figure 7),
then touch the Edit button. From the Edit Protocol screen, change the name by touching inside the box. This will
bring up the Keyboard screen, follow the instructions listed in the Storing a Protocol section 5.4.2. The run time,
rate, rest time, and cycles can also be adjusted in the Edit Protocol screen.
Operating Manual
13
1300-87075-1A
Figure 9. Edit Protocol Screen
5.4.4 Delete a Protocol
To delete a saved program, touch the protocol name to highlight the name on the Saved Protocols screen
(Figure 7). Then touch the Delete button. A pop-up window opens confirming to delete this protocol. Touch Yes
to delete the protocol or touch No to keep the saved protocol.
Figure 10. Delete Confirmation Screen
5.4.5 Modify a Recalled Protocol
Once a saved protocol is recalled to the Control Panel screen, the user can modify the parameters by using the
left and right arrows. If the protocol is modified, (MOD) will appear next to the protocol name, e.g. Shale Rock
(MOD).
6.0 Loading the Grinding Jar
Before using a planetary mill grinding jar, check to make sure that it is clean and that the O-ring is in good
condition. The sample should be crushed to proper feed size before it is loaded into the jar, approximately ⁄-
inch to ⁄-inch for the steel jars.
Place the sample in the grinding jar FIRST, then the grinding balls and apply the cover (firmly seated). Do not
overload the grinding jar. Recommended sample amounts for 500 mL jar (100 g to 225 g) and for
250 mL (50 g to 100 g). Additional information on grinding and mixing is in Section 9.1.
Operating Manual
14
1300-87075-1A
7.0 Locking the Grinding Jar in the Clamp
Lock the Clamp Assembly before running the unit. It is essential that samples are securely locked into
the clamp assembly before operation.
The clamp locking knob is the most critical component of the Planetary Mill, as it must be carefully adjusted to
hold the jar firmly in place. The rotation motion of the clamp is extremely vigorous. The jar must be held securely
in the clamp during operation to prevent damage and leakage.
The clamp base has two dierent size pins, designed to specifically fit in the two holes on the bottom of the jar.
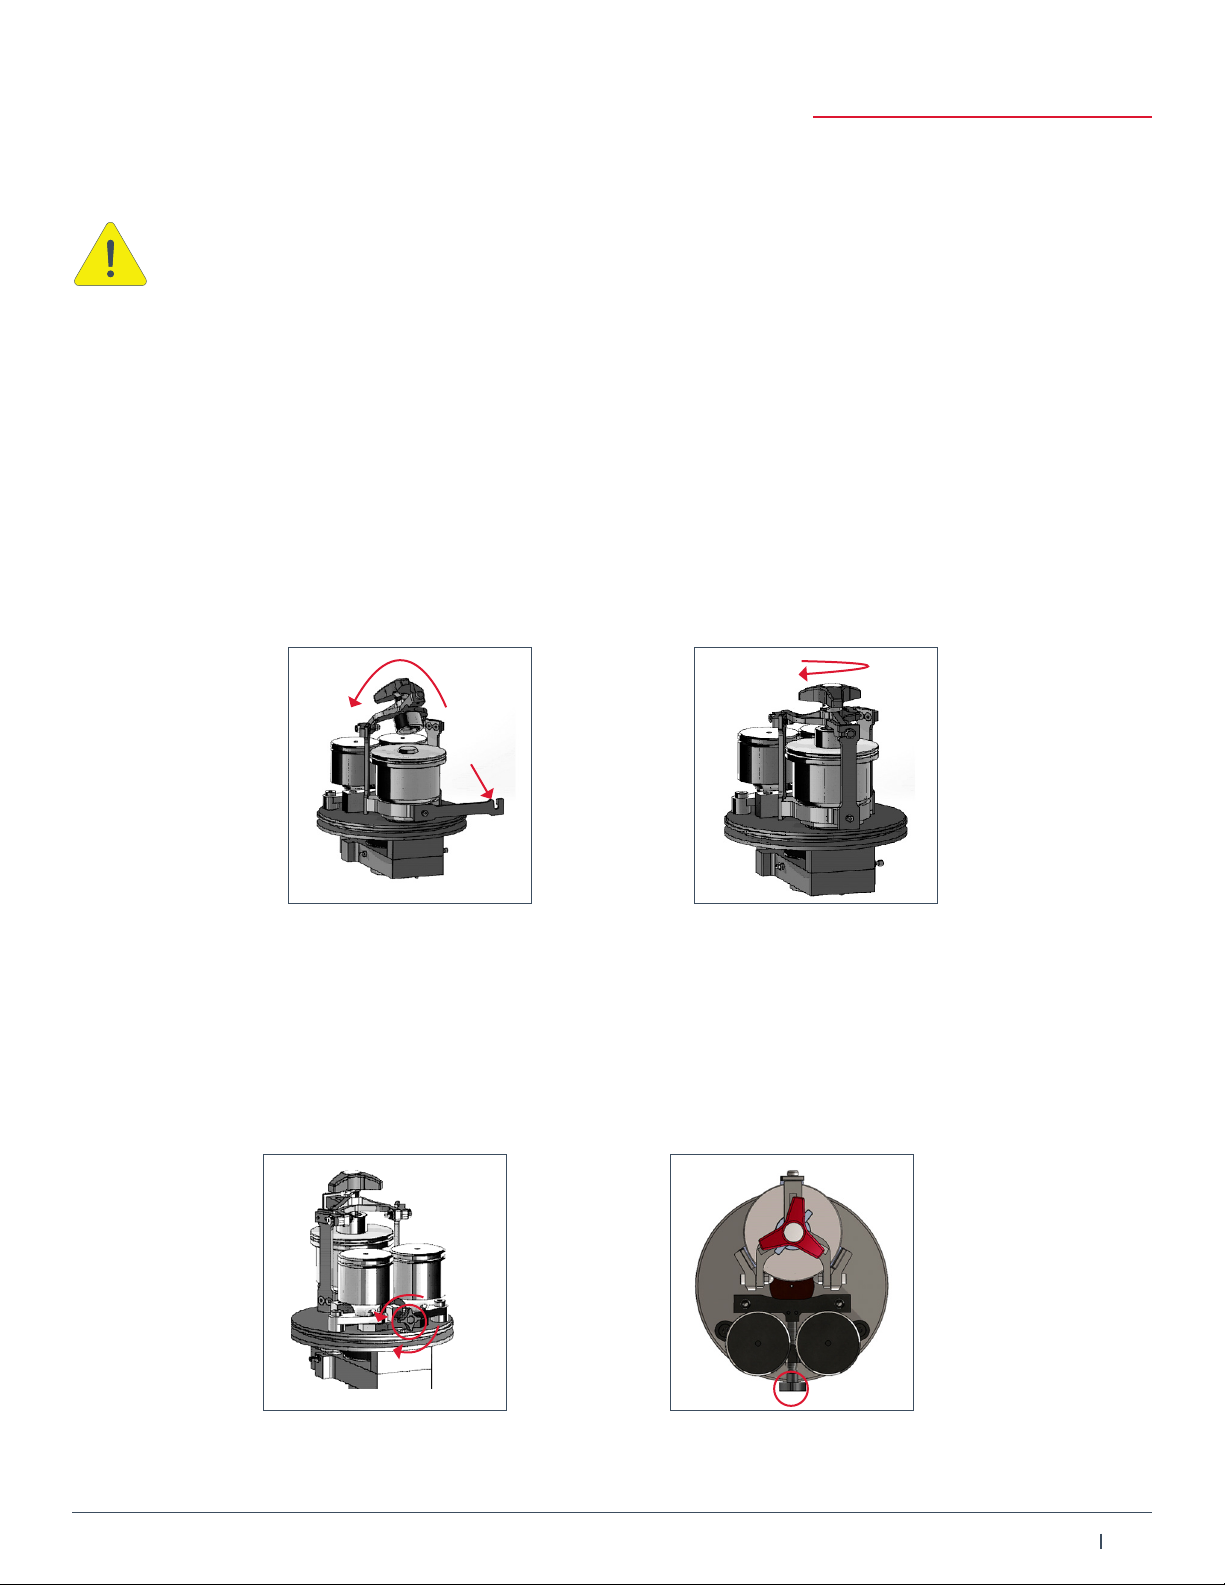
To place a jar in the clamp, loosed the locking tab on the threaded shaft, and unscrew the locking knob with a
few turns (counter-clockwise). Rotate the moveable arm clockwise (downward) unclasping it from the Y-cross bar,
lift the locking knob assembly upward as shown in Figure 11. When placing the jar in the clamp, make sure the
pins are fitting in the proper holes. Once the jar is seated in the clamp base it should not be able to twist.
To lock the jar in the clamp, lower the locking knob assembly, rotate the moveable arm counter-clockwise
(upward) to engage the arm opening into the Y-cross bar pin (Figure 12). Turn the locking knob clockwise to
secure the jar and tighten the locking tab by turning clockwise.
Figure 11. Opening the Clamp Figure 12. Locking the Clamp
8.0 Balancing the Jar
8.1 Adjusting the counterweight
The counterweight is set at the manufacturing facility to balance the stainless steel 500 mL jar with eight 30 mm
stainless steel balls. Turning the knob (Figure 13) clockwise increases the counterweight. Furthermore, turning
the knob counter-clockwise decreases the counterweight.
Figure 13. Counterweight Figure 14. Counterweight (top view)
Operating Manual
15
1300-87075-1A
Note: If the counterweight is not properly balanced, the unit may vibrate or shake vigorously. If this occurs,
turn the unit o by pressing the Stop button on the touch screen or hitting the red Emergency Stop button (red
button above the display).
The mill will not run if the Emergency Stop button is pushed in. To disengage the Emergency Stop button, turn it
clockwise until the button pops out.
Table 3. Weight of jars and stainless steel balls.
Description Jar Weight with Lid Ball Weight per Ball
Stainless Steel Grinding Jar, 500 mL 9.9 lb –
Stainless Steel Grinding Jar, 250 mL 7.2 lb –
Stainless Steel Grinding Balls 40 mm – 0.575 lb
Stainless Steel Grinding Ball, 30 mm – 0.242 lb
Stainless Steel Grinding Ball, 20 mm – 0.070 lb
Stainless Steel Grinding Ball, 10 mm – 0.0089 lb
Table 4. Suggested number of balls per grinding jar based on sample weight.
Stainless
Steel Jar
Sample
Weight
40 mm Stainless
Steel Balls
30 mm Stainless
Steel Balls
20 mm Stainless
Steel Balls
10 mm Stainless
Steel Balls
500 mL 100 – 225 g 4 8 20 100
250 mL 50 – 100 g – 4 10 50
After the sample jar is loaded and secured into the clamp mechanism and the counterweight properly adjusted,
close the door. Grasp the handle and rotate clockwise to slide the door to the closed position (Figure 15).
Figure 15. Closing the Door

Operating Manual
16
1300-87075-1A
9.0 Operation
Before operating the Planetary Mill, make sure it is plugged in and turned on. The power cord inlet is located on
the rear of the cabinet. The white on/o button is located on the rear of the cabinet (Figure 2).
The following steps outline a standard operating cycle:
1. Load sample and balls in grinding jar
2. Firmly place lid on the grinding jar
3. Clamp the jar in place
4. Confirm balance setting and close the door
5. Set the timer
6. Set the number of cycles
7. Set reverse option to on or o
8. Set the pause time
9. Set the run speed
10. Press the green Run button to start a run
11. When the run is complete, open the door
12. Unclamp the jar
9.1 Mixing and Grinding
For samples that cake during mixing, a slurry with water or alcohol may be helpful. Water may be removed
afterwards by drying the sample in the jar in a very low temperature oven. If caking is due to static charge, a
small amount of cellulose (10%) can be added to the jar. Dry grinding is the simplest approach and most often
used.
If a sample is not being ground fine enough, the user can decrease the amount of sample, increase grinding
time, use a denser grinding medium, and/or add a grinding aid or liquid. Wet grinding keeps the sample from
caking and will give a smaller final particle size, but there are hindrances; an extra drying step is required, the
fluid used for wet grinding must be chosen carefully not to alter the sample or attack the jar, all have gaskets and
are watertight.
None of the jars are inherently gas-tight. Limited results can be achieved by loading and unloading the jar in a
glove box under inert gas.
CAUTION: Always use grinding balls that match the material of the jar (e.g. hardened steel balls for a hardened
steel jar, stainless steel for stainless steel, etc.). This will limit contamination.
9.1.1 Grinding Hints
For any grinding jar, the smaller the initial sample size, the finer it can be ground in a given time. Unless a sample
cakes during grinding, the longer it is ground, the finer it will get. Particle size can almost always be lowered
further by reducing the sample size or lengthening the grinding time, or both.

Operating Manual
17
1300-87075-1A
Dry grinding is relatively ecient for most brittle materials, but at small particle sizes (below 50 microns) there is
a tendency for particles to agglomerate or cake. There are many grinding aids to prevent caking. Water, alcohol,
solvents, and other liquids can be added to create slurries whose medial particle size after grinding can be well
below 10 microns, but for most analytical techniques the liquid must be removed before analysis.
9.2 Operating the Door
To close the cabinet, grasp the handle and rotate clockwise to slide the door to the closed position (Figure 16).
The door must remain closed during a run.
To open the cabinet, grasp the handle and rotate counter-clockwise to slide open the door to its open position.
Figure 16. Door Operation
9.2.1 Manual Door Release Latch
To open the cabinet if the power to the Planetary Mill fails, insert the manual key tool into the hole atop the
cabinet, (right side) index lever to release and rotate the red door handle at the same time to open the door.
9.3 Running the Planetary Mill
Press the green Run button to initiate a programmed run. The screen will display a countdown of the time
remaining in a run as shown in Figure 17. The Planetary Mill will stop automatically at the end of the run. When
the grinding program has ended, the screen will display Run Complete. Touch the screen to return to the
Control Panel.
Figure 17. Run Screen
Manual Door Release
Operating Manual
18
1300-87075-1A
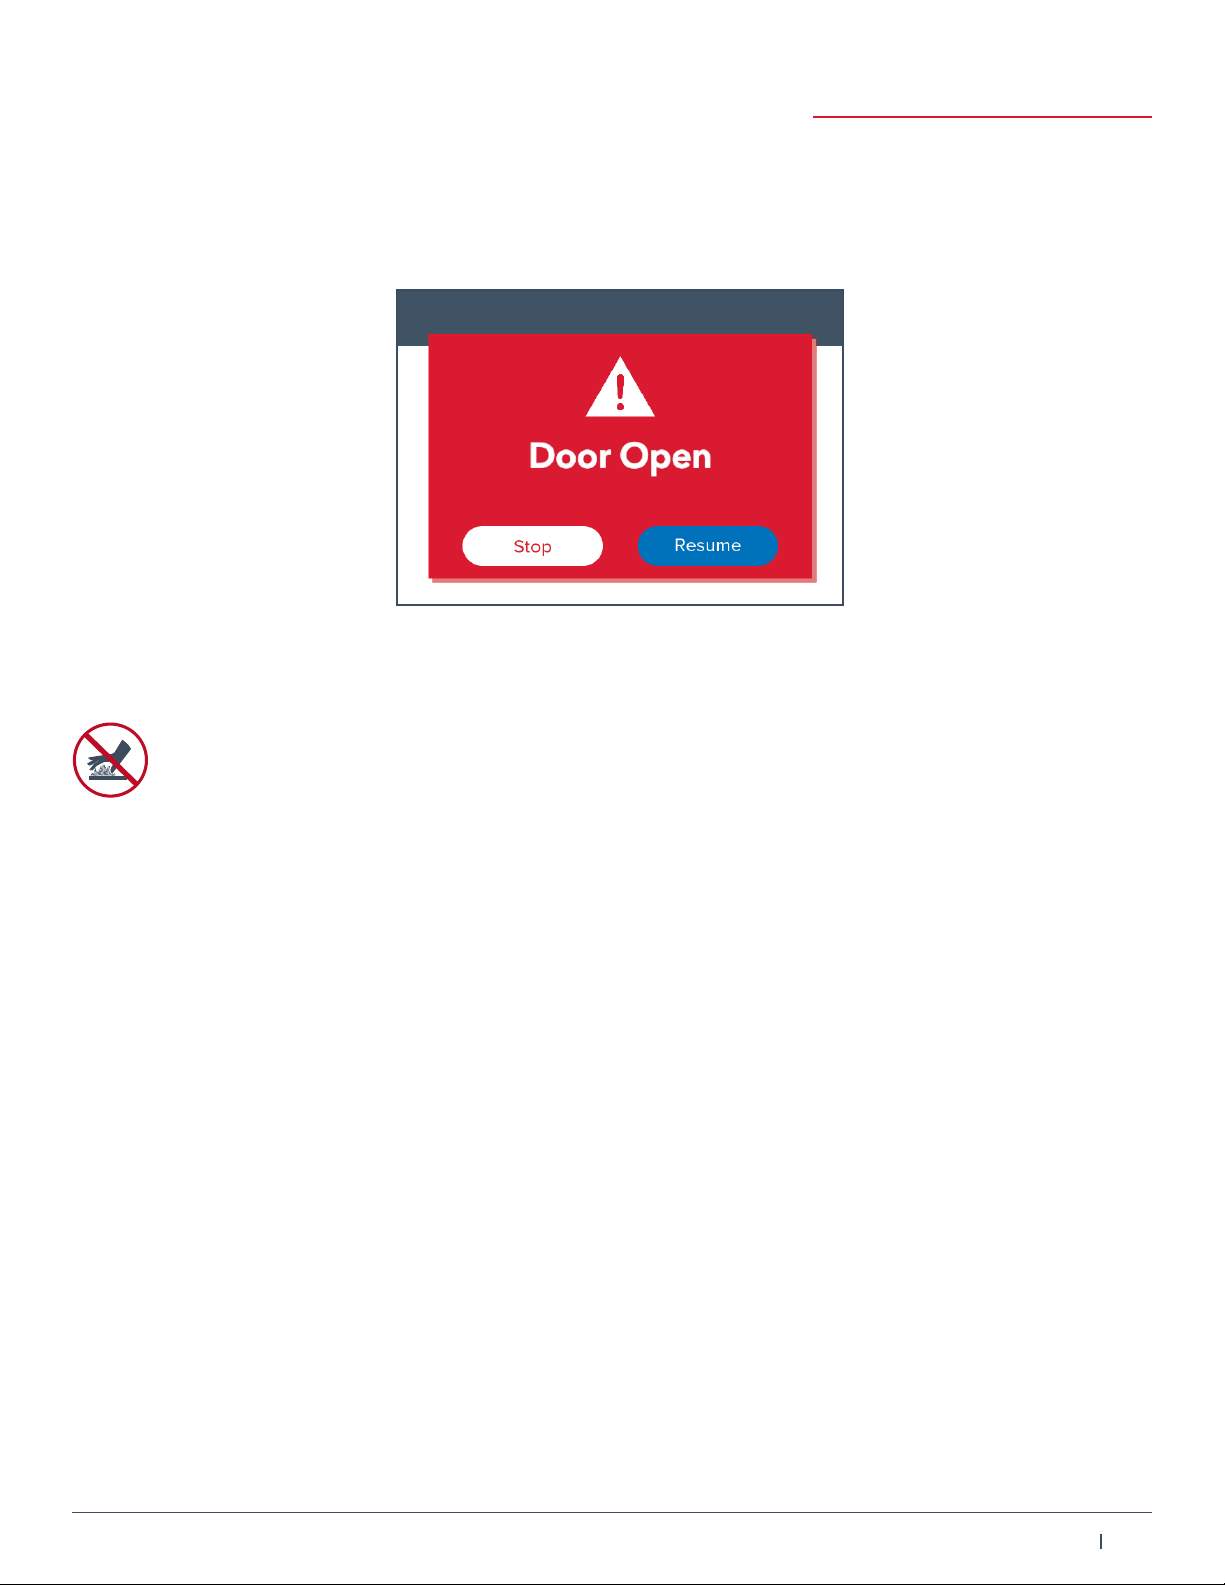
To stop the Planetary Mill during a run, press the Stop button on the screen. If the door lock fails and the door
opens, the screen will display a Door Open message as shown in Figure 18. The timer will maintain the time
remaining in the run. To restart, close the door and press the green Resume button to finish the run. To abort the
run and restart the timer, press the red Stop button. The Door Open message will disappear once the door is
closed.
Figure 18. Door Open Message
9.4 Emptying and Cleaning the Grinding Jar
CAUTION: The jar can become extremely hot after grinding. If the run time is longer than 5 minutes,
it is recommended to allow the jar to cool for 10 to 20 minutes before opening. Carefully pry open the
jar using the opening tool. Tip: If jar is too warm to touch, use gloves that are heat resistant.
The 500 mL grinding jar can be emptied by using the sieve attachment to separate the grinding balls from the
ground sample. Follow the steps below to attach the sieve and sample collection jar to the grinding jar.
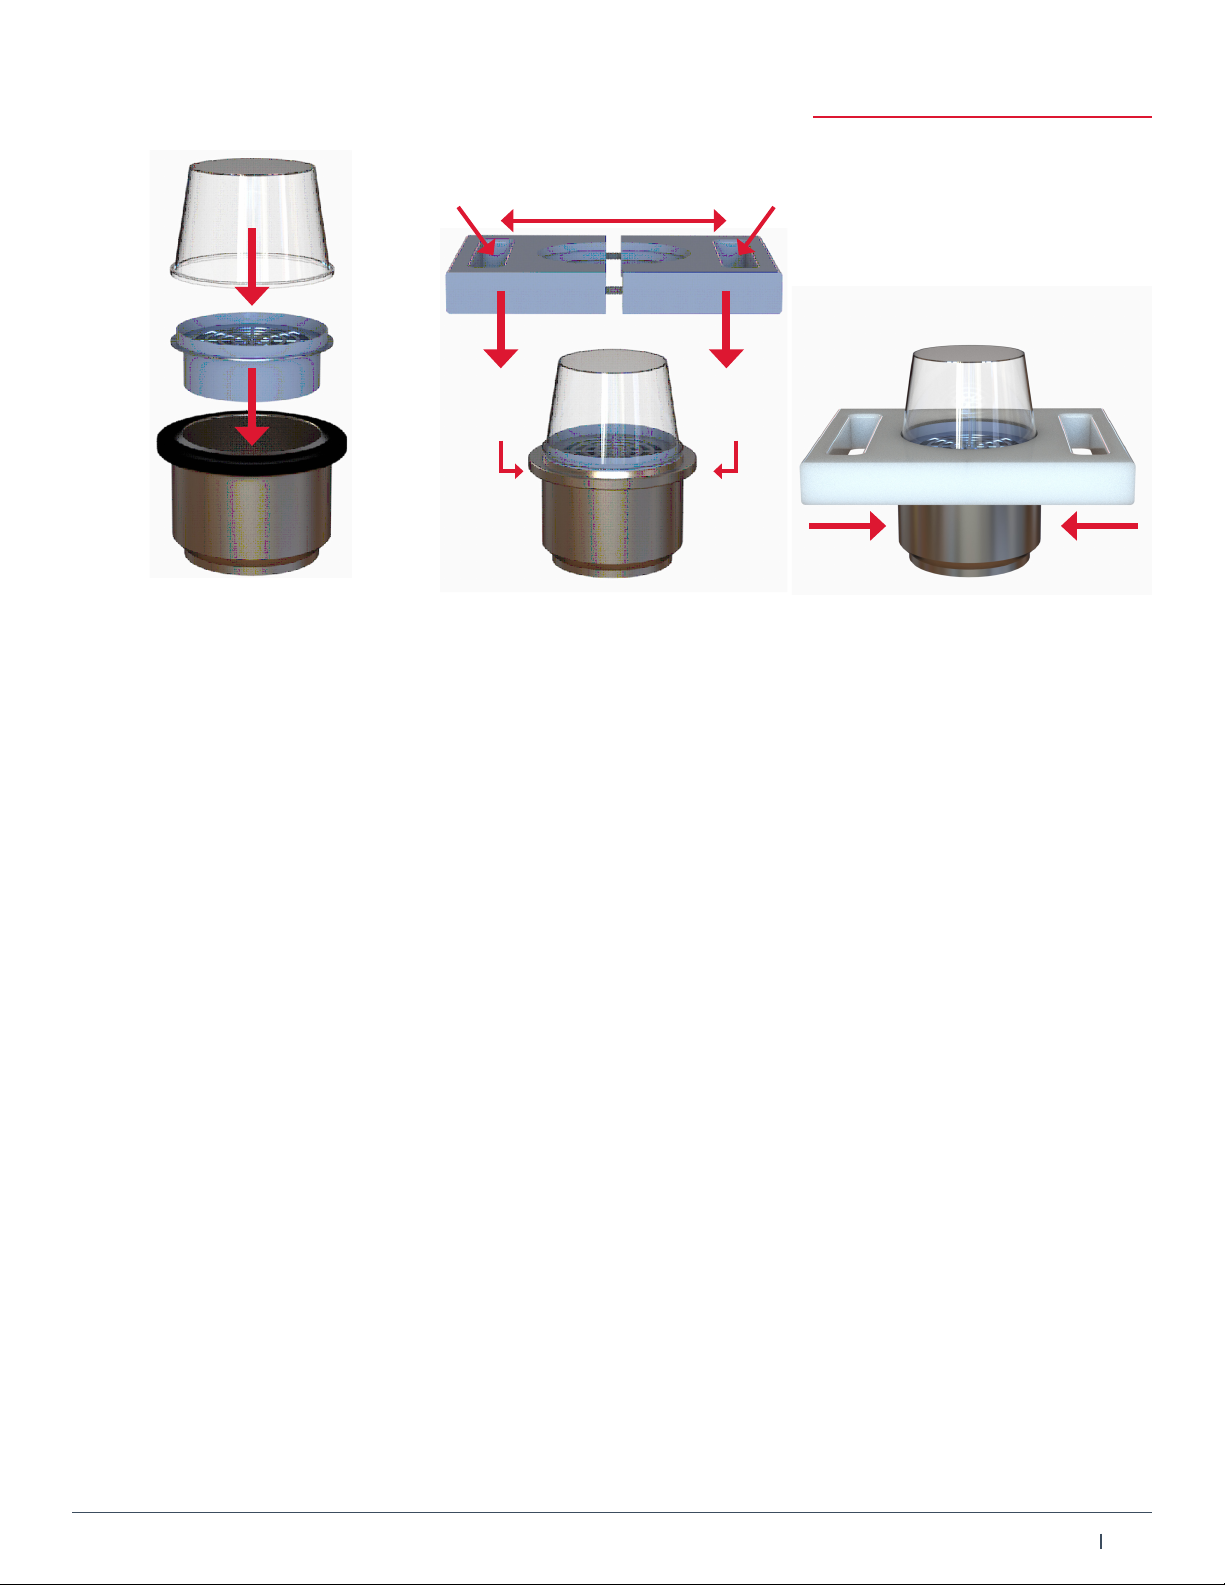
1. After the jar is cool to the touch, remove the lid using the lid opening tool.
2. Scrape (with spatula) any loose powder on the lid into the retain container.
3. Insert the sieve into the jar and place the retain container on top, as shown below.
4. Slide the sieve handle mechanism over the jar and retain container, locking them together.
5. Firmly grasp and invert the assembly (flipping over), and gently tap on the benchtop to shake loose the
powder into the retain container.
6. Remove the sieve handle and carefully lift grinding jar o of the retain container.
7. Remove the sieve containing the grinding balls.
8. Scrape (with spatula) any loose powder from the jar into the retain container.
9. Apply jar lid and label (with sample ID).
Operating Manual
19
1300-87075-1A
Step 3.
Insert Sieve and Container
Retain
Container
Grasp Here Grasp Here
Sieve
Jar
Step 4.
Slide on Sieve Mechanism
Step 5.
Grasp Firmly and Flip
Warning: Finely pulverized sample always presents a respiratory hazard; a dust mask or other protection
should be worn when working with it.
Grinding jars should be cleaned after use. Methods include wiping with a damp paper towel, blowing out with an
air hose, rinsing with water or alcohol, etc. Most of these methods are not very eective, and blowing the dust
out of a jar with an air hose certainly causes a respiratory hazard. We recommend a 3-minute period of grinding
with a mixture of clean quartz stone, hot water, and soap or laboratory detergent. The residue is easily and
safely washed out of the jar, which then may be dried.
Technicians who are particularly concerned about cross-contamination may adopt the “grind and discard”
technique. After sample A has been ground and the grinding jar nominally cleaned, a portion of sample B is
ground and discarded, and the jar cleaned again. Now it should be possible to grind a portion of sample B
without contaminating it with sample A.
If a cleaned grinding jar will not be used immediately, store in a plastic bag. Hardened steel grinding jars should
always be dried and stored carefully, as they are prone to surface rusting.
9.5 Safety Recommendations
The Planetary Mill is intended for use only by qualified and trained personnel. For questions about the operation,
maintenance or service of the 8200 Planetary Mill, contact us at +1.855.GET.SPEX or +1.732.623.0465.
Every eort has been made to ensure that the Planetary Mill is safe to operate. However, the safety protection
provided by the unit may be impaired if the Planetary Mill is operated in a manner other than what is
described in this manual. In addition, the Planetary Mill should only be used with accessories provided by, or
recommended by, Spex and must be used in the intended manner. Use of accessories not recommended by
Spex may negatively aect the safety protection provided by the unit and may void the warranty.
Do not use the 8200 Planetary Mill with hazardous materials for which the unit was not designed. Be aware
of the hazards of the materials that are being used, particularly in the event of a spill. For instance, use of a
flammable liquid could create a fire hazard if a sample is spilled.

Operating Manual
20
1300-87075-1A
10.0 System Settings
To access the Settings screen, touch the icon o the Home screen (Figure 3). The firmware can be upgraded,
diagnostics viewed/exported, and files exported (run history, protocols), and protocols imported. Time display
can also be changed from 12-hour to 24-hour, and time and date can be entered or changed (Figure 19). Touch
inside the window to change the date or time. A pop-up window opens to enter the time or date. Touch the Set
button to confirm the change. Select 12- or 24-hour time, which will be displayed on the Run screen. Touching
the back arrow button returns the user to the previous screen.
Figure 19. Settings Screen
10.1 Run History
To recall the run history, go to the Home screen and touch the Run History button. The date, time, user, run
label, and run protocol data are stored on this screen (Figure 20). The run history can be exported to computer
devices via the USB port located on front of unit. Note: The Export History button will have a dimmed or muted
appearance which indicates it is inactive. After a flash drive or USB cable (connected to computer device)
is inserted into the port, the button will turn brighter indicating it is active. To export run history, touch the
Export History button at the bottom right of the screen. To clear run history or delete run history permanently
from data storage, touch the Clear History button at the bottom left of the screen. To return to the Home screen,
touch the back arrow at the top left of the screen.
Figure 20. Run History
Table of contents


